
Polyjet 3D Printing Used to Make PDMS Molds for Sliding Trapper Microfluidics Design Concept12/27/2018
http://bit.ly/2T8xoVk
Polyjet 3D Printing Used to Make PDMS Molds for Sliding Trapper Microfluidics Design Concept http://bit.ly/2RjKjX8 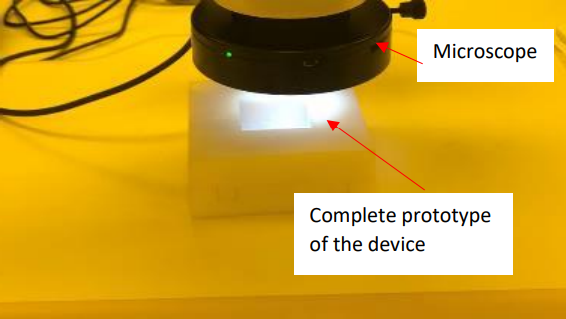
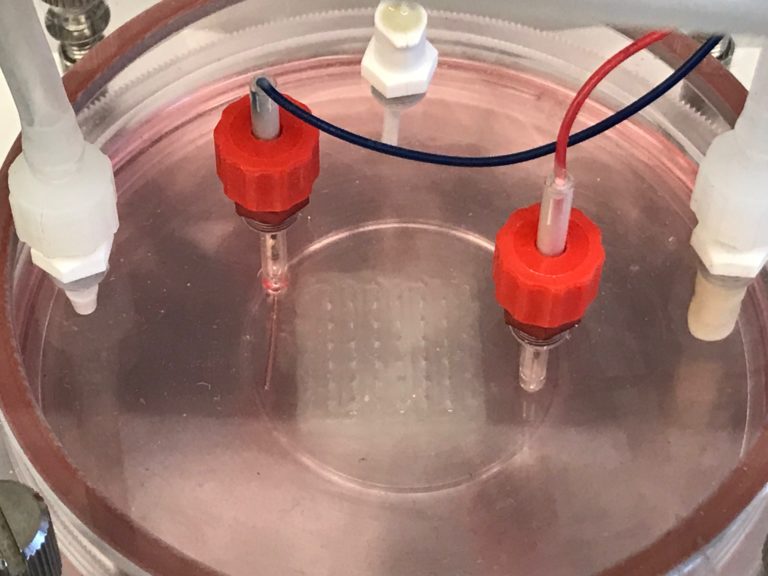
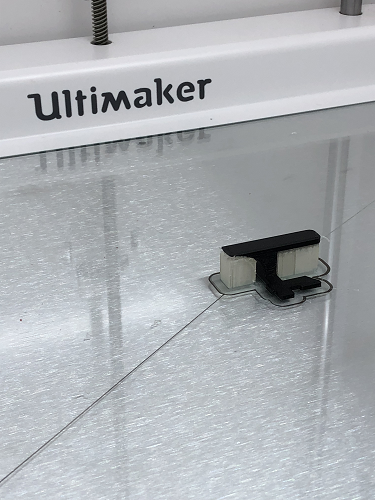
Assembled top and bottom layer of PDMS. Microfluidics, which often crosses paths these days with 3D printing, deals with manipulating and controlling the flow of fluids in tiny channels, often on the sub-millimeter scale. Many microfluidic devices have been developed to assist in cell analysis, which is very beneficial for the medical field. For his University of Saskatchewan thesis paper, titled “On the Sliding Principle of Micro-Fluidic Devices for a Potential Use in Sorting Cells of Different Sizes with One Device,” Annal Arumugam Arthanari Arumugam focused on a new microfluidics design concept known as the sliding principle. In the paper, Arumugam explains that while there are many microfluidic devices that can capture, isolate, position, and sort single cells, most can only work with cells of the same size. Tunable microfluidic devices can be used to capture and sort single cells sized 20 to 30 µm, but many applications have a desired size range of 2 μm to 100 μm, or even more.
The device’s overall function requirement (FR) is to be able to capture cells of different sizes, ranging from 2 µ to 100 µ, with the resolution of 2-5 µm. Sub-function requirements included:
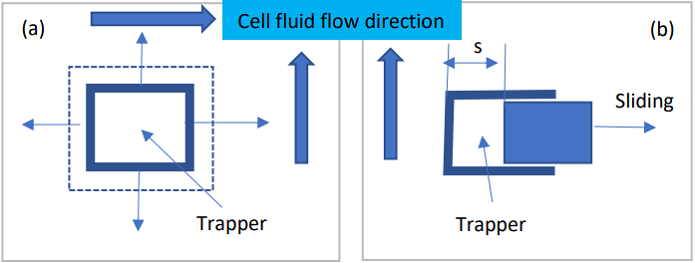
The sliding principle of the adaptable trapper. (a) The trapper is a square with four The device that the cells contact had to be made from biocompatible material, with maximal stress in the cell at less than 4.5 Pa, and the adjusting range of the sliding less than 1000 µm. Arumugam considered two different design options for his sliding trapper, but the first did not work out, as the contact surface of two blocks may not have been flat enough to allow for smooth sliding between blocks and leakage was possible. So he instead focused on the second option.
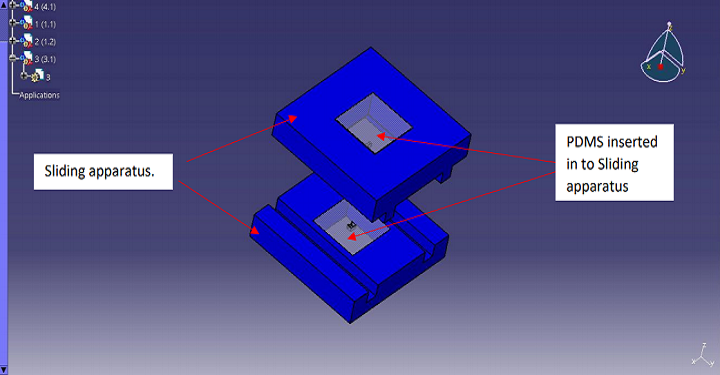
The driving mechanism for the top block. A guide, rack, and top and bottom blocks, with embedded sheets made out of PDMS, make up the mechanism; a single axial stage with the motion resolution of ~3 um, made out of full cure 835 Vero white plus material, helped to drive the top block. Arumugam used Polyjet 3D printing to make a mold for the PDMS parts. In testing the design, the device was measured to see if it met “the design specification in the geometry and topology of the device,” and the sliding operation was also measured, in order to “examine the change of the well.” While the measurements were satisfactory for the PDMS sheets, and showed that the sliding principle concept is indeed valid, they were eroded a little on the sides, which makes channel spacing less accurate; the reason for this damage was due to the sticky PDMS not peeling cleanly away from the mold during curing. 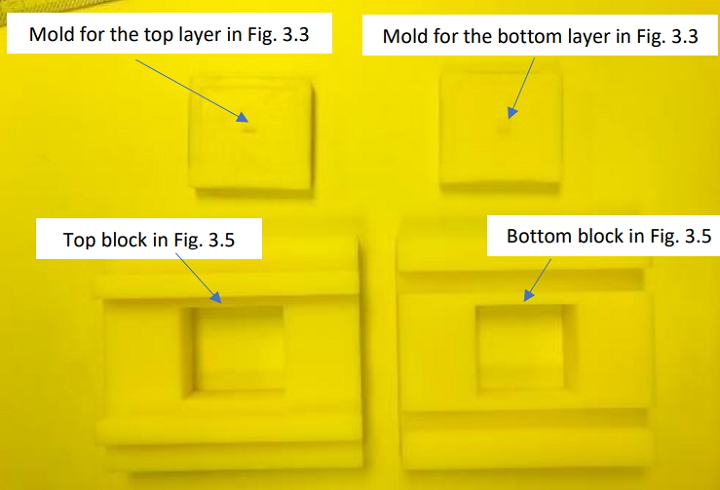
The 3D printed mold and sliding assembly for PDMS, which was made at the university’s engineering workshop.
The author recommends some future works to help advance microfluidic device technology, such as optimizing the fabrication of PDMS channels and further modification of his design. Discuss this research and other 3D printing topics at 3DPrintBoard.com or share your thoughts below. Printing via 3DPrint.com | The Voice of 3D Printing / Additive Manufacturing https://3dprint.com December 27, 2018 at 01:18PM
0 Comments
10 Ways 3D Printing Changed Medicine in 2018 http://bit.ly/2CzaGQA The stream of 3D printing news coming from the medical world is almost constant. From 3D printed implants to complex medical models to actual human tissue, there are so many developments happening so rapidly that it’s almost impossible to keep up. Look at what has happened in one year alone. A comprehensive review of all of the amazing medical breakthroughs that happened in 2018 would be overwhelming, so we’ve chosen 10 of the most fascinating, groundbreaking medical stories of the past year to share with you. A 3D Printed Polymer Rib
For the first time in Bulgaria, a patient received a polymer 3D printed rib implant. 35-year-old Ivaylo Josifov had to have his fifth rib removed due to a growth, and doctors used 3D printing to perfectly recreate the size and shape of the original rib so that the implant could fit into the patient with no complications. 3D Printed Prosthetics for Victims of War
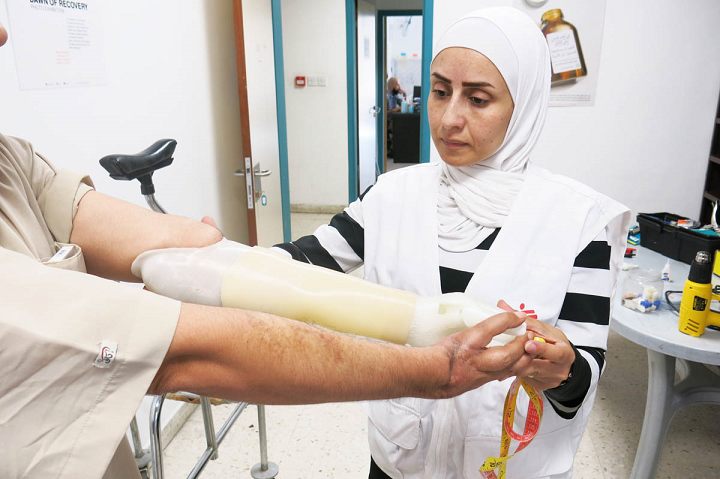
3D printed prosthetics are not a brand new story, but what Médecins Sans Frontières is doing is truly amazing. The organization has been running a reconstructive hospital in Jordan for war victims for over a decade now, and the number of patients with missing limbs due to bomb blasts is staggering. The hospital is restoring these patients’ limbs with 3D printed prosthetics, offering hope in a grim situation. 3D Printed Ligaments
Scientists at the University of New Mexico are working on creating 3D printed ligaments for the first time, using a special electrospinning technique. Ligament tears are common injuries, and they’re difficult to treat, with current standard treatments carrying risk of future complications. 3D printed ligaments could represent a new breakthrough in the way these injuries are treated. 3D Printed Bionic Eye
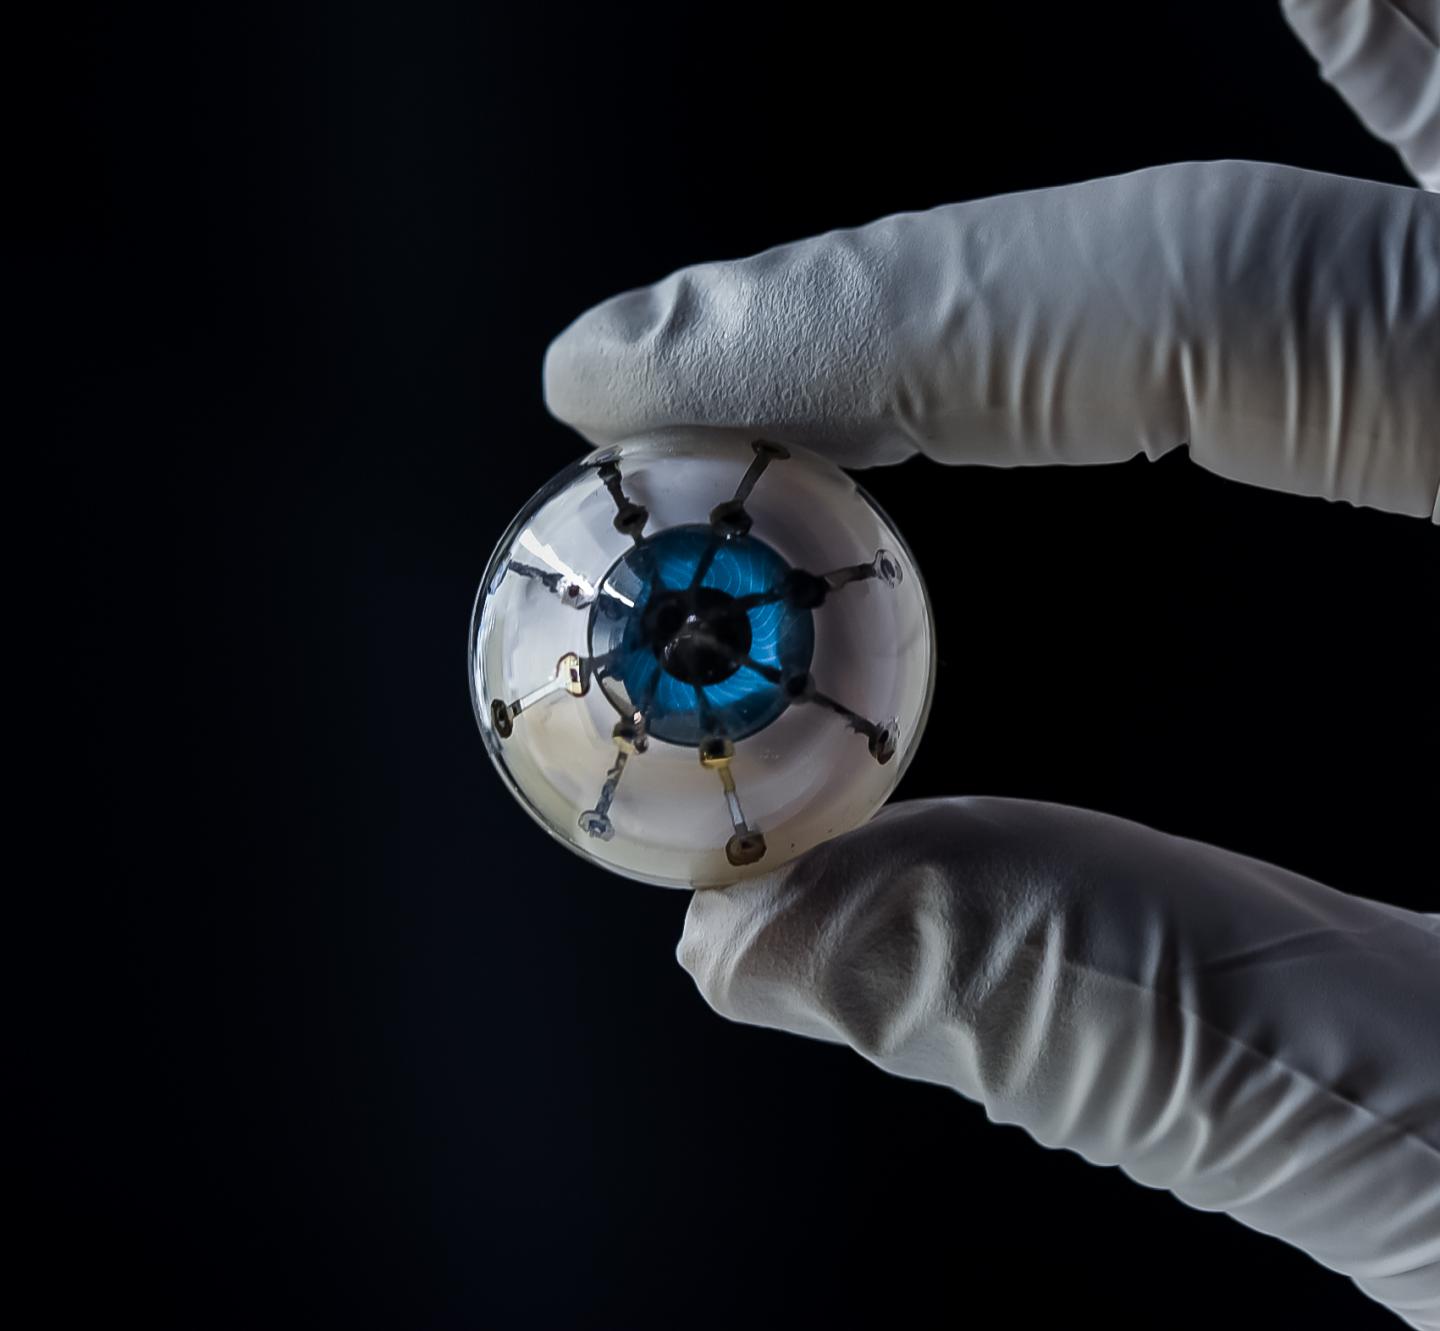
Researchers at the University of Minnesota 3D printed photoreceptors on a hemispherical surface, a technique that could eventually lead to an actual functional bionic eye. The technology could pave the way for curing blindness. Placenta on a Chip
The placenta is a mysterious organ that scientists have been trying to learn more about for years. Researchers have now 3D printed a placenta on a chip, which is a miniature cell culture that behaves in the manner of a full-sized organ. This tiny chip may be able to provide brand new insight into the way that conditions pass from mothers to children. 3D Printed Artificial Lung
COPD is a common and debilitating illness, especially prevalent among veterans. Relief may be on the horizon, though, in the form of a 3D printed artificial lung, the first truly wearable device that is compatible with human tissue and can provide both short- and long-term respiratory support. 3D Printed Neural Scaffold
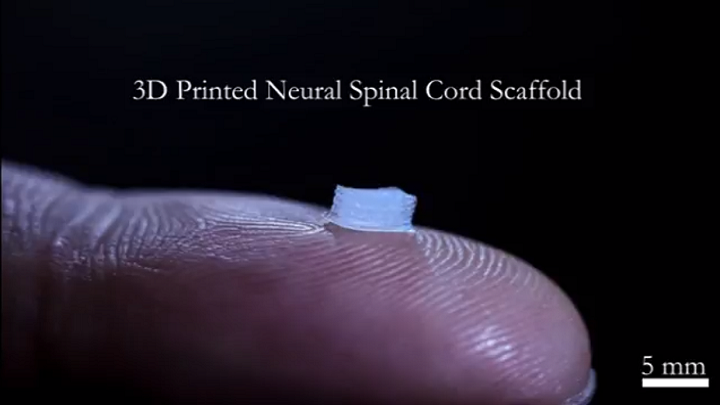
Hundreds of thousands of people in the United States alone suffer from spinal cord injuries, which cause loss of function up to and including complete paralysis. But a tiny 3D printed neural scaffold could help patients with long-term spinal cord injuries actually recover some function in the future. 3D Printed Talus Replacement
A patient in India lost his talus bone in a devastating accident, but in a world first, in trauma, surgeons were able to completely replace the bone using a 3D printed, patient-specific titanium implant. 3D Printed Human Heart Tissue
BIOLIFE4D wants to accomplish the ultimate in 3D bioprinting: 3D printing an actual human heart. This won’t be happening next year, or for quite a while probably, but earlier this year the company announced that it has successfully 3D printed cardiac patches, sooner than expected. This is a promising sign, and one more step forward in the quest to 3D print entire new organs. Multiple Tumors Removed from Woman’s Uterus
A patient was diagnosed with nearly 50 tumors in her uterus, and doctors told her that her only option was a hysterectomy. When she sought a second opinion, however, determined doctors were able to remove all of the tumors while leaving her uterus intact – thanks to an intricate 3D printed model that allowed them to plan the surgery ahead of time. Discuss this and other 3D printing topics at 3DPrintBoard.com or share your thoughts below.
Printing via 3DPrint.com | The Voice of 3D Printing / Additive Manufacturing https://3dprint.com December 27, 2018 at 12:21PM New Forever stamp honors legendary entertainer Gregory Hines http://bit.ly/2ESd47u The 42nd stamp in the Black Heritage series honors Gregory Hines, whose unique style of tap dancing injected new artistry and excitement into a traditional American form. A versatile performer who danced, acted and sang on Broadway, television and in movies, Hines developed the entertainment traditions of tap into an art form for a younger generation and is credited with renewing interest in tap during the 1990s. Printing via USPS News http://bit.ly/2hH9aDC December 27, 2018 at 11:36AM Why the Maritime Industry Should Embrace 3D Printing for Spare Parts http://bit.ly/2Soj3Eb
In an article entitled “Is it Time for the Maritime Industry to Embrace 3D Printed Spare Parts?” a pair of authors argues that the shipping industry could benefit from 3D printing spare parts. The shipping industry, the authors point out, is typically conservative when it comes to change, but they offer several reasons why this industry, in particular, could be well-served by embracing 3D printing. Ships are frequently operating far from repair facilities and spare parts storage, so the ability to produce spare parts directly aboard the ships could be immensely helpful. The authors also examine several other industries in which 3D printing has been successfully utilized in the production of spare parts, including the aerospace industry. The advantages that the aerospace industry has seen include better energy efficiency, cutbacks in emissions, better design handling and lower manufacturing lead time. Reduction in inventory cost is another benefit, as manufacturers can produce spare parts when and where they are needed rather than keeping a warehouse full of parts that may or may not be used. The maritime industry isn’t a complete stranger to 3D printing, and the authors highlight a few cases in which the technology has already been successfully used. They mention a 2016 project called “3D Printing Marine Spares,” which was initiated by the Innovation Quarter, the Port of Rotterdam Authority and RDM Makerspace with the participation of 28 businesses and agencies.
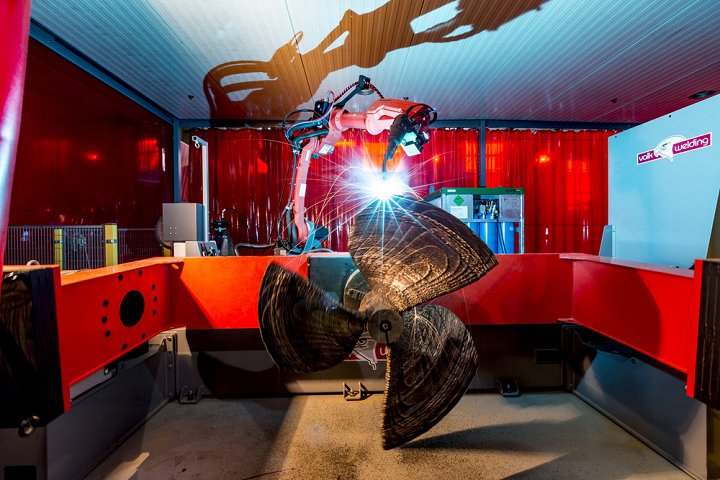
The WAAMpeller The project concluded that 3D printing holds promise for a variety of spare parts. However, extra work needs to be done to adjust regulations in order to qualify 3D printed parts. The authors also mention the WAAMpeller project, in which several organizations worked together to fabricate the world’s first class-approved 3D printed ship’s propeller. Then there is the Green Ship of the Future consortium, which involves more than 20 industry partners exploring opportunities for 3D printing in the maritime industry. The United States Navy has also used 3D printing to great success in a number of maintenance cases.
The authors conducted several interviews with people working in the maritime industry. Most of the respondents had some idea of what 3D printing is, and almost all of them had a positive view of the technology; a few were skeptical, but not negative.
A submarine hull 3D printed by the US Navy There are several issues to be addressed, they continue, including finding the best process for use aboard a ship, protecting intellectual property, and training personnel in the technology. Overall, however, they conclude that 3D printing is a “promising” technology and one that should be seriously considered by the maritime industry. Authors of the paper include E. Kostidi and N. Nikitakos. Discuss this and other 3D printing topics at 3DPrintBoard.com or share your thoughts below.
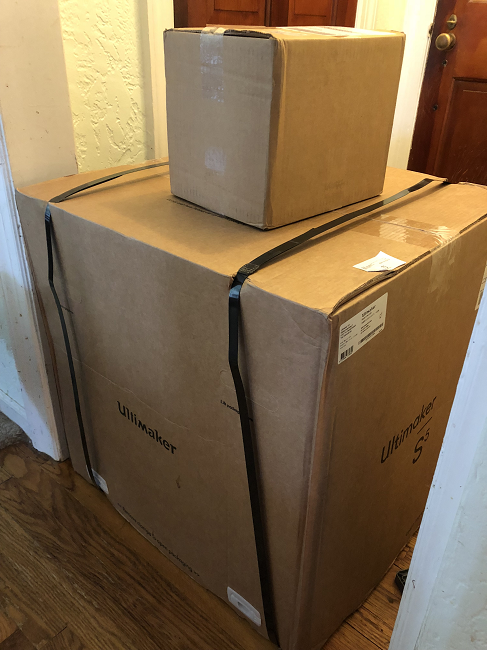
Printing via 3DPrint.com | The Voice of 3D Printing / Additive Manufacturing https://3dprint.com December 27, 2018 at 10:18AM Long Term Home Review of Ultimaker’s New S5 Professional 3D Printer http://bit.ly/2GEivIL
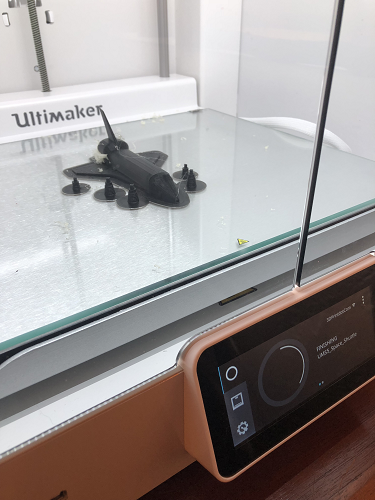
Full disclosure – while I’ve completed 3D prints before at Dayton’s 3D printing bar, this would be my first time setting up and operating a 3D printer all on my own. So when the gigantic box, and a smaller one of extra filament, arrived on my porch, I was a little…okay, a lot…intimidated. In fact, I was so concerned about not having anything pull focus from the unboxing and set-up process that the gigantic carton just sat in my dining room for a few days until the opportune moment. At 3DPrint.com we do not charge money for reviews. This is my own experience and my own opinion. I’ll say this – the S5 was extremely well packaged. I was amazed at the sheer amount of used packing material I had at the end of the process, but also not surprised; I was dealing with precious cargo, after all. Another thing I will say, with complete honesty, is that while I write about technology all day every day, handling it is not my personal forte. So the fact that I was able to get this machine out of the box and set up with relatively few hiccups means that anyone can. The provided instructions were easy to follow, and if I needed more information, I just checked out the Ultimaker Resources. The S5 came with a test print and a box of hardware accessories and tools, including two print cores, several nozzle covers, the glass build plate, a 2 mm Hex screwdriver, a glue stick, spool holder with a material guide, XY calibration sheets, a power cable, and a USB drive. The 3D printer also came with Tough PLA and PVA support material, the latter of which I am in love with…but more on that later. 
Keeping my cats and dogs away! I found it fairly straightforward to set up most of the hardware, but I had a bit of trouble using the clips to secure the Bowden tubes; however, I think that was more user error than anything else. I had no issues installing the Cura software, or updating the firmware once the 3D printer was fully up and running, though it took me a couple of tries to get the 3D printer to connect to my WiFi. While there were no problems loading the materials, I had a harder time installing the BB 0.4 print core. I think this was mainly due to the fact that I was so insanely aware of just how expensive this machine was and was treating it with kid gloves, and a firmer hand is sometimes required when installing hardware. Luckily, the more I used the 3D printer, the more comfortable I became. Speaking of actually using the 3D printer, when the time finally came to test it out, I got a little too excited and forgot about a very important step: calibration. I very quickly realized that there was a problem, as the print was stringing and not adhering to the build plate, even though I’d applied a thin layer of glue, and stopped the job about three minutes in. While I was sad that my first print was far from a resounding success, I resolved to make it right.
My first successful attempt was one of the two sample prints that came on the included USB drive, which printed very quickly. I love the intuitive touchscreen on the front of the S5 – it’s very user-friendly, and I quickly figured out how to pull up a rough image of what the print would look like once it was complete, so I’d know that it was printing correctly. Once I pried the tiny print off of the plate (a very easy task thanks to a layer of glue underneath), I put it in a small container of water and let it sit overnight, so I could see how long it took to dissolve the PVA support structures. I loved the Ultimaker water soluble PVA. It was just so easy – pop the print in water and let the material work its magic. It’s possible to simply crunch and pull the supports off by hand as well, but the immediate effect wasn’t as clean. Obviously, the larger and more complicated the prints were, the longer I had to let them sit in water, and I learned that unless I felt like getting gummy residue stuck to my fingers, it was best to just wait until the supports had 100% completely dissolved. It was also a little tough cleaning the build plate, as the PVA sort of bonded with the glue and became hard to scrub off. But I followed the advice of the Dynamism team and got a soft, non-abrasive sponge to help with this task. My next two prints were included Cura files: a star trophy and a rocket ship. Both of these were fairly straightforward prints, and gave me a chance to try out an extra form of bed adhesion with the addition of a brim; I can tell you now I much prefer a skirt, but I figured I would just give it a shot.
I’m going to take a moment here to rave about the remote monitoring. I didn’t download the app, but I did not have the S5 set up in my office. I live in an older Cape Cod house, and my office is in the half story upstairs, which doesn’t have great ventilation. So I decided it would be better to put the 3D printer on a table in my dining room, which is in a much more open part of the house. But this meant that I couldn’t keep my eye on it during the day. Having the option to monitor my print jobs from upstairs, thanks to Cura and the camera located above the auto-leveling bed, provided me with peace of mind. I would have called this adorable Low Poly T-rex by Thingiverse user slavikk my favorite, had I not screwed it up so badly. I had been messing around in the custom settings in Cura, just to try and put the system through its paces by changing up things like the infill and layer height, and I somehow managed to change the support material from Extruder 2 – the Natural PVA – to Extruder 1 – the Tough PLA. It took me about a quarter of the way into the print to realize my mistake, and by then it was too late. So this dino is still pretty cute, but I think he will be much better-looking when I take the time to get an X-Acto knife and cut away the black supports from the front.
In completing my small collection of low poly animals from Thingiverse, I chose to 3D print a Low Poly Cat – another print by slavikk – and a Low Poly Stanford Bunny by johnny6. I put both the cat and the bunny on the build plate at the same time for a 7.5 hour print. This is where things started to get a little rocky. About four hours in, an error message popped up on the touchscreen: “One material appears to be empty. Please change it to a new material to continue printing.” I wasn’t home (this became the only time I left the house during a print job) and my husband texted me about it, but said that it didn’t appear that the filament was empty. Once I got home and took a look, it was definitely very obvious that neither filament was empty, so I just took a shot in the dark and pressed ‘Ok’ below the error message to confirm that I had changed to a new material, even though I hadn’t, just to see if it would start up again. I got lucky and the prints resumed…for about 20 minutes. Then, the same thing happened again, I tried the same fix, and things continued on, though the support material was looking pretty stringy. About an hour later, the connection went out and I lost the monitor view upstairs, but the S5 just kept rolling along. My next print was an STL file that the Dynamism team had sent me of a generic sample spare part, which took about 15 hours to print, with no supports, when scaled to 100%. It was a good illustration of just how important professional 3D printers, like the S5, can be for businesses in need of prototypes or models. The level of quality and accuracy of the prints produced on the S5 is just stellar, in my opinion. Maybe you should take my opinion with a grain of salt, because as I noted earlier, I’m not an expert on using 3D printers, but that’s up to you.
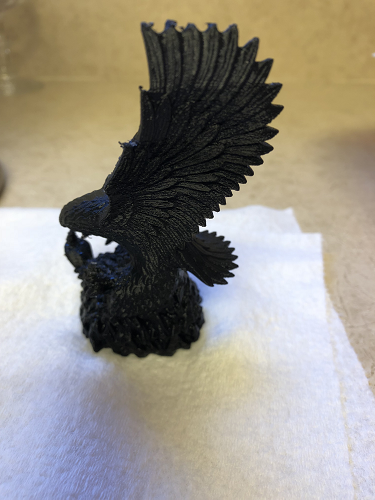
I also decided to 3D print this very detailed Eagle Sculpture by Thingiverse user 3DWP for my husband, who is an Eagle Scout and has a small collection of eagle figurines and sculptures. With this one, I couldn’t get my computer upstairs to connect to the 3D printer downstairs. I turned the WiFi off on both the computer and the printer and then immediately back on, and still nothing. So in the interest of saving time, I simply saved the STL file to the USB drive and printed it that way. About 10 hours in to the 16.5 hour print, I got the same error message I’d received with the low poly animals, and “fixed” it the same way. It seemed to only occur on prints with PVA supports for some reason.
I enjoyed trying out the Ultimaker S5 3D printer from Dynamism. I had it for far longer than I planned, but thoroughly enjoyed using it. What I knew already from writing about this technology daily, and have now had the chance to truly experience for myself, is that 3D printing takes time, which is something I don’t always have in the evenings – I do a decent amount of church and theatre volunteer work. So I kept searching for quick print jobs to try with the S5 because I just do not often have 15-24 hours where I am at my house the entire time. But as for the quality and ease of use – that was top notch. The Ultimaker S5 is available for purchase on the Dynamism website starting at $5,995. Discuss this and other 3D printing topics at 3DPrintBoard.com or share your thoughts below. [Images taken by Sarah Saunders for 3DPrint.com] Printing via 3DPrint.com | The Voice of 3D Printing / Additive Manufacturing https://3dprint.com December 26, 2018 at 05:51PM
http://bit.ly/2SjDX7m
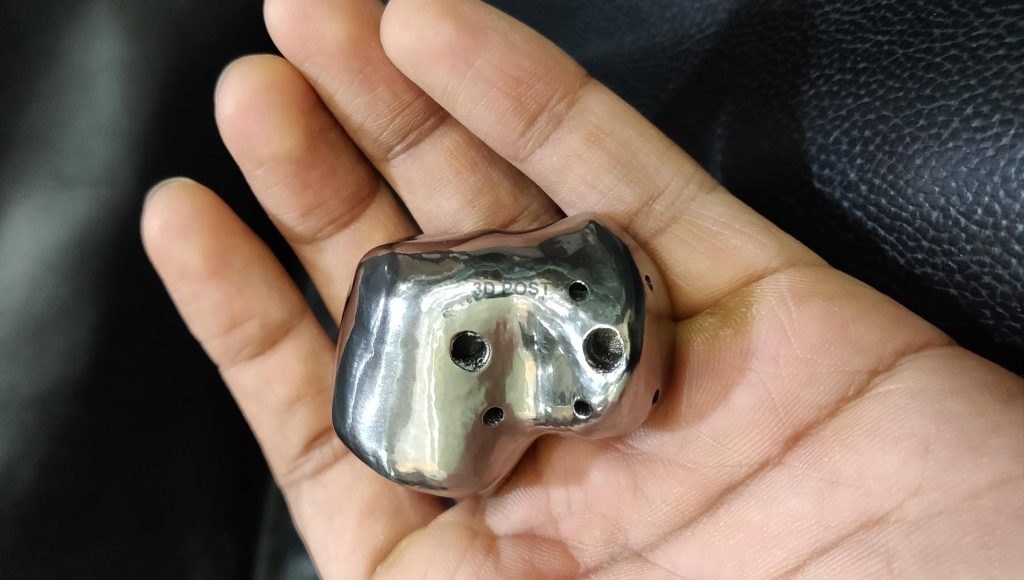
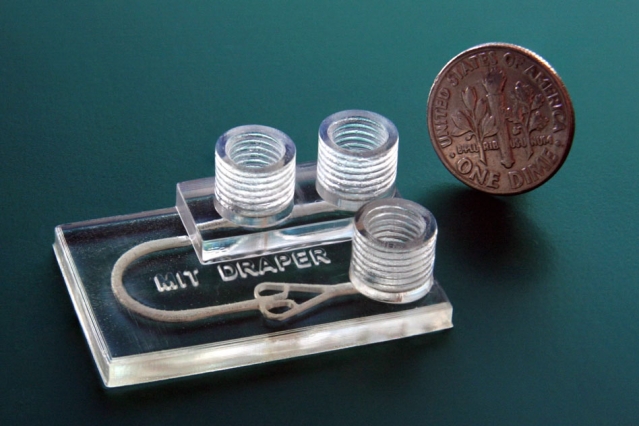
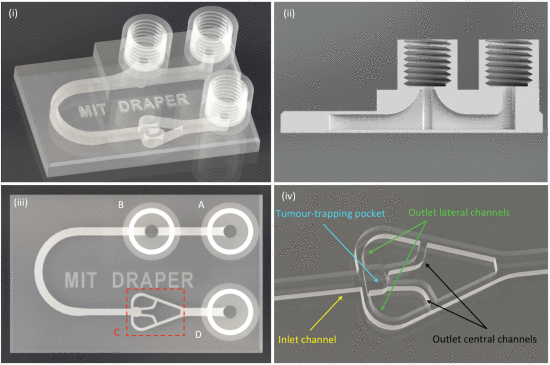
3D Printed Microfluidic Device Designed to Customize Cancer Treatment http://bit.ly/2ArtuQD
Testing cancer treatments is a lot of trial and error currently, and patients are often subject to multiple uncomfortable and time-consuming therapies before finding one that works. Developments have been made, including growing artificial tumors to test drugs on specific cancer types, but these tumors can take weeks to grow and they don’t account for patients’ individual biological makeup. Now, however, researchers from MIT and Draper University have come up with a new option: a 3D printed microfluidic device that simulates cancer treatments on biopsied cancerous tissue. The device is a chip slightly larger than a quarter that can be 3D printed in about an hour. It has three cylindrical chimneys protruding from the surface, which are ports that input and drain fluids as well as remove unwanted air bubbles. The biopsied tumor fragments are placed in a chamber connected to a network of deliver fluids to the tissue. These fluids could contain things like immunotherapy agents or immune cells. Clinicians can then use imaging techniques to see how the tissue responds to the treatments. The researchers used a new type of biocompatible resin, traditionally used for dental applications, that can support the long-term survival of biopsied tissue. This contrasts with other 3D printed microfluidic drug testing devices, which have chemicals in the resin that quickly kills the cells. Fluorescence microscopy images showed that the new device, called a tumor analysis platform or TAP, kept more than 90 percent of the tissue alive for at least 72 hours and potentially much longer. The TAP is cheap and easy to fabricate, so it could quickly be implemented into clinical settings, according to the researchers. The devices is adaptable as well – doctors could 3D print a multiplexed device that could support multiple tumor samples in parallel, so that the interactions between tumor fragments and several different drugs could be modeled simultaneously for a single patient.
One potential application is testing immunotherapy, a new treatment method that uses drugs to “rev up” a patient’s immune system to help it fight cancer.
The research was published in a paper entitled “Monolithic, 3D-Printed Microfluidic Platform for Recapitulation of Dynamic Tumor Microenvironments.“
Microfluidic devices are typically produced via micromolding with PDMS. The technique was not suitable, however, for producing a device with fine 3D features such as the fluid channels, so the researchers turned to 3D printing, which allowed them to create the device in one piece. They experimented with several resins, but finally settled on Pro3dure GR-10, which is often used to make mouth guards. The resin is nearly as transparent as glass, can be printed in very high resolution, and has hardly any surface defects – and it doesn’t harm the cells.
The device also features a “bubble trap” and a “tumor trap.” Fluids flowing into a device like this one creates bubbles that can disrupt the experiment or burst and release air that destroys tumor tissue. So the researchers created a bubble trap, a chimney that rises from the fluid channel into a threaded port through which air escapes. Fluid gets injected into an inlet port adjacent to the trap, then flows past the trap, where any bubbles in the fluid rise up through the threaded port and out of the device. Fluid is then routed around a small U-turn into the tumor’s chamber, where it flows through and around the tumor fragment. The tumor trap sits at the intersection of the larger inlet channel and four smaller inlet channels. Tumor fragments, less than one millimeter across, are injected into the inlet channel via the bubble trap. As the fluid flows through the device, the tumor is guided downstream to the tumor trap, where it gets caught. The fluid continues traveling along the outlet channels, which are too small for the tumor to fit into, and drains out of the device. A continuous flow of fluids keeps the tumor fragment in place and constantly replenishes nutrients for the cells.
The next step is to test how the tumor fragments respond to therapeutics.
Discuss this and other 3D printing topics at 3DPrintBoard.com or share your thoughts below. [Source/Images: MIT]
Printing via 3DPrint.com | The Voice of 3D Printing / Additive Manufacturing https://3dprint.com December 26, 2018 at 03:57PM
http://bit.ly/2ERj942
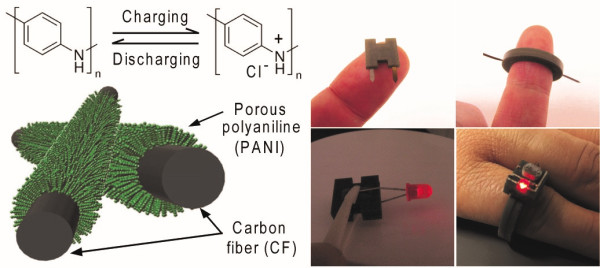
Researchers 3D Print a New Variety of Zinc Ion Battery Shapes for Wearable Devices http://bit.ly/2CBl8Ht
With the development of flexible wearable devices comes the need for new battery shapes, as most batteries are currently limited to spherical or rectangular shapes. These shapes do not use space as efficiently as other shapes could, so a team of researchers led by Professor Il-Doo Kim from the Department of Materials Science at KAIST and Professor Jennifer Lewis from the School of Engineering and Applied Sciences at Harvard University have used 3D printing to manufacture batteries with a variety of novel shapes. These shapes include ring-type, H and U-shaped batteries. Through a research collaboration with Dr. Youngmin Choi at the Korea Research Institute of Chemical Technology (KRICT), these 3D printed batteries were applied to small wearable electronic devices, namely wearable light sensor rings.
The researchers used an electrospinning process to fabricate a carbon fiber current collector and uniformly coated electrochemically active polyaniline conductive polymer on the surface of the carbon fiber for a current collector-active layer integrated cathode. The cathode, which is based on conductive polyaniline consisting of a 3D structure, exhibits extremely fast charging speeds, with 50 percent of the charge being completed in two minutes. It can be fabricated without the detachment of active cathode materials, so various battery forms with high mechanical stability can be manufactured.
The research was published in a paper entitled “High-Power Aqueous Zinc-Ion Batteries for Customized Electric Devices.“
Most current battery shapes are optimized for coin cell or pouch cells. Since batteries occupy most of the space within microelectronic devices, different shapes are required to fit the new wider variety of devices. The researchers’ success could lead to more of a variety of wearable devices, including very small ones. In related news, Professor Kim was appointed as an Associate Editor of ACS Nano, in which the article was recently published.

(L to R) Dr. Bok Yeop Ahn, Dr. Chanhoon Kim, Professor Il-Doo Kim and Professor Jennifer A. Lewis Authors of the paper include Chanhoon Kim, Bok Yeop Ahn, Teng-Sing Wei, Yejin Jo, Sunho Jeong, Youngmin Choi, Ill-Do Kim and Jennifer A. Lewis. Discuss this and other 3D printing topics at 3DPrintBoard.com or share your thoughts below. [Source/Images: KAIST]
Printing via 3DPrint.com | The Voice of 3D Printing / Additive Manufacturing https://3dprint.com December 26, 2018 at 03:30PM
http://bit.ly/2ENfx27
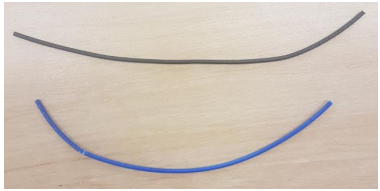
Combining Chopped Carbon Fiber with ABS Has Surprising Effect on 3D Printed Parts http://bit.ly/2ER2nC6 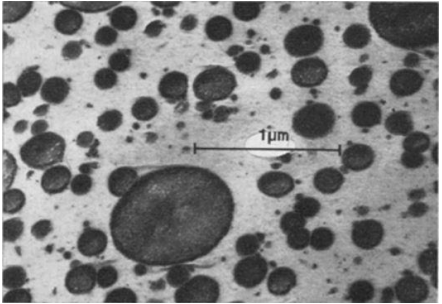
Microscopic view of ABS particles In a paper entitled “Determining the Effect of Yield Strength of Acrylonitrile Butadiene Styrene through the inclusion of Chopped Carbon Fibre,” author Owen M. Cannings of the University of New South Wales at the Australian Defence Force Academy discusses potentially increasing the yield strength of 3D printed ABS parts by adding chopped carbon fiber. While carbon fiber is a common form of reinforcement in 3D printing materials, it usually comes in the form of continuous fibers throughout the material. The author aims to find out if chopped bits of carbon fiber can have the same effect. First Cannings tested samples of plain ABS and ABS reinforced with chopped carbon fiber. The carbon fiber-reinforced sample experienced more deformation than the regular ABS sample, which suggests that the CF-ABS material is more ductile. He also tested the yield stress of 3D printed samples of both materials. The yield strength of the 3D printed parts was lower than that of the unprocessed filament, suggesting that the printed parts may have some voids or defects within them.
Cannings attempted to contact the company responsible for the manufacture of the filament, but received no response.
This could be a major factor that affects the difference in strength between the ABS and carbon fiber-reinforced ABS samples. Future work, the author suggests, should focus on a proper mixing procedure and modification of the carbon fiber geometry. It is rather surprising that the parts 3D printed from plain ABS achieved higher yield strength values when compared to those 3D printed from carbon fiber-reinforced ABS. The inclusion of chopped carbon fiber particles within the ABS resulted in a reduction of between 13 and 29 percent tensile strength. More research needs to be conducted to determine the reason for this, but an initial estimate suggests that the bonding between the carbon fiber particles and the ABS plastic results in a weaker material. Many operators buy CF filament in the hope that it outperforms regular filament. For many cases, we already know that the increased costs are not worth it at all for most users in most applications. Most carbon fiber filament is nonfunctional and silly. This is a useful piece of research that backs this up. We’re also grateful that amidst an endless stream of positive research results it is nice to have a negative result as well! Discuss this and other 3D printing topics at 3DPrintBoard.com or share your thoughts below.
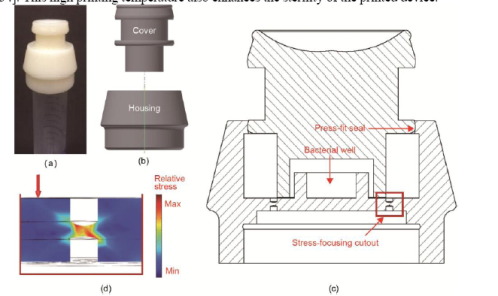
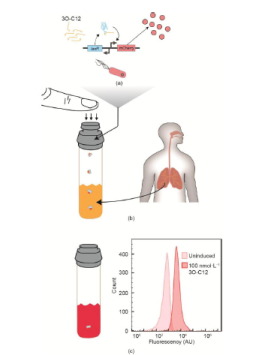
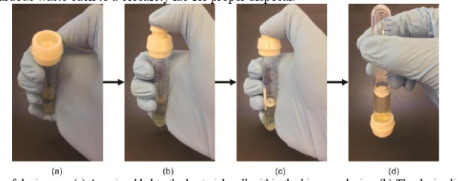
Printing via 3DPrint.com | The Voice of 3D Printing / Additive Manufacturing https://3dprint.com December 26, 2018 at 11:49AM 3D Printed Device Allows Living Biosensor to be Deployed in the Field http://bit.ly/2ERvVPt
Genetically modified organisms, or GMOs, are subject to strict regulation. In a paper entitled “An Additive Manufacturing Approach that Enables the Field Deployment of Synthetic Biosensors,” a group of researchers explains that living biosensors, which can be deployed for disease diagnosis in the field, are considered GMOs and are therefore subject to that same regulation. Using 3D printing is one way in which these biosensors can be made secure and acceptable for deployment in the field. In rural and less-developed areas, the researchers explain, the pathogen P. aeruginosa can be acquired in local clinics. The organism is found in lung sputum samples upon infection, and the samples can be collected and placed in commercially available sample tubes. The researchers’ study focuses on creating a biosensor that could be used to immediately diagnose the disease in the field. They used E. coli as a biosensor, but needed a way to safely transport the dangerous bacteria from the laboratory. So they 3D printed a unique cap that completely encases the bacteria and can be securely sealed onto a sample tube containing lung sputum samples.
P. aeruginosa, they continue, functions as an opportunistic pathogen in the lungs of patients with cystic fibrosis. Currently, it is diagnosed either with enzyme-linked immunosorbent assays (ELISAs) and real-time polymerase chain reaction (PCR) assays, which are either expensive or require extensive training to administer. The researchers’ hope is that their biosensor, with its secure 3D printed containment device, can be used as an inexpensive, easy-to-use alternative. The 3D printed device was designed in Autodesk Inventor and 3D printed in ABS ULTRAT using a Zortrax M200 3D printer.
The biosensor quickly senses the presence of the P. aeruginosa pathogen, and because of its enclosure within the 3D printed device, it should face far fewer regulatory hurdles, allowing it to be deployed freely outside the lab.
Authors of the paper include Daniel Wolozny, John R. Lake, Paul G. Movizzo, Zhicheng Long and Warren C. Ruder. Discuss this and other 3D printing topics at 3DPrintBoard.com or share your thoughts below.
Printing via 3DPrint.com | The Voice of 3D Printing / Additive Manufacturing https://3dprint.com December 26, 2018 at 11:49AM
http://bit.ly/2SiDjHl
Interview with Scott Schiller Global Head of Market Development at HP 3D Printing About Manufacturing Using 3D Printing http://bit.ly/2CzHGsh
Scott Schiller is the Global Head of Market Development at HP. He’s also brilliant and has a long history of building HP businesses in Inkjet and digital press. HP is, of course, a huge company with an incredible degree of technical prowess which they’re bringing to bear on 3D printing. But, in our industry, in terms of installed base, they’re a startup. They have to be agile and bring new strategies to win in our market. If they stick it out and keep pouring on their research capacity then I think we can all agree that HP will stay a major player in our market. But, large corporations can be capricious and visions like dreams can change. So for HP, were always looking to see how permanent HP’s commitment to 3D printing is. A good sign of this is HP eating its own dogfood. If the company truly internally uses 3D printing widely then the technology will permeate the entire organization and hopefully make them more competitive and cost-efficient in many fields. The 3D printing idea is that it will speed up time to market and make organizations more agile. So every time a large company engages with the technology we would expect for them to use it internally as well to consolidate parts, make more niche products, save weight and do all the things the technology is supposed to do. That’s, why it is extremely good news that HP is using over 140 3D printed parts on its 300 and 500 series 3D Printers. The company truly is eating its own dog food and using 3D printing to save money and be more competitive. We interviewed Scott about this and also learned that they have 80% powder reusability and are speeding up time to market in various products. Scott is also the first person to go on the record to claim that “The question isn’t if 3D printing will be the new platform for global mass-production, it’s when.” 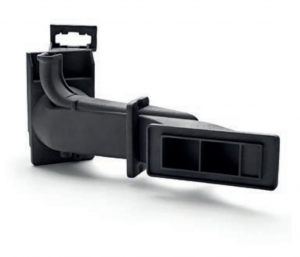
A PA 12 Part What material are you using?
What kinds of parts do you print?
An HP PA 11 part Why do you do this?
What would you advise a company that wants to explore manufacturing with 3D printing?
Is this also a useful technology for tens of thousands of identical parts?
VIDEO Does it make your development more agile?
Do you have any parts where you reduced part count as well?
What were some of the stumbling blocks to adopting 3D printing internally?
Printing via 3DPrint.com | The Voice of 3D Printing / Additive Manufacturing https://3dprint.com December 25, 2018 at 06:15AM |
Categories
All
Archives
April 2023
|


 RSS Feed
