
|
https://ift.tt/2T6eHGb
A Look Into Some Movies That Have Used 3D Printed Props https://ift.tt/2U9rT9z Since the 1990’s 3D technology has gone hand in hand with the film spurned by the with the growth of special effects. CGI has become commonplace in movies and is used to create designs of characters, creatures, objects, explosions, planets, entire universes even. But movies are not just CGI. Props are an important part of filmmaking which help sets and even characters come to life. There is no doubt that the use of 3D printers in the film industry is becoming more promising: producers, filmmakers, propmakers and costume designers are lately utilizing 3D printers to save time and money while creating astonishing effects for us to enjoy.
Mixing real objects, accessories, and costumes with CGI is essential to get optimum results, but it means that studios and investors need more and more money, and making films has become very expensive. 3D printing can in these cases be used both to augment special effects, create inexpensive props, be used for stop motion and generally can be used to save costs. During the last couple of years 3D printed props, models and costumes made their appearance in movies. One of these movies even won an Oscar last weekend for Best Costume Design while another won an Oscar for best special effects. Here are some of the most interesting uses of 3D printin in the movies: First Man (2018) 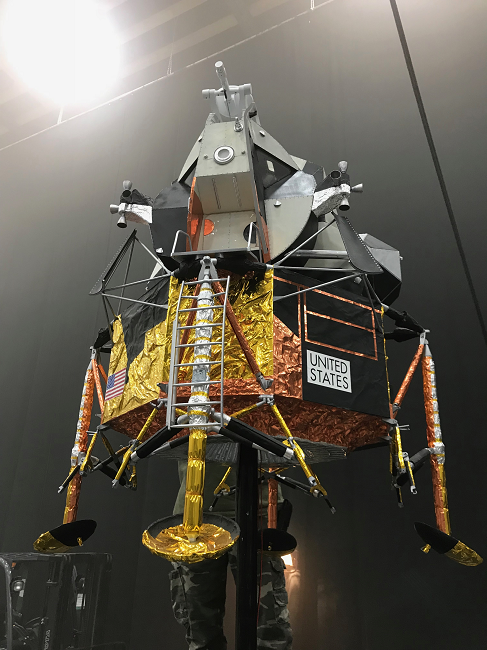
Image provided by BigRep First Man is a biographical drama film directed by Damien Chazelle and written by Josh Singer. The film is based on the book “First Man: The Life of Neil A. Armstrong” by James R. Hansen. The film follows the years leading up to the Apollo 11 mission to the Moon in 1969, and to bring this to life, 3D printers were used. First Man’s production designer Nathan Crowley came across a BigRep 3D printer printing a chair while strolling through the Brooklyn Navy Yard during the shoot for The Greatest Showman in the fall of 2016. He did not get to use a 3D printer for said movie, but he was sure he wanted to for his next movie. 
Image provided by BigRep For First Man, Crowley rented two BigRep One 3D printers to create an accurate scale replica of the Apollo 11 capsule and Saturn V rocket, along with other crucial props, in less than six months. Although the crew already had some experience with 3D printing, BigRep One was nothing compared to what they have used before, thus BigRep’s senior 3D printing specialist Michael David helped the crew with the installation and training. You can read more about it here.
Black Panther (2018)
Black Panther is a superhero film based on the Marvel Comics character of the same name. Produced by Marvel Studios and distributed by Walt Disney Studios Motion Pictures, it tells the story about T’Challa who is crowned king of Wakanda following his father’s death, but his sovereignty is challenged by an adversary who plans to abandon the country’s isolationist policies and begin a global revolution. Black Panther has recently won an Oscar for Best Costume Design for Ruth Carter’s amazing work. 
Photo: Kwaku Alston The movie takes place in a technologically advanced environment with several futuristic gadgets, therefore, it was important that costumes reflected that aesthetic. Carter, in charge of the movie’s costume design, created a series of sketches, illustrations, and digital patterns. To bring them to life, Julia Koerner, an inter-disciplinary designer specialized in 3D printed wearables helped Carter. Koerner collaborated with Materialise, a Belgian 3D printing company, on creating a collection of cutting-edge accessories fit for Queen Ramonda played by actress Angela Bassett.
Jurassic World (2015) From the classic Jurassic Park film series, Jurassic World is a science fiction adventure film directed by Colin Trevorrow and written by Derek Connolly. The movie takes place 22 years after the events of Jurassic Park, in the fictional Central American island of Isla Nublar, where a theme park of cloned dinosaurs has operated for nearly a decade.
Jurassic World got closer to reality thanks to 3D printing. The team used 3D scanning and 3D printing to create replicas of prehistoric artifacts by 3D scanning original bones and fossils and to help them create 3D printable models. 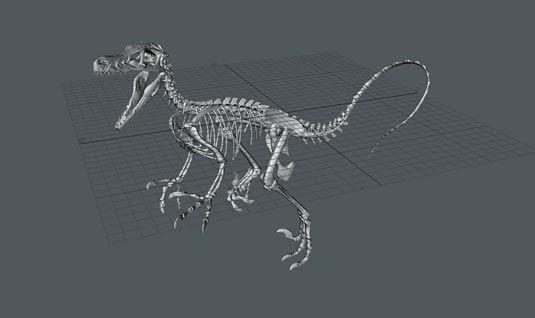
Source: 3D World Magazine Issue #182 Thanks to 3D printers, the team had the chance to print dinosaur skeletons. By doing some modification on their 3D files, they were able to create males, females, and adolescents. Additive manufacturing gave them a lot of freedom to adjust the design of dinosaurs to make them look as realistic as possible.
Chase Me (2015)
Chase Me is a 3D printed film created by the French digital artist Gilles-Alexandre Deschaud. The short film was entirely made from 3D printed parts. The story begins with a girl playing the ukulele as she walks through a magical forest. As she walks, her shadow evolves into a monster that chases her through the woods. Every frame of the film was first designed by the artist in CG and later processed into 3D prints.
This short animated film took a total of two years to make, ten months of nonstop 3D printing, four months of CG animation, and 2,500 3D printed pieces. The set and characters were printed in 100 micron resolution, and bigger pieces, like the tree in the forest, were printed in 22 individual parts and later assembled.
Star Wars: The Force Awakens (2015)
Star Wars: The Force Awakens is a space opera film produced, co-written and directed by J. J. Abrams. The Force Awakens is set 30 years after Return of the Jedi, the film follows Rey, Finn, and Poe Dameron’s search for Luke Skywalker and their fight alongside the Resistance, led by General Leia Organa and veterans of the Rebel Alliance, against Kylo Ren and the First Order, a successor to the Galactic Empire.
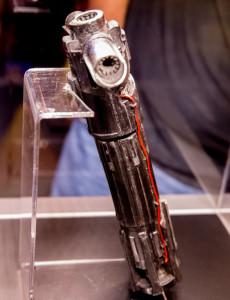
A lot of props and costumes have been 3D printed for this Star Wars movie and all of them were created under the supervision of practical special effects and costume design Michael Kaplan. The famous Stormtroopers helmet, large portions of the shiny chrome Stormtrooper armor, Kylo Ren’s red lightsaber, and some parts of C3PO have been manufactured using 3D printers. The main advantage of using 3D printers was that this manufacturing technique allowed the movie to get props quite quickly and with great accuracy.
ParaNorman (2012)
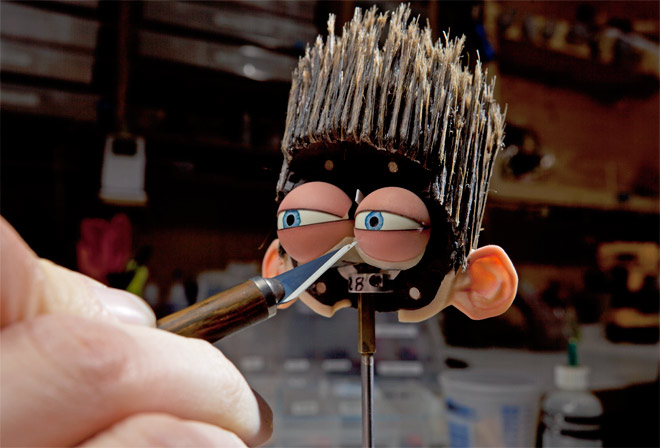
ParaNorman is a stop-motion animated comedy horror film produced by Laika and Directed by Sam Fell and Chris Butler. It is the first stop-motion film to use a 3D color printer to create character faces, and only the second to be shot in 3D. The film tells the story about Norman, a young boy who can communicate with ghosts, is given the task of ending a 300 year-old witch’s curse on his Massachusetts town.
The team that worked on this movie wanted to create various facial emotions for the same character. To do this, they used 3D printers to create all the faces with different facial emotions. Norman was then capable of 1.5 million expressions. For the 27 characters with 3D printed faces, the rapid-prototyping department output 31,000 parts, which they were stored and cataloged in a face library. One 27-second shot required 250 different faces for a single character, so each face was marked by tiny fissures where the components fit together. Later on, a “seam team” removes the fine lines in postproduction.
[Sources: ChaseMeFilm, Variety, PopularMechanics] Printing via 3DPrint.com | The Voice of 3D Printing / Additive Manufacturing https://3dprint.com February 28, 2019 at 05:30PM
0 Comments
SABIC Explores Effects of Autoclave Tooling on Large Format Additive Manufacturing Parts https://ift.tt/2T4TP22
LFAM occurs via the melting of plastic pellets on a large scale and allows for the use of additional additives from glass to carbon fibers, minerals, and more, offering strength and performance that the SABIC team states cannot be achieved through the use of unfilled resins. In the creation of large parts, strength and cohesion are required to sustain comprehensive structure not only during the time of printing but afterward when the final result may be serving as an important prototype or functional piece. Large parts can be printed, with all the typical benefits of additive manufacturing and 3D printing, such as production of complex geometries that are made quickly, and affordably. For industries delving into progressive technology in manufacturing, the advantages of 3D printing on any scale are enticing due to the savings in time and money as compared to conventional processes like computer numerical control (CNC) machining; in fact, with LFAM technology, multiple designs and multiple iterations can be made just in the time that it would take to create one metal tool via CNC machining. Refinement within the autoclave environment has been a major issue, however. The SABIC team points out that a serious obstacle in replacing metal tools with those made by LFAM has been finding a suitable resin/filler system combination. Any material used must not only have good printability but also be able to hold up against temperatures, loads, and size requirements.
Application requirements for this study are as follows:
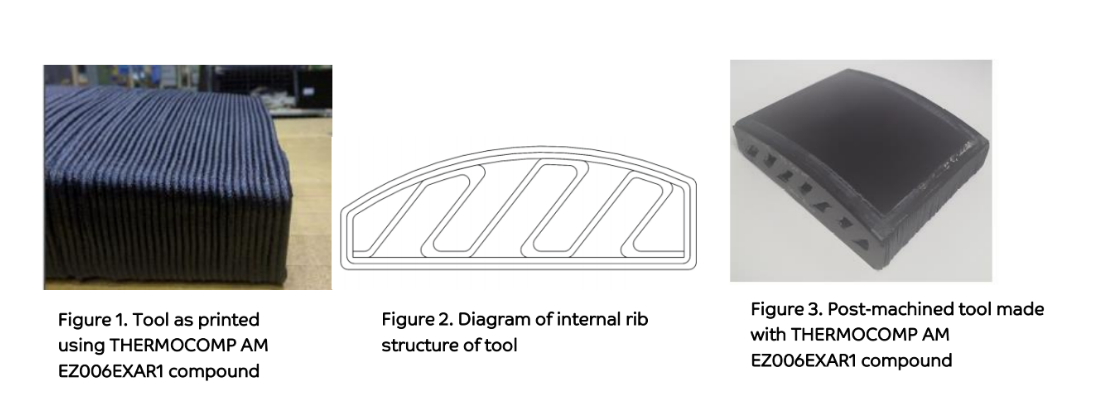
Using their expertise in materials, SABIC suggested the use of LNPTM THERMOCOMPTM AM EZ006EXAR1 compound, providing a combination of ULTEMTM resin, a high-temperature material used in aerospace applications. The team used several different tool sizes in experimenting during this study and ultimately, focused on one type of geometry that is often used in military aircraft designs. The tool was then printed at the SABIC Polymer Processing Development Center (PPDC) in Pittsfield, MA, on the BAAM machine, technology we have been following since they used it to develop reinforcements for automobiles previously, a yacht hull and also have used the technology in connection with the development of other new materials.
Four different phases of testing followed. Phase 1 involved 3D scanning of the tool with a Creaform HandySCAN 3D® handheld scanner.
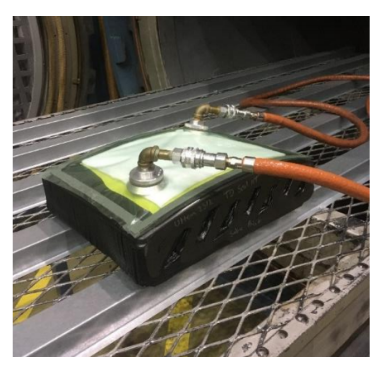
Tool setup before autoclaving In Phase 2, the SABIC team tested the tool in autoclave cycling at PPDC.
Five testing cycles were completed in the autoclave, and then the tool was scanned again revealing that 99.7% of the tooling surface was within +/-0.004 inches of the baseline scan conducted after the Phase 1 testing was completed. In Phase 3, the tool endured further testing in five more autoclave cycles, using the same methods, although pressure was increased to 100 psig.

Tooling surface after five cycles. In Phase 4, the tool went through extreme measures with ten cycles in the autoclave using the same methods as Phase 3. Scanning was performed again afterward, and when compared to the baseline, the researchers saw that 99.7% of the tooling surface was still within +/-0.004 inches of the original baseline scan. In conclusion of this research, the SABIC team stated:
What do you think of this news? Let us know your thoughts! Join the discussion of this and other 3D printing topics at 3DPrintBoard.com. 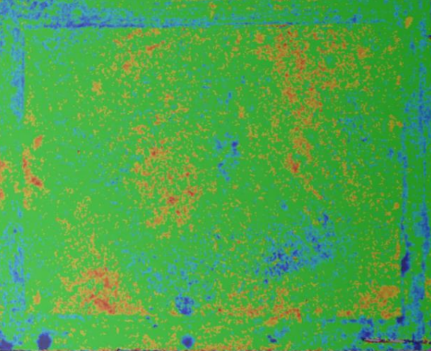
Tooling surface after 20 cycles. [Source / Images: SABIC case study shared with 3DPrint.com] Printing via 3DPrint.com | The Voice of 3D Printing / Additive Manufacturing https://3dprint.com February 28, 2019 at 01:09PM
https://ift.tt/2sfxuwu
Are You Putting Your Landing Page CTAs in the Right Place? https://ift.tt/2IDVc2L Your CTAs are directional signs that tell your visitors where to go and what to do. Calls to action communicate your goals to people who visit your website.
Sign Up for Your Free Trial Download the eBook Buy It Here
All of these messages help move people toward achieving a goal. To do that, they need to be clear, obvious, and easy to find. Placing your messages where your visitors are looking is probably the most important action you can take with your CTAs. So, how do you know you’ve put them in the right place?
I’ll give some examples of best practices for placing your CTA, and seven steps to test your CTAs to make sure they’re where they need to be. But first, let’s talk about just how important your CTAs are so you can get a sense of why you should invest time in perfecting them.
How important is your CTA?CTAs drive conversions and generate leads. And they do it better than Adwords! According to WordStream, the average click-through rate for Adwords is 2 percent – while the average CTR for a CTA is almost 3.5 percent. Using calls to action isn’t just a best practice; in 2019, it’s an expected feature on your website. In fact, people are so conditioned to look for a CTA, that they may not know how to navigate your site if they don’t find one. CTAs on landing pages move people further into your site by getting them to sign up, enter an email, type in their url, or take some other very specific action. Take a look at Hulu’s homepage, which also serves as a landing page.
The CTA is very clear: Start Your Free Trial. You know what to do and how to take the next steps to do it. CTAs move people from emails to your site, too. Here’s an email from Houzz, an online community for home improvement professionals.
Right there in green is their first CTA: See Winning Designs. There are other smaller linked CTAs, but this is the one they really want you to click. It’s right at the top in a big, green box. CTAs also appear in or around content. Here’s an example from Neil Patel’s blog.
In this piece, there are two CTAs in the right rail and above the nav bar. Both of them are sticky, following you as you scroll down, and they ask you a very specific question: Do you want more traffic?
What makes a high-converting CTA?What makes a good CTA great at converting customers? These are elements that all high-converting CTAs have:
1. It’s obviousYour CTA should look like one. CTAs look like buttons. They’re offset by a contrasting color and they’re large enough to be found easily on a page, but not so big that they’re intrusive on the user experience. Patagonia has a number of CTAs on their homepage that either take you further into the buyer’s journey or further into their content (which brings you into the buyer’s journey, too).
This one beckons you to watch one of their videos. Patagonia’s stark, black buttons stand out against their hero images and contrast the header copy.
2. It’s compellingThe text for your CTA should be specific and irresistible. Here’s one from content marketing analysis tool MarketMuse.
MarketMuse turns the CTA on its head, here. Instead of calling upon you to analyze your content, MarketMuse flips the conversation. When I click on their CTA, I am commanding them to analyze my content.
3. It’s personalizedThere’s a reason why marketers are encouraged to build customer personas as the first step to building effective content. When you have a specific targeted audience in mind, it’s much easier to craft personalized CTAs. And the more relevant your CTAs are to your site visitors, the more likely they are to convert. As an example, let’s say you have two different audiences for your vacuum cleaner business:
Both audiences might click on a landing page CTA that reads something like Learn more about our products. But, potential customers for the commercial space may be more likely to click on a CTA that reads Learn more about our industrial grade vacuums, while private consumers may be more likely to click on Learn more about our home cleaning systems for individual buyers. The simplest example of a personalized CTA are those created for new versus returning users:
4. It’s not lost in a sea of textAn effective CTA is one that stands out on the page. It isn’t buried in whole blocks of text. On landing pages, you don’t want to wax prosaic about your company. Save that for the Product and About pages. This, for example, is Apple’s current homepage.
While I’m sure they’ve tested this, I find this to be a lot of text for a landing page. And the CTAs are hard to see in blue against a black background. Meanwhile, Microsoft is also having a sale. But they’ve laid out their landing page a little differently.
There is a playful tie-in to the Super Bowl with minimal text. A black CTA stands out against the pink background and complements the black t-shirts on the football players. The point of a landing page is to state who you are and how you can solve your visitor’s problem. After that, hit them with your CTA.
5. It’s in a good placeI saved the best for last, here. If you want people to click on your CTAs, they should be able to find them. In all of the examples above (except Apple), the CTA was easy to spot. None of the CTAs were:
Good placement is all about anticipating where your audience is going to look for it. Let’s look at some best practices, and then we’ll talk about steps you can take to make sure your CTAs are in the right place.
Best Practices in CTA PlacementThe bad news: There’s no magical sweet spot on any web page that guarantees CTA clicks. The good news: You can put your CTAs in very logical places that will make them easy for visitors to find. It all depends on how your page is set up, but the running theme is to align your CTAs to the parts of the page that are getting the most attention. Whether you have underperforming CTAs that need fixing or successful CTAs that could be nudged to do even better, here are some examples for inspiration:
Homepage/landing page CTAsFor homepages and landing pages with a large hero image, a visitor’s eyes are naturally drawn to the center of the page. That’s where you find the page’s headline in a large, bold font. Since people will likely start reading down the page, your CTA should appear right below your headline text, in the center of the page. Here’s an example from GoPro cameras.
There are two CTAs nestled right under the promise of insanely smooth video and the price (consumers love transparency!). The blue CTA that’s easier to see lets you add the Hero 7 Black right to your shopping cart. The less obvious, clear one invites you to learn more about the camera before you make your purchase (clever).
Text page CTAsIf you’re placing CTAs in text, keep in mind how people read content pages. Visitors begin at the top left of your page and then scan down. They stop at subheads, but don’t necessarily read the text underneath. To get your CTA seen, then, it would make sense to place it fairly high on the page and as close to the text as possible.
One of Forbes’s goals is to get their stories shared across the internet. That makes sense, since they sell ad space in their right rail. As you can see above, they place a CTA to tweet out a tantalizing quote from the story before the reader even gets to the first paragraph.
Email CTAsAccording to Yoast’s CEO, a strong, singular CTA in an email can increase click-through rates by 371 percent and sales by 1617 percent. So, choose your CTA carefully and place it where your audience will see it.
Just like your webpages, readers aren’t going to scroll all the way down your email. So placing your CTA at the very beginning of your email is going to get you more clicks. In this email, Shutterfly placed an attention-getting CTA at the top of the email. You don’t have to scroll at all.
7 steps to optimize your CTAsWe’ve talked about the importance of a good, well-placed CTA. But once you’ve placed your CTAs, how do you make sure they’re in the best place possible to get the optimal CTRs? And how do you track whether your changes have made a positive impact on your bottom line? I’m going to walk you through the steps you should take to make improvements in your conversion rates.
1. Take note of where your CTAs are placed on your siteBefore you make any changes or run any experiments on your CTAs, you should map out where they are located on your site, and whether they’re contributing to a primary or secondary revenue goal.
As an example, if you’re an ecommerce brand your primary revenue goal is probably a purchase.
Whereas your secondary revenue goal may be an email signup (since ecommerce brands heavily promote their products via email, the odds are good that people will convert via a a promotional campaign).
2. Look at A HeatmapOnce you’ve created the framework for your investigation, you should run a heatmap report on the pages where your most important CTAs are placed. Heatmaps show you where the majority of your visitors are engaging — or stop paying attention — so they’re perfect for helping you figure out if your CTAs are in the right spot. To get a sense of how a heatmap can help you, here’s one that’s been run on Crazy Egg’s website:
Take a look at their homepage and note where the CTAs are. Now, look at the heatmap above. Are the areas that are white hot (indicating a heavy number of clicks) aligned with their goals as a company? If your visitor engagement hotspots aren’t where your CTAs are placed, you’ve got a big missed opportunity on your hands.
3. Consult a scroll mapNext, you should run a scroll map on your page to make sure your CTAs aren’t below the fold, or stuck in a dead zone where no one’s looking.
In this video, Crazy Egg’s GM Suneet Bhatt walks you through how the company thinks about their homepage design and how to make it more effective using heatmaps and scrollmaps together.
He points out that the logo in the top left is getting a lot of clicks on the heatmap, even though the logo goes nowhere. Those are clicks that could be going to the CTA; the key is just to figure out how to remove the distraction the logo is creating. By consulting a scrollmap, he found that the CTAs were, in fact, falling in the right place.
4. See the percentage of clicks your links are getting with a list reportWhile a heatmap shows you where people are clicking, a list report will show you the most clicked-on elements by percentage. So, if you have two white-hot CTAs on your page, you can look at the list report to see which one is getting more clicks over the other.
5. Fill in the gaps with recordingsWhat you can’t learn from heatmaps, scrollmaps or a list report, you can learn from user session recordings. Recordings let you watch individual website visitors navigating from page to page on your site. You will see where their cursor lands, where they click and where they pause.
If you’re looking for reasons why your CTAs aren’t converting, Recordings can help you uncover a whole host of reasons – perhaps your mobile design is cutting off the CTA, or a pop up is getting in the way, or your form is confusing.
A lot of people say they wouldn’t know about a CTA roadblock if it weren’t for session recordings.
6. Run an AB test!For this next step, let’s say you’ve got a CTA on your homepage, in the upper right corner, that says “Shop Now.” You’ve looked at your list report and it’s not getting the majority of clicks. You decide to put it more front and center, within a hero image. Now it’s time to test your new page against the old design to see which one gets you more purchases. This is your A/B test. Once you’ve let enough visitor data collect, it’s time to check the results.
Does your new variant outperform the control? If so, you have a successful CTA you can continue to tweak! If not, it’s time to try a different variant. When Crazy Egg tried two new homepage designs to improve engagement, the first iteration saw no improvement in reducing clicks on the logo, and there was almost no engagement with the CTA.
They had thought that compressing the space the copy used and redesigning the graphics might help increase conversions and alleviate the confusion that could have been leading people to click on the logo. It turns out that wasn’t the case. They also discovered that visitors’ attention fell on a dead space.
So they increased the white space around the copy, put more emphasis on the CTA with the blue box and moved it all up on the page. They even created a graphic that literally points to their call to action. Here’s how it was doing just a few days after it was released.
Notice there are considerably fewer clicks on the logo and a lot more engagement with the CTA. And it’s in the right place, too.
Once you’ve found a CTA placement that meets your goals (like Crazy Egg did), don’t rest on your laurels. Keep a close eye on your reports, and keep testing to improve your CTAs over time.
ConclusionThere’s no doubt your CTAs are an integral part of your conversion and lead generation goals. Make it as easy as possible for your visitors to take that next step by putting your CTAs right under their noses. And when you think you’ve got it right, keep testing and tweaking. You may just see more success.
If you’d like to know more about designing great landing pages, check out these resources: 9 Best Landing Page Design Trends for 2019 How to Design a High-Converting Landing Page
Author: Laurie Mega is a freelance writer, specializing in content strategy. She spent 12 years in educational publishing before making the leap to digital marketing and publishing. For the past six years she has worked with major brands to boost their marketing initiatives.
The post Are You Putting Your Landing Page CTAs in the Right Place? appeared first on GetResponse Blog - Online Marketing Tips. Printing via GetResponse Blog – Online Marketing Tips https://ift.tt/1Qs2QKR February 28, 2019 at 08:24AM
https://ift.tt/2IF0nzH
Bioprinting 101 Part 8 Gelatin https://ift.tt/2tKeJ7m
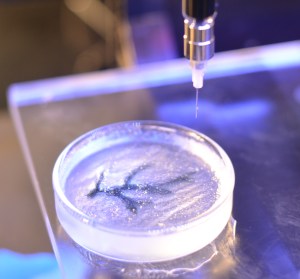
Most biomaterials all are vastly different than each other in interesting ways. For those who have kept up with this series, it is safe to assume we still have a bunch of materials to analyze and understand. The field of biomaterials is vast and we need to understand all our options for bioprinting. Most additive manufacturing industries are comparatively simple and have polymer standards when it comes to 3D printing. So the materials are often derivatives and are similar to existing well-understood materials. This is not the case yet in bioprinting because of how complex biology is. We cannot limit the scope of materials because different materials are beneficial for a wide array of purposes within bioprinting. Today we will take a look into how gelatin is used in bioprinting. Gelatin is a translucent, colorless, brittle (when dry), substance that is derived from collagen obtained from various animal body parts. It is also referred to as hydrolyzed collagen, collagen hydrolysate, gelatine hydrolysate, hydrolyzed gelatine, and collagen peptides. It is typically used as a gelling agent in food, medications, photographic films, and cosmetics.
Gelatin formation through collagen hydrolysis It is important to understand the terminology of a hydrolyzed collagen within bioprinting. Collagen is the most abundant protein in the body and helps give structure to our hair, skin, nails, bones, ligaments, and tendons in our body. Collagen allows us to move, bend and stretch. Collagen also keeps our hair shiny, our skin glowing, and our nails strong. It is an essential protein. Collagen cannot be absorbed by the body unless it is hydrolyzed. This means that the process of hydrolysis must occur before it can be effectively absorbed. Water is used to break down a collagen into its components. These components are amino-acids such as glycine, proline, hydroxyproline, and arginine, all of which help our body’s connective tissue, skin, hair, nails, as well as gut health.
Earlobe Vasculator Structure from Gelatin With all that info stuffed down your throats, I am sure you are wondering how is this relevant for bioprinting. Typically gelatins are used to create hydrogels. We have discussed hydrogels in general before in this series. These particular gelatin hydrogels have important properties. They have excellent biocompatibility due to the amount of amino-acid components embedded within them. They have rapid degradability due to how they break down in reaction to water. They lastly have non immunogenicity due to how readily available the components of a gelatin are within the human body. The biggest pain point for gelatin hydrogels is the melting point temperature. Gelatins are thermosensitive polymers. This causes tensile strength to sharply reduce once the material is above 28 degrees Celsius. The strength of a gelatin is also dependent on other additives that are used in combination with it. This is only us scratching the surface on gelatin as a biomaterial. Through this series we hope that people realize that we are only giving small pieces of info out. We encourage you as a reader to follow up and learn more from reading and expanding your knowledge. Maybe an interest for bioprinting will lead to you studying more biochemistry and a variety of topics. We will continue to give you small sample sizes of the vast world within biology and how it can be applied to bioprinting. Leave some comments even on some things you would like to know about as a reader. Printing via 3DPrint.com | The Voice of 3D Printing / Additive Manufacturing https://3dprint.com February 28, 2019 at 05:03AM
https://ift.tt/2TltUm4
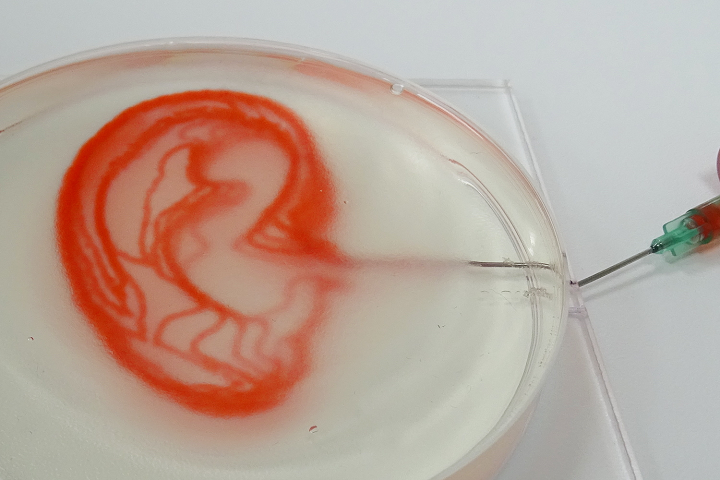
Korea: Researchers 3D Printing Tracheas with Epithelial Cells & Chondrocytes https://ift.tt/2GNkZ7f Korean researchers have been experimenting further in the bioprinting of tracheal implants, publishing recent results in ‘Trachea with Autologous Epithelial Cells and Chondrocytes.’ The team of scientists details their use of polycaprolactone and hydrogel mixed with nasal epithelial and auricular cartilage cells. After bioprinting an artificial trachea with these materials and tissue, they transplanted them into 15 rabbits, six of which were a control group. The goal was to find a way to overcome tracheal problems due to tumors, the most common of which are adenoid cystic carcinomas and squamous cell carcinomas. Previously there have been substantial challenges in creating viable tracheas that are anatomically correct and can produce a ciliated epithelium. Issues have arisen with infection, implants that become dislodged, have migrated, or experienced obstruction. 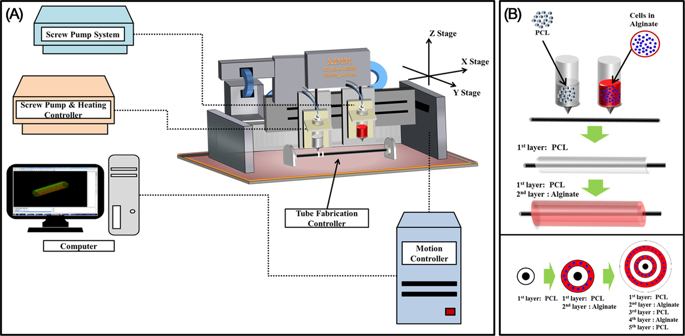
System components and bioprinting process. (A) Schematic graph of 3D bio-scaffold plotting system. (B) Detailed fabrication process of artificial trachea using bio plotting system. First, porous PCL layer; second, cell-laden alginate; third, non-porous PCL layer; fourth, cell-laden alginate; and fifth, porous PCL printing on tube type module.
Materials similar to tracheal cartilage include polycaprolactone (PCL), polyglycolic acid (PGA), polylactic acid (PLA), and poly(lactic-co-glycolic) acid (PLGA). These have all been used in 3D printing and ongoing research. In this study, the researchers 3D printed tracheas as close to the human tracheal structure as possible and assessed them over a 12-month period.

3D printed alginate hydrogel and artificial trachea. (A) Alginate hydrogel being extruded at 300 um nozzle. (B) Optical image of 3D alginate cube type (16 × 16 × 2 mm3). The higher concentration of alginate hydrogel providing more precise and porous cube type. (C) Gross image of the artificial trachea fabricated using a 3D bio-printer. (D) Scanning electron microscopic image. From the bottom: first, porous PCL layer; second, epithelial cell layer; third, non-porous PCL layer; fourth, chondrocyte layer; and fifth, porous PCL layer are clearly seen. (E–G) Fluorescent microscopic images using green dye for the epithelial cells (E) and red dye for chondrocytes (F); and merged image (G) reveals that the 2 hydrogel layers are completely separated. The emphasis was on creating epithelium and cartilage regeneration, with nasal cells in the internal layer and auricular cartilage cells in the external layer. The researchers stated, however, that the use of two different types of cells in implants has been challenging.
For these types of bioprinted transplants, cartilage is vital. No formation of cartilage was noted in the 3-month group, although there was some growing at 6 and 12 months.
They ended the research realizing that greater methods should be studied to find ways to reduce the amount of time it takes for cartilage regeneration. Further, in conclusion, the research team states:
The trachea has been the object of bioprinting in the last five years, improving the lives of patients like babies with 3D printed trachial splints, a child in Ireland now able to breathe more normally despite pulmonary alveolar proteinosis, and other medical innovations such as tracheal implants without tissue scaffolds. Find out more about this particular study here. What do you think of this news? Let us know your thoughts! Join the discussion of this and other 3D printing topics at 3DPrintBoard.com. [Source / Images: Experimental Tracheal Replacement Using 3-dimensional Bioprinted Artificial Trachea with Autologous Epithelial Cells and Chondrocytes] 
Histopathologic images of epithelial regeneration. Compared with the normal tracheal epithelium (A), the control group (animal no. 5) does not show epithelial regeneration (B). However, the experimental group shows epithelial regeneration at 3 months, and 1 animal shows incomplete epithelial regeneration with squamous metaplasia (C, animal no. 8). The animals at 6 (D, animal no. 14) and 12 months (E, animal no. 21) show complete epithelial cell regeneration. (F) A whole trans-sectional image at 3 months in the experimental group (animal no. 9) also shows complete epithelial regeneration. (Masson’s trichome staining, the bars in subpanels A-E indicate 50 µm and that in subpanel F indicates 1 mm) The epithelial regeneration was pointed with green and yellow boxes in (D,E). Printing via 3DPrint.com | The Voice of 3D Printing / Additive Manufacturing https://3dprint.com February 28, 2019 at 04:54AM Germany: IMT Researchers Assess 3D Printing Materials & Processes in Miniaturization & Microfluidics2/28/2019
https://ift.tt/2TgwIkv
Germany: IMT Researchers Assess 3D Printing Materials & Processes in Miniaturization & Microfluidics https://ift.tt/2II65Rc
Previously 3D printing resins have not been evolved enough to handle the chemistry required in fabricating microreactors or lab-on-a-chip devices. In this latest study, the researchers study new developments in materials and technique, focusing on transparent silicate glasses, ceramics, and fluorinated polymers. Here, miniaturization is discussed regarding the field of microfluidics and the potential for creating intricate but in many cases, microscopic, devices. Historically these types of devices are fabricated with silicon, but as the researchers point out, that is difficult to do with 3D printing. As the use of polymers has progressed, the scientists see promise for microfluidics too.
Fabrication of chips and prototypes is already going strong, but what the researchers would like to see happen is for a stronger connection between microfluidics and chemistry. As they point out, 3D printing has also been used successfully for chemical batches in low-volume production, along with flow-through synthesis reactors used for making pharmaceutical molecules. This is generally achieved through stereolithography (SLA) printing though, which is in incompatible for the scientist’s purposes here as it leads to negative chemical reactions. Because of this, the research teams has realized a need for materials in SLA printing that are uniquely and highly resistant. They also see such ‘fine-tuning’ as an opportunity to control further micro- and nano-structuring of bulk material and create ‘significantly enhanced’ materials
Creating new SLA printing materials, according to the research team, means mixing the following:
All of these together should allow for 3D printing of microstructures in high resolution. In this study, the researchers focus on fabrication with fused silica glass, which they describe as ‘one of the most chemically and thermally stable materials, ceramics, and the most inert type of polymers, fluoropolymers.’ 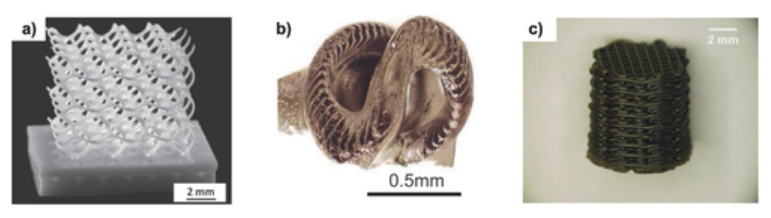
3D printing of ceramics: a) Cellular tube fabricated by stereolithography printing of alumina nanocomposites and subsequent thermal debinding and sintering. Reproduced with permission.45 Copyright 2014, John Wiley and Sons. b) Cork screw printed using preceramic polymers. Reproduced with permission.47 Copyright 2017, Science. c) Robocasted heterogeneous ceramic catalyst fabricated by printing an Al2O3/Cu slurry and subsequent sintering at 1400 °C. Reproduced with permission.52 Copyright 2016, Elsevier. Fabrication of transparent silicate glasses was not achieved in 3D printing for over 20 years, although the researchers explain that there were many attempts leading to results with white or nontransparent parts. Ceramics have also been explored and are being used in 3D printing in numerous cases we have followed before—from use in printing replacement parts on naval ships to making jewelry to medical implants. As a class of material for 3D printing, they exhibit both high thermal and chemical resistance.
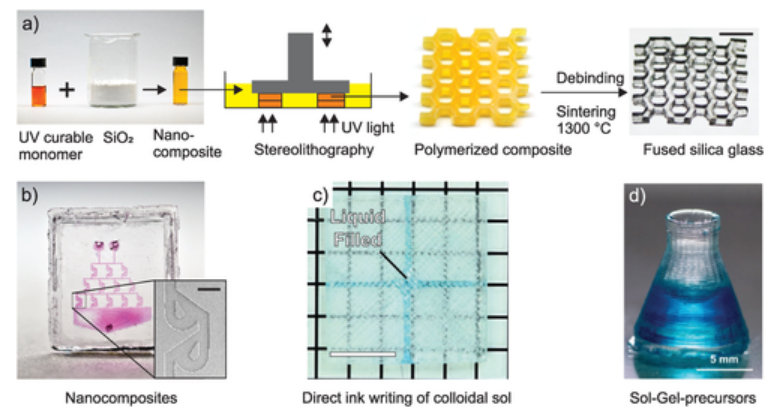
3D printing of transparent glass. a) Stereolithography printing of silica nanocomposites. Amorphous silica nanoparticles are dispersed in an acrylic photocurable binder matrix. The nanocomposites can be printed using stereolithography printers. The printed part is then converted to a transparent fused silica glass via thermal debinding and sintering (scale bar: 7 mm). b) Microfluidic Tesla mixer fabricated using microlithography (scale bar: 200 µm). (a,b) Reproduced with permission.33 Copyright 2017, Springer. c) Cavity filled with dyed water printed using direct ink writing of colloidal silica suspensions (scale bar: 4 mm). Reproduced with permission.36 Copyright 2017, Wiley. d) Erlenmeyer flask printed using hybrid sol‐gel precursors in a stereolithography printer. Reproduced with permission.37 Copyright 2018, American Chemical Society. In assessing polymers as a rule in 3D printing, the team explains that most of them do not have high chemical stability, but fluoropolymers are different, offering very low surface energy.
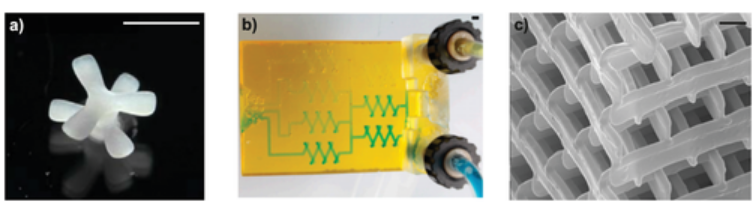
3D printing fluorinated polymers: a) Teflon part printed using stereolithography and sintering (scale bar: 1 mm). Reproduced with permission.27 Copyright 2018, IEEE. b) Microfluidic mixer structure fabricated by using PFPE methacrylates and commercial stereolithography printers (scale bar: 2 mm). Reproduced with permission.64 Copyright 2017, MDPI. c) High‐resolution woodpile structure in PFPE‐based resin structured using two‐photon polymerization (scale bar: 2 µm). Reproduced with permission.65 2013, American Chemical Society. The scientists state that 3D printing does offer great potential for on-chip synthesis and includes the usual benefits of speed in production and greater affordability. They conclude by saying:
What do you think of this news? Let us know your thoughts! Join the discussion of this and other 3D printing topics at 3DPrintBoard.com. [Source / Images: ‘ High‐Performance Materials for 3D Printing in Chemical Synthesis Applications’]Printing via 3DPrint.com | The Voice of 3D Printing / Additive Manufacturing https://3dprint.com February 28, 2019 at 12:09AM Volvo’s conservation project: 3D printed tiles for a Living Seawall at Sydney Harbour https://ift.tt/2BV69HJ 
The Swedish carmaker Volvo developed 50 tiles for the Living Seawall Oysters, seaweed, fish, algae and many more organisms have a new home at North Sydney Harbour. At one of the world’s largest Living Seawalls in Bradfield Park, an ocean conservation project brought together Swedish carmaker Volvo, Reef Design Lab, the Sydney Institute of Marine Science (SIMS) and the North Sydney Council to create an ecosystem for some of the most vibrant marine life using 3D printing. For decades marine life had to look for other places to inhabit because more than 50% of the Sydney Harbour shoreline is armoured with seawalls, a form of coastal defence that protects against waves and tides. In tune with it’s sustainable vocation, the Swedish giant sought an opportunity that seeks to restore the balance of the ecosystem. Using 3D printing technology, experts have developed 50 tiles that have been installed along an existing seawall structure last October and were designed to mimic the root structure of native mangrove trees, becoming the home to thousands of living organisms.
The loss of important ocean habitat due to an increase in urbanization near the coastlines, along with plastic-polluted water have reminded the Scandinavian company that a different approach to a sustainable cleanup might require more than just riding the planet of plastic garbage. The Living Seawall tiles have small geometries edged into the design to give marine life a place to live, usually seawalls are completely flat constructions without nooks, curves or cavities that organisms can use to colonize. The use of 3D printing technology is key to creating a mold that is cast in concrete and then reinforced with 100% recycled plastic fibers. According to Reef Design Lab, the 3D printed texture is really good for oyster colonization because it replicates the geometry of their shells. The collaborative project will remain in the water for at least the next two decades improving biodiversity and water quality, and will be monitored by specialists, like Melanie Bishop, associate professor of Macquarie University and one of the main researchers of living seawalls in Australia. SIMS explains in its website that “Sydney scientists have been leading the world in the study of the greening of seawalls for more than a decade,” and Bishop is evaluating this new approach for transforming entire seawalls into eco-friendly structures, which can be applied at coastline cities. 
Volvo´s 3D printed tiles for the Living Seawall The beautifully engineered hexagon shaped tile, or so-called ‘habitat tile’, developed by the Sydney Institute of Marine Sciences (SIMS) and Reef Design Lab, proved very promising after a small-scale trial in Sawmillers Reserve, those 108 tiles along with Volvo’s 50 mangrove-like tiles are ideal for marine life colonization. However, this is not the first and only attempt to improve the quality of oceans and seas, in 2017, University of Sydney scientists used 3D to track changes in coral reefs in an attempt to save the endangered underwater ecosystem. Another advocate of marine sustainability is Australian entrepreneur Darren Lomman, who launched the social enterprise GreenBatch, which is working to build a system that will reprocess plastic bottles into filament, to avoid the PET product ending up in our oceans. Also in line with water conservation philanthropy is Adidas, the company released sneakers created from recycled ocean waste three years ago. In New England, oyster growers use 3D printed structures to help restore the reef ecosystem. 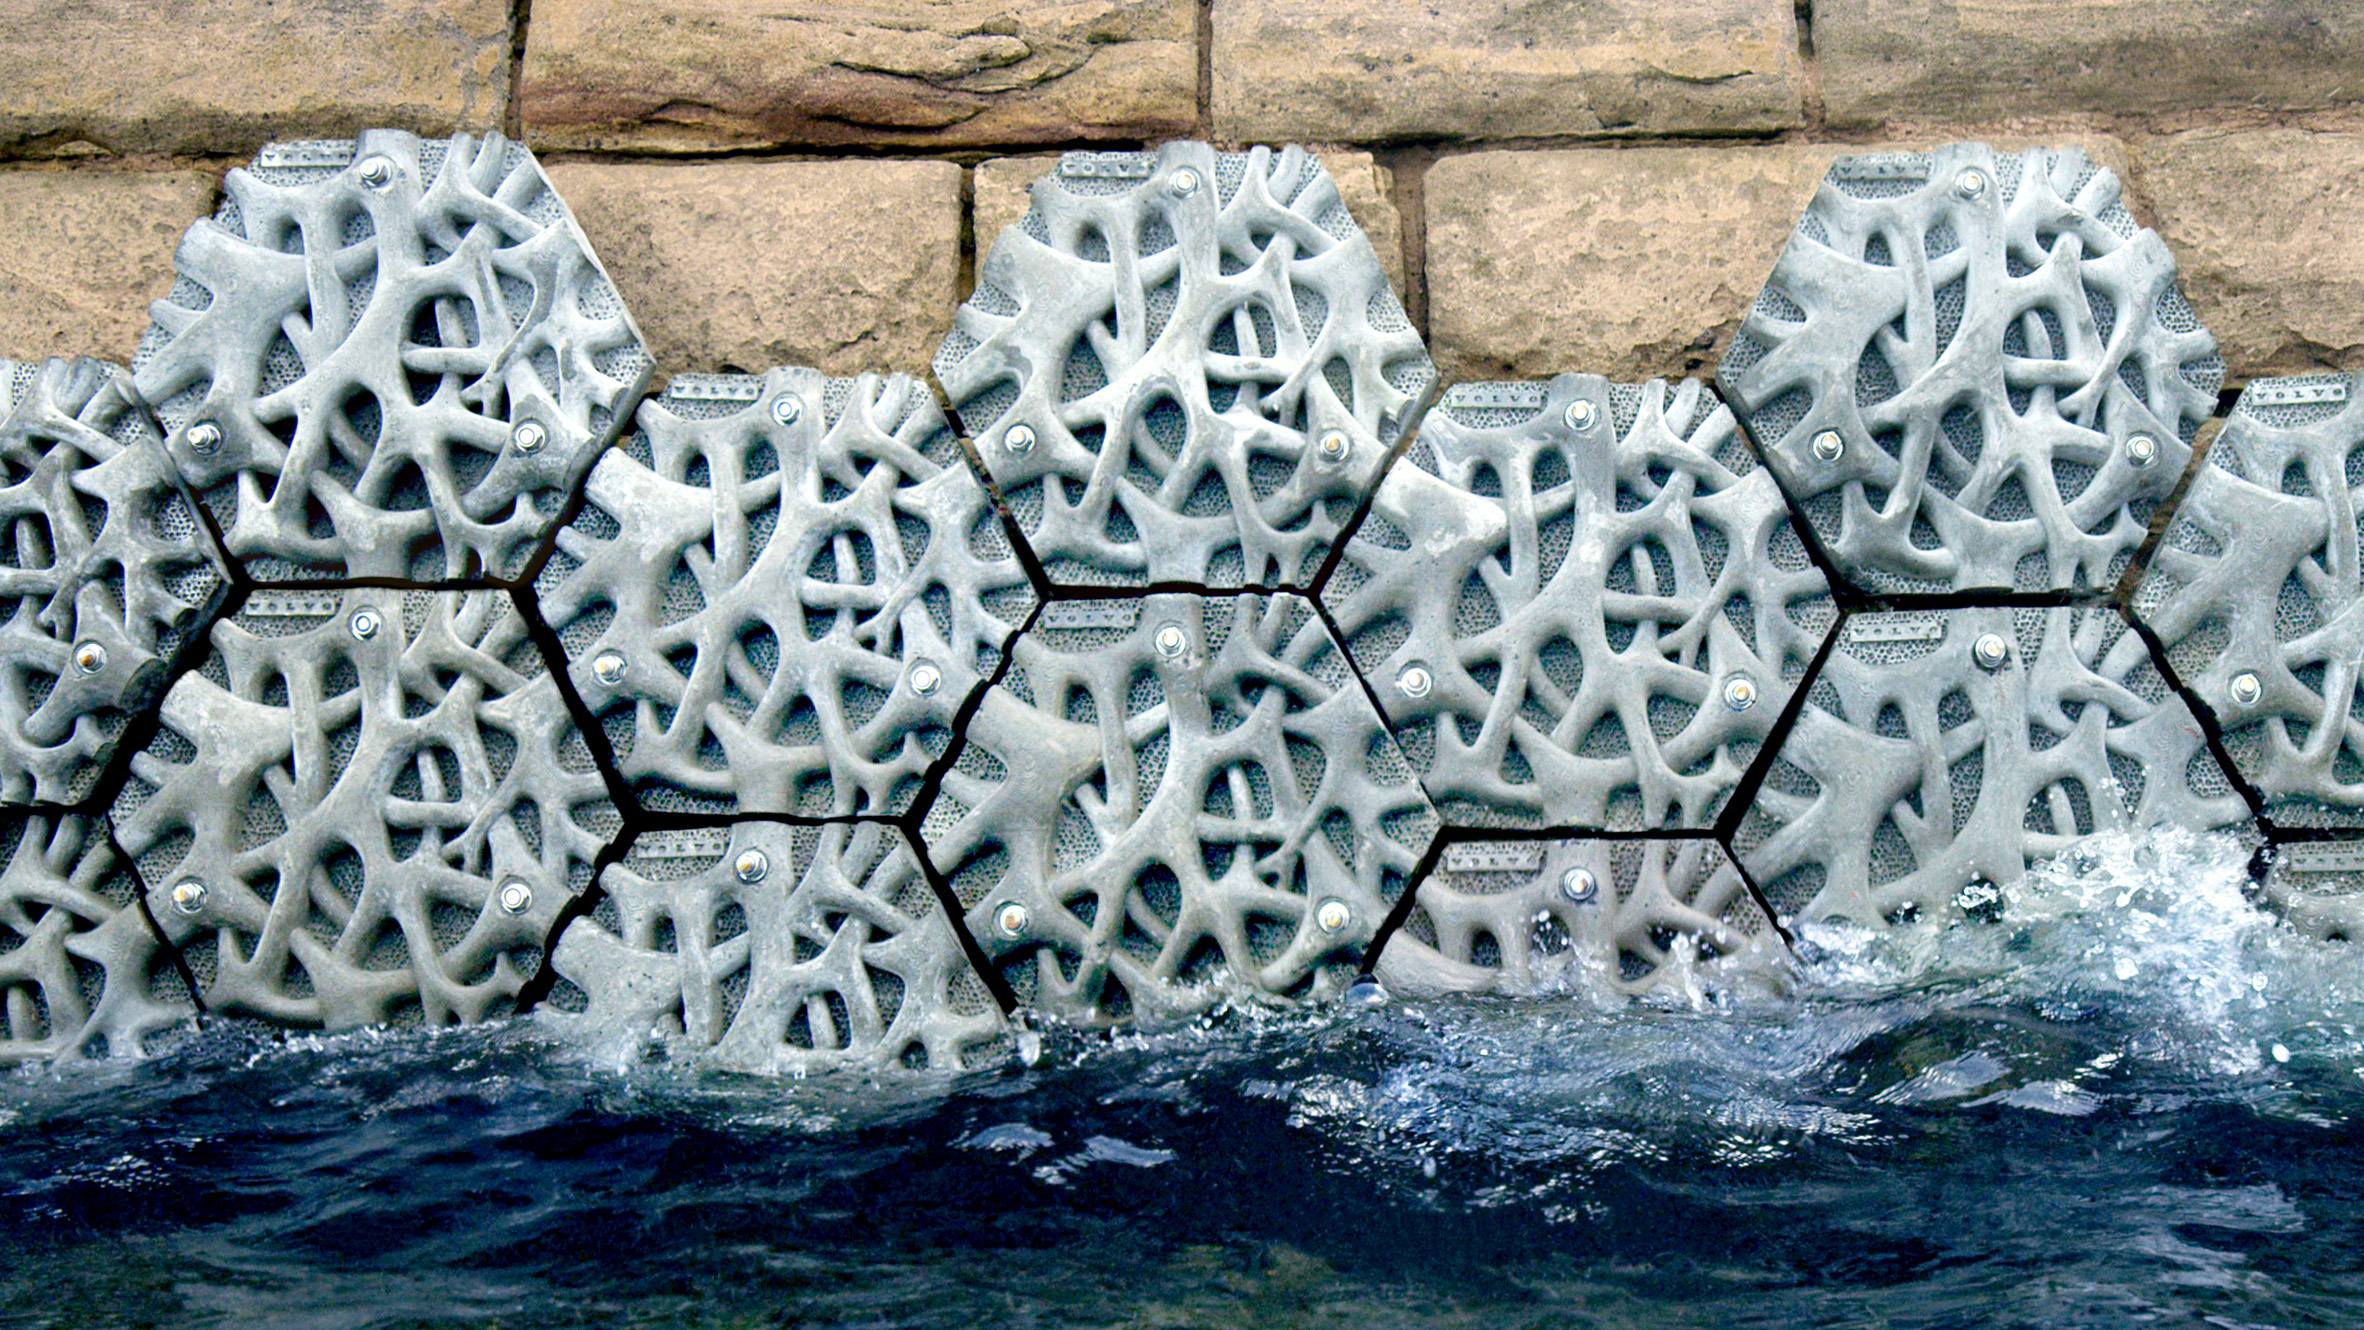
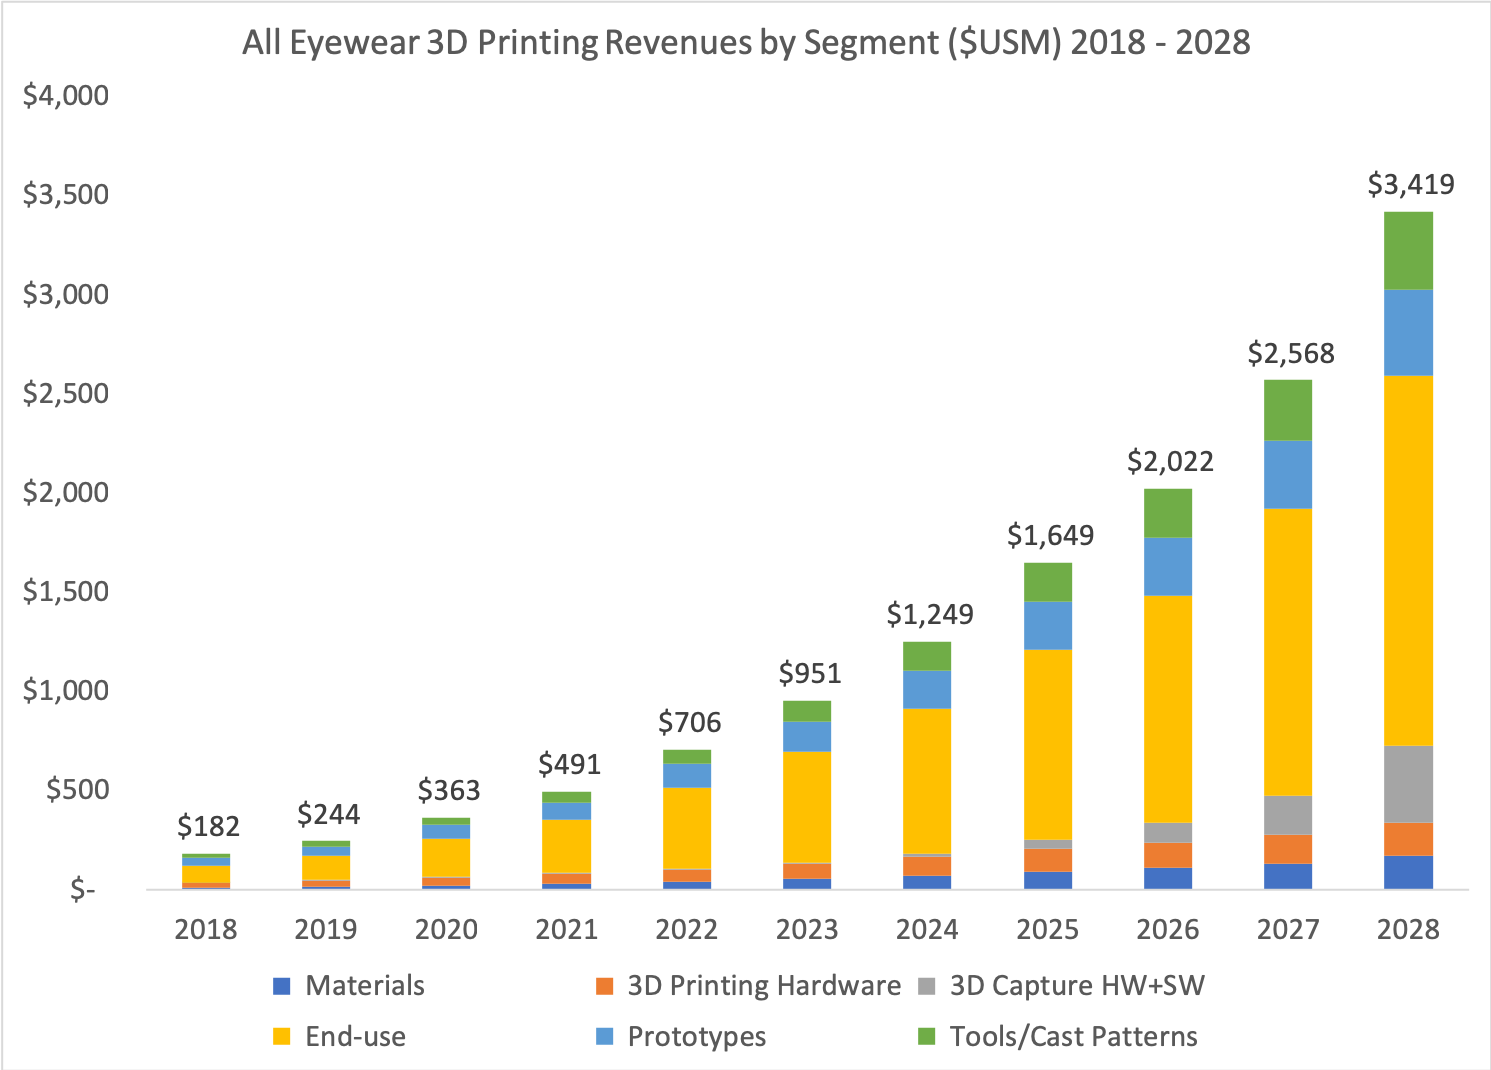
The Living Seawall attached to the coastal seawall at Sydney Harbour One of the partners of the Living Seawall, Reef Design Lab, is no newcomer to this type of undertaking. Led by designer Alex Goud, the Australian-based 3D printing innovators have been developing 3D printed habitat designs for seawalls since 2014. They first use computer models, then 3D print them and finally mould the designs in marine concrete. As reported by the World Wildlife Funds’ last Living Planet Report, released in 2018, the Earth is estimated to have lost about half of its shallow water corals in the past 30 years. This somber shadow of life lost is quickly becoming a concern and so many businesses are partnering with creative engineering designers and NGO’s to come up with ideas that will prevent further damage. This type of radical, disruptive and innovative thinking is what might just save the Earth’s water. VIDEO Printing via 3DPrint.com | The Voice of 3D Printing / Additive Manufacturing https://3dprint.com February 27, 2019 at 02:27PM SmarTech Analysis Reports on Projections for 3D Printed Eyewear Industry from 2019-2028 https://ift.tt/2BZdqGl
SmartTech foresees this massive profit potential being driven by final parts production in 3D printing, marking a turning point for the technology’s use in true manufacturing rather than just rapid prototyping with a continued reliance on conventional production techniques. And while eyewear may be only a sliver of what the 3D printing industry will be offering, the forthcoming financial projections show the potential for definite disruption in what has been a very structured business model previously without customers having nearly as much interaction in design, not to mention enjoying drastic speed in turnaround, and in many cases, price. Current analysis is also designed to give industry stakeholders a summary of what types of technologies exist in additive manufacturing to include a wide range of materials and potential services, of which 3D capturing and online customization will play a major role as consumers seek goods that are made specifically to their needs, and fit. The report also goes into further detail regarding conventional methods such as tooling and casting—along with the benefits of 3D printing at the desktop for both production in volume and prototyping during the design process.
Currently, the most popular technology being used to create eyewear is material jetting, along with 3D printing in metal with powder bed fusion and the use of nylon 12 (PA122) most commonly.
Highlighted companies in the SmarTech report include Carbon, DWS, EOS, Formlabs, Fuel 3D, Glasses USA; Hoet, Hoya, HP, Luxexcel, Luxottica, Materialise, MONOQOOL, Mykita, Protos, Safilo, Sculpteo, Seiko, Sfered, Sisma, Specsy and more. Analysis of 3D printing has become almost as popular as the actual innovative activity itself, a technology that lends itself to great fascination regarding the future—and most importantly, outlook and finances for many industries. Eyewear is certainly a market being revolutionized due to the myriad benefits of 3D printing, whether you are an athlete using custom eyewear, a fashion designer creating innovative frames, or a user looking for sunglasses. Find out more about SmartTech and their projections within the 3D printing industry here, and keep an ‘eye’ out here at 3DPrint.com for more on truly progressive frames and glasses. What do you think of this news? Let us know your thoughts! Join the discussion of this and other 3D printing topics at 3DPrintBoard.com. 
Companies like GlassesUSA even allow consumers to 3D print their own eyewear frames. [Photo credit GlassesUSA and Sinterit] https://youtu.be/R5_O8SR0lXo [Source: SmarTech] 3Dprint.com is an equity holder in SmarTech Printing via 3DPrint.com | The Voice of 3D Printing / Additive Manufacturing https://3dprint.com February 27, 2019 at 10:45AM
https://ift.tt/2IEpjal
43 Email List Building Ideas [UPDATED] https://ift.tt/2T62TUk Email list building is crucial for email marketing. A high-quality email list can be your most valuable business asset. In this article, you’ll find practical tips on how to build an email list.
How to build an email list FAQ
What is email list building?Email list building is the process of attracting and adding new contacts to your database. It is the core of all email marketing activities. For more information on the fundaments of email marketing, read Email Marketing for Beginners.
Why is list building important?List building is crucial for effective email marketing for an obvious reason – the bigger your contact list, the bigger the conversion rate opportunities. The more people receive your emails, the higher are your chances of generating sales revenue and achieving your other business objectives.
What is a high-quality email list?A high-quality email list is a list built with email addresses of people representing your target audience. People who will benefit from using your product or service. Overall, it makes sense to market your offer to people who are likely to become your customers.
How to build an email list from scratch?In email marketing jargon, building an email list from scratch is called organic email list building, and means that you find out ways of reaching your target audience and ask them to sign up for your email marketing program. Organic list building strategy is permission-based, which means that only people who have expressed explicit consent are added to your list.
How to build an email list fast?The fastest way to build an email list is to run PPC ad campaigns and partner up with other brands to co-promote an ebook or a report. The goal is to attract as much target audience as possible. In this article, you’ll find plenty of ideas that will help you build your contact list in no time.
Basic email list building tools/resources:
Subscription formsA subscription form a.k.a. a web form or a signup form is an HTML form that is installed on a website to enable visitors to sign up. There are different kinds of forms to choose from, e.g., a subscription form, download box, scroll form, fixed bar, lightbox, or an exit pop-up. Choose the right form and customize its design, so that it efficiently attracts new subscribers. When designing your webform think about the quality/quantity ratio. If you want to reach a specific target audience (e.g., to generate B2B leads), you might need to create a longer webform asking for more details: company name, company size, position, etc.
On the other hand, if your goal is to reach a broader audience (e.g., to reach potential ecommerce customers), you might ask only for basic information like name and email address. The rule of thumb is that the longer the form, the fewer people subscribe. The shorter the form, the more subscriptions you get, but you can’t be sure how many people actually meet your criteria. The trick is to know your goal and ask only for relevant information to balance the quality/quantity ratio accordingly.
Landing pagesA landing page, also known as a “lead capture page” or a “squeeze page”, is a single web page that is designed with a single call to action for hig conversion. In email marketing landing pages are most often used for lead generation.
Related post: The Anatomy of a Killer Landing Page
|
Categories
All
Archives
April 2023
|


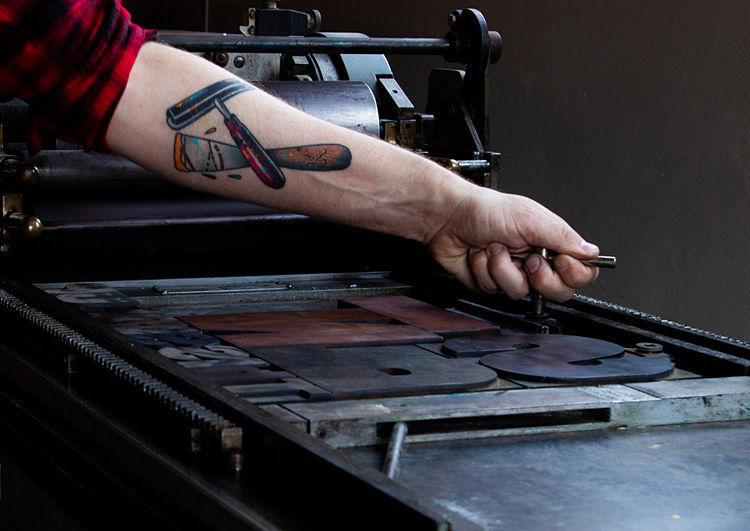 Karakter Prints offer personalised letterpress printing services for wedding invitations, posters and birth announcements to name a few. From his studio Bart also conducts workshops in letterpress, stamp and poster making. He also works as a guest teacher in primary and secondary school, and is part of visual mash up collective Tintenkillers.
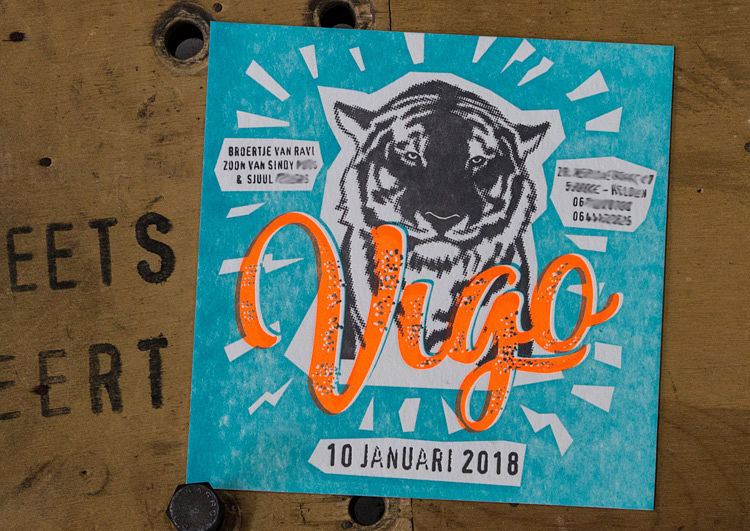

 RSS Feed
