
|
Is this 3D Printed Alto Saxophone on Kickstarter Viable? https://ift.tt/3mtCo5n I’ve been playing music in some form or fashion since I was in the first grade, from singing and ringing handbells in various church choirs, taking piano lessons, and playing flute in the high school marching and concert bands to rocking out on the marimba in our school’s indoor winter percussion ensemble. So, whenever I hear a story about 3D printed instruments, my ears perk right up. North Carolina-based data analytics consultant Joe McGuire has been playing the saxophone for over 30 years, and is passionate about sharing his love of music with students young and old through his YouTube channel, Advanced Saxophone Lessons Made Easy (ASLME). He is also, it seems, a fan of 3D printing. About a month ago, he launched a Kickstarter campaign for a high-quality, professional, yet affordable 3D printed alto sax, in order to, as the campaign states, “make music accessible to a much wider demographic.”
However, if you check out the video below, you can see that opinions on playing high-quality saxes differ a little. For example, Jay Metcalf of the Better Sax YouTube channel pitted his professional Yanagisawa A991 alto sax against one he bought on Amazon for less than $300, and found that the cheaper instrument, while obviously of lesser sound quality, was able to hold its own. Some saxy background: even though the instrument is typically made out of brass, it’s part of the woodwind family because the sound is produced through a reed, usually made of woody cane, rather than vibrating your lips in a mouthpiece cup like other brass instruments. With woodwinds, the pitch of a note is controlled by covering holes in the body of the instrument through the pressing of keys. These holes serve to control the air column’s resonant frequency. There are several types of saxophones, but the most common are the alto, baritone, and soprano saxes.
His goal with this Kickstarter is to design, 3D print, assemble, and distribute high-quality alto saxophones to a variety of musicians, from aspiring, inner-city players to the most expert of virtuosos. Unfortunately, the campaign doesn’t seem to be going well. It ends this Saturday, October 31st, and McGuire has only raised $511 of his $5,450 goal. If he somehow manages to raise all of the funds by this Saturday, the money will be used to cover production and distribution costs, but mostly to purchase a high-quality 3D printer and a variety of filaments, which he will test out to find which material will be optimal for making the sax parts. 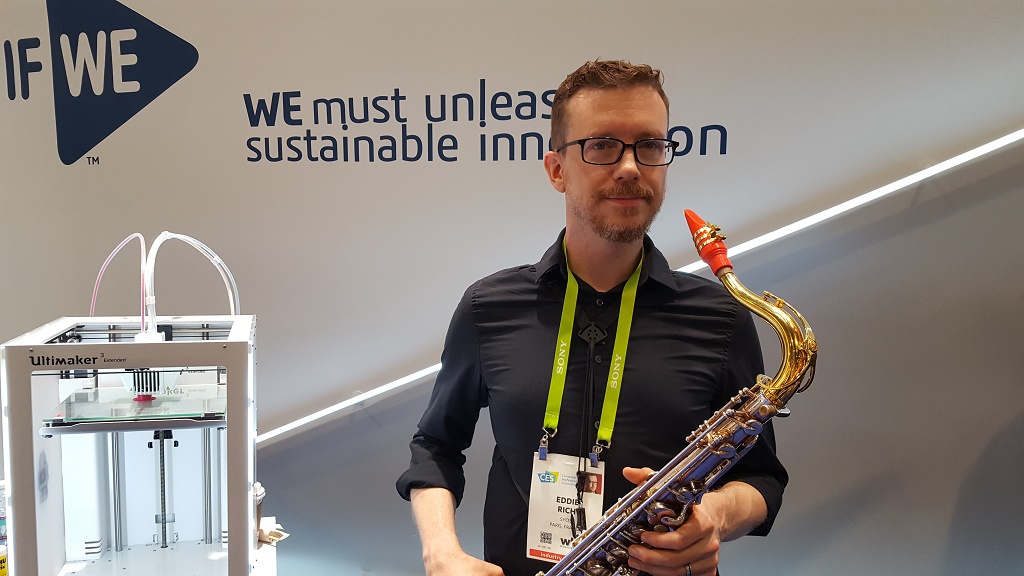
Las Vegas musician Eddie Rich playing a sax with a 3D printed mouthpiece at CES 2018. (Image courtesy of Sarah Goehrke for 3DPrint.com) Olaf Diegel made a 3D printed saxophone using Duraform PA nylon powder, while Taiwan’s Industrial Technology Research Institute (ITRI) printed one a year later out of titanium alloy powder, and French company Shape Your Own Sound (SYOS) 3D prints sax and clarinet mouthpieces using ABS plastic. There are obviously multiple options, so I’m not sure which direction filament-wise McGuire would go with his project. Regardless, he’s estimating that the time from design to final 3D printed sax to distribution will be between eight months and a year. The first objective in his Kickstarter campaign will be to design and 3D print an alto sax mouthpiece that “rivals those from the leading manufacturers.” McGuire says that while the outer part of the mouthpiece looks “rather straightforward,” how the interior is formed will really impact the sound. A friend of mine from college, who has some experience with 3D printing and is an accomplished sax player himself, can vouch for this. He told me he tried a 3D printed mouthpiece for his instrument, which did not go well because he wasn’t able to get the correct geometry or accomplish an airtight seal on the actual printer. He managed a few squawking noises, but that was it. But McGuire seems confident that once he’s tested his as-yet un-purchased printer with different designs and materials, he should be able to finish the mouthpiece in less than four months.
The next part of the project will be designing the neck, which seems difficult to me because of its more complex design feature: the small hole at the top of the neck must be completely open sometimes and completely sealed at others.
Even so, the estimated time for designing and 3D printing the neck of the alto sax is about 1-2 months.
The most challenging part of the design, and the 3D printing, will be the body of the saxophone, which tracks with what another skilled sax-playing friend of mine said: “The hard part will be the keys.” The hollow tube of the instrument features 25 tone holes, each of which must “perfectly rounded for the optimal response.” McGuire will be 3D printing small screws in order to attach the keys, each to be printed separately, that will cover the tone holes.
Again, this is all contingent upon whether or not he makes his Kickstarter goal. If you find this project interesting, you can pledge $10 for no reward, or pledge $40 to receive a personal thank you note from McGuire. A $125 pledge will get you the first working 3D print of his mouthpiece, and for $250, McGuire will print any design that you choose (within reason) and send it to you. The big question here is this: would a 3D printed saxophone be viable? I don’t know the answer to that. I mentioned earlier that an accomplished sax player tested out a cheap sax against his own expensive, professional one, and found that it performed decently…if you’re a beginner, that’s really all you need, and accessibility to good instruments is what McGuire is trying to achieve. But what about the professionals who shell out thousands to buy the best of the best? Would a 3D printed sax cut the mustard, so to speak? Above is a video from 2009 that shows how a saxophone is traditionally manufactured. At one point in time, the methods used there were also brand new, just as 3D printing once was, so part of me thinks, if we’re able to scan and print patient-specific dental aligners and hearing aids, surely the technology can handle a musical instrument. But on the other hand, Laurent Lacombe, the co-founder of Creadditive, acknowledged that the sound his 3D printed violin made was not identical to the sound a traditional hand-crafted violin would make, and Ottawa Symphony Orchestra concertmaster and violin teacher Mary-Elizabeth Brown said the instrument she tried “had a different kind of soul” than her own violin. So in my humble opinion, the viability of 3D printed instruments is still up for debate. Printing via 3DPrint.com | The Voice of 3D Printing / Additive Manufacturing https://3dprint.com October 28, 2020 at 07:32AM
0 Comments
https://ift.tt/2HKdAa9
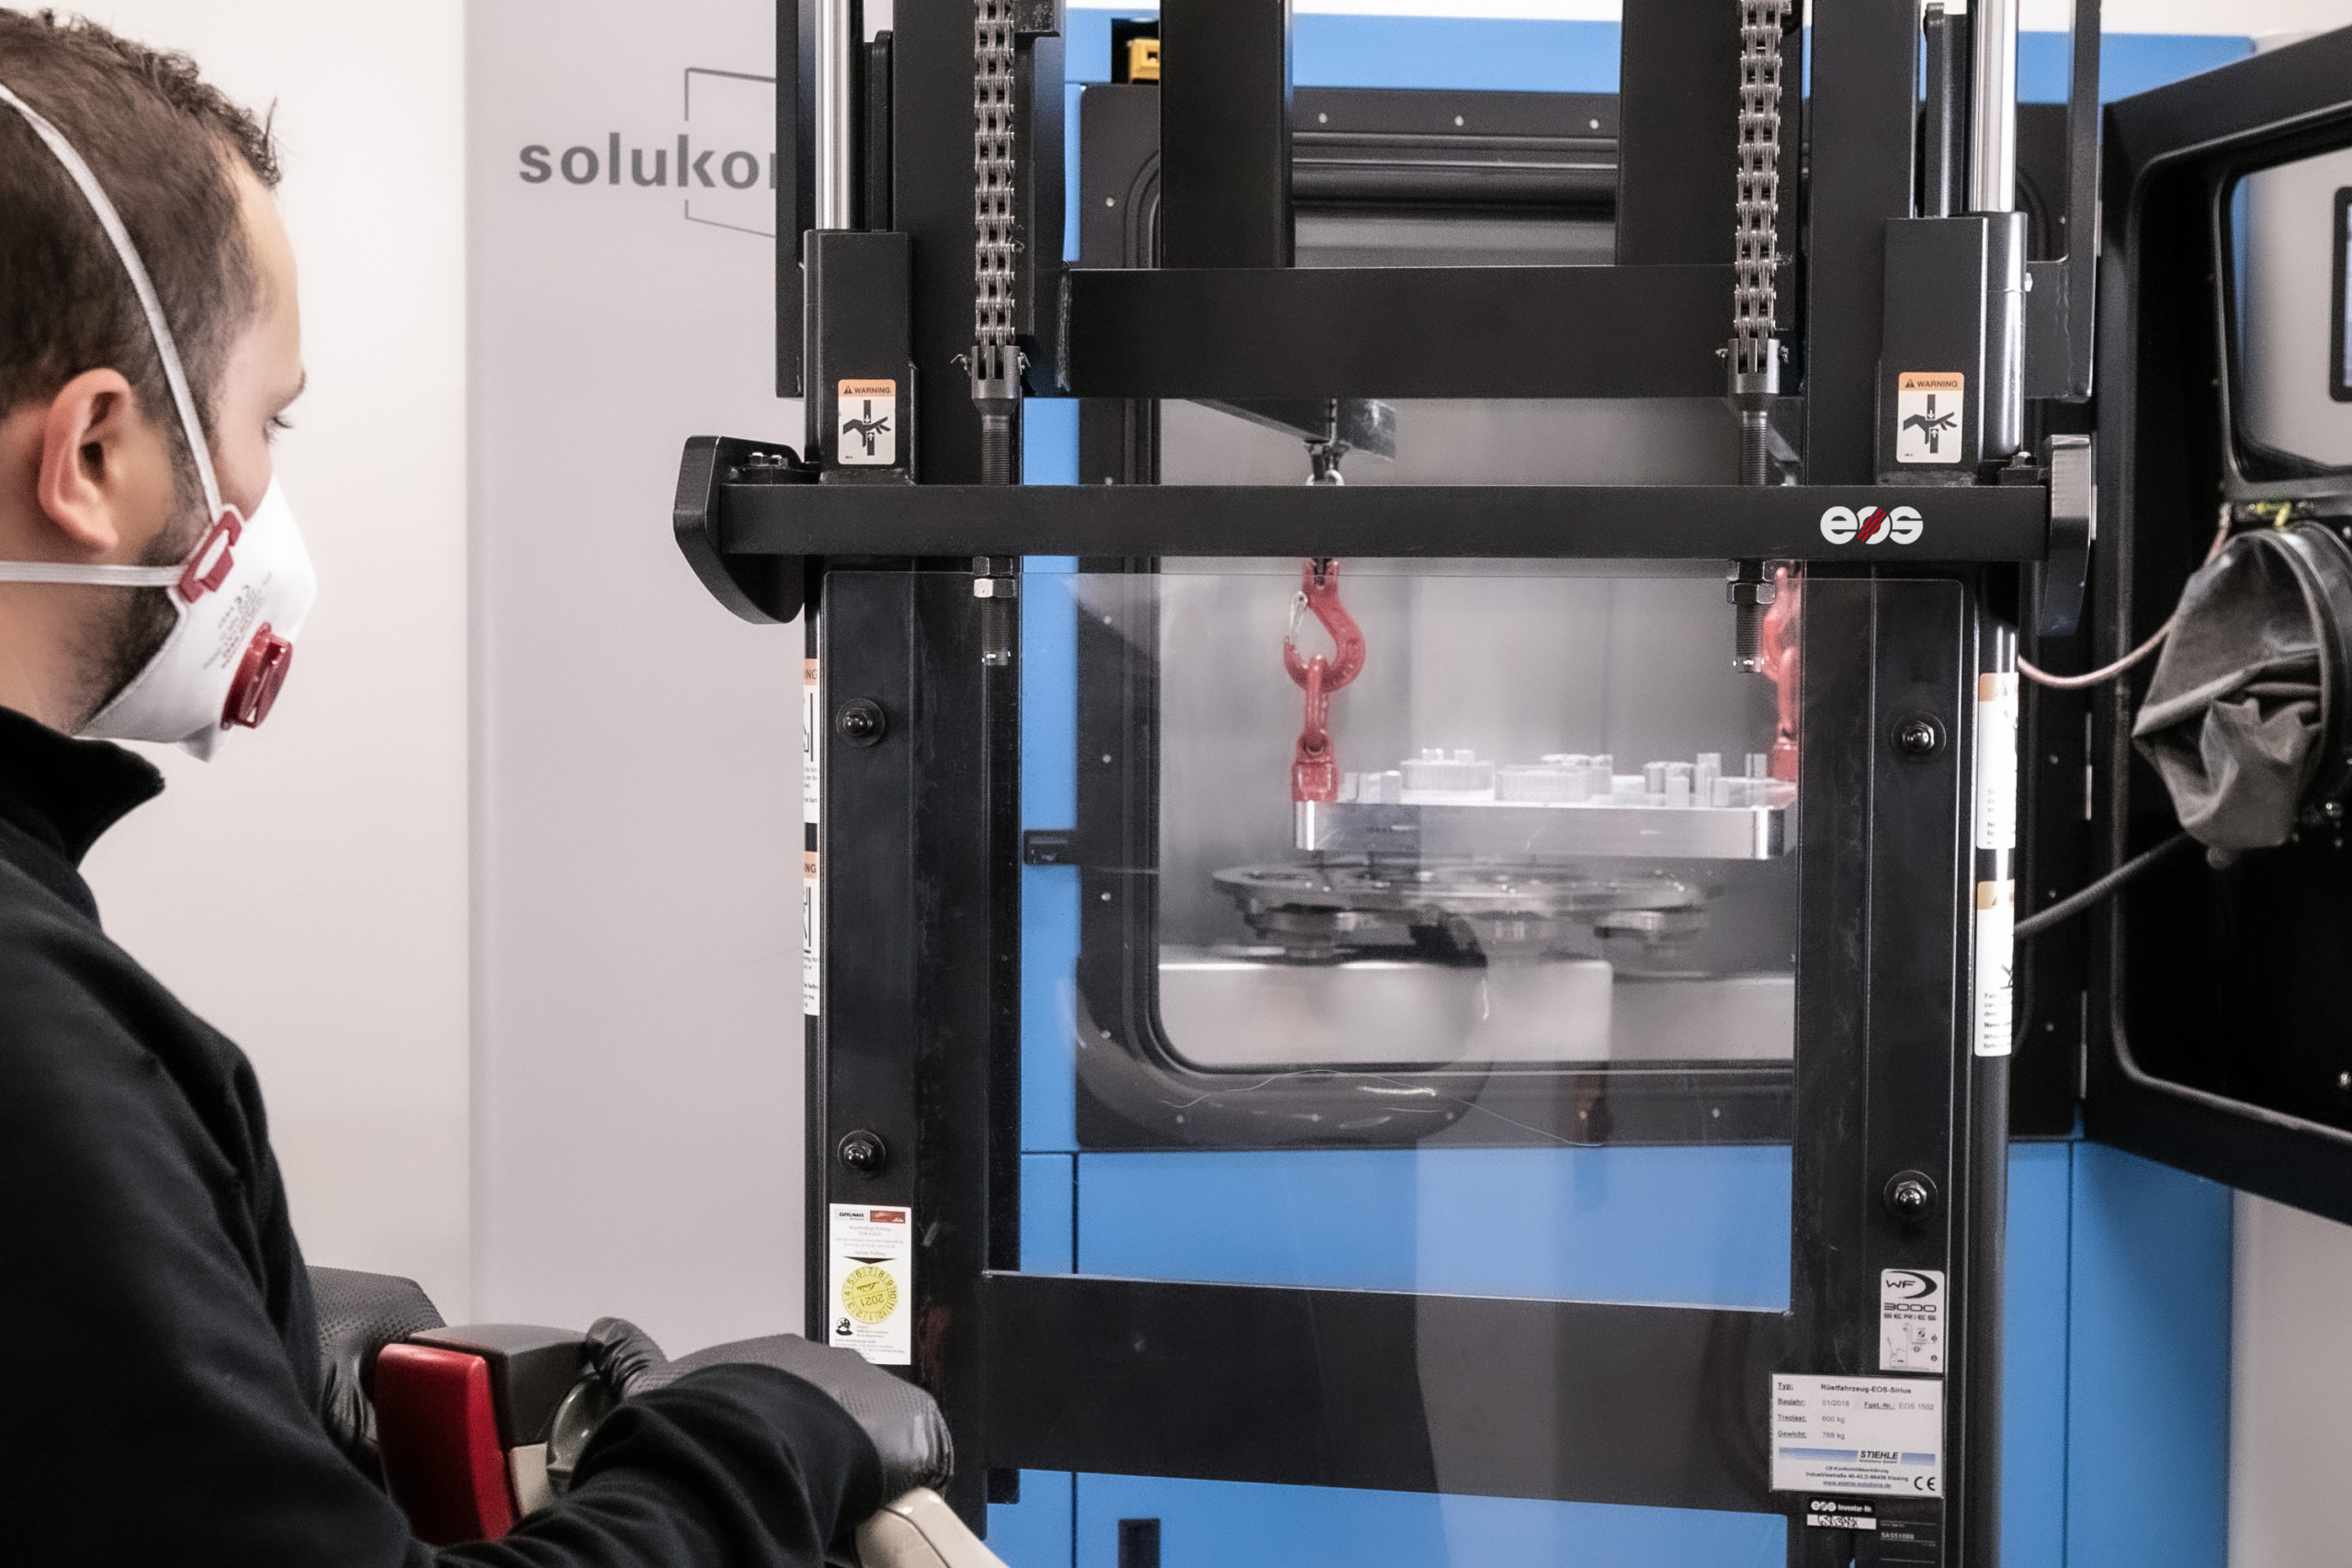
EOS Leverages Solukon’s Automated Depowdering Tech for Metal 3D Printing https://ift.tt/3jBECy3 Germany-based EOS, a global technology provider for industrial 3D printing of metals and plastics, has installed two automated powder removal systems developed by additive manufacturing (AM) post-processing solutions specialist Solukon Maschinenbau to improve the efficiency of its part-building process chain. With the installation of the two Smart Powder Recuperation (SPR) technology machines at its facilities in Krailling and Maisach, near Munich, EOS will ensure that the powder removal process of large parts is easier, more efficient, and requires minimal maintenance from its operators, resulting in cleaner parts and more sustainable manufacturing processes. Between the two locations, EOS operates approximately 50 metal AM systems for testing, application development, and printing of demo parts for customers, making it one of the largest operation centers of metal AM systems in the world. Until the acquisition of the two Solukon systems, initial metal powder removal was done by using EOS modules, typically followed by industrial vacuum cleaners for additional powder removal. However, the time involved in the process had proven unproductive for EOS, it would often take many hours of work to get all of the powder cleaned out, and it became a frustrating task for employees. The powder removal process in all EOS machines had been a headache for the company. Vacuumed excess powders had to be scrapped due to contamination concerns, and for the remaining powder, in particular, the one trapped in internal channels, the partially cleaned build plate was placed in a blasting cabinet where the powder was manually blown out of difficult places using compressed air. According to EOS, there were key needs for powder removal that needed addressing, such as deep cleaning of all areas of the part and documentable and repeatable part cleaning protocols. Instead, Solukon made powder removal easy and automated.
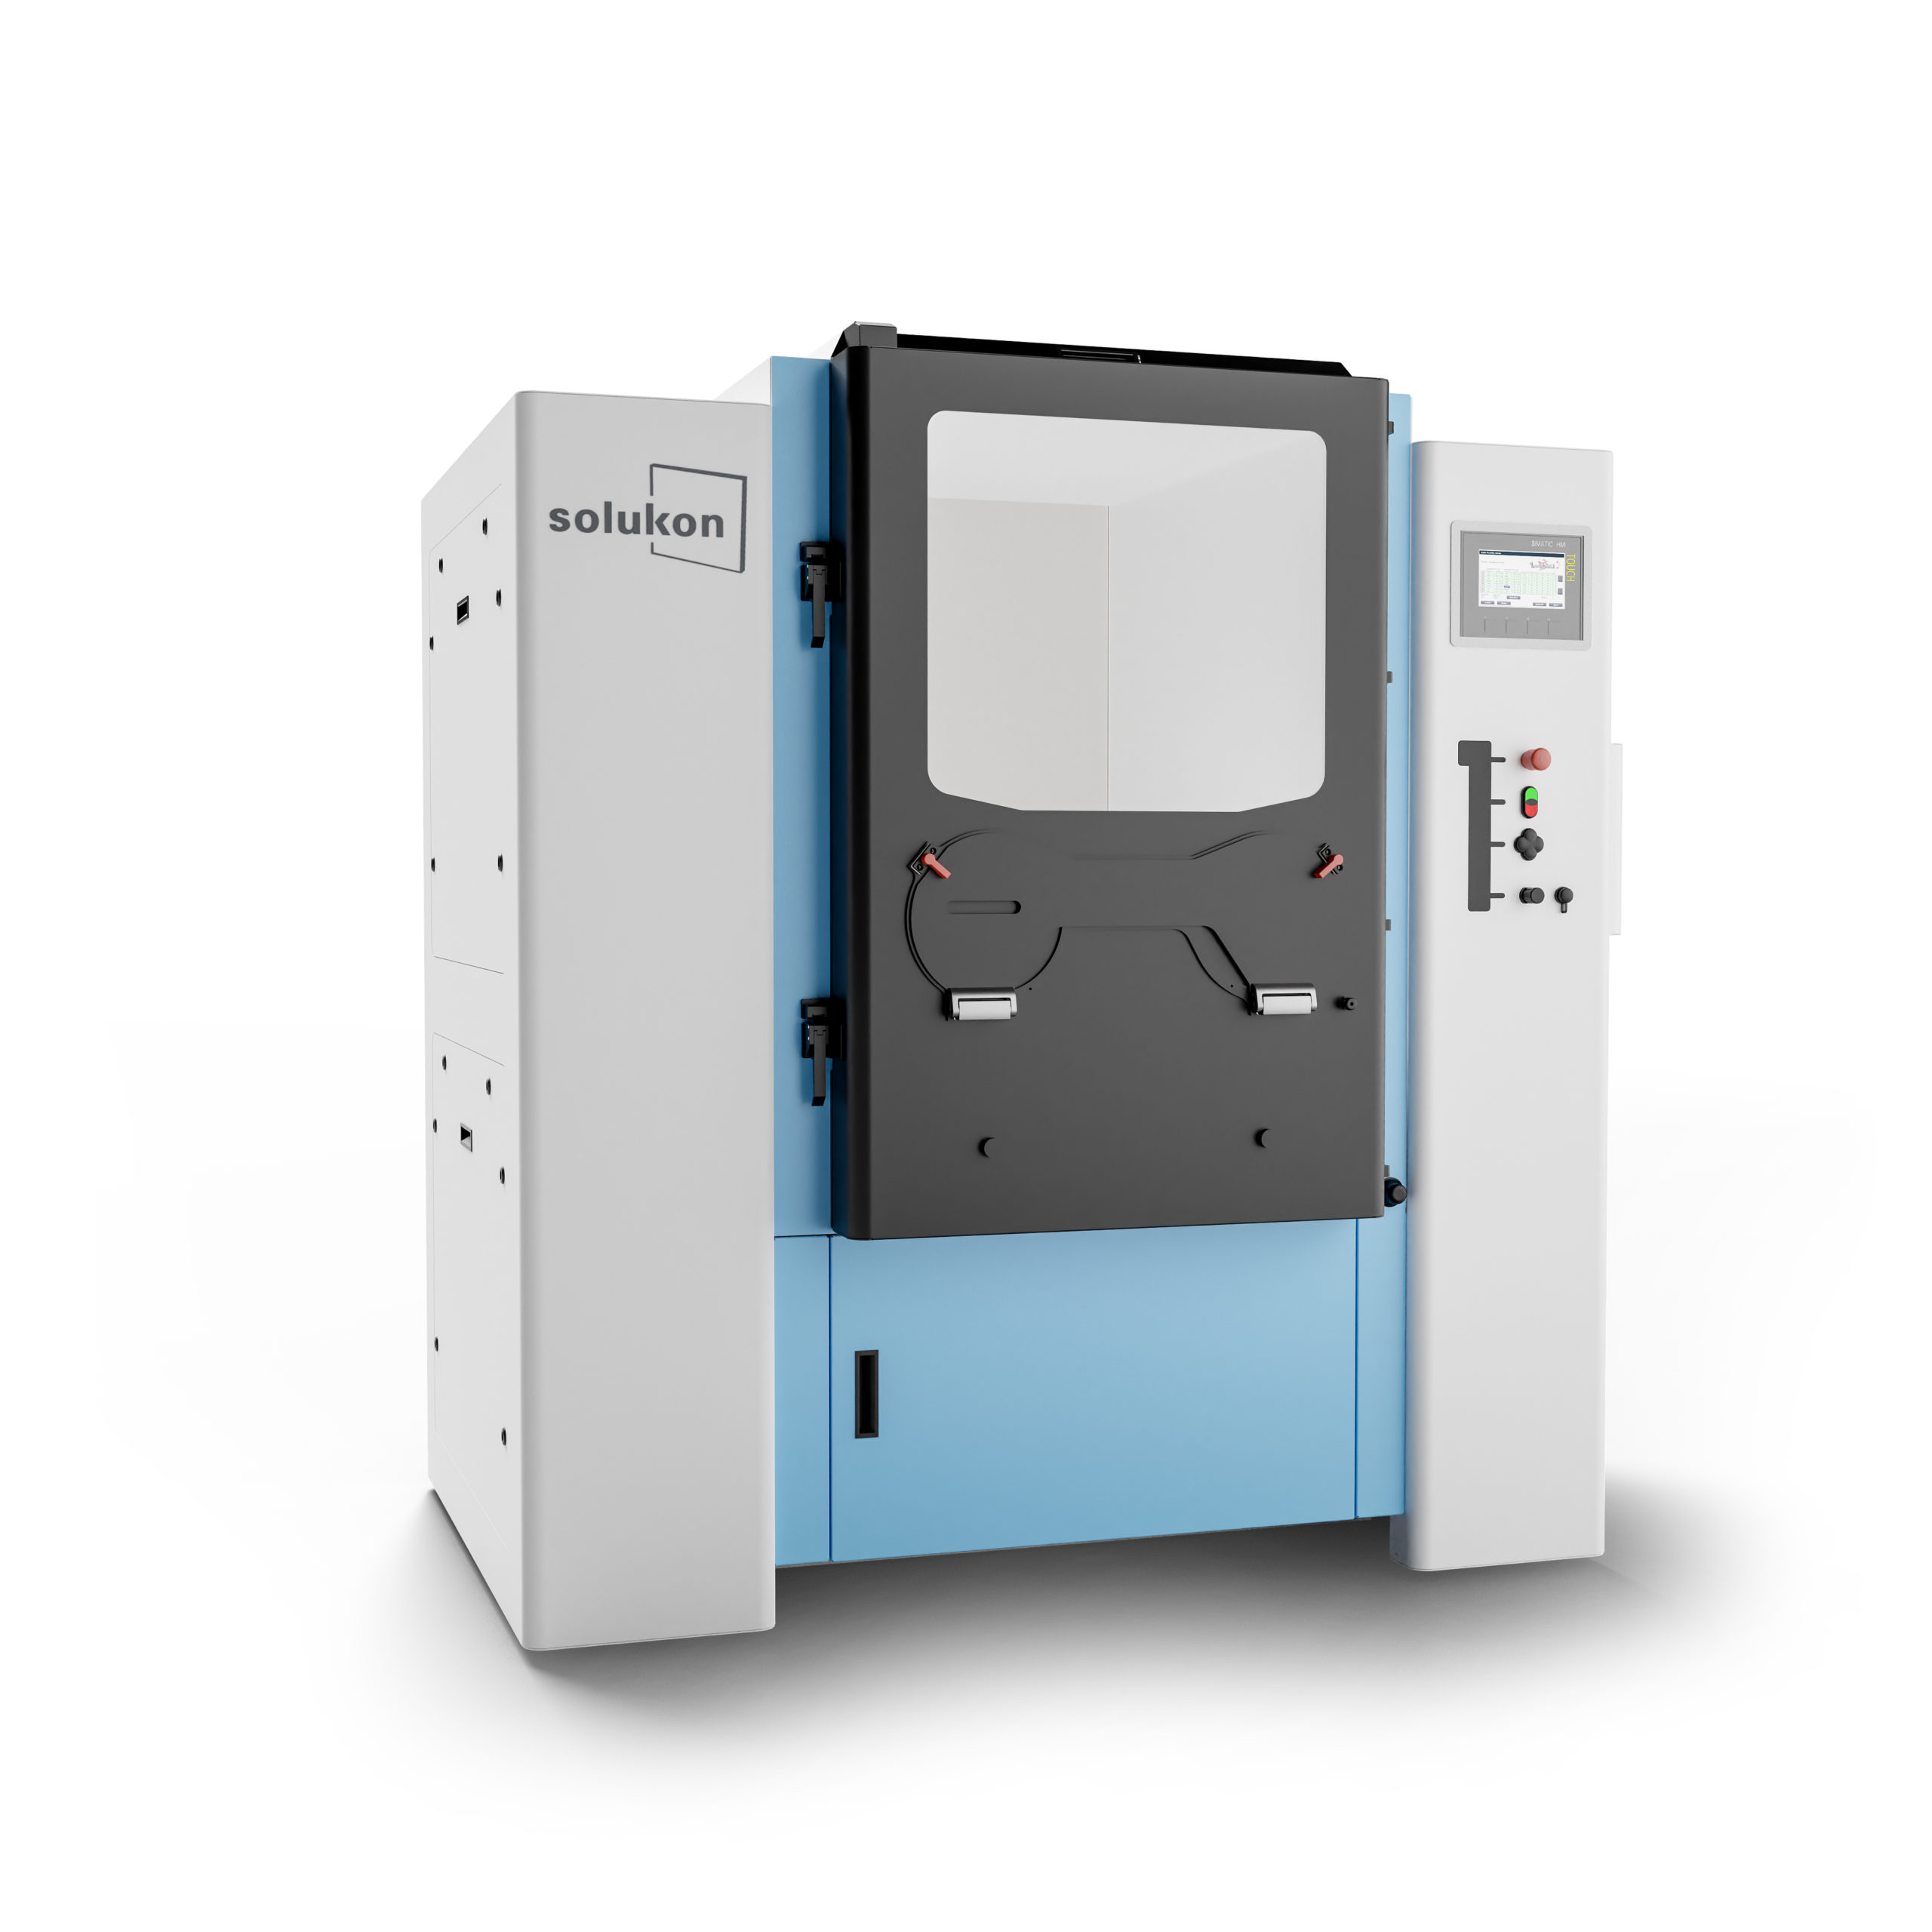
Solukon’s SFM-AT800-S system. Image courtesy of Solukon EOS is currently operating two SFM-AT800-S Solukon systems and is already considering purchasing a third. The company claims its employees are now more satisfied and less frustrated than when they were performing manual cleaning. Solukon’s SPR technology provides a safe and airtight environment where controllable vibration frees powder from even the most stubborn internal channels, according to the company. The system collects unused powder for reuse in the process, in line with evolving AM sustainability efforts, as recovering unused powder can result in environmental and economic efficiencies, especially when using expensive powder alloys. For the more reactive materials, like aluminum and titanium, Solukon provides an inert operating environment. The part cleaning process is programmable and repeatable and can be customized for material type and part geometry. Heavy parts of up to 300 kg can be easily manipulated in the larger Solukon units, while smaller systems can handle parts weighing up to 60 kg. Quote request Are you looking to buy a 3D printer or 3D scanner? We're here to help. Get free expert advice and quotes from trusted suppliers in your area. Powered by Aniwaa
Solukon’s depowdering technology at work. Image courtesy of Solukon There are several key needs that have to be addressed when it comes to powder removal, mainly saving time and labor costs. EOS has particularly indicated that potential customers investing in AM equipment for production purposes have inquired about post-processing costs. This comes as no surprise, as experts have estimated that post-processing can represent up to 60% of the overall cost for each AM part – depending on the application. As if the cost wasn’t enough of a setback, a 2019 report by AM market research firm SmarTech Analysis, suggested that metal AM post-processing has long been considered the most time-intensive part of the AM workflow. Even more expensive and time-consuming than the printing process itself. Many companies today still go about this manually, which is slow and can lead to inaccurate finished parts. Instead, automated post-processing systems, like Solukon’s, offer a better solution to remove powders, particularly from some of the complex geometries achievable through metal AM. 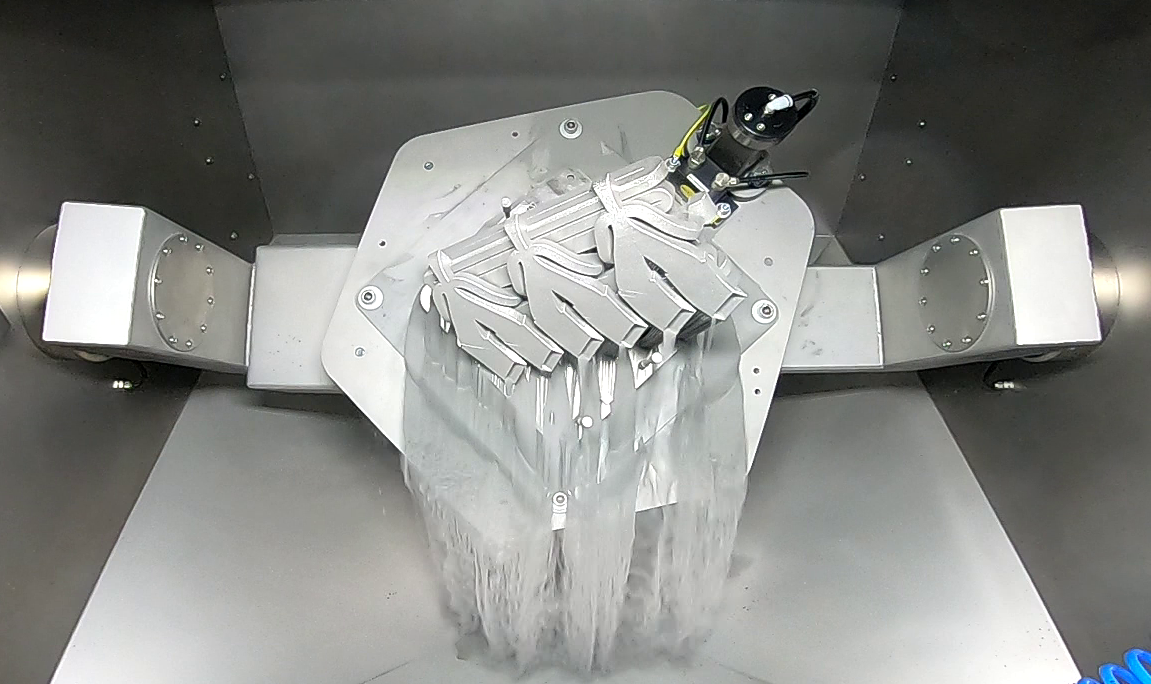
Solukon’s systems can depowder the most complex geometries in metal AM. Image courtesy of Solukon As post-processing costs become a more important factor in the entire cost of the process chain, EOS customers are asking more and more questions about peripheral processes, such as powder removal, said the company’s Periphery and Automation Project Manager, Dominik Hertle. He also highlighted that EOS is looking to encourage and facilitate the development of peripheral processes and automation through collaborations with innovative companies that specialize in these areas, such as Solukon. Working towards the development of the AM segment into a fully mature manufacturing modality, EOS expects customers, both new and current, to experience Solukon’s SPR solutions at the company’s customer and technology center in Krailling. As Hertle said, “we lead by example,” adopting and demonstrating how cutting edge technologies and best manufacturing practices can make operations more efficient. Printing via 3DPrint.com | The Voice of 3D Printing / Additive Manufacturing https://3dprint.com October 28, 2020 at 07:02AM 2020 AM Salary Survey – Participate as an Employer and Win AM Consultancy Package https://ift.tt/3oD8dee Alexander Daniels Global has started collecting responses for their yearly global Additive Manufacturing Salary Survey. This is the fifth consecutive year that the recruitment company conducts the... View the entire article via our website. Printing via 3DPrint.com | The Voice of 3D Printing / Additive Manufacturing https://3dprint.com October 28, 2020 at 06:52AM
https://ift.tt/3oBmMPp
DADA FROST https://ift.tt/31QVzhH DeAnne Frost, aka DADA FROST, is an American-born graphic designer and screen printer based in Scotland. She studied Graphic Design at University, and after a few freelance jobs when she first graduated, DeAnne ended up working in publishing and then for a charity. However, nine years ago, after having her first child, DeAnne decided to enrol on a beginners screen printing course at Spike Print Studio; “I loved it, learning the process was so satisfying and my obsession with learning to screen print grew. I did several more courses and eventually became a member there“.
www.dadafrost.com Printing via People of Print https://ift.tt/2DhgcW7 October 28, 2020 at 03:49AM
https://ift.tt/3mF3NBN
A Beginner’s Guide to Squeeze Pages (Templates & Examples) https://ift.tt/2OBrajs Are you unhappy with the number of leads your company’s website is generating for you? If driving traffic isn’t the problem, then I’ve got bad news for you – it’s your website. *dun dun duuuun* Don’t worry, though. I’m not going to tell you to redesign it. Instead, I suggest that you create a squeeze page. And then drive traffic to it, skipping your company homepage. Feeling slightly hesitant? Good, we’ll answer your questions and provide examples and templates as well. Table Of Contents Want to skip one section or the other? Just click on one of the quick links in the table of contents above to jump right to the part you’re most interested in. Let’s begin with some theory. Editor’s note: Did you know you can build squeeze pages using GetResponse Landing Page Creator? Grow your audience and keep it engaged with the squeeze page, email, and Facebook ads combo! What is a squeeze page?A squeeze page is a landing page designed to collect a visitor’s contact information – usually an email address. Squeeze pages “squeeze” visitors into becoming subscribers by pointing their focus to the signup form or the call to action button. While other types of landing pages may be designed to generate click-throughs, video views, or some other kinds of user interactions this isn’t the case for squeeze pages. They are used exclusively to capture an email address and start a conversation with a potential lead or prospect (ideally, this should all be part of carefully planned marketing funnel). Squeeze pages are sometimes referred to as signup pages or opt-in pages. Some marketers also use the term landing pages interchangeably with squeeze pages. Personally, I don’t think it’s the best choice and consider squeeze pages to be a type of landing pages, similar to thank-you pages, click-through, or viral landing pages. Naturally, you may disagree with this distinction. To make sure we’re on the same page, here’s a squeeze page example, created by Smart Insights. Squeeze page example from Smart Insights. Squeeze page vs homepageWhy or when should you use a squeeze page instead of your homepage? The squeeze page definition already hinted toward the right answer. Your homepage has a different purpose than a squeeze page (in most cases, at least). It’s designed for many types of users and various goals. There are additional elements like a navigation bar, potentially tons of links, images, and maybe even multiple calls-to-action (CTAs). Even if you do have a primary CTA or even a signup form in the above the fold part of your page, it’s probably not optimized for capturing email addresses. And all of these individual elements compete for your user’s attention, while they’re checking out your homepage. Remember the example I’ve shared above from Smart Insights? Let’s take a look at their homepage now. Example of a homepage. You see right away that there are many more elements competing for your attention. That’s because they choose to communicate other things there. Elements like the navbar, login or blog links, multiple CTA buttons, or the search bar could potentially take away the attention from a signup form – if they had one there. But they didn’t place a signup form on their homepage. On purpose. Because that’s what they use squeeze pages for. Bonus Resource: Want to build squeeze pages that convert? Then grab this free guide to learn how to avoid the most common mistakes that kill conversions. Squeeze pages are free of excessive content, links, and any other elements that could potentially distract users from the main goal – providing their email address. This is critical, especially when you’re running paid ad campaigns to drive traffic to your pages and you have to be careful about your budget. Before digging deeper into the topic of squeeze pages, I’d like to note that this distinction isn’t always as clear-cut as it may seem. Sometimes companies design their homepages so that they resemble a typical landing page. It’s usually the case when the company’s still developing its product, like in the following example from SparkToro. Homepage that acts as a squeeze page. Notice that apart from the navigational bar the rest of the page consists of only a web form with a single form field and a very descriptive call to action button. Or when their primary goal is to generate conversions and new registrations, like in this example from Spotify. Another example of a homepage that has a similar goal to a squeeze page, i.e., lead generation. And as always in the online marketing world, landing pages, homepages, and squeeze pages come in all shapes and forms. How to create a squeeze page (6 steps)Now let’s look at all the elements your page should include and best-practices to follow when creating high-converting squeeze pages. 1. Make an offer they can’t refuseThe most important element of your squeeze page is the offer. What is it that the user will get in exchange for their contact details? This is what we call a lead magnet or a signup incentive. A freebie that’s meant to convince the potential subscriber to leave their email address. A few examples you might have come across include content offers such as ebooks, spreadsheets, and email courses. Here’s one squeeze page example where the lead magnet is a report. Squeeze page using a report as a lead magnet. There are many other, however, and it’s important that you use the right lead magnet for your target audience and your campaign. To learn more about this, read our blog post on lead magnets. 2. Start with a powerful headlineHow long do you usually spend on a page before you decide to exit it or fill out the form? Not much, that’s for sure. Your headline has to seize that moment. Capture your user’s attention, spark interest, emphasize the value or pain points you’re helping with, and convince them to read more or go right to the form. Take a look at this squeeze page example that stresses the value right from the start. Headline with a clear benefit for the audience on this signup page. Bonus: Want to generate more leads with your landing pages? Join our free email course: 3. Write convincing copyWriting copy that turns landing pages into conversion machines is both an art and science. Your supporting copy has to convince users that the offer is exactly what they need and it’s in their best interest to fill out the form right away. Reassuring copy that overcomes hesitation on Netflix homepage. Other times you just need to emphasize the value and minimize the perceived-risk. That’s what Netflix does on their homepage. 4. Use social proofMarketing copy isn’t always sufficient. Sometimes users need to hear the voice of other customers or users to decide whether filling out the form is the right thing to do. That’s where social proof comes into play. Customer quotes, testimonials, and case studies can help you fulfill that need. Consider this example from Ahrefs, where they’re showing tweets about their blogging course. Example of how using social proof on your squeeze can help you increase your conversion rate. 5. Add trust and authority elementsYour offer sounds fine, the copy is convincing, and there are even some customer reviews on the page, but that’s still not enough for certain customers. They want to see what other brands, companies, or people you’ve worked with said about you. This is especially important if money is involved. Not exactly a squeeze page, but here’s how Transferwise is using FCA, Bloomberg, Financial Times, and information about the number of their customers to help them minimize customer hesitation. Here’s how Brian Dean uses authority elements to collect more email signups on his homepage, which is designed pretty much like a squeeze page. Lead capture page example featuring industry-known influencer. 6. Cut down the deadweightSince squeeze pages are meant to convert as many website visitors into email subscribers, it’s only natural that everything you place on that page should point towards the primary goal. At the same time, everything that could potentially distract your users from leaving their email address should either be removed or placed somewhere where it’s not going to collide with your primary goal. What kind of elements do I have in mind? Think of all the extra links that you have. Your resources, blog, social media, careers page, contact us page, etc. All of these are useful links, but not in that particular moment. The same goes for all the other content or products you may want to promote along with your lead magnet. If they’re not essential, keep them for later, and consider showing them on the thank you page instead. You’ll have to approach this individually. See what’s critical for your audience and make a decision yourself. As an inspiration, consider this squeeze page example from BigCommerce. Notice that they’ve skipped the navbar or any other irrelevant links here? Slightly long lead capture page using social proof and authority elements effectively. As you can see, there are a number of elements and best practices that most high-converting landing pages include. You can learn more about them in our post on the anatomy of a landing page, written by Pam Neely. As for design inspiration, here’s an awesome post from Brea Weinreb from 99designs on the landing page design trends for 2019. Squeeze page templatesNow that you know how to make squeeze pages, I’d like to provide you with some more inspiration. Below you’ll find squeeze page templates that ready to use in GetResponse. As you’ll see, they’ve been prepared to fit several different industries, but you can adjust them easily to fit any other vertical, too. Want to give it a try? Go ahead and sign up for a free trial account to access these templates right away. Fitness coachesOnline coachesReal estateNon-profit organizationProfessional servicesDo squeeze pages workIt’s time to talk a bit about numbers. In order to know whether your squeeze page is truly effective, you need to know its conversion rate. According to the data we’ve collected in our Email Marketing Benchmarks report, landing pages across all industries get an average conversion rate of 5.86%. Keep in mind that conversion rates tend to vary between industries. For example, Nonprofits saw a conversion rate of 2.17%, while Legal Services observed a conversion rate of 10.98%. You can see the full breakdown in the table below. Average landing page conversion rates across different industries. Data from the Email Marketing Benchmarks report Q1/Q2 2019. What’s also important is that many different factors can affect your squeeze page conversion rates. Things like:
To give you an idea of how significant those can be, here’s what we’ve seen in one of our recent campaigns. We’ve developed an ebook and placed it on a squeeze page that was then localized (this mostly came down to translating the page and ad copy) and promoted on several different markets. Although we used the same marketing tactics across all our marketers, the conversion rates ranged between 25.46% and 65.67%. Here’s what the page looked like for our English and Spanish-speaking audiences. Squeeze page example we’ve used for one of our campaigns. Here’s the version prepared for our English-speaking audience. The second variant of a squeeze page example we’ve used for one of our campaigns. Here’s the version prepared for our Spanish-speaking audience. List of tools that’ll help you create squeeze pagesYou’ve learned why squeeze pages are important and the best practice should follow to design them. Now it’s time to look at the how part of creating the best squeeze pages. Here are some tools that’ll help you with the process. Squeeze page builderGetResponse offers a set of solutions that’ll help you build and promote your squeeze pages with ease. Here are the main ones: Landing Page Creator is a squeeze page builder that lets you create landing pages both from scratch or using one of many mobile-responsive templates. Packed with 5,000 free Shutterstock images, intuitive drag-and-drop editor, and built-in A/B testing capabilities, it’s got pretty much everything you’ll need to design an effective opt-in page. Here’s what it looks like in action: Autofunnel lets you run your entire lead generation campaign using just a single dashboard. By combining elements like the funnel creator, Facebook and Instagram ads, autoresponder sequences, social ads creator, and more – it helps you drive traffic and build your email list fast. You can learn more about from our post on lead funnels. GetResponse squeeze page builder comes with built-in analytical reports that keep you informed about the number of people who visited your page and how many of them signed up to the list. If you’d like to gather more analytical data, you can use:
Editor’s note: Adding all these elements is super-easy if you’re using GetResponse Landing Page Creator. And thanks to the GetResponse Facebook Ads integration, Facebook pixel is automatically added to all the pages you build inside of the platform. Last but not least, you’ll also need to be able to design your lead magnets and maybe additional assets for your squeeze pages. Here are several tools that’ll help you along the way:
Ready to create your first squeeze page?Now that you know the basics, you should be fully equipped and ready to create epic squeeze pages that’ll help you generate tons of new leads. Now, keep in mind that you rarely hit the home run on your first attempt. That’s why when you’ve successfully launched your first squeeze page, make sure to check out these more advanced materials: Landing page optimization: A step-by-step process for optimizing your landing pages Printing via GetResponse Blog https://ift.tt/2Xap2TD October 27, 2020 at 10:30AM Learn Digital Marketing and Make the Most of Your Free Trial https://ift.tt/3jvpH8l Running online marketing is challenging at first. It’s about planning and running many different campaigns at the same time. Usually, your main goal is pretty clear – to drive revenue and boost sales. To do that, you need to learn how to reach out to potential customers, build relationships, and convert them into satisfied customers. Only consistent work towards multiple goals eventually translates into growth and more revenue. So, when you’re new to digital marketing, it means that you’ve got a lot to learn in a short time. If you’re looking for effective ways to gain professional marketing skills, this article is for you. It combines a small amount of online marketing theory with a clear game plan to put your ideas into practice. Not only will you learn how to run professional online marketing campaigns with a professional online marketing platform, but you’ll do it for free during the 30-day free trial. Let’s get started! Table Of Contents How do I start learning digital marketing?The best way to learn digital marketing is by doing. That’s why this article is a step-by-step guide to help you start running your online marketing with GetResponse. With the right tools you can implement your strategy and do all of your internet marketing activities swiftly from any place you find convenient. Now, you can easily learn and run professional online marketing campaigns from home and for free (GetResponse is a remote-first company and I’ve been successfully working remotely for a few months now). The idea is to show you how much you can do during the GetResponse 30-day free trial. Goal: The goal of this article is to help you use the 30 days of free trial to its full potential and help you make an informed decision to buy the right plan. Who is it for? This article is for everyone who wants to run their business online. It’s for you, if you want to:
Is digital marketing easy?Digital marketing can be easy provided that you have the right tools. GetResponse is a powerful, simplified tool to send emails, create pages, and automate your marketing. This article provides simple step-by-step instructions to learn necessary skills and implement your first digital marketing strategy. What is digital marketing and how do I get started?Digital marketing is the use of the Internet to reach out to potential customers, build relationships, and convert them into satisfied customers. Digital marketing typically requires running multiple campaigns on mobile devices, social media, search engines, and other online channels. You can start with digital marketing for free with GetResponse 30-day free trial. Take up the challenge: I recommend using each section of this article as a weekly challenge. Set up all the described action items (or the action items you find particularly relevant to your business) in 7 days and observe your KPIs (key performance indicators) in 3 stages: after 10, 20, and 30 days. Results: If you follow the suggested steps and set up the processes in the first week of your free trial, you’ll be able to observe the results at the three milestones after 10, 20, and 30 days. This way by the end of your free trial you’ll have:
The business KPIs you’ll track:
What skills do you need for digital marketing?In order to become a professional digital marketer you need to learn how to:
Action itemsFollow these steps to make the most of your free trial. I highly recommend you to take up the challenge and set up everything in 7 days. Then, you’ll be able to sit back and observe the results. Create a listYour email list is the place where your contacts are stored, and a basic “storage unit” for all content created in your account. That’s why you should build solid foundations for your online marketing success by creating your contact lists the right way. Set the (business) goal for your list, e.g. welcome new contacts, build relationships with contacts from a promo campaign, or follow up with customers. When the goals are clear, choose proper names for your lists. Technical tip: each list you create has to have a unique name. It means you can’t use the same name twice and that the name of your list can’t exist in a different GetResponse account. That’s why we suggest personalizing your email list by adding a prefix to the list name, e.g.:
If you already have a contact list, you can import it to GetResponse and move on to the next part. Pro tip: Plan your segments. A segment is a specific group of contacts found with specific search conditions, saved under a unique name. 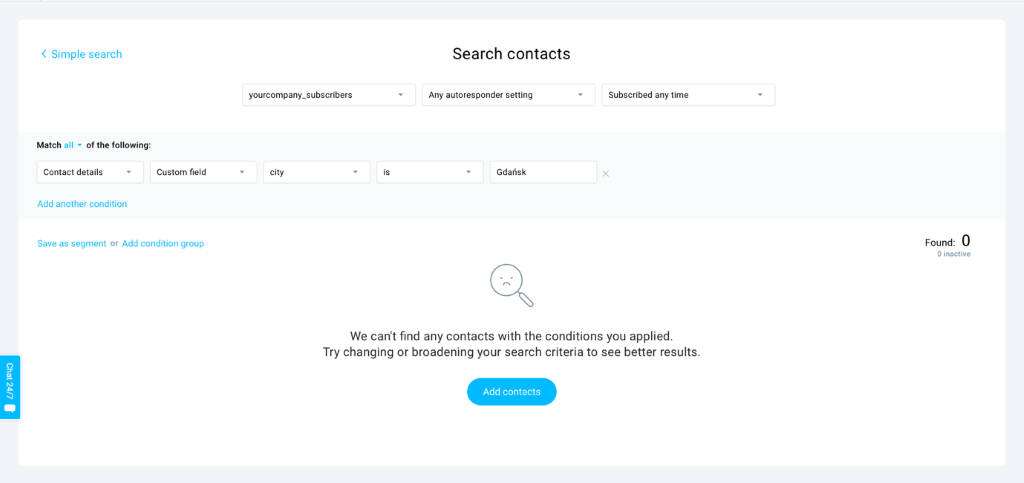
Segments allow you to set up a specific group of search conditions to define a group of contacts without keeping them in a separate list. They are dynamic — you don’t need to manually add new contacts to a segment. As soon as they meet the conditions, they’re added to the segment automatically. Start a list building processBuilding a contact list is a regular online marketing activity. The goal here is to reach your target audience. Make sure that the people on your contact list are interested in your offer and find the emails you send valuable. Focus only on the people who are likely to become your customers and don’t hesitate to remove inactive contacts from your list. Here’s what you can do to build an email list with GetResponse. Here’s what to do if you don’t have a website: Create a sign-up pageA sign-up page is a simple website with a sign-up form. You can use it to promote your newsletter, product, or use it as a stand-alone lead generation campaign, where you offer something (e.g. ebook or video) for people who join your contact list. Here’s how you do it: Go to Landing pages in the top menu and click the Create landing page button. You’ll arrive in the pre-designed template library where you can choose the Sign-up and registration category in the menu on the left. 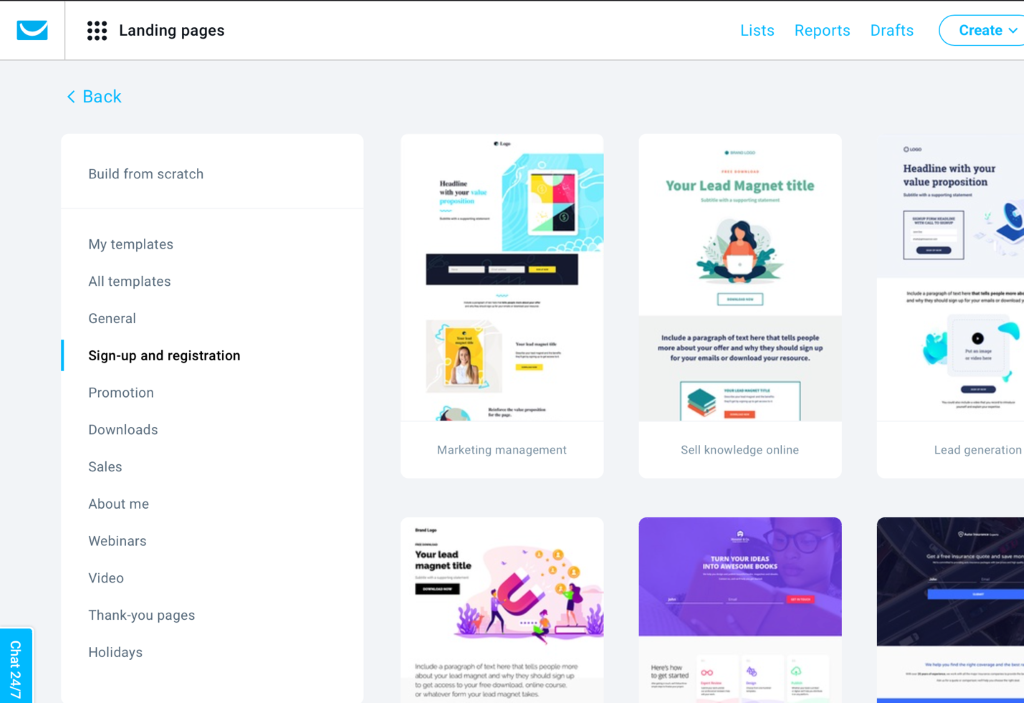
Creating a sign-up page with a pre-designed template is easy. All you need to do is customize it with your brand logo, colors, and copy. If it’s your first landing page, I suggest following the structure of the template. If you want to go pro, you can click the tab with the “+” sign in the upper left corner of the editor and create a variant for A/B tests. 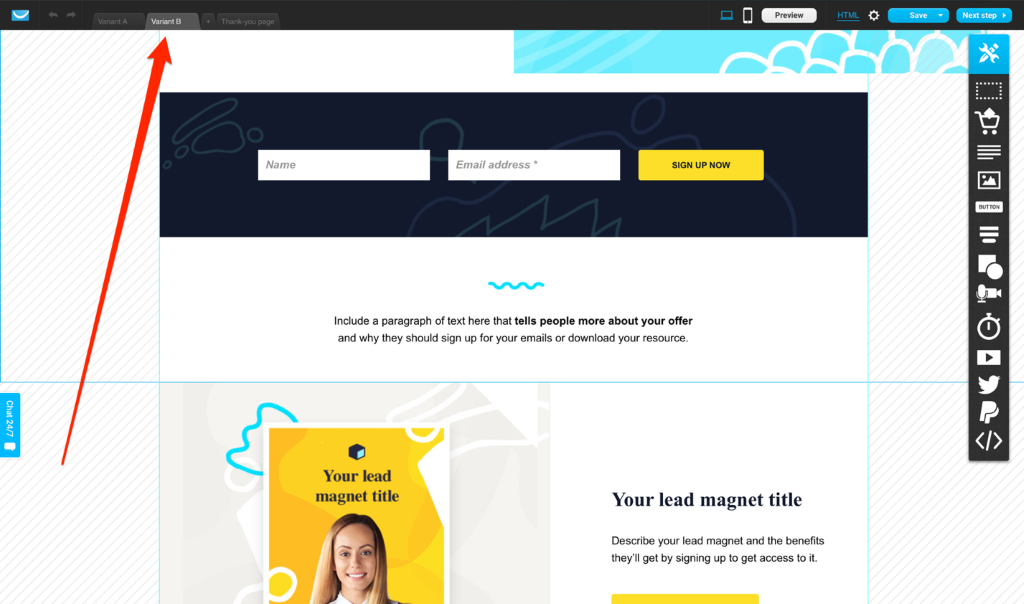
Basically, your landing page should be easy to understand for the viewers. Make sure they know what you expect them to do. Create an opt-in funnelAn opt-in funnel is an automated list building campaign based on the sales funnel model. In a conversion funnel you’ll see how many new contacts join your list in real-time. It provides clear context for the use of several GetResponse features – you can capture new leads on your landing page and nurture them with automated emails. For even better results, you can use a lead magnet in your funnel. Lead magnet is anything your target audience finds valuable. By sharing valuable content in exchange for email addresses you can get much higher conversions. 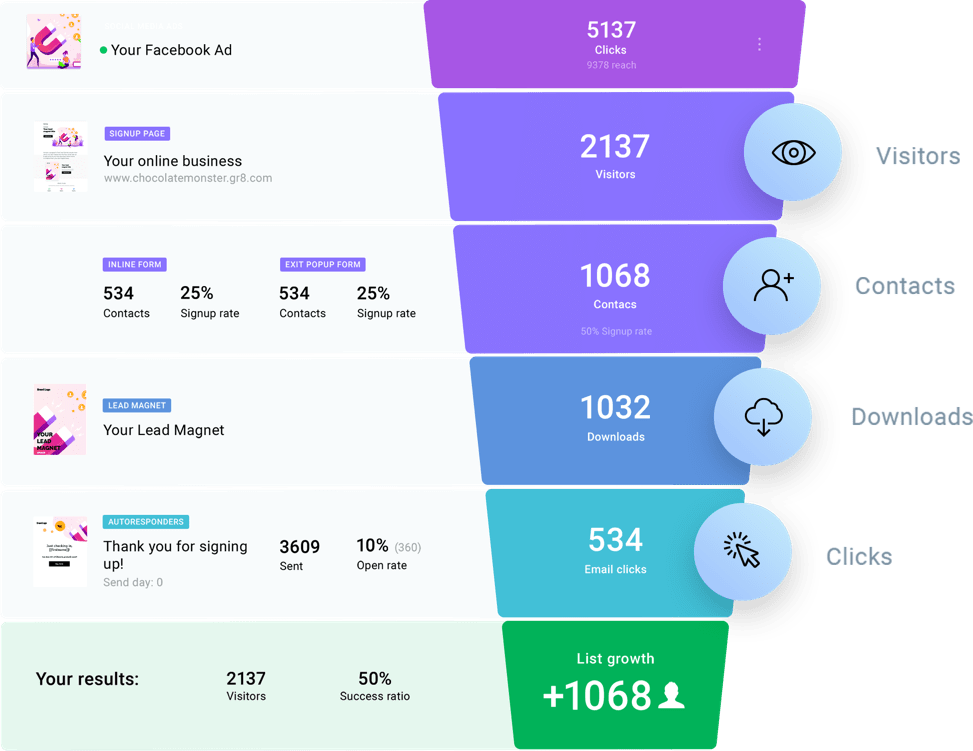
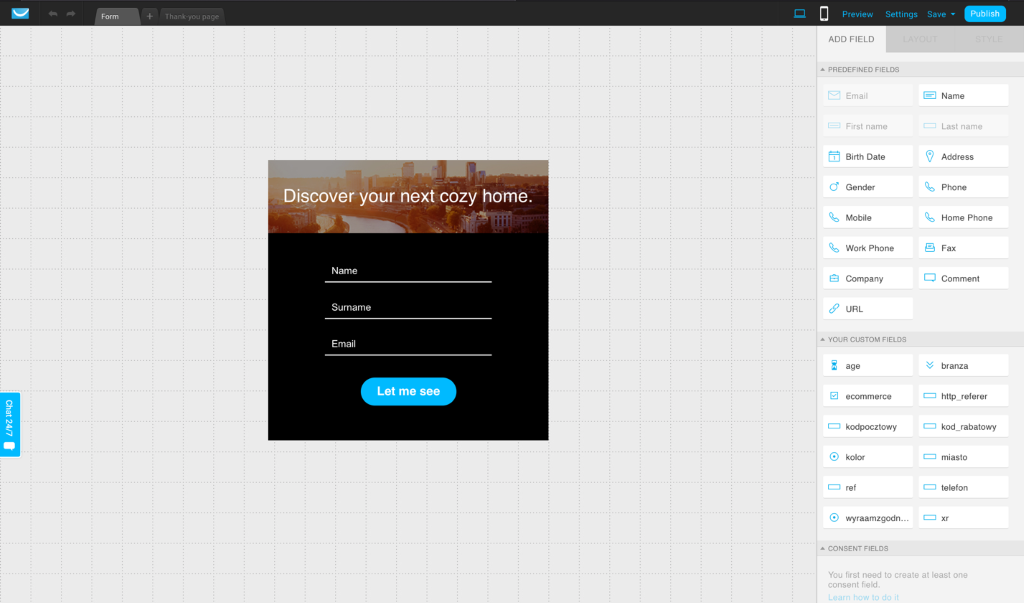
Here’s what to do if you have a website: Create a webformA webform, or email subscription from, is the place where people sign up to your contact list. The standard webform usually collects their name and email address. However, you can add more form fields and use your it to collect valuable information about your contacts that will help you send relevant communication (e.g. shopping preference, date of birth). Go to the Forms and surveys category in the menu, and click the Create form button. Here you can edit one of the pre-designed webform templates and choose a type of webform. In the menu on the right hand side you’ll see a feature called COLOR MAGIC. Use COLOR MAGIC to customize the colors of your form so that it matches your website. 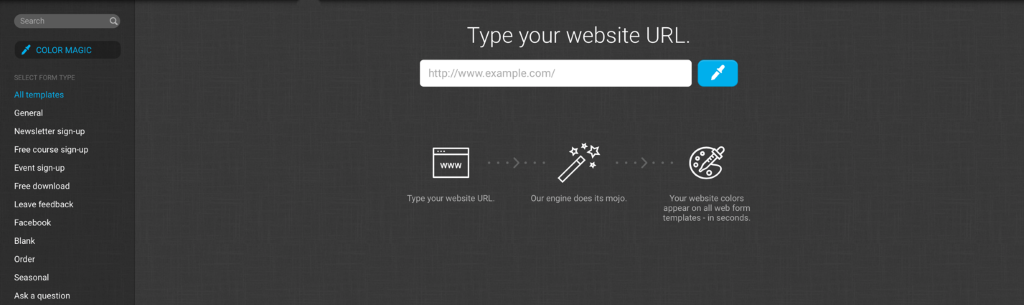
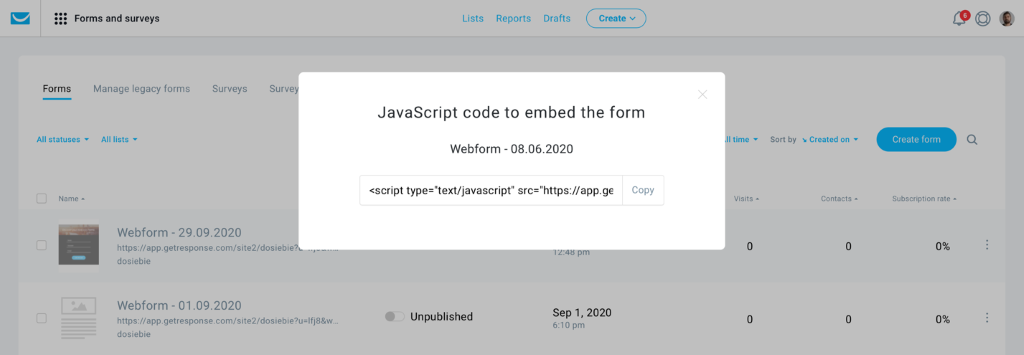
When you create your webform, all you need to do is copy the JavaScript code and embed your form on your website. Here’s what to do if you have social media profiles: Promote your sign-up pageUse social media channels to promote you sign-up page among your target audience. Here are a few things you can start with:
Now we’ve gone through solid foundations of contact list building. And hey, if you put the ideas into practice… congratulations! You have created a fully functional list building process. You can monitor the number of new contacts as your main email marketing KPI. Welcome new contacts with a welcome emailA welcome email is crucial to your email marketing communication. It sets the expectations for your email marketing. There are many reasons to send out a welcome email right after a new person subscribes. The first one is simply to show new contacts that your email marketing system works properly. Here’s a simple process we recommend you to start with: Set the goal for the welcome emailWhy do you want to send the welcome email? What’s in it for the subscriber? What do you expect new contacts to do? Here are a few examples of goals (or reasons) for a welcome email:
Choose the right call to action (CTA)CTA expresses the main goal of your message. Let’s use the goals above and create matching CTAs:
Once you’ve set the goal and came up with a proper CTA, it will be much easier to choose the right template and customize it with copy and graphics that reflect your brand identity. 
Create a newsletterWhile creating a newsletter, you can save time by choosing one of the pre-designed templates in the Welcome category. 
Choose the one with a structure that best fits your content idea. You can customize every template by changing any elements, copy, and pictures. Create your newsletter templateA newsletter can be a great sales tool, provided that you build your contact list with people who are interested in your product or service. One of our customers, TechSoup Polska, observed a 12 times increase in revenue (yes – 1200%) year on year in March and April 2020. Here are a few tips form Liza, Project Coordinator at TechSoup Polska, on how to prepare a professional newsletter template:
Once you create your newsletter template, save it as such before you exit the editor. This way, you’ll be able to use it next time. 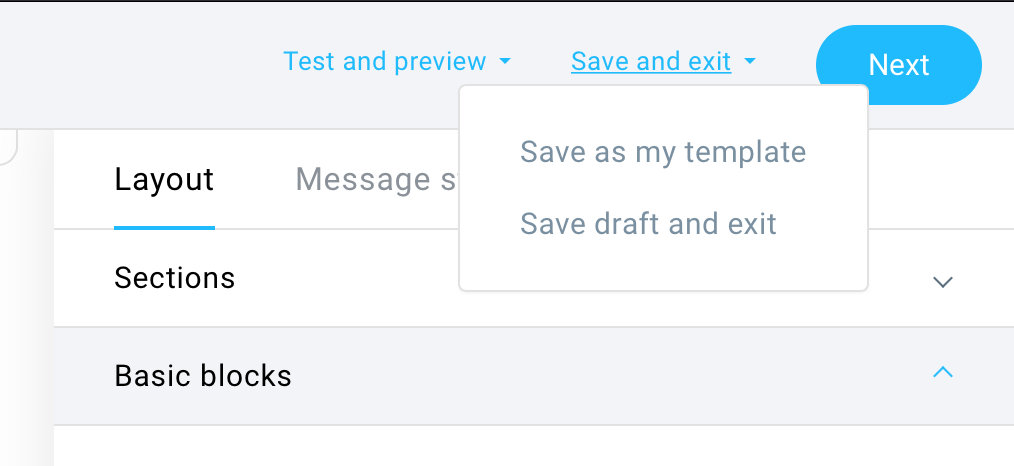
Automate the processSending a welcome email is extremely important. Once you have your email ready, you can create an automation workflow for your new contacts. Choose Automation in the main menu and click the Create Workflow button. This will take you to the template library where you can choose one of the pre-designed workflows in the Welcome category. I recommend using one of the following two workflows:
Pro tip: In order to create a super simple welcome workflow, you can use the Welcome new contacts one and remove the last 3 elements. This way you end with a workflow that automatically sends a welcome email whenever somebody subscribers. 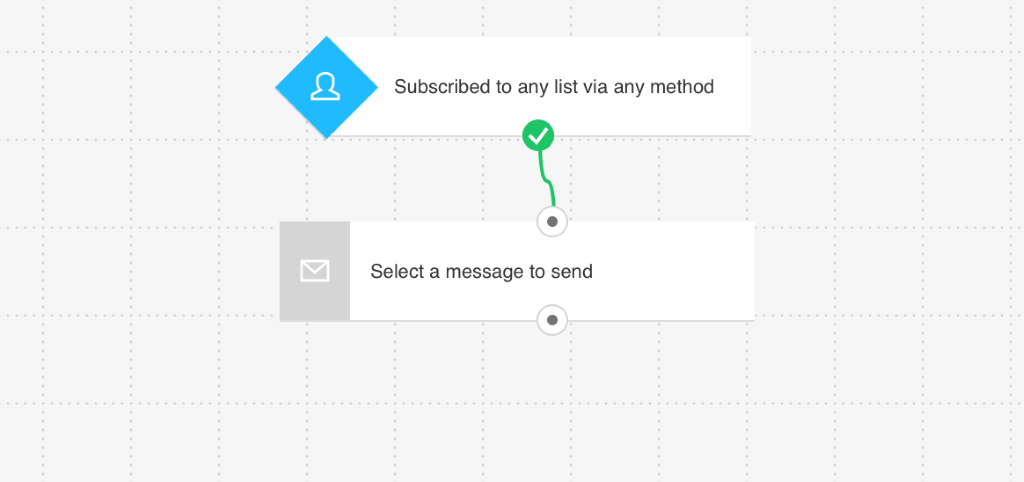
Run a webinarNow you have:
At this point you have your basic tools in place, congratulations! It’s time to run a webinar. If you don’t know what a webinar is, here’s a fragment of Ada’s guide to webinar marketing:
Find everything you need to know about webinars here: How Do Webinars Work? A Beginner’s Guide to Webinar Marketing Webinars are among the most effective lead-gen campaigns (lead generation – attracting potential customers), and here’s how you can run one: Choose Webinars in the top menu. Click the Create webinar button and you’ll see the settings. 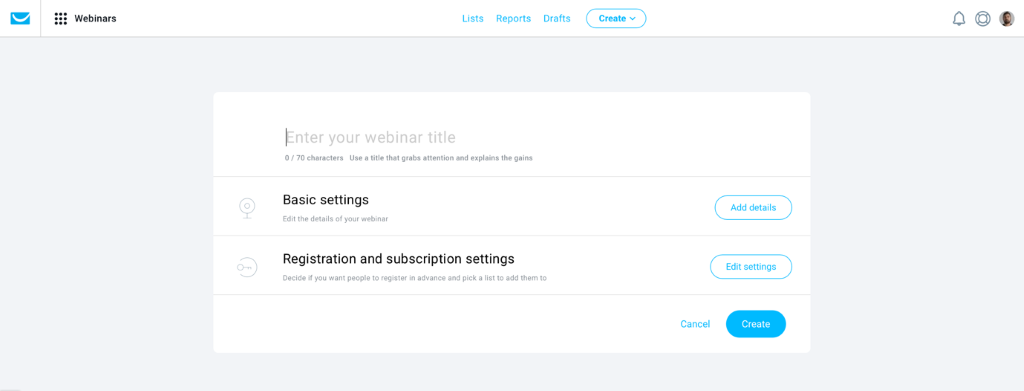
The basic settings for a webinar are:
Hot tip: Use the thank you page after the webinar to promote your main offer. It’s a very important touchpoint with the webinar attendees, yet most people use default thank you pages without customizing it to the overall webinar experience. Once your webinar is created you can create an invite and send a promo email to your existing contacts. Facebook PixelOnce you connect your accounts, this integration automatically generates and places a Facebook pixel on all of your GetResponse landing pages. The pixel tracks visitors entering your site through a Facebook ad so you can target them based on their actions. Only you have access to this information in your account. We won’t be able to view, use, or share it with anyone. The integration allows you to:
Google AnalyticsOur integration with Google Analytics helps you track newsletters in your Google Analytics account. It modifies the links in your newsletter by adding UTM parameters needed for in-depth tracking:
Use presets or enter your values By default, this integration adds the preset UTM values for the source, medium, content, and campaign to the URLs in your email:
ZapierZapier allows you to integrate different applications to allow them to communicate with each other without the use of any code. Zapier is integrated into GetResponse, allowing you to create and manage the Zaps in your Zapier account in your GetResponse dashboard. Make the most of your free trialThis article is an overview of what’s possible during the 30 days of a free trial. The steps I recommend taking are based on my own experience and various interactions with GetResponse customers. However, bear in mind that it is all about YOU and the specific needs of your business. Set the business goals and make the most of your free trial to achieve them in 30 days. So, are you ready to start the challenge? Printing via GetResponse Blog https://ift.tt/2Xap2TD October 27, 2020 at 10:23AM USPS marks Red Ribbon Week with Drug Free USA stamp https://ift.tt/3dZ3gr9 Oct. 27, 2020 U.S. Postal Service Marks Red Ribbon Week With Drug Free USA StampForever Stamp on Sale Today 
WASHINGTON, DC — The U.S. Postal Service today issued the Drug Free USA stamp during Red Ribbon Week, the nation’s oldest and largest drug abuse prevention awareness program, during a stamp dedication ceremony held at Drug Enforcement Administration (DEA) headquarters in Arlington, VA. This Forever stamp is being sold at Post Office locations nationwide and online at usps.com/drugfreestamp. News of the stamp is being shared on social media using the hashtag #DrugFreeStamp. “It’s our hope that the Drug Free USA stamp will help publicize the dangers of illicit drug use and to promote drug abuse prevention,” said Postmaster General Louis DeJoy. “Millions of Americans have had their lives hijacked by the impact of addiction. Families are destroyed, and communities are disrupted. We can measure the cost to society in the billions, but we cannot measure the grief and the despair. To fully address this problem requires a unified effort at every level of the community, and with this stamp, the Postal Service is proud to join the Drug Enforcement Administration and many other federal, state and local partners’ commitment to a Drug Free USA.” DeJoy was joined for the ceremony by Timothy Shea, Drug Enforcement Administration acting administrator; Gary Barksdale, U.S. Postal Service chief postal inspector; Peggy Sapp, National Family Partnership president; and Camille Schrier, Miss America 2020. The stamp event can be viewed on the Postal Service’s Facebook and Twitter pages. “With this powerful image and message, the U.S. Postal Service has given us another means to promote the battle against drug abuse,” said Acting Administrator Timothy J. Shea. “In America alone, 70,000 lives are lost to drug overdoses every year, with countless others impacted by the actions of violent drug traffickers and the scourge of illegal drug use. We urge the public to engage in this fight against illegal drug use and to use the Drug Free USA stamp to signify their support for safer, drug-free communities.” Background In 1988, the National Family Partnership coordinated the first Red Ribbon Week, with President Ronald Reagan and first lady Nancy Reagan serving as honorary chairpersons. The week runs Oct. 23-31 and coincides with National Substance Abuse Prevention Month every October. Red Ribbon Week was started after the death of Drug Enforcement Administration special agent Enrique “Kiki” Camarena, who was tortured and murdered in 1985 by drug traffickers he was investigating in Mexico. After Camarena’s death, many people started wearing red ribbons to honor his sacrifice. The Drug Free USA stamp art features a white star with lines of red, light blue and blue radiating from one side of each of the star’s five points, suggesting the unity necessary at all levels to effectively address drug abuse. Charlottesville, VA, designer Greg Breeding designed the stamp with original artwork by Portland, OR, graphic designer Aaron Draplin. USPS Stamp Services Director William Gicker was the art director. The stamps are being issued as Forever stamps, which will always be equal in value to the current First-Class Mail 1-ounce price. Postal Products Customers may purchase stamps and other philatelic products through the Postal Store at usps.com/shop, by calling 800-STAMP24 (800-782-6724), by mail through USA Philatelic, or at Post Office locations nationwide. A pictorial postmark of the first-day-of-issue location, Arlington, VA, is available at usps.com/shopstamps. The Postal Service receives no tax dollars for operating expenses and relies on the sale of postage, products and services to fund its operations. ### Printing via USPS News https://ift.tt/2hH9aDC October 27, 2020 at 09:03AM
http://img.youtube.com/vi/oatw8q2qzz8/0.jpg
3D Printing for Preppers: Copper 3D Printing Filament https://ift.tt/2G8XbMk While disaster has not yet befallen my humble family, there is no shortage of emergencies globally and the COVID-19 pandemic has demonstrated just how useful even desktop 3D printing can be during disaster situations. Provided with the opportunity to review an Ultimaker S3 3D printer and several unique filaments, I thought I’d explore the 3D printing of simple goods that might be useful during emergency situations to get an idea for just how useful a desktop 3D printer might be. In addition to providing an overview of the subject, I’ve reviewed the Ultimaker S3 and spoken to Ultimaker about the use of desktop 3D printers in emergency and disaster scenarios. Perhaps the most exciting prospect for me when beginning this series was the creation of metal objects with a desktop system. To explore the possibilities of making metal with a desktop 3D printer designed for plastic filaments, I reached out to the Virtual Foundry, which manufactures filament and pellets composed of metal particles within a thermoplastic binder. Once printed, the part can be sintered in a furnace, resulting in a dense metal part. In a subsequent article, we’ll get into more detail about the Virtual Foundry and what they do. 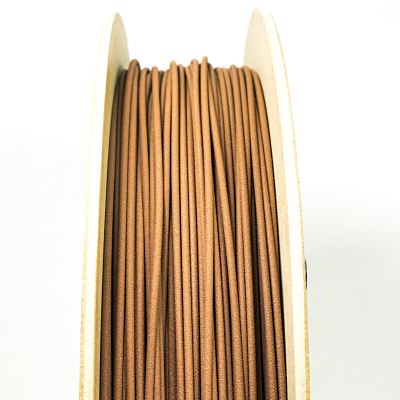
Copper Filamet can be purchased from the Virtual Foundry for around $66. It contains 89% – 90% metal, with a density of 4.5g/cc – 4.7g/cc. Image courtesy of the Virtual Foundry. I printed the Virtual Foundry’s Copper Filamet on the Ultimaker S3 to determine how easily a novice user could produce metal parts using a desktop machine in a disaster or emergency scenario. As someone with no 3D modeling skills, my first step was to find a part that would be a suitable demonstrator for the concept, representing the primary obstacle to using a 3D printer in an emergency. Without the proper abilities, my selection for suitable models was significantly limited. Because metal AM is primarily reserved for high-end production firms, there are almost no models specifically designed for metal 3D printing publicly available. Instead, public repositories, such as Thingiverse, are dedicated to plastic parts. I, therefore, had a couple of options: pick a model designed for plastic 3D printing and produce it with the Copper Filamet or design something myself with user-friendly software. I did attempt to create something with TinkerCAD, one of the easiest-to-use online modeling programs, but ultimately decided to opt for existing models. With the Filamet, I printed something I discovered at the peak of the COVID-19 3D printing hype: a multi-tool hands-free door opener. Developed by U.K. startup Fractory, the SafeKey can not only be used to operate doors, cabinets, cash machines and other items shared with the potentially contagious public without the use of one’s hands. At the same time, it acts as a bottle opener and wrench. Fractory manufactured the tool from CZ108, antimicrobial grade brass with 64 percent copper content, thus limiting the possibilities of disease transmission. 
Unfortunately, there are no photos of the pre-sintering version of my SafeKey, but it printed just as smoothly as this copper gear the Virtual Foundry hosts on its website. Image courtesy of the Virtual Foundry. So, I reached out to Fractory and received a STEP file of the SafeKey and converted it to STL using an online tool. Because copper has inherent antimicrobial properties, just like CZ108, I 3D printed the SafeKey from Copper Filamet on the Ultimaker. To print with the filament, I selected the material profile from the Ultimaker Marketplace. Though Cura recognized the Copper Filamet, I had trouble getting the Ultimaker itself to boot up the profile when I wanted to load the filament. What this means is that, the 3D model of the SafeKey was sliced according to the right settings for the Copper Filamet, but that the Ultimaker wasn’t optimized for loading the material into the print head. What I had to do was select a material with settings that most closely matched the Filamet and load it that way. Before printing, I ensured that the bed was completely clean of previous plastic prints and cleaned out the extruders using the Tough PLA provided by Ultimaker and following the instructions on the LCD screen. This included hot and cold plastic pulls until the material coming out of the hot ends was smooth and cylindrical. Once it was loaded, printing was extremely easy. The filament adhered to the bed perfectly. As explained in my previous post, the second extruder for supports was giving me some problems because I had clogged it with polyvinyl alcohol filament. This meant that I was limited to less complex structures, which was no problem with the SafeKey, as it was already designed for CNC machining. 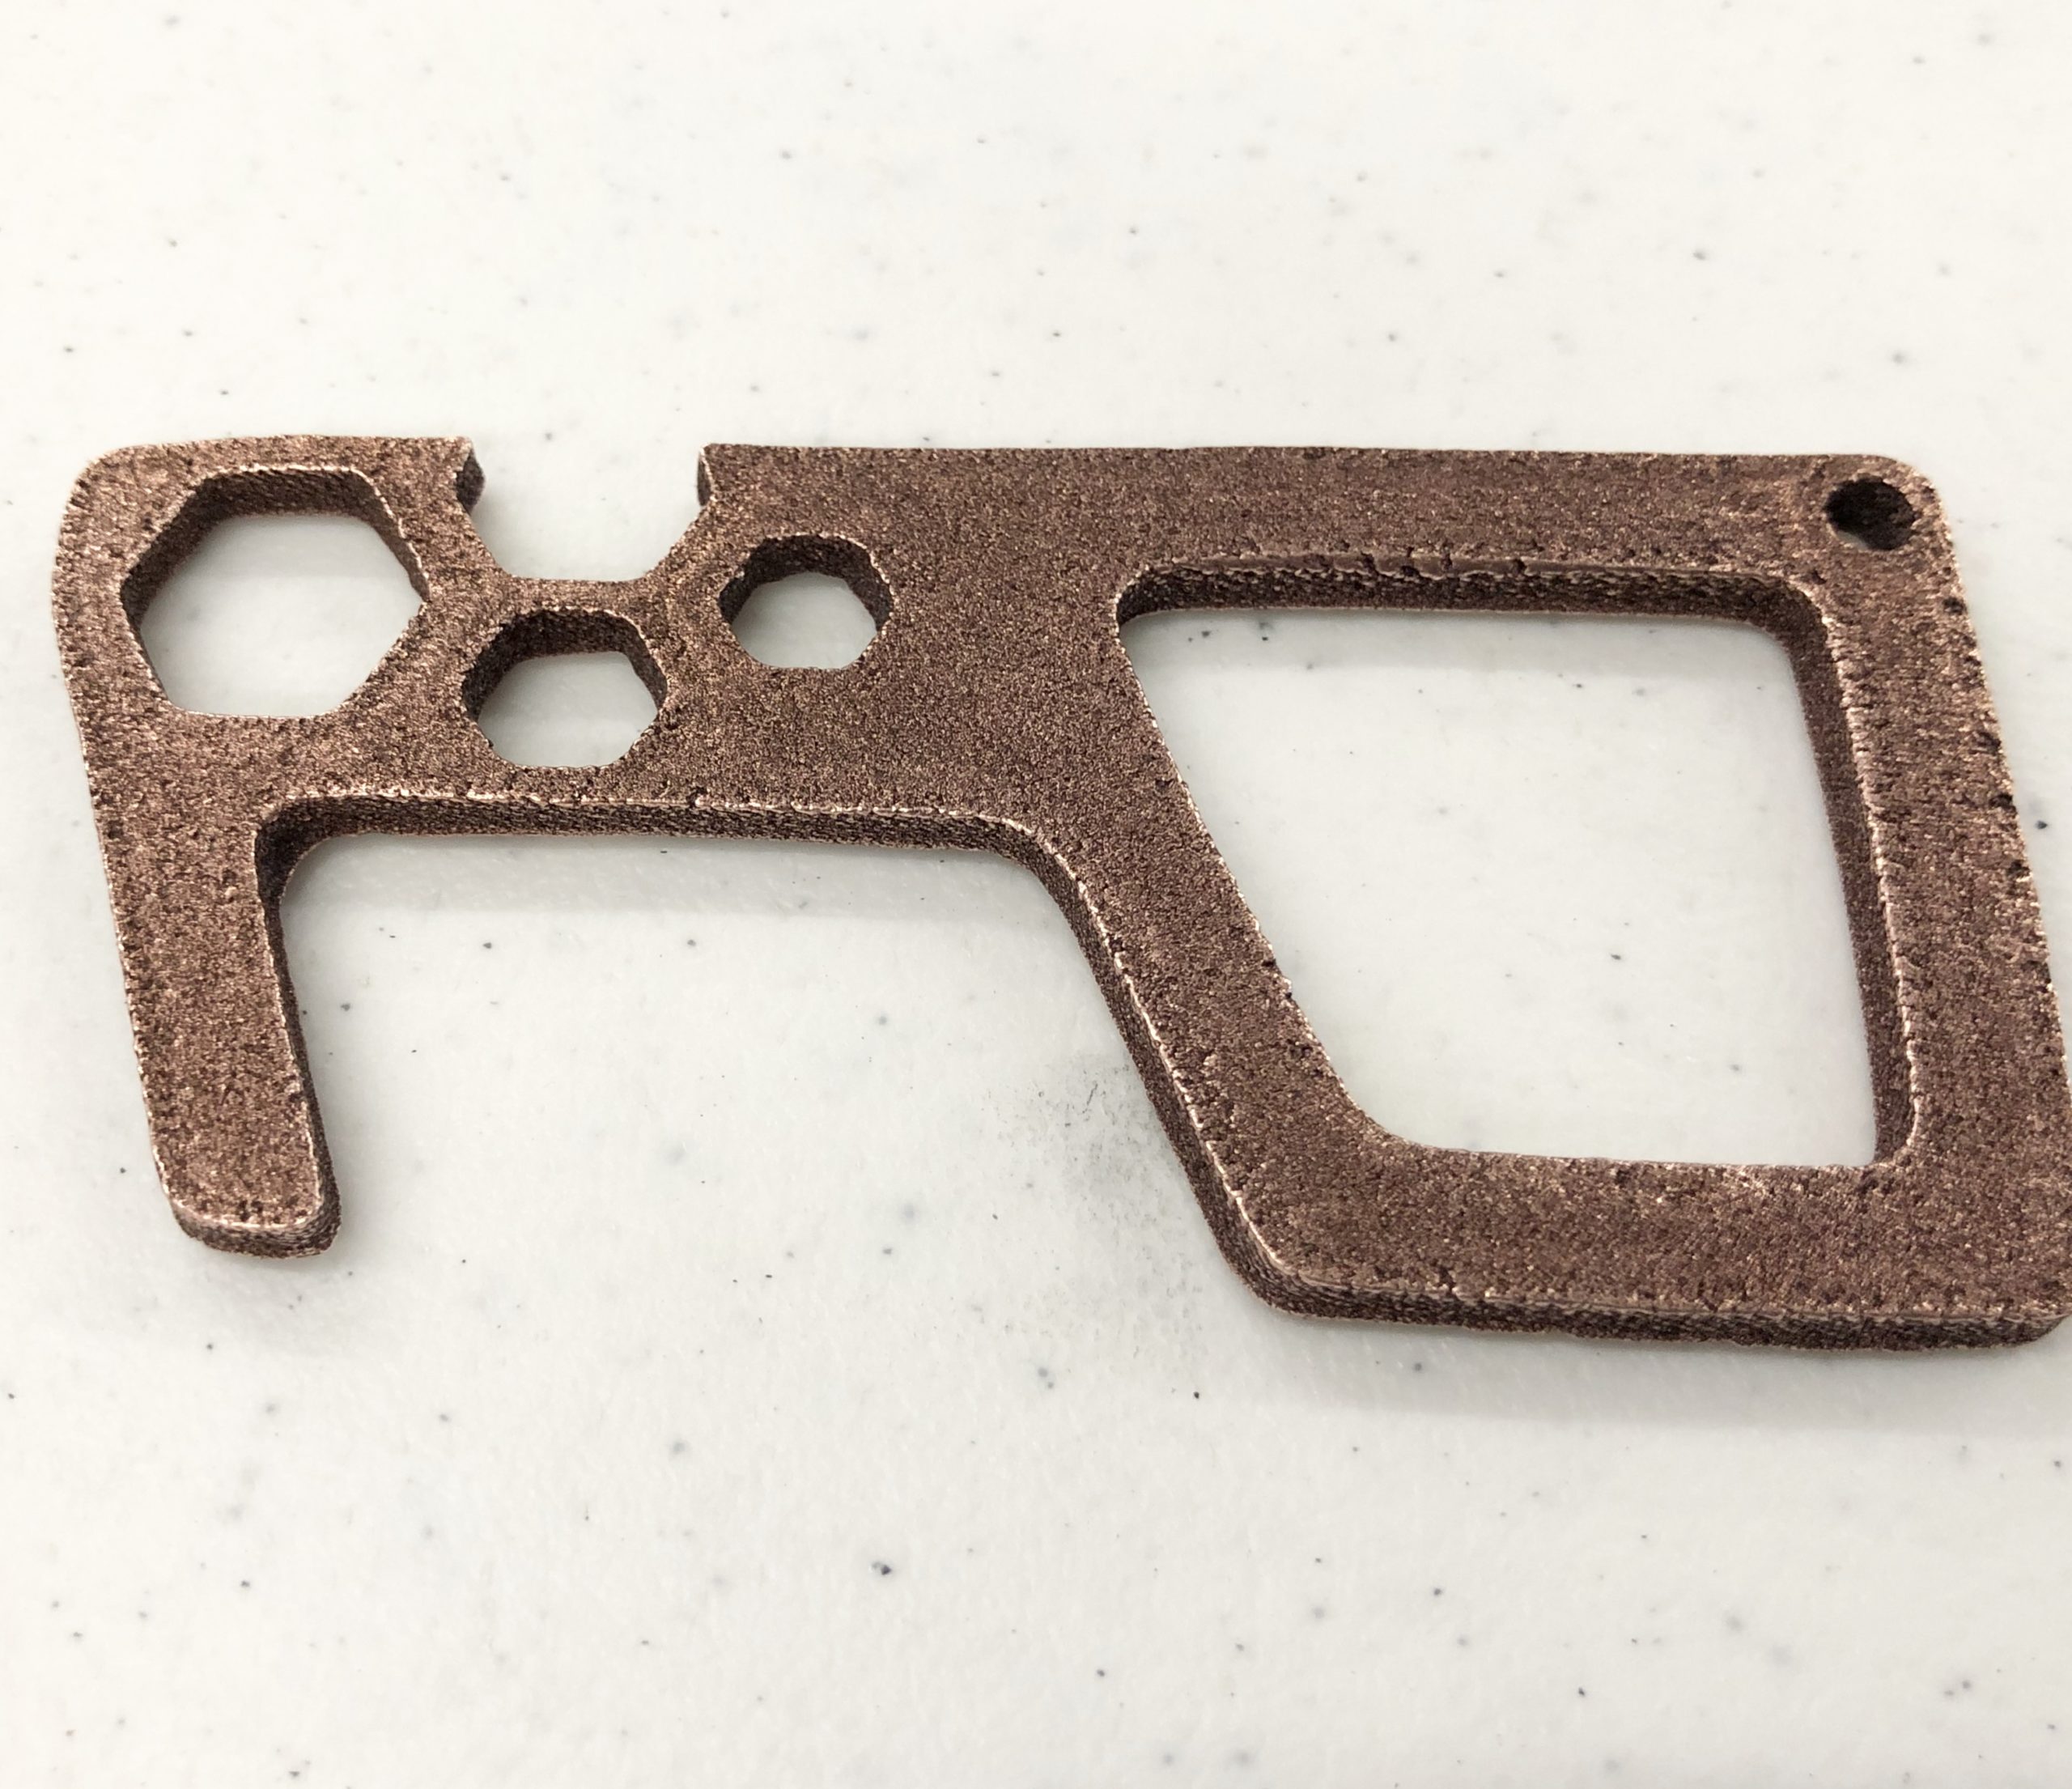
My 3D-printed SafeKey, post-sintering. Made from Copper Filamet. The part printed on the first try. Unfortunately, it was extremely delicate, and I snapped it in half while getting it off the bed. I printed once more and, again, had no problems. However, I was now left with the task of sintering it into an entirely metal part. Initially, I reached out to a local art studio that offered kiln use for firing clay pottery, but, due to the pandemic, the instructor had closed down her business. In turn, I contacted a nearby makerspace that she had donated the furnaces to, but they too busy to take on the project. Another option I had was to purchase kiln. The Virtual Foundry, for instance, sells devices that start at a little over $3,000. Naturally, because this was a one-time project, I couldn’t justify the investment, but, luckily, the Virtual Foundry is partnered with a sintering service provider, Sapphire3D. The company agreed to sinter my part for free because I was reviewing their material and they had produced items similar to the SafeKey already. Had they not provided complimentary services, sintering with Sapphire3D ranges from $50 for a 2” x 2” x 2” (50 mm x 50 mm x 50 mm) copper part to $190 for a 4” x 4” x 4” (100 mm x 100 mm x 100 mm) 17-4 stainless steel part. I mailed the printed part to Sapphire3D, who sintered it and sent it back with about a ten-day turnaround. I was extremely excited to receive the final component and was thrilled to hold in my hand a metal SafeKey that I had printed just days earlier. To test its durability, I gave the tool a bend only to find it split in half, feeling my joy turn to devastation just as quickly. I reached out to the Sapphire3D team to learn what went wrong. 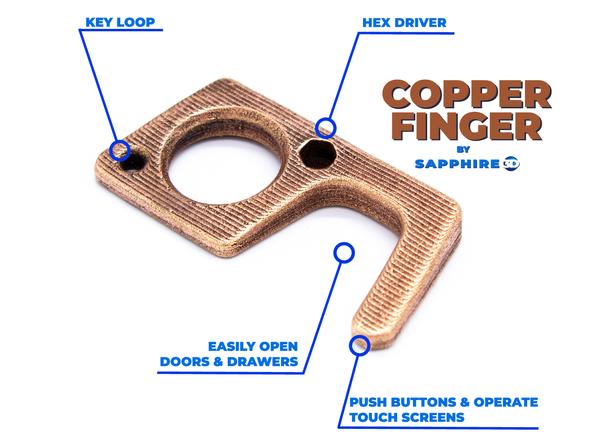
While my SafeKey snapped, the 3D printed copper finger Sapphire3D sent me is quite dense and sturdy. I tried snapping it several times and it didn’t even bend. Image courtesy of Sapphire3D. Though there were recommended printing parameters for the Copper Filamet online, the very first mistake I made was not doubling the thickness of the tool, initially designed for CNC’d solid metal. David Lawson at Sapphire3D also recommended a slight rounding of the edges of the device for added strength. Lawson summed up his recommendations for me as follows:
While I was disappointed at the failure of my first Copper Filamet part, I was somewhat comforted by a free hands-free door opener that Lawson included when sending back my part. What the entire experience demonstrated was that, even as close as desktop metal 3D printing may be for even novice users, push-button metal part production is still just out of reach. As with desktop plastics, there is a learning curve. In this case, I was confronted by a lack of design skills, lack of furnace, and lack of experience with both the materials and the sintering process. Had I had my own kiln I could have learned some of these tricks. It’s likely that even smaller businesses could do so with relative ease. In a follow-up post, I will be speaking to the Virtual Foundry team to learn more about their range of materials and how those with the proper skills could lend a hand during emergencies and disaster scenarios. The interview helps us establish just what types of parts their materials are suitable for. After that, I will be discussing my experiences with an investment casting material for 3D printing and the resulting metal parts. Printing via 3DPrint.com | The Voice of 3D Printing / Additive Manufacturing https://3dprint.com October 27, 2020 at 09:01AM Agorize Challenge: Design Affordable 3D Printed Houses in Canada https://ift.tt/3jyhgJx Open innovation platform firm Agorize and Canadian construction company Horizon Legacy have launched a new online challenge for individuals and startups worldwide to submit disruptive solutions in the field of construction. The goal of the Marco Polo 100 Digital Build Challenge is to create sustainable and affordable housing in Canada using new construction technologies and processes, particularly 3D printing. Participating teams will gain expert mentorship, access tools to create a prototype, and win the chance to see their building come to life. The challenge is completely free, open to teams of one to 10 individuals, and will run from January 2021 through August 2022. It is designed to solve the affordable housing crisis by developing a livable multi-residential building in Southern Ontario, Canada, for CA$100 per square feet using new technologies. For a young family, this means CA$100,000 to construct a 1000 square feet two-bedroom apartment. With cash prizes ranging from CA$15,000 to CA$200,000, ongoing royalties, and the ultimate prize of CA$10M investment to construct a building, the participating teams will attempt to reduce construction costs and timelines by utilizing cutting edge new technologies and processes while making a building that appeals to local audiences. Up until now, 10 teams have registered but applications are open until January 12, 2021, when 20 successful applicant teams will be chosen to start working with Horizon Legacy in Canada. They will develop and evaluate their plans to construct a futuristic building. The teams are expected to build a design to 30% completion, provide costs, schedules, construction work plans, and technology or process innovation for the building. Then judges will select the 10 best submissions to move to the following stage of the challenge. Next, the best teams will have the opportunity to present their plans and only five teams will be awarded the chance to build a “Small Building” intended to showcase the innovative technology process and scalability. During this stage, the finalists will have an entire year to work with the sponsor firm and a local architect and engineer to complete their designs, engineering and submit a building permit application. Finally, in August 2022, one team will be selected to partner with Horizon to construct a livable “Big Building.” Teams will compete in several tracks, including costs, originality, constructability, time, and teamwork. During the annual competition, the teams will receive mentorship and training. Individuals participating will learn about specifications, submissions, building permits, and other applicable requirements and regulations. The winning team will receive several prizes, including up to CA$10 million investment and CA$200,000 cash prize; royalties of CA$1.86 per square feet, and an intellectual property maintenance fee of $250,000. The five teams selected during the third stage of the competition will also receive prices, including a stipend for travel to Toronto, Canada; up to CA$140,000 in investment and CA$15,000 in cash; royalties of CA$1.39 per square feet, and an intellectual property maintenance fee of CA$65,000.
Most of today’s successful cities have a housing shortage. For example, a recent study by FreddieMac disclosed that in the United States, at least 2.5 million additional housing units will be needed to make up for the housing shortage. Hosting a similar crisis, the European Union claimed in 2020 that although there are more than 220 million households, an alarming number of 82 million Europeans are overburdened by housing costs, many even at the risk of eviction. Canada is no exception, while the crisis of affordable housing in Vancouver and Toronto has been widely publicized, other Canadian cities like Montreal are facing similar pressures. In 2015, the Canadian Mortgage and Housing Corporation even reported that growth in demand for housing was outpacing construction of new housing units.  3D Printed Accessory Dwelling Unit (ADU). Image Courtesy of Mighty Buildings 3D Printed Accessory Dwelling Unit (ADU). Image Courtesy of Mighty Buildings
According to Horizon Legacy, the building and construction industry faces several key challenges resulting in a shortage of affordable housing for the modern family. Yet they hope that relying on technology, automation, and innovation in construction processes will lead to reduced costs and timelines for construction; improve efficiency and productivity, and attract younger people to the field of construction and create new types of jobs. In the past, companies leveraging 3D printing technology have proven able to construct sustainable and affordable buildings. As shown by businesses like Mighty Buildings capable of constructing an entire house, or dozens of projects in Dubai planning to 3D print buildings, including entire skyscrapers. There have even been several proposals to construct sustainable space exploration habitats using additive manufacturing. The technology has the right potential to reduce costs, delays, and risks, that tend to make housing so expensive.
For more information on the challenge, including judging criteria and submission deadlines, visit the Marco Polo 100 Digital Build Challenge. Printing via 3DPrint.com | The Voice of 3D Printing / Additive Manufacturing https://3dprint.com October 27, 2020 at 08:31AM Formlabs Launches New 3D Printing Resins for Dental Engineering and Manufacturing Applications10/27/2020 Formlabs Launches New 3D Printing Resins for Dental, Engineering, and Manufacturing Applications https://ift.tt/31J7aiH Less than a year after acquiring its main material supplier, professional 3D printer and materials developer Formlabs continues to introduce new materials to its vast portfolio in order to help clients bring their products to life. The company has an expert team of more than 30 material scientists working every day to develop new innovative, high-performance materials so that customers have easy access to what they need to create optimal 3D printed products and grow their design capabilities. At its annual Global User Summit today (register for free here), the 3D printing unicorn announced the launch of two new versatile, proprietary materials for engineering and manufacturing applications: a reformulation of its existing Draft Resin, for quick design iterations and prototypes as well as dental products, and Rigid 10K Resin, which provides high resistance and stiffness for engineering and manufacturing purposes.
 Draft Resin Draft Resin
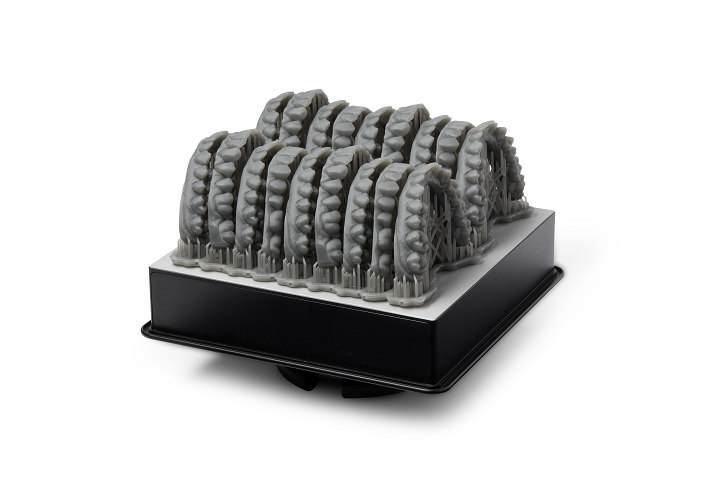
According to Formlabs, these two new resins “complement the natural progression of product development,” meaning they can be used to help print parts ranging from just the initial design phase all the way to the final, high-performance end product. The company states that the new formulation of its Draft Resin, which comes in a new grey color, makes it possible to print parts up to four times faster than other available resins, all while improving part quality and without losing accuracy. When compared to the standard Formlabs Grey Resin, which is able to 3D print eight models in just under ten hours, Draft Resin can do the same in just an hour and a half. This new Draft Resin reportedly features a better surface finish, in addition to improved post-processing requirements, such as nominal support removal and wash and cure times. It’s good for fast design iterations, initial prototyping, high throughput jobs, and live 3D printing demos, and while it’s a great choice for product design, manufacturing, and engineering, this reformulated Draft Resin can also be used for dental and orthodontic applications. With the higher speed this material is said to offer to achieve, orthodontic practices can print aligner and retainer models, on site, in less than 20 minutes, which would be ideal for chairside printing or same-day delivery, and Formlabs also says it can be used to print over 95 dental models a day on the large-format Form 3BL printer.
The stiffest material in the Formlabs range, the new Rigid 10K Resin can simulate glass or fiber-filled thermoplastics, and features a smooth matte surface finish. The company says that its high strength and resistance to chemicals, heat, and high pressure make it a good option for precise industrial parts that need to stand up under significant loads without bending or breaking, as well as fluid-exposed components, jigs, and fixtures, and molds.  Rigid 10K Resin Rigid 10K Resin
This strong, stiff material is said to be perfect for aerodynamic test models and short run injection mold masters and inserts, and Formlabs customer Novus Applications, an engineering and consulting company that works in the consumer packaging industry, is happy to vouch for it.
Novus Applications is using Rigid 10K Resin to make the injection molding workflow more efficient by 3D printing short-run injection molds, cores, and inserts, as the material is able to withstand high pressure and temperatures. By using this new Formlabs material, the company was also able to save on manufacturing time and money.
Tune into the free Formlabs Global User Summit today and tomorrow for more information on the new Draft Resin and Rigid 10K Resin. (Source/Images: Formlabs) Printing via 3DPrint.com | The Voice of 3D Printing / Additive Manufacturing https://3dprint.com October 27, 2020 at 08:01AM |
Categories
All
Archives
April 2023
|


 In the summer of 2019, with her family, she relocated to Edinburgh, Scotland. With no job to go to, DeAnne saw this as a fresh start, and a chance to realise her dream of making a living by being creative. She took a leap of faith and became a full time printmaker. Today, DeAnne is now a member of Edinburgh Printmakers and prints most days either in the studio or at home. “I feel like I am starting to create my own style and I am enjoying exploring that” explains the printmaker.
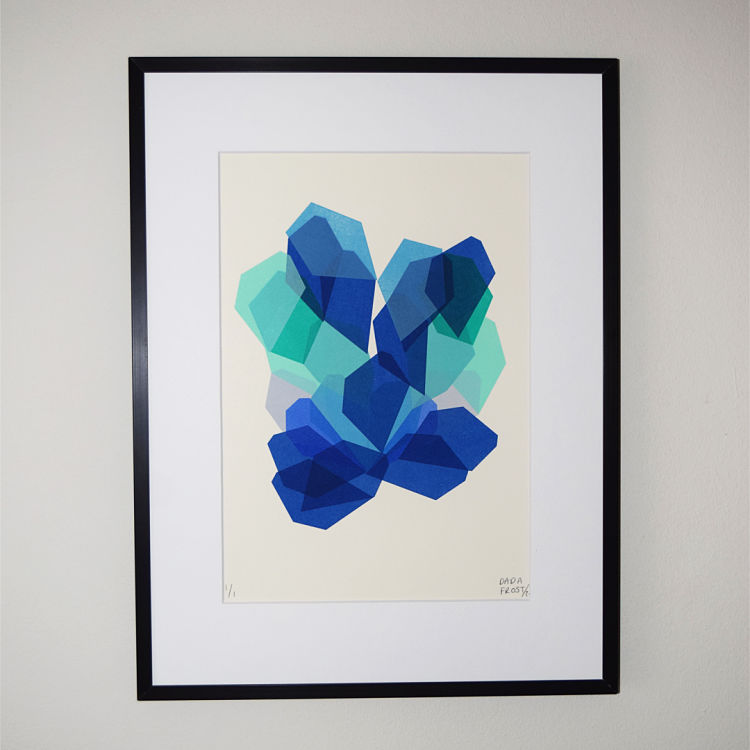 “The way I work is that I will have a general concept, but I won’t really know what the end product will look like, even when I draft something on my computer. Until I start physically printing, it is always open to change which allows me the freedom to make spontaneous decisions, using my instinct to form the final composition. This method results in small editions or unique one-off prints.”
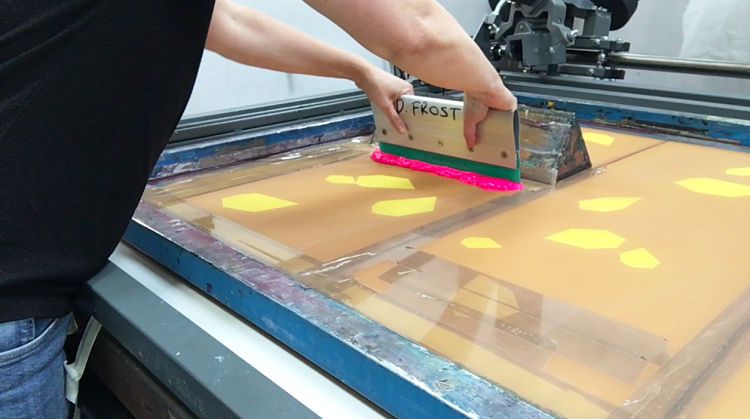
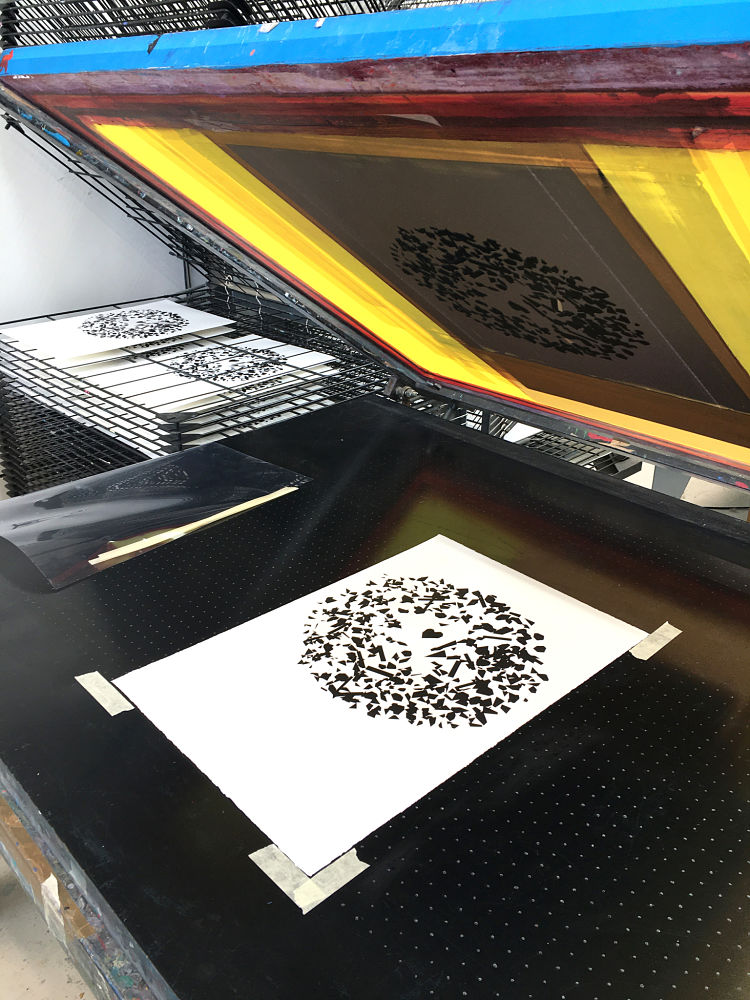 Her work is defined by her use of geometric shapes, resulting in abstract and striking pieces. DeAnne’s artworks play with layering; she joins edges together and turns the paper around multiple times until she is happy with the results. “Printing like this allows me lots of options to experiment without having to re-expose screens, which I need the studio for. Each shape you see in my prints is one layer, one flood of the screen” states DeAnne.
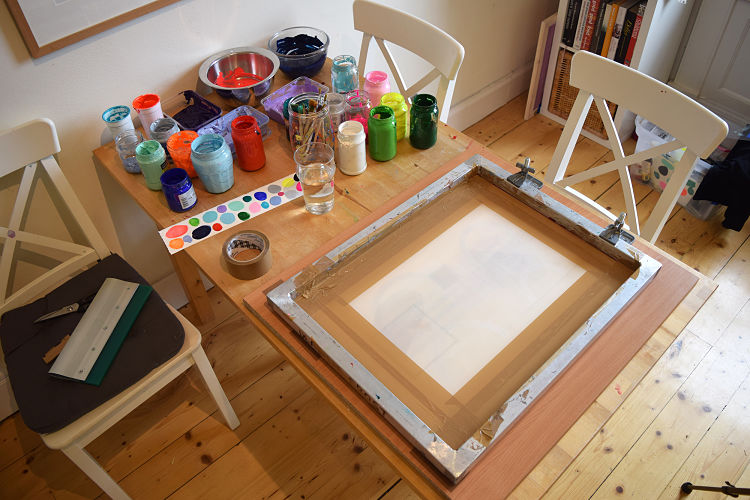
 DeAnne’s daughters are a big influence on her work; “I love watching them draw and paint and to see what colours they use and mix together“. Her youngest is currently obsessed with drawing rainbows, the influence of which shines through in her work. She states; “I am also really enjoying the vibrancy of neon colours which you can’t really replicate in digital printing“.
 DeAnne hopes to keep making, playing with ideas, learning new techniques, and growing with her practice. She concludes; “Right now, I feel thankful that I get to do what I love every day and proud of myself for not letting go of my dreams“.
 You can shop DADA Frost’s collection on Department Store

 RSS Feed
