|
http://ift.tt/2nxDUqt
How to Turn Blog Posts Into a Video Funnel http://ift.tt/2rVLdxz
Looking for tips to qualify leads more effectively? In this article, you’ll discover how to warm up and convert prospects by turning blog posts into a three-part video funnel. How to Turn Blog Posts Into a Video Funnel by Serena Ryan on Social Media Examiner.
Building Awareness, Engagement, and ConversionSimon Sinek famously stated, “People do business with people.” Trust is built upon knowing the people behind a product or service, meaning you increase the chance that cold prospects will become customers by getting to know them and letting them get to know you in return. A blog can play an integral role in building that relationship. That said, simply publishing blog posts isn’t enough. You need to build on the impact of your blog posts by using each one to support a sales funnel. For example, I repurpose blog posts into videos I promote as part of a larger, structured funnel that I use to begin relationships and generate conversions. My funnel is built on the know, like, trust model. Rather than marketing to everyone, I let my content connect me to the right people. If people show they like me (by viewing, liking, sharing, and commenting on my content), I show how I can help them, and ultimately offer a product or service they can use. This process is also referred to as building awareness, engagement, and conversion.
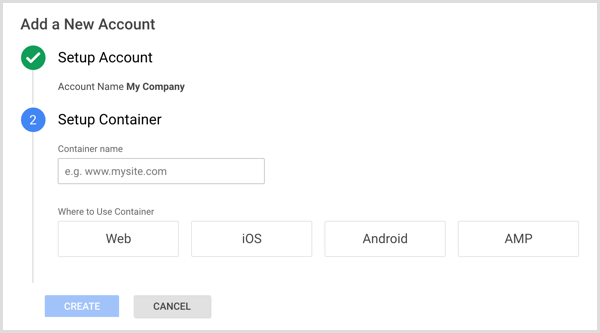
Here’s how you can set up a similar funnel system for your own WordPress site. #1: Set Up Funnel Management Tools on Your SiteNote: I started my business from scratch without a marketing budget, therefore many of the tools I recommend below are either free or have a relatively small fee. Set Up Google Tag Manager A tag is a snippet of code that sends information about website user behavior to a third party, such as Facebook, Twitter, or Google. Adding individual snippets of code for multiple tags directly to files on your website can not only be confusing, but also slow down your website’s page load time. Because speed to load is one of the top 10 things Google looks at when assigning search placement, I recommend installing Google Tag Manager to house and manage your tags. To install Google Tag Manager, go to tagmanager.google.com to create an account (or access an existing account). Follow the prompts to create a container for your site.
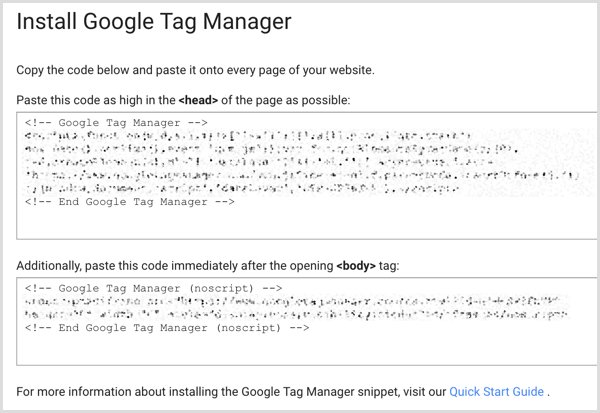
When Google Tag Manager shows you the code you need to add to your website, copy and paste the code snippets into the appropriate location in your website code. As shown here, one snippet goes in the head tag and another in the body tag.
In Google Tag Manager, you can choose from more than 50 types of tags, including Google Analytics and the Facebook pixel. You also create events to track activity on your website such as when a lead is collected via your site’s contact form. Add the Facebook Pixel Tag to Google Tag Manager Facebook makes a significant feature in my funnel for two key reasons. First, it has the largest online audience (2.1 billion users) you can market to. Second, it has the most sophisticated targeting tools available. To take full advantage of these attributes, you need to install the Facebook pixel. To add the Facebook pixel to Google Tag Manager, you first need to create your pixel in Facebook.
Choose the Manual Installation option and follow the prompts to add the pixel to your Google Tag Manager.
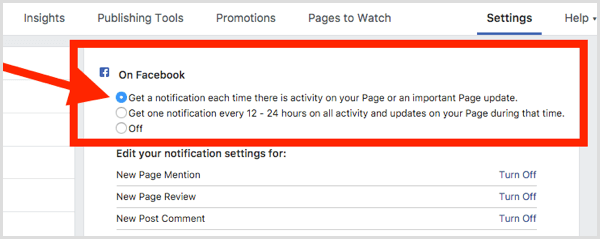
#2: Prime Your Facebook Business ChannelsThe type of business you have will dictate which type of Facebook business page you have. I run my funnel with a Public Figure page, but you can easily adapt this funnel for a standard business page. Enable Notifications The key is to avoid selling and focus on developing relationships. To this point, it’s important you monitor all mentions of and engagements on your Facebook page. To turn on notifications for your Facebook page, go to general settings, select Notifications from the menu on the left and click on Get a Notification Each Time There Is Activity on Your Page.
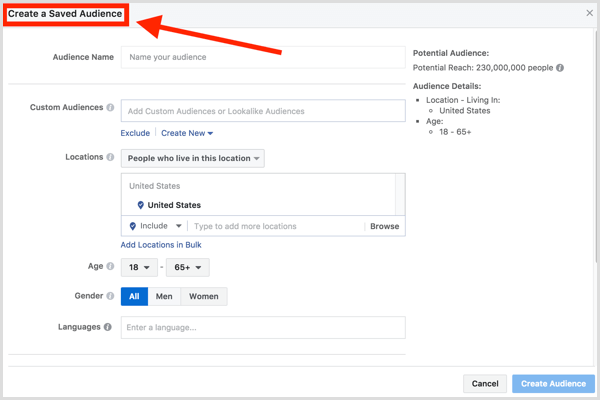
Create a Primary Custom Audience As part of your business plan, you need to identify your ideal target audience, which is the same audience for your blog. To set up your first saved audience, you’ll want to consider specific characteristics such as gender and age demographics, interests related to your area of expertise, geographic location of your service area, and potential jobs that might be held by your ideal customer.
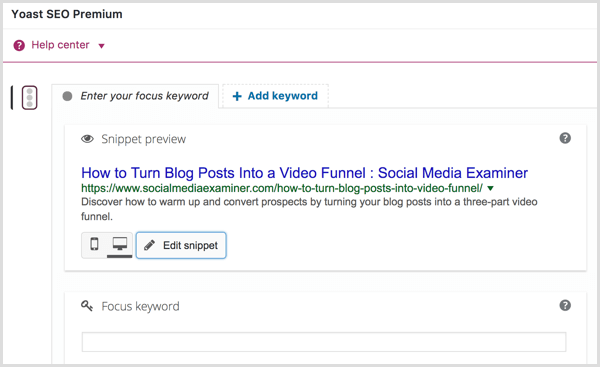
#3: Develop and Publish Your Blog PostsAim to publish at least one blog post per month and include photos and personal stories that show what you do and the value you offer. Remember that you build trust with your audience by sharing who you are, not just your product or service. So don’t just share knowledge; share how your knowledge is based on your experience. Writing from your experience also gives each blog post unique context. Your content looks more unique, which builds trust with Google. (Google frowns upon duplicate content.) Potential customers also learn more about you, your expertise, and natural points of difference from the competition. To select topics for your blog posts, take your research beyond online tools so your content will stand out to your audience. While online tools (such as Google Keyword Planner, SERPs, etc.) can help you gauge what your ideal audience is searching for, you should also ask your ideal audience what they want to know on your Facebook page or within an online group. Optimize Your Content for Search and Readability You’ve researched what topics interest your audience so you know the main keywords prospects will use to find information related to your blog post when they do a search online. Make sure your keywords naturally appear in the text of your blog post. To improve your post’s visibility in search further, add other elements that improve SEO. If you have a WordPress website, you can install the Yoast SEO plugin, which works like a checklist to help you maximize blog post visibility. Plus you get a good preview of how your blog post metadata will appear in Google search. Based on this preview, you can adjust your metadata so that it’s more compelling, and entices people to click and read your blog post.
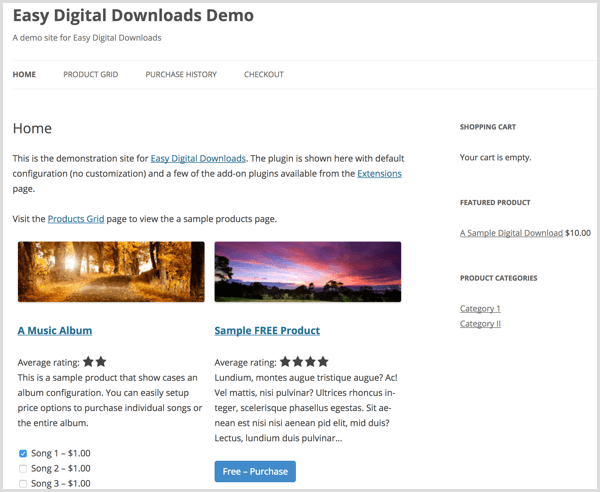
Your blog post title plays an important role in search performance. In addition to keywords, check whether your title is interesting and evokes curiosity. However, avoid clickbait titles that mislead your prospects. Instead, look for ways to appeal to your target audience using the keywords you identified. Ideally, repeat your blog post title in the first paragraph. Under the hood, add alt text to your images and link to other pages with appropriate anchor text to improve blog post visibility. Alt text makes your website more accessible. The best alt text describes what’s in your image. Anchor text helps your SEO if you link to a few relevant pages, and the text you select for the link (the anchor text) gives readers a good idea of what they’ll find. Last but not least, before you publish a post on your blog, check whether you can improve the readability of the content, which will help people find your post via search. Check whether your post contains long sentences you could break into shorter ones. Visually, you can increase white space, include subheadings, and bold key points to help readers discover the value in your blog post. Enhance Value With a Free Download If someone reads to the end of your blog post, there’s a good chance they’re interested in what you have to say. At the end of every blog page, offer a free download to lead readers into your funnel. In your download, offer more value with actionable insights that readers can implement (beyond what’s on your blog), resources, and options for working with you. To offer a download on a WordPress site, check out the Easy Digital Downloads plugin.
Even with the free version, you can easily add digital products to your website. Also, you can configure the plugin based on your conversion goal. For instance, request an email address from people who download your giveaway or track your giveaway’s performance in other ways. #4: Repurpose Your Blog Posts Into VideoPublishing a blog post isn’t enough. To make the most of current digital marketing trends, repurpose all of your blog posts as videos to share on social media. Video is the most effective digital marketing content you can create. Sharing videos on social media helps you increase your reach, build relationships, and get more conversions. As you plan your videos, identify stories, examples, and photos in your blog post that focus on three topics important to your funnel. First, look for concepts or ideas that explain why your area of expertise is important to your audience. These “Why” videos will build brand awareness and help your audience get to know you.
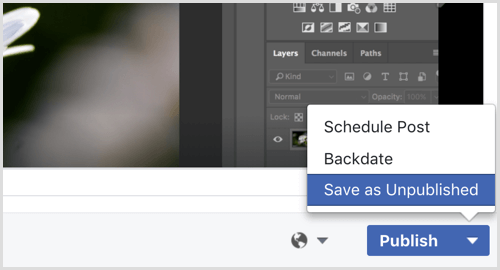
Second, look for how-to content that demonstrates the value you offer clients and that can build engagement among your audience. Through these videos, people interested in the first video can learn more about how you can help. With “How” videos, your goal isn’t to sell, but to build relationships. Offer more value than you did in the first video but leave your audience curious for more information. For the third type of content you want to repurpose, explain what your offer or solution is. This “What” video is only for people who watch the first two videos and would be most interested in converting. Your videos might not use all of the content from your blog post. Your main goal is to deliver the material most relevant to each part of your funnel. Choose the best content to create a 1- or 2-minute video with the information your funnel requires. To pack the most value into each video, cut introductions and instead display text or titles in the lower third of the video. Your videos don’t require professional-quality production. What’s important is to get your message across clearly and succinctly. Use your smartphone on a tripod to record. For lighting, go outside if you don’t have good indoor lighting. To achieve clear sound, practice projecting your voice or use a lavalier microphone. You also need to add screen captions to your videos because up to 85% of people play videos without sound. When you have a set of videos ready to go (make sure you have at least one video each for the Why, How, and What components of your funnel), upload the videos to your Facebook page and save the video posts as unpublished. You’ll post each one in a funnel sequence using custom audiences.
#5: Warm Up Prospects With Your Facebook FunnelTo begin bringing Facebook users into your funnel, choose a Why video to publish. Then wait at least 24 hours for organic engagement. In Facebook Insights, look for videos where at least 50% of total views are at least 10 seconds. At a glance, you want to see good reach and engagement.
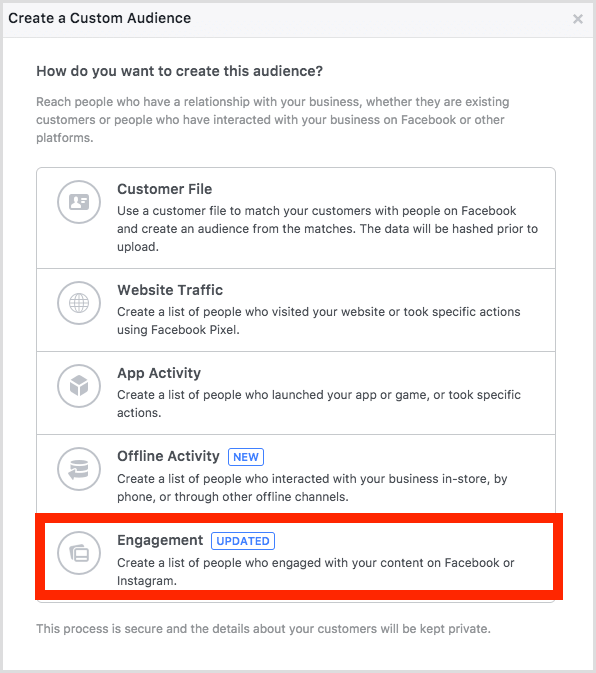
When you get this kind of reach, begin a structured ad sequence that leads prospects into your funnel. The basic premise of this structure is “if they see this, then I’ll show them that.” Ad 1: Boost a “Why” Video With High Organic Reach When a Why video resonates organically, create a Facebook ad to boost the post to see if the video has wider appeal. To test the video on a wider audience, boost it for $1 a day for 7 days to your ideal audience. As mentioned earlier, it’s helpful to create an ideal audience with the Facebook Audiences tool and save that audience for running ads like these. Ad 2: Show a “How” Video to a Video Engagement Custom Audience After the boosted post runs for 7 days, create a custom audience based on people’s viewing habits of the performing content. To illustrate, if someone views a video for more than 10 seconds, they have consciously stopped scrolling and watched a reasonable amount of the video. To create your audience, open the Audiences tool in Ads Manager and click the option to create a custom audience. Then select Engagement from the options that appear.
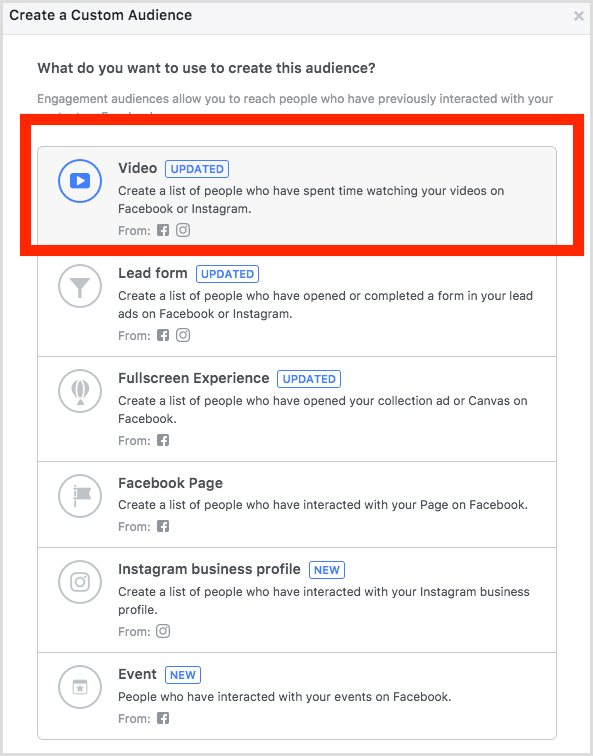
Facebook then asks, “What do you want to use to create this audience?” Select the Video option.
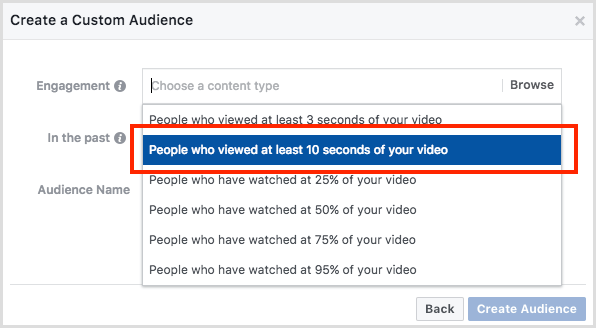
Next, from the drop-down menu, select People Who Viewed at Least 10 Seconds of Your Video. Then click Browse to select a video.
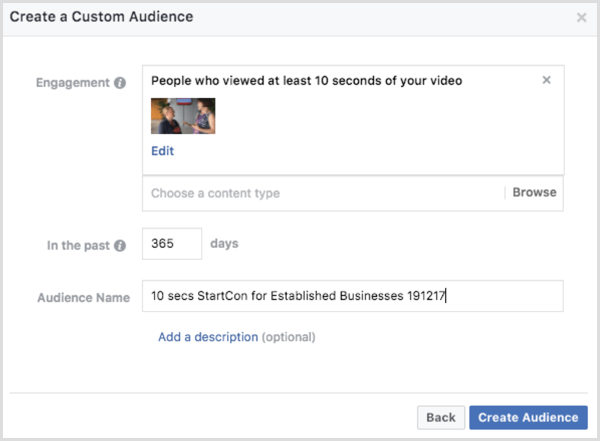
To help you track this audience easily, name the audience based on the behavior that viewers have taken. Be specific enough that you’ll be able to distinguish this audience from other audiences you’ve saved.
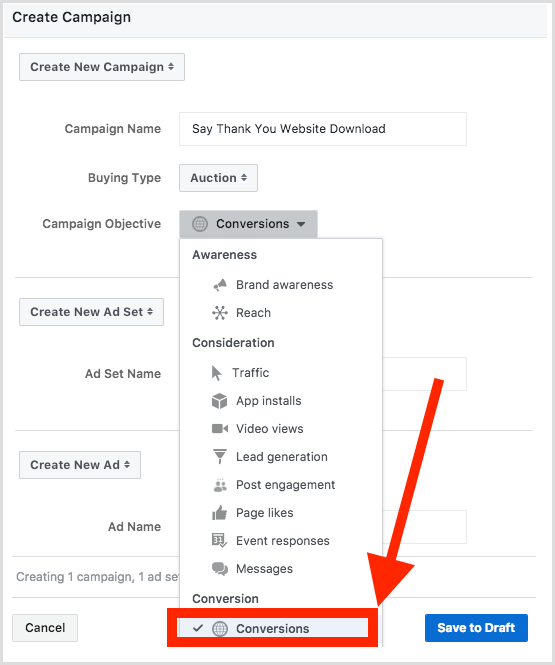
After you set up the audience of people who watched your Why video for 10 seconds, create a Facebook ad that shows this audience another video. Select a How video that builds on your boosted video’s content to bring that interested audience further into your sales funnel. Ad 3: Run a Conversion Ad With a Video That Sells Your next step is the last in your funnel. You want to create a new custom audience that includes anyone who watched at least 10 seconds of the second video. Repeat the process of creating a custom audience based on user behavior. When you create the ad, instead of choosing Engagement as your goal, choose Conversions as the objective.
In this ad, show that audience your third video, which is a What video with an offer. The offer should be relative to how much engagement viewers have had. For example, after two video views of at least 10 seconds, you might offer a free download with content that guides your audience through a process and helps them achieve a goal like making more money from a website. Incorporating Interviews From Conferences and Events To accompany the written blog posts that you create based on your experience and knowledge, consider sharing interviews with people attending conferences and events. If the interview is a video, post the video on Facebook and boost it for $1 a day over 7 days to the audience of the person you interviewed, attendees of the event, and/or the media. This tactic increases your visibility and brand awareness in your ideal audience and/or those connected with your ideal audience. Then you can create more custom audiences based on user engagement. Conclusion For your content to have a positive impact on your business, you can follow a systematic approach to create a marketing funnel for your blog. After you lay the groundwork by tracking user engagement with your content and writing blog posts that provide value and are optimized for search, repurpose your content into videos that take advantage of the video trend on social media. You can then use ads and custom audiences to build awareness, engagement, and conversions. The key is to continuously review analytics and optimize ads based on user behavior to maximize conversions. What do you think? Have you posted videos on social media to build engagement? What’s your experience turning video engagement into conversions? Please share your thoughts in the comments.  Social Media via http://ift.tt/1LtH18p February 1, 2018 at 05:03AM
0 Comments
Leave a Reply. |
�
Amazing WeightLossCategories
All
Archives
November 2020
|





 RSS Feed
