
|
https://ift.tt/2MgsrWo
How to Promote Your Blog Posts With Facebook Dynamic Ads https://ift.tt/2MgZKsp
In this article, you’ll discover how to set up a product catalog of blog posts you can automatically promote with a Facebook dynamic ads campaign. 
How to Promote Your Blog Posts With Facebook Dynamic Ads by Renata Ekine on Social Media Examiner.
Why Use Facebook Dynamic Ads for Blog Promotion?You may be familiar with the use of Facebook dynamic ads for ecommerce. Businesses use them to promote products in their catalog to people who expressed an interest but didn’t make a purchase. To illustrate, visitors might see a dynamic ad for a specific product they viewed on the company’s website. Did you know you can also use Facebook dynamic ads to promote your blog posts? This tactic lets you show new and current readers content they’ll likely want to read. If this is your first time running dynamic ads, you need to get access to Business Manager, which acts as a container for organizing all of your Facebook assets (pages, pixels, ad accounts, product catalogs, etc.). And if you haven’t already, be sure to install the Facebook pixel on your blog. Once you have these things in place, here’s how to set up a product catalog for your blog posts and use Facebook dynamic ads to promote your content. #1: Create a Pixel EventTo run dynamic ads, you need to create additional pixel events. Typically, the standard events for ecommerce businesses are View Content (fired when a product page is viewed), Add to Cart (fired when a product gets put in the cart), and Purchase (triggered when a product has been purchased).
To use dynamic product ads for your blog posts, you need to set up the View Content event, which will be triggered when someone views your blog post page. Here’s the base code for this event:
To send the ID of your blog post with this event, you need to add an additional line of code to include the content ID, as shown below. Replace 12345 with the ID of your blog post.
Now add this code just below the <head> tag on the page with your blog post. #2: Set Up a Product Feed of Your Blog PostsOnce you’ve created the necessary pixel event, you’re ready to create the product feed that will allow you to run Facebook dynamic ads. A product catalog holds a file that contains all of the products you want to promote. This file is called a product feed because it feeds the product catalog with information on your products (your blog posts, in this case). The most common supported file formats are CSV, TSV, RSS XML, or ATOM XML. Google Sheets is a good option for creating your product feed because any changes you make will automatically be reflected in the feed. To get started, create a new sheet and add these required columns:
After you add your data to the sheet, it should look like this:
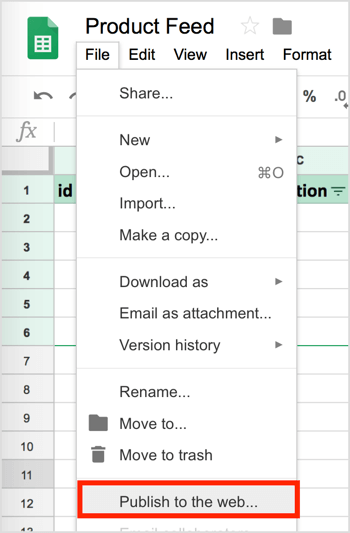
Tip: You can download Facebook’s product feed CSV template here. When you’re done creating your product feed file, you need to export it in CSV format. If you’re using Google Sheets, choose File > Publish to the Web.
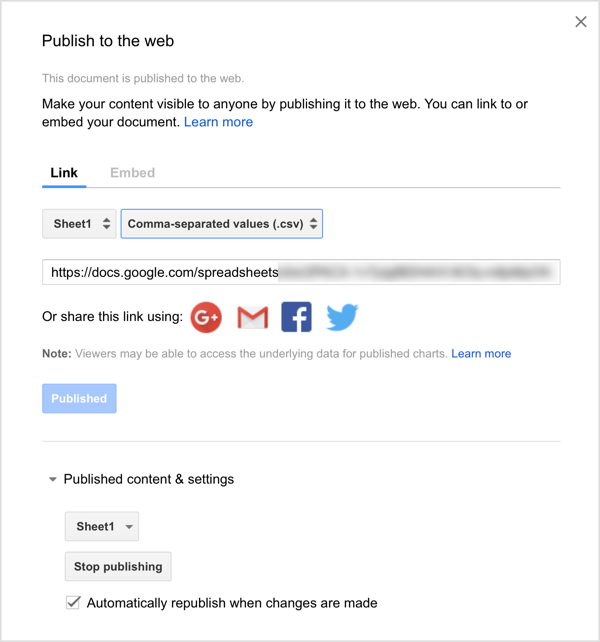
In the Publish to the Web window, select the sheet you’re using as a feed, choose the Comma-Separated Values (.csv) option, and click Published. Then copy (and save) the link to the feed, which you’ll need for your product catalog.
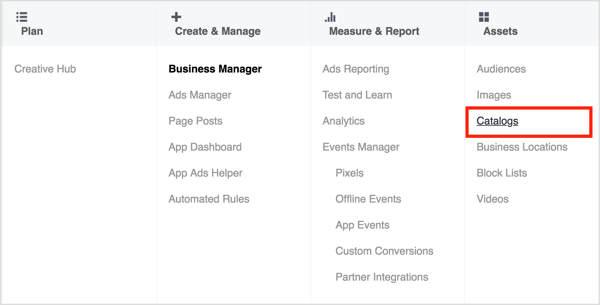
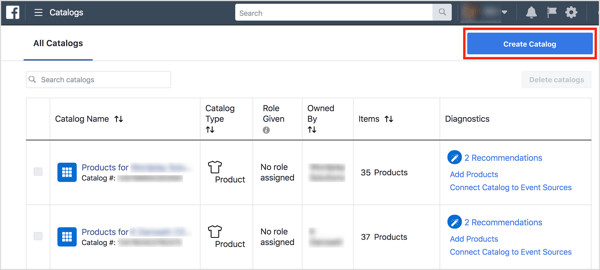
#3: Create a Product CatalogAfter you’ve set up your product feed, the next step to running Facebook dynamic ads is to create your product catalog. Remember, the product catalog is the container in which the product feed lives. To access the Catalog Manager, open Business Manager and select Catalogs, or go directly to https://www.facebook.com/products.
Next, click the Create Catalog button.
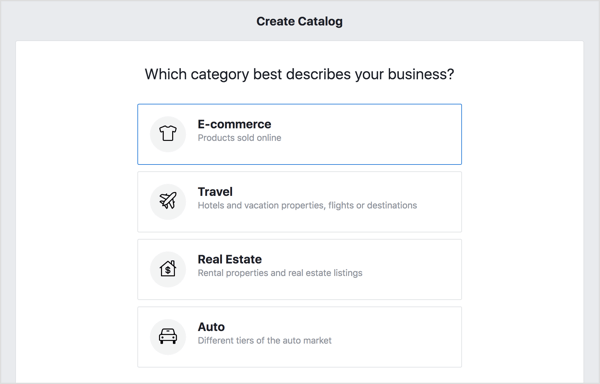
Then choose the E-commerce option and click Next.
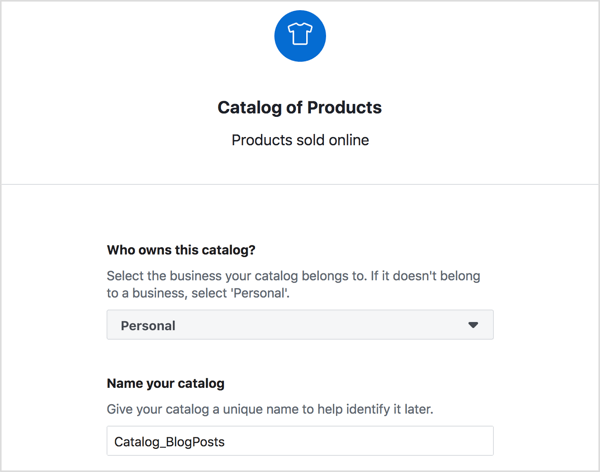
From the drop-down menu, choose the owner of the product catalog. If it doesn’t belong to a business, select Personal. Then enter a descriptive name for it and click Create.
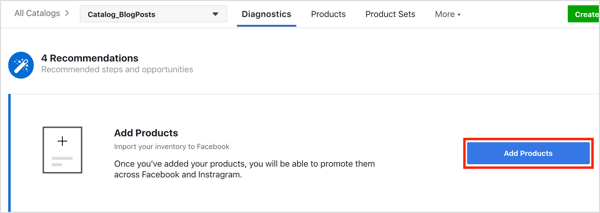
On the next screen, click View Catalog. Now you’re prompted to add products. Click the Add Products button.
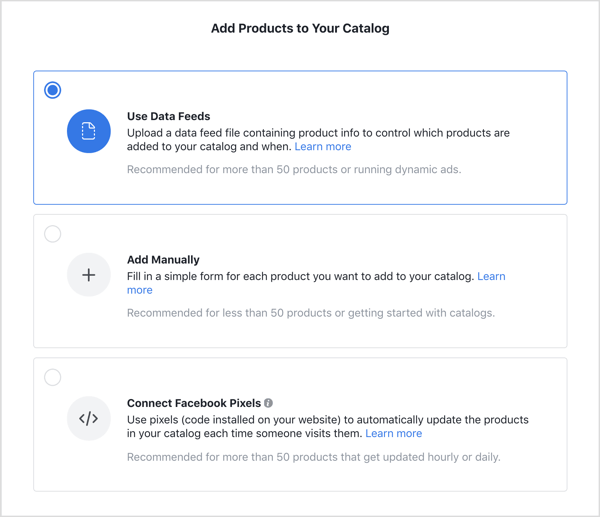
This is the part where you’ll connect the feed you created earlier. Here’s a brief rundown of your options:
For this example, choose Use Data Feeds and click Next.
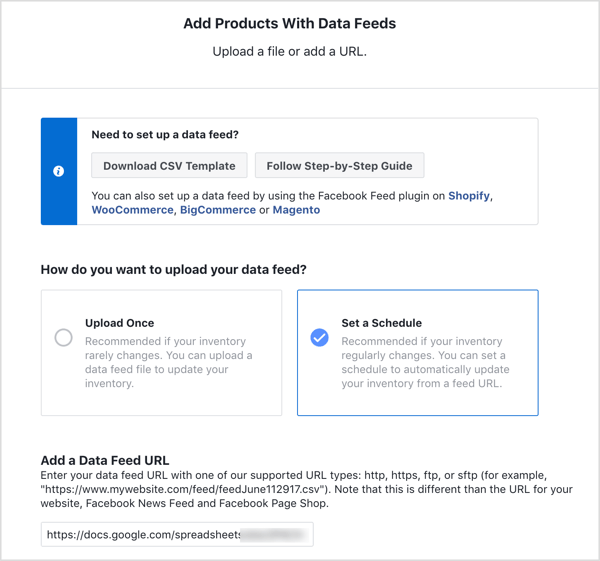
Now choose the Set a Schedule option so if you need to add any more articles to the feed (your Google sheet), it will be updated automatically. Below that, add the URL of your published Google sheet. (This is the URL you copied earlier when you published your product feed.) Add your credentials if the file is password-protected.
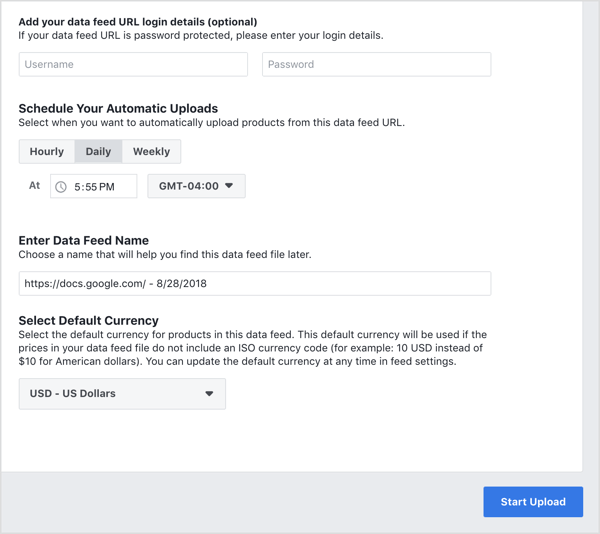
Then fill in the rest of the details and click Start Upload.
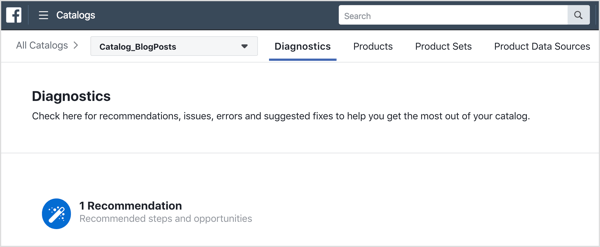
After you upload your feed, follow these steps to ensure the catalog and feed are set up correctly: First, open the Diagnostics tab to check for any issues you need to resolve.
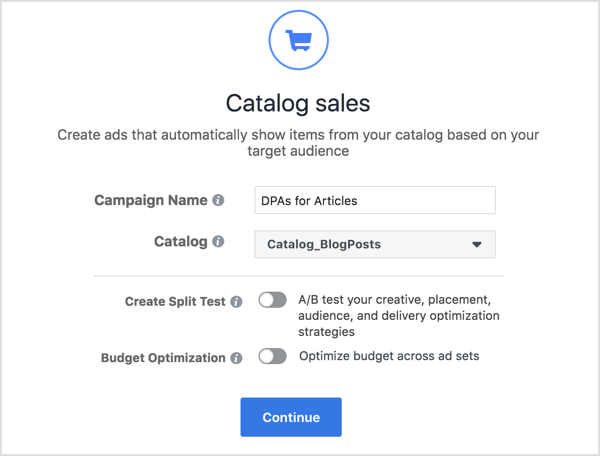
Also check the product details on the Products tab. Ensure that the products are as specified in the feed (price, image, etc.) and make changes if necessary. You can also add more products on this tab, as well as delete items from your feed or de-activate them from your campaign delivery. Finally, connect your Facebook pixel to the catalog. This is important because the pixel will help show more relevant articles to your audience. #4: Set Up a Facebook Dynamic Ads Campaign to Promote Your ContentNow you’re ready to set up your Facebook dynamic ads. Create a new Facebook campaign in Ads Manager and select Catalog Sales as your campaign objective. Next, enter a campaign name, select your catalog, and click Continue.
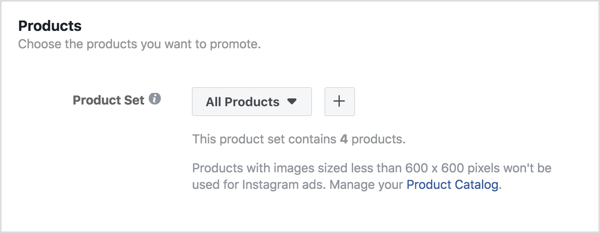
Create Your Ad SetNow move on to the ad set level and make sure all of the products in your product catalog are chosen to be displayed in your ads.
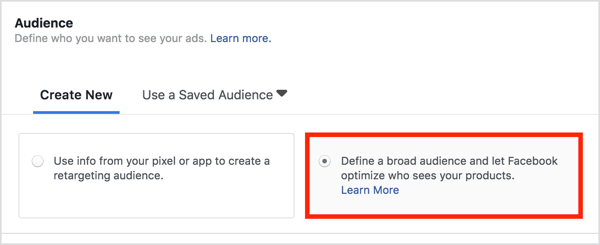
In the Audience section, choose Define a Broad Audience and Let Facebook Optimize Who Sees Your Products so you can reach new people and not existing blog visitors.
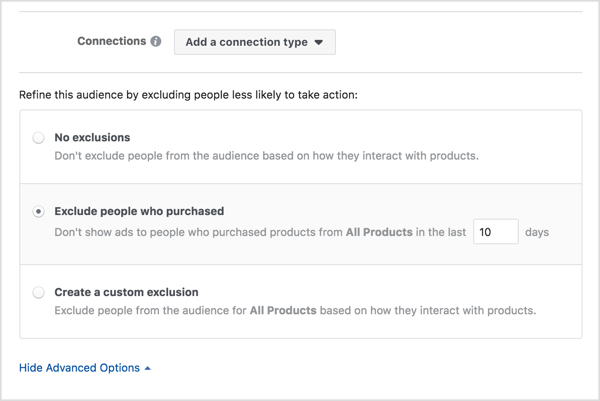
Scroll down below the Connections menu and click Show Advanced Options. You then see options that let you refine your audience to exclude people who are less likely to take action, such as someone who has already visited your blog.
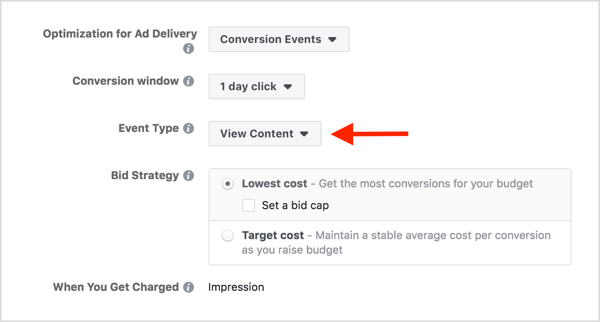
Continue with the rest of the ad set creation process as usual. One thing to pay attention to is the optimization event type. You want to optimize for View Content, the Facebook pixel event you created earlier.
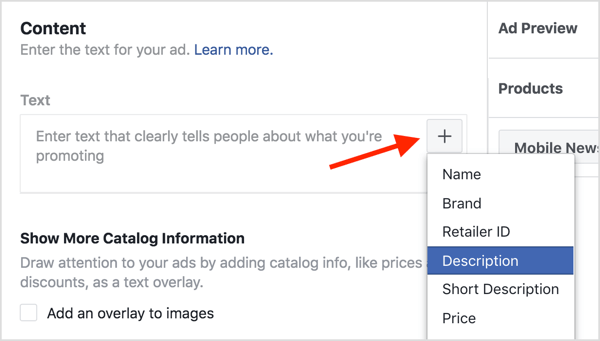
Select Your Ad CreativeNow move to the ad level and choose Single Image as the ad format. If you typically use landscape images in articles, single images will look great. You may need to make some changes if you want to use the carousel format. Next, focus on your ad copy. The cool thing about using Facebook dynamic ads for your blog posts is that you don’t have to insert the article name, description, or other particulars. You can click the + button inside each box to pull a catalog field from the Google sheet you created earlier. For instance, click the + button in the Text field and select Description from the drop-down list.
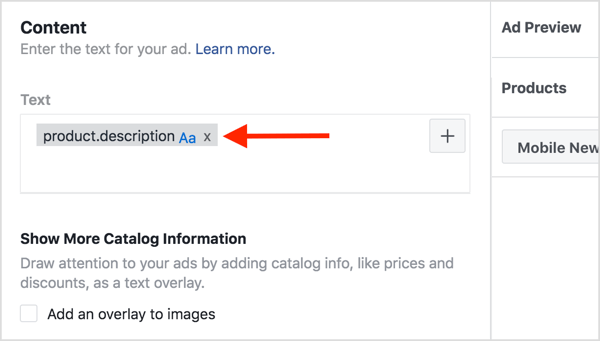
Facebook then adds the product.description tag to the Text field.
In the example below, I added the product.description tag to the Text field and the product.name tag to the Headline field. Facebook then pulls the data from the product catalog’s Description and Title fields, respectively.
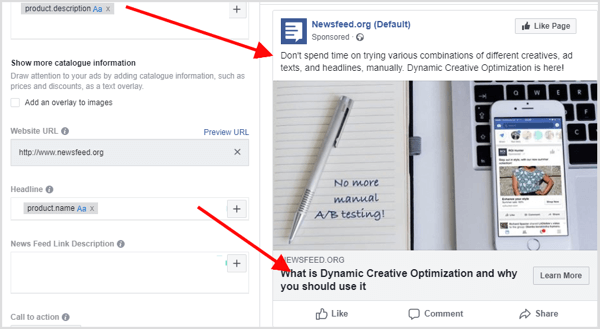
And that’s it! Just click Confirm and you’ve successfully created your dynamic ad. You may think: “But what about the other articles? Shouldn’t I create ads for those, too?” No, you don’t need to. That’s the beauty of Facebook dynamic ads! Instead of creating an individual ad for each article, you create an ad template that automatically uses images and details from your data feed for articles you want to promote. Tip: From here, the possibilities are endless. You can create a template to style your images and make them more appealing. You can also add custom columns to your feed to use in your ads or create new product sets. .What do you think? Has this tutorial inspired you to try Facebook dynamic ads to promote your articles? What type of dynamic ads will you try first? Please share your ideas and thoughts in the comments below.  Social Media via Social Media Examiner https://ift.tt/1LtH18p September 10, 2018 at 05:08AM
0 Comments
Leave a Reply. |
�
Amazing WeightLoss Categories
All
Archives
November 2020
|


 RSS Feed
