
|
http://ift.tt/2wwFtbQ
How to Easily Turn Blog Posts Into Videos http://ift.tt/2fuU2IJ
Looking for a no-cost tool to simplify the process? In this article, you’ll discover a partially automated tool that turns your blog posts into shareable social media video. How to Easily Turn Blog Posts Into Videos by Orana Velarde on Social Media Examiner.
#1: Choose Your Blog PostLumen5 is an automation tool that lets you turn your blog posts into animated informative videos that you can share on your social media channels. It’s currently free to use (as it’s in beta) and premium features will be launched soon. The app gives you a commercial license for the videos you create so you can use them for business purposes. It’s your responsibility to follow international copyright laws and use only your own content. After you sign up for a free account, you have two options for importing the content from your blog post. You can type in the link to your post or paste your text in manually. The most efficient way is to add the link and let the Lumen5 artificial intelligence (AI) bots pull the text and images from there. In the text box shown below, enter your blog post URL and click Create. Add the URL for the blog post from which you want to create a Lumen5 video. Note: If your blog post images are smaller than 500 x 500 pixels, they won’t be uploaded. However, you’ll have the opportunity to upload images from your computer that are large enough or use the search function to find free stock images. #2: Arrange Your Text to Support a Video StoryboardOn the next screen, you’ll see the text from your blog post on the left and a video storyboard on the right. The blog post title appears in a box at the top of the storyboard. Your blog post text appears on the left side of the screen and the storyboard is on the right. To create your video storyboard, choose text that summarizes your article. Click sentences on the left to add them to your storyboard. If you want to add text manually, click the + button and type in your text. To rearrange sections on your storyboard, hover over the box you want to move, revealing two icons. Drag the move icon (shown below) to change the order on the storyboard. Click and drag the cross icon to change the order of a box on your storyboard. Lumen5 recommends that you use no more than 120 characters in each box so the text will fit nicely on each slide/scene of your video. Click in a box to edit the text to change the wording or delete characters. If your blog is built on a module theme like DIVI and the blog post is separated into different modules, you may discover that Lumen5 didn’t pull all of the text from the article and place it in the left pane. In this case, you can manually copy and paste text from your blog post into boxes on your storyboard. If your blog is built on a standard WordPress, Blogger, or Squarespace editor, you should have no problem with all of the text appearing on the left for you to create the storyboard. When you’re finished building your video storyboard, click Continue at the top of the page. #3: Fine-Tune Text Overlay and MediaIf your blog post has images that are 500 x 500 pixels or larger, they’ll be used as backgrounds for the slides/scenes on the right. If your images aren’t big enough, Lumen5 suggests free stock images (from sites like Unsplash and Pexels), using keywords pulled directly from your storyboard. These stock image suggestions appear on the left below your article images. 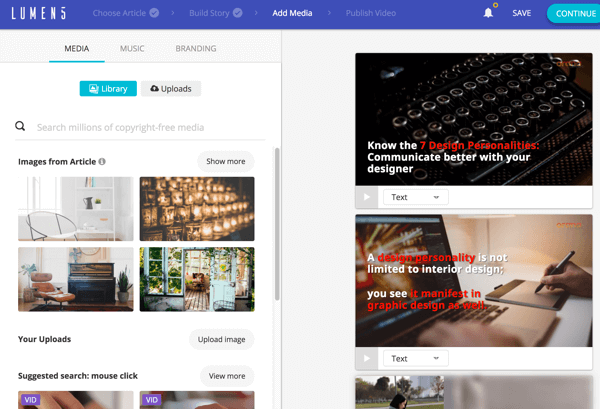
Lumen5 creates scenes for each box on your video storyboard. You also have the option to upload images for your video. They need to be at least 500 x 500 (preferably 1280 x 720) and in JPG, PNG, or GIF format. The maximum upload size is 15MB. If you want to change the background image for any scene, drag the replacement image from the image library to the scene. If you choose a horizontal image, it will fill the background completely. If you choose a vertical image, it will show as a collage, with the original photo positioned next to a blurred and enlarged version of it. Drag a new image from the left side of the screen to add it to the scene. In the finished video, the background will be slightly animated. Horizontal images will pan from top to bottom and vertical images will have a double panning effect with the original and the blurred counterpart. Click the Play button on the scene to preview this effect. You have a number of options for editing the text for the scenes. Click the drop-down list to change the format and styling of the text. Your options are Text, Quote (adds quotation marks), No Text, and Title (enlarges the text). Choose an option to change the style and format of the text. Click in the text box to see options for changing placement and color. For placement, you can choose from nine different layout positions on a grid. Choose a layout position for your text. To apply color to important keywords, select the desired text, click the A icon, and click the color you want to apply. Note that you have to use this same color if you want to highlight text in other scenes. Apply color to emphasize keywords on your slide. If your slide includes a long sentence, the app will automatically divide the sentence into multiple text boxes, which will be animated one after the other. Lumen5 will automatically divide long sentences into two text boxes. If you want to add a new scene, scroll down on the right and click the + sign at the bottom of the list of scenes. To rearrange scenes, drag the move icon (with the two double arrows on it). The last scene is labeled Outro Scene. For this scene, you can add your logo (as explained in step 5 below), leave the default “Share this video” text, or add a call to action. #4: Add an Audio Track to Your VideoIf you click the Music tab, you can choose from a library of free audio tracks to add to your video. Click the Mood drop-down list and select the type of music you want to add. If you want to preview a track, click the Play button to the left of it. Once you find a track you like, click to apply the track to your video. Select the type of music you want to add from the Mood drop-down list. Keep in mind that you don’t have to add music to your video. You can just leave the Music section blank. #5: Upload Brand AssetsOn the Branding tab, you can upload assets to brand your video for your blog or business. You can upload a logo and watermark, and change the highlight and icon background colors. You have the option to upload your logo and a watermark. If you upload a logo, it must be at least 400 x 400 pixels and will be placed in the center of the last scene of the video (the Outro Scene). The watermark can be a simple version of your logo or something else. A small, slightly transparent version of the watermark will then appear in the top-right corner of every scene. If you upload a logo, it will appear in the last scene of the video. You can also change the highlight color for text and the icon background color (on scenes with icons as the background color). #6: Publish and Share Your VideoWhen you’re finished creating your video, click Continue at the top of the screen. You’ll then see a preview of your video. If you need to make additional edits to your video, click Continue Editing. If you need to fix anything, click Continue Editing. If you’re satisfied with your video, click Publish. After you click Publish, you’ll see a pop-up message that your video is rendering and could take a while. You’ll receive an email when it’s finished. When your video is ready, you can download your video as an .mp4 file and share it on your social media channels and website. You can download your video, and share it on your website and social media channels. Pro Tip: Use Smart Templates to Automatically Create Videos for Future Blog Posts Lumen5 is an AI app, meaning it builds videos automatically using your content. It can build videos out of any of your blog posts, even the ones you haven’t written yet. Lumen5 can’t see into the future, but it can read your RSS feed. To use this feature, you need to add your RSS feed to the app. On your dashboard, select Smart Templates on the left side of the page. Follow the steps to proceed to the Smart Templates page and then click Manage Feeds. Go to the Smart Templates section of your dashboard and click Manage Feeds. Add your blog RSS feed URL in the text box below and click Add Feed. Now the next time you publish a new blog post, Lumen5 will create a video based on that content, and notify you to preview and edit it as you like. Type in the RSS feed for your blog and click Add Feed. Conclusion Lumen5 makes it easy to create animated informative videos to share on your social media channels. To create professional-looking video, all you have to do is choose your blog post and let the Lumen5 AI bots do their thing. What do you think? Do you repurpose your blog posts as video? Will you consider using this tool to automate the process? Please share your thoughts in the comments below. Social Media via http://ift.tt/eZnnjC August 10, 2017 at 05:08AM
0 Comments
Leave a Reply. |
�
Amazing WeightLoss Categories
All
Archives
November 2020
|
 RSS Feed
