|
https://ift.tt/2J3uHmA
How to Create a Facebook Ad With Business Manager https://ift.tt/2IJ7rGS
Wondering how to create your first Facebook ad using Business Manager? In this article, you’ll learn how to create a Facebook page post ad using Facebook Business Manager. 
How to Create a Facebook Ad With Business Manager by Tristan Adkins on Social Media Examiner.
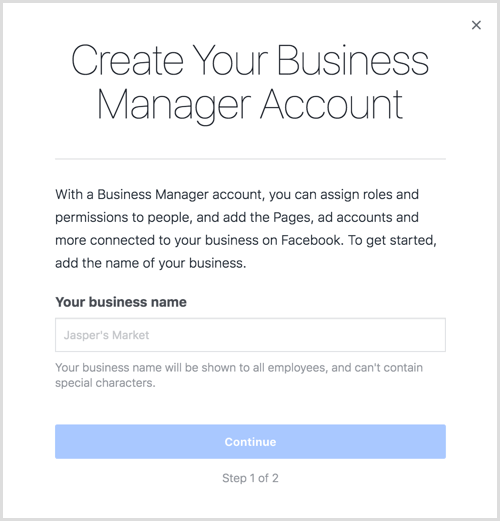
#1: Set Up Facebook Business ManagerIf you don’t already have a personal Facebook profile, creating that profile is your first step. Next, you need to create a separate Facebook page for your business. After you create a Facebook page for your business, you can create a Business Manager account that allows you to run ads for your page. To begin, go to the Business Manager home page and click Create Account in the upper right. You’ll need to log in using the email and password you used to set up your personal Facebook profile. Next, enter your business name and email to set up your Business Manager account. When you’re done, click Finish.
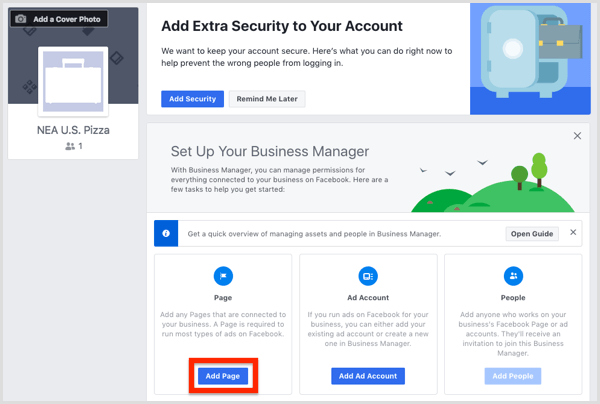
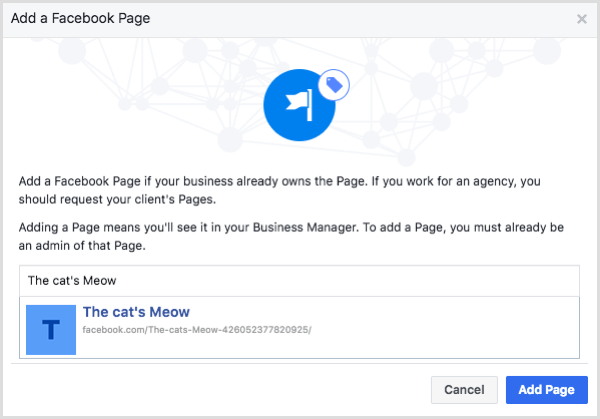
Now you’re ready to add your Facebook page to your new account. On the Business Manager home page, click Add Page.
In the next window, click Add Page under Add a Page of Your Own. Then select your Facebook page and click Add Page. Your page is now added to Business Manager.
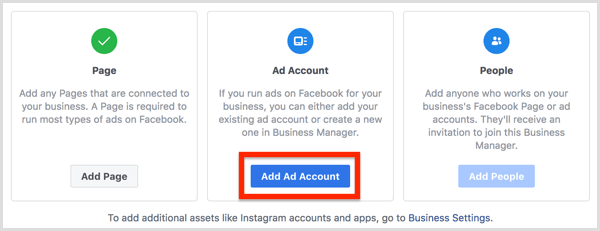
Next, you need to add your Facebook ad account. On the Business Manager home screen, click the Add Ad Account button.
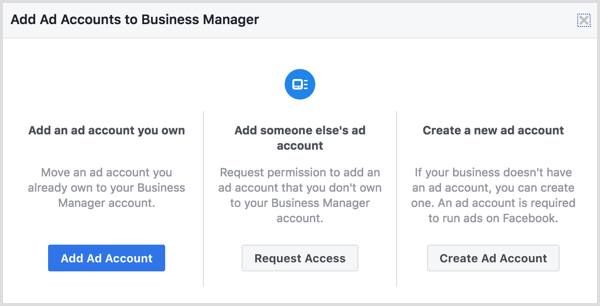
From here, you can either add an existing ad account or create a new ad account.
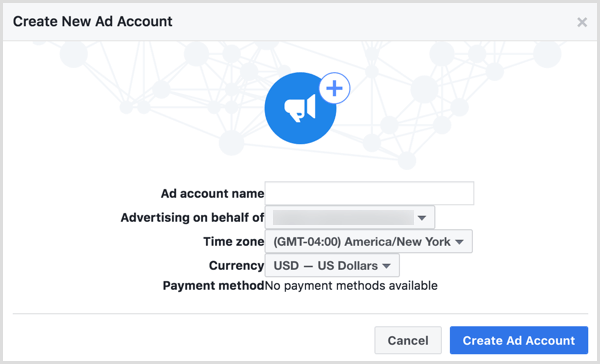
If you’re creating a new ad account, use your business name when asked to name your new account. This name doesn’t appear publicly but helps you and any employees you add to the account to identify what it’s for.
When you’re done, click Create Ad Account and you have the foundation to start advertising through Business Manager. Manage Employee Access to Your Facebook Ads Account The Business Settings option in Facebook Business Manager is your go-to tool for handling administrative tasks related to Facebook ads like changing your billing information and managing employee access. Because you just set up your Business Manager account, this section focuses on giving an employee access to your business’s Facebook page and ads account. To start, open Business Manager, click the menu icon in the upper left to open the menu shown below, and select Business Settings on the right.
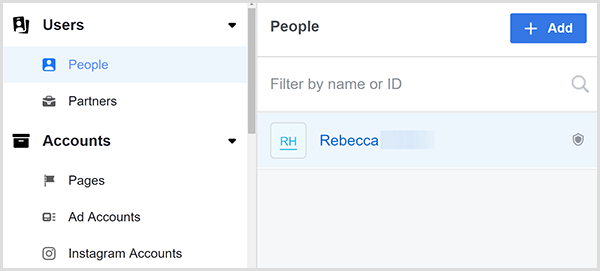
On the Business Settings page, make sure People is selected under the Users heading on the left. On the right, you see all of the users you’ve added. If this is a new account, you’ll be the only user. To add someone else, click the Add button in the upper right of the People column.
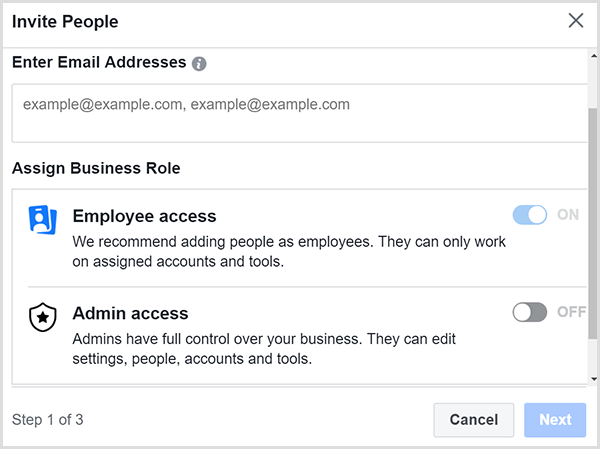
The Invite People dialog box appears, which walks you through the settings you can choose as you add someone to your account. First, type the email address of the person you want to add. Then select whether to give Employee Access or Admin Access. You typically want to provide Employee Access, which allows you to limit the pages the person has access to and actions they can take.
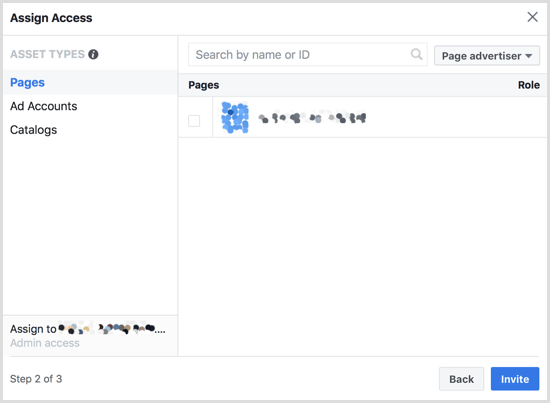
Click Next, and you see a screen that lets you give your employee access to any page connected to your Business Manager account. When you give an employee access to the page, they can create posts that are shared with your page followers and anyone who visits your page. If you give the employee access to the ad account, they can create and monitor ads via the backend of your Facebook page.
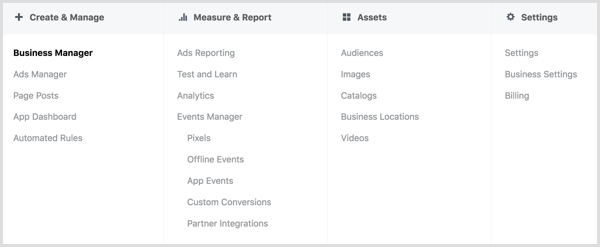
When you’re done assigning access, click the Invite button, and you see a confirmation that your invitation was sent to your employee’s email address. #2: Install the Facebook PixelTo set up the basics for Facebook advertising, you also need to install the Facebook pixel onto your website. Although using the Facebook pixel is optional, it offers key benefits for advertisers. The pixel is a tracking code that allows Facebook to identify people who visited your website, create custom audiences of those visitors, and then show ads to those custom audiences. (These ads are a type of retargeting.) The pixel can also help you identify potential customers based on their similarity to people who visit your website (also called a lookalike audience). To begin the process of adding the Facebook pixel to your website, open Business Manager, click the menu icon in the upper left, and select the Pixels option from the Measure & Report column.
On the screen that appears, click the Create a Pixel button. Before you create the pixel, make sure you read and understand the terms for using the Facebook pixel. Then check the pixel name and click Create when you’re ready.
Facebook takes a moment to create your pixel and then shows an Install Your Pixel Code dialog box. Select the method you plan to use for installing your pixel from the three options: with a tag manager, manually, or by emailing the code to a developer. For this example, select the Manually Install the Code Yourself option. After you click that option, scroll down to see the pixel code to copy and paste into the head tag of your website. To copy the code, you can click the Copy Code to Clipboard option.
The steps for adding the Facebook pixel code to your website depend on how you’ve set up your site. To illustrate, the way you install the pixel on a WordPress-based site differs from steps for a Wix-based website. After you install the pixel on your site, scroll down to the bottom of the Install Pixel Code dialog box to test whether it fires correctly. You simply enter your website address and click the Send Test Traffic button. If the testing feature’s No Activity Yet status doesn’t show a change, you have an issue that you need to troubleshoot and fix before you can use the pixel for your ads. When your Facebook pixel is working, click the Continue button.
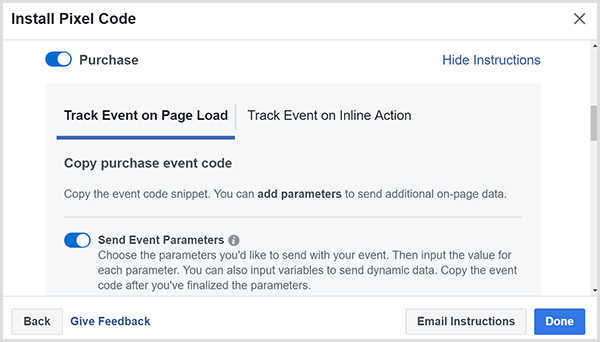
On the next screen, you can set up tracking of events for each web page a customer visits. Think of an event as an action customers can take on your website. Say a customer makes a purchase and then sees a thank-you page. If you set up a Purchase event pixel on the thank-you page, you can distinguish people who ordered something from casual visitors. Setting up events, such as the purchase event, is important because you can then show targeted ads to people who bought your goods or services, and you can use lookalike audiences to target potential customers who fit the profile of your current customers. The event options you see in the Install Pixel Code dialog box include Purchase, Generate Lead, Complete Registration, Add to Cart, and View Content. To see the code you copy and add to a web page to track that event, click the toggle next to the event name. For instance, here you see the details that appear for the Purchase event.
Tip: If you use the Chrome web browser, you can use the Facebook Pixel Helper extension to see whether your pixel is working and see how the pixel is implemented on other websites. With this extension, you can identify both general and event pixels on every website.
If your pixel is installed correctly, you start to see activity like that in this example for TJ’s Burgers.
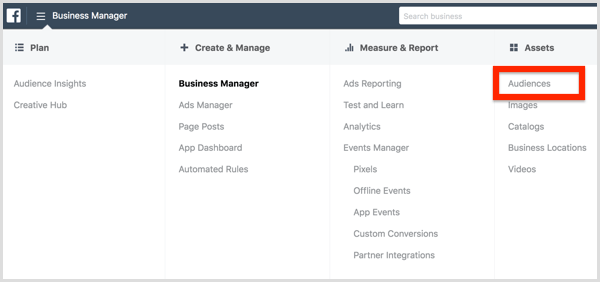
#3: Create Audiences to Target UsersWith the Audiences tool, you can create and save audiences that are most relevant to your brand. To access this tool, open Business Manager, click the menu icon in the upper left, and select the Audiences option from the Assets column.
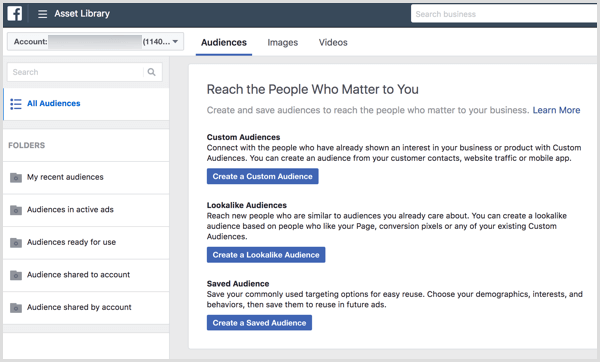
When you first open the Audiences tool, it asks what type of audience you’d like to create: custom audience, lookalike audience, or saved audience.
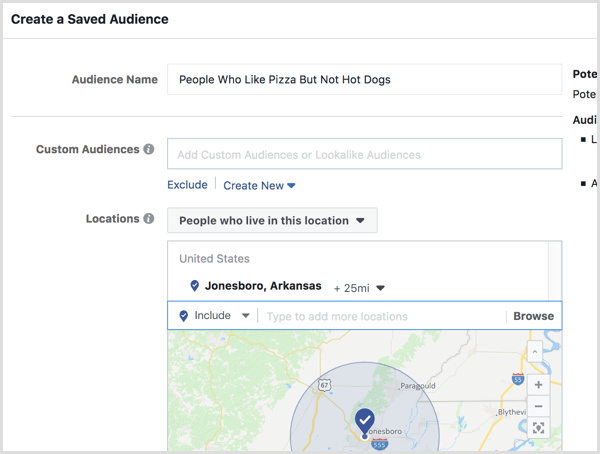
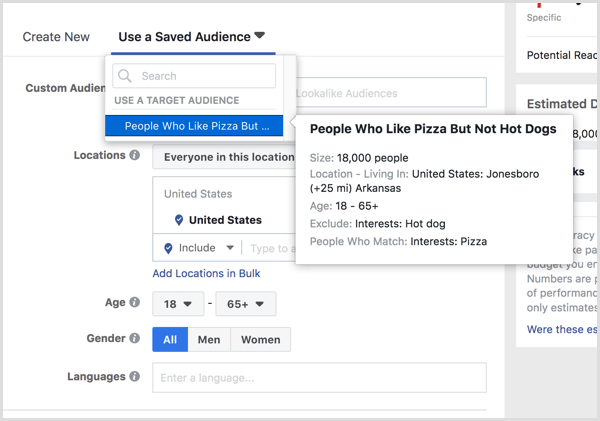
A custom audience is based on customers taking action with your brand, such as interacting with your Facebook page. A lookalike audience uses artificial intelligence to create audiences that closely resemble people you’ve already been able to identify. In other words, a lookalike audience finds people who resemble audiences you’ve created. A saved audience is an audience of people who share certain behaviors, interests, or demographics. If you’re a local business getting started with Facebook advertising, a saved audience can be a good way to start showing targeted ads. To create a saved audience, click the Create a Saved Audience button and give your audience a name that helps you identify whom it targets. From there, you can select attributes you want to include in your saved audience. To illustrate, if you’re a local business, make sure you limit your audience to people in your area. Based on your knowledge of how far people travel to buy from your establishment, you can even limit that to a certain radius, such as 10 miles.
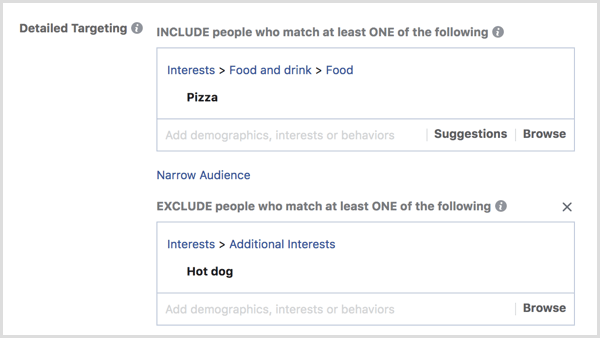
In addition to location, you can target people who fit a certain demographic or have specific interests and behaviors. You’ll find these options below the location targeting options, so simply scroll down to find them. For example, if you own a pizza restaurant, you can target people who like pizza. Just type “pizza” into the detailed targeting area. You can also use exclusions or add a second attribute to narrow your audience.
After you click the Create Audience button, the audience is saved and you can choose to target this audience when you create Facebook ads. #4: Create a Facebook Ad From a Facebook Page PostNow you’re ready to create the ad itself. Before you proceed, it’s important to know that Facebook Ads Manager categorizes each campaign at three different levels. At the highest level, the campaign category, you pick the objective, which is what you want your ad to accomplish. Do you want more clicks, sales, video views, leads generated, or something else? Then you set up the ad set and ad itself. To get started, open Ads Manager.
On the Campaigns tab, click Create.
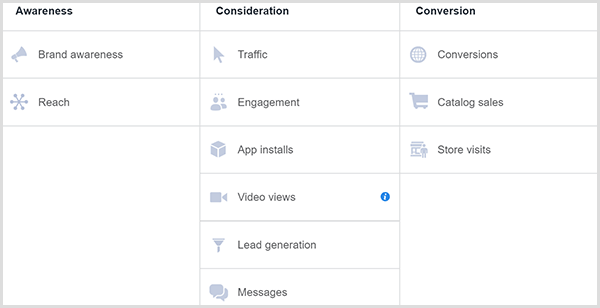
Now you’re asked to choose an objective. The marketing objectives are broken into awareness (how many users you can get to see your post), consideration (how many people you can interest in your product), and conversion (ultimately getting people to buy your goods or services).
Choosing the right objective depends on your marketing strategy. You can choose among many approaches, and it’s up to you to find out what works best for your business. The more expensive your product or service, the more trust you must build with your potential customers. After selecting your campaign objective, you create the ad set. At this level, you choose the audience you’re targeting, select the placement (where your ads will be seen with Facebook’s advertising platform), set the budget, and decide when your ad will be seen. For the audience, you can select an audience you’ve already created and saved, or create and save the audience while you set up a campaign.
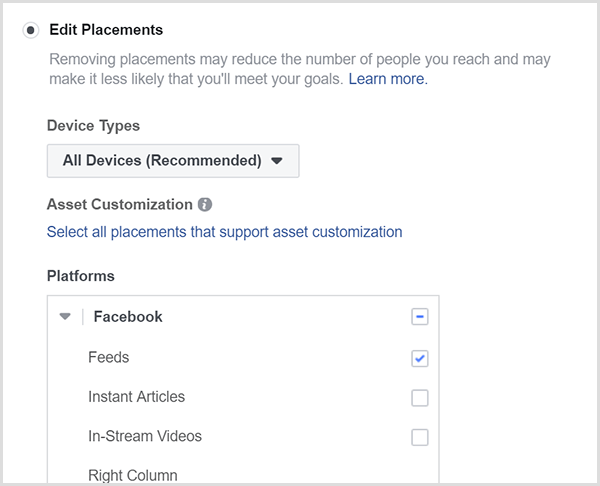
After you select an audience, choose Edit Placements to see your options, which include different device types, as well as options within Facebook, Instagram, and throughout Facebook’s Audience Network (banner ads with partnered websites). When you place your first ads, target only the Facebook news feed. Later on, you can test how other placements work for your business.
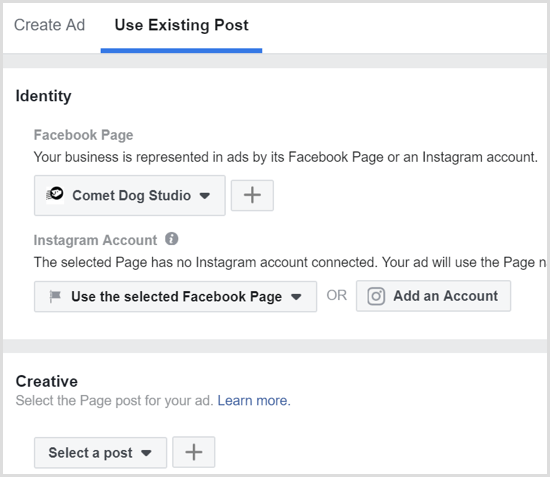
Next, you decide how much you want to spend running your ad and when you want the ad to be seen. If you aren’t sure how much to spend or how long to run your ad, start with a low budget of $30 and run the ad for 5 days. After you click Continue, you create the actual ad that your customers see as they scroll through Facebook. If you have multiple Facebook pages, make sure you select the page that’s associated with the ad you want to show. For your first ad, select a post you’ve already published on your page.
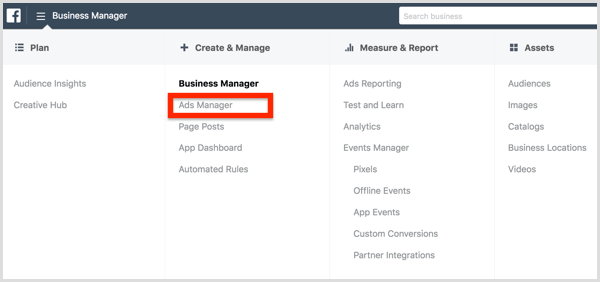
After you click Confirm to create your ad, everything you need is on the Ads Manager menu. The easiest way to understand each option is by exploring each column the tabs are in. For instance, in the Measure & Report column, you can find tools that help you track your campaigns. The Assets column has tools for creating online catalogs, storing videos, and separating your local businesses if you have several locations.
Conclusion As the Internet continues to eat into small establishments’ profitability, it’s imperative that small business owners understand how online marketing works and how social media marketing can help their local business. Facebook advertising is a complex platform, but to get started, you can focus on a few basics so you don’t become overwhelmed. Start by setting up the foundation, creating a simple audience, and running an ad based on an existing post on your Facebook page. This start will give you the basic understanding you’ll need to continue learning about the plethora of options and marketing tactics the platform offers. What do you think? Have you tried running Facebook ads for your local business? What ideas from this article will you try? Please share your thoughts in the comments.  Social Media via https://ift.tt/1LtH18p May 24, 2018 at 05:06AM
0 Comments
Leave a Reply. |
�
Amazing WeightLossCategories
All
Archives
November 2020
|





 RSS Feed
