
|
http://ift.tt/2rpvMcq
How to Build a Facebook Page for Business: A Guide for Beginners http://ift.tt/2szuAGS
Are you curious about how to manage a page effectively and securely? In this article, you’ll discover how to build a Facebook page for your business and how to protect it. How to Build a Facebook Page for Business: A Guide for Beginners by Tammy Cannon on Social Media Examiner. What Is a Facebook Page?A Facebook page is attached to your personal profile so Facebook knows who owns the page, but it’s a separate presence you can use to promote your business, brand, or cause. Because pages are designed for business use, they have a number of features not available on profiles including analytics, advertising, and post scheduling. To make sure you set up your page for success, take advantage of all of the features available to you. #1: Setting Up a Facebook PageTo set up a Facebook page for business, you’ll need to log into your Facebook profile and click the Home button next to your name. Next, click on the Pages tab in the Explore section of the left-hand sidebar of your profile home page. Clicking on this takes you to the main Pages area where you can view top page suggestions, explore invites to other pages, view pages you’ve liked, see the pages you’re already managing, or create a new page. You’ll click on Create Page. Next, you’ll choose a page type for your new business page. There are six options:
Choose the type for your Facebook Page carefully. Each page type has a drop-down menu with an extensive list of categories. Choosing the right page type for your business may seem straightforward at first, but after glancing at the categories, you may find that your business fits into a different page type than you had originally thought. Keep in mind that each page type has unique category options, and that each category option has unique features, so it’s important not to rush this part; find the right fit. Consider the features each type and category offers for your Facebook page. After browsing the page type categories, choose the Facebook page type and category that will be the best option for now. If you change your mind after the page publishes, you can always go back and change the category. Fill out the name of your new page along with any other requested information fields, click Get Started, and you’ll be taken to your new page! For this example, I chose to create a brand page and gave it the name The Styled Story: Flatlays, Stock Photos and Design. You’ll see a prompt list with tips and ideas designed to help you create a great page before you start inviting people to like it. At this point, you’ll want to unpublish your page so you can work on it out of the public eye. Click on Settings in the top navigation bar and open the Page Visibility row in General Settings. Change the visibility to Page Unpublished, and click Save Changes. Now you can build your page and unveil it when it’s complete. Unpublish your Facebook page while you work on getting it ready to launch. #2: Design and Add a Profile Picture to Your Facebook PageYour profile photo for your business page can be any number of things:
Whatever you choose, keep the composition simple so it’s easily recognized. Your profile photo should be 180 x 180 pixels to ensure all of the details of the image are present. You can easily create the right size using a free tool like Canva.com. Inside Canva, click Create a Design and choose the Use Custom Dimensions option. Create a profile image in Canva at 180 x 180 px. Type in 180 x 180 px and click on the Design button to reach the design page. Here you’ll upload your own image. Resize your image so it fits within the square and looks the way you want. Once you’re done, give your profile image a name and click the Download button. Now you’re ready to upload your newly created profile image to Facebook, so head back over there and click on Add a Picture in the prompt list. While you have the option to take a photo with your computer’s camera, you’ll choose the Upload Photo option. Now, simply follow the prompts to upload your new profile picture. Load your profile picture to your new Facebook business page. #3: Create and Add a Cover Photo for Your Facebook PageWith the exception of changing dimensions, you’ll go through the same process as above to create a cover photo; the dimensions for a Facebook cover photo are 828 x 315 px. Something to keep in mind is that the mobile-friendly area is within the 560 x 315 px area, so if you want to add words to your cover photo by adding a text overlay, make sure it will be visible across all devices. When your image is ready, click on the Add a Cover button in the upper-left corner of the Cover Photo space, and then click Upload Photo. You can drag the image to position it correctly and when you’re happy with how things look, click the Save button. After uploading your cover photo, click on the image to fill out the description. This is a valuable piece of real estate on your page, so make sure to utilize this area to share a tagline or a price point, and to include a link to your website or a product landing page. Then, if someone clicks on your cover photo, they’ll find out even more about the page or your business. Add a description to the image you use for your Facebook business page cover photo. #4: Add a Call-to-Action Button to Your Facebook PageAdding a call-to-action button to your page gives people an easy way to do things like sign up for your giveaway or newsletter, buy something, and so forth. Add a Call To Action button to your Facebook business page cover photo. Once you click on Add a Button, which is located just under the right corner of your cover photo, you’ll be prompted to choose from seven types of standard buttons. You’ll have seven types of CTA buttons to choose from. The Book Services option has two buttons.
The Get in Touch option has five buttons.
The Learn More option has two buttons.
The Make a Purchase or Donation has a single button.
The Download App or Game option has two buttons.
Explore all of the types of call-to-action buttons to see which is the best fit for your business. #5: Write and Add a Description to Your Facebook PageUse the Description area to tell people what your page is about. The more information you give potential new followers, the more likely they are to stick around. Your description is limited to 155 characters and shows up in search results, so you’ll want to think about how potential followers might search for your product or service to find your page online. Click on the Add a Short Description prompt and write one to two sentences, including keyword phrases where appropriate, to succinctly describe the focus of your page or business. Use the prompt box to open the Short Description box. Click the Save button and you’re all set. Create a search friendly description to help your audience find you. #6: Create a Custom Username for Your Facebook PageEach Facebook page receives a unique identifier in its URL when it’s created; something similar to http://ift.tt/2rAO7Hq. To create a closer tie to your business and to make it easier for people to find you or tag you on Facebook, you can customize the latter portion of your Facebook URL with a unique username. For example, I might choose StyledStory as the username for our test page, so the URL would become http://ift.tt/2skXubi. Create a username to make it easy for people to find you. In general, you want to keep your username as short as possible. That said, you should avoid abbreviations or acronyms that aren’t intuitively tied to your brand. #7: How to Adjust Important Privacy and Security SettingsNow that your page is set up on the front end, it’s time to make sure it’s secure, define the roles you’ll give to people who have access to or manage it, configure how the public can message you, and so on. General Settings Use the General Settings area to manage control of your new Facebook business page. Here are some helpful settings from this section: Want to save a few steps to navigate to your page? Enable Shortcuts to pin your Facebook page to the shortcuts section of your profile for quick and easy access your page. Open Visitor Posts and choose to allow people to publish posts, photos, and videos to your page. If you’re worried about inappropriate content, you can check the Review Posts by Other People box to let you approve or reject each post before it’s published. Giving people the ability to ask questions through Messenger encourages communication, so it’s important to tick the Messages box that shows the Message button on your page. Allowing people and other businesses to tag your page and share it with others is a great way to expand your reach to other audiences. To take advantage of this, tick the Others Tagging this Page box. Use the General Settings area to manage control of your new Facebook business page. If you have a business in the alcohol and tobacco industries or other age-sensitive products, it might be a good idea to restrict certain ages from seeing your page. The Age Restrictions setting has six options for you to consider. The Page Moderation setting is important if profanity filters make sense for your business. You can use this setting to block comments that feature specific words you choose. Want to show up when someone is searching for a certain topic or page on Facebook? Tick the Similar Page Suggestions box to allow Facebook to suggest your page as a result in relevant searches. It’s possible to allow Facebook to publish a post whenever you update your description, phone number, website, and other details, or keep those posts from being published. Edit the Page Updates settings to reflect what’s best for you. Use the General Settings area to manage control of your new Facebook business page. If you have a global or multi-lingual audience, you can tick the Post in Multiple Languages box and your posts will be shown to your fans and followers in their language. Do you have a preference for the order in which comments are viewed by fans and followers? The Comment Ranking setting lets you choose whether to show the most recent comments first or the most relevant comments based on engagement first. Did you know that fans and followers of your page can download videos published to your page? Depending on the goals of your business, you may want to restrict downloading of videos by ticking the Content Distribution box. Messaging Settings When someone sends you a private message through your page, you have the option to turn on the Response Assistant to deliver automated responses. These messages are personalized with the user’s name and you can edit the template copy to align with your voice. You can configure an auto-response to:
Configure any quto-responses you want to use for your Facebook business page. Edit Page Settings While your page is created with a default order of tabs, you can customize the order and selection of tabs that show up on the left side of your page under your profile picture. OPen Edit Page Settings to click on and drag each tab until you have the order you like. For example, if you have a strong video strategy, you can move the Video tab to the top of the list. Reorder the tabs on your Facebook business page to reflect your content or marketing strategy. Notifications Settings This setting lets you decide how you’re notified when there’s activity on your page. Think about whether you want notifications every time something happens or every 24 hours. You can also choose which types of activity you want to be notified about. Do you want to know every time your page gets a new comment, a new page post share, or a new mention? Turn these and other options off or on from within this section. Finally, tell Facebook whether you want to receive notifications by email, text, or both. Messenger Platform Settings Messenger is evolving quickly within Facebook and the new Discover feature allows people to discover your business to send a message. You can take advantage of extended visibility by choosing to let Facebook show your page in Discover. Page Roles Settings Page Roles deserve some serious consideration because they control who works on your page and what level of access they get. While you can have multiple people working on your page with different roles, you’ll likely want to keep yourself as the only administrator and assign different levels of responsibility to other members of your team. 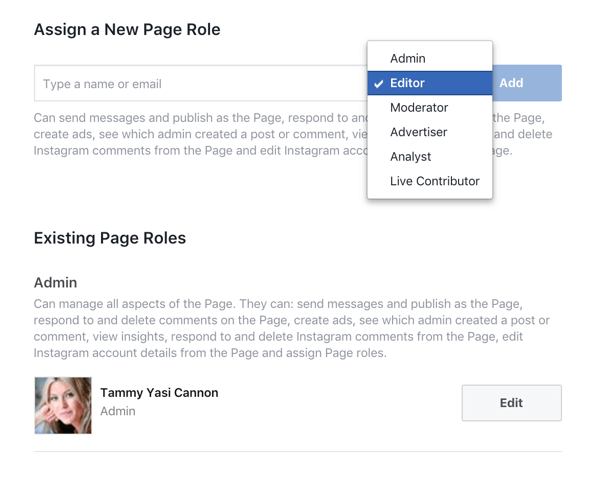
Give every member of your team only the access they need to manage their portion of your Facebook business page. As you click through the page roles in the menu, Facebook provides a description of the access each one has. Use this to help guide page role selection for anyone who helps manage your Facebook page. People and Other Pages Settings This gives you a list of pages and people who like your page. In the event you need to ban someone, you can do it here. Preferred Page Audience Settings If you know who your ideal client is, you can set up a specific audience here that will help Facebook put your page and posts in front of people who fit this target. Define a Preferred Audience to help Facebook understand who you want to reach with your posts. Page Support Inbox Last but not least is this handy inbox for any support tickets you’ve submitted to Facebook for your page. You can monitor any support requests here. #8: Finalize Page DetailsThere are just a few more things to do before you publish your page and begin posting. Click on the three dots on your cover photo to reveal a drop-down that will let you add some final details to your page. Start with Edit Page Info. After you’ve completed these details, click on See All Information to reveal multiple places to provide more granular information about your business. Run through the About section to finalize all your information. Browse through all of the options, but give the following special consideration:
You can add a menu, showcase awards you’ve won, and even add a description of the products you offer. Be sure to use all options that make sense for your unique presence, and remember you can always go back to add things or make changes. When you’re satisfied that everything is in place, it’s time to publish your page and start posting. Click on Settings in the top navigation bar and open the Page Visibility row in General Settings. Change the visibility to Page Published and click Save Changes. Summary Having a Facebook business page makes it easy for new customers to find you, engage with your content, and buy from you. Use these tips as a guide to help you create a Facebook page that aligns with and promotes your business in the best way possible. What do you think? Will you create a Facebook page for your business? Which parts of the process are most confusing? What other questions do you have? Let us know in the comments below. Social Media via http://ift.tt/eZnnjC June 16, 2017 at 08:21PM
0 Comments
Leave a Reply. |
�
Amazing WeightLoss Categories
All
Archives
November 2020
|
 RSS Feed
