
|
http://bit.ly/2wv0KUs
5 Up-and-Coming Social Networks You Should Know About http://bit.ly/2QAjTxm For a time, Facebook was the only social network that businesses had to bother with. Then, YouTube blew up. Twitter became big. Influencer marketing made Instagram a must. Like it or not, social media is a cat-and-mouse chase. Unless brands follow users to new platforms, they risk missing out on social media marketing ROI of up to 1,000 percent.
The post 5 Up-and-Coming Social Networks You Should Know About appeared first on Social Media Explorer. Social Media via Social Media Explorer http://bit.ly/2onGYog May 30, 2019 at 11:03AM
0 Comments
http://bit.ly/2MlE2sE
How to Create Mobile Wallpapers to Share with Your Instagram Followers http://bit.ly/2KcT5Cd We look at our phones about 80 times per day, or once every 12 minutes. With these staggering numbers in mind, it makes sense that we want our devices to look as good as possible. Chances are, you have carefully chosen a wallpaper for your phone’s background and lock screen that brings you some sort of joy (or at least shows everyone around you how cool you are). For brands and organizations, providing phone wallpapers to social media followers is a great way to say thank you—with mutual benefits. Your audience gets spiffy new phone backgrounds, and your brand gets to boost awareness and positive sentiment. To find out more about this practice, I spoke to Hootsuite’s social media team, as well as social media marketers from Saje Wellness and Lush who have found success by sharing their own phone wallpapers—especially on Instagram. Continue reading to discover:
Bonus: Download a free checklist that reveals the exact steps a lifestyle photographer used to grow from 0 to 600,000 followers on Instagram with no budget and no expensive gear. Why your brand should be sharing mobile wallpapers on social mediaYou may be wondering how your brand could possibly benefit from creating a free resource for your audience. But, there are many advantages to sharing mobile wallpapers with your followers. Brand awarenessIf you create a relevant and aesthetically pleasing mobile wallpaper for your audience and they use it, chances are people will take notice. Take Hootsuite’s Global Social Engagement Specialist Nick Martin. He currently has a Dungeons and Dragons themed phone wallpaper. When he’s out with friends and people notice his cool phone background, he tells them where it came from, and where they can get one for themselves. If you’re looking to boost awareness about your brand, this is the perfect low-cost opportunity. Get a branded image on the devices that your customers are looking at all day long, especially while around potential new customers, and it’s basically like having a built-in moving billboard. To ensure your branded phone wallpapers reflect your brand, our social media team at Hootsuite suggests you:
Positive sentimentThe joy of getting something for free is universal. By offering free mobile wallpapers to your audience, you’re showing them that you appreciate their business. By boosting positive sentiment through freebies like mobile wallpapers, you are also more likely to increase engagement and build trust. When done well, this kind of proactive engagement will undoubtedly increase positive feelings around your brand. To make sure your mobile wallpapers actually increase sentiment—instead of decrease—our social media team has some tips:
3 brands doing mobile wallpapers rightSaje WellnessSaje Wellness is a 100% natural essential oil and skincare company that focuses on plant-based ingredients. Due to the nature of their products, Saje regularly shares plant-themed mobile wallpapers. I spoke to Fanny Lau, a Social Media Specialist at Saje, about their approach to sharing wallpapers with their audience. Lau explains, “We end up collecting lots of beautiful imagery captured by our in-house photographer [Kornelia Kulbacki] that are not only used for our marketing campaigns but end up as wallpapers for our personal phones, presentations, and laptops. We figured that our Instagram community might love them as much as we do, so we decided to share them to Instagram Stories.” Through sharing wallpapers with their Instagram audience, Saje has seen an uptake in engagement with their content. “Every time we share a wallpaper story, we get lots of positive sentiment from our social community, who share their gratitude and excitement for us sharing them,” Lau says. Often followers will send screenshots of their favorite wallpaper in use, and respond to their wallpaper Stories to let them know how much they love them. “It’s so nice to know that people have a little piece of Saje with them wherever they go!” Lau says. Key takeaways:
Game of ThronesWhile HBO’s Game of Thrones might not need any more brand recognition, this popular (understatement) show has perfected the art of building hype. To create buzz for the eighth and final season of the show, their social media team shared a number of themed wallpapers for their 7.8 million followers. Using the hashtag #ForTheThrone, Game of Thrones first shared the announcement to their Twitter account with a link to their Instagram Highlights where the wallpapers are available permanently. Key takeaways:
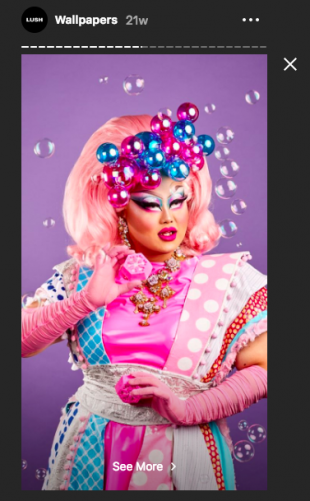
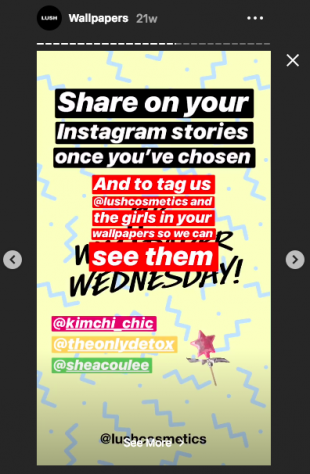
Lush CosmeticsLush Cosmetics is most widely known for inventing the bath bomb more than 30 years ago, but their product line also includes ethical, natural, and never animal-tested cosmetics, skincare, and other personal care items. I spoke to Lush’s Community Manager, Sabine Schwirtz-Zinser, to find out exactly how the brand engages their audience with mobile wallpapers. Lush started sharing wallpapers after their audience voiced their desire for this type of content. Schwirtz-Zinser explains, “Since our audience is so engaged, it’s incredible for us to continue to deepen our connection with them by providing a static piece of content that they can use on their own terms.” For Lush, positive sentiment is also a huge aspect to sharing mobile wallpapers. “Regularly we will ask customers to engage on past posts or tell us what they want to see next, and we use this to temperature check if this is something our audience is still engaged with this content,” says Schwirtz-Zinser. If they don’t post new wallpapers regularly, followers send Lush’s customer care team direct messages asking for them. To keep this positive sentiment going, Lush’s team shares mobile wallpapers that reflect their core brand values such as their vocal support of the LGBTQ+ community. For the holidays, Lush shared a special drag queen edition of their “Wallpaper Wednesday.” This line of wallpapers features three drag queens, Kim Chi, Detox, and Shea Couleé, from RuPaul’s Drag Race. These tied into a larger campaign where Lush hosted meet and greets with the queens, using the images for in-store advertising. Schwirtz-Zinser explains, “We like to share wallpapers that match every campaign we put out. Whether that’s #bathart photos, photos of one of our farms, or photos of skincare products, we always try to put something up that aligns with current messaging.”
Key takeaways:
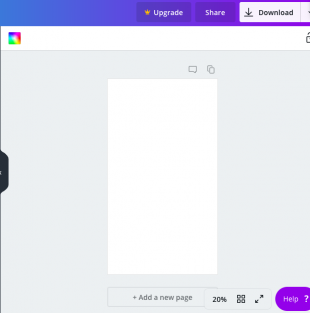
How to easily create phone wallpapers for your brandNow that you understand the benefits of sharing phone wallpapers with your audience, it’s time to learn how you can actually create some for your brand. The online design tool Canva makes this process as easy as possible. We’ll walk you through how to create a wallpaper with Canva’s desktop tool, as well as their mobile app. Bonus: Download a free checklist that reveals the exact steps a lifestyle photographer used to grow from 0 to 600,000 followers on Instagram with no budget and no expensive gear. Get the free checklist right now!Desktop:1. First, go to the Canva website. If you don’t already have an account, it’s quick and easy to sign up either with your email or Facebook account. 2. Once you’re logged in, use the search bar and type in “Instagram Story.” Click on the suggested option of “Instagram Story” when it appears.
3. Start adding elements to the blank template.
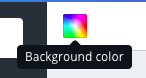
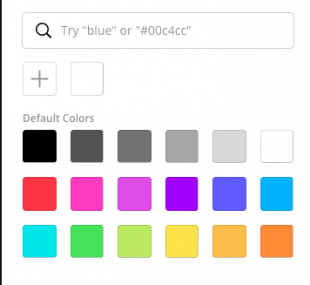
4. To change the main color, click on the rainbow icon in the top left corner.
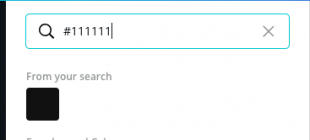
5. If you have official brand colors, for example, you can add the exact Hex Code to match it perfectly.
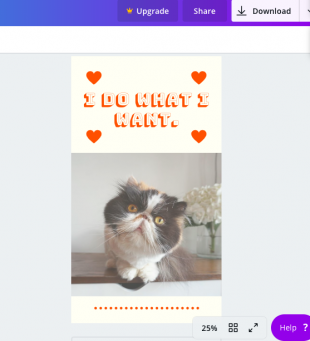
6. Once you have your background color, it’s time to add other elements. You can add writing (e.g.., for an inspirational quote), shapes, and other images. Canva has tons of free elements like grids, shapes, lines, photos, icons, gradients, and charts. To make this phone background for my cat’s Instagram account, I uploaded a photo, added a text box, and then used heart icons and a dotted line—all available for free in Canva (and done in under 10 minutes.)
7. Once you’re happy with how your phone wallpaper looks, click on the “Download” button.
8. After you download your Story wallpaper to your computer, send it to your phone and then upload to your Instagram Stories as you normally would. Mobile app:1. Download the Canva app if you haven’t already. It’s free for both Apple and Android users.
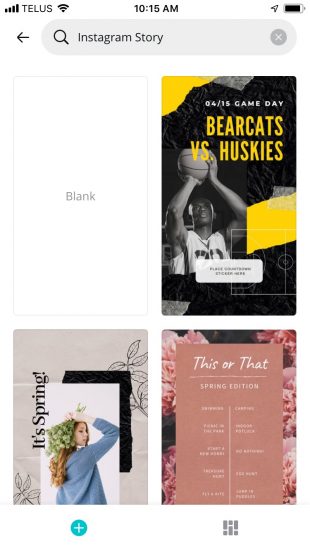
2. Open the app, and use the search bar to search for ‘Instagram Story’.
3. Click on the ‘Blank’ template. 4. Tap to change the background, and then follow Canva’s clear instructions to edit other aspects and customize to your heart’s desire.
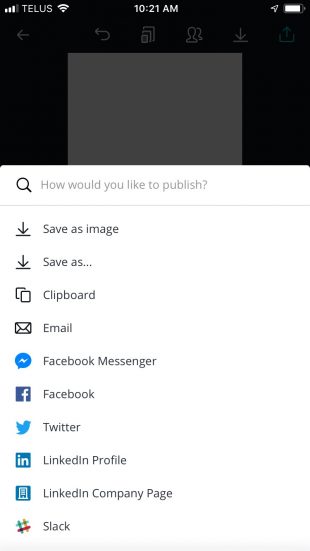
5. Once you’re done designing, click on the blue arrow in the top right corner and save your image. You’re now ready to share with your followers!
Manage your Instagram presence alongside your other social channels and save time using Hootsuite. From a single dashboard you can schedule and publish posts, engage the audience, and measure performance. Try it free today. The post How to Create Mobile Wallpapers to Share with Your Instagram Followers appeared first on Hootsuite Social Media Management. Social Media via Hootsuite Social Media Management http://bit.ly/1LdunxE May 30, 2019 at 08:32AM The world of digital advertising explored http://bit.ly/2K9ysXA Getting your brand out into the public domain is a lot more complicated than it once was. About twenty years ago there were three main ways of advertising your product: print, radio or television. Granted there were a few other niche areas like cinema or billboards, but the reality was that the bulk of the advertising spends went between those three main platforms. The advent of digital however brought with it a whole new set of options. Because digital is a very broad category that contains a huge number of sub-categories and options – it is a broad church. So, if you are looking to spend some advertising budget digitally, here are a few areas that you might want to consider. SocialPlatforms like Twitter, Instagram and Facebook have grown massively in the last decade and they now offer brands one of the best profiled and largest audiences available. Their sheer size and reach but the depth of their databases means that social media advertising has become a very popular place for brands to spend. The reach is huge, the targeting is impressive and the return on spend tends to be very good. Paid SearchDiscoverability is a big thing for websites and most spend a lot of search engine optimization. The goal of SEO is to get your page at the top of the list that is returned by Google or Bing or one of the others. But there is another way to get to the top of the list and that is to buy keywords and get to the top of the list as paid search. It is where you want to be, it is generally cheap because you can operate on a pay per click model and it puts your brand right in front of people who are looking for it. BannersBanner advertising is the traditional way people advertise on digital platforms. Old school premium campaigns still exist but now most people look to use programmatic solutions that offer a more targeted audience and a much better CPM rate. Programmatic advertising is an online exchange that matches the needs of the publisher (who is essentially the supplier of advertising inventory) with those of the brand (who are the demand source), to secure the best deal for both parties. Because supply far outweighs demand the average CPM rate has dropped alarmingly in the last five years, but it is simply what the market has dictated. VideoAs the video starts to play an increasingly large role in the digital space, so pre-roll and in-roll advertising is the latest form of advertising to grab the attention of media buyers. These are simply video advertisements that accompany video clips. One of the big advantages of this type of advertising is that it cannot be blocked by ad-blockers. In short, if you want to view the content then you have to sit through the advertisement. This means that the brand gets good views and interactions. It also means that the publisher is able to charge much higher rates for advertising. Another win for everyone. The post The world of digital advertising explored appeared first on Social Media Explorer. Social Media via Social Media Explorer http://bit.ly/2onGYog May 29, 2019 at 09:02PM The Role of Social Media in a Content Marketing Strategy http://bit.ly/2W2afoJ Content marketing has always been an integral component of any digital marketing strategy. But where does social media marketing sit within this strategy? Social media and content marketing are like cupcakes and muffins. They are made similarly, and the desired effect is the same. However, when you incorporate them accurately, you can create something powerful. Note that content marketing goes beyond the simple process of creating content. It is about the overall process of creating and distributing that content. While advanced factors such as web hosting resources can impact the performance of your website and overall user experience, creating and sharing great content is an effective way of grabbing your audience’s attention and keeping them interested in what your brand. That means social media marketing is an important part of content marketing. It is made of videos, pictures, storytelling, and more. The role of social mediaIn addition to your website, social media is like a vehicle on the internet that help driver content to the right destination. Just take a closer look at the entire social network. You will realize that there are many reliable platforms that can be used. That means you will not be driving your content on a single street. Besides, social media can help keep your target audience engaged, offer you a global publishing platform, and probably reach out to a wide audience, especially when it comes to establishing brand awareness. Note that the content published on your website or shared on social media must be relevant and high-quality. That means you may want to work reliable content writing platforms in case you are not experienced in content and social media marketing. It is, therefore, important to align your content to social media strategy. This will make your content marketing campaigns more effective. Note that this alignment requires accurate planning and strategy. Planning your business goals and marketing objectives can help you align your content marketing and social media strategy. Having clearly set business objectives makes it easier to create a relevant content marketing plan to achieve those goals. Set aside enough time to create a list of the pieces of content you need and set a plan of how this content will be distributed. On this basis, consider creating a social media content plan that can become a very powerful roadmap to the success of your content marketing campaigns and your business too. It is also important to understand your audience and how they use different social media channels. You should make sure that you create content in a way that your target audience prefers. This will make you their first choice when it comes to finding answers online. Make sure that you create the right balance of your content and business image, especially when sharing promotional content with them. Remember, you should always keep the interests, trends, and the needs of your target audience aligned with the specific content you create and share on your website and social media channels. The post The Role of Social Media in a Content Marketing Strategy appeared first on Social Media Explorer. Social Media via Social Media Explorer http://bit.ly/2onGYog May 29, 2019 at 08:31AM
http://bit.ly/2JMOBmD
How to Create an Instagram Stories Style Guide (and What to Include) http://bit.ly/2Kasupz No matter how dedicated you are to running your company’s Instagram account, you can’t be there all the time. Everyone needs a vacation every now and then! When another team member has to take the reins, an Instagram Stories style guide will help to set them up for success by covering everything they need to know. Read on to find out:
Download your free pack of 20 customizable Instagram Stories templates now. Save time and look professional while promoting your brand in style. Why you need a style guide for your Instagram StoriesYou need an Instagram Stories style guide for the same reason you need a style guide for your other social media channels. It will help you maintain a consistent look and feel for your Stories, which strengthens your brand as well as your relationships with your followers. Plus, it will give your coworkers confidence when they need to step up to the plate, so they can focus on creating great Stories rather than worrying that they’re using the wrong fonts or hashtags. With that in mind, here’s what your style guide should cover. 10 things to include in your Instagram Stories style guide1. FontsWhether you prefer one of the five standard fonts on Instagram Stories (classic, modern, neon, typewriter or strong), or use a third-party app like HypeType to expand your options, your font says a lot about you. As designer Sarah Hyndman has found, fonts convey your brand’s personality and character to audiences. Using a different font will change the tone of your Stories, as if they suddenly started speaking in that weird British accent of Madonna’s. So wherever your font comes from, make sure you include it in your style guide. Specify sizes and weights, and any exceptions or special situations. If you use all caps for headlines, or prefer to stick with a casual all-lowercase vibe, make sure to mention it. 2. List of approved + branded hashtagsAdding hashtags to your Instagram Stories can help them reach a wider audience. But they can also work against you if you accidentally write something embarrassing or off-key. Spare your coworkers (and your brand!) the embarrassment with a comprehensive list of hashtags. These should include branded hashtags (the ones that are specific to your company or campaigns, like Warby Parker’s #WarbyHomeTryOn), as well as any other approved hashtags you use regularly and when to include them.
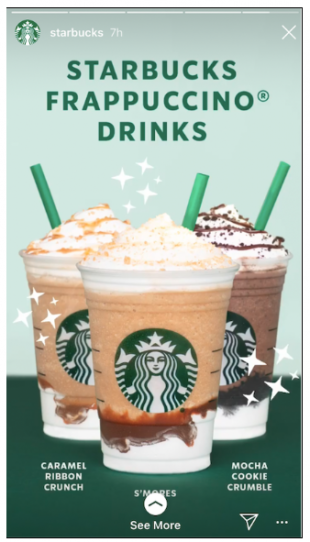
Don’t make assumptions about how familiar other team members are with Instagram shorthand. You might think everyone knows what #TBT means, but it doesn’t hurt to be clear. 3. List of approved GIFsI hope you’re using GIFs, the common language of the internet, in your Instagram Stories. There are almost no posts that can’t be improved by the addition of a dancing Tina Belcher. If you are, you should include them in your style guide! Whether you create your own or just pull some favorites through GIPHY, your style guide should cover GIFS and their usage. For instance, maybe when you include a link in your Instagram Stories, you always add a specific “swipe up” or “read more” GIF. It can help here to include screenshots or image files. These details are small, but they make all the difference in crafting a Story that feels right to your followers. 4. Image sources and guidelinesJust like coffee is the most important part of your morning, visuals are the most important part of your Instagram strategy. Leave details for where to find approved images, like your preferred stock photos sites or meme accounts, and shared folders with assets for your products or campaigns. In the event that your coworkers need to take live photos and videos for their Instagram Stories, it can also be helpful to provide guidelines about image best practices. Lucky for you, we have tips on taking great photos! But you should also include any regular filters or edits that you do to keep your images on-brand, to provide guidance for image editing as well. 5. ColorsColor is key to your brand identity. Using color consistently in your Stories will help to build brand recognition and establish a distinctive style. Just think of Starbucks and their signature green:
Your Instagram Stories style guide should include a list of your brand colors, including where and when you use them. Include your primary palette (the colors of your logo and packaging, for instance, which are most strongly associated with your brand), as well as secondary colors. The secondary colors might be more neutral or subdued, but should complement your primary palette. Include specific HEX codes and RGB values for content creators who may be designing images or working with templates (more on those below). Tools like Canva also let you store presets with your brand colors, which makes them easy to document and share. View this post on Instagram 6. Apps and toolsWhat do you use to make your Stories look amazing? Whether it’s VSCO for enhancing your videos and photos or Life Lapse for stop-motion-style Stories, your style guide should include these tools! Download your free pack of 20 customizable Instagram Stories templates now. Save time and look professional while promoting your brand in style. Download the templates now!
Include any presets or go-to filters and settings, so that your teammates can nail the look and feel of your Instagram Stories. 7. Instagram Stories templatesRecommending specific apps will help achieve an on-brand look and feel for your Instagram Stories, but providing templates will ensure perfect alignment. If you have multiple team members uploading Instagram Stories, we recommend using templates to create polished, consistent content (start with our free templates). There are a ton of apps for creating Story templates. Some of our favourites include Canva, Adobe Spark, and Unfold, which was used by Tommy Hilfiger to make this Story:
Include login details for your account in your style guide, so your teammates can access the templates you use regularly. Provide guidelines for usage of each template. For instance, if you use a specific template for Stories about new blog posts, note it in your guide! 8. Content calendarMaybe you take a spontaneous approach to Instagram Stories, capturing whatever inspires you each day. We respect a free-spirited approach! But more likely, you use a social media content calendar to plan out your posts. This is valuable information if someone new is tending to your Instagram Stories for a longer period of time! The content calendar should include featured content for all your channels, like product launches and special occasions. But it should also have tips for any recurring or planned Instagram Story features. If you include regular Story content on certain days (like Everlane’s Transparency Tuesdays or Basically’s Wednesday cooking Q+As), make sure you have those details outlined in your content calendar. 9. Evergreen content ideasWhether or not you have a calendar mapping out day-by-day (or week-by-week) content for your Stories, it can be helpful to include a guide to your brand’s evergreen content too. Evergreen content refers to the posts that are always relevant for your audience. It can be repurposed to fill gaps in your posting schedule, or if you’re just drawing a blank on what to share. These could be your “best of” blog posts, your most popular interviews, and the photos and videos that got the highest engagement. You can also suggest user-generated content here, like posts from influencers that feature your products. Your style guide should include suggestions and links here for guidance, as well as tips on what types of Stories perform best with your audience. If you know your followers always loves a Story about your office’s cutest pup, that’s good intel to include! That way, if your teammate isn’t sure what to post, they’ll have some solid ideas to draw from. 10. Posting times and frequenciesThere are no best practices for how often to post to Instagram Stories, or what times of day you should post (unlike posts to the feed, or other social media channels!) The key to success isn’t a magic number of stories per day— it’s consistency. For you, that might mean posting a few Stories every day, or just having a few days each week where you post content. If you track your Stories analytics, you’ll figure out what works best for your audience! Whatever you do, put it in your style guide. If you typically post three Stories each day, it’s going to look bizarre to your followers if an overeager teammate posts 25 all at once. Once you’ve assembled your style guide, you can take a break from your brand’s Instagram account with confidence. It might take a little effort to put together, but it’ll save your team a ton of time and worry down the road! Most importantly, it’ll let all of you enjoy the process of creating and sharing great Stories with your audience. Manage your Instagram presence alongside your other social channels and save time using Hootsuite. From a single dashboard you can schedule and publish posts, engage the audience, and measure performance. Try it free today. The post How to Create an Instagram Stories Style Guide (and What to Include) appeared first on Hootsuite Social Media Management. Social Media via Hootsuite Social Media Management http://bit.ly/1LdunxE May 29, 2019 at 08:20AM
http://bit.ly/2EHgE2z
How to Craft Meta Tags for SEO and CTR http://bit.ly/2HZp3z6 Creating content is hard work. It takes time, effort, and resources to make landing pages, write blogs, build custom infographics, and create videos for your website. But all of that hard work will go to waste if people aren’t navigating to your site. Creating the content itself is only half of the battle. Now you need to make sure that it’s optimized for search engines so you can drive organic traffic to your pages. That’s why you need to understand the importance of meta tags. Once you learn how meta tags work, you can optimize them to boost your Google search ranking. The higher you rank, the more clicks you’ll get; it’s really that simple. In fact, 75% of all clicks go to the first page of Google search results. The top result of any given search gets roughly 33% of clicks. While positions two and three get 15% of clicks and 9% of clicks, respectively. What happens if your site is on page two of Google? That’s close enough, right? Wrong. According to Forbes, the second page of search results only gets 6% of all clicks—and that’s distributed throughout the entire page. We’ve reached a point in the world of SEO where websites can no longer afford to ignore meta tags. I’ll explain everything you need to know about crafting title tags and description tags that will maximize your SEO value and boost your click-through rates. What are meta tags?Let’s start with the basics. Meta tags are basically just HTML text that describes the content on a particular page. However, you won’t see the tags on the front-end site of any web page. Instead, these tags are written on a page’s code. The purpose of a meta tag is to give search engines additional information for what the page is all about. Crawlers will be able to get a good idea of what type of content is on your page by the text and heading tags. But the meta tags give these crawlers even more to work with. Furthermore, your meta tags can appear in the SERPs, even though they aren’t actually part of the page. Let me show you an example so you can see what I’m referring to.
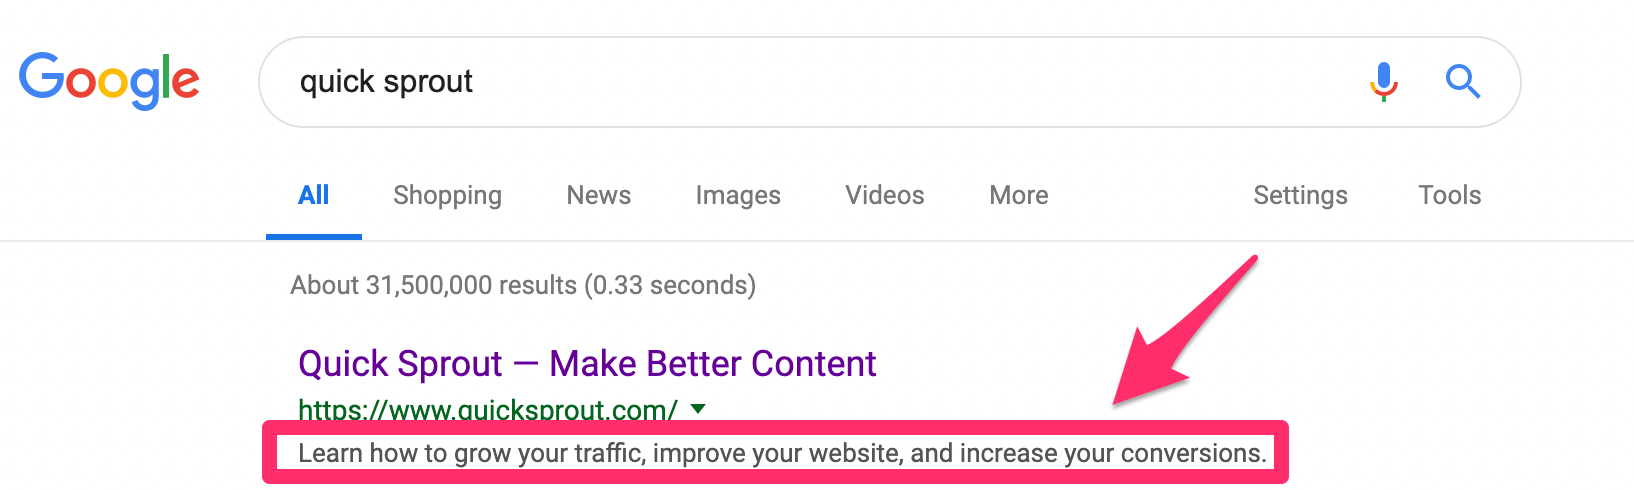
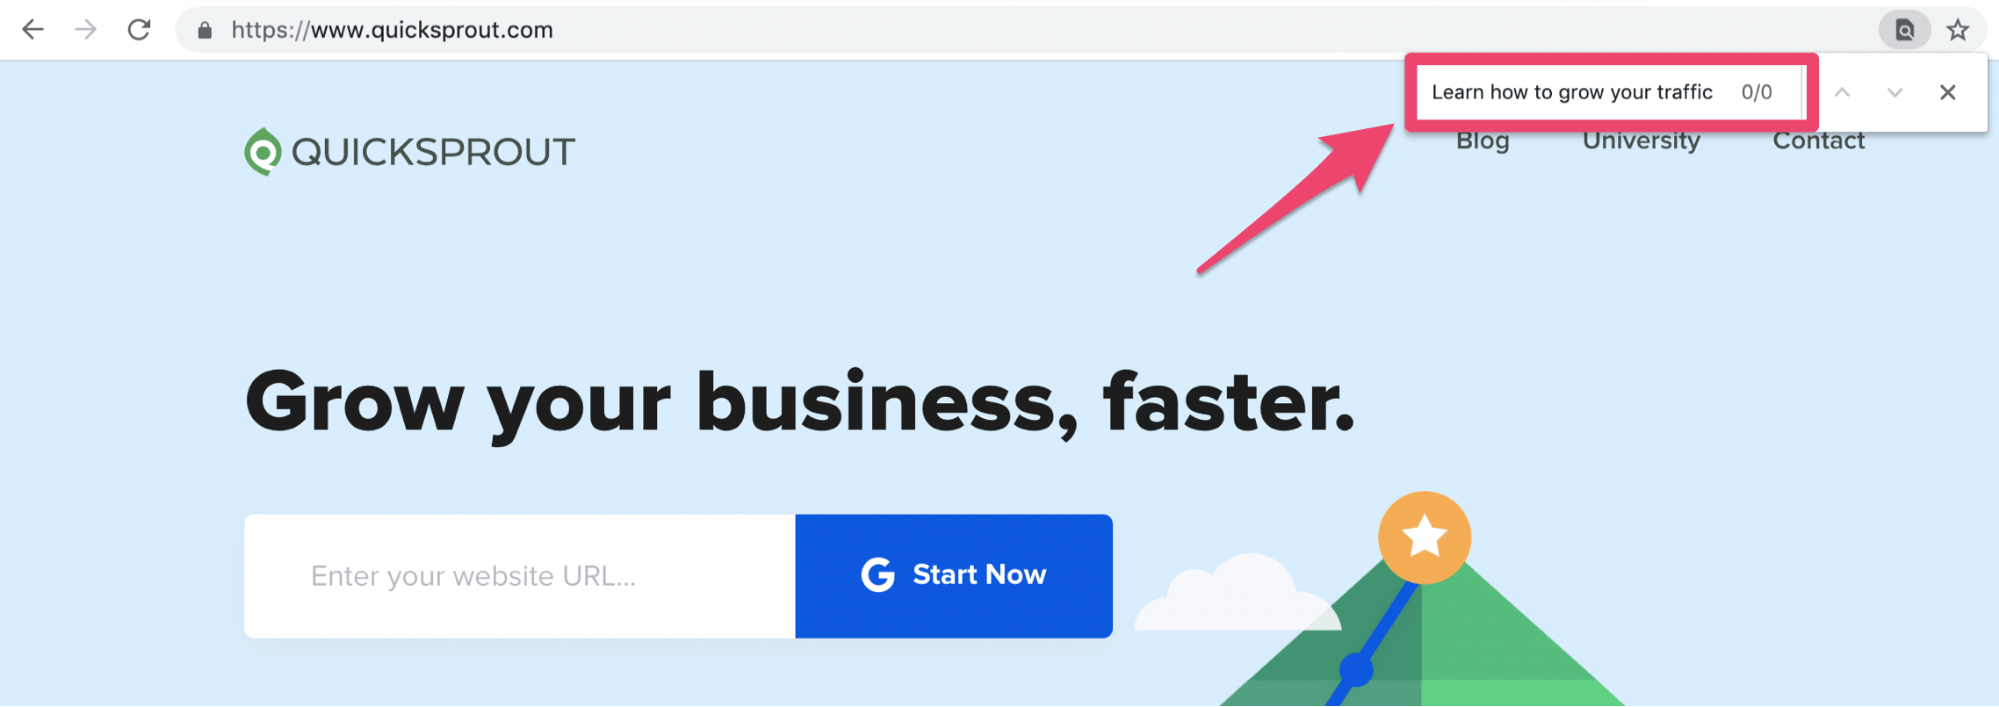
We’ll keep things simple here. If you search for Quick Sprout on Google, our homepage will be the top result. I took a screenshot so you can verify this. But instead of the search engine just providing a link to our site, there is some additional text underneath the URL in the search results. This is the meta description of our homepage. Now, let’s navigate to the page itself. If you land on the Quick Sprout homepage, you’ll see that the text in the SERPs is nowhere to be found on the page.
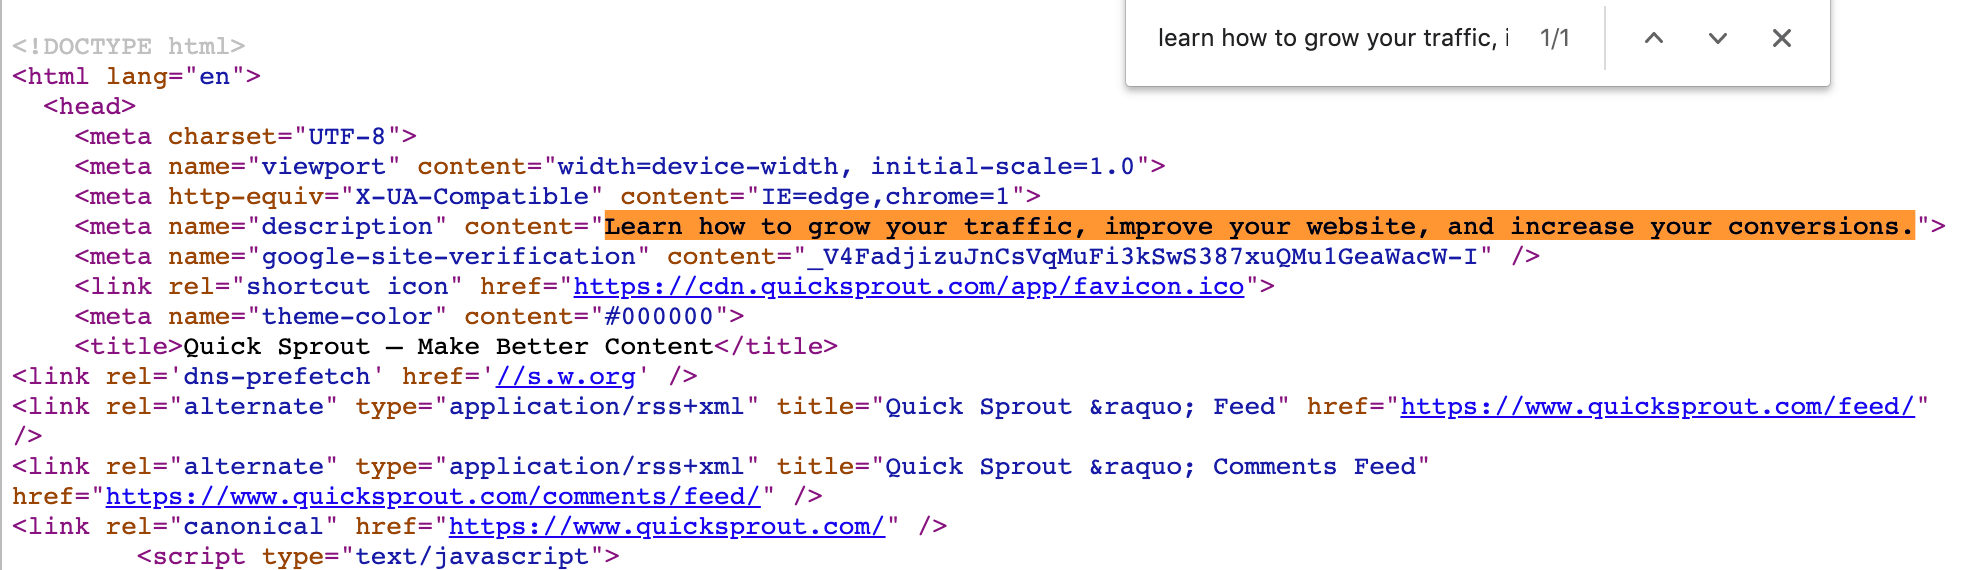
Look what happens when I search for that text. There are zero results. How is this possible? That’s because the meta description is in the code. Anyone can look at the code of a page to see if it has meta tags. You just need to know where to look. So if we right click on the Quick Sprout homepage (or any page on any website) you can click “view page source” to see the code. You’ll be redirected to a new window where you’ll see a bunch of syntaxes that can tough to decipher.
Rather than looking for those tags manually, you can use the “Command + F” search function to your advantage. This time when you search for that exact text, you can see that it’s on the page. I highlighted this meta description tag in the screenshot above so it’s easier for you to see. If you click closely, you’ll see other meta tags in this code as well. We’ll discuss some of these other tags in greater detail as we continue through this guide. Types of meta tagsAs I just said, there are several different types of meta tags that can appear in the code of a web page.According to Google, there are actually nine meta tags and related items that their search engine recognizes. With that said, some of these are pretty technical. I don’t want to spend time diving deep into all of them. So instead, we’re going to focus on the most important meta tags that have the biggest impact on SEO and CTR. Title tagsTechnically, title tags are not actually meta tags. But they’re treated the same way and recognized by Google, just like a meta tag. Your title tag will still appear in the <head> of your HTML code, along with the rest of the meta tags on that page. Title tags are usually used jointly with a description to provide a high SEO value for a web page. Here’s something else that you need to understand about a title tag. This is not the same as the header of a page or the title of a post. In fact, the two can be completely different from each other. Here’s an example so you can see exactly what I mean.
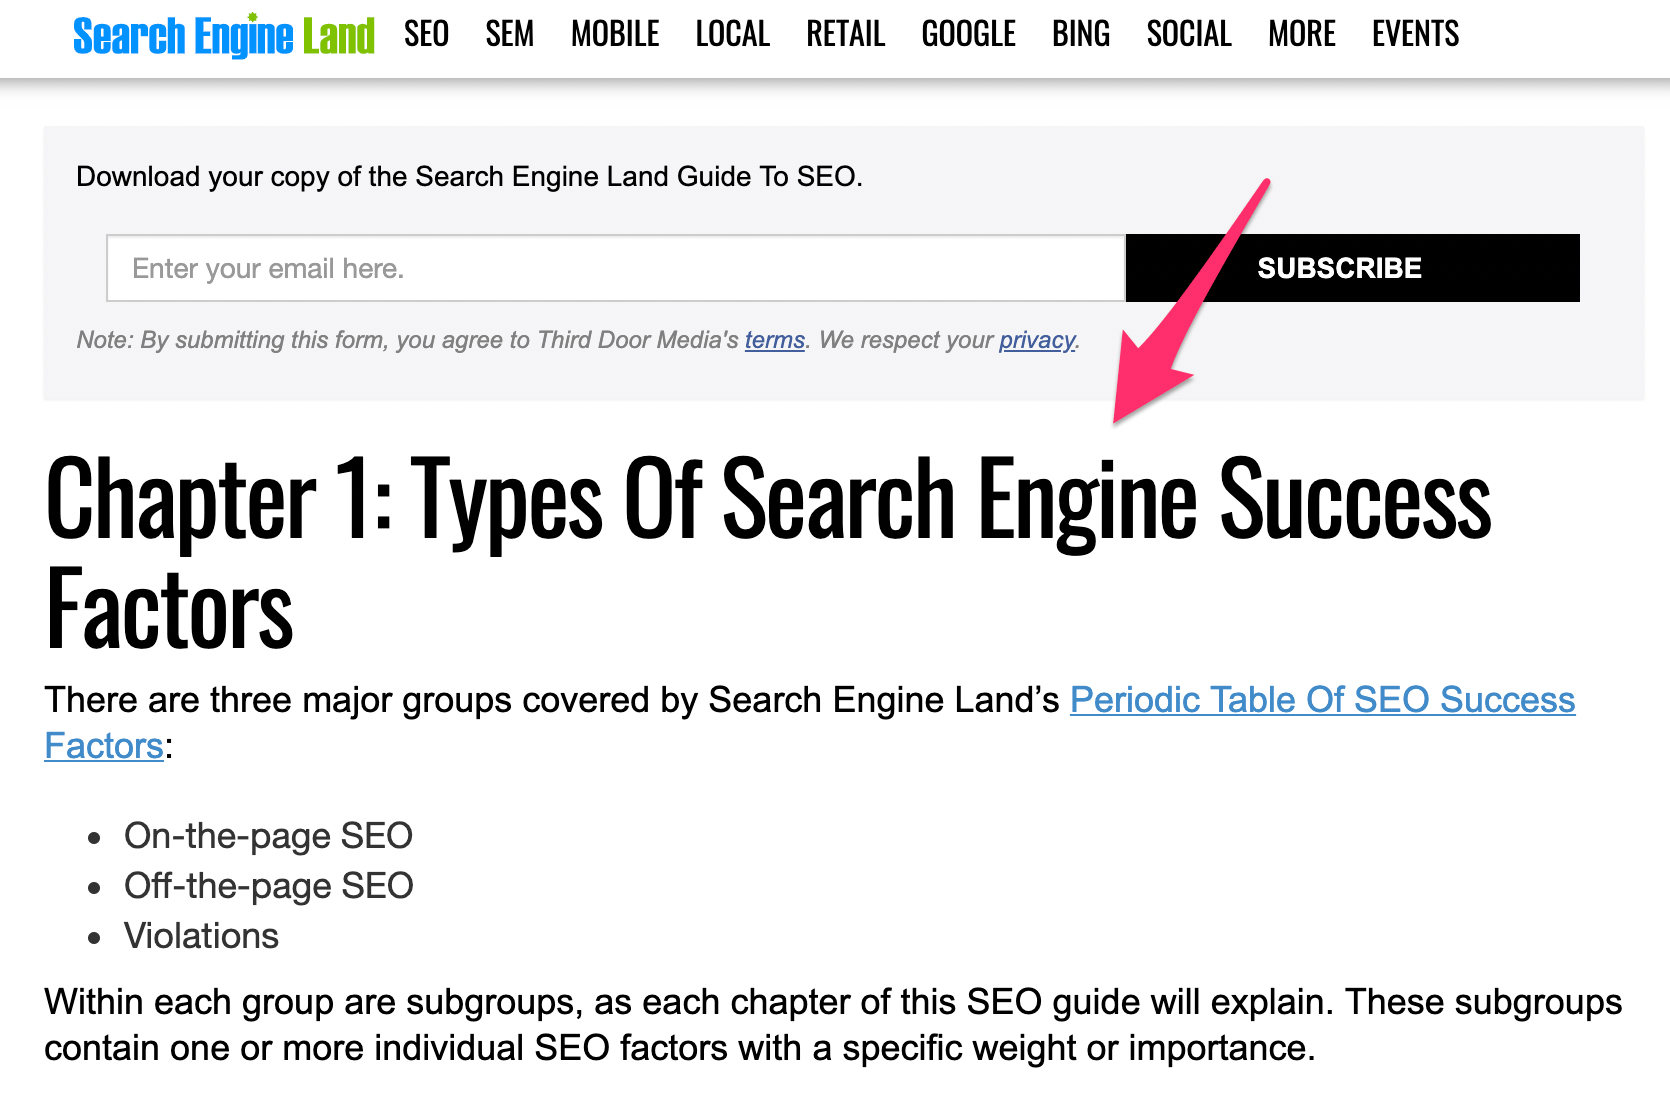
This is a screenshot of search results for a page on Search Engine Land. I highlighted the title tag, which is how it looks on search engines. Here is that same title tag, except written in the code of that page.
As I knew it would, this title tag in the page source matches exactly how it’s displayed in the Google results. This is very easy to follow so far. But now let’s take a look at the page itself.
The heading on this page doesn’t match the search title, nor does it match the code. Simply put, the title tag and headline does not need to be the same. You can use alternative title tags for SEO value. In this case, “SEO Guide” will have a much better SEO value than “Chapter 1” for searches. I’m sure that’s why Search Engine Land made the change for their title tag. You need to realize that the title tag will be the first thing that people see in the search results. That’s why it needs to be a clear indication of what that landing page will be about. Title tags should be crafted in a way that can be understood by real people, while still speaking to search engines. Meta descriptionWe talked about meta descriptions earlier when I showed you the example from Quick Sprout. These snippets are meant to tell crawlers, as well as humans, what they can expect to see on a page. Again, this won’t appear on the page itself, but it will show up in the SERPs. Here’s the thing. Technically, your meta description won’t automatically be the snippet shown in the search results. According to Google, there are two ways that these snippets are determined.
Google “sometimes uses meta tags to generate snippets.” This is the exact wording from Google a webmasters support page. But in my experience, if your page has a meta tag, that’s what will be used in the SERPs. This is a great way to control how your site appears in search engines, in addition to showing crawlers what your page is about. Use your meta description as a way to differentiate your page from other websites in the results. Explain why your website is offering exactly what the user is looking for, based on their particular search. Robots meta tagsRobots tags are a little bit more technical, so I don’t want to spend a ton of time on them. But these tags are definitely worth bringing up since they have an impact on both SEO and CTR. Examples of the type of controls used with robots meta tags include:
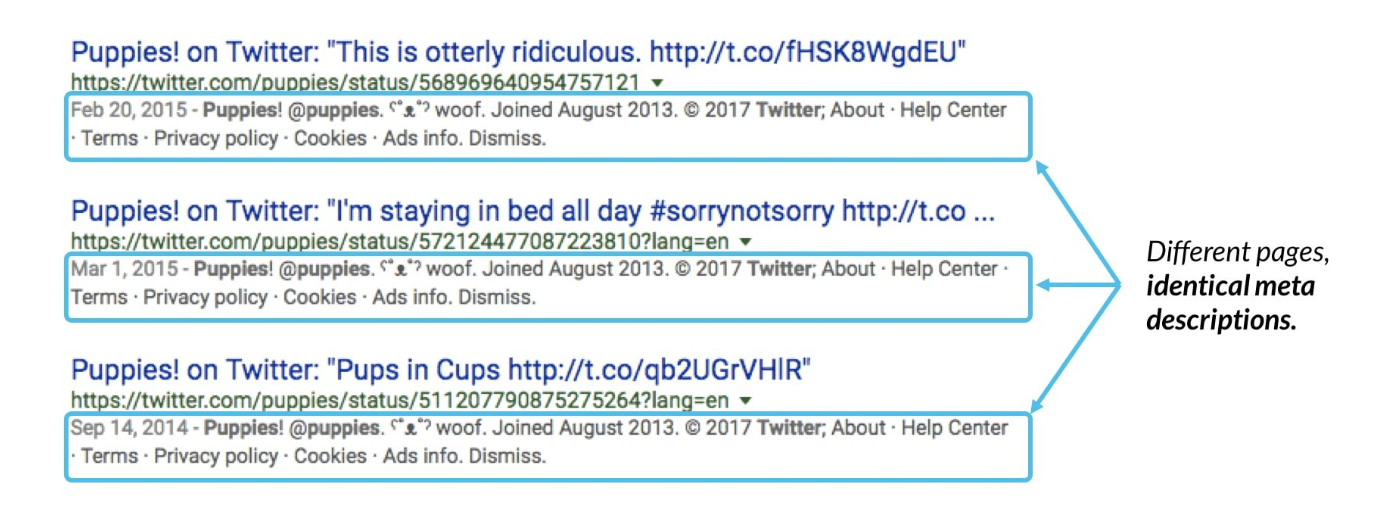
For those of you who want a more advanced way of improving your site’s technical SEO value, review my guide on how to optimize your robots.txt file. Meta tags best practicesAs I said before, you’re going to want to focus primarily on title tags and meta descriptions. So use this as a checklist, guide, or reference to make sure you’re optimizing these two tags the right way for SEO and CTR. Don’t use keyword tagsIf you look at other online guides about meta tags, you’ll see that some “experts” will tell you to include keyword tags. That’s a waste of time. Keyword tags are an outdated SEO tactic. In fact, it’s been nearly a decade since Google announced that they don’t use keyword tags as a factor for rankings. You can even refer back to the page I referenced earlier about the types of tags that Google recognizes. Keywords aren’t on the list. That’s because their crawlers are so advanced that they can extract keywords from the content without needing those tags. Plus, it prevents people from adding irrelevant keywords to their HTML code just for the sake of ranking. With that said, you’ll still want to use keywords in your title tag, meta description, and heading tags. But having separate keyword tags won’t give you any added SEO benefit. Avoid duplicate descriptionsEvery page on your website should have a meta description. But if you’re using the same meta description (or slightly different versions of the same meta description) on more than one page, it won’t be helpful when those pages appear next to each other in the search results. Here’s an example.
Users won’t know what to click here. The meta descriptions don’t add any value, so they’ll probably just skip over the results and move on to another option. This would definitely damage your CTR. Plus, Google always tries to prioritize the user experience. So if they notice duplicate or similar descriptions on your website, they may just eliminate those snippets from the search results altogether when your site is being indexed, which would be another harmful scenario for your CTR. Meta descriptions are so valuable to users when they’re making a decision of what site to click on in a list of search results. For those of you who are using duplicate descriptions as a shortcut since you’re strapped for time and don’t want to create one for every page, you need to learn how to prioritize. At the very least, have unique descriptions for the most important pages on your site. Eliminate weak meta descriptions and just rely on rich snippets to appear in the SERPs. Be descriptiveIt may sound redundant for a meta description to be descriptive, but you’d be surprised how often I see people make this mistake. This is not an opportunity for you to just blindly stuff as many keywords as possible into your page code. The meta description needs to make sense. That doesn’t necessarily mean that it always has to be in a complete sentence format. But with that said, it has to add value to real people, as well as crawlers. Keyword stuffing for bots can result in Google removing your snippet from the search results. Prioritize quality. Give people a glimpse at something that isn’t displayed on your pages. Don’t just take the shortcut and make your meta description the same as your subheader. That’s not the best way to maximize SEO value. Don’t use quotation marksRemember, your meta description is going to be in your HTML code. So certain characters will impact the way it’s displayed. Whenever a double quotation mark is added to a meta description, the remaining text that appears after the quotation mark will be cut off when it appears in the search results. So just be aware of this when you’re writing a description. It’s probably in your best interest to avoid special characters and just stick to plain text. ConclusionGreat content alone won’t maximize your SEO value. There are lots of other factors at play when it comes to your search ranking and CTR metrics. You need to learn how to use meta tags to your advantage. The three meta tags that have the biggest impact on SEO and CTR are:
For the most part, you’ll want to prioritize title tags and meta descriptions. You can move on to robots.txt files when you’re ready for a more advanced strategy. Use this guide of best practices for crafting title tags and meta descriptions that will positively impact your SEO ranking. Social Media via Quick Sprout http://bit.ly/UU7LJr May 29, 2019 at 07:11AM
http://bit.ly/2WwLAwK
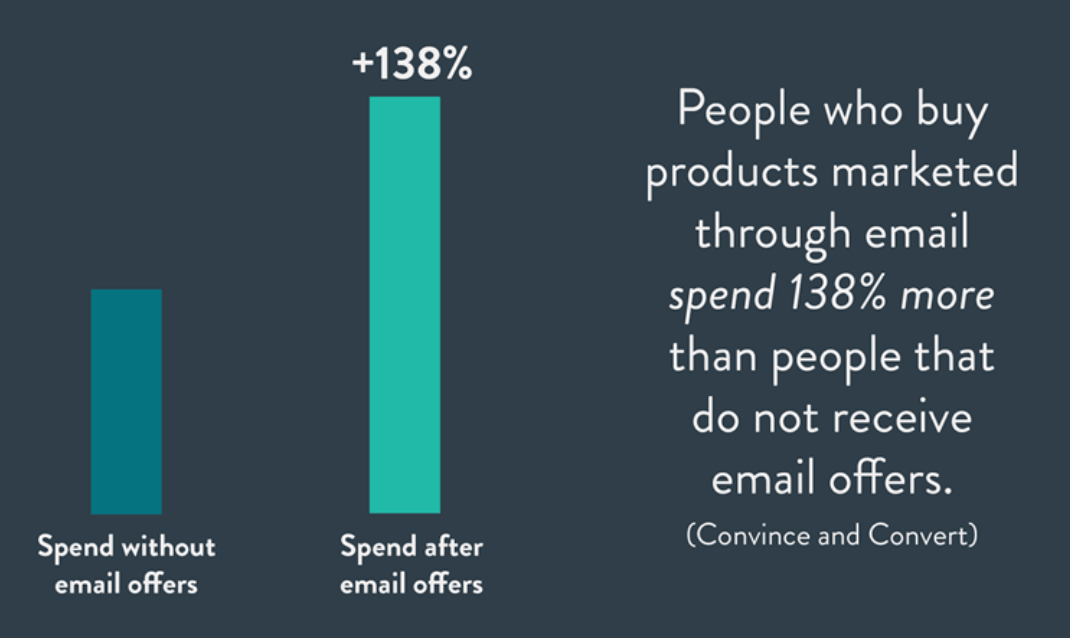
How to Build an Email List on Your Blog http://bit.ly/2XfVr7k Blogging is arguably the best content creation strategy for promoting your website. Publishing blogs on a regular basis boosts your site traffic, adds SEO value, generates leads, helps you build backlinks, and increases your internal linking opportunities. Blogging gives your website visitors a reason to keep coming back to your site and stay on your pages for longer periods of time. Furthermore, blogs are highly shareable. It’s a great way to increase your exposure on other platforms. The list goes on and on. I could sit here all day and talk about the benefits of blogging. That’s why I publish so many blogs on a regular basis and have done so for years. So for those of you who already have an active blog, that’s great news. You’re already on the right track. But now it’s time to take your blog to the next level. You can use this part of your website as a lead generation tool. The best way to do that is by building an email list. It doesn’t matter what type of website you have; this strategy can be applied. Some of you might have an ecommerce site with a blog as a supplemental page. Others may have a website that’s strictly dedicated to blogging. The rest of you probably fall somewhere in between. Regardless of your unique situation, you need to use your blog to get email subscribers. Here’s why. Email marketing yields a massive ROI. Studies show that marketers average a $44 return for every $1 they spend on email campaigns. That’s a 4,400% return! People on your email subscriber list will spend more money than your other customers.
Plus, seemingly everyone on the planet uses email. Well, at least everyone who is landing on your blog pages. According to Statista, there will be roughly 5.6 billion active email accounts worldwide by the end of 2019. In the United States, 91% of all Internet users have an email account. Here’s something else to consider. 99% of people with email account check their messages on a daily basis. 73% of Millennials say that email is their preferred method of communication from businesses. Simply put, email marketing works. But before you can benefit from these campaigns, you need to build your list. That’s what inspired me to write this guide. I’ll show you how to turn your blog into an email opt-in machine. Choose an email marketing serviceBefore you can collect emails, you need to be signed up for an email marketing service. You won’t be sending out individual messages or bulk emails manually—that’s just crazy talk. Email software makes it easy for you to collect, manage, and contact your subscribers. Plus, you’ll gain valuable insight on the success of your campaigns. Email marketing services will tell you things like:
For those of you who already have email marketing software, you can skip over this part; unless of course, you want to switch providers. These are some of the top email marketing options on the market right now:
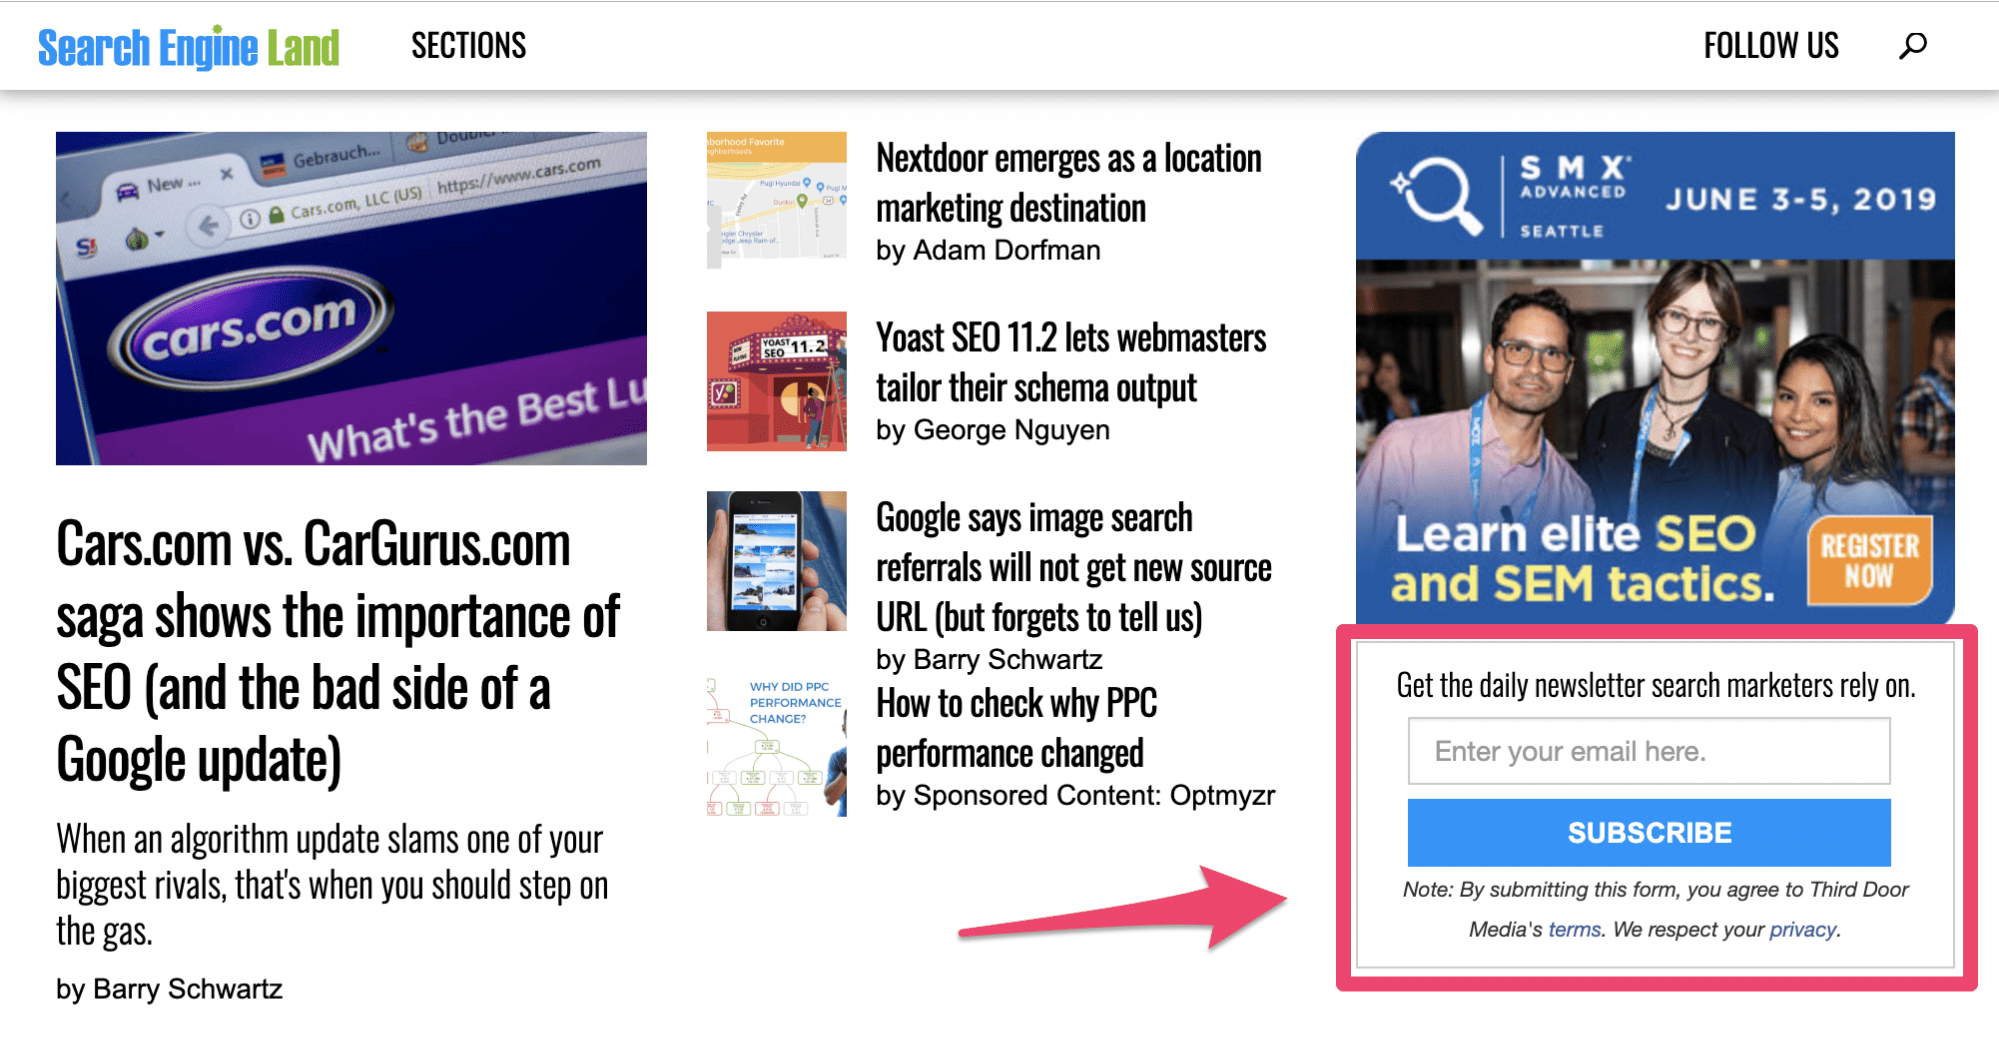
There are dozens of other legitimate email marketing services out there for you to consider, but they are all extremely similar. Pricing is typically based on the number of subscribers that you have on your list. As the list grows, the price increases as well. Don’t worry; this is a good thing. You want to have a huge email list. Plus, as we said earlier, you can expect a high ROI from your email marketing campaigns. Choosing your email software is based on personal preference. You might want to consider a free trial to test out the navigation, user experience, and features before you finalize your decision. But for the most part, you really can’t go wrong if you choose one of the options that I listed above. Create an opt-in formNow that you’ve signed up for a service, you need to create an opt-in form to place on your website. You should definitely have a dedicated landing page on your website for email sign-ups. But you’ll also want to have sign-up forms on other pages of your site as well, including your blog main page, and every blog that you publish. You can create these forms through your email software. Again, the instructions and wording will vary slightly depending on which service you’re using. But it should be very straightforward and easy to find. Then just generate a shortcode of the form to embed on your website. You’ll probably create several of these, which we’ll talk about in greater detail shortly. Here’s a basic example from Search Engine Land of what the final version of these opt-in forms will look like on your blog.
This screenshot is from the blog homepage. It’s very simple. On the right side of the screen, there’s an option for visitors to sign up for their newsletter. The only piece of information required to join this mailing list is an email address. Short opt-in forms increase the chances that more people will sign up. If your forms require a first name, last name, email address, phone number, zip code, favorite color, and mother’s maiden name, it feels like you’re one step away from asking for the person’s social security number. That’s overkill. Think about it. All you really need is their email address. Other information makes it easier for you to personalize the customer experience, but you can worry about that down the road by asking them to create a user profile or account. For now, just focus on getting them to subscribe. Search Engine Land continues to apply this strategy on all of their blogs.
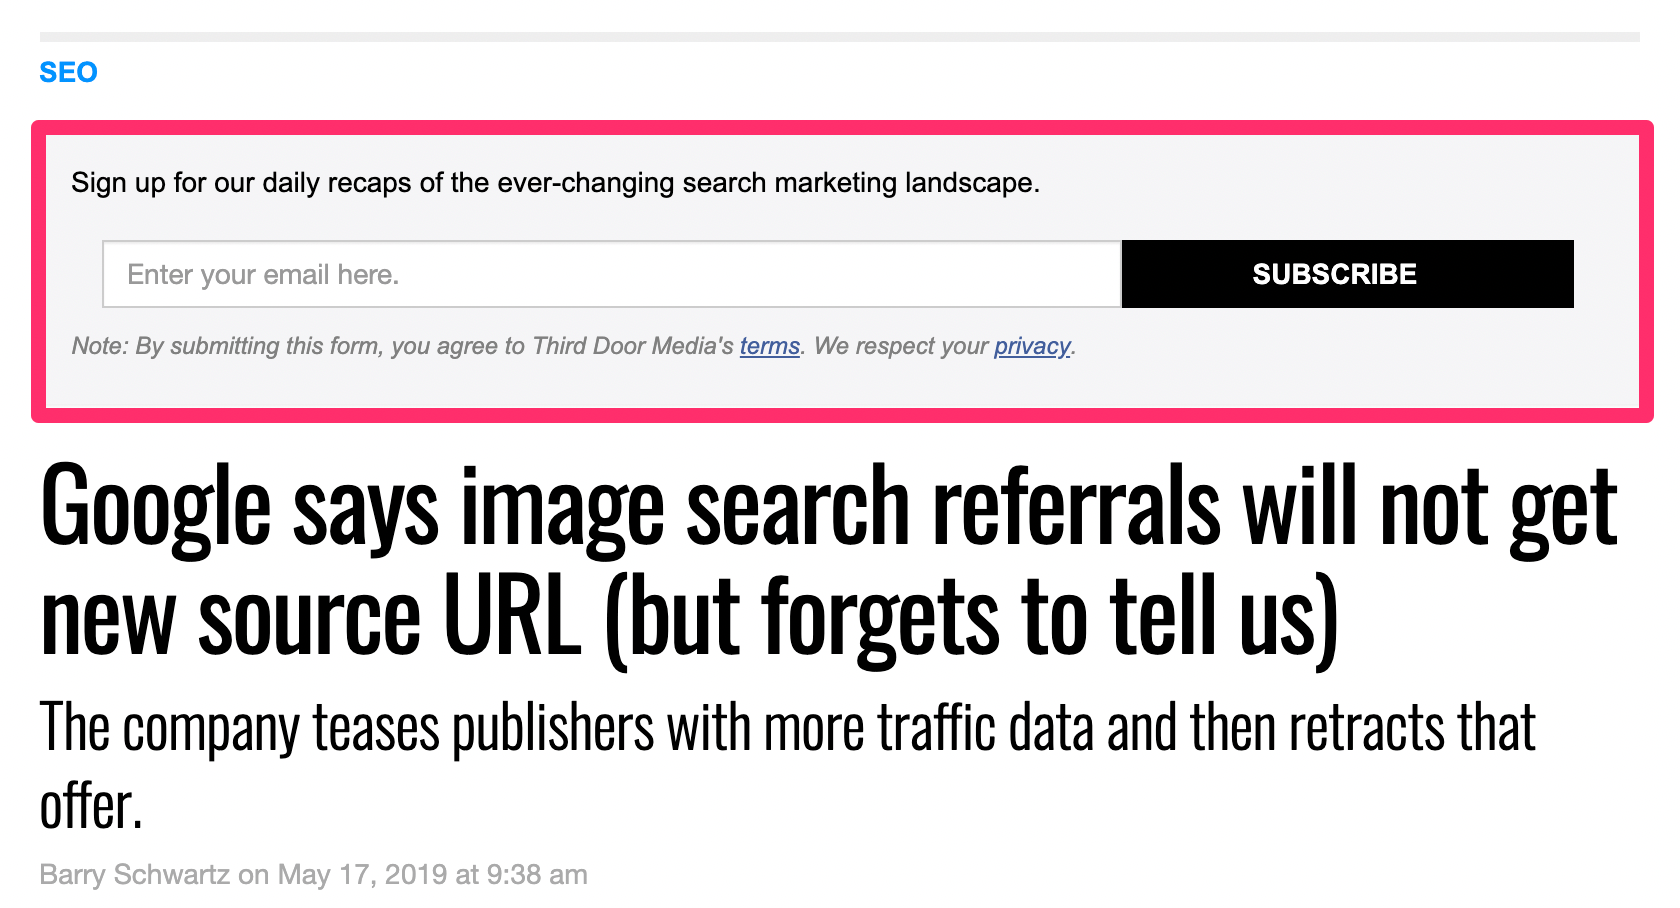
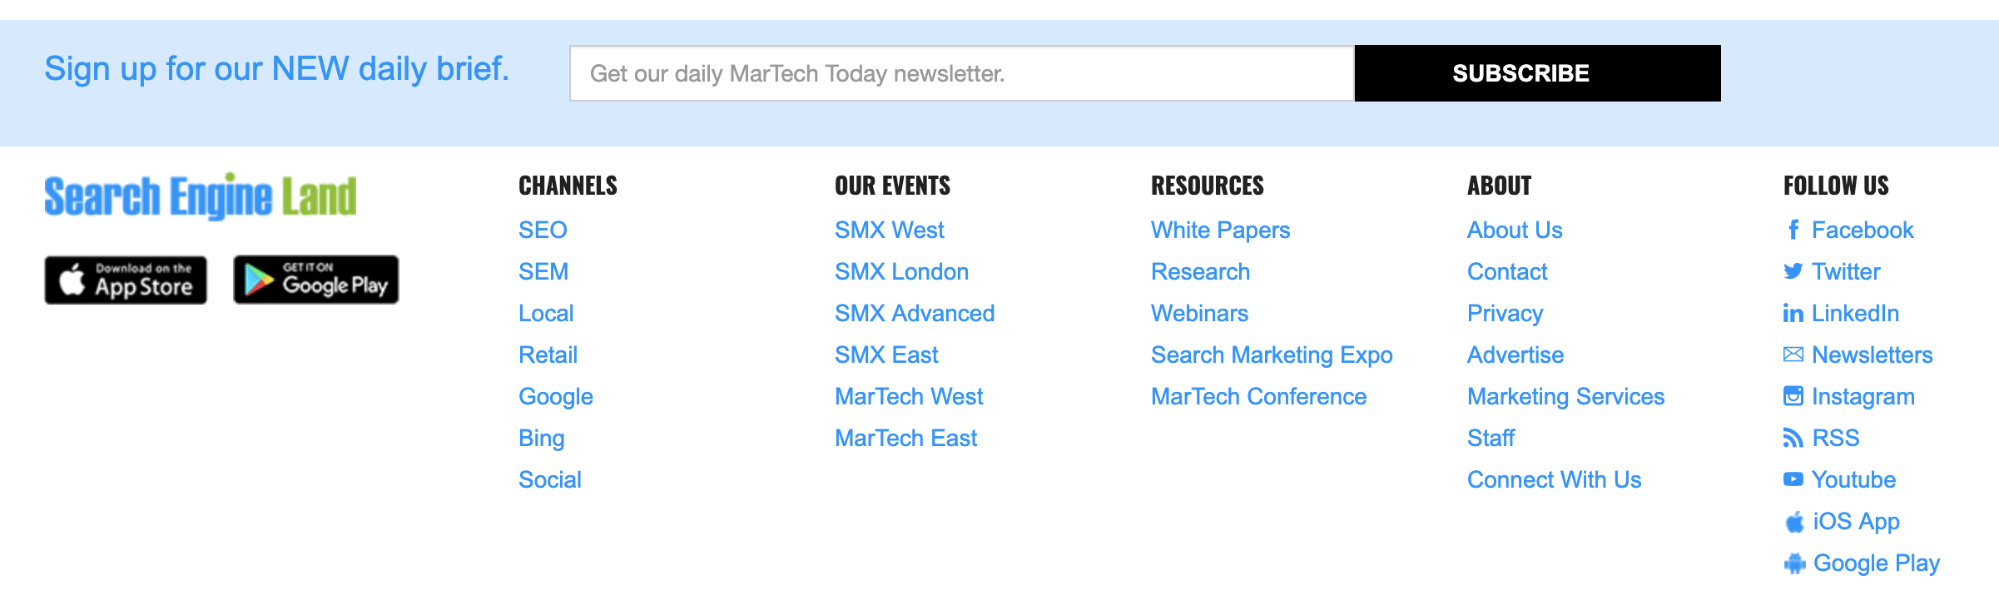
Here’s what it looks like when you click on an individual blog post. Before the title, they give you another chance to opt-in through a simple form. As you can see, it’s not quite the same as the first form, but it’s very similar. They don’t stop here either. There is another opt-in form at the bottom of each blog post as well.
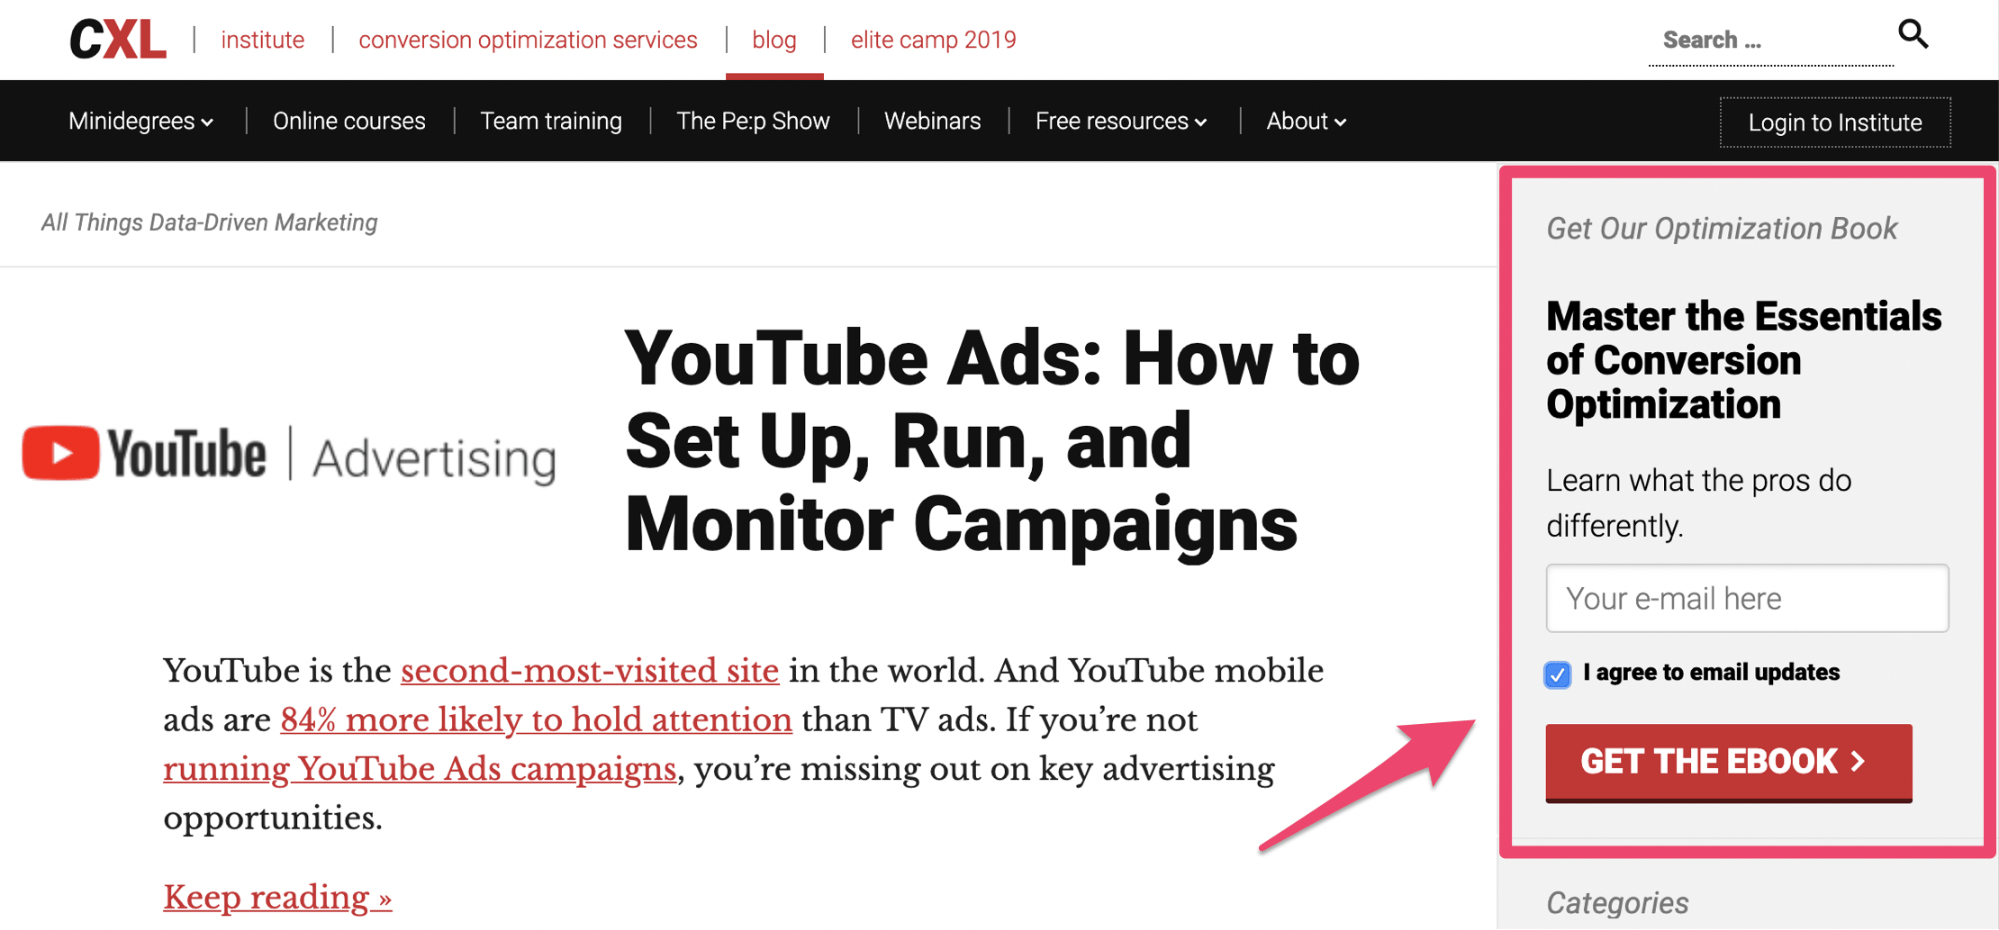
By putting these opt-in forms all over the blog, it increases the chances that people will sign up. Notice what all of these forms have in common. None of them are obtrusive. Website visitors can still navigate and read without having to deal with any pop-up windows, sliders, or anything else that could ruin their experience. As I said earlier, you’ll want to create multiple versions of your opt-in form so it’s easier for you to track. Eventually, you’ll run tests to see which ones are performing the best. But I’ll talk about those tests later on. Add an incentiveWhy should someone sign up to get emails from you? It’s a fair question. Sure, you want their email address so you can monetize them, but what are they actually getting in return? If you don’t give people a reason to sign up, they probably aren’t going to. Think about how many emails you get on a daily basis. If it’s anything like me, you’re getting hundreds. In fact, the average office employee receives 121 emails each day! Not everyone will be so willing to just subscribe to every opt-in form they see without thinking twice about it. But by adding an incentive, it can dramatically improve your chances. Here’s a great example from the Conversion XL blog.
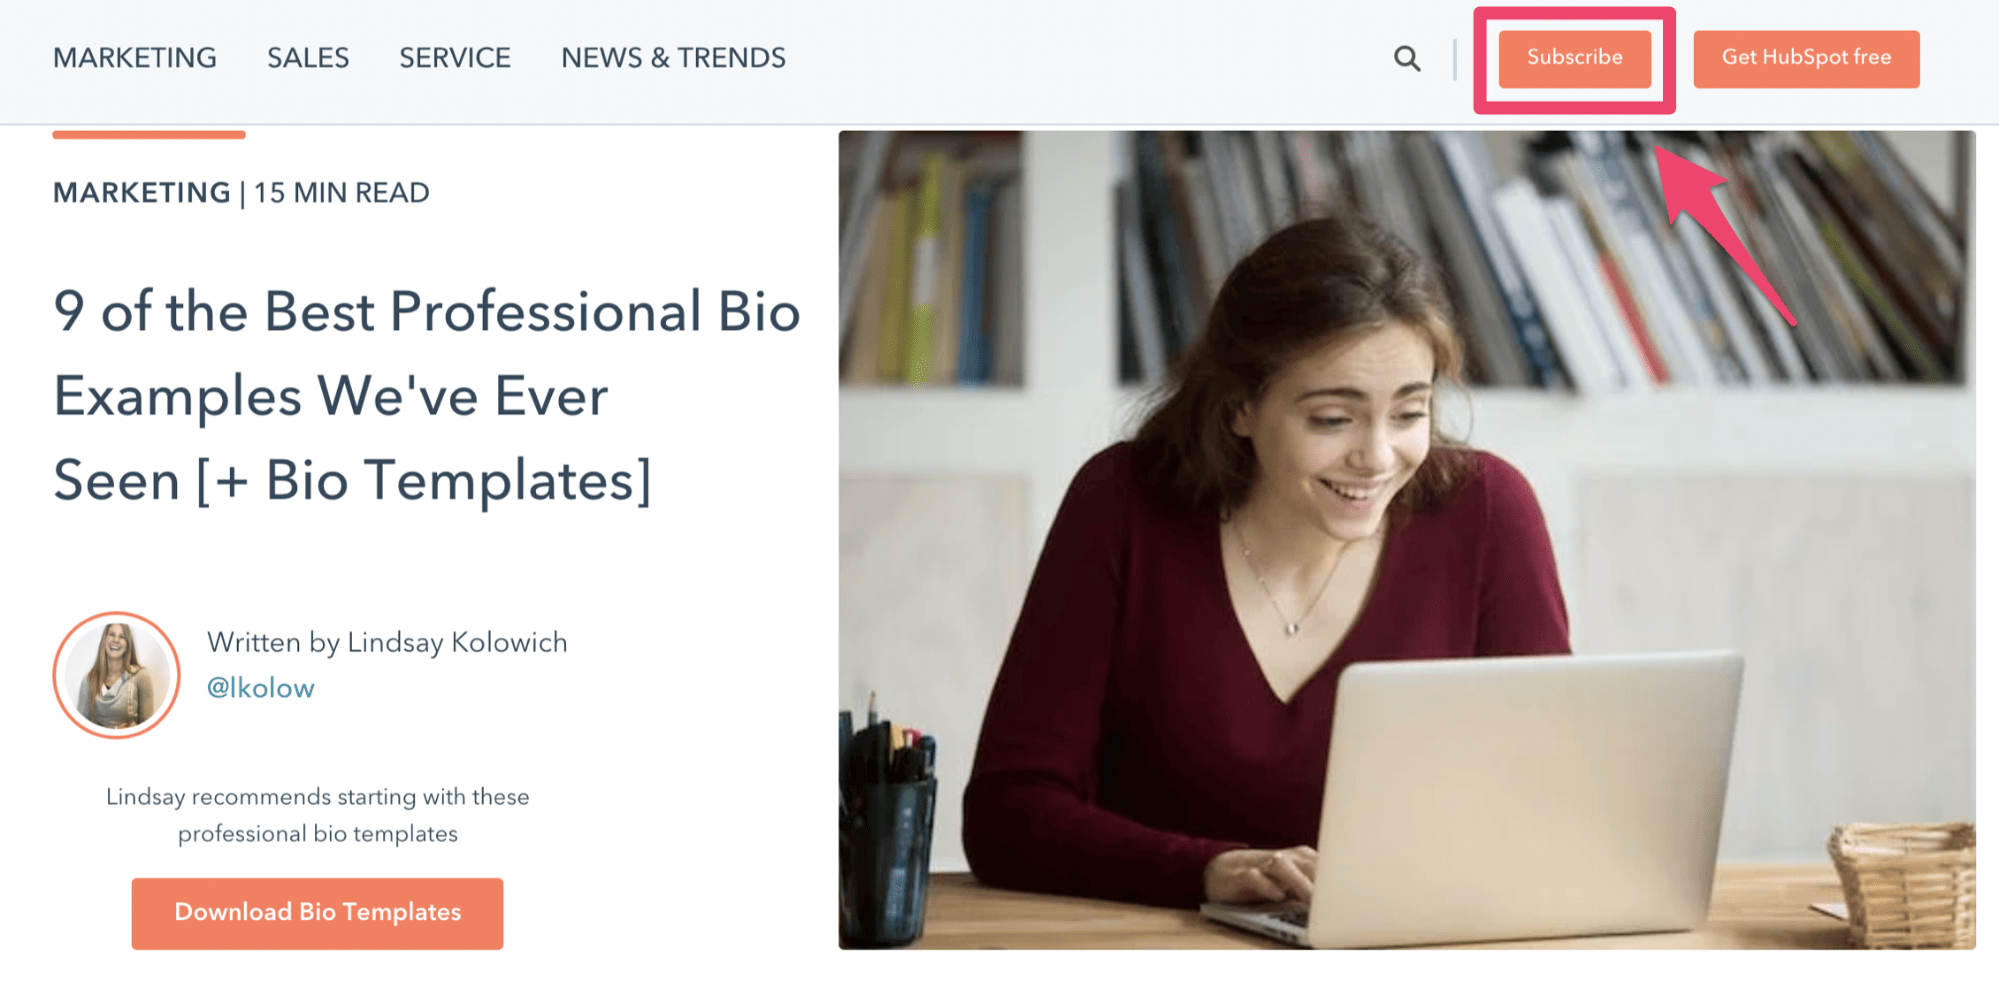
This simple sign-up form is similar to the examples we saw before. However, this one is pitching the website visitor from a different angle. Rather than just saying “subscribe for weekly updates” or something along those lines, they are offering a free ebook. As you can see, the book is about mastering conversion optimization. In order to get the free ebook, the person has to provide their email address. There is a box below that line saying the user will also be getting updates via email. There are tons of ways for you to employ this strategy on your blog as well. For example, let’s say you operate an ecommerce site. On your blog posts, you can pitch a discount code for joining an email list. Offer a dollar amount or percent discount off of the visitor’s next purchase. Just think of something that goes beyond “sign up.” Learn how to craft the perfect value proposition and add it to your opt-in forms. Use a sticky barIf you don’t want an opt-in form in the sidebar or within the content itself, like the previous examples we looked at, you can always use a sticky bar as an alternative. As the user scrolls through your blog, the sticky bar will remain in place at the top of the page. This is another non-obtrusive way to collect email addresses with your blog. Here’s an example of how HubSpot uses this strategy.
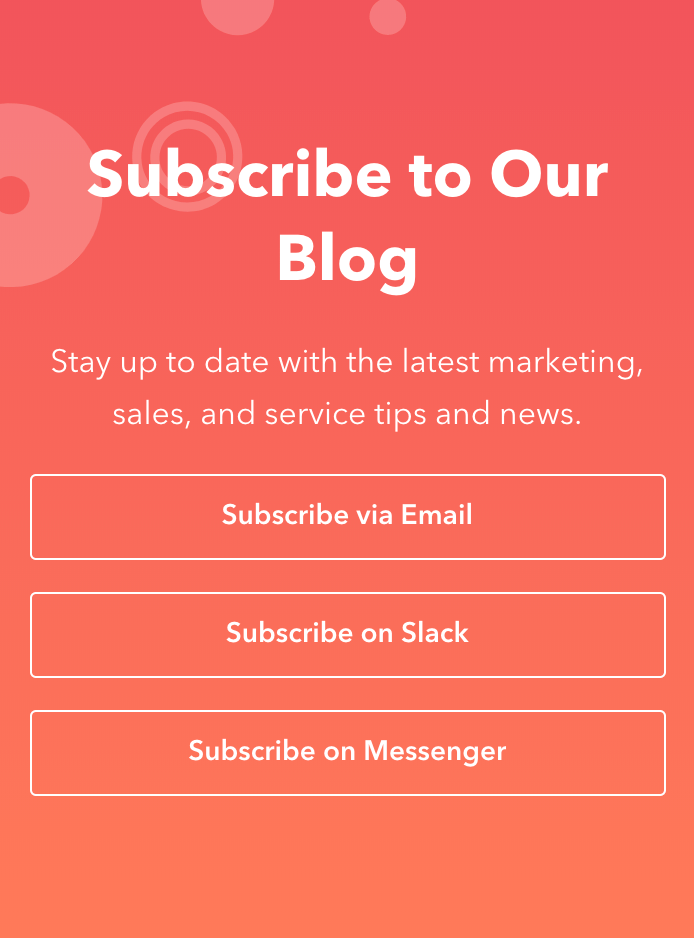
The “subscribe” button is at the top of every blog post. So this will always be in view as people read through the blog. If you click on this button, you’ll see the following options:
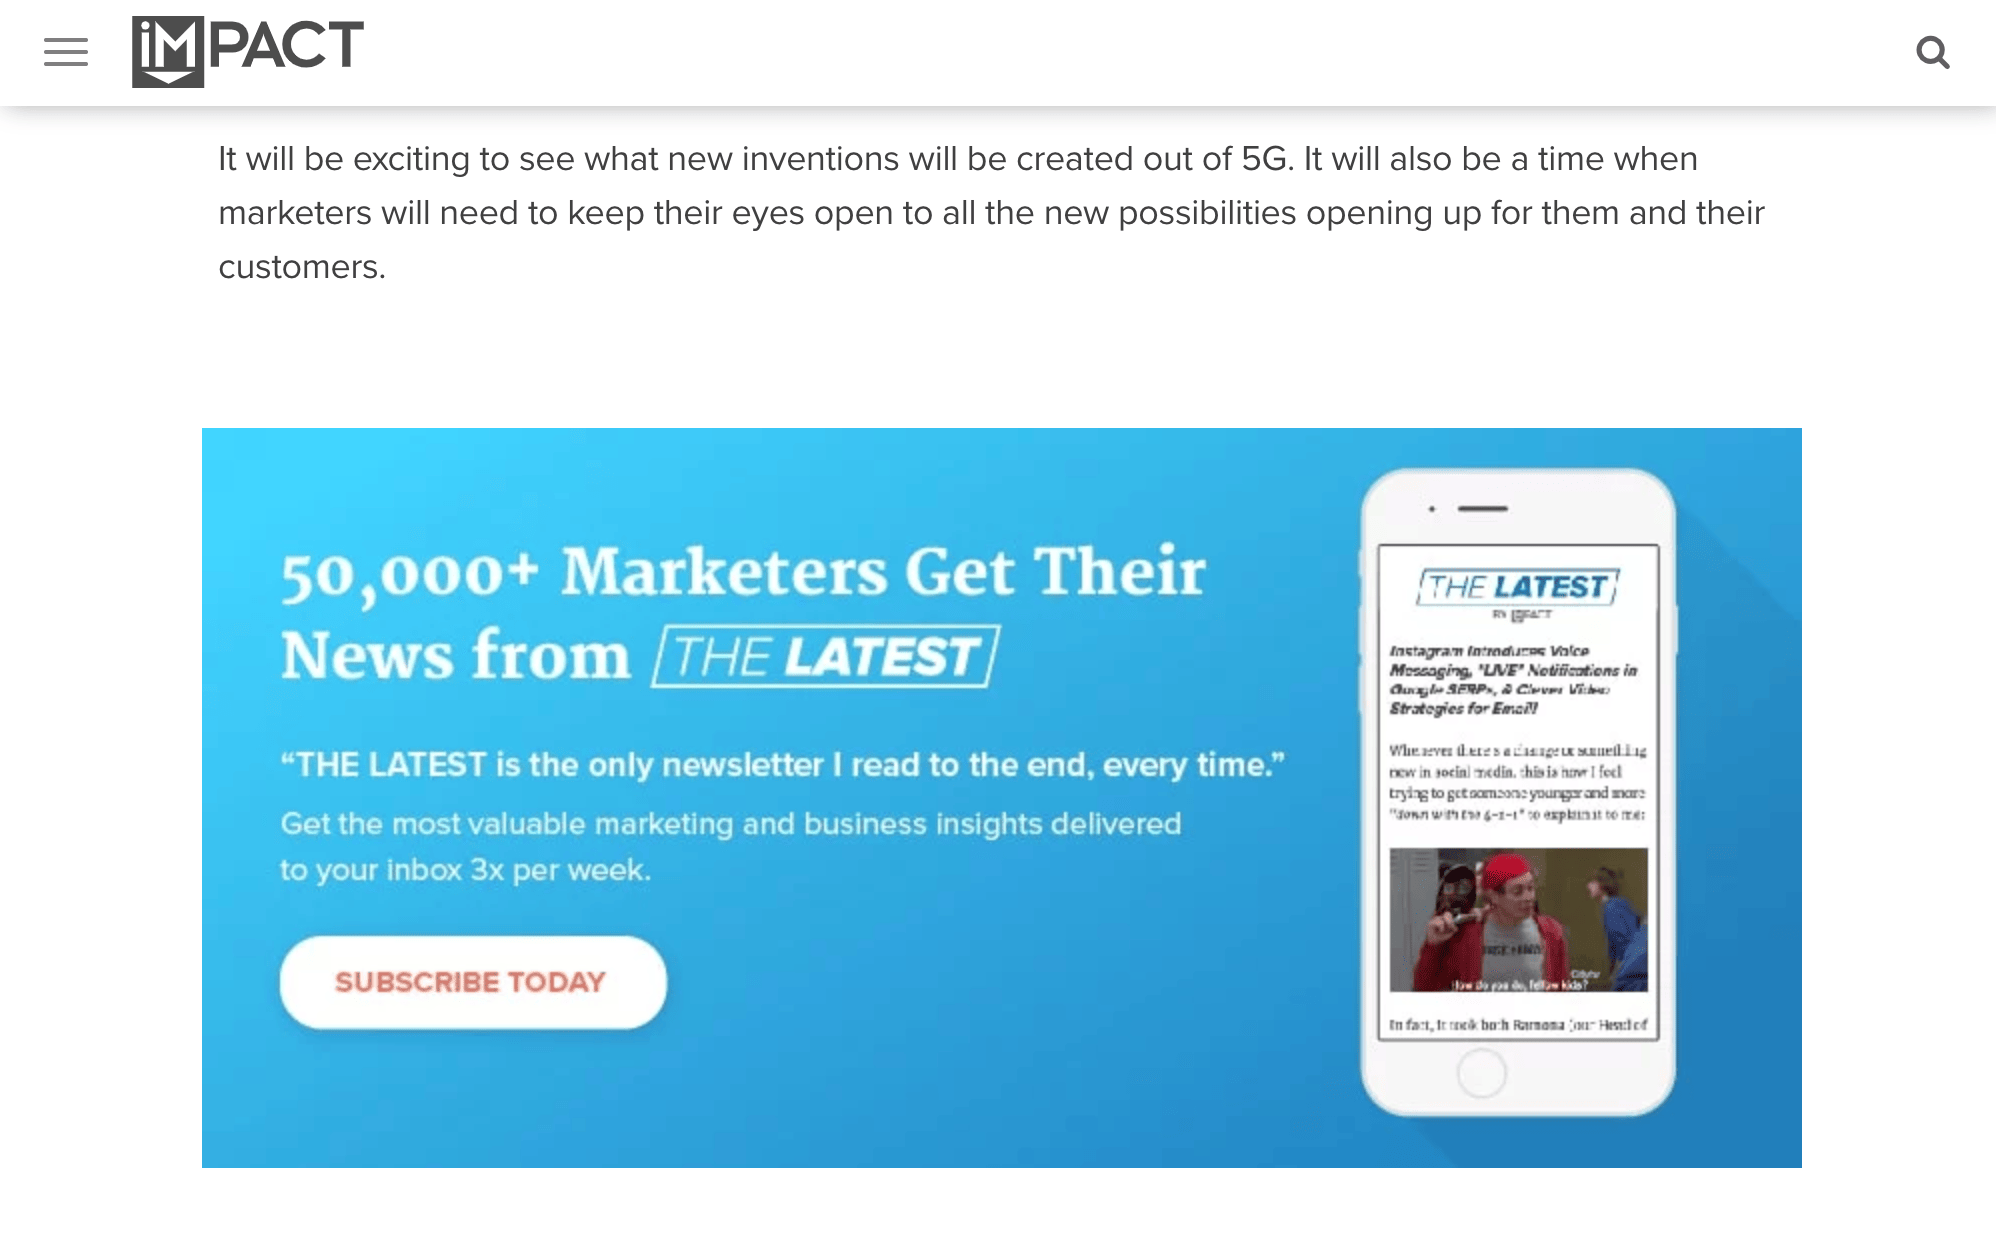
Subscribe via email is the top option. Once someone clicks on this, they’ll be provided with an opt-in form similar to the ones we saw earlier. Keep in mind, these added steps may not generate as many subscribers as other methods. But with that said, website visitors who go through this process will be more qualified leads. You know that they’re interested in getting emails if they complete the extra steps. Check out my guide on creating a double opt-in landing page as a way to qualify your leads as well. This type of sticky bar is just another approach for you to consider. Create a visual CTAInstead of a traditional opt-in form, you could try making something that’s a little bit more inviting to draw attention to your email list. In this case, a custom visual image with a CTA should do the trick. You can put this at the top or bottom of your blog posts. Here’s what this looks like on the IMPACT blog.
Notice how this looks different from the other examples we’ve looked at so far. The entire visual is dedicated to getting subscribers. It includes a photo, value proposition, and CTA button. IMPACT is enticing readers to sign up by power in numbers. Psychologically, if 50,000+ people are doing something it must be good, right? That’s the idea behind this strategy. I also like how the image shows the newsletter on a mobile device. It’s very relatable to the audience. This tells the story of someone who can get updates to their phone, which is super convenient. Since 61% of all emails are opened on mobile devices, this makes a ton of sense. Overall, this is a creative way to draw attention to an email list on a blog post. Run A/B testsEvery element of the email opt-in forms on your blog should be tested.
Start with one idea, then move on to the other. The idea behind A/B testing is that everything can always be improved. You might think you have the perfect opt-in strategy, but that’s not always the case. Some of you will be surprised to learn that a subtle change can drastically increase your sign up conversion rates. Let me take a moment to circle back to what we discussed earlier in terms of creating multiple opt-in forms. This makes it easier for you to test out different elements and variations. For those of you who plan to take an approach like Search Engine Land and place forms in multiple areas throughout the blog, you can figure out which one is performing the highest. You may ultimately decide that one of them can be eliminated. Then you can continue A/B testing the most popular forms to ensure that it converts at the highest possible rate. ConclusionYou’re not getting the most out of your blog until you start using it as a tool for building an email list. The first step to implementing this strategy is choosing an email marketing software. Then you’ll use that software to create opt-in forms to place on your blog. From here, it’s just a matter of figuring out how you’re going to present that form to your website visitors. Adding an incentive, using a sticky bar, or creating a visual CTA are just three ways to drive conversions. You’ll ultimately want to test out all of your strategies make sure that your blog is performing at the highest possible level. Social Media via Quick Sprout http://bit.ly/UU7LJr May 29, 2019 at 07:02AM
http://bit.ly/2WtVhf7
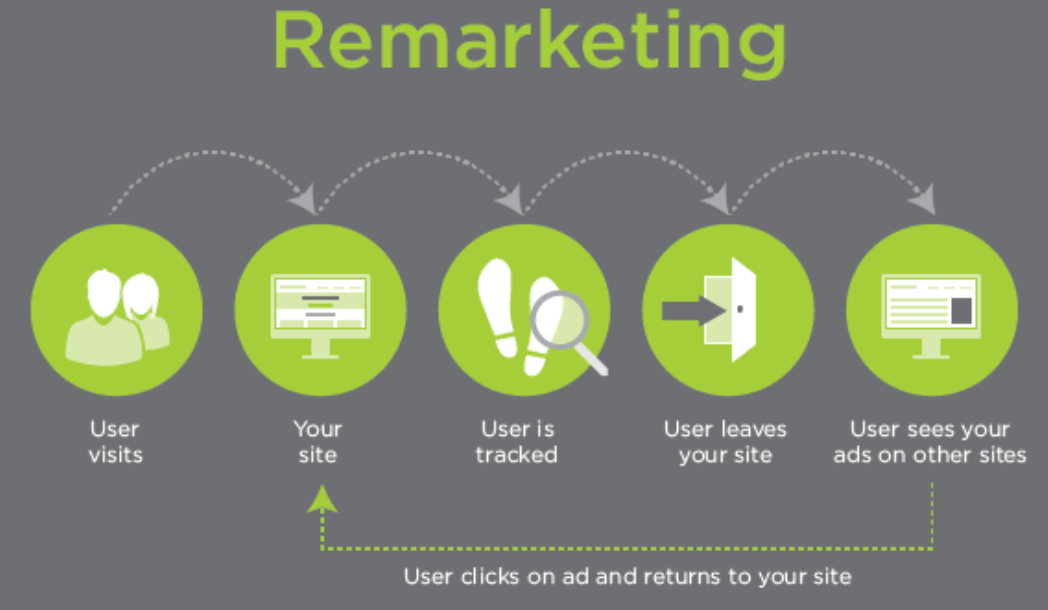
How to Get More Conversions From AdWords Using Remarketing http://bit.ly/2VYae4Z In a perfect world, all of your website traffic would be organic. That’s the most ideal scenario for everyone. But sometimes it can take 6, 12, or even 18 months for you to really notice the benefits from your organic search strategies. That’s not to discourage you. While you should stay the course and continue to prioritize SEO best practices, you can always use paid ads for the time being to drive more traffic to your site. So for those of you who have available funds in your marketing budget, I’d definitely recommend that you give PPC campaigns a try. The best way to run paid ads is with Google AdWords. Google does an amazing job of giving you the tools to ensure that your ads are viewed by people who are most interested in your business. One of the most effective campaign approaches is remarketing. What is remarketing?It’s a way to expose your ads to people who have previously viewed your website in the past. Since these visitors are already familiar with your brand, it’s more likely that they’ll convert when they see your ad in SERPs or on a Google partner site. Getting traffic to your website is obviously great. Who doesn’t want more traffic? But if those visitors aren’t converting, you’re not going to see a high ROI on those paid ads. That’s where remarketing comes into play. Here’s a simple visual representation to show you exactly how remarketing works.
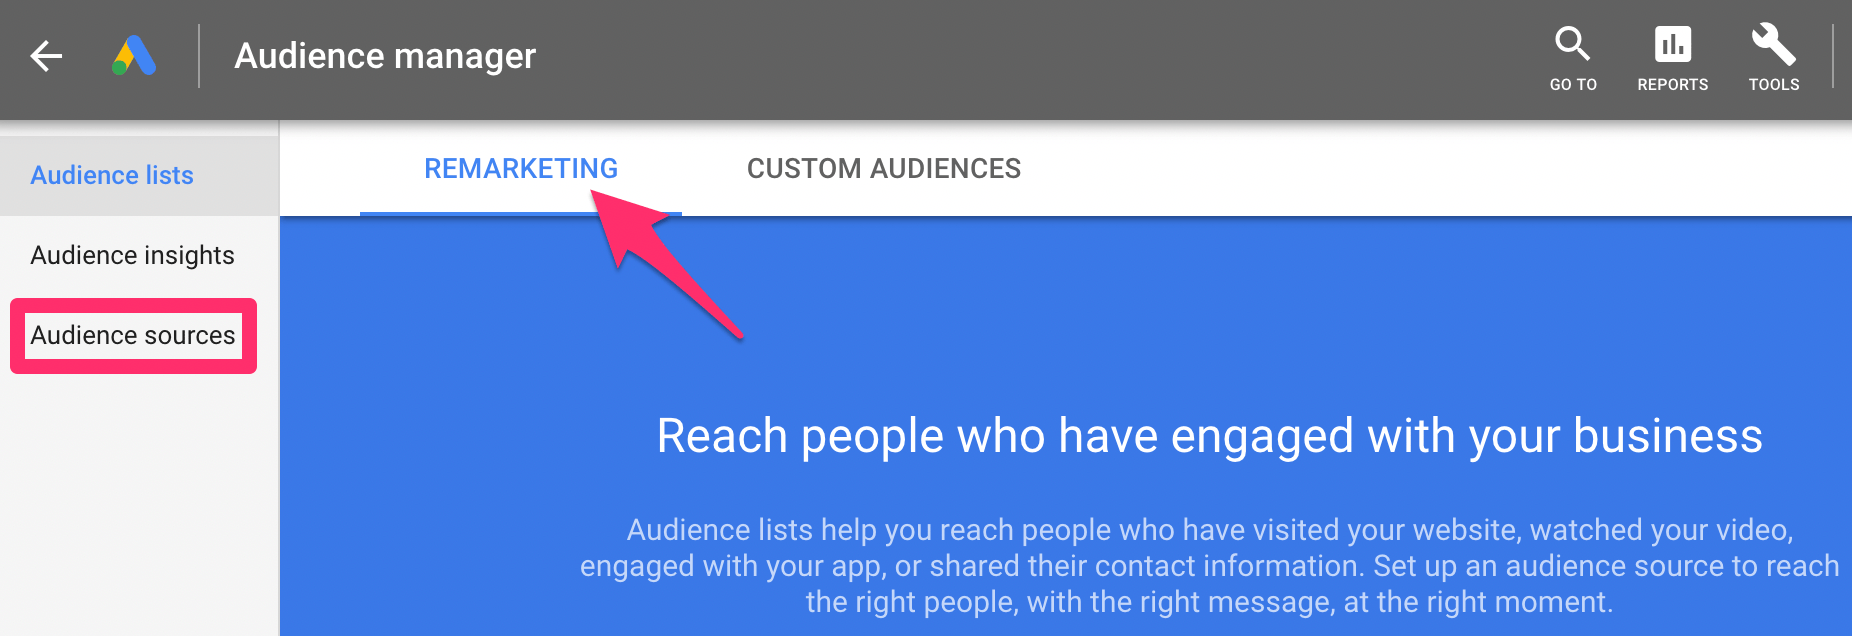
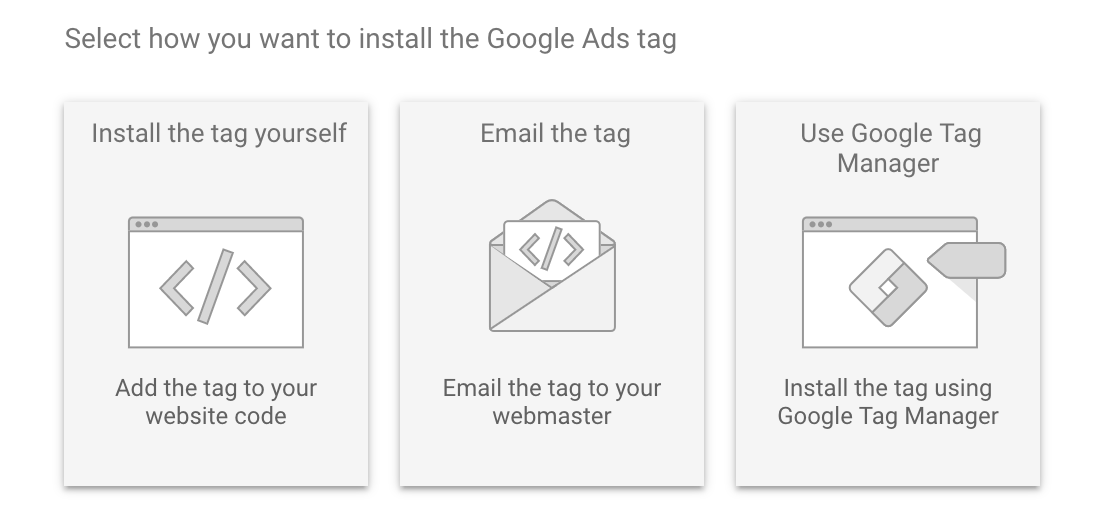
It’s a very easy concept to understand. Basically, your website visitors will be tracked based on their behavior. Then your ad will appear when they’re browsing on another site in the future. I’m sure this has happened to you before. You search for something like “hotels in Miami” and then later that day you see an ad for a hotel website that you were browsing earlier. That’s a remarketing campaign. For those of you who have never used this strategy, I’ll explain every step you need to take to set this up with Google AdWords. Implementing a remarketing strategy will boost your conversion rates and generate a higher ROI for your ad spending. Generate the remarketing codeThe first thing you need to do is generate a remarketing code from your Google AdWords account. Then you’ll eventually add this code to your website so Google can track visitors and ultimately apply this strategy via partner sites. I’m going to assume that you already have a Google Ads account. If not, take a moment to set that up. It’s a quick process and free to do so. You won’t pay anything until you actually start running ads. Once you’re signed in to Google AdWords, click on the “tools” icon at the top of your dashboard to expand the menu.
Then navigate to the “shared library” column and select “audience manager,” as pictured above. When you land on this page, you’ll see that you’re already in a remarketing section. On the left side of the screen, click on “audience sources” to continue.
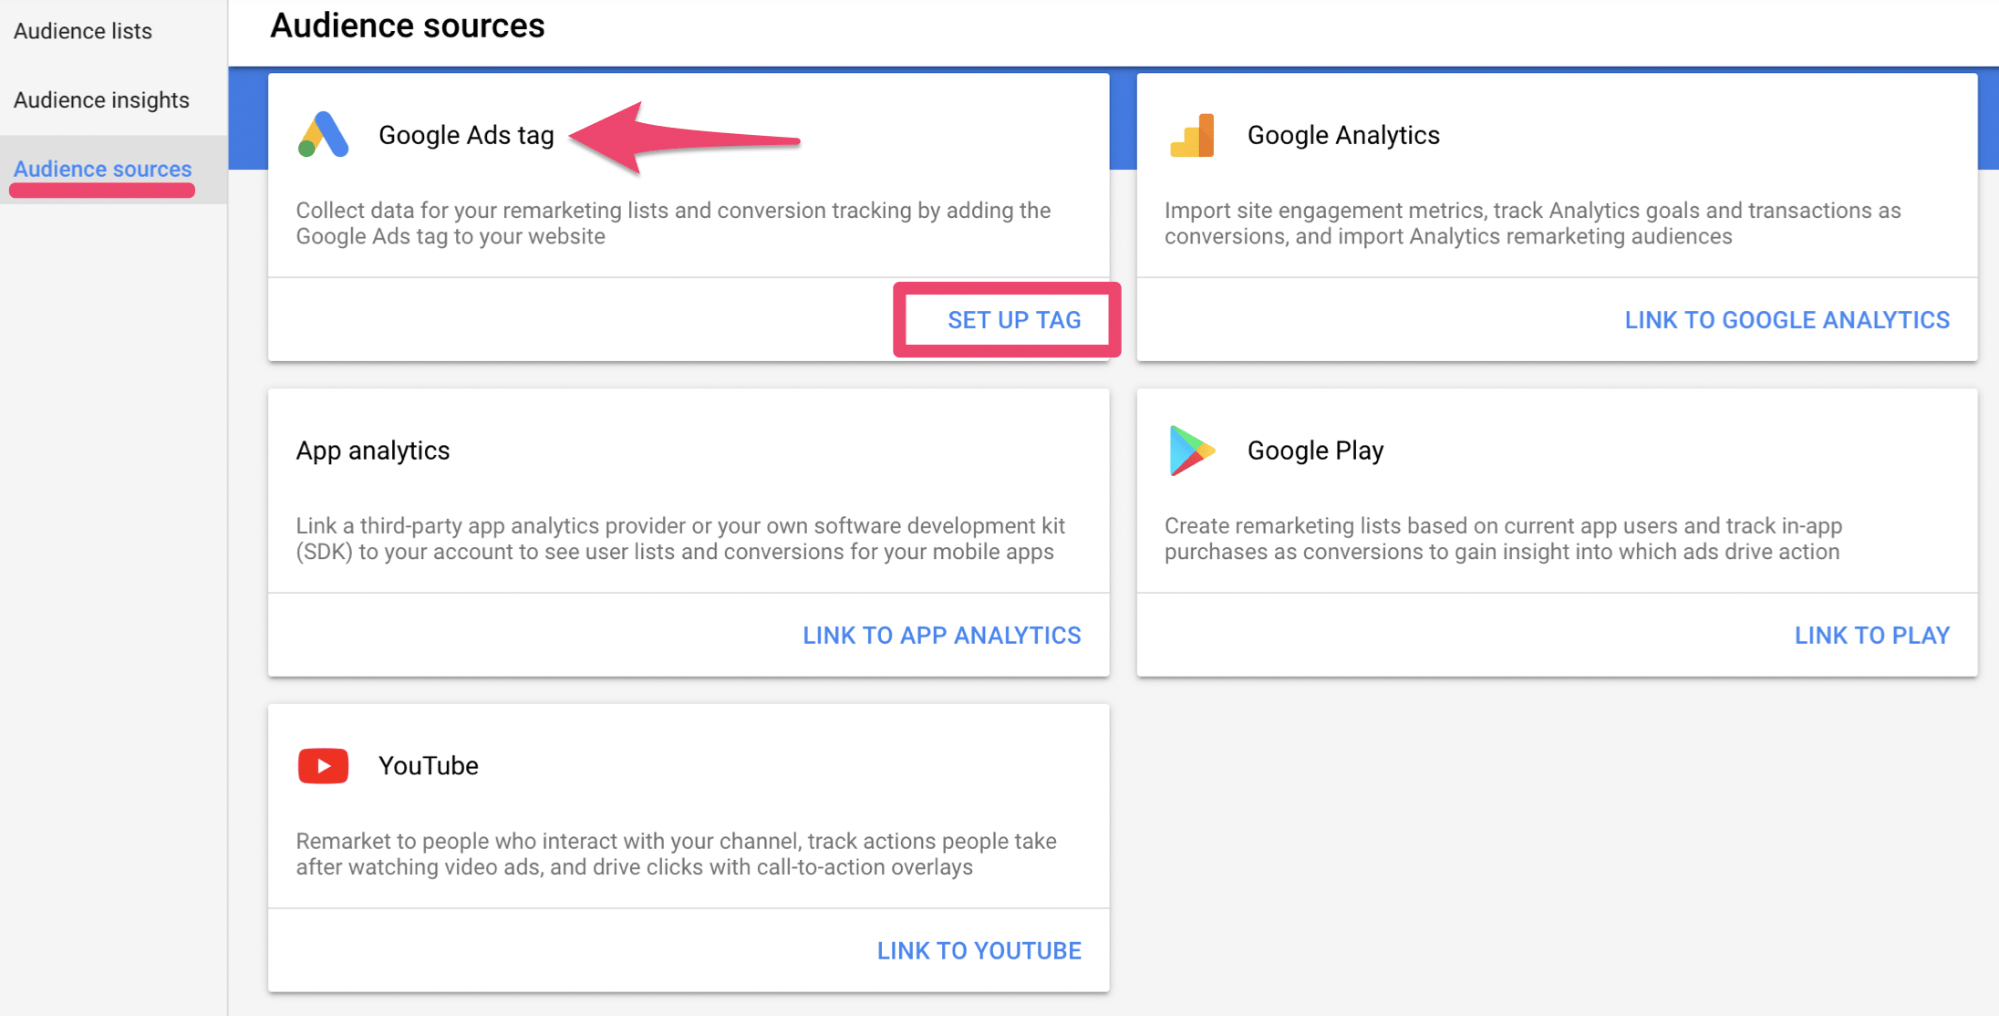
When you get to this page you’ll see five different options:
These are all ways that you can track customers for remarketing campaigns. But for our purposes today, you’re going to select “set up tag” from the “Google Ads tag” box.
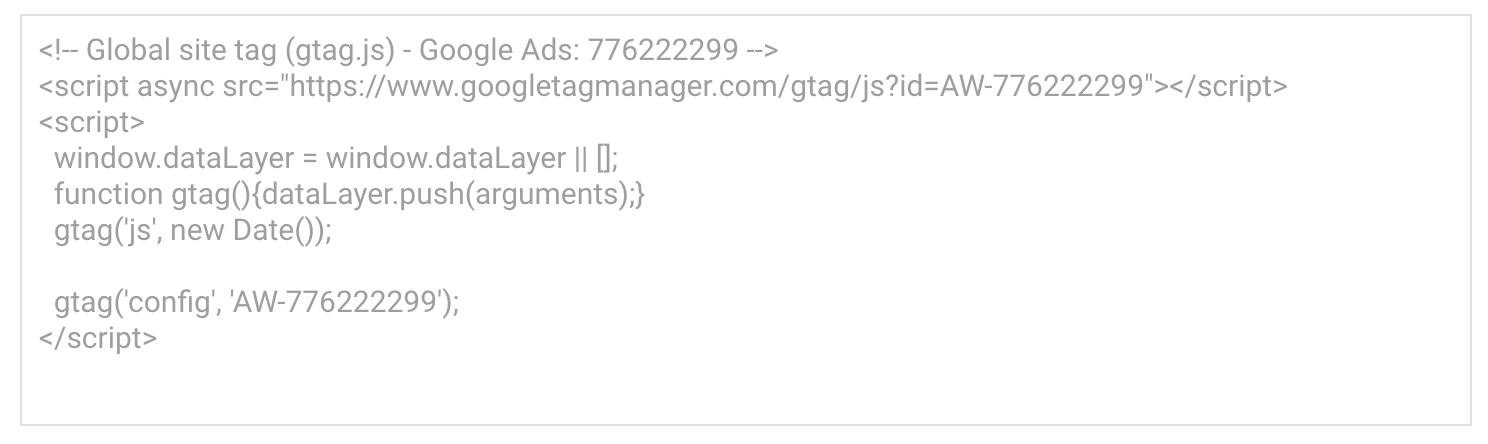
Now you need to determine the type of remarketing campaign that you want to run. You’ll be presented with two options. The first choice is very straightforward; collect general data about website visitors. Basically, this means that if someone lands on your site, they will be a candidate for your remarketing campaigns. But just because someone visits your site, it doesn’t automatically mean that they’re interested in what you’re offering. Sometimes people will land on your site by mistake. Or maybe they realized that what you’re offering isn’t actually what they need. It’s possible that your products are out of their price range. There are tons of different factors at play here. So remarketing to everyone and anyone isn’t always the most effective way to drive conversions. That’s why you should consider the second option. Google lets you collect data based on specific visitor actions to show more personalized ads to people. For example, you could target only people who added something to their shopping cart but didn’t convert. After you pick the type of remarketing strategy you want to pursue, Google will automatically generate a code for you. Add the tag to your websiteOnce the remarketing code has been generated, you need to install the tag on your website. For those of you who choose the second option involving specific visitor actions, you’ll see that two codes have been generated.
The global site tag should be added to every page on your site. This will be installed in the <head> section of your page HTML. Here’s an example of what it looks like when the tag gets generated for you on AdWords.
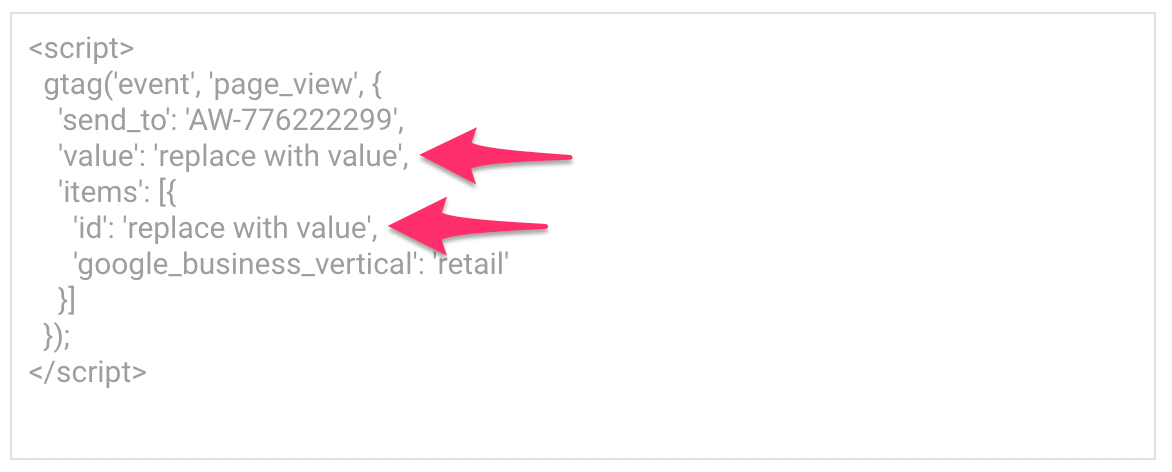
The event snippet tags are a little bit more complex. You cannot just install the code on your site as it reads in the auto-generation box. There are placeholders in the code that need to be updated based on the type of event you’re tracking for remarketing. Remember, the whole purpose of this strategy is to find people who are most likely to covert. So the snippets won’t go on every page of your site. Instead, they’ll only be added to pages where those certain actions take place, such as an add-to-cart page or a product page. Here’s an example of an event snippet code with those placeholders.
As you can see from what I’ve pointed out above, there are parts of the tag that need to be replaced with a value for tracking purposes. Let’s break this down even further. From the top, you can see that this snippet is measuring page views by default. But other examples of events include things like:
Once you set an event, you need to change the value items, and ID parameters to correspond with your remarketing campaigns. This all depends on your business and the type of website you have. These choices are extremely versatile. Google gives you the option to be very specific within your business vertical. Recently, Google updated the code for their tags. So for those of you who previously installed a remarketing tag on your site in the past, you should update those old tags. Google says that the old ones will still work, but they recommend generating new global tags and event snippets for future use. There are three ways to install these tags on your website.
Every option is pretty self-explanatory. Google will walk you through the process each step of the way. If you decide to do this on your own, just make sure you realize that the placeholders need to be changed. Otherwise, the campaigns won’t work. Item parametersAs I explained before, you need to update the placeholders in the event snippet code to track specific actions by visitors on your website. The item parameters will vary based on the type of business vertical that you choose. These are the categories:
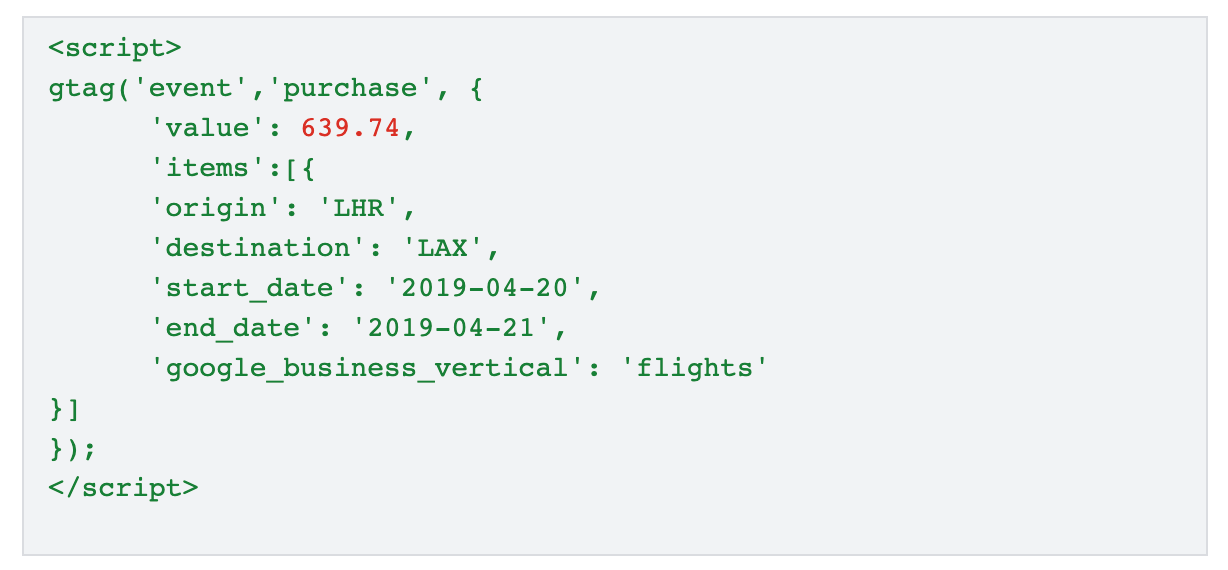
So if you have a retail site, the ID could represent something like a unique product. Here’s another example using a different vertical. If you have an airline or operate a website that sells flights, your event snippet tag could look something like this:
This event is specifically tracking people who purchased a flight from London to LAX. So one of their remarketing campaigns could be an ad for upgrading their seat, getting a hotel, or renting a car when they arrive at their destination. To view the full list of requirements and examples of item parameters in your industry, check out this resource from Google. I’d also recommend reading this Google support page that discusses custom rules for remarketing campaigns. Update your privacy policyOnce you have all of this set up and the code is installed on your site, you need to make some additional changes to your website as well. Your privacy policy needs to be updated to tell your site visitors exactly what you’re doing. According to Google, these are the requirements for what your updated privacy policy needs to cover:
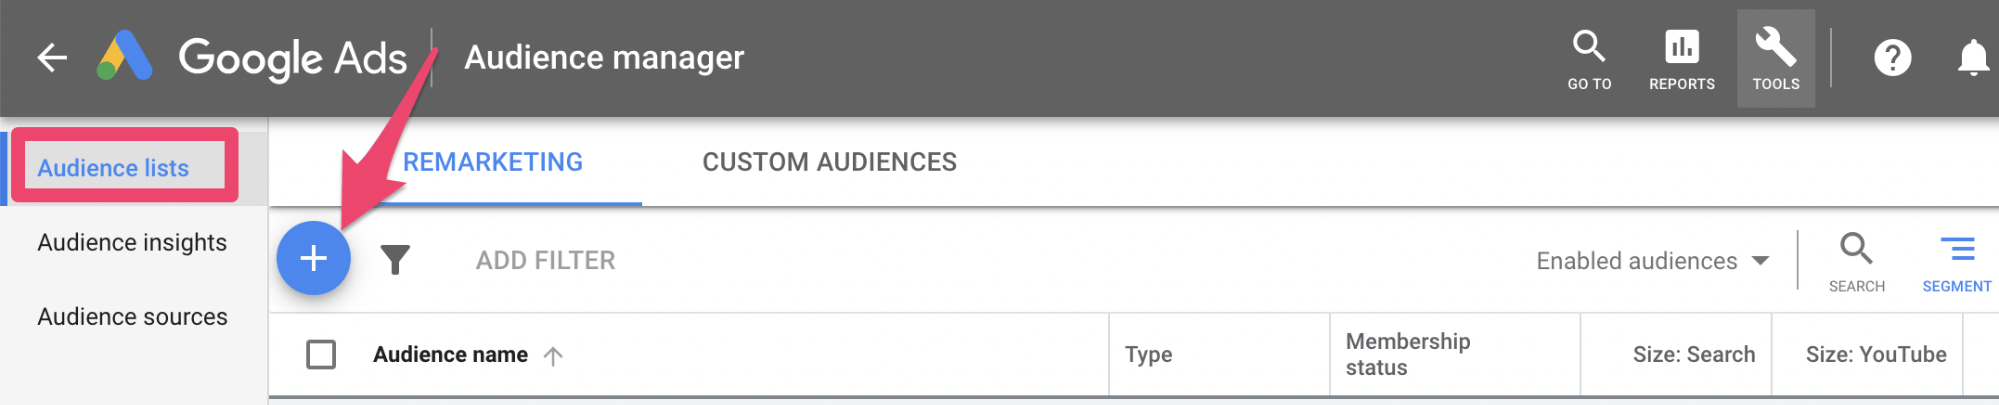
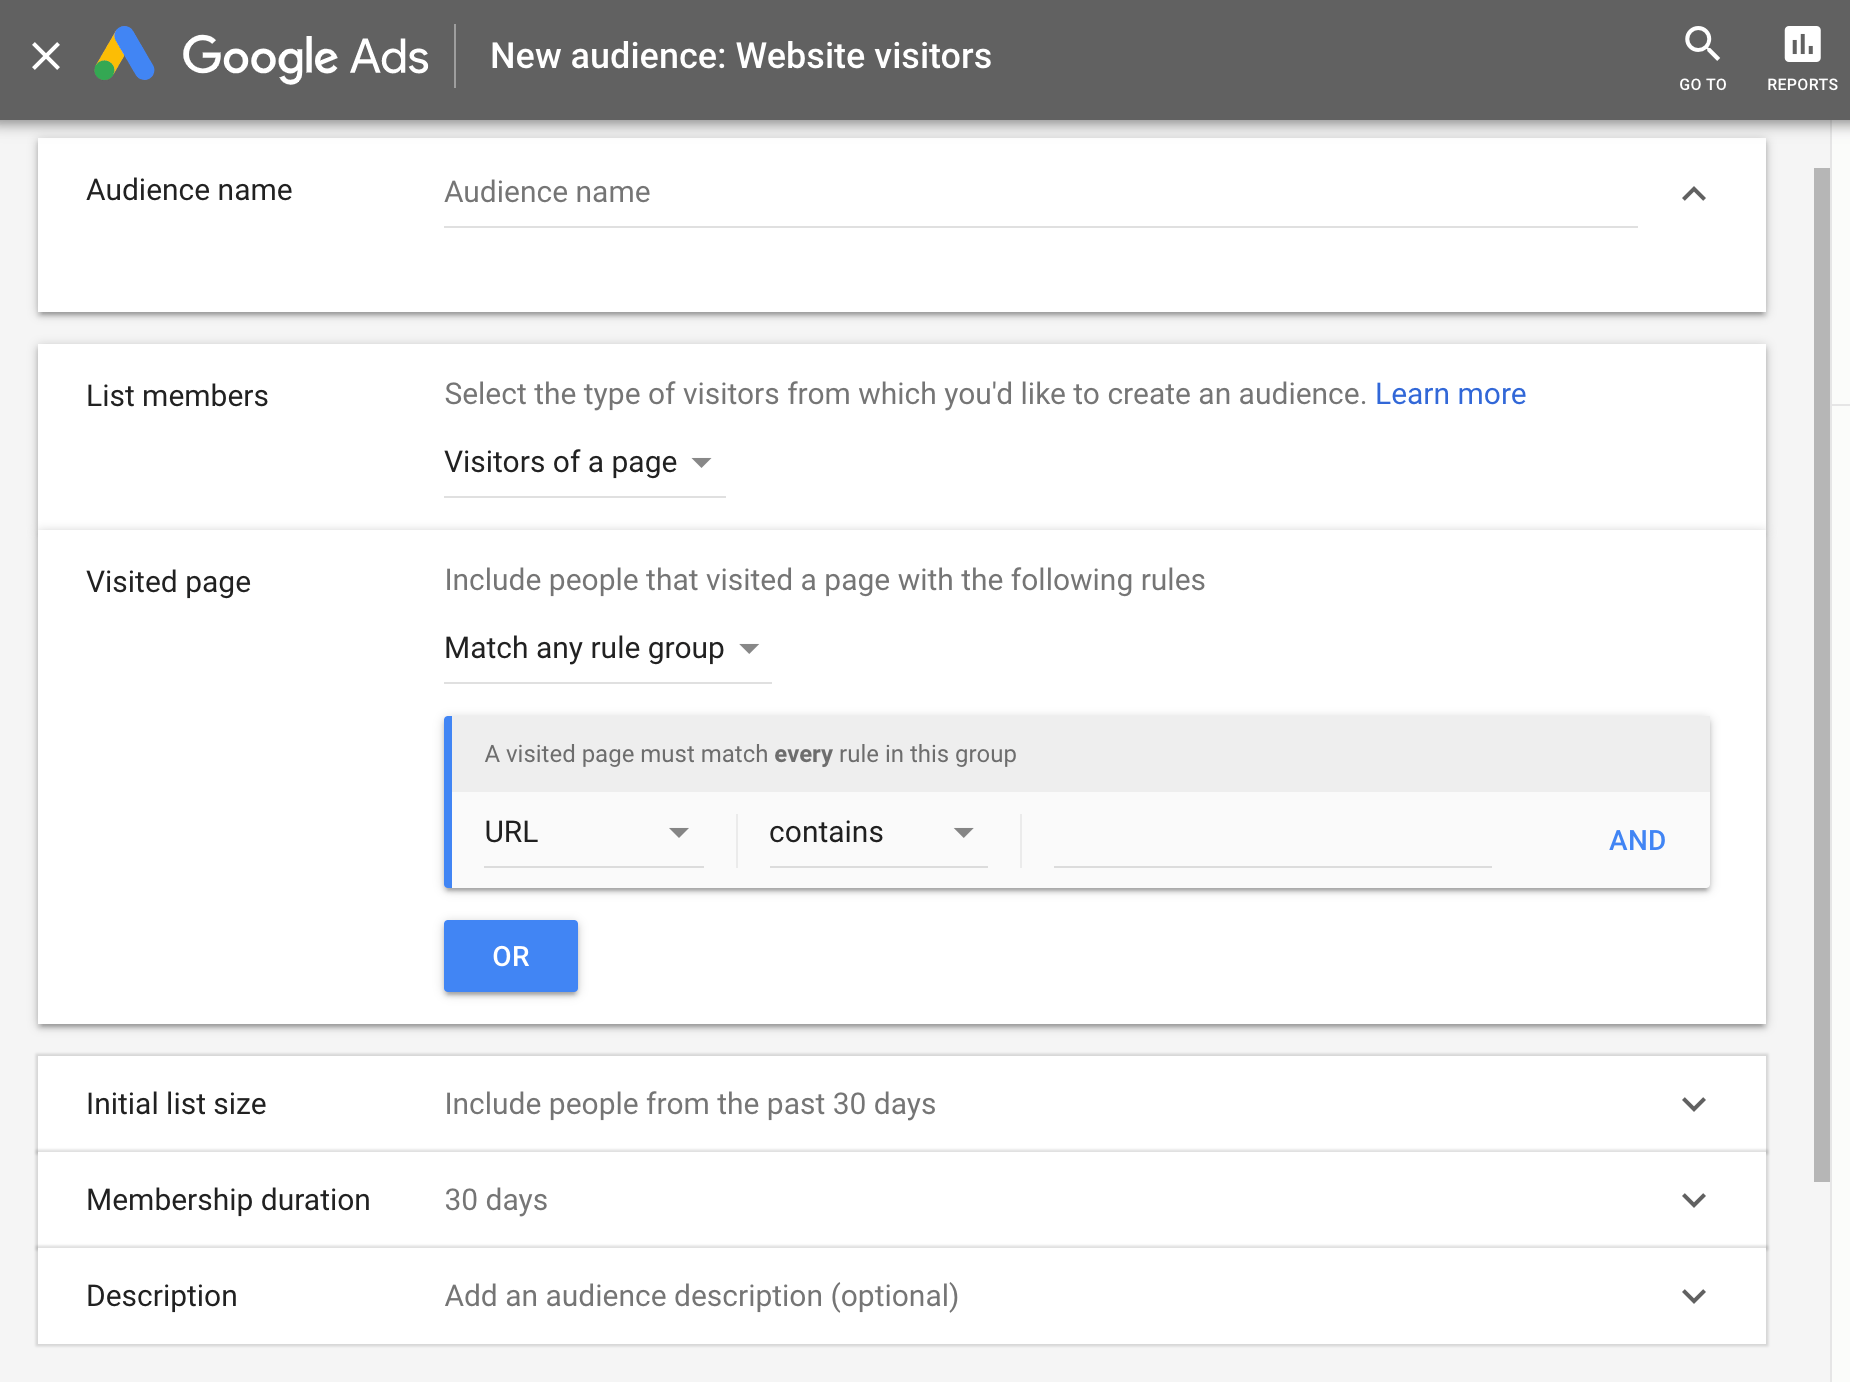
Don’t skip this step. It’s unethical to deceive your website visitors. Plus, Google states that you need to disclose all of this information if you’re using AdWords for remarketing. Create custom audience listsNow it’s time to customize exactly who you’ll be targeting with remarketing. Go back to the “audience manager” page on your AdWords dashboard. Then navigate to the “audience lists” tab and click on the plus (+) sign to add a new audience.
Next, you’ll be presented with different options for where this list will come from.
For our purposes today, go ahead and select the “website visitors” option. Next, you can add more information about this list by naming it and changing the settings. Here’s what that page looks like:
First, you should name your audience. Be specific so you’ll be able to distinguish it from other lists. You’ll be able to select this audience later on when you run your ads. Next, you can update custom information about their behavior and actions on your site. Here are your options:
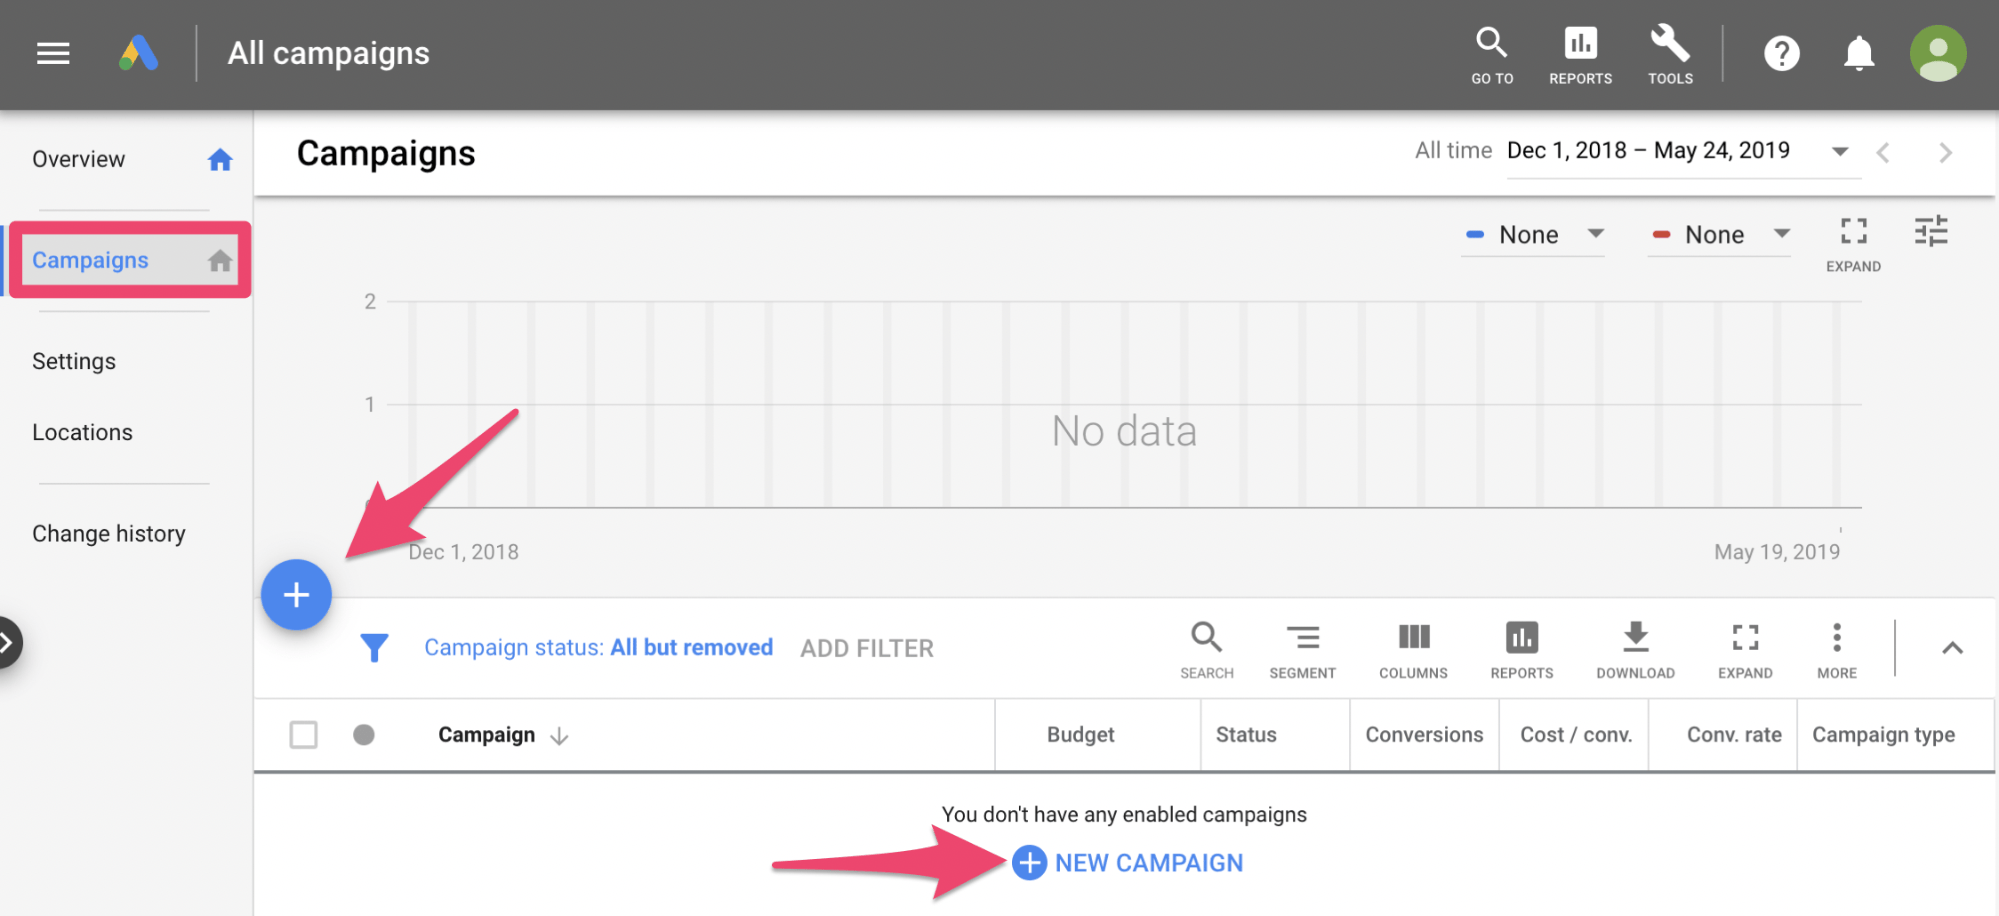
For example, maybe you want to target website visitors who landed on your “about us” page but didn’t visit your product page. Or maybe you want to target people who visited a product page and a shopping cart page. Depending on the options you choose, you’ll add those specific URLs as well. Then it’s time for you to determine how long you want this audience list to be kept on file. By default, this is set to 30 days, but it can be as long as 540 days. Depending on the page and campaign, you’ll want to adjust this accordingly. If you’re promoting impulse buy products, you’d probably want it set significantly lower. Or if you’re promoting a specific landing page for a holiday sale, you’ll want to make sure the ads don’t run past that holiday. For the most part, 30 days should be fine. You can always experiment with other periods of time when you create new audience lists. Launch your remarketing campaignAfter your settings are in place, it’s time for you to put all of this to the test. You need to create and run your ads. Go back to the AdWords dashboard. Find “campaigns” on the left side of the screen.
Click on one of the plus signs to start a new campaign. Next, you’ll be prompted to choose your goal from one of the following options:
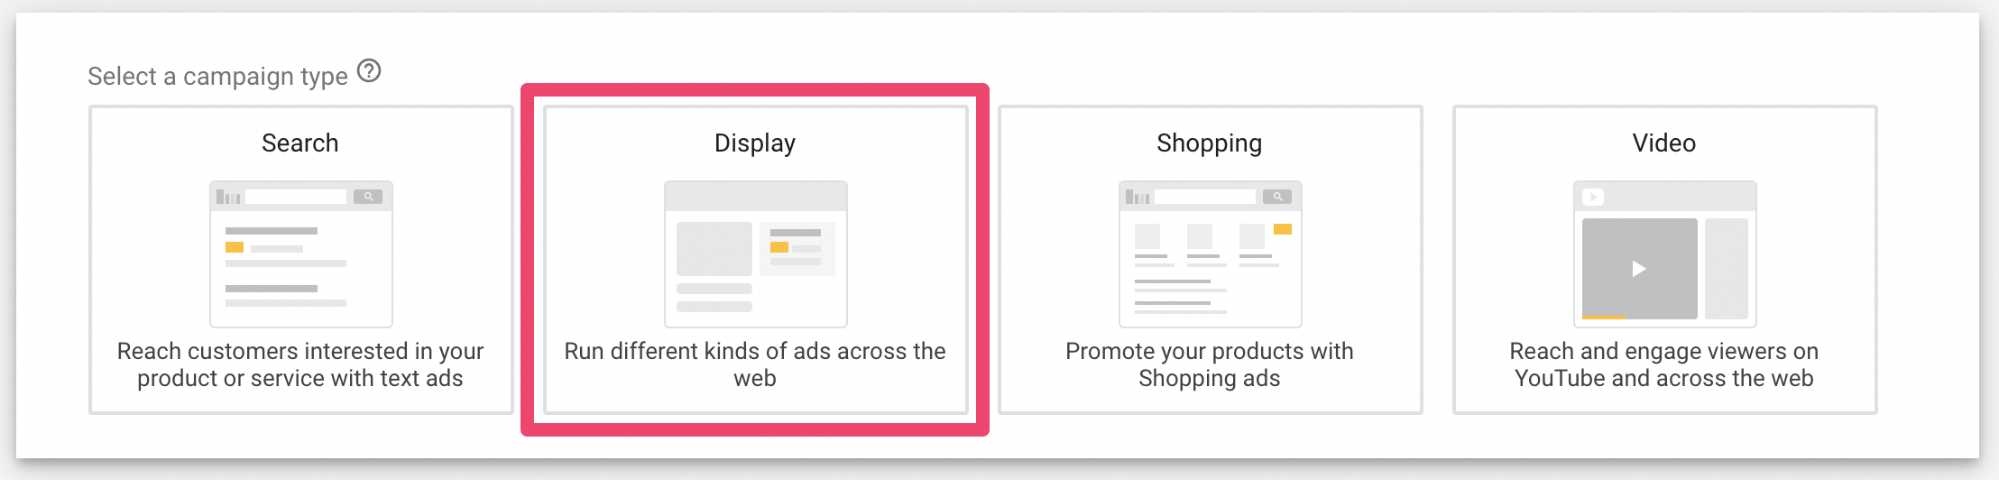
You can pick whatever you want from this list. But for conversions, you’ll probably want to choose sales, leads, or product consideration. Next, you’ll decide on the campaign type. For remarketing, select the “display” option.
This is your chance to customize all of the settings and parameters for your ad. You’ll set things like:
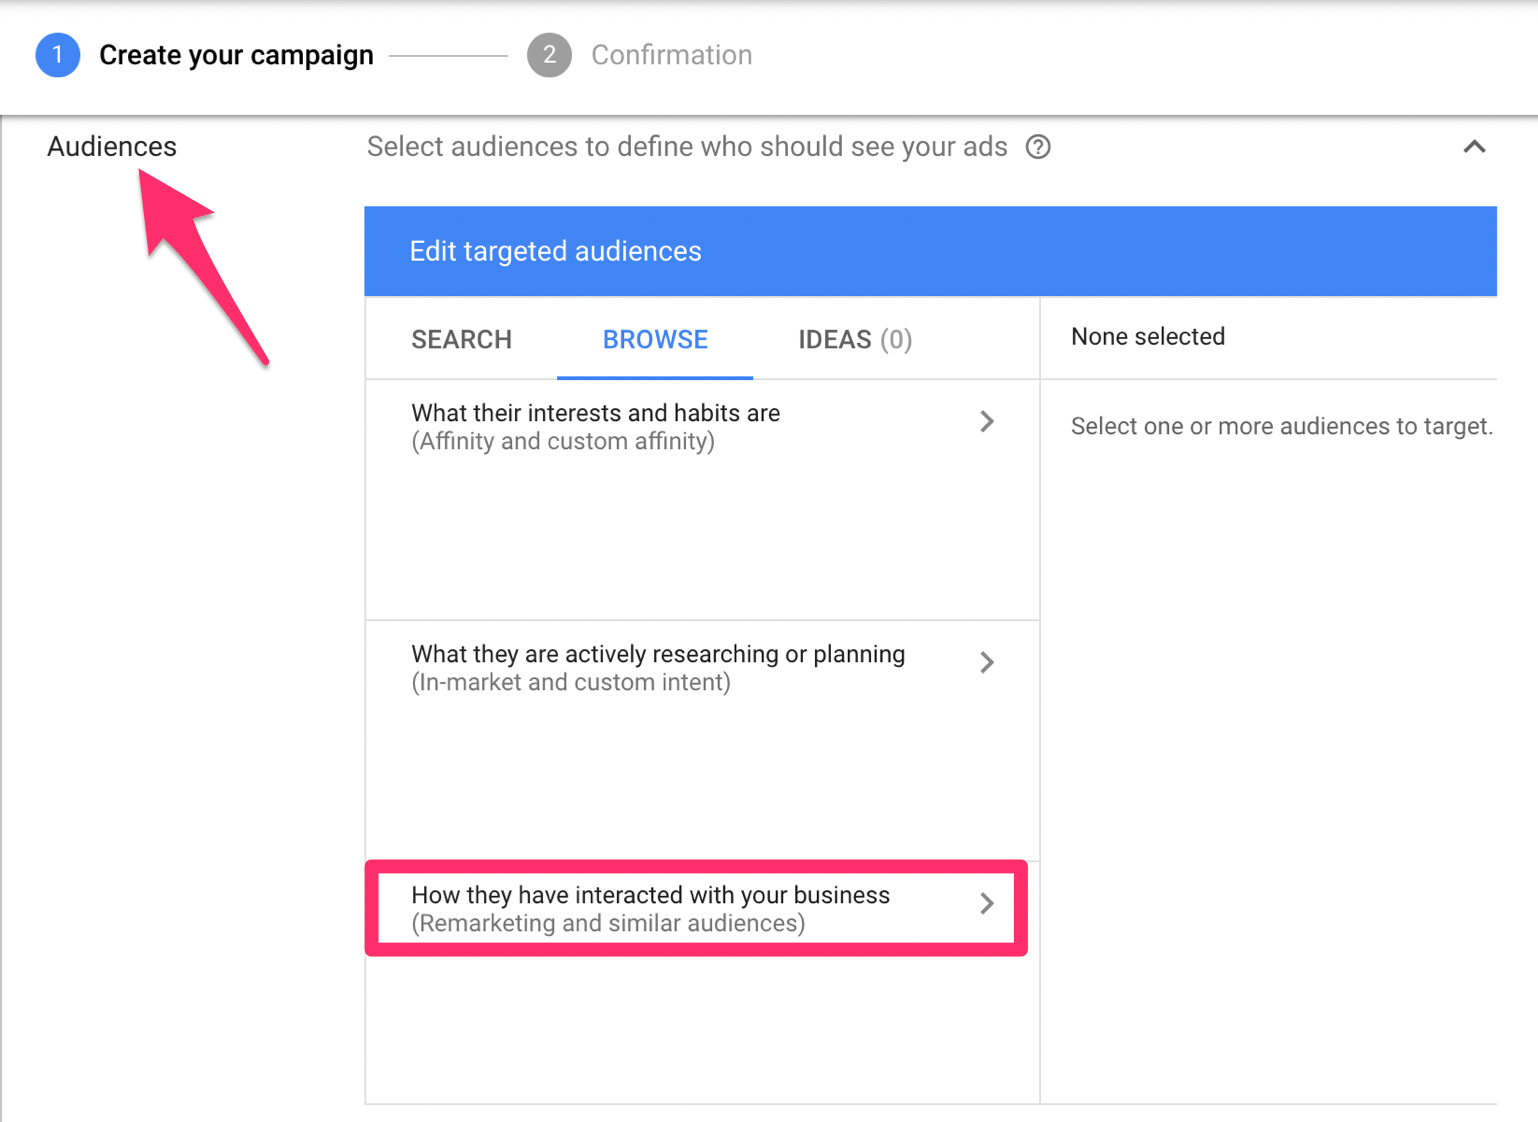
After you finalize all of this, scroll until you see the “audiences” section.
Click on the “browse” tab in the middle of the “edit targeted audiences” window. Navigate to the third option, as I highlighted in the screenshot above. This will allow you to pick how certain audiences have interacted with your business. From here, you can choose a list from the custom audiences that we created in the previous step. You could also choose all audiences or audiences that have been optimized by AdWords. Then it’s just a matter of creating your ads and launching the campaign. Your ad creation process will vary based on your remarketing campaign. For example, if someone viewed a specific product and already purchased it, then it wouldn’t make sense to show them an ad for that same product. Whereas if they added an item to their cart but never finalized the purchase process, showing them that same product again would entice them to buy. ConclusionIf you’re going to spend money on PPC campaigns with AdWords, I strongly recommend you run remarketing ads. With remarketing, you have the ability to target qualified leads. These are people who have already been to your website and completed some type of action that was close to converting. Since they’re already familiar with your brand, website, products or services, getting those visitors to finalize the conversion will be much easier than advertising to someone who has never heard of you. Track your conversions. See which types of ads, actions, and custom audience lists are driving the best results and highest ROI. Then you can double down on those campaigns and make changes to ones that aren’t performing as well. That’s how you drive conversions with Google AdWords using remarketing campaigns. Social Media via Quick Sprout http://bit.ly/UU7LJr May 29, 2019 at 06:55AM
http://bit.ly/2KjuSKT
How to Get LinkedIn Leads Without Advertising http://bit.ly/2JKPtIt Do you need to generate more leads and prospects? Wondering how to identify and nurture leads organically on LinkedIn? In this article, you’ll find a three-step plan to develop profitable relationships with people on LinkedIn, without spending any money on ads. LinkedIn’s Role in the Sales FunnelI love LinkedIn, but the platform has long felt like the estranged uncle who’s wickedly smart and brimming with potential but putters along unremarkably, much to the surprise of the people around him who see what he could be and want him to realize that potential. For social media marketers trying to use LinkedIn for marketing and sales, that’s a special kind of frustration. It feels like we should be killing it, but many of us aren’t. Here’s why LinkedIn should be an awesome source of prospects for any marketer:
And here’s why marketing on LinkedIn can be frustrating, in my opinion:
LinkedIn is an amazing social media platform, and my clients and I have found a great deal of success there. You can find success too; however, you need a more evolved strategy that not only capitalizes on LinkedIn’s strengths but also considers how it fits into everything else your business is doing. Your mileage on my assumptions may differ. I’ve heard from LinkedIn ad executives that many people are missing opportunities with how they structure ad campaigns on the platform, so you should take a well-rounded approach to your LinkedIn education and not take my sole word for it. For many salespeople, “social selling” is the vague idea of being exceptionally active on social media to drive conversions. In practice, the average salesperson rarely goes beyond adding LinkedIn connections and sending the odd follow-up message—a dramatic underuse of the marketing potential of LinkedIn. And that potential, in terms of the perspective on LinkedIn marketing that I’ve developed through my work with clients, might differ from what you think and may run counter to the other LinkedIn advice you receive.
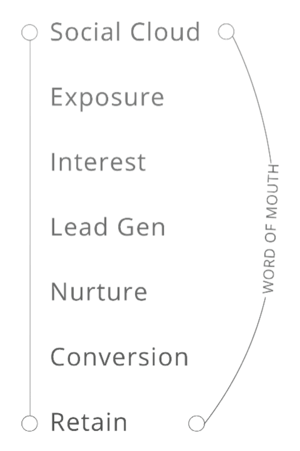
Before we dive into using LinkedIn specifically, let’s review the basic stages of a social sales funnel:
In your world, you might call this a customer journey and have different definitions for each stage. However, this general framework is universal for the most part and helps us map the various ways we can influence a prospect and customer during the sales process. An effective LinkedIn strategy can impact each of these stages if it’s well-designed and properly executed, which is a big win for you as a salesperson. Digital marketers break every step a customer needs to take to commit to a purchase into an independently measurable stage. That funnel is comprised of specific tactics that often map to the high-level funnel described above. That sequence might look like the following: Google Ad > Landing Page > Retargeting Ad > Secondary Landing Page > Lead Nurture Email Campaign > Abandoned Cart Advertising > Product Purchase > Post-Purchase Promotional Offers For LinkedIn marketing to be effective, you need to put more consideration into the various roles that LinkedIn can play in a sales funnel. You’re a thoughtful marketer and you likely have a lot in play when it comes to your marketing, so here’s what a B2B funnel might look like with a fully integrated LinkedIn approach: Prospecting on LinkedIn > Scrape Email > Cold Email > Cold Call > First Meeting(s) > LinkedIn Connection > LinkedIn Content (Lead Nurturing) > Meeting to Close Sale > Fulfillment > LinkedIn Content (Retention) > Network Research > Referral Requests
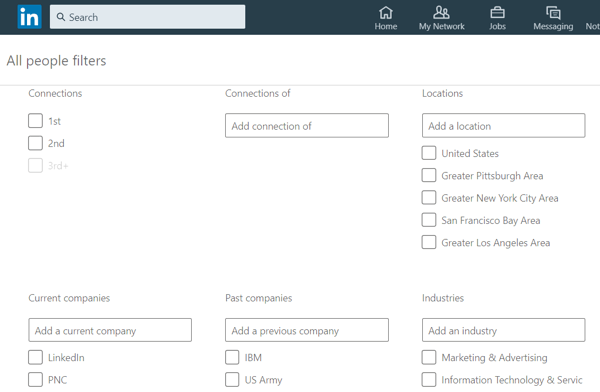
For those of you focused on B2C sales, I’m leaving out the part of the story where the prospect might have come in through an ad or referral because those are different kinds of opportunities. The good news is that even if a prospect jumps ahead to scheduling a first meeting with you, every other LinkedIn activity that comes in the following stages is still relevant. #1: Create a List of Prospects to Identify LeadsThe greatest strength of LinkedIn is perhaps its search features. With so many professionals using LinkedIn, there’s a high chance your prospects are there, even if they aren’t daily or weekly users. While a lack of LinkedIn engagement might not be great for passive marketing such as posts to your LinkedIn feeds, the fact that your prospects have registered for an account is an opportunity for you. The first thing you should do is comb through the connections of your top customers or clients to find prospects you want to meet. Then ask for an introduction. This is LinkedIn Marketing 101, but I still meet salespeople who don’t take this step. If you’re too busy to prompt referrals, give the job titles and industry types you’re targeting to an assistant and ask them to do the connection combing for you. Pro Tip: You should likely limit how often you request referrals from a particular client for the sake of the relationship. Once a quarter might be just aggressive enough, and twice a year is likely safe. From there, start doing cold outreach to keep your pipeline full of new opportunities. This is where I find that InMail consistently comes up short. As a consumer myself, if I receive a cold InMail, my immediate thought is that it’s spam because so many poorly run InMail campaigns flood my inbox each day.
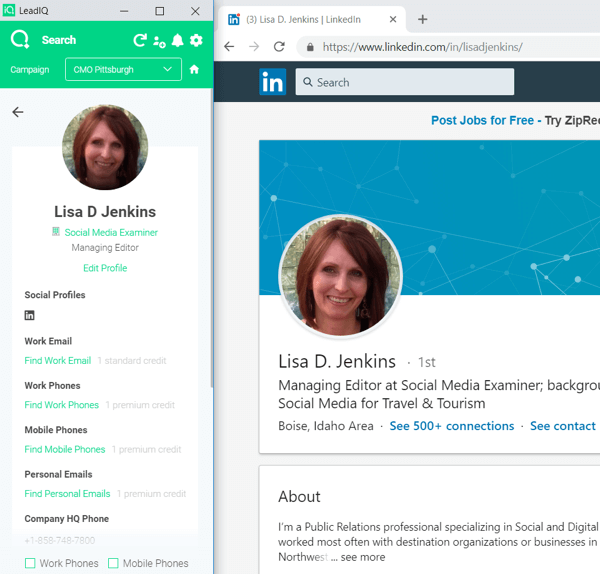
It’s so bad that LinkedIn auto-populates a much nicer “no thanks” than most people would likely write on their own. And on top of that, many people use LinkedIn intermittently, which means that they might not check their messages for several days or weeks (and maybe never). For prospecting, I recommend that you use LinkedIn’s amazing search functionality (upgrade to Premium or Sales Navigator to uncap the limit on your searches) to identify prospects. Then use a service like LeadIQ (plans start at $60/month) to scrape those prospects’ email and phone numbers. With LeadIQ or a service like it, you can quickly grab direct contact information for your prospect. This means you can skip over the InMail dance and get in touch with prospects in the places where they’re most likely to respond. Prospects answer their phones and they check their emails multiple times a day.
When you build a list this way, the following tips might be helpful:
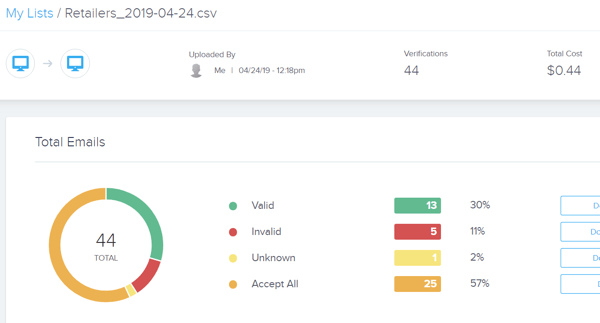
How to Make Better “Data-Driven” Marketing Decisions in Less Time— Without the Guesswork!
What you say or write to get the prospect’s attention is up to you and your creativity. In general, remember that these messages—phone or email—should not be spam. They should feel like they came from a person rather than a robot, and spark enough interest to get you a first meeting. Be personal. Be organic. #2: Begin Initial Lead Nurturing ActivitiesAfter the first meeting, most salespeople drop their prospects into a drip marketing system, especially if the sale isn’t likely to close in the immediate future (long sales cycles are often the nature of B2B). Typically, this means an automated email campaign, though savvier salespeople mix in follow-up calls, webinars, and even direct mail to introduce some variety in the way they add extra touches to their relationship with the prospect. LinkedIn should be a part of your lead nurturing activities, including:
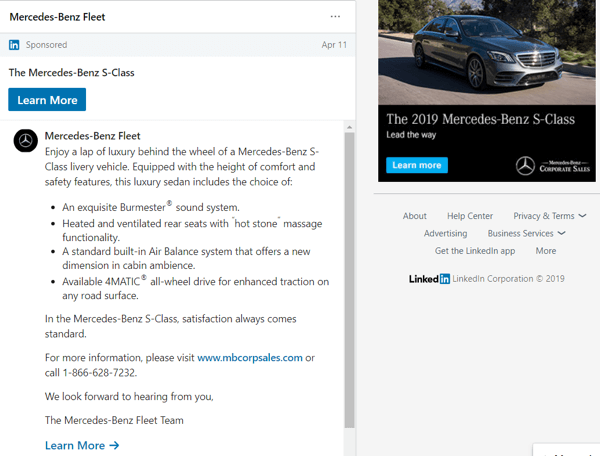
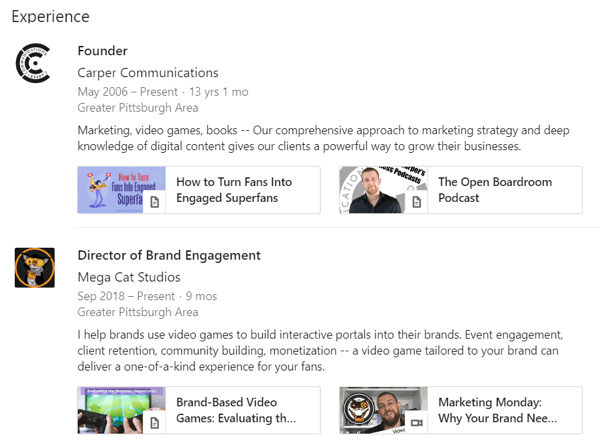
We typically tell our clients that they should wait to request a connection with a prospect because cold connections often feel just as spammy as a cold InMail. Prospects typically will recoil as soon as they feel like they’re being sold to, and the cold connection request throws that red flag. Once you’ve had the first meeting or received an email back but didn’t have a meeting, that’s when you should make the connection. There was a human interaction and they know that you’re real, so the connection is more appropriate. When you make that connection request, your prospect will invariably view your profile (perhaps for the second time because they likely saw you looked at their profile when you did your prospecting). Knowing this, make sure your LinkedIn profile is well-developed and matches the messaging of your sales process. On this front, the visual nature of profile media uploads is an opportunity to inject your branding and eye-catching graphics into LinkedIn.
As for the content you share on LinkedIn, remember that the feed is a passive way to engage prospects. Each post you publish is a very small boost to the relationship you started to form with a prospect. You also have to accept the reality that your prospects won’t see everything you post. To make your LinkedIn posts as effective as possible, use the following best practices:
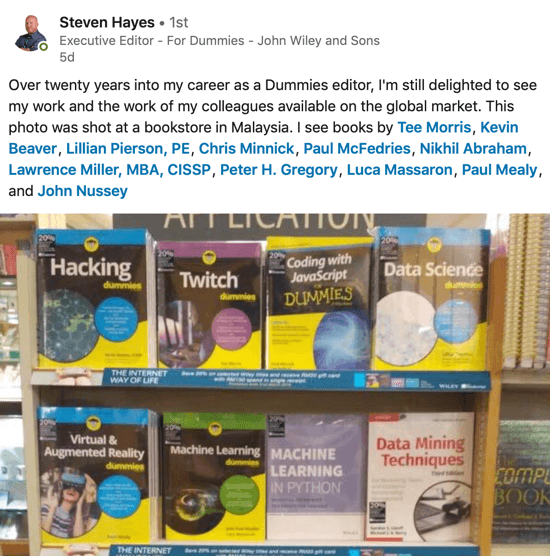
Remember, this isn’t direct lead nurturing, so don’t expect the same direct data or clear indicators of interest that you see in an email campaign. However, the process works if you give it time. #3: Create Deeper Engagement With Your Leads on LinkedInWhen you’ve covered the basics of LinkedIn marketing, you can build on that foundation with more advanced tactics that help you connect with prospects, nurture leads, and drive referrals. Here are some ideas to mix into your regular cadence of activity. Tag High-Value People in Your LinkedIn NetworkWhen you tag someone, you have an opportunity to inject yourself into their network of connections. This means you can put yourself and your business in front of new people who might also be your customers. The caveat is that the tag needs to be a positive experience for the other party involved. You might have success with the following tactics:
Extend Partnerships to LinkedInIf you run a social media marketing firm and often collaborate with a specific web developer, extend your collaboration to LinkedIn. Share each other’s content and comment on each other’s posts. The regular interactions have a positive effect on the way the LinkedIn algorithm pushes content, and these interactions are passive ways for each party to share the expertise of their partners with their networks. The more ambitious adopters of this strategy structure and plan how they’ll boost each other’s content. Having 10 people from your networking group jump into a LinkedIn discussion is a big bump in engagement that often sows the seeds for more engagement from other users. If you don’t abuse this approach or fake it, coordinating with a larger group of partners can be beneficial. Dive Deeper Into Sales Navigator FeaturesPaying for a LinkedIn subscription isn’t mandatory, but it’s helpful. Though this article doesn’t spend a great deal of time on pay-to-play features, you should revisit Sales Navigator once your LinkedIn activity is rolling. The additional search features can be useful, but the lead alerts can be especially helpful. If you know when a key position at a target company changes, that can be your opportunity to turn a dead sale into a new conversation, but you’ll never know that happened unless you’re paying attention. ConclusionThe major takeaways for this LinkedIn lead generation guide should be the value of consistency and the power of original content. The small touches matter and they’ll add up if you make each one a positive, educational, and entertaining experience for your prospects. In the future, be on the lookout for more content opportunities via LinkedIn. For my part, I’m excited by the potential of live video on LinkedIn, but who knows what else this must-use business platform has in store? What we do know is that you should be on the platform and doing more than you are. What do you think? Have you used LinkedIn to successfully generate new business? What tips can you offer? Share your thoughts in the comments below. More articles on LinkedIn marketing:How to Make Better “Data-Driven” Marketing Decisions in Less Time— Without the Guesswork! Social Media via Social Media Marketing | Social Media Examiner http://bit.ly/1LtH18p May 29, 2019 at 05:01AM
http://bit.ly/2HHFFMS
Tying Social Media Strategies Into Your SEO http://bit.ly/2JIwYUZ Search engine optimization and social media are connected, but most people view each one as a separate entity. Social media can be integrated into a marketing plan with an SEO agency if expectations are kept in line with the facts. Social media can be used for content promotion, but it can do so much more. Gain Links Through Social MediaLinks are the go-to SEO strategy, but a lot of people aren’t getting links from social media. A simple post may generate links, but everyone is posting content on social media. The trick is that you need to get your content in front of the right people. If 1% of your followers have a blog, that means that you’re trying to target 1 out of 100 people for a link. You need these links to get in front of:
But how? One simple method is to mention these targets in your post. Influencers are monitoring posts so that they can interact with followers. If you can cite these influencers in your post or feature them in the content that you’ve linked, you’ll often gain a lot of high-quality links in the process. Optimize Your Content ProperlyContent should be optimized for sharing, but many new website owners don’t understand this. You don’t want to spam your followers, and this is what a lot of website owners do. The owners will post their content repeatedly and wonder why their social media strategy is not working. You need to engage with your audience, but more importantly, you have to focus on what happens when a person clicks on your site. Most people have heard about bounce rate, and this is how many people leave your site on the page that they enter. But Google knows that there’s more than just bounce rates to worry about. Time on site also matters. If people land on your guide to widgets and spend 10 minutes on the page reading, this can be beneficial to your SEO strategy. How does this relate to your social media strategy? You can use analytics to see which tweets gain more traction, and if people are going to a key page on your site, you may want to tweet that page more often. Your guide to widgets will get more clicks if you tweet using an image or video with catchy titles. Use these metrics as another way to find content that can be updated to more thorough and answer the follower’s questions. Stop Focusing on FollowersIt’s easy to get stuck on the number of followers that you have. Perhaps you want to hit the 100,000-follower mark, but will it actually do anything for you? No. Google doesn’t care about your follower count or fans. Your time is better spent on trying to reach the right people on social media. Outreach is intimidating, but it can get your name in front of followers. Spend your time focusing on the right content, analyzing which content is best able to generate links and shares. You can also see who shares your content, and reach out to these people if they have blogs that can benefit your SEO in some way. Content shares can tell you if your content is impactful or not. If you’re not using social media to be able to determine which content people like, you’re missing out on the opportunity to strengthen your content and boost your rankings. The post Tying Social Media Strategies Into Your SEO appeared first on Social Media Explorer. Social Media via Social Media Explorer http://bit.ly/2onGYog May 29, 2019 at 12:49AM |
�
Amazing WeightLoss Categories
All
Archives
November 2020
|


 RSS Feed
