
Act Fast: Refurbished Canon RF 50mm f/1.2L in stock at the Canon USA store for $1839 (Reg $2299)10/26/2020
https://ift.tt/3kxHjlo
The Canon USA store as refurbished copies of the best autofocus 50mm lens ever made, the RF 50mm f/1.2L USM. Act quickly, these won’t last long. Refurbished Canon RF 50mm f/1.2L $1839 (Reg $2299) Photography via Canon Rumors https://ift.tt/2v4dYqS October 26, 2020 at 06:43PM
0 Comments
https://ift.tt/2J8URGb
Canon has released their Third Quarter 2020 financials, and as one could have guessed COVID-19 continues to be a big challenge for the market. Canon did have a bit of good news, as they have raised their full-year projecting for ILC’s by 500,000 units to 5.9million for 2020. The Canon EOS R5 and EOS R6 have been excellent sellers according to Canon, even with the manufacturing challenges. Imaging System – Cameras:
Canon Inc. Third Quarter 2020 Results:Photography via Canon Rumors https://ift.tt/2v4dYqS October 26, 2020 at 08:41AM
https://ift.tt/31LO2kq
Canon USA has dropped the price of the Canon EOS RP w/24-105mm f/4-7.1 IS STM kit, it’s now under $1000 USD. For anyone on a budget, but that wants to get into the EOS R system, this is a great place to start. Canon EOS RP w/24-105mm f/4-7.1 IS STM $999 (Reg $1399) Photography via Canon Rumors https://ift.tt/2v4dYqS October 26, 2020 at 07:08AM
https://ift.tt/34q9U6y
The post The World’s First Completely AI-Powered Photo Editor Will Debut Before the Year Is Out appeared first on Digital Photography School. It was authored by Jaymes Dempsey. Skylum’s Luminar AI, billed as “the first image editor fully powered by artificial intelligence,” will come available before the year is out. 
Already, the image editor has created controversy among photographers thanks to its automated, AI-based approach to image editing, with some claiming that Luminar AI’s easy, no-experience-necessary approach is problematic – or even cheating. And while we don’t know exactly how the program works, Skylum has released several videos showing off some of Luminar AI’s standout features. 
Highlights include:
To see some of these AI effects in action, check out Skylum’s latest video: While Luminar AI will be offered as a standalone editing program, Skylum’s most up-to-date software, Luminar 4, already packs some AI-based features (including a popular sky-replacement option). But Luminar AI promises to take AI editing to the next level, opening up advanced post-processing effects to a much larger audience. Will Luminar AI do everything for you? It doesn’t seem like it. As Skylum explains, you have to make creative choices; Luminar AI will do a lot of editing work for you, but you’ll remain at the helm. 
As for the Luminar AI release: The date is currently unknown, but Skylum promises a “holiday season” release. I’d expect an early December debut, though mid-December or late November certainly isn’t out of the question. In terms of price, you can currently preorder Luminar AI for a discounted rate: $74 USD for a standard copy of Luminar AI, or $139 USD to download both Luminar AI and Luminar 4. So if Luminar AI’s simple approach to editing appeals to you, make sure you take a look while the discount still lasts! You can view the software here. Now over to you: What do you think about Luminar AI? Do you like the idea of AI-based editing? Or does it feel like cheating? And will you purchase the program? Share your thoughts in the comments! The post The World’s First Completely AI-Powered Photo Editor Will Debut Before the Year Is Out appeared first on Digital Photography School. It was authored by Jaymes Dempsey. Photography via Digital Photography School https://ift.tt/29wB9CX October 26, 2020 at 04:10AM
https://ift.tt/31HHt1Y
This is one I haven’t shared in a long time, but it’s one of those things I stumbled upon years ago and I thought, “Hey, that looks kinda cool,” but I wasn’t exact sure why at the time (well, now I know why, but I didn’t when I first found it). 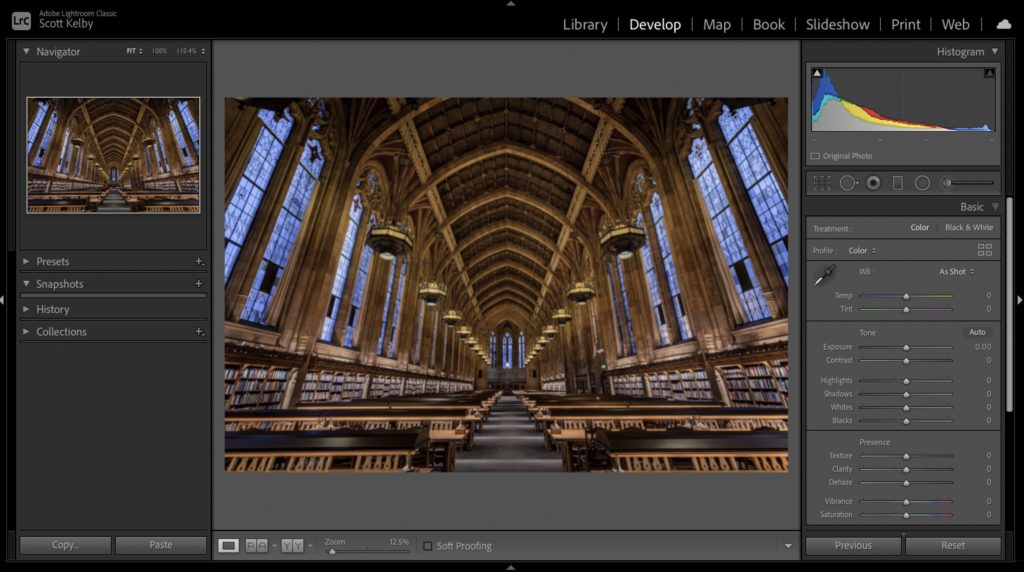
Anyway, the idea for this came to me a few years back while I was just doing my daily editing in Lightroom Classic. I usually work in a view called “Fit” which fits your entire image inside the center preview area, with a gray canvas area around it (as seen above). 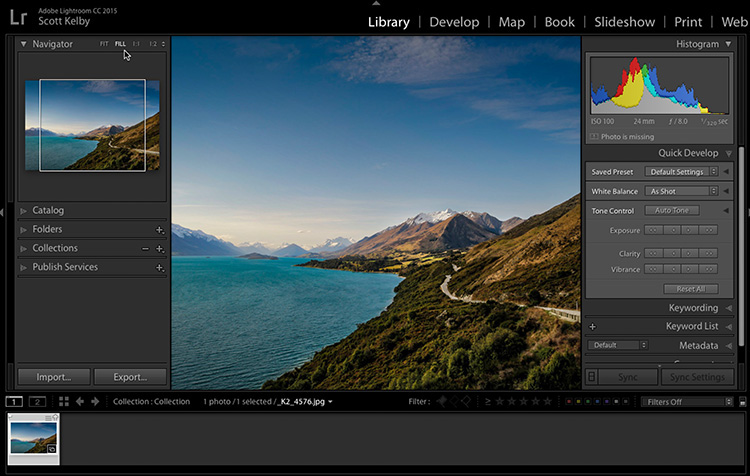
But for some reason, on this particular day I had my View set to Fill (so your image fills the entire center preview window — with no gray canvas area surrounding it, as seen above). 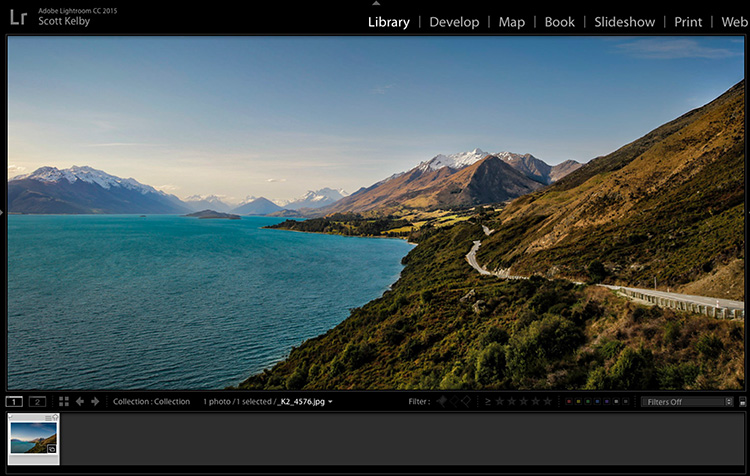
Normally, when I want to focus on just the photo, without all the distractions of Lightroom’s panels, I press Shift-Tab, which hides the top, bottom and side panels from view, so all you see is the photo, but on this particular day, instead I hid just the side panels (as seen above), and I’m looking at the screen and I’m thinking “Man, that wide view really looks kind of cool.” 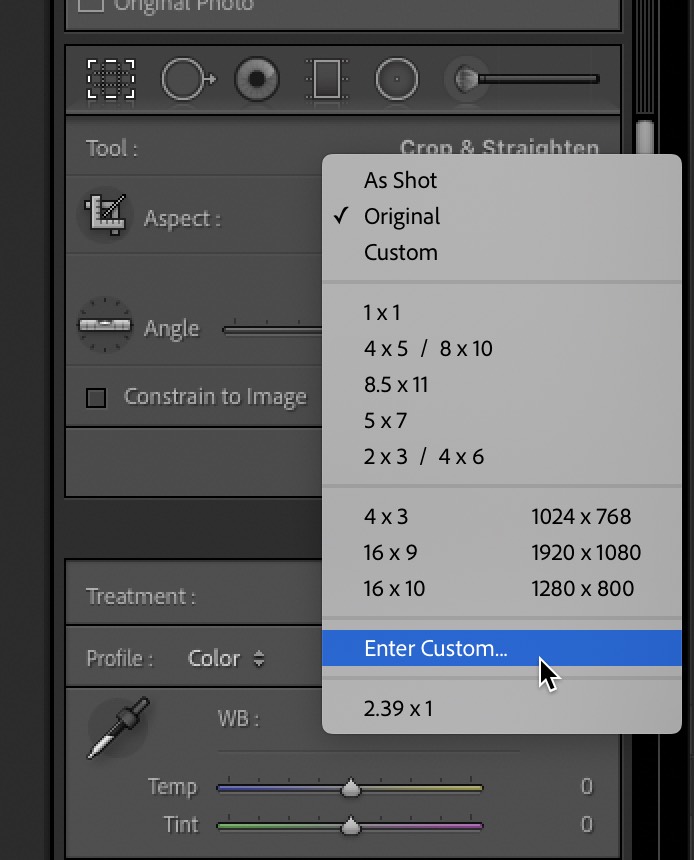
But but it wasn’t until I wrote a blog post about it that one of my readers who follows me on Twitter (Enrique San Roman) posted a comment that nailed it. He noted that you can go to Lightroom’s Crop Tool; go to the Crop pop-up menu and from the bottom of the menu choose “Enter Custom…” (as shown above). 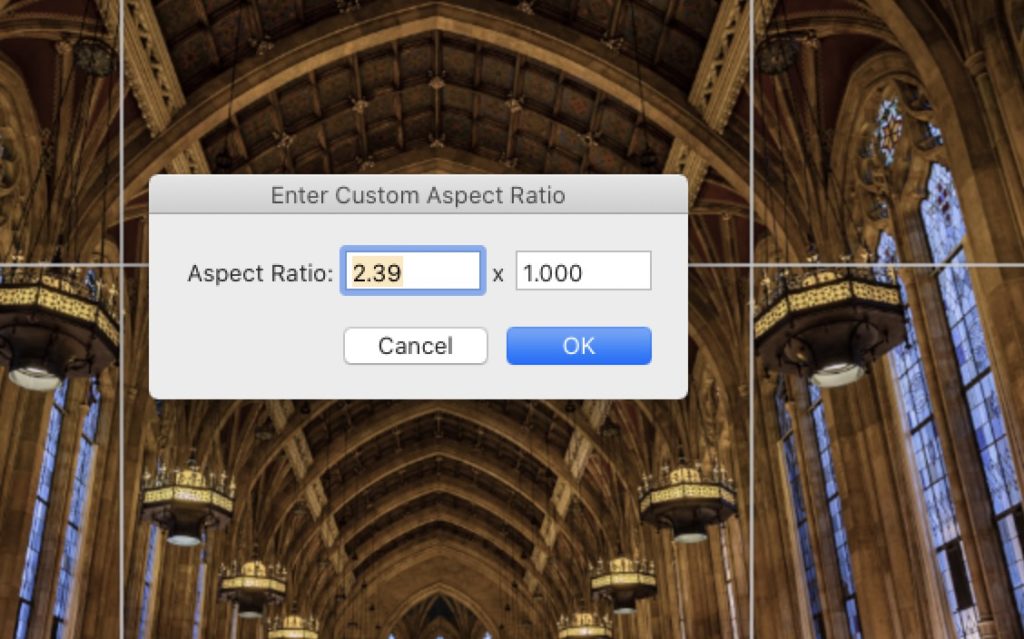
When the “Enter Custom Aspect Ratio” dialog appears, enter an Aspect Ratio of 2.39 to 1 to get the same type of cropping you’d get by hiding the left and right side panels. Enrique noted that the crop ratio is based on Panavision film (thanks Enrique!) which is (as a movie buff) probably why I was so drawn to this type of aspect ratio in the first place. 
Above: Here’s how the crop border changes when you enter that 2:39 crop ratio. You can slide your image up or down inside that cropping border by just clicking and dragging. 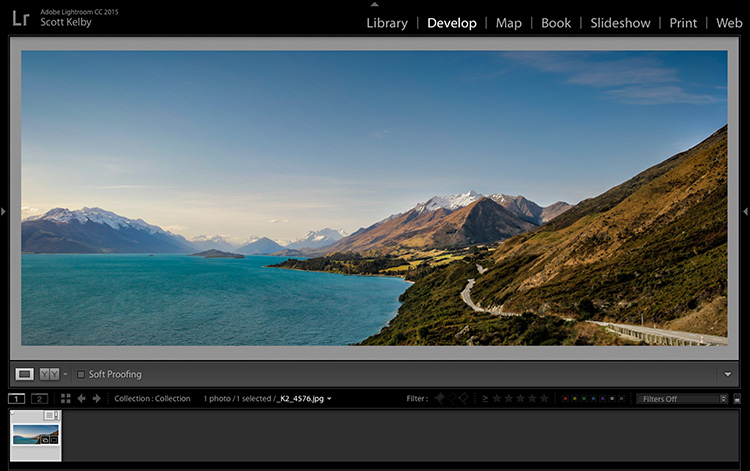
Above: Here’s the final cinematic widescreen crop after pressing the Return key (PC: Enter) to lock in your cropping. Anyway, give this a try on some of your photos and see what you think. Of course, if you have Lightroom, just open any image, set the View to Fill (in the Navigator panel), and then just hide the left and right panels from view (press F7 and F8 to hide them), and there you have it—Cinematic Style Widescreen Cropping (without having to actually crop). Hope you find that helpful (or at least kinda fun). The Flash Photography Conference is just three (or so) weeks awayI’m putting the trailer here (below) in case this is the first time you’re hearing about, but hundreds of photographers from all over have already signed up for The Flash Photography Conference (featuring Joe McNally), and you don’t want to miss out. Tickets and more details here, but make sure you check out the trailer. Cheers, -Scott The post How To Do “Cinematic Style” Cropping in Lightroom appeared first on Lightroom Killer Tips. Photography via Lightroom Killer Tips https://ift.tt/2sh0aZ8 October 26, 2020 at 03:39AM
https://ift.tt/2HCb5ql
Canon News has uncovered a smartphone lens add-on design by Canon. On the surface, it looks like a lens addon, capable of different focal lengths. The different lenses in the design illustration seem to show that they are held together magnetically. Canon has had some new designs and products such as the PowerShot Zoom over the last year or two, so it’s possible that this too will end up a consumer product. Photography via Canon Rumors https://ift.tt/2v4dYqS October 25, 2020 at 01:44PM
https://ift.tt/3mhvErh
The post Food Photography Techniques and Tips appeared first on Digital Photography School. It was authored by Jonathan Pollack. Editor’s note: This article was updated in October 2020. I originally wrote this article in 2009 when I was beginning to take pictures for my wife’s baking blog and various local magazines. Since then, I’ve had a lot of practice, and I’ve honed my food photography techniques. I’m thrilled to update everyone with what I’ve learned, and I hope that you find the information here helpful when taking pictures of your food. 
Food styling
When you’re taking pictures of food, it’s critical that your subject looks as good as it hopefully tastes. If you don’t have the budget to hire a food stylist, it’s important to know some basic styling techniques that can make food look its best. Make more food than you think you’ll need, and always photograph the examples that look the best. You cannot make a burnt waffle or soggy asparagus look appetizing. 
Props can help you set the mood for your food photos. I have a basement full of plates, platters, chargers, cups, glassware, utensils, napkins, tablecloths, surfaces, and cutting boards at my disposal. With those, I can pull together what I need to set a table (or a portion of a table) for a picnic setting, a fine-dining scene, or something in between. While you don’t need to have a ton of food photography props, I recommend that you at least have a few place settings and utensils, as well as a nice surface to photograph on. 
Plating your dish properly can elevate it from mundane to extraordinary. If you aren’t working with a professional chef or food stylist, I recommend you read articles and watch video tutorials about plating as a starting point. Think about ingredient placement, creating height or depth, adding color, or increasing contrast. Here are a few plating tips to improve your food photography:
Food photography composition
When taking pictures of food, you have the advantage of a subject that is stationary. This means you have complete control over the camera’s position and angle, and how close or far away the camera is from the scene. To get the best composition, I recommend you start with a few food photography techniques:

Food photography lighting and exposure
While you don’t need the absolute best equipment to photograph food – I’m using camera equipment that’s a decade old! – you do need to think about how your choice of lighting, exposure, and even camera equipment affect your photo. Placing your dish with natural light to the side and behind generally yields great results, but it’s also not consistent or reproducible; a passing cloud or thunderstorm can suddenly destroy all of your styling and composition efforts. If you’re working on taking photos over the span of a few hours and you want them all to look similar, I highly recommend that you use artificial light of some sort. Most food photos I’ve taken indoors are photographed using flashes with diffusion from behind or off to the side of the food. I use reflectors to bounce some light back to the front of the dish, if needed. If you’re working within a budget, consider getting inexpensive work lights and putting white linens between the lights and your food. 
Learn how to use the exposure triangle whether you’re using natural or artificial lighting, and start setting everything on your camera manually. Aim to blur out your background while keeping the foreground nice and sharply focused. And, of course, make sure everything is lit just right. Equipment for food photographyThe best camera equipment in the world won’t help if you haven’t learned what to do with it. I always advise people to start by renting equipment or buying cheap, used gear. To start off, I recommend a tripod, a camera body that supports detachable lenses, and a medium zoom lens. I encourage you to learn to shoot and edit RAW photos, as you can adjust far more in post-production with them than you can with JPEG images. If you’re ready to move on from your basic camera setup, I recommend you buy color calibration equipment and lighting. And when you feel confident that you have a good understanding of all of the gear you have and you feel that your current gear is holding you back, finally commit to a full-frame camera system and professional lenses. Food photography techniques: conclusionWhat food photography techniques have worked for you? What techniques have been problematic? Please let me know in the comments! The post Food Photography Techniques and Tips appeared first on Digital Photography School. It was authored by Jonathan Pollack. Photography via Digital Photography School https://ift.tt/29wB9CX October 24, 2020 at 04:08AM
https://ift.tt/2J0YoGw
The post Weekly Photography Challenge – Silhouette appeared first on Digital Photography School. It was authored by Sime. This week we’re looking forward to not seeing the subject of your photographs because the theme is ‘Silhouette’ we hope you’re up for it! #dPSSilhouette is the hashtag we’d like you to use (add it to your post wherever you post it: details at the end of the post) See ALL of our weekly challenges right here 
Not sure how to make a silhouette photograph? Have a look at these articles! Photograph silhouettes in eight easy steps 18 Shape defining silhouette images 
Great! Where do I upload my photos?Simply upload your shot into the comments field (look for the little camera icon in the Disqus comments section) and they’ll get embedded for us all to see. Or, if you’d prefer, upload them to your favourite photo-sharing site and leave the link to them. 
Share in the dPS Facebook GroupYou can also share your images in the dPS Facebook group as the challenge is posted there each week as well. If you tag your photos on Flickr, Instagram, Twitter or other sites – tag them as #DPSSilhouette to help others find them. Linking back to this page might also help others know what you’re doing so that they can share in the fun. The post Weekly Photography Challenge – Silhouette appeared first on Digital Photography School. It was authored by Sime. Photography via Digital Photography School https://ift.tt/29wB9CX October 23, 2020 at 02:14PM
https://ift.tt/34mU4cF
We would like to announce that a new firmware update is now available for the SIGMA Global Vision lenses in Canon EF mount listed below. For customers who own the SIGMA USB DOCK UD-01 and applicable products listed below, please update the firmware via SIGMA Optimization Pro. [Applicable product]
[Benefits of the update]
[Applicable product]
[Benefits of the update]
[Applicable product]
[Benefits of the update]
[Applicable product]·SIGMA 20mm F1.4 DG HSM | Art in Canon EF mount [Benefits of the update]
[How to update] Connect the lens to a computer via the SIGMA USB DOCK UD-01 (sold separately), then open SIGMA Optimization Pro*. If the lens firmware isn’t the latest version, the following message will appear: ‘The latest lens firmware is available’. Click ‘Yes’ to update. * Before updating lens firmware using the SIGMA USB DOCK UD-01, please ensure you update SIGMA Optimization Pro to the latest version. Photography via Canon Rumors https://ift.tt/2v4dYqS October 23, 2020 at 12:37PM
https://ift.tt/35ovDep
The post Photography Equipment for Beginners: What to Buy When Starting Out appeared first on Digital Photography School. It was authored by Rick Ohnsman. You’ve decided you want to get more serious about photography, move beyond just making snapshots with your cellphone, and perhaps even pursue making money from your hobby. You’re ready to start shopping for a better camera and the accessories that go with it. Many articles about photography equipment for beginners will immediately start recommending makes and models. Or, if you walk into a traditional brick-and-mortar photo store, a salesperson might start showing you equipment, eager to make a big sale. 
Ask other photographers, “What should I buy?” and many will launch into a list of equipment they like, probably favoring the make and model of the gear they own. (Stay far away from “fanboys,” people who will tell you Brand X is the only way to go and only idiots would buy anything else.) I’m here to suggest that, rather than immediately seeking a make/model answer to the “What should I buy?” question, you should instead start by asking yourself some more general questions. Assessing your needsCameras and associated equipment will not make you a great photographer, any more than buying an expensive sports car will instantly make you a winning race car driver. To take that analogy further, why would you plunk down the big bucks for that exotic sports car when all you need is something to drive to the grocery store? The same goes for simply buying the “latest and greatest” gear because that’s what other photographers are excited about, or because that make/model is the buzz of trade magazines and online photo sites. Porsche sports cars have a great reputation, but do you need one? The new mirrorless cameras from the big-name camera manufacturers are exciting, but are they right for you? If money is no object (I wish that were my situation!), does that mean you should buy the most expensive, sophisticated camera and all the lenses and goodies to go with it? Will that guarantee you have the “best” and most capable gear that will ensure you make stellar photos? I hope you don’t just reach for your wallet. Instead, do a little self-assessment and homework first. 
So, let’s explore the questions you should be asking yourself as we dive into photography equipment for beginners. What do you already know about photography?If you’re looking for photography equipment for beginners, here’s the first question you should ask: What do you already know about photography? How much knowledge and experience do you already have? Have you only made some “pretty pictures” with a single press of the shutter button on your cellphone? Have you heard of the exposure triangle? Do you understand what ISO, shutter speed, and aperture are and how they interact to control exposure, depth of field, and motion capture? Have you had or might you have an interest in pursuing formal instruction to better learn both the artistic composition of photos and the technical operation of the camera? 
Sure, you can buy a fancier, more expensive camera with the idea that you will “grow into it.” Of course, that more sophisticated camera with buttons, knobs, dials, and cryptic menus could also overwhelm you as a beginner. Sometimes simpler is better, especially when you’re still learning. On the flip side, a cheap point-and-shoot, highly automatic camera might be easy to learn, but can very quickly create limitations for you as you grow as a photographer. The real question here is, “How serious are you about photography?” Do you simply want a camera you will use on occasion, perhaps take on vacation, and that will make good photos with its automatic modes? Or do you plan to make this a serious hobby in which you will invest time, study, and frequent practice? Do you want to dig in and really learn? What type of photos will you be making?Cameras don’t make photographs; photographers do. A camera is simply a tool a photographer uses to create a photograph. In any endeavor, having the right tool for the job makes the work easier and gives improved results. So, when choosing the right camera for your photography, an essential question is, “What kind of photographs do I intend to make?” I purposely use the word “make” rather than what many people say about “taking photos.” Snapshooters might take photos, seeing something of interest and quickly, without much thought, snapping a shot. Serious photographers, however, are craftspersons, thinking about composition, camera settings, and many other things involved in creating and “making” a photograph. Whether you just want to take snapshots or make photographs will also influence what kind of equipment you should buy. So what kind of photos do you want to make? What subject matter is your favorite? I hear some saying, “I’d like to make all kinds of photos of whatever catches my eye.” So let’s ask the question this way: “What kind of photos do you envision making 80% of the time?” Photos of your kids as they grow up? Formal portraits? Landscapes? Vacation photos? Wildlife photos? There are hundreds of photo genres to explore and, while some camera and lens combinations might be able to handle a greater variety of these, expect to pay more for such photography equipment. Specialized kinds of photography, such as bird or wildlife shooting where fast camera responsiveness and long lenses are required, will take more specialized gear. Perhaps you want to take photos of your kids playing soccer or engaging in other sports. You might consider an inexpensive point-and-shoot camera, but even if it does have a built-in 10x “superzoom,” will the lag-time between when you press the shutter and when it fires cause you to frequently miss the action? Will the tiny built-in flash have enough power to light your kid at the other end of the basketball court as he hits the winning shot at the buzzer? Finding the balance between spending enough to have the most versatile equipment and yet not paying for things you will never or only rarely use can be hard. Back to the “80% factor” I mentioned: Buy the gear that will accommodate 80% of your needs. If you suddenly get to photograph that African safari and don’t have the equipment you need, then you can upgrade or, better yet, rent the equipment to handle that unique opportunity. How will your photos be used?Before digital photography and the internet, a photograph meant a print. Today, it’s becoming rarer and rarer to see printed photos. Some of these statistics are from 2017, so they’re already dated, but still amazing to consider:

Do you wonder why companies such as Olympus have folded and even the largest digital camera makers are struggling? Sure, you’re reading this because you intend to continue pursuing digital photography, but the question I’m heading toward is, “What percentage of your images do you intend to print?” Do you need a high-megapixel camera?Top-end camera manufacturers like to boast about the high-megapixel cameras they are producing and, yes, these can produce some amazing images. Cameras from the top manufacturers now tout specs showing sensors between 40 and 60 megapixels (with prices to match). The question is: If the vast majority of the images you shoot are only for display on your monitor or online, do you need such high megapixel counts? You can print a beautiful 300 DPI 16” x 20” print with a 4800 x 6000 pixel (28.8 MP) image. At the time of writing, the Sony A7R IV is the highest megapixel full-frame camera, and it produces a 9504 x 6336 pixel (60.2 MP) image. Printing that at 300 DPI would give you a nice 20″ x 30″ print, and it would be quite easy to go far bigger than that. On the other hand, if the largest you’d ever print is 8″ x 10″ (about an A4 size using European standards), a 7.2-megapixel image would be just fine. Most current smartphones produce higher resolution images than that. 
I don’t mean to confuse you with math. But I want you to ask yourself the question, “Do I expect to be printing my photos and, if so, how large might I print them?” Do you need an expensive, full-frame, high-megapixel camera if all you’ll ever do is share your work on social media? 


Size, weight, and environmental factorsYou’ve heard the saying, “The best camera is the one you have with you.” I suppose the corollary to that is, “The worst camera is the one you left at home” (or in your car, or anywhere that is not with you). If you buy a camera (and lenses, and tripods, and other equipment) that becomes a nuisance to bring along, or makes you wish it were smaller and lighter, you’ve probably bought the wrong gear. Interestingly, many people believed the way to save on size and weight was to move to the latest mirrorless cameras. Yes, mirrorless cameras are marginally smaller and lighter, but lenses for them are not appreciably smaller and lighter. Many mirrorless cameras also draw more battery power, and so the weight saved with smaller equipment is offset by having to carry more batteries. About the only thing that has grown appreciably lighter are photographers’ wallets, because the new smaller, lighter cameras often carry a premium price. Something else to be considered when shopping for photography equipment for beginners is where and how the camera and accessories will be used. If you’re taking a camera on vacation for travel photos, how much equipment do you want to pack and carry around all day? If you’re a backpacker or outdoorsman, do you want to take a tripod? An array of lenses? Might one of the more sophisticated bridge cameras be a better option for a travel camera? Another consideration might be the operating environment in which you intend to make photos. If you will frequently be in dusty environments, you may not want a camera with interchangeable lenses. Maybe you frequently shoot in the wet, rain, snow, or in other inclement weather. If so, a camera that is weather-sealed might be worth considering. UpgradabilityIf you intend to pursue photography for many years, you will want to give consideration to upgrading your equipment as you improve, as new innovations come along, as you diversify in your shooting, or even as equipment wears out. Photographers who shoot with interchangeable lenses often find that they soon have more money invested in good lenses than their camera bodies. “Good glass” that can still be used when a camera body is replaced becomes a good investment. Because camera manufacturer lens mounts are usually proprietary to that brand, once you select a make and purchase a few lenses, you will likely want to stick with that manufacturer in the future, rather than sell off everything and start all over. 
New, used, or refurbished?Some people only want to buy new equipment and, if paying full-price for equipment to get factory-fresh gear with a full warranty is worth it to you, go for it. But sometimes, when researching photography equipment for beginners, substantial savings can be had by buying well-cared-for, used equipment (with stress on well-cared-for). Here’s a good article from Jaymes Dempsey about considerations when buying used photo equipment, and here’s another by Tom Mason. I have had generally good experiences buying used equipment because I:

Excellent savings can often be had by purchasing used when new equipment is just coming out. Photographers with GAS (Gear Acquisition Syndrome) just have to have the latest, greatest thing. Many of these shooters, eager to trade up, are willing to sell their slightly used equipment for bargain prices. Now, as a beginning photographer, you don’t need the newest cutting-edge equipment, because you likely still have to master the basics. If last year’s top (and now slightly used) camera can be had, helps you learn the basics, allows you to better understand your needs, and fits the bill at a reduced price, so what if you only have it a short while before you upgrade? Who to purchase from?Some good advice about buying photo equipment (or anything else for that matter) is the Latin phrase caveat emptor. You likely know that means let the buyer beware. It used to be that you could walk into a camera store and deal face-to-face with the store owner or at least a salesperson. Even then, you always had to be wary of the unscrupulous salesperson who, once you were pegged as a beginner without much knowledge, would try to upsell you into purchasing far more gear (or more expensive gear) than you really needed. You hoped instead that you’d get a dealer who really wanted to understand your needs and outfit you with the best equipment suited to your budget and needs. This second type of dealer would ask the kinds of questions we’re exploring here, knowing that a satisfied customer would tell others of their good experience and thus bring in more business. Sadly, these kinds of brick-and-mortar camera stores are becoming rare (the last dealer in my town closed shop about a month ago after 74 years in the photo business). That doesn’t mean there aren’t reputable online dealers who offer good customer service on photo equipment. You just have to do your research. Talk to experienced photographers and ask them where they buy their equipment, who gives good deals, who provides good advice and service, and who honors warranties. 
Always be cautious of dealers who have questionable reputations and, even more so, offer deals that are too-good-to-be-true. Often photo equipment manufacturers will require all dealers to offer their equipment at the same price, and so where you shop won’t change the price. Some dealers will thus come up with their own incentives and offer packages of accessories they throw in to sweeten the deal. Look carefully at whether this is really worthwhile. You might get a cheap cleaning kit, a worse-than-nothing tripod, or a shoddy camera bag, stuff that’s not worth it if it tempts you to do business with a shady dealer. Also, beware of the dealer who tries high-pressure tactics to get you to add on stuff you didn’t initially intend to buy or a questionable “extended warranty.” And beware of “gray market” equipment, which most manufacturers won’t warranty at all. Using online buying guidesI have refrained from suggesting any specific makes or models targeted as specific photography equipment for beginners. If, after asking yourself the questions I’ve outlined, you think you’re ready to begin looking at specific gear, there are some great places to check out. Here on the Digital Photography School (dPS) site, check out the Cameras & Equipment section. 
Another place I particularly like is the Digital Photography Review site (DPReview.com) and their Buying Guides section. The Cameras by Use Case pages are great for helping suggest makes and models based on how you intend to use your camera. I’ve primarily discussed cameras, but if you’re shopping for tripods, lighting equipment, or any other kind of photo accessories, places such as dPS and DPReview offer a wealth of information. There are also forums where you can learn from other photographers about the ins-and-outs of specific gear. Do be cautious, however. Fanboys and trolls like to hang out in places like that, so don’t just go with the first opinion you read. 
Photography equipment for beginners: The questions to askI’ve thrown out a lot of stuff here, so let’s summarize with a list of questions to ask yourself:

Now take my moneySome people aren’t much for researching purchases and simply want someone to tell them what to buy. It’s easy to find salespeople perfectly willing to tell you what you “need” and take your money. I suspect that, if you’ve read this article, you are not one of those people. So, in writing this guide to photography equipment for beginners, my aim is not to tell you what to buy, but rather to have you ask yourself the right questions. If you do that, you can best make a wise purchase and get the photo tools that best suit your task. The ultimate objective is that you learn and grow as a photographer, enjoy photography, and make increasingly better photographs. Best wishes! The post Photography Equipment for Beginners: What to Buy When Starting Out appeared first on Digital Photography School. It was authored by Rick Ohnsman. Photography via Digital Photography School https://ift.tt/29wB9CX October 23, 2020 at 04:08AM |
Categories
All
Archives
November 2020
|

 RSS Feed
