
|
https://ift.tt/3luCc5L
The post Weekly Photography Challenge – Coffee appeared first on Digital Photography School. It was authored by Sime. Right then! This is a little self-indulgent, but, I like to photograph my coffee (not even kidding!) and I thought it might be fun to see how others around the world take their coffee, so let’s try it – #dPSCoffee is the theme! You have to make a new photograph, none of that plucking one from the archives – head out and grab a coffee, trek to the kitchen, whatever you prefer! Will you light it, place it in the morning sun? What will it be! 
Photography & Coffee seem to go together pretty well, so I’m looking forward to seeing what you come up with this week! 
Great! Where do I upload my photos?Simply upload your shot into the comments field (look for the little camera icon in the Disqus comments section) and they’ll get embedded for us all to see. Or, if you’d prefer, upload them to your favourite photo-sharing site and leave the link to them. 
Share in the dPS Facebook GroupYou can also share your images in the dPS Facebook group as the challenge is posted there each week as well. If you tag your photos on Flickr, Instagram, Twitter or other sites – tag them as #DPSCoffee to help others find them. Linking back to this page might also help others know what you’re doing so that they can share in the fun. The post Weekly Photography Challenge – Coffee appeared first on Digital Photography School. It was authored by Sime. Photography via Digital Photography School https://ift.tt/29wB9CX November 13, 2020 at 01:14PM
1 Comment
https://ift.tt/32BiTR5
The post Insta360 One R Review: An Action Camera With a Twist appeared first on Digital Photography School. It was authored by Suzi Pratt. The Insta360 One R debuted in February 2020 and was touted as an all-in-one modular action camera that can transform from a 4K wide-angle camera into a 360 camera – or even into a one-inch camera with an ultra-wide Leica lens. 
The Insta360 One R is supposed to be the ultimate action camera alternative to GoPro models and the DJI Osmo Action. But how does this camera hold up in practice, and does it deliver on its promise of being the ultimate all-in-one action camera? Read this Insta360 One R review to find out! Recent firmware updatesWhen the Insta360 One R first came out, some initial reviewers reported technical problems with the camera, such as bugs and low external microphone sound quality. Fortunately, Insta360 responded very quickly to these problems by issuing several firmware updates. A recent firmware update (version 1.2.13) came out in September 2020 and fixed many of these issues. So if you read a previous negative review of the Insta360 One R, it’s worth revisiting the camera, since improvements have been made over the past few months. How the Insta360 One R worksUnlike other action cameras, the Insta360 One R is made of 3 pieces: the Core Module with a touchscreen live view display, the camera module, and an 1190 mAh lithium-ion battery base that holds the two Mods together. The Camera Module can be swapped out for one of three different options: the 5.7K 360 Mod (7.2mm focal length, f/2.0), a 4K wide-angle Mod (16.4mm focal length, f/2.8), or a One-Inch Mod (14.4mm focal length, f/3.2). The touchscreen block can also be attached to the screen facing forward or backward, which is useful for vlogging situations. The camera’s battery base can be charged via a USB-C cable. It takes roughly 65 minutes to charge fully. You can also get an optional double battery base hub for faster charging. Battery life is rated at about 70 minutes while shooting at 4K/60p. There’s a single micro-USB card slot, and the camera accepts memory cards up to 256 GB. Which Mods should you get?There are several different ways to purchase the Insta360 One R. The Insta360 One R Twin Edition is the most popular option, as it comes with both the 5.7K 360 Mod and the 4K wide-angle Mod. If you want to add the One-Inch Mod, you can purchase it separately to add to your Twin Edition set. Alternatively, you can buy the Insta360 One R 1-inch edition if you don’t want the extra two Mods. In practice, I found the 360 Mod and the One-Inch Mod to be the most used of the three. Photo and video capabilitiesLike most action cameras on the market, the Insta360 One R can shoot both videos and photos (JPEG and DNG format). The recent September firmware update introduced PureShot, a new AI-powered shooting mode for creating HDR-like photos when editing images via the Insta360 smartphone app. But while the photo modes on the Insta360 One R are good, the camera excels at video. 

Note that image quality and resolution depend on which Mod you use. The 4K wide-angle Mod is equivalent to 16.4mm at f/2.8. It produces 12-megapixel photos, as well as videos at up to 4K/60p, plus high-definition slow motion at 1080p and 200fps. The Dual-Lens 360 Mod is equivalent to 7.2mm at f/2.0. It produces 18.4-megapixel photos, as well as videos at up to 5.7K/30p, though it can also shoot 100fps at 3K. The One-Inch Leica Mod uses a 14.4mm equivalent wide-angle lens. It can shoot at up to 5K/30p, as well as 4K/60p. 
Compact size, but…Despite there being many pieces to this camera, it is very compact when it is assembled. The size and weight of the Insta360 One R is comparable to your average action camera. However, there are a couple of drawbacks to the modular nature of this camera. First, it takes time to take the camera apart if you ever need to swap out the lens or rearrange the position of the touchscreen. Second, although there is a nice rubber protective sleeve for the 360 Mod, no carrying case for the camera Mods is included, so you’ll have to come up with your own solution. Action-readySince the Insta360 One R is an action camera, it is waterproof up to five meters and can withstand most rugged conditions, though you’ll want to make sure that your Mods are tightly snapped together and assembled in the included mounting bracket before throwing it in the water. For those wanting to dive even deeper, there’s an optional Dive Case that lets you submerge the camera at up to 60 meters. Speaking of the bracket: You’ll have to use it if you want to add a GoPro-like connection point for sticking the camera on a handle or tripod. No tripod or GoPro mount is built into the camera itself. 
UsabilityThe Insta360 One R can be controlled via the Core Mod’s touchscreen display, or by connecting to the Insta360 smartphone app via Bluetooth. I found the touchscreen display to be the fastest and easiest way to control the camera. Touchscreen responsiveness is excellent, but the menu differs from that of other action cameras and is not the most intuitive. That said, it’s easy to use once you learn where all of the features are. Digital lenses for “zooming”One of the best features of the Insta360 One R is the ability to use built-in digital lenses. You can choose from ultra-wide, wide, linear, and a narrow field of view when shooting both photos and videos. This adds some flexibility to the otherwise fixed lens on the Camera Mod. Ability to add an external micThe internal microphones on the Insta360 One R are okay, but there is a lot of noise when you are moving with the camera. If you plan to vlog with this camera and/or want the very best sound, using an external microphone is your best option. Like other action cameras on the market, the Insta360 One R does not have a built-in mic jack, but you can add one by purchasing a mic jack adapter. This tiny adapter does not add much bulk or weight to the camera, though it can be easy to misplace. Using an adapter lets you add an external microphone such as a shotgun mic or a wireless mic to enhance sound. When using an external mic, there’s a handy icon that appears on the camera’s display to verify that the mic is connected. Early reviews reported that external mic levels were too low, but that problem has been corrected as of the September 2020 firmware update. 
Image quality and colorConsidering that this is a first-generation camera, the image quality for both videos and photos is impressive. However, as mentioned previously, the Insta360 One R is a video camera first, and that’s where its strengths are concentrated. You can shoot in a flat video mode and apply your own LUT or color grading in post-production. Or you can choose from a color profile built into the camera. New in the recent firmware update is a Vivid color profile, as well as AquaVision, which uses AI to color-correct video shot underwater. Related to video quality, the Insta360 One R now records video as a .MP4 file as a default. This makes it easier to edit the videos in your video editing software of choice. Prior to the September firmware update, the camera only recorded in a proprietary .INSV video file, which could only be read by the Insta360 Studio app. Video stabilizationThe Insta360 One R provides silky-smooth video footage via FlowState Stabilization, meaning you don’t need to use a gimbal with this camera. Just note that the stabilization is added in post-production. This means that you must import the video footage into the Insta360 Studio app to enable stabilization, and then export it into your video editing software of choice. This extra step can be a workflow hurdle if you prefer using a single application to edit your videos. On the plus side, Insta360 has released updates that allow you to add stabilization via Adobe Premiere or Final Cut X. In my experience with Final Cut X, this integration is laggy and not quite usable, but that will likely be fixed in a future firmware update. 
Use it as a webcamAlso new as of the September firmware update: The Insta360 One R can be used as a webcam when connected to a Mac or PC. In this work-from-home age of Zoom calls and FaceTime, this is a pretty cool feature, especially since the webcam can be used with the 360 Mod to show a split-screen effect of your surroundings. When using the 4K wide-angle Mod, the webcam also has an automatic face-tracking effect that can follow you as you move around a room. These features are best demonstrated in video format, but they add an extra layer of fun to otherwise monotonous webcam experiences. Zero bugsDuring my month of vigorously using the Insta360 One R, I was pleased to experience no bugs or glitches when using the camera. It was very responsive and did exactly what I asked it to with no delays or problems. While I might’ve just gotten lucky, this was a welcome seamless experience, given the bugs that tend to be present in other action cameras (e.g., GoPro). High quality and affordable optional hardwareIn addition to the camera Mods, there are lots of useful Insta360 One R accessories that may be worth buying, depending on how you plan to use the camera. The fast-charging hub or boosted battery is a good add-on to ensure that you have enough power for a full day of shooting. Also, the Invisible Selfie Stick is handy, not only for shooting 360 videos, but also for regular use as a handgrip or selfie stick. There are also dive cases for the 4K Mod and the 360 Mod to dive even deeper (up to 60 meters), rugged lens protectors for the 360 Mod lenses, and an aerial Mod to add the Insta360 One R to a drone. 
A few drawbacksLike any other camera, the Insta360 One R comes with a few drawbacks to consider: If you need a mount, you must use the Insta360 One R in a caseThe Insta360 One R must be placed in a mounting bracket to use it with a tripod. This can be cumbersome when trying to place the One-Inch Mod in the bracket and doing a lens Mod change. (Here’s a quick tip for working with the One-Inch Mod: Unscrew the lens to get it to fit!) Certain features are only unlocked when editing in the appThe Insta360 One R can shoot time lapses, star lapses, and can even use a cool feature called Bullet Time that produces a drone-like circling effect on a subject. There are also some creative video editing effects that can be applied to videos in post-production. However, the resulting videos cannot be previewed on the camera. You must use either the Insta360 phone app or the Insta360 Studio app to get the desired effects. This can be a drawback if you would rather use your own editing software of choice and not deal with an intermediary step. 
An uncertain futureEven though the Insta360 One R isn’t even a year old, it’s still fair to question its future. Will this first-generation camera get an update? If so, what’s the timeline, and will the update take full advantage of the modular camera setup? Ideally, you could reuse certain Mods and not have to buy them again when a newer version comes out. But since this is a first-gen camera, it’s hard to say what direction the company will go in. Insta360 One R Review: ConclusionFuture speculation aside, the Insta360 One R delivers on its promise of being a unique, all-in-one action camera. The ability to go from a wide-angle lens to a 360 lens using the same camera is extremely convenient, and other action camera companies should take note. You can purchase the Insta360 One R here for just under $500 USD. The post Insta360 One R Review: An Action Camera With a Twist appeared first on Digital Photography School. It was authored by Suzi Pratt. Photography via Digital Photography School https://ift.tt/29wB9CX November 13, 2020 at 03:14AM
https://ift.tt/3nlEWmA
If you’re in the Develop module working in the Basic panel and then decide you want to jump to: …the new Color Grading panel, just press Command-4 (PC: Ctrl-4). To jump back up to the Basic panel press Command-1 (PC: Ctrl-1) Press Command-2 (Ctrl-2) for the Tone Curve. Command-3 (Ctrl-3) for the HSL/Color panel Command-5 (Ctrl-5) for the Detail (and so on). Pretty handy stuff, eh? Have a great weekend. Stay safe and sane and catch you here next week. -Scott P.S. On Tuesday, the KelbyOne Flash Photography Conference 2020 kicks off (featuring the world’s #1 wizard of flash, Joe McNally), but the day before I’m doing a pre-conference workshop for people who are absolute flash photography beginners, designed to get folks up and running fast. Then on Tuesday it splits into two training tracks: one for beginners with me, and an intermediate / advanced track with Joe. Although the whole event is live (with Joe up in a studio in Connecticut and me down in Tampa), but we archive the entire conference for six full months so you can go rewatch any sessions, or catch any sessions you missed on either track.Photographers from all over have already signed up, and it’s not too late if you want to join us next week. Here’s the link for tickets and more details. The post Get right to the panel you want without having to scroll down appeared first on Lightroom Killer Tips. Photography via Lightroom Killer Tips https://ift.tt/2sh0aZ8 November 13, 2020 at 02:27AM
https://ift.tt/3nhQGqs
The post Dare to be Different With Your Photos appeared first on Digital Photography School. It was authored by Rick Ohnsman. It’s estimated that over two billion photos are uploaded to the internet every day. We are deluged with images. So if you’re a photographer looking to stand out from the crowd, then going to the same iconic locations, framing up and shooting the same compositions, and looking to emulate the great images you might find from skilled photographers is not what you should do. You need to dare to be different with your photography – by making the shot in a way people haven’t seen before. If the reaction you want is “Wow!” rather than “Meh,” you need to mix it up. 
Where’d you shoot that?I belong to a camera club, and we routinely show our images for review and critique. Something I hear too often when a great photo is displayed is, “Where’d you shoot that?” I guess it’s a fair question. But I’m always concerned that the person asking it is thinking: If I go there, get the same light, perhaps use the same camera settings, and shoot from the same spot, I could make a great photo, too!” But why would you want to be a copycat? Sure, we all like to go to the iconic spots, but why not try to make a shot that is different and uniquely yours, one that stands out from the crowd? 
Go where others don’tI just got back from a trip to Yellowstone National Park. While I was there, I wanted to see the Grand Prismatic Spring, a very iconic spot and a natural wonder well worth seeing. Upon reaching the overlook, I had to wait to even get to the edge as dozens of tourists took turns at the rail, shooting with their cellphone cameras, posing for selfies, even asking photographers like me, who were carrying obviously more sophisticated camera gear, if we’d snap their group photo with their cellphone. 
I get it: They wanted a photographic souvenir of being at the Grand Prismatic Spring, a shot they could post on social media to share with their friends. That’s fine, but what about you? Are you a serious photographer looking to make artistic photographs? Or are you a tourist looking for a snapshot? Sure, I wanted to see the Grand Prismatic Spring. And yes, I took my camera and made a shot. In fact, I’ve photographed next to other photographers at similar iconic locations. How could you not photograph the Statue of Liberty in New York, the Golden Gate Bridge in San Francisco, the Eiffel Tower in Paris, Mesa Arch in Canyonlands National Park, or the Sydney Opera House in Australia (the list goes on)? So hit the iconic spots, make the usual shot, and check it off your bucket list. But then find ways to change things up. Go to the lesser-known spots and make some photographs others won’t have considered – images that are uniquely yours. But how do you make shots that don’t look like the tens of thousands taken by others? Let’s explore that. 

Canon 6D | Canon EF 17-40mm f/4L USM | 6s | f/11 | ISO 200 Seek a new perspectiveAmateur photographers almost never use tripods. So they often raise their camera to their eye and shoot from a standing position. Hence, the great majority of their shots are from a five- to six-foot, eye-level height, even when the subject suggests that something else might be better. A shot of a small child is typically made looking down on the subject, as is a picture of a flower or some other shorter subject. If shooting with a standard digital camera, the great majority of images will be in landscape mode; if shooting with a phone, most shots will be in portrait mode. Little – if any – thought is given to rotating the camera to best suit the subject. The subject will typically be placed dead-center in the frame, so that if the photo is a portrait, then there is an excessive amount of headroom. This type of photographer has never heard of the rule of thirds. 
We expect student photographers to be a little better, right? They might shoot with a tripod. Yet I have been to plenty of photo workshops where the photographers are lined up like gunners in a firing squad, cameras on tripods but at that same eye-level height, all trained on the same iconic subject. How much different will their shots be? Maybe they ought to just buy a postcard in the gift shop.
I’m not sure of the context in which Mr. Hincks was speaking when he authored this quote. But appropriating it so that it applies to photographers, you need to consider various perspectives to better suit your subject and create images that bring new interpretations and compositions. Get up, get down, shoot from a bird’s-eye perspective or a worm’s-eye perspective. Shoot through objects that create natural frames. Try some point-of-view (POV) shots. There are lots of things to try in order to explore new looks and create interest, excitement, and mood in your photos. As a photographer, I expect you are more of a visual learner, so here are some shots to help communicate these concepts: 


Dare to be different with your photos: the next stepPeople might call me names, but as a photographer, there’s one name I hope never applies: Snapshooter. I consider a snapshooter to be the photographer who sees something that catches their attention, raises the camera to their eye, and takes a snapshot. That is the person who gives no thought to composition, angle, perspective, subject, storytelling, or concept. They don’t understand camera controls, exposure, depth of field, or ways to use the camera as a tool to communicate their vision. They probably don’t even grasp the concept of a vision. They don’t take the time to consider what they might do to make their photographs better or different. Can they even communicate what they are trying to say with their images? But that’s not you, right? You have come to a place called the Digital Photography School, presumably as a person looking to learn how to make better images. So I challenge you: Dare to be different with your photos. Make photographs that are intentionally creative, unique, tell a story, and show the viewer something in a way they may not have seen it before.
The post Dare to be Different With Your Photos appeared first on Digital Photography School. It was authored by Rick Ohnsman. Photography via Digital Photography School https://ift.tt/29wB9CX November 12, 2020 at 03:22AM
https://ift.tt/38xZFQ7
One of the least fun editing tasks in Lightroom Classic is cleaning up sensor spots in the sky. Starting with a noisy and mottled sky makes it even worse. I wondered if it wouldn’t be easier to simply replace the sky completely instead of cleaning it up? I didn’t want a sky that was unrealistic or overly dramatic, just clean with a smooth gradient. So, I thought I’d give the new Select > Sky function a try. Here’s how it went. Starting in LrC, here’s the photo, which is a merged pano that ended up being about 55 MegaPixels. 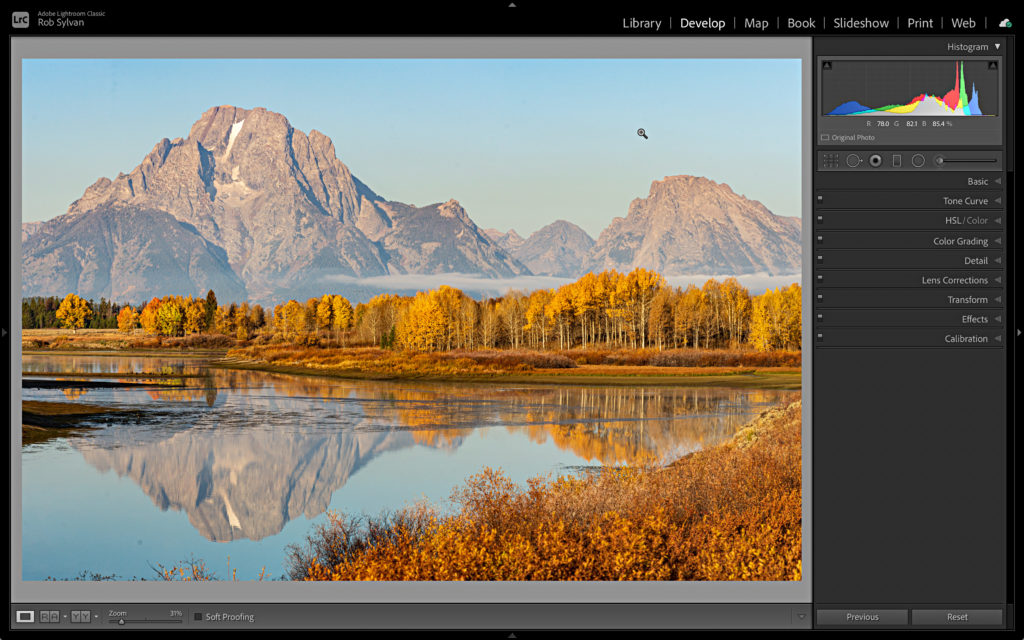
I love the colors and even the simple sky, but looking at it up close, it is a bit of a mess. Especially when I turn on the Visualize Spots function in the Spot Removal tool. Ugh. Yes, I obviously needed to clean the sensor. 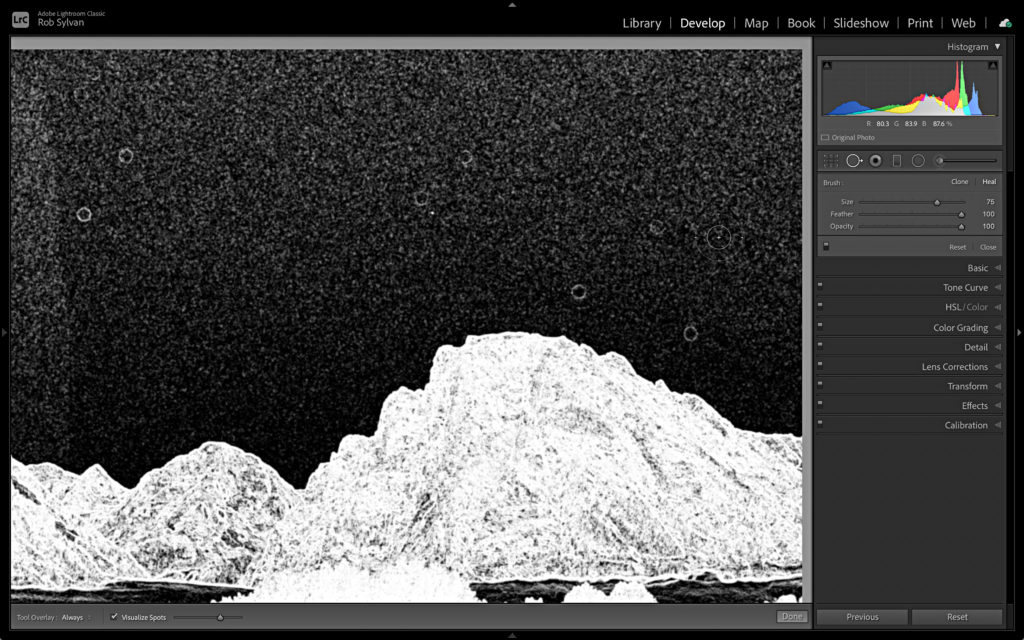
So, after completing my edits in LrC, minus Spot Removal, I sent a copy to Ps with LrC edits to see if I could rebuild the sky quickly and easily. The first thing I did was create a new empty layer above the Background layer. Then, grabbing the Gradient tool, I selected a blue gradient preset, and customized it by selecting colors from the sky in the photo. I wanted the new sky to look very similar to the original, just cleaner. 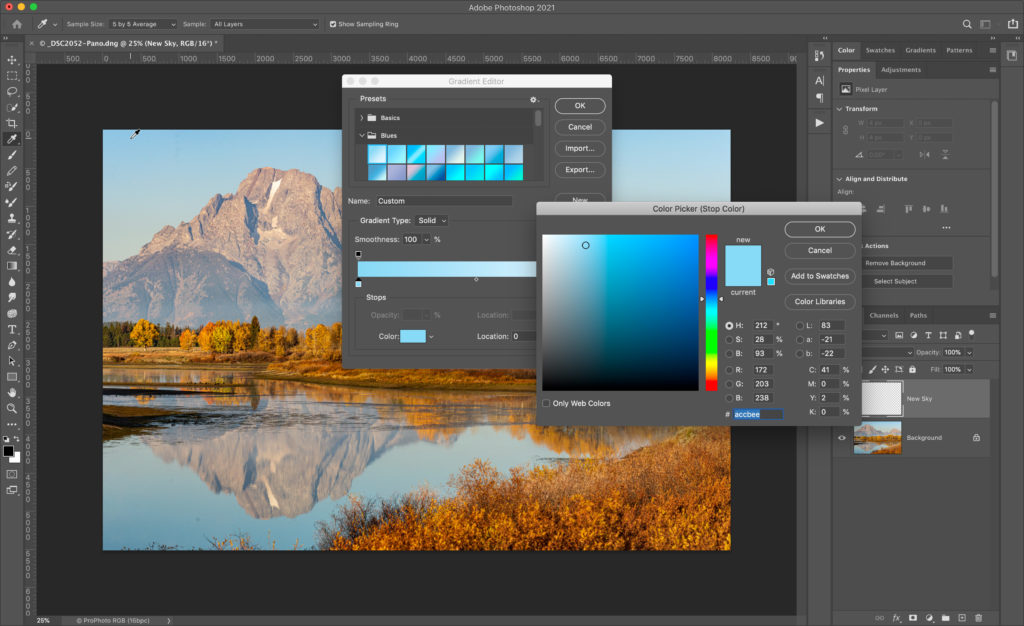
Then, on the new empty layer (that I named New Sky), I held the Shift key to constrain to vertical, and drew out my gradient. 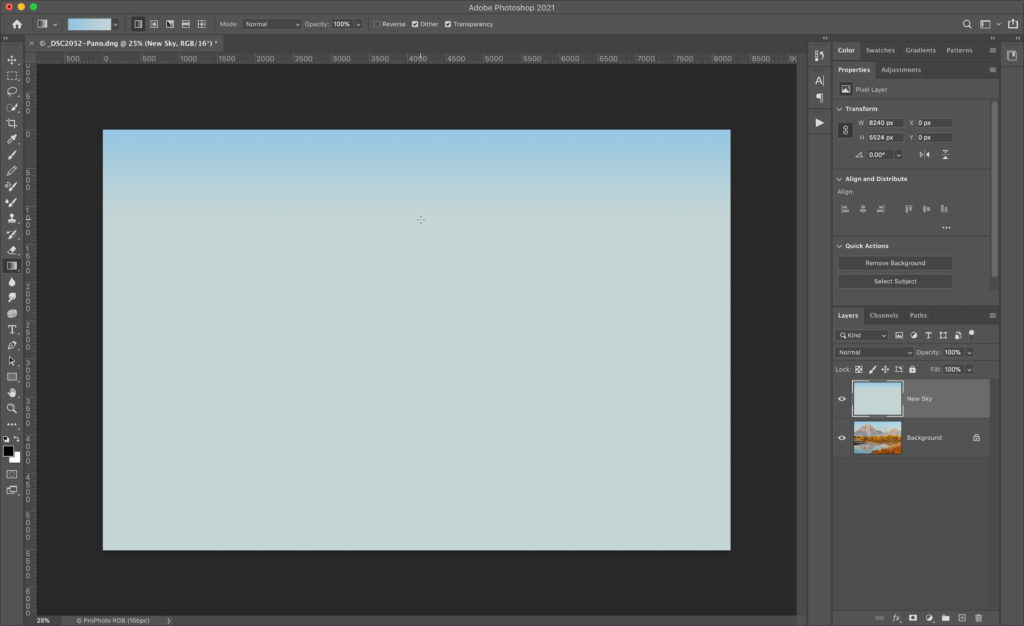
I can always re-draw that gradient, but that was good enough for a start. Next, I turned off visibility of the New Sky layer and selected the Background layer. Then, used the Select > Sky menu to have Photoshop work its magic and select the sky for me. 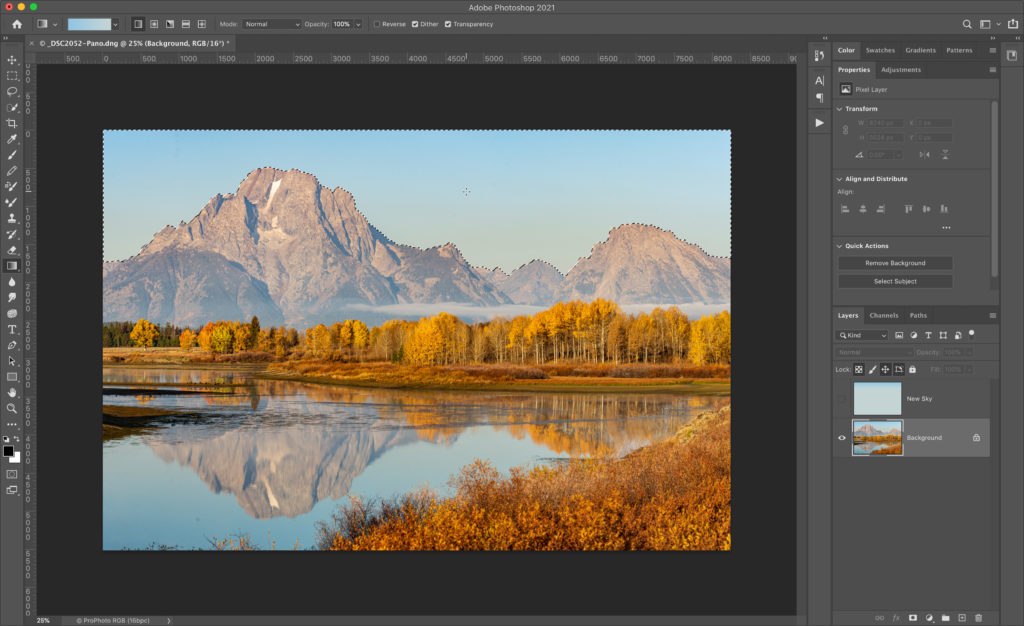
With my selection loaded, I made the New Sky layer visible again, selected it, and applied a Layer Mask to it. All my spots, noise, and mottled color were gone! 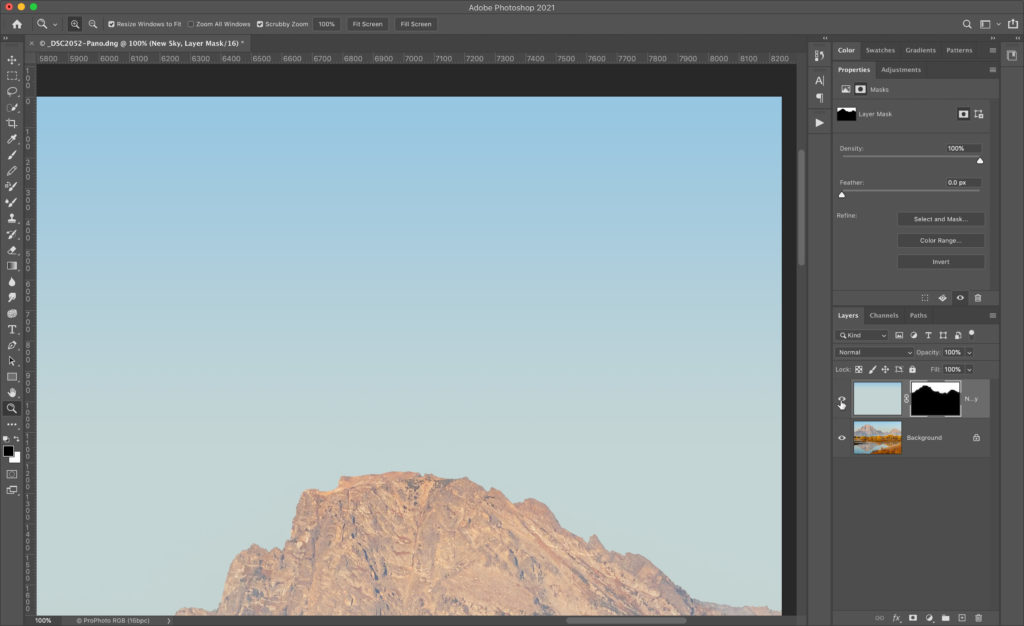
Next, I wanted to clean up the mask a little. The Select > Sky function does include some of the foreground as part of its function for blending in a new sky, but since my new sky wasn’t much different than the original in terms of color and tone, I didn’t need that aspect. So, with the mask selected, I clicked on Select and Mask in the Properties panel to refine the mask. 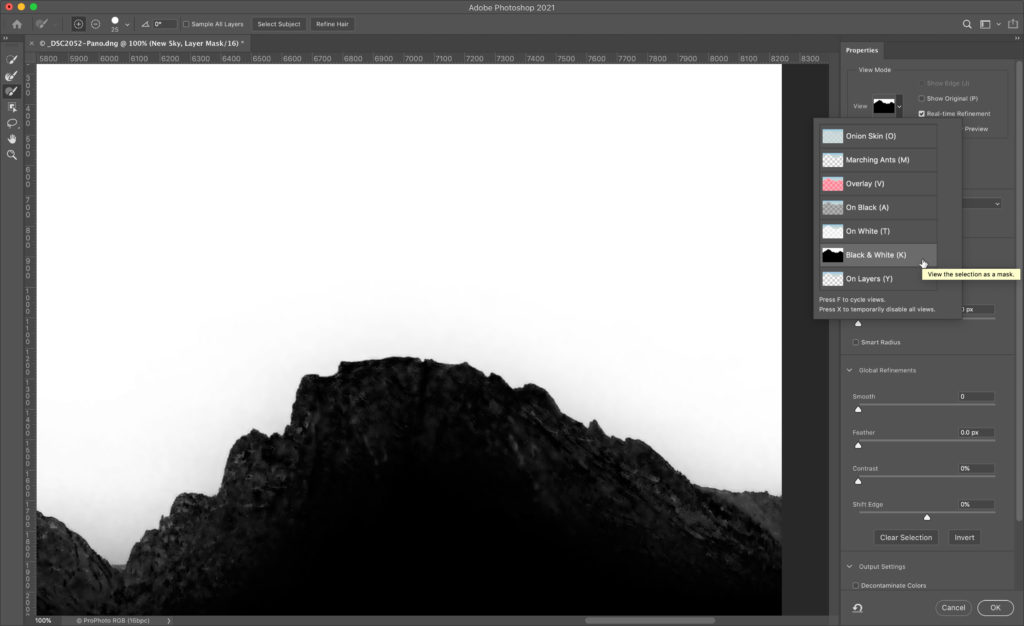
With the view in Select and Mask set to Black and White you can see the mask clearly. 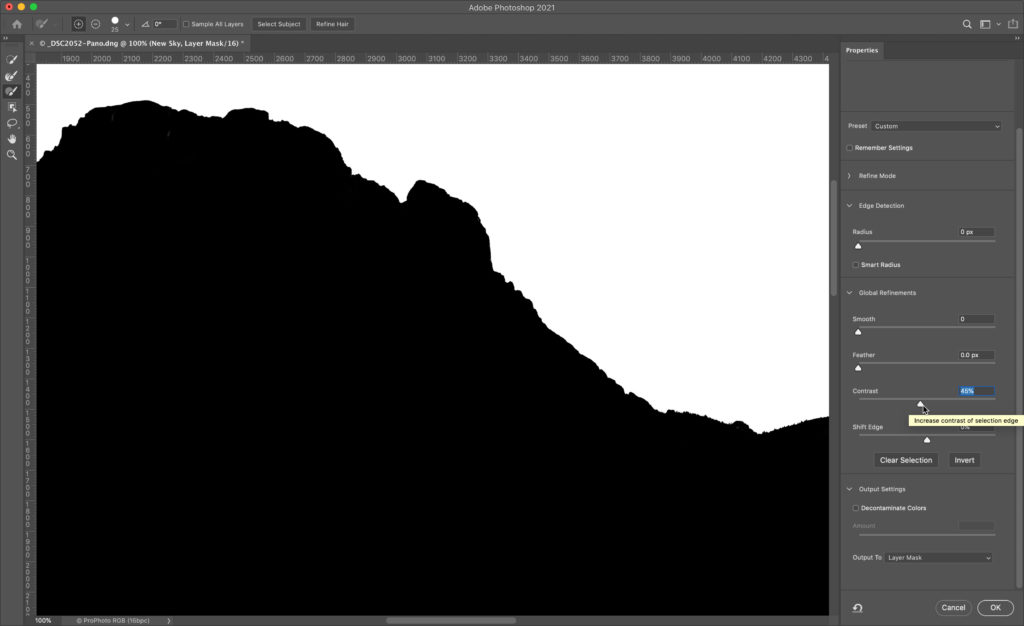
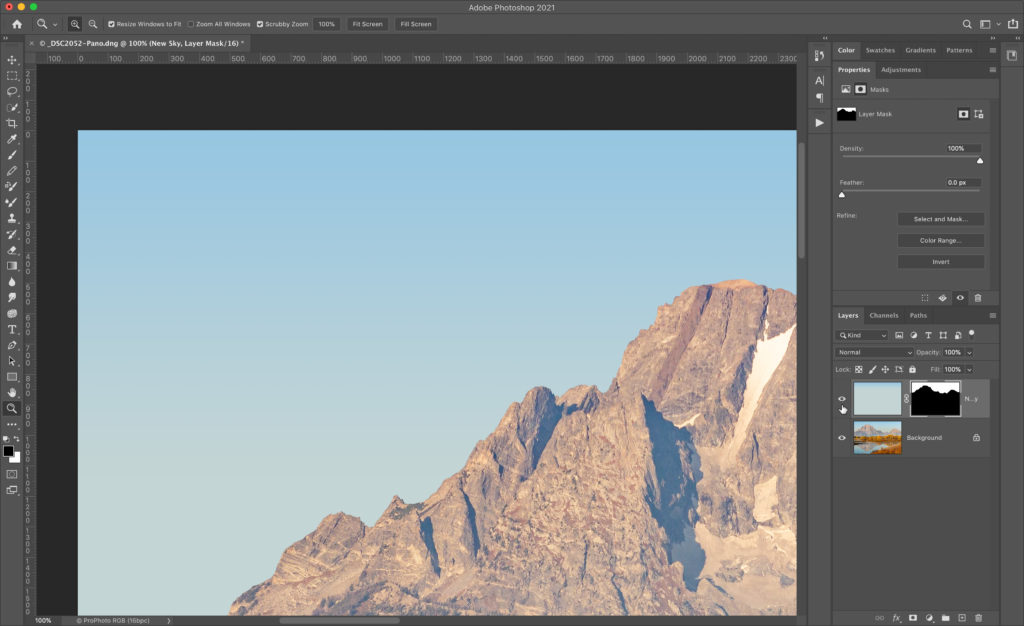
Increasing the Contrast slider forces the black areas blacker and white areas whiter, and cleaned that up nicely. With the output set to Layer Mask, I clicked OK, and I was done. Here’s the before and after just turning off the New Sky layer. 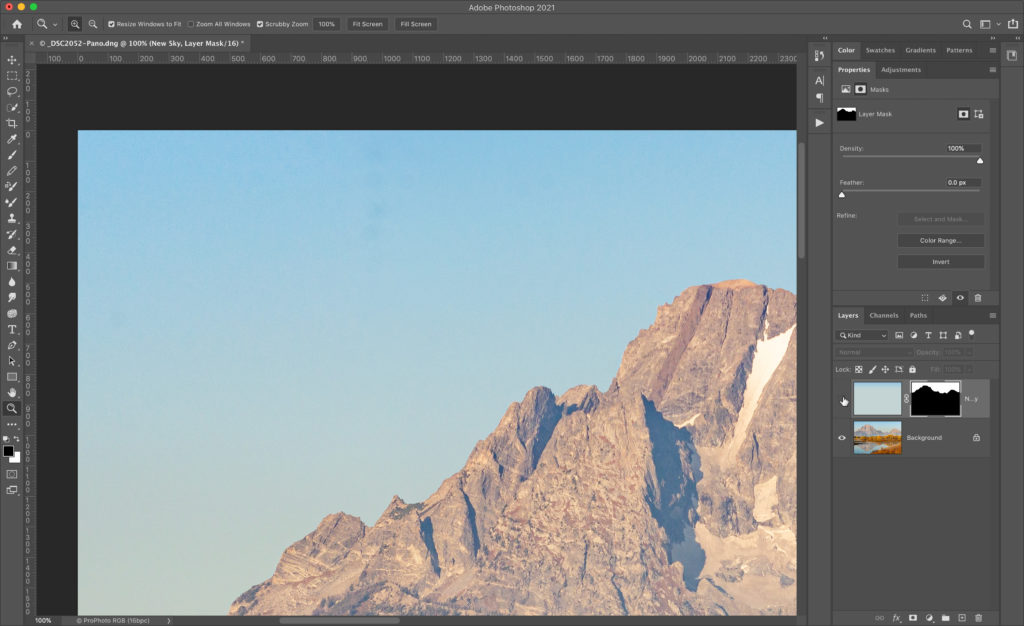
I will definitely keep that in mind for the next dirty sky, and will most likely will be using the Spot Removal brush in LrC a whole lot less (and yes, I did also clean the sensor). Hope you find that useful too! The post Replacing the Sky Instead of Cleaning It appeared first on Lightroom Killer Tips. Photography via Lightroom Killer Tips https://ift.tt/2sh0aZ8 November 11, 2020 at 04:14PM
https://ift.tt/2GQ6wsy
From Canon USA: With over 1 million downloads across the globe with 300,000 of them in the United States alone, the next chapter in the EOS Webcam Utility software story has been written. Continuing to fulfill the very apparent need of our customers, Canon U.S.A., Inc., a leader in digital imaging solutions, today announced the full production version 1.0 of the EOS Webcam Utility Software for macOS as well as version 1.1 for Windows. Now officially out of beta, macOS users, as well as Windows users, have access to the software, which converts compatible Canon EOS Interchangeable Lens (ILC) and PowerShot cameras into high-quality webcams for video conferencing and streaming.
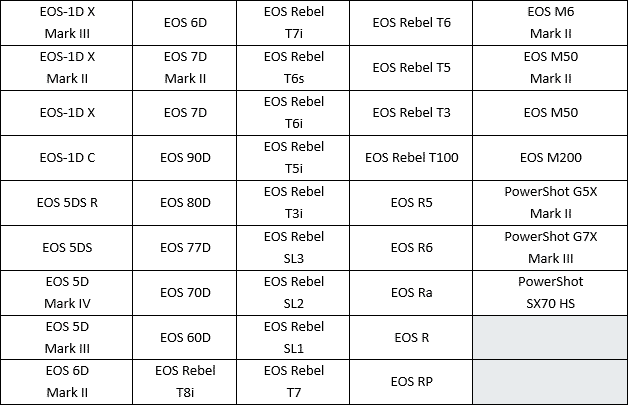
Rooted with ease and convenience at its core, the EOS Webcam Utility software is a direct result of the market shift that Canon identified; and, adhering to the needs of our customer base, Canon designed software that produces high-quality video streaming. Now compatible with 43 Canon EOS ILC and PowerShot cameras, including the new EOS M50 Mark II, the complete list of compatible Canon cameras includes:
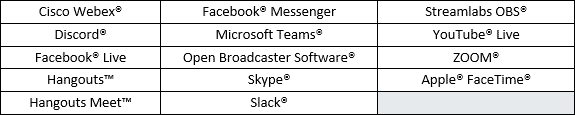
Another common conversation theme within the beta software forums was compatibility with third-party applications. As of announcement day, the new production version of the software has been tested* with various video conferencing applications as well as streaming applications** including:
Moreover, customers have desired to record a high-quality video file onto the memory card in their camera while video conferencing or streaming, and we listened. This can now be achieved*** by simply pressing the record button on the camera and not through the software. Without customers sharing their points of view, experiences, and preferences via the EOS Webcam Utility software user forums, the software would not have reached this level of success. Moving forward, Canon will continue to lean on customers, listen to the market, and create innovative solutions that fulfill customer’s needs – while continuing to offer high quality, digital imaging equipment, and solutions. To download the full production version of the EOS Webcam Utility software version 1.0 for macOS and version 1.1 for Windows and learn how to use it, visit https://www.usa.canon.com/support/eoswebcamutility. The new software will be available worldwide and available for download directly from the Canon website in each region. If you’d like to ask questions or provide feedback pertaining to the production version of EOS Webcam Utility software for macOS, please visit our newly created forum https://Canon.us/forum-eoswebcamutility. *Tested to confirm the EOS Webcam Utility is selectable as a video source and the video feed is displayed properly with macOS 10.15(Catalina), 10.14(Mojave), and 10.13 (High Sierra). The macOS version may affect the usability of the application(s). For more detail, please visit our https://ift.tt/3eQXF6x **Subscription to a third-party service required. Subject to third-party service provider’s terms and conditions. ***Restrictions may apply depending on camera specifications, such as maximum video recording time Neither Canon Inc. nor Canon U.S.A., Inc. represents or warrants any third-party product or feature referenced hereunder. All referenced product names and marks are trademarks of their owners and are hereby acknowledged. Photography via Canon Rumors https://ift.tt/2v4dYqS November 11, 2020 at 03:14PM
https://ift.tt/3pixlqM
Third-party lens maker Viltrox has recently added three new fast prime lenses with autofocus for the EF-M mount/EOS M cameras, and they’re affordable.. While Canon doesn’t appear to be interested in making such lenses for EOS M, we may have to rely on third-party manufacturers going forward. You can buy Viltrox EF-M lenses directly from Amazon. You can learn more about Viltrox lenses at their official web site. Photography via Canon Rumors https://ift.tt/2v4dYqS November 11, 2020 at 12:29PM
https://ift.tt/3klWI7i
The post Darktable: Is This Free Lightroom Alternative Right for You? appeared first on Digital Photography School. It was authored by Simon Ringsmuth. When most people think about software for managing and editing their photographs, the most prominent program that comes to mind is Adobe Lightroom. And while there are other options, such as Capture One and Apple Photos, there’s another program worth considering: Darktable is an open-source alternative to the mainstream options, and while it might not have every single feature of its counterparts, it does have one enormous advantage: it’s free. That alone makes it worth checking out, but is it the right solution for you? Read on to find out. 
What is Darktable?Darktable might be a new name for you, but it has been around since 2009 and has been steadily growing in popularity ever since. In an era where software costs are skyrocketing and more programs are moving to a subscription model, Darktable’s approach seems almost quaint. Anyone can use Darktable for free – with no worries about contracts, upgrades, or missing features. This alone makes it a highly compelling editing solution, and certainly one worth considering for photographers without an unlimited budget. There are some important tradeoffs with Darktable, especially if you are used to using Lightroom or another commercial program. Keep your expectations in check, and remember that the phrase “You get what you pay for” is popular for a reason. That’s not to say you should ignore Darktable, but just be aware of what you are getting into. 
Darktable overviewAt its core, Darktable is similar to other programs you might already use. It’s a non-destructive image editor (it can handle RAW, JPEG, and many other formats) with a bevy of tools and options to edit your images. Darktable has two central modes: Lighttable and Darkroom. These function much like the Library and Develop modules in Lightroom. Darktable lets you import, categorize, sort, rate, flag, and tag images just like most other programs. Even the name Darktable is a play on the word Lightroom. That said, there is a bit of a learning curve to Darktable because the features it offers are so overwhelming. Some new users are put off by this at first, but it doesn’t take much time to pick up the basics and start editing. One additional thing worth noting: I have found Darktable to be noticeably slower than Lightroom. Edits are shown in real time, but there is just a bit of lag as you drag sliders and change values. It’s not a dealbreaker, but something to be aware of. 
In order to find out if Darktable is right for you, it’s helpful to understand precisely how its two main components, Lighttable and Darkroom, function. LighttableIn a broad sense, the Lighttable mode is similar to Lightroom’s Library module. You use Lighttable for importing images as well as tagging, rating, sorting, and general organizing. The Import dialog lets you select files or a folder of images from your computer that is then loaded into the application. You can select multiple files and perform batch operations such as adding keywords, assigning color labels, and even applying GPX files for location data. 
The sheer number of options is a bit overwhelming at first, but like any program, the more you use it the more it makes sense. Much of the Lighttable interface will be familiar to longtime Lightroom users, though the program does not strive for 1:1 feature parity. Instead, Darktable presents a logical series of actions and options designed to help photographers manage and import images. Note also that the Export panel is in the Lighttable module, which is one way in which Darktable differentiates itself from Lightroom and other programs. In the screenshot below, you can see some of the many options available for exporting, which gives you a sense of the sheer depth offered by Darktable: 
While things seem great up to this point, I do need to temper your expectations a bit. My biggest issue with Darktable is evident just from using the Lighttable module: overall responsiveness is not great. Scrolling through images, selecting pictures, editing metadata information, and other simple operations take far longer than other programs. Not that Lightroom and Capture One are speed demons – but comparing them to Darktable is like comparing a Ferrari to a Toyota Corolla. The latter will get the job done, but the former will do it way faster. That’s not necessarily the only peg to hang your editing hat on, though. While speed is important, it’s not everything, and many quibbles with Darktable are mitigated by its price. After all, despite my issues with Darktable’s user interface and lack of polish, it’s impossible to overlook the cost. I am still kind of amazed that all these features are in a free program that continues to be actively developed. For frugal photographers, it would be difficult not to recommend Darktable, and for everyone else, it just helps to have some patience. 
One note for more technical users: Darktable doesn’t operate with a catalog like Lightroom. Instead, the program stores all metadata in sidecar XMP files that reside next to your images on your computer. That means any information, such as keywords, star ratings, color tags, and edits, can be transferred along with your images just by copying the XMP files. Some people find this more freeing than the catalog system in Lightroom, and while I have never had any issues with a catalog system, I do see the benefits of this approach. DarkroomWhile the Lighttable module is used for sorting and organizing your images, Darkroom is designed for the type of in-depth editing you would expect from a program that caters to the most demanding photo editors. In fact, in terms of sheer editing prowess, Darktable blows Lightroom clear out of the water. 
On the left side of the Darkroom interface, you will find elements that operate similarly to Lightroom and other editors. Darkroom contains a history panel, a system for managing duplicate images, a snapshot browser, and more. Across the bottom is a series of thumbnails for selecting images. The right side shows a histogram and a series of modules for editing things such as white balance, tone curves, sharpness, lens imperfections, and more. The final two words of the previous paragraph hide the true strength of Darkroom: the sheer quantity of editing options available is absolutely stunning. Whereas Lightroom has nine modules to choose from, Darktable has dozens. So many, in fact, that most of them aren’t even shown by default and are instead kept tucked away under a module called “More Modules.” 
Beneath the histogram are icons that let you choose from a default set of modules most photographers find particularly useful: Basic, Tone, Color, Correction, and Effects. Click any of these to load modules that correspond to that type of edit. For instance, click the Basic Group icon to access modules such as Base Curve, Tone Equalizer, Crop and Rotate, Exposure, and White Balance. You can also create your own custom set of editing modules and use the “Search Module” feature to locate a particular module just by typing its name. 
Click any of the module titles to open its editing parameters, and you will see a familiar set of sliders and numerical values. The key difference with Darktable is the sheer quantity of sliders, values, and editing options at your disposal. For instance, the Color Balance module contains sliders such as Input Saturation, Output Saturation, Contrast Fulcrum, and Contrast. In addition, there are three separate values (Factor, Hue, and Saturation) for Shadows, Midtones, and Highlights. 
Compare this to the options in Lightroom, and you’ll quickly see that Darktable clearly pulls ahead in terms of editing efficacy. And Color Balance is just one of the editing modules available to you. Some of the modules are so technical that Darktable lets you adjust their parameters but actively discourages you from doing so: 
Another powerful feature in Darktable is its implementation of custom masks. Most of the editing options can be combined with masks that can be accessed in the Mask Manager on the left side. This lets you use common shapes, such as a brush or a circle, to create masks. However, Darktable goes one step further by letting you draw custom masks. This is helpful for anyone whose editing has been stymied by the comparatively limited options available in Lightroom. 
Again, I need to temper expectations. Performing many of the editing maneuvers is an exercise in patience, even on a newer computer. Drawing a mask, moving a slider, or even cropping an image often involves precious seconds of wait time, which can really add up when going through hundreds of images. There is also no mobile support, meaning photographers who rely on tablets or phones as essential components of their editing workflow will be left out in the cold. Proceed with cautionAt this point, you might be ready to cancel all your editing software subscriptions and jump on the Darktable bandwagon. But before you take the leap, I need to offer a few words of caution. This article is not meant to be a review of Darktable, but rather a tool to help you decide if this program is right for you. And while there is no doubt that Darktable can handle any image editing tasks you throw at it, including more advanced options such as tethered shooting, slideshows, and printing, there are a host of drawbacks, as well. As much as I want to like Darktable, I just can’t get around its overall sluggishness and lack of polish. Implementing edits is slow, and drawing custom masks can be a patience-draining exercise. Odd interface quirks abound, like truncated slider names and weird thumbnail resizing when switching in and out of the Lighttable mode. 
The sheer level of complexity can also be a significant detriment. It takes a great deal of experimentation, trial and error, and online searching to figure out all the tools at your disposal. While this is true of any image editing program, the relatively small Darktable user base means that there just aren’t as many resources available to aspiring users compared to Lightroom and others. Is Darktable right for you?The best person to answer that question is you, and since Darktable is free for anyone to download, I recommend you give it a shot and see what you think. However, if you want a bit more guidance, the following information might help. I recommend Darktable for:
I do not recommend Darktable for some people, including:

Where you fall along this spectrum is up to you to decide. You can’t lose anything just by downloading Darktable and taking it for a test drive. You might very well be surprised by what it can do for you! You can download the latest version of Darktable here. The post Darktable: Is This Free Lightroom Alternative Right for You? appeared first on Digital Photography School. It was authored by Simon Ringsmuth. Photography via Digital Photography School https://ift.tt/29wB9CX November 11, 2020 at 03:15AM
https://ift.tt/2IsiOHW
Bryan at The-Digital-Picture has completed his exhaustive review of the brand new Canon RF 85mm f/2 IS STM. Canon’s latest “affordable” fast prime. As we’ve read and seen from other reviewers, this lens appears to be a big winner, especially once the price is considered. A lot of photographers will end up with this lens in their kit. From TDP
Photography via Canon Rumors https://ift.tt/2v4dYqS November 10, 2020 at 07:29AM
https://ift.tt/3eLgCHZ
Over 300 new features including HDR grading, AI magic mask, improved Fairlight usability, improved editing, and much more! Fremont, CA, USA – Monday, November 9, 2020 – Blackmagic Design today announced DaVinci Resolve 17, a major new release with over 300 new features and improvements including HDR grading tools, redesigned primary color controls, next-generation Fairlight audio engine including Fairlight audio core and support for 2,000 real-time audio tracks plus dozens of other time-saving tools for editors including a redesigned inspector, new bin sorting and metadata clip views! DaVinci Resolve 17 public beta is available for download now from the Blackmagic Design web site.
DaVinci Resolve 17 is a major new release with over 100 new features and 200 improvements. The color page features new HDR grading tools, redesigned primary controls, AI-based magic mask, and more. Fairlight updates mouse and keyboard edit selection tools so customers can work faster, along with Fairlight Audio Core and FlexBus, a next-generation audio engine and busing architecture with support for 2,000 tracks. Editors get a metadata slate view with bin dividers, zoomed waveforms for audio trimming, smart reframing, a unified inspector, and dozens of other time-saving tools. In addition, compositions created in Fusion can now be used as an effect, title or transition on the edit and cut pages. DaVinci Resolve 17 features incredible new creative tools for colorists. Power Window drawing has been improved, there are new split-screen wipe options, an additional Sat vs Lum curve, improved scopes, support for 17 point 3D LUTs and more. The HDR grading palette lets customers create new color wheels with custom roll-off for specific tonal ranges, giving customers more creative control to make fine adjustments. The wheels include exposure and saturation controls for each zone. They’re color space aware so customers get perceptually uniform results. The mesh-based warping tool lets customers adjust two-color para7 at once. Customers can adjust both hue and saturation or chroma and luma. Adjustments are made by dragging control points, with smooth falloff for clean, natural-looking adjustments. It’s an entirely new way to transform color in their images. Selecting and tracking people for targeted correction has never been easier. Magic mask uses the DaVinci Neural Engine to automatically create masks for an entire person or specific features such as face or arms. Customers get matte finesse tools, the ability to add and remove strokes, and automatic tracking. 
DaVinci wide gamut and DaVinci intermediate are timeline color space and gamma settings that provide a universal internal working color space. It’s larger than what cameras can capture, or BT.2020, ARRI wide-gamut, and even ACES AP1. Customers will never lose image data, no matter where it comes from. DaVinci Resolve 17 is the biggest update in Fairlight history with new features, tools, and core improvements that make it the world’s fastest and highest quality solution for audio post-production. Edit selection mode with new keyboard shortcuts unlocks functionality previously available on the Fairlight Audio Editor. These context-sensitive tools make editing incredibly fast. If users are switching over to Fairlight, these intuitive and familiar tools will help customers get up and running quickly. Fairlight Audio Core is a low latency, next-generation audio engine that intelligently manages workload by using all CPU cores and threads, as well as the optional Fairlight Audio Accelerator card. Customers get up to 2,000 tracks, each with real-time EQ, dynamics, and 6 plug-ins, all on a single system. FlexBus is a flexible bus architecture that uses up to 26 channel wide multi-purpose buses instead of fixed buses. Customers can send tracks to buses, buses to tracks, and buses to buses in as many cascade layers deep as needed to create massive sessions. Route anything to anything without limitations. The new transient analysis tool automatically detects individual words, beats, or sound effects. Transient markers are displayed as vertical lines in the waveform. Customers can navigate between them using the arrow keys. Transient markers make it easy to identify specific parts of a sound for editing. Fairlight Audio Core and FlexBus enable large projects with thousands of tracks on a single system. Previously this required “chase” computers to be sync’d with a primary system. Plus DaVinci Resolve’s multi user collaboration lets multiple sound editors work on the entire project at the same time. DaVinci Resolve 17 makes the cut page even smarter with great new features designed to help customers finish quick turn around projects even faster. Metadata slate view with bin dividers makes it easy to sort and find clips based on scene, shot, camera and more. When used with source tape, it’s the fastest way to jump in and out of scenes or groups of shots. 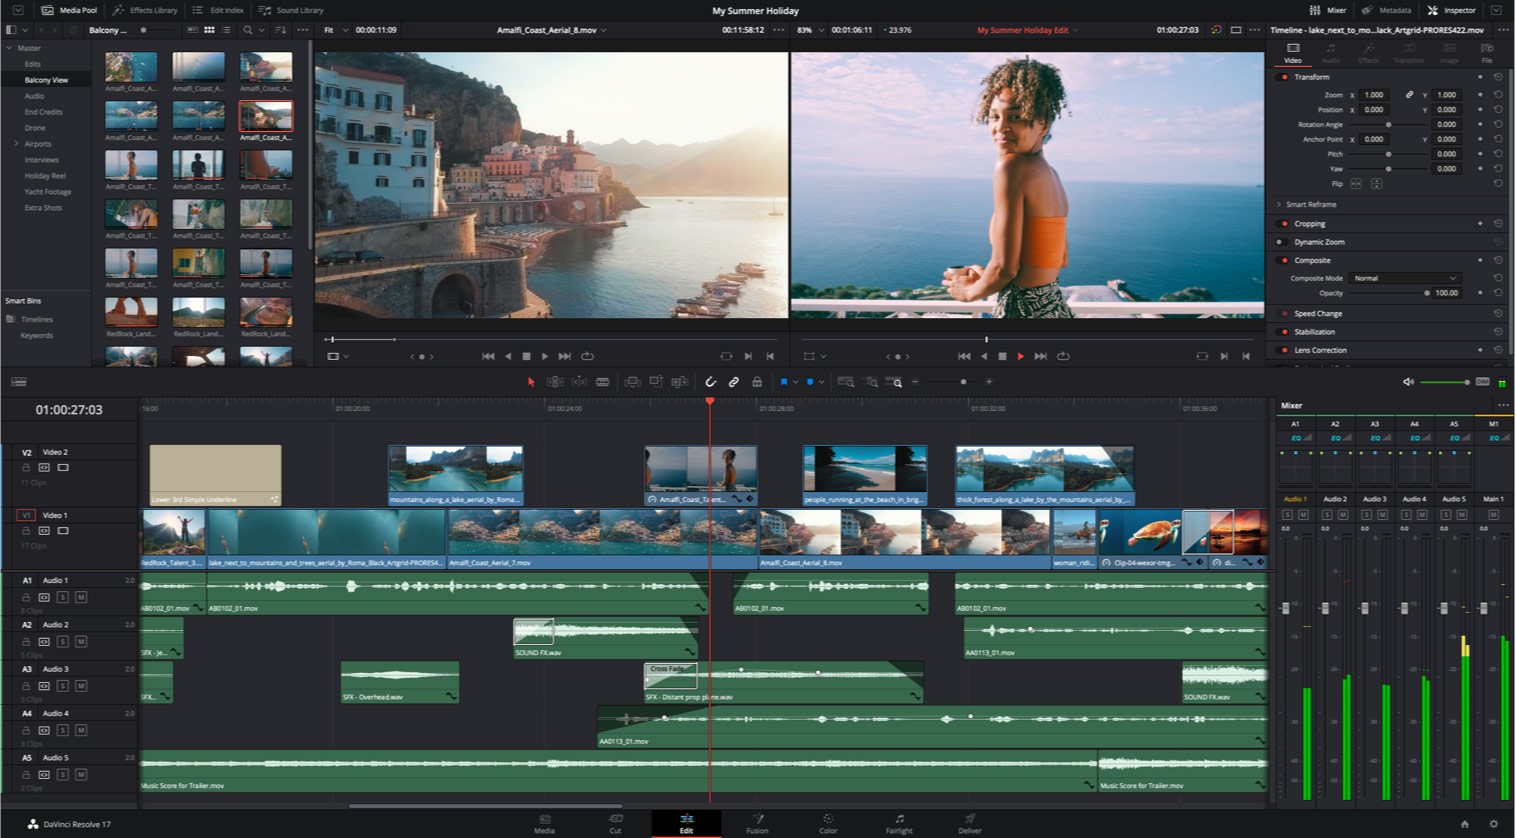
Now customers can edit in 16:9 HD or Ultra HD and quickly create square or vertical versions for posting to Instagram and other apps. The DaVinci Neural Engine automatically identifies faces and repositions them inside the new frame so customers don’t have to do it manually. Finding the right effect, transition or title is faster and easier than ever. The elegant, new multi-column view lets customers see more and scroll less. Descriptive icons also help customers quickly find what customers need. Plus, customers can hover scrub the mouse across any item to see a live preview in the viewer. Live production projects from ATEM Mini Pro ISO can be opened as a video edit. The sync bin with multiview lets customers fine-tune edits from the original live production or even replace shots. You can use the HD ISO recordings from ATEM or relink to Blackmagic RAW camera files for finishing in Ultra HD. The edit page adds dozens of time-saving new features that professional editors have asked for. Now customers can create easily managed, independent proxy media that dramatically improves system performance and makes projects portable. Proxies can be as small as 1/16th resolution and saved as H.264, H.265, ProRes or DNxHR. They can even be generated internally or externally by third-party tools. It’s now easier to create synchronized multicam clips. Simply stack clips on the timeline and use the new “auto-align” tool to sync based on timecode or waveform. Customers can also manually move clips into position to create a sync map. Timelines can be converted into a multicam clip or a compound clip. New Resolve FX 3D, HSL, and luma keyer plug-ins let customers pull keys directly in the timeline on both the edit and cut pages. In addition, alpha channels from Resolve FX and Open FX plug-ins are now supported, as are embedded alpha channels and external matte files giving customers even more compositing options. The render in place command lets customers generate render files for any portion of the timeline. Once rendered, customers can move, edit, and trim without having to re-render. Unlike cache files, render files are easy to manage and portable. Source side adjustments let customers change a clip before editing it into the timeline. For example, customers can adjust RAW controls, add a LUT, remap audio tracks, change sizing, playback frame rate, and more, all before editing a clip into the timeline. 
New support for native processing of interlaced timelines results in higher quality compositing and titling for interlaced deliverables. High-quality DaVinci Neural Engine de-interlacing analyzes motion between fields to reconstruct progressive frames. Customers also get real-time 3:2 pulldown removal. Compositions customers create on the Fusion page can now be saved as a template and used on the edit or cut page. New animation curve modifiers can be used to automatically retime animations when customers change their duration in an edit. Audio playback with waveform display makes it easier to create precisely timed animations, there are shared markers with the edit page, and more. In addition, 27 GPU accelerated Resolve FX have been added to the Fusion page, including the noise reduction and sharpening tools from the color page. New node view bookmarks make it easy to navigate large comps, the toolbar can be customized with their favorite tools, and vertical layouts are supported in the node editor. Node tree bookmarks let customers quickly navigate to any part of the node tree in a large composition. Customizable toolbars let customers quickly switch toolbars based on the current task. Vertical node tree layouts give customers more room to view the spline and keyframe editors when creating animations and more. Customers will find new and improved format support on the media page, new delivery options, and a unified inspector design on the media, cut, edit, and Fairlight pages. DaVinci Resolve 17 also features consistent timeline navigation across all pages, better metadata support, new image scaling algorithms, the ability to share smart bins, smart filters, and optimized media across all projects on a system, and even more GPU and CPU accelerated Resolve FX. Now anyone can build their own post-production studio. The free version of DaVinci Resolve now includes the revolutionary multi-user collaboration tools previously available in DaVinci Resolve Studio. That means customers can have multiple users all working on the same project at the same time, for free. Support for growing files in the media pool lets customers start editing while files are still being recorded. There’s decoding support for QuickTime PNG, uncompressed RGB 8-bit and YUV 10-bit AVI, and spanned Panasonic 8K SHV clips. DaVinci Resolve 17 support for frame-based metadata from Blackmagic RAW, ARRI, RED, and Sony camera files, along with decoding and rendering per frame EXR metadata. In addition to existing Python and LUA scripting, DaVinci Resolve 17 adds a new workflow integration API and a new encoding API. These APIs allow third-party developers to create integrated asset and workflow management solutions for DaVinci Resolve, as well as encoder plug-ins for custom output options.
“This is a massive update and it has amazing new technology and features for colorists, audio engineers, editors and visual effects artists,” said Grant Petty, Blackmagic Design CEO. “While the new color science, HDR grading and improvements and Fairlight usability are the most noticeable features, what I am most proud of are the thousands of small improvements that customers will notice every day!” DaVinci Resolve 17 Features
Availability and PriceDaVinci Resolve 17 public beta is available now for download from the Blackmagic Design web site. Photography via Canon Rumors https://ift.tt/2v4dYqS November 10, 2020 at 07:29AM |
Categories
All
Archives
November 2020
|
 RSS Feed
