
|
http://bit.ly/2DM0rt2
The post How to Find the Perfect Photography Assistant appeared first on Digital Photography School. It was authored by Mat Coker. Whether you’re a professional photographer or a passionate amateur, I insist that you need a photography assistant. You may think that you can lug around your own gear and do a great job on your own, but no matter how good you are, a photography assistant will make you better. 
It’s not just about carrying your gear around. Your photography assistant takes on the tasks that clutter your mind and smother your creativity. When your assistant carries the load of the little things, your mind has room to roam and allow creativity to flow. Your assistant frees your working memory to be creative. While you’re spitting out ideas, they’re taking note and making sure everything happens right. Meanwhile, you’re paying attention to nothing but your subject and the creative ideas coming together in your mind. They’re your second brain and second set of hands that you wish you were born with. The practical implications of having an assistantIf you love street photography but are too shy to approach people for portraits, you can bring a chatty friend to be your assistant. They can strike up conversations with people and then say, “can my photographer friend take your picture?” Your assistant can document your process through candid photos of you at work as a photographer. This is perfect for your blog and other publications. During a wedding day, they’re organizing people for photos and handing you lenses as you need them. Your mind is free to focus on creative ideas and details that normally escape you. Even when you’re photographing a landscape they can become your model when you wish there was a person in the scene. Together, you and your assistant are an incredible partnership. On the other hand, an assistant can ruin your work when they become a liability. Here is how to find the perfect assistant who won’t let you down. 
While I’m taking photos, my assistant is checking my list and adding to it as we have new ideas. The traits of a great assistant1. Loves to learnThe first thing to look for in an assistant is somebody who is obsessed with learning. They will love working with you and soak up the entire experience. They are eager to help with everything. Somebody who loves to learn and explore, and who can’t wait to work with you through new experiences. 2. AgreeableWhen you find somebody obsessed with learning, they also need to have an agreeable personality. An assistant must be willing to do whatever you ask them without objecting to your ideas. Some people simply can’t handle being a helper – insisting on being in charge. You don’t want that sort of person because you’ll always be bumping up against them in conflict. 3. PoliteYour assistant must be capable of being extremely polite. Don’t risk jeopardizing your shoot with somebody who is rude toward your clients. They should also be enthusiastic and not shy about strangers. 4. HardworkingThe perfect assistant is hardworking and willing to be on their feet. They will be willing to run around without rest all day if necessary. They must be orderly and know where everything goes, and keep everything in place and ready for you. If you work in high pressure situations, then your assistant must be capable of embracing stress without crumbling. 
Look for assistants wherever you can find them. Sometimes an older sibling can help you make the infants laugh! My actual assistant is crouched behind the seat making sure the infant doesn’t fall. Where can you find an assistant?Your assistant doesn’t need to be an actual photographer. This may sound crazy, but it really doesn’t matter if they understand photography as long as they can assist you in the way you need them to. In fact, a non-photographer may offer insights that a fellow photographer would overlook. Maybe your assistant should be a painter, musician or engineer. Each one will help you overcome different challenges in their unique way. But if you are looking for someone who is a photographer to assist you, perhaps you could begin at a photo club. Many people at photo clubs are not working professionals, but they may be incredible photographers nevertheless. You could bring a professional photographer to assist you. If that’s the case, I suggest a photographer who is the opposite of you. I assist a local photographer from time to time and we love working with each other because we are exact opposites. He is orderly, precise, in tune with the details, and works with strobe lighting. In contrast, I prefer chaos, haphazard camera work, tuning into the big picture and using terribly challenging ambient light. It is a thrill to bring such opposites together! 
I often let kids use my camera during family photo sessions. This candid photo was captured by my assistant. When to fire your assistantDon’t hire an assistant unless you are strong enough to fire them some day. Fire them if they hinder your work and won’t change their ways. But even when you have an amazing assistant with perfect chemistry, fire them as soon as they’re ready to have their own assistant. Don’t hold them back. Push them out so that they can grow too. In the meantime, enjoy having the perfect assistant who frees your mind to let your creativity loose.
Feature image by: Greg Gelsinger The post How to Find the Perfect Photography Assistant appeared first on Digital Photography School. It was authored by Mat Coker. Photography via Digital Photography School http://bit.ly/29wB9CX January 31, 2019 at 12:18PM
0 Comments
http://bit.ly/2DLDDtn
 Another patent application for a Canon RF 24-70mm f/2.8L IS has appeared within what appears to be a patent for the RF 28-70mm f/2L. From Japan Patent Application 2019015956:
Canon has already let us know that they’re hard at work on the “holy trinity” of pro zoom lenses for the RF mount. We expect all three lenses to be announced in 2019. Photography via Canon Rumors http://bit.ly/2CsmGDw January 31, 2019 at 12:12PM
http://bit.ly/2SjPzuu
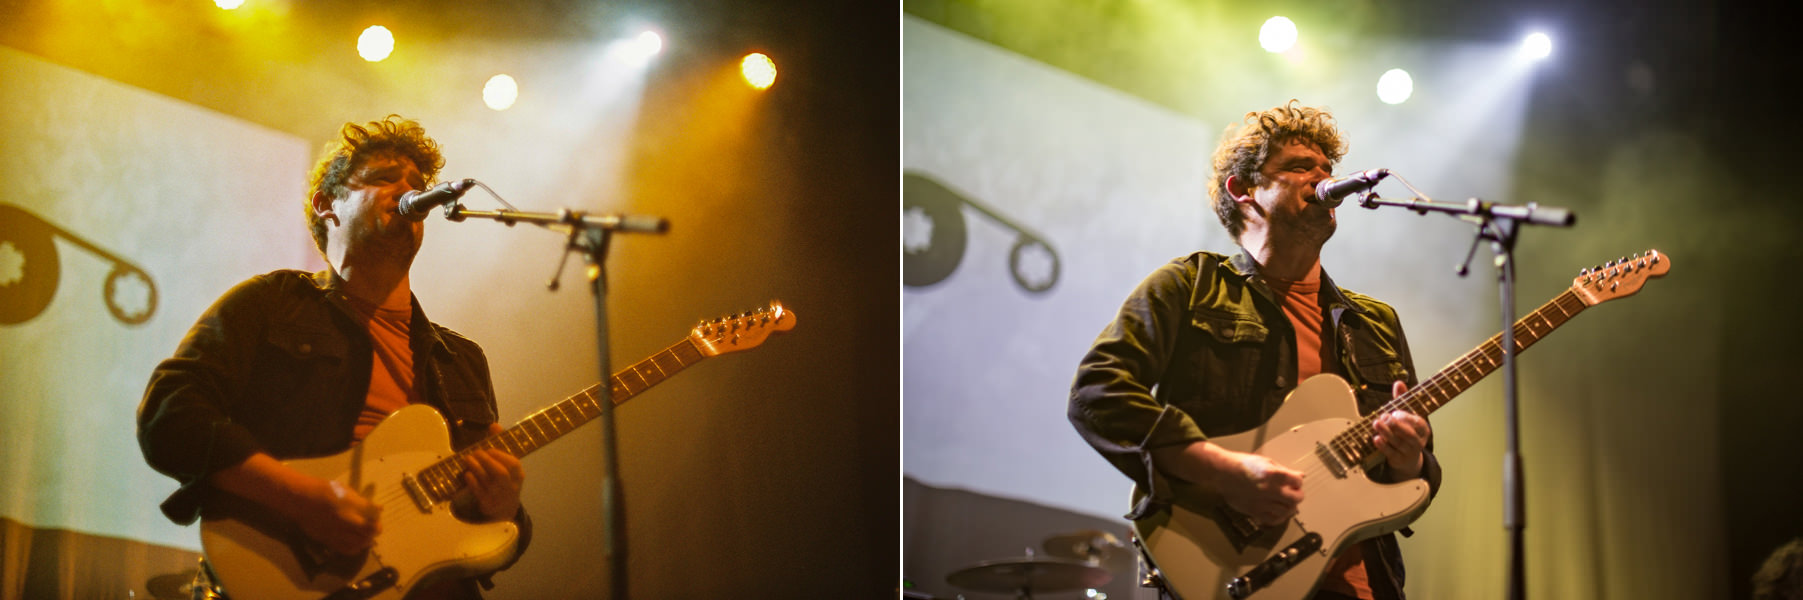
Film vs Digital in Music Photography: I Shot the Same Show With Both http://bit.ly/2B77f2D
Film is very rarely used in music photography anymore. The reason for this is primarily because of social media and instant news. There’s no time to go home and start pouring chemicals onto film to develop it or wait until the morning until a lab opens to do it for you. For festivals or stadium gigs, we would bring our laptop with us and start sending out photos minutes after the artist stepped on stage. This is what people expect with modern technology. Secondly, film can be difficult to work with, especially for music photography. Venues are generally very dark, and high sensitivity color film is difficult to find and is expensive. When there are lights, they tend to strobe making it even more difficult to get the exposure right. On top of that, if you have a good film camera, it was probably built in the 1970s. The auto-exposure technology wasn’t great back then and it may not have aged well. 
However, film still has a charming quality to it and shouldn’t be put in the obsolete bin with the Walkman and DVD player just yet. A few years ago I compared film vs digital cameras for music photography. Since then, I’ve managed to track down two identical rare film lenses from around 1973. On one of the lenses, I removed the old Canon FD mount and replaced it with a modern Canon EF mount so that it can fit on my Canon digital camera. I used ISO 400 film and set my digital camera to ISO 400. So this is a direct comparison between a chemical film sensor and a modern digital sensor. 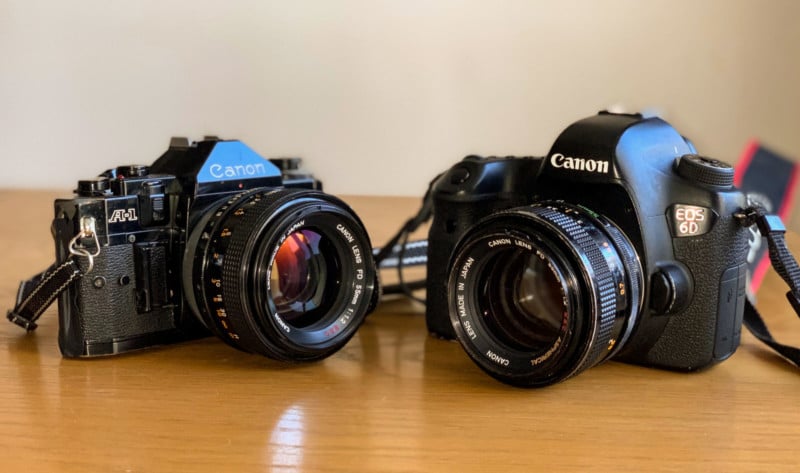
Music photography is the toughest environment to compare film vs digital. The dark venues, fast-moving artists, massive contrast by artificial stage lights, even the eye-wateringly expensive modern cameras can struggle in such surrounds. 
Technical details: I used Fujifilm Superia X-tra ISO 400 36 shots film on a Canon A-1 with a Canon 55mm f/1.2 SSC. Everything was shot at f/1.2, and the shutter speed was set by the camera’s auto exposure. The film was developed and scanned in Gunn’s Camera shop. For digital, I used a Canon 6D with a Canon 55mm f/1.2 SSC Aspherical. Everything was shot at f/1.2 at ISO 400, I varied the shutter speed from 1/80 to 1/250 based on the light. Both images had normal edits in Lightroom. 
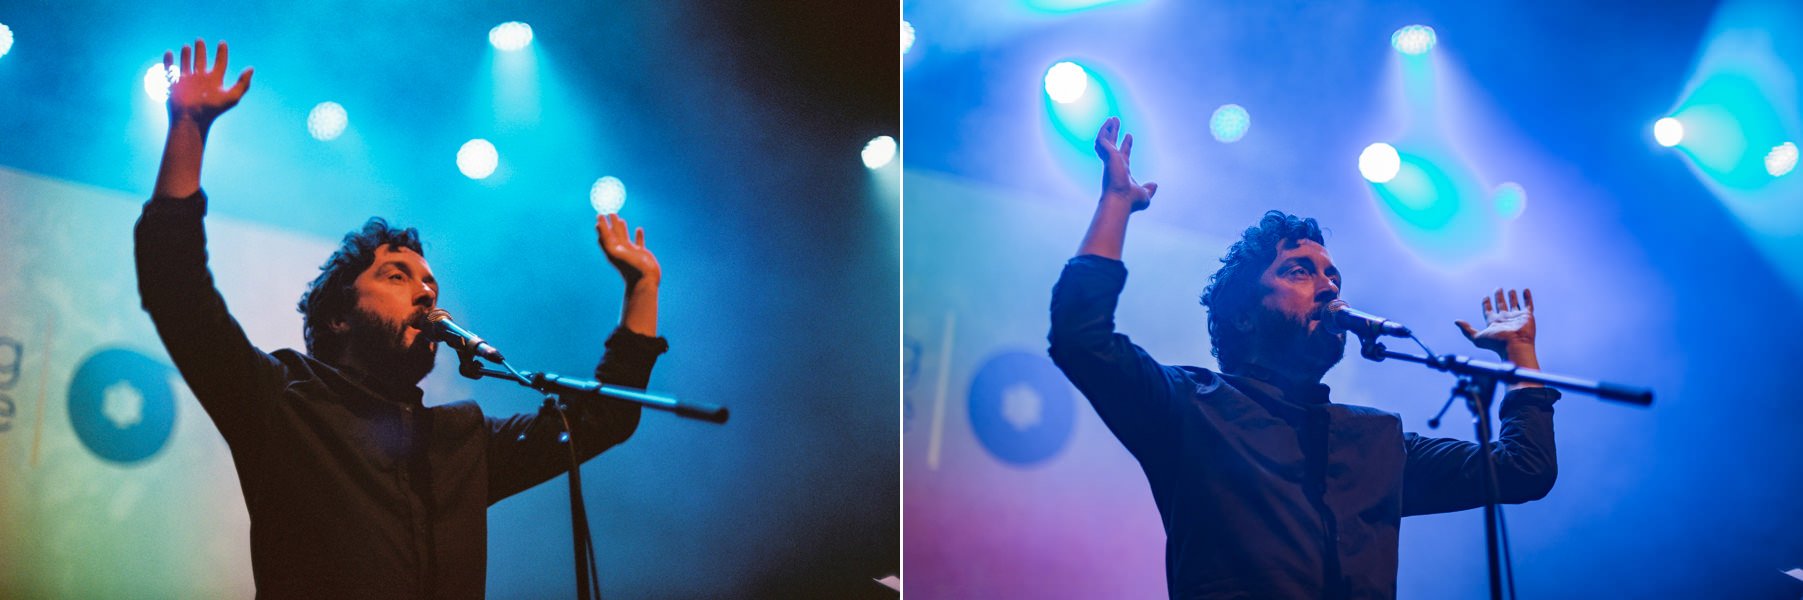
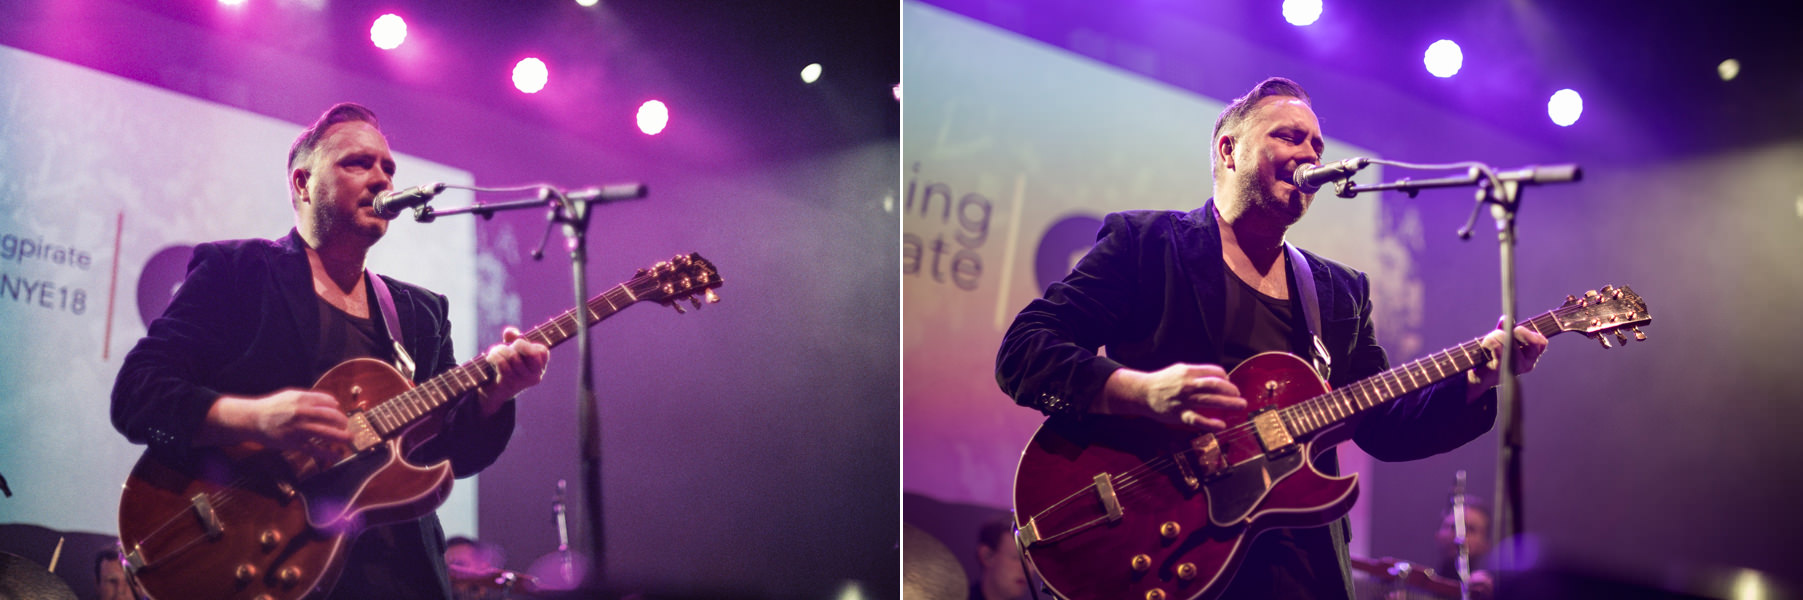
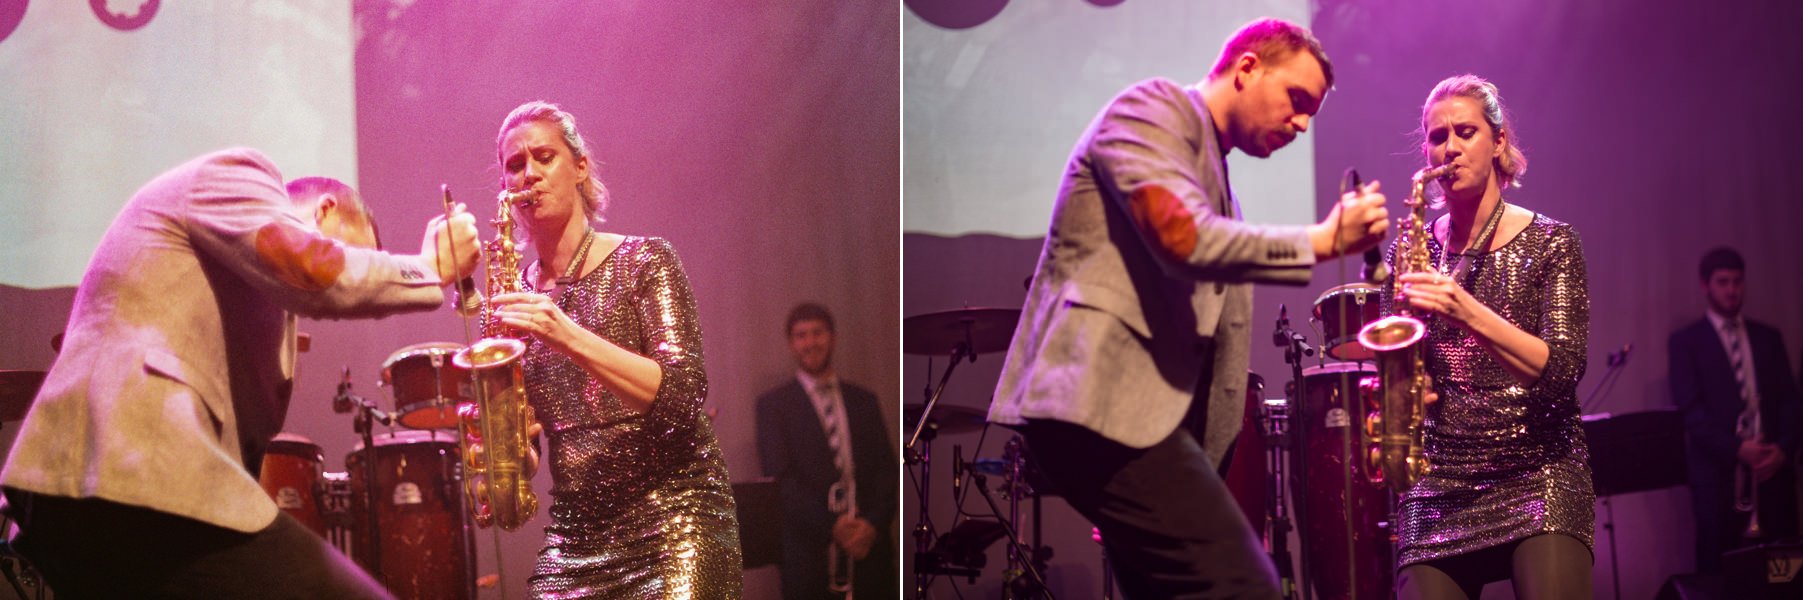
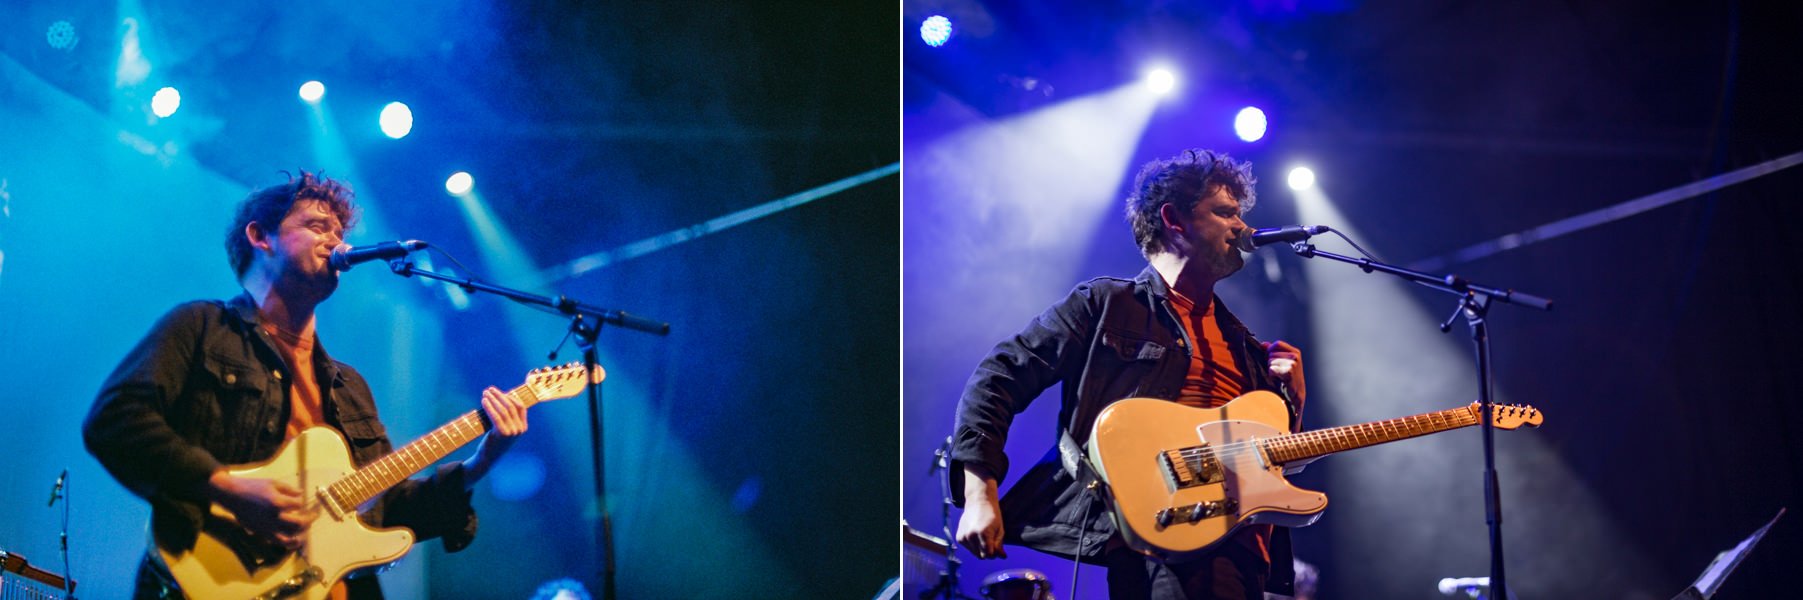
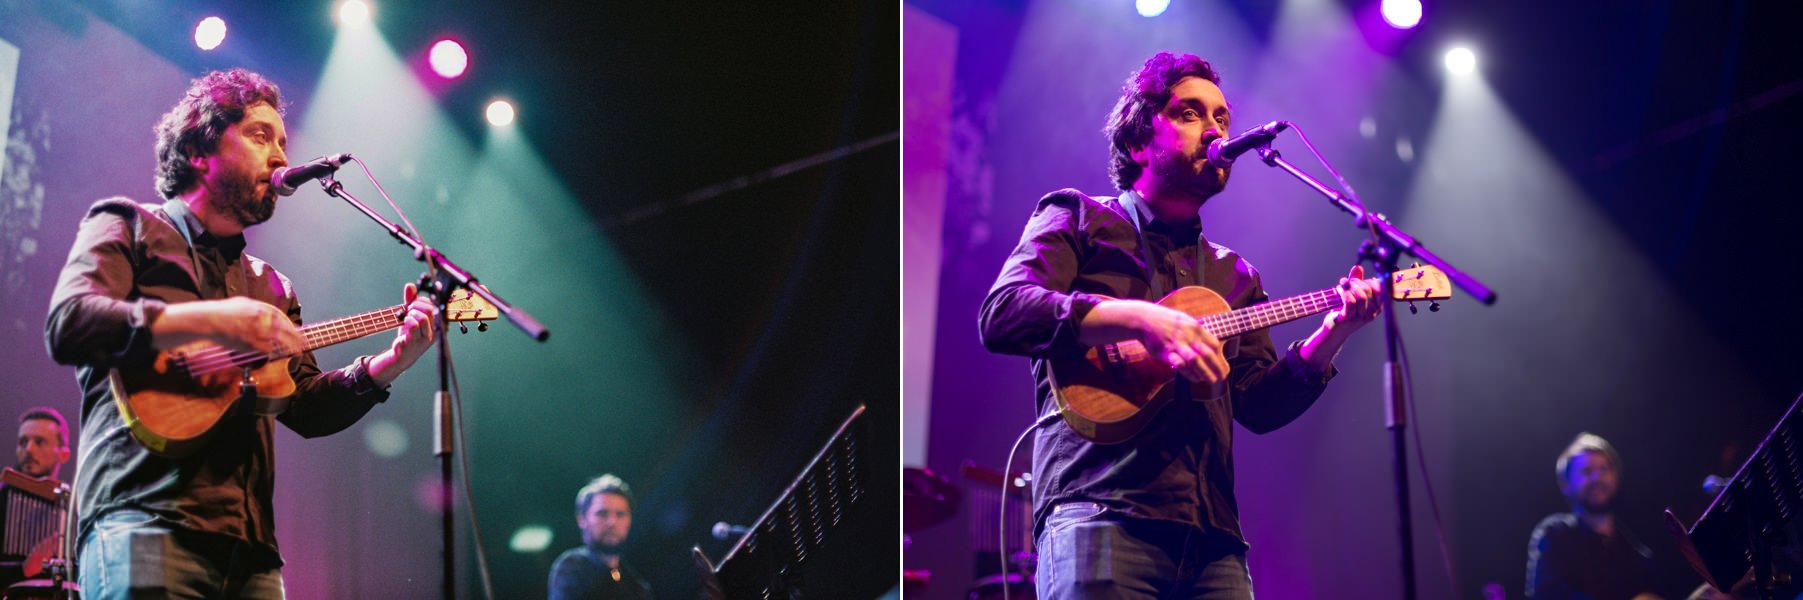
Below are a selection of photos comparing film and digital images (film on the left, digital on the right):
What I’ve found by using both mediums is that with film you are forced to slow down, make sure the composition is right, watch the artist, and predict how they are going to move next, because I know I only have 36 shots on my roll and I don’t want to waste any of them. With digital it’s the complete opposite. Modern cameras don’t have the split prism focusing screen that helps you nail focus like the old film cameras (I bought a split prism for my digital camera but it turned out to be useless). With the tiny depth-of-field of the f/1.2 lens, focusing becomes a game of trial and error in which I ended up with 20 times as many photos. About the author: Owen Humphreys is a professional music and event photographer based in Dublin. The opinions expressed in this article are solely those of the author. Humphreys has been featured in Goldenpec, The Irish Times, Stereogum, Hotpress, among many other publications. You can find more of his work on his website, Facebook, Twitter, and Instagram. This article was also published at Goldenpec. Photography News via PetaPixel https://petapixel.com January 31, 2019 at 12:03PM
http://bit.ly/2CX3vRg
ZTE appears to be getting ready to launch smartphone with 32MP front camera http://bit.ly/2HK4aLz
Smartphone front cameras used to be overshadowed by their counterparts on the rear of mobile devices, offering low pixel counts, fixed focus lenses and generally simple specs. This is changing quickly, however, with some front cameras on the latest high-end smartphones featuring high-resolution sensors, AF-systems, computational bokeh modes, HDR and other advanced functions. It looks like ZTE is now about to take things to a new level by launching a smartphone with a 32MP front-facing camera. The new device, which is said to be the ZTE Blade V10, has emerged in a regulatory filing on China’s TENAA website and is thought to use Samsung's ISOCELL GD1 sensor. The latter comes with a 0.8 micron pixel pitch and pixel-binning technology, merging four adjacent pixels into one for better dynamic range and lower noise levels. The sensor also comes with real-time video HDR, so the ZTE could be a good option in difficult high-contrast scenes. Other specs put the new model into the mid-range bracket of the market. There'll be a 6.3-inch full-HD+ LCD display, an octa-core chipset and a 3,100mAh battery, according to the filings. The main camera comes with a 16MP primary sensor and a 5MP secondary sensor, likely for depth sensing. Photography News via Dpreview http://bit.ly/i0r8o5 January 31, 2019 at 11:51AM
http://bit.ly/2HGr3zG
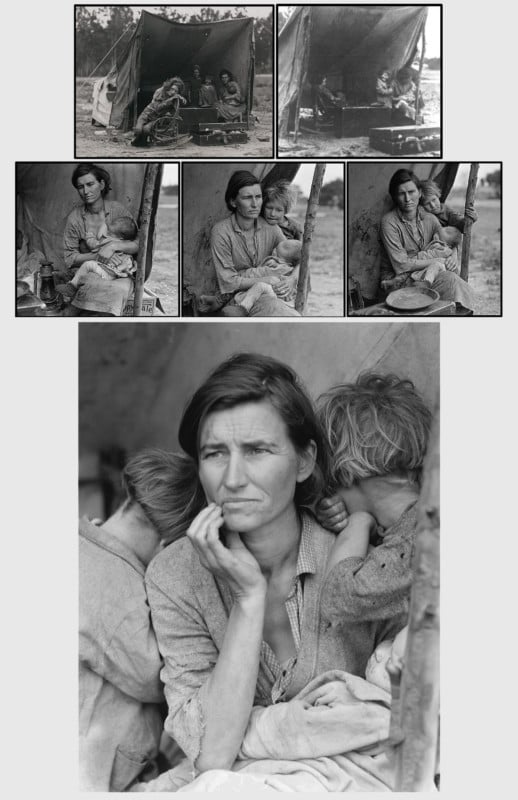
How the Iconic Photo ‘Migrant Mother’ Came to Be http://bit.ly/2CTEsP3 Dorothea Lange’s 1936 photo Migrant Mother is an iconic photo of the Great Depression. The Nerdwriter made this fantastic 6-minute video that tells the behind-the-scenes “story of how Dorothea Lange created perhaps the most iconic photograph in American history.” The video tells of how Lange went from shooting portraits of the upper class in San Francisco to being hired by the US government for its propaganda effort during the Great Depression — the goal was to photograph the poor rural workers in order to raise public support for government aid. 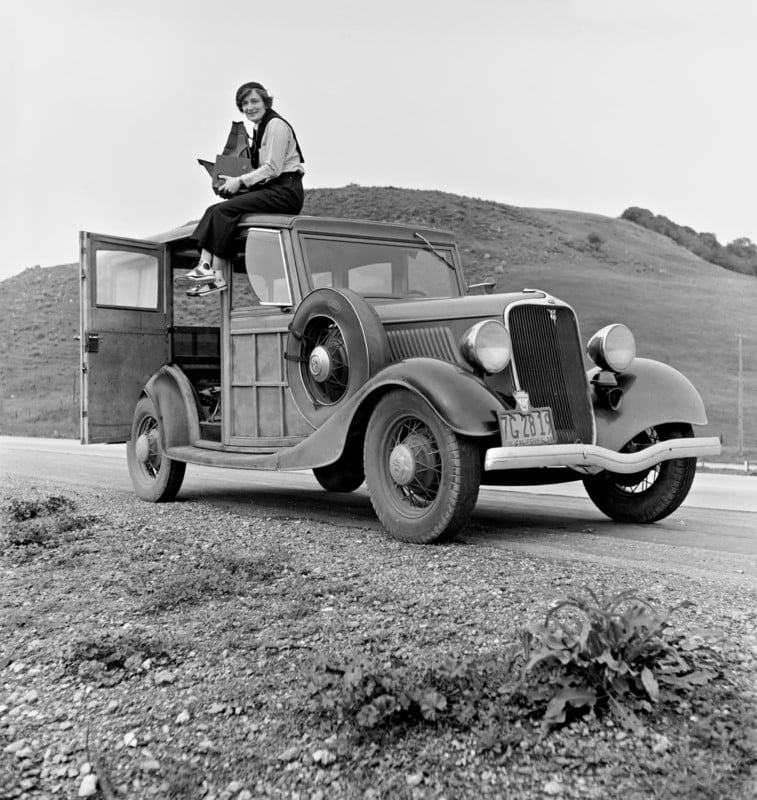
And on a drive home with completed work ready to be developed, Lange passed a camp of destitute pea pickers in California. It was during 10 short minutes spent at the camp that the now-famous portrait would be made. After setting the stage, Nerdwriter then looks into exactly how Lange went about photographing the mother, Florence Owens Thompson, and her children by examining the small set of images Lange took while she was with them.
As we shared recently, the portrait that became Migrant Mother was “Photoshopped” to remove Thompson’s left thumb from the log in an effort to remove distracting elements from the frame. “Being able to actually see the steps of Lange’s craft enhances her work,” Nerdwriter says. “It gives the photograph a third dimension. “[Migrant Mother] came to define the Depression in the American consciousness. And on a deeper level, it became the archetypal image of struggling families in any era.” Photography News via PetaPixel https://petapixel.com January 31, 2019 at 11:15AM
http://bit.ly/2DLGDpt
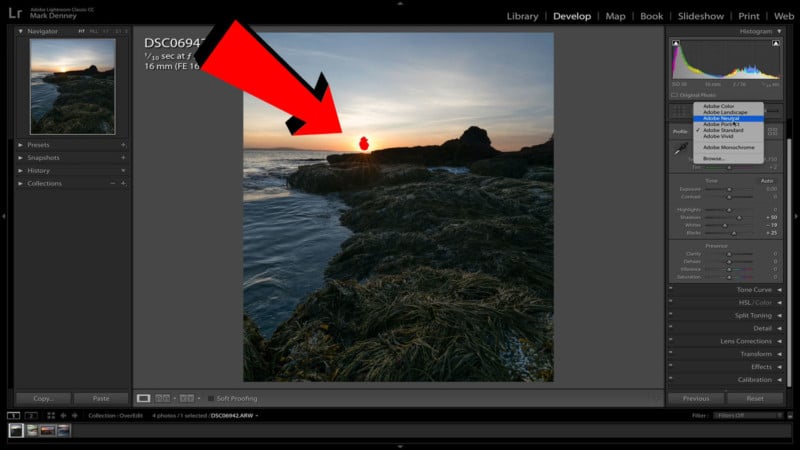
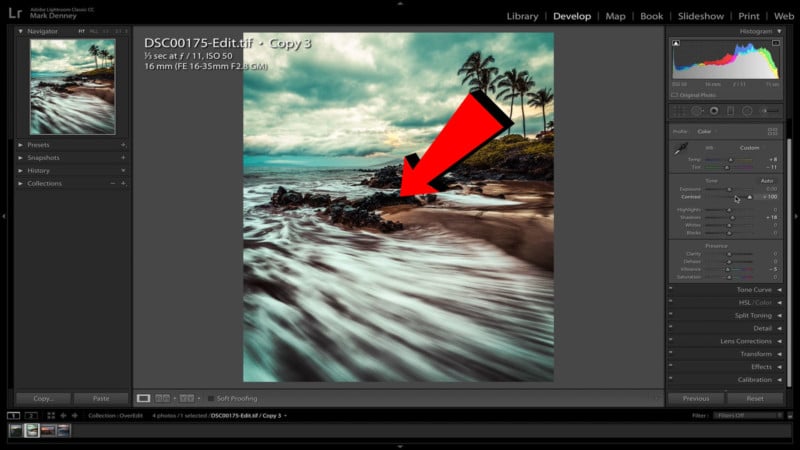
5 Signs You’re Over-Editing Landscape Photos http://bit.ly/2Ru01eg One of the more difficult aspects of post-processing is identifying when you’re starting to over edit a photo. It’s common knowledge what many of the characteristics of an over-edited image are, but determining when you’ve gone too far, that’s the challenging part. In this 14-minute video, I break down five tips that have helped me to understand and identify when I’m beginning to over process an image. Sign #1. Unrealistic Shadows and Highlights
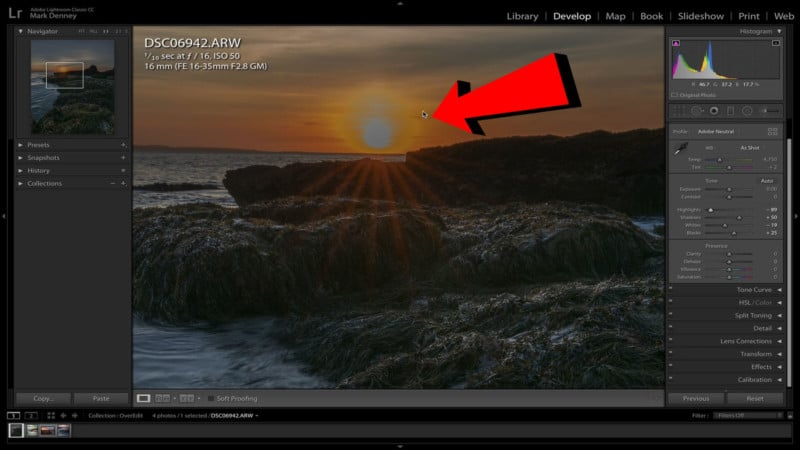
A common issue with landscape photography is when you’re shooting into the sun and either you overexpose the sun, sky, or both. A quick tip before you make any adjustments is to change the profile from Adobe Standard to Adobe Neutral. Adobe Neutral is a flatter profile that’ll give you more latitude in recovering clipped highlights or shadows.
In order to resolve the overexposed area, if you reduce the highlights to a point that you begin to see an unnatural ring around the sun, then you’ve gone too far.
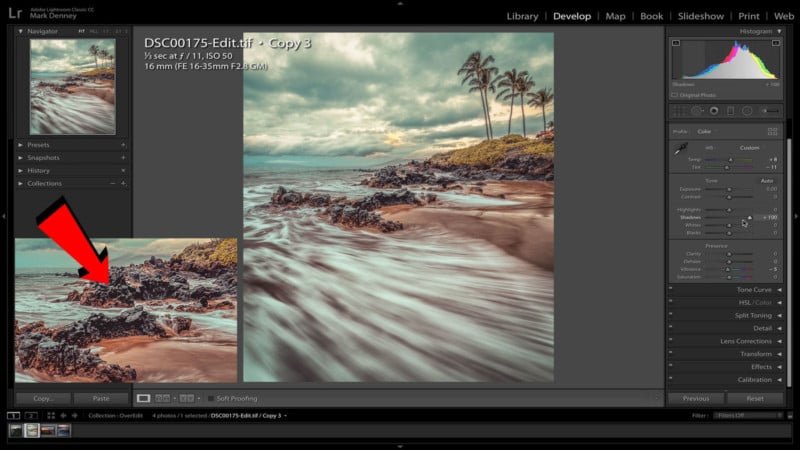
On the opposite side, if you’re increasing the shadows to a level that your image begins to lose structure and appears flat, you’ve once again gone too far. Shadows are an important aspect of an image as they add three-dimensionality and structure and should be preserved. Sign #2. Adding Too Much Contrast
Contrast is king and can certainly make or break a photo so understanding when you’re going overboard is critical. Too little contrast and your image appears flat and lifeless. Too much contrast and you lose detail in your shadows and your image looks muddy. When making contrast adjustments, keep a close eye on your shadows. When you begin to lose detail in the darker areas of your photo, reducing the contrast could be in order… unless that’s the look you’re going for. Sign #3. Over-Sharpening and Clarity
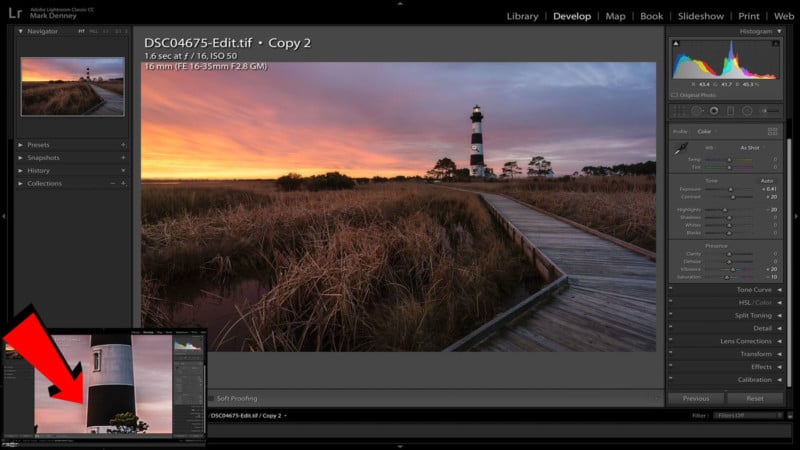
This could be the most common issue among over edited landscape photos, and it’s also the easiest to identify. To see the effects of over-sharpening you have to do a bit of “pixel-peeping” — zoom in and look for a glow or halo along an edge when you toggle the sharpening on and off. If your edges are glowing then you’ve applied too much sharpening or clarity to your image. Sign #4. Extreme Vignetting
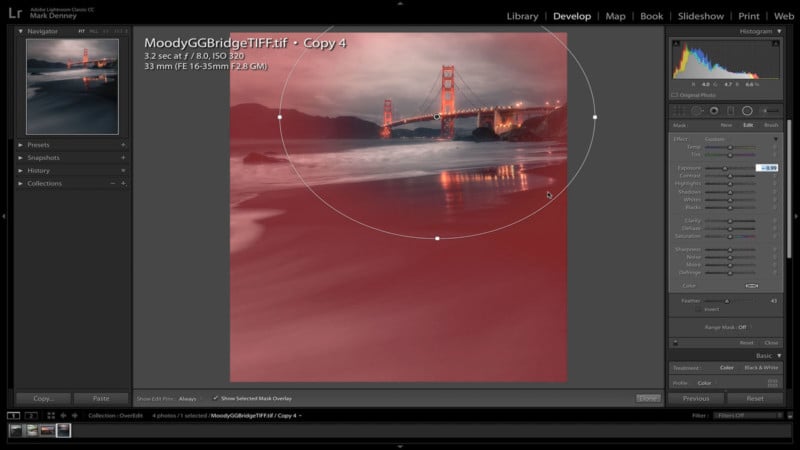
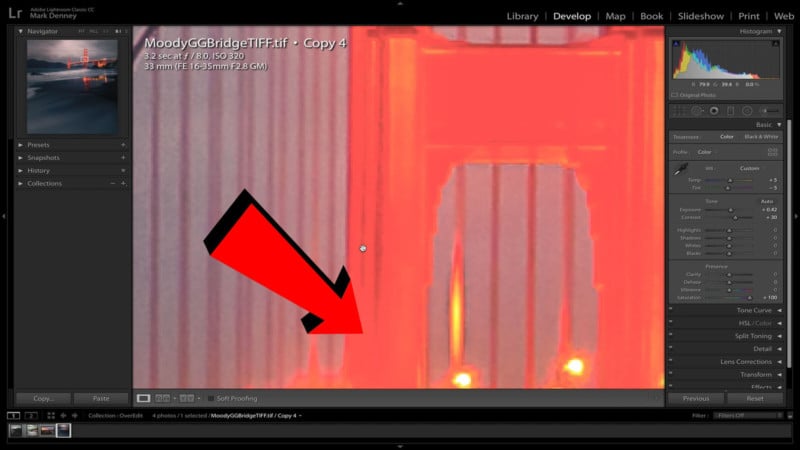
As with much of photo editing, a vignette is meant to enhance a photograph and not distract. If the first thing you notice when you look at your photo is the vignette then you’ve gone too far. When I’m looking to direct the viewer’s eye, I’ll create a custom vignette using an inverted radial filter in order to place the center around the actual subject of my photo. I find this approach to be more intentional as opposed to the standard vignette tool available in the ‘Effects’ panel within Lightroom. Sign #5. Over-Saturated Colors
In my opinion, this is the most difficult adjustment to identify when it’s starting to look garish. There isn’t an easy way to determine this, but if you zoom into an area where you can see fine detail and turn the saturation all the way up, you’ll notice that most of the detail is lost. Outside of this, though, there really isn’t a definitive way of identifying over-saturation outside of just using your best judgment to replicate the natural colors you saw when you captured the photo. I think many of us have fallen victim to these signs of over-editing at one point or the other, I know I certainly have, but it’s all part of the learning process. P.S. If you enjoyed this video and article, you can find more by subscribing to my YouTube channel. About the author: Mark Denney is a landscape photographer based in North Carolina. The opinions expressed in this article are solely those of the author. You can find more of his work on his website, Facebook, Twitter, and Instagram. Photography News via PetaPixel https://petapixel.com January 31, 2019 at 10:33AM
http://bit.ly/2WyAIeJ
GoPro Plus now offers unlimited cloud storage and increased accessory discounts http://bit.ly/2HQkwCC
GoPro has given a boost to its Plus subscription service. From now on the service offers unlimited cloud storage space for photos and videos to its subscribers. Previously users could upload unlimited photos but there was a 35-hour limit for video footage. The service is specifically useful for users of WiFi-enabled GoPro cameras, such as the Hero5, Hero6 and Hero7 models, who can now automatically upload all captured footage to the cloud, without the need for any manual data transfer to a computer or other device first. In addition to the lifted storage limit, the discount on GoPro accessories has also been increased for Plus subscribers. It is now 50% off most mounts and other accessories, compared to 20% previously. What hasn't changed is the monthly subscription rate at $5 which makes the service a pretty enticing option for GoPro power users. There's also a 30 day free trial period for the service if you're interested in trying it out first. Photography News via Dpreview http://bit.ly/i0r8o5 January 31, 2019 at 10:26AM
http://bit.ly/2SfOSSY
Video: The making of the iconic 'Migrant Mother' photograph captured by Dorothea Lange http://bit.ly/2SfLzLv It's one of the most iconic photographs in American history and it was captured by one of the most influential photographers of the 20th century. The world knows the photograph as 'Migrant Mother,' and it's seen throughout photography textbooks the world over, but how exactly did the image come to be and what led Dorothea Lange to capture the image? YouTuber Nerdwriter1, whose known for his thorough deep dives into various people and subjects, has created a video essay that takes a look into the history behind 'Migrant Mother' and what events led up to Lange capturing the photograph. Throughout the nearly seven minute video, Nerdwriter1 explains what exactly Lange was doing when she captured the photograph and shows a number of images captured in the ten minutes leading up to the iconic frame to paint a picture of how the image was shaped frame by frame to get the powerful portrait known today. Yes, the video is presented in portrait orientation, but Nerdwriter1 is known for experimenting with delivery and he particular chose this aspect as he explains in the highlighted comment on the video's page. Photography News via Dpreview http://bit.ly/i0r8o5 January 31, 2019 at 10:11AM
http://bit.ly/2WxlVkz
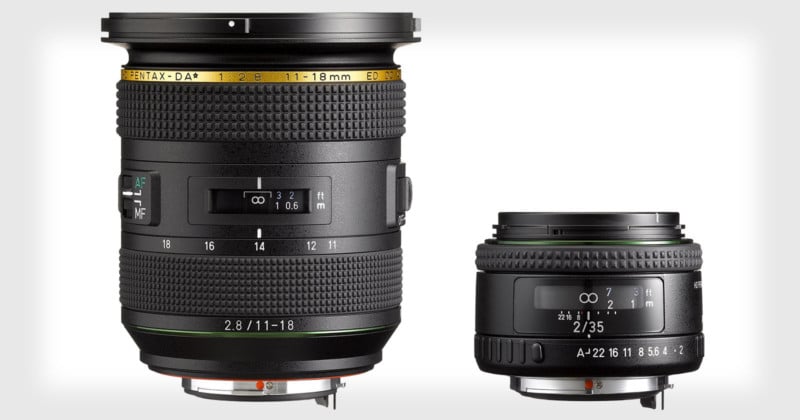
Ricoh Unveils Pentax 11-18mm f/2.8 and 35mm f/2 K-mount Lenses http://bit.ly/2Tq7PiU
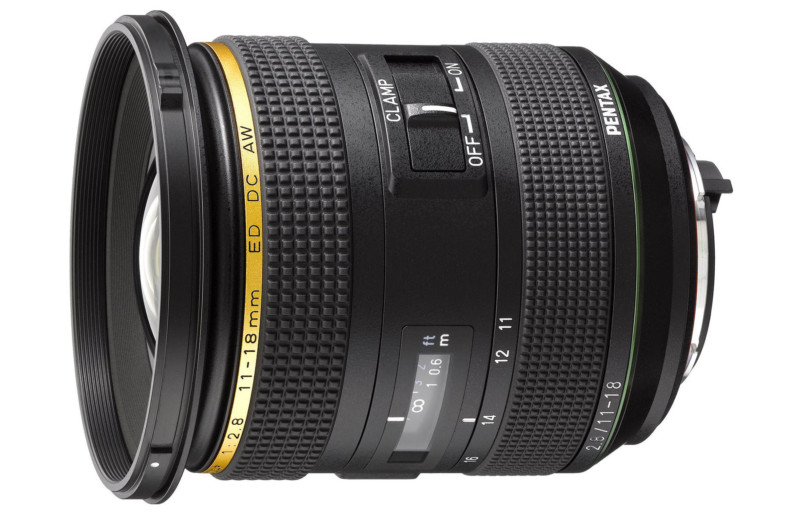
Ricoh today announced two new lenses for Pentax K-mount DSLR cameras: the Pentax HD Pentax DA* 11-18mm f/2.8 ED DC AW and Pentax HD Pentax-FA 35mm f/2. Pentax HD Pentax DA* 11-18mm f/2.8 ED DC AW
The new Pentax 11-18mm f/2.8 lens is a Star series (*) APS-C lens that is designed to stay relevant into the era of “super-high-performance digital cameras of the future.” “It delivers high-resolution, high-contrast images without blurring at the edges, and assures excellent imaging performance, even at open aperture,” Ricoh says. The 11-18mm focal range is equivalent to a 17-27.5mm lens in 35mm terms, and it’s geared toward landscape and outdoor photographers. Features of the lens include a high-grade HD coating that minimizes flaring and ghosting, a dust-proof and weather-resistant build, a Focus Clamp Mechanism that locks the focal point even when the focus ring is rotated, a dew heating strip that prevents condensation without affecting focus-ring operation, a rounded 9-blade aperture, 16 elements in 11 groups, an 82mm filter thread, and a weight of 1.55lb (704 g). Pentax HD Pentax-FA 35mm f/2
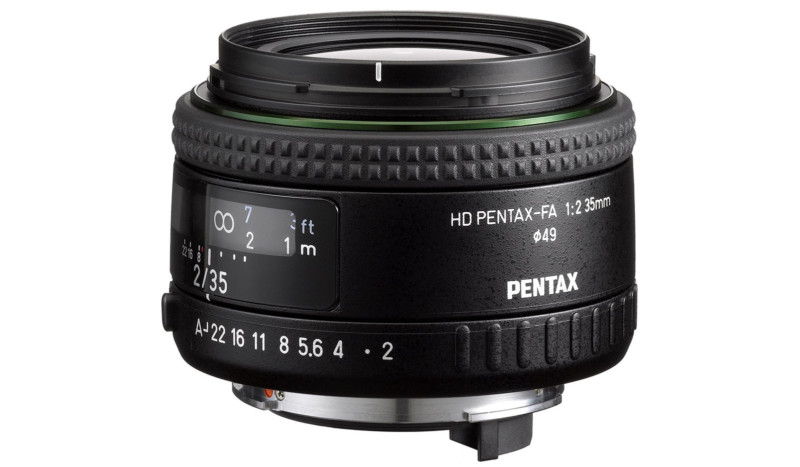
The new Pentax HD Pentax-FA 35mm f/2 is a full-frame wide-angle lens that’s designed for everyday use. On an APS-C camera, it offers the 35mm equivalent focal length of 53.5mm. Features of the lens include 6 elements in 5 groups, a multi-layer coating that reduces flaring and ghosting, a stain-repellent coating, a 6-blade aperture, a 49mm filter thread, and a weight of 6.81oz (193g). Pricing and AvailabilityBoth lenses are available for pre-order starting today. The Pentax HD Pentax DA* 11-18mm f/2.8 ED DC AW has a price tag of $1,400 and the Pentax HD Pentax-FA 35mm f/2 costs $400. Photography News via PetaPixel https://petapixel.com January 31, 2019 at 10:04AM
http://bit.ly/2Gb6lW4
3 Characteristics Every Good Photographer Possesses http://bit.ly/2WzYGGP The question of what it takes to be a good photographer is a question that will draw as many answers as people it is asked of. Many will cite things like the ability to form a perfect composition, achieve proper exposure or consistently get in-focus shots. While these hallmarks of technical proficiency aren’t meaningless, history has revealed that a photo can lack one or all of these traits and still be considered a good photo — great, even. Being a good photographer is about so much more than an evenly distributed histogram. At the risk of being a bit abstract, I’d like to submit three characteristics that I believe anyone who is driven to be a good photographer must possess. 1. CuriosityKids have adults beat when it comes to curiosity. Children enjoy everything except vegetables and bedtime because everything is a new experience. They seek out new discoveries, new sensations. Sure, their curiosity can lead them to mischief every now and then, but it’s part of the learning process. Photographers would do well to acquire (or re-acquire) and maintain a childlike curiosity. Garry Winogrand championed curiosity when he claimed, “I photograph to find out what something will look like photographed.” I can’t think of a more fundamental reason to pick up a camera. Of course, as you continue to photograph the faces, places and things around you, your reasons for shooting will grow and become more nuanced but the underlying motivator will remain. Go out and discover what the world around you really looks like. 2. CourageCuriosity isn’t all that valuable if you don’t act on it. Having the courage to get up and act on your curiosity doesn’t apply only to photographing difficult subjects or working in dangerous environments. Street photography stirs up anxiety in some individuals; for others, portrait photography or macro photography can be intimidating. The specific reasons for why one might experience angst over a given type of photography is unimportant here, though I suspect a general fear of failure is a common thread. Courage, though, is how you make things happen. Don’t fear failure — we all fail at some point. Pull yourself up, learn from your mistakes and keep trudging along. Don’t fear new experiences — they will reshape your thought process and expand your creativity. 3. CommitmentTo be a good photographer you need to commit to what you’re doing. It doesn’t matter what your skill level is, what genre of photography you tend to indulge in, where you live or what kind of camera you own. You must commit to following through on those concepts of curiosity and courage that we discussed above. You must commit to continuous self-improvement (both creatively and technically). You must commit to your work in such a way that nothing — not even Instagram fame, or the lack thereof — can hamper your passion for photography. Things won’t always go according to plan, but some good old fashioned “sticktoitiveness” will help get you through the discouraging times. Final ThoughtsThere are things you can do in an effort to become a good photographer — study, practice, seek feedback — all of which will prove useful. But like all creative endeavors, the foundation of success (not in financial terms) is based largely on internal attributes and motivations. Whether you have what it takes to be a good — or great — photographer is up to you. Further Reading
Further LearningIf you're looking for a pragmatic way to improve your photography without getting bogged down in theoretical tomes and technical manuals, Action Cards are the thing you will want to get your hands on. The Action Cards are 65 beautifully designed and printable project sheets that will give you over 200 photography assignments, covering everything you can imagine. Each sheet contains:
Grab yours here todayShareable Images for Pinterest      
The post 3 Characteristics Every Good Photographer Possesses appeared first on Light Stalking. Photography News via Light Stalking http://bit.ly/2kwTW5i January 31, 2019 at 10:02AM |
Categories
All
Archives
November 2020
|


 RSS Feed
