RICK REA: Helping You Grow Through Online Marketing
  • Home
  • Blog
    • Social Media News
    • SEO Marketing News
    • Digital Trends News
    • Photography News
    • Mobile Marketing
    • Business News
    • Gadget News
    • Printing News
  • Contact
  • About
  • Subscribe

Photography News

Canon drops flagship EOS-1v film body and projects end date for repairs

5/31/2018

0 Comments

 
https://ift.tt/2J7EJ2Y

Canon drops flagship EOS-1v film body and projects end date for repairs

https://ift.tt/2J0yvpp


It’s a bad week for film lovers as Canon follows Leica with the news of the discontinuation of an important 35mm camera from its line-up. Earlier Leica reported the end of the M7, and now Canon has announced it has ceased production of its flagship film body, the EOS-1v. The fact that most of us didn’t even know it was still in production anyway hardly softens the blow, as the launch of this model in 2000 was truly one of Canon’s greatest moments.

The hard-as-nails professional body can shoot at 10 fps with the PB-E2 power pack attached, and can even manage 9 fps in AF servo. It has a 45-point AF array, a shortest flash sync of 1/250 sec, a top shutter speed of 1/8000sec and is claimed to be good for over 150,000 actuations. It can store the shooting data from 100 rolls of 36 exposure film to be read-out using Canon’s EOS Link ES-E1 software and matched to the roll using an ID number imprinted on the film leader by the standard camera back. Best of all, its 0.72x 100% viewfinder presents a huge, clear and bright view of the world even by today’s best standards.

When it was launched in 2000 the camera was priced at 270,000 yen ($2480 at current rates), and used models still fetch around $600 through online auction sites.

Canon says repairs will be carried out until October 31 2025, though after its statutory repair period in 2020 expires the company can’t guarantee it will have the necessary parts.
If this sad news is too much for you, reading the Google Translate version of Canon Japan’s statement might cheer you up. You can also read more about this fantastic camera in Canon's fabulous Camera Museum.




Photography News

via Articles: Digital Photography Review (dpreview.com) https://ift.tt/i0r8o5

May 31, 2018 at 11:11AM
0 Comments

More Pros Than Ever Can Now Benefit From the Newly Expanded Canon CarePAK Program

5/31/2018

0 Comments

 
https://ift.tt/2kBYKUo


Providing Accidental Damage Protection, CarePAK Plans Now Offer Coverage for Cinema, Video and Professional Printer Equipment

MELVILLE, N.Y., May 30, 2018 – Canon U.S.A. Inc., a leader in digital imaging solutions, today announced the expansion of its CarePAK PRO and CarePAK PLUS service and support offerings for imaging professionals. The current CarePAK PRO program, which now includes accidental damage protection, has been restructured to meet the needs of the professional cinema, house of worship, and in-house corporate video production industries, among other professional video markets, and now covers Cinema EOS Cameras, Cinema Lenses, and Professional Camcorders. Additionally, the popular CarePAK PLUS plan, which currently includes professional SLR camera systems among other consumer products, has been expanded to cover Canon imagePROGRAF PRO-1000, PIXMA PRO-100, and PIXMA PRO-10 professional inkjet printers.

“Providing yet another solution to our customers, the CarePAK program expansion allows us to extend our services to more of Canon’s professional customers, implementing a worry-free ownership experience to help visual story-tellers focus and bring forth their creative visions,” said Kazuto Ogawa, president and COO, Canon U.S.A., Inc.

With CarePAK, customers can feel confident that their investment is covered by Canon’s world-class service and support. In addition to accidental damage protection from drops, spills, power surges, and other unforeseen events, CarePAK PLUS and CarePAK PRO provide normal wear and tear coverage for hardware and include Image Recovery*, designed to retrieve lost or corrupted images or videos from cameras, camcorders and printers with a memory card slot (only for use with a removable memory card).

Additional CarePAK benefits include:

  • Priority service for fast, reliable repairs and minimal downtime
  • Service and support direct from Canon using only genuine Canon parts
  • $0 deductible for any repair or replacement
  • Free shipping to and from Canon for all service and repairs
  • Dedicated phone and email support at 1-833-CAREPAK (1-833-227-3725) and carepakpro@cits.canon.com or carepakplus@cits.canon.com
  • Ability to transfer the plans during the coverage period to a new owner

Under a CarePAK plan, a damaged product will be repaired to good working condition or replaced with the same or an equivalent product, a feature that is unique to Canon and currently not available from other providers. CarePAK PRO and CarePAK PLUS will be available for Canon Cinema Cameras, Cinema Lenses, Professional Camcorders, and Professional Inkjet Printers beginning June 1 and can be purchased at the time of product purchase, or for up to 90 days thereafter.

For more information, please visit usa.canon.com/carepak. For those in attendance at this year’s Cine Gear Expo, stop by the Canon booth (number 12) to learn more about Canon’s service and support offerings, including  CarePAK PRO.


Photography

via Canon Rumors https://ift.tt/xgIh23

May 31, 2018 at 10:43AM
0 Comments

New Canon Full-Frame Cinema Camera the EOS C700 FF to be Showcased at Cine Gear Expo 2018

5/31/2018

0 Comments

 
https://ift.tt/2J5kT8k


The company will offer hands-on demonstrations with its latest products and host panel discussions

MELVILLE, N.Y., May 31, 2018 – Canon U.S.A., Inc., a leader in digital imaging solutions, will showcase its newest digital cinema products in Booth #12 at Cine Gear Expo 2018 in Los Angeles.

Visitors to the Canon booth will have the opportunity to experience the full range of Canon Cinema cameras and lenses, 4K reference displays, and DSLR cameras and lenses, including the recently announced EOS C700 FF Cinema Camera. Available in EF or PL mount, the EOS C700 FF features a 5.9K full-frame sensor with built-in anamorphic de-squeeze capabilities and RAW capture. The camera will be on display paired with the CN-E20mm T1.5 LF F lens, the latest addition to Canon’s line of CN-E prime lenses. Canon’s newest 4K HDR reference display, the 24-inch DP-V2421, will also be available for hands-on demonstrations, showcasing on-set HDR functionality.

Cine Gear attendees will be able to learn more about Canon’s CarePAK PRO Extended Service Plan, which recently expanded to include professional video and cinema products. Canon CarePAK PRO offers coverage from accidental damage such as drops, spills and power surges, protecting customer investments from unforeseen repair costs and excessive downtime. Conditions and restrictions apply*.

In addition to showcasing products and professional service and support offerings, Canon will host a series of panel discussions and educational seminars. On Saturday, attendees** will have the opportunity to see the new EOS C700 FF in action with a screening of Dishful of Dollars, a short film directed by Nigel Dick and shot by Nancy Schreiber, ASC. The full panel schedule is as follows:

Friday, June 1

2:30-3:15 pm

Screening Room 5

Choosing Between Full Frame And Super 35mm: A Hands-On Image Characteristics Comparison for Cinematographers
Instructor: Loren Simons, Sr. Engineer, Field Applications, Canon U.S.A.

Friday, June 1

5:30-6:30 pm

Paramount Theater

Options in Optics

Moderator: Tim Smith, Sr. Film and Television Advisor, Canon U.S.A.

Panelists:

  • Daniel Levin (Inside the FBI)
  • Claudia Raschke (RBG, The Price of Everything)
  • Steven Poster (The Boor, Amityville: The Awakening)

Saturday, June 2

4:30-5:30 pm

Paramount Theater

Dishful of Dollars – In-depth with the EOS C700 Full Frame

Moderator: Tim Smith, Sr. Film and Television Advisor, Canon U.S.A.

Panelists:

  • Nancy Schreiber, ASC (Director of Photography)
  • Nigel Dick (Director)
  • Gunnar Mortensen (1st AC)
  • Loren Simons (Sr. Engineer, Field Applications, Canon U.S.A.)

Follow Canon’s Cine Gear activities on Twitter at @CanonUSApro or on Instagram at @CanonUSAprovideo.


Photography

via Canon Rumors https://ift.tt/xgIh23

May 31, 2018 at 10:40AM
0 Comments

Nik Collection by DxO Press Release Leaks Ahead of June 6 Announcement

5/31/2018

0 Comments

 
https://ift.tt/2L9WBKU

The first update of the plugin suite that DxO acquired in late 2017, the Nik Collection 2018 by DxO offers full compatibility with the latest Mac and PC OSs and Adobe CC products, while DxO PhotoLab 1.2 enhances its local correction tools that incorporate exclusive U Point technology.

PARIS – June 6, 2018 – DxO, one of the world’s most innovative consumer imaging companies, today announced the immediate availability of the Nik Collection 2018 by DxO, an updated suite of Adobe Lightroom and Photoshop plugins for photographers and creative professionals. Eagerly awaited by the user community, this “by DxO” update marks the return to the market of the Nik Collection with the first stable version and with customer support. Also available today, DxO PhotoLab 1.2, an update of DxO’s acclaimed RAW and JPEG image processing software, adds new local correction features and adds support for seven additional cameras.

Nik Collection 2018 by DxO: Better user experience and stability

Since the acquisition of the Nik Collection from Google in late 2017, the DxO development team has spent several months analyzing and optimizing the code of the seven plugins that make up the software suite to make them stable and operational. “The process was long and complex,” explained Bruno Sayakhom, Product Owner at DxO. “It was necessary to recover and recompile source code that had not been maintained for a long time in order to make it compatible with the latest versions of Adobe products and the latest Apple OS updates. This is a first step that allows us to start afresh.”

The Nik Collection 2018 by DxO is now fully functional and compatible with all 64-bit Windows and Mac platforms, as well as with Adobe Lightroom Classic CC, Photoshop CC 2018, and Photoshop Elements 2017/2018. In addition, DxO now provides support in four languages on its website (http://nikcollection.dxo.com/), which will soon include exclusive tutorials. The software suite update, including the seven plugins, is now available in 13 languages, and includes a free 30-day trial period.

“We are proud to relaunch the Nik Collection, which users have been waiting for,” said Jean-Marc Alexia, DxO’s VP of Product Strategy and Marketing. “We have put all of our know-how into offering photographers and creative artists the best possible user experience. This is just the first step: using Uservoice-type surveys, we will be reaching out to the user community, from whom we greatly desire to gather feedback about their experiences and gain insight into their expectations.” Designed for expert photographers and graphic designers, the Nik Collection includes seven powerful plugins for Adobe Lightroom, Photoshop, and Photoshop Elements that offer a full range of creative effects and filters:

  • Analog Efex Pro applies analog film, camera and lens simulations to digital photos.
  • Color Efex Pro includes a set of filters for color correction, touch-up, and creative effects.
    Dfine reduces the noise of digital images by analyzing the specificities of each device.
  • HDR Efex Pro processes images in HDR.
  • Sharpener Pro increases the accuracy and enhances the detail of digital images.
  • Silver Efex Pro is a black and white image conversion solution inspired by darkroom techniques.
  • Viveza locally adjusts the color and tone of specific areas of the image.

Thanks to exclusive U Point technology, the Nik Collection plugins allow you to apply local settings to specific areas in a fluid and precise way.

The Nik Collection 2018 by DxO is available for download on the DxO website (http://shop.dxo.com/us/photo-software/dxo-nikcollection) for $49.99 / £39.99 / €49.99 instead of $69 / £59 / €69 until July 1st, 2018.


DxO PhotoLab 1.2 improves its local adjustment tools that integrate U Point technology

Recently awarded the 2018 TIPA Award for Best Image Processing Software, DxO PhotoLab (formerly DxO OpticsPro) offers a complete RAW and JPEG processing solution based on optical corrections from mathematically established laboratory models, as well as such exclusive features as PRIME noise reduction technology and DxO Smart Lighting intelligent exposure optimization.

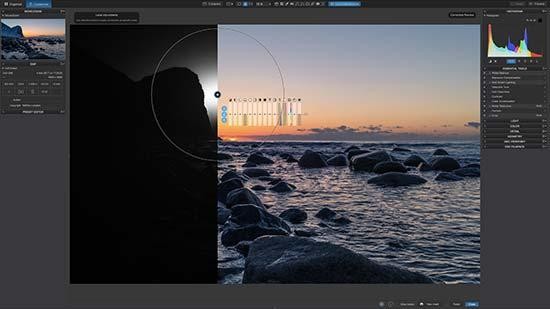
DxO has integrated Nik Software’s U Point technology, acquired from Google in late 2017, into DxO PhotoLab. This exclusive technology allows photographers to apply local settings in a non-destructive RAW stream to specific areas in an image.

With version 1.2 of DxO PhotoLab, DxO continues to enhance its software by adding the Hue (HSL) and Selective Tone settings, to unblock locally dark areas or recover overexposed areas. The tool’s equalizer system has been redesigned accordingly, and local settings are now grouped by categories: Light, Color, and Detail. Each category can be shown or hidden with a single click, for an efficient workflow.

In response to user requests, DxO has added a new keyboard shortcut that displays the U Point mask in grayscale and shows the area that will be affected by the correction.

Finally, DxO PhotoLab 1.2 adds support for images from the Sony A7 III; the Panasonic Lumix DMC-G9, TZ90, and GF9; the Canon EOS 2000D; and the Apple iPhone 8 Plus and iPhone X. Thanks to the quality of DxO PhotoLab’s RAW conversion, which is based on prior calibration of each sensor in the laboratory, images taken with these cameras and smartphones will automatically be corrected for optical defects.

The ESSENTIAL and ELITE editions of DxO PhotoLab (PC and Mac) are available for download on the DxO website (http://shop.dxo.com/), and from retailers at $129 / £99 / €129 and $199 / £159 / €199, respectively (recommended retail prices). Photographers who own a version of DxO OpticsPro can acquire an upgrade to DxO PhotoLab by logging into their customer account at www.dxo.com. A fully-functional trial version of DxO PhotoLab, valid for one month, is available on the DxO website: https://www.dxo.com/us/photography/download.


Photography

via Canon Rumors https://ift.tt/xgIh23

May 31, 2018 at 10:33AM
0 Comments

Feel The Frustration! Astronaut Discovers Hes Forgotten the Cameras SD Card While on Spacewalk

5/31/2018

0 Comments

 
https://ift.tt/2J290A4

Feel The Frustration! Astronaut Discovers He’s Forgotten the Camera’s SD Card While on Spacewalk

https://ift.tt/2smw2v5

Space: The final frontier for making rookie photography mistakes.

It happens to the best of us.

You get ready for a big day of shooting with your camera and you find out at the last minute that you’ve forgotten a critical piece of gear and it sets you back or even ruins the outing.

Well, don’t feel so bad – the same thing just happened to astronaut Drew Feustel when he took his GoPro for a spacewalk only to discover he had forgotten his SD Card.

Feustel, a flight engineer aboard the International Space Station, discovered he had forgotten the card when went to take some shots of outer space only to find he couldn’t in an embarrassing lapse caught on camera while the astronaut was communicating with Houston back on Earth.

Image via Pixabay from Pexels.com.

Of course, the GoPro camera Feustel is using is clad in protective casing to keep it safe from the harsh environment of space but, as Digital Rev points out, without an SD Card it really is just a glorified viewfinder. Feustel was going to take some epic pictures while he was out on a routine maintenance mission for the space station. We're sure that's a highly technical affair so his mind might have focused itself on other things, needless to say.

Cameras and space travel have had a long history together, with the relationship between Nikon and NASA going all the way back to 1971. We reported last year on a huge order of Nikon D5 DSLRs going to space, 53 to be exact. These cameras were delivered to NASA without modifications by Nikon but will likely undergo extensive reworking by NASA to tailor the devices to the agency’s needs.

If you would like to watch the moment Drew Feustel discovers he has left his SD Card back inside the International Space Station, you can do so by clicking here to view it here on YouTube.

The post Feel The Frustration! Astronaut Discovers He’s Forgotten the Camera’s SD Card While on Spacewalk appeared first on Light Stalking.


Photography News

via Light Stalking https://ift.tt/2kwTW5i

May 31, 2018 at 10:00AM
0 Comments

TIMEs Latest Cover Photo is a Drone Photo of 958 Drones

5/31/2018

0 Comments

 
https://ift.tt/2LLvZ45

TIME’s Latest Cover Photo is a Drone Photo of 958 Drones

https://ift.tt/2sm2VZ3

TIME magazine’s latest issue is a special report on the rapid explosion of drones in our culture. For the cover photo, TIME recreated its iconic logo and red border using 958 illuminated drones hovering in the sky. It’s the first-ever TIME cover captured with a camera drone.

To create the photo, TIME partnered with Intel’s Drone Light Show team (which creates beautiful sky displays using hundreds of drones at a time) and Astraeus Aerial Cinema Systems to fly and capture (respectively) the 958 drones above Folsom, California (where Intel has a campus).

The project was one of the biggest drone shows ever done in the United States — it’s a display measuring 100 meters (~328 feet) tall:

Here’s a 13-second video in which a camera drone flies through the cover in the air:

And here’s a 4.5-minute behind-the-scenes video showing how the one-of-a-kind photo shoot was done:

The display was actually filmed with a cinema camera on the Astraeus-flown drone, and the cover photo was a still frame extracted from the footage.

The cover can be found on the June 11, 2018, issue of TIME, which will hit stands on June 1st.


Photography News

via PetaPixel https://petapixel.com

May 31, 2018 at 09:52AM
0 Comments

Yongnuo Unveils 50mm f/1.4 II Lens Replacing Its Canon Clone

5/31/2018

0 Comments

 
https://ift.tt/2LadWnf

Yongnuo Unveils 50mm f/1.4 II Lens, Replacing Its Canon Clone

https://ift.tt/2st3Wxv

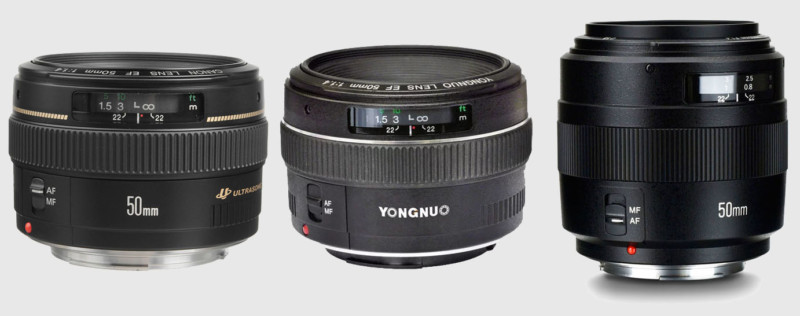
Now that Yongnuo is more established as a third-party lens maker, the company is slowly distancing itself from the lens designs it copied from Canon lenses early on. In addition to replacing its original 50mm f/1.8 “Nifty Fifty” clone, Yongnuo is now also updating its 50mm f/1.4 clone with a new YN50mm f/1.4.

The Canon 50mm f/1.4 (left), the original Yongnuo 50mm f/1.4 (center), and the new Yongnuo 50mm f/1.4 (right).

The new autofocusing Yongnuo YN 50mm f/1.4 features a 7-blade aperture for “beautiful soft blurred backgrounds [with] circular defocused spots as well as 14-star effect if you stop down the aperture,” Yongnuo says. The company has been emphasizing bokeh quality as a strength of its lenses — its new 50mm f/1.8 II has what Yongnuo calls “Super Bokeh.”

As with Yongnuo’s other new lenses, the new 50mm f/1.4 II features a USB port that lets you update the lens’ firmware without any additional dock.

The lens also boasts live view focusing, Yongnuo says. “When Lv mode is on, this lens can focus from special angles, or focus precisely from the broadened view on the display screen.”

Other features of the YN 50mm f/1.4 II include an electromagnetic aperture (supports M/Av/Tv/P/B shooting modes), glass optics, multilayer coatings for increasing light transmittance while controlling ghosting and glare, gold-plated contacts, a durable metal mount, and a focus distance indicator.

The new Yongnuo 50mm f/1.4 II can be found through places like Amazon for $199 when it’s in stock for Canon EF mount cameras. No word yet on what other mounts it will be available for.

(via Yongnuo via Photo Rumors)


Photography News

via PetaPixel https://petapixel.com

May 31, 2018 at 09:17AM
0 Comments

Working with Different Shutter Speeds for Landscape Photography

5/31/2018

0 Comments

 
https://ift.tt/2xwaTDT

There are three fundamental settings in landscape photography: the ISO, Aperture and Shutter Speed (known as the Exposure Triangle). While all of these are equally important to understand in order to create technically correct images, there’s one that’s extra important when it comes to an image’s visual impact. Adjusting the shutter speed makes a big difference and is often what can make your image stand out from the crowd.

Choosing the ideal shutter speed is not an easy process though. There rarely is a single correct shutter speed but there certainly are scenarios that benefit from a specific one. In this article, we’ll look at a few different scenes and how the shutter speed affects each of them.

Working with Fast Shutter Speeds

The easiest shutter speed to work with is a fast one. Working with fast shutter speeds doesn’t require a tripod and you can easily photograph subjects that quickly pass by. This is also the most common choice for most beginning photographers as it doesn’t require much effort (and most auto functions choose a relatively fast shutter speed).

Below you have a typical example of when you need to use a fast shutter speed. In order to freeze the motion of the deer, I had to increase the shutter speed to 1/320th of a second. Had the deer been moving at a higher tempo I would have to increase the shutter speed even more to avoid any motion blur.

deer in a field - Working with Different Shutter Speeds for Landscape Photography

Photographing animals is not the only time where you should use a fast shutter speed though. In the image below, I used a shutter speed of 1/1600th.

Why did I use such a quick shutter speed for that scene? By the looks of it, the water is quite still, there are no moving subjects and there’s still enough light to use a slightly slower shutter speed, right? Yes, however, this shot was taken from a boat and even though the waters were relatively still, I needed a very quick shutter speed in order to freeze the scene without any blur from camera movement.

iceberg and water - Working with Different Shutter Speeds for Landscape Photography

Use the ideal settings not perfect ones

Had I been standing on land, I could have easily used a slower shutter speed and achieved a similar look. In fact, the overall quality could have been even better as I could have used a lower ISO and an ideal aperture. However, the purpose of photography isn’t to always have the perfect settings; it’s having the ideal settings that allows you to get the shot within the given conditions. The most important is to actually capture the image.

For too long I was too focused on always having the perfect settings. The truth is that this often leads to missing the shot as you focus too much on the technical aspect rather than working with the conditions you’re given.

For example, using a slower shutter speed when standing on a boat (such as in the image above) would have led to the icebergs being blurry due to the motion. What would you prefer? A blurry picture which is “technically” perfect, or a sharp picture that doesn’t have the technically perfect settings?

Before we move on to slower shutter speeds, let’s look at a few more scenarios where a fast shutter speed is recommended:

  • When photographing handheld.
  • Photographing quickly moving subjects.
  • When aiming to freeze motion.
  • When photographing from a vehicle.

Working with Slow Shutter Speeds

In landscape photography, the difference between slow shutter speeds is much bigger than between fast shutter speeds. While you won’t see a huge difference between 1/320th of a second and 1/640th of a second (in most cases) you may see a big difference between 10 seconds and 60 seconds. Because of this, I’ll split this section in two parts: less than 30 seconds, and more than 30 seconds (Bulb Mode).

dark image with moving water - Working with Different Shutter Speeds for Landscape Photography

The definition of a long exposure is somewhat vague but in my Ultimate Guide to Long Exposure Photography eBook, I describe is at the shutter speed where you no longer can capture a sharp handheld image. Typically, this is in the range of 1/50th of a second, depending on your camera and focal length (a longer focal length requires a quicker shutter speed to capture a sharp handheld image than a wide-angle).

Shutter speeds up to 30 seconds

While the difference between a 1 second and 30-second shutter speed is big, it’s more natural to put these together in one section to keep this easier to follow. Still, I’ll try to break it up a little to give you an idea of which shutter speeds you should experiment with in different situations. Again, there’s no correct choice and it often comes down to your preference and the tools you’ve got to work with.

When photographing beaches and seascapes where waves are crashing onto the shore or forming around rocks, I often work with a shutter speed of 0.5-1 second. I find that this creates a nice blur in the water while still keeping enough texture. A slower shutter speed such as 8 seconds blurs the water but not enough to give it the “silky” effect you often see with long exposure photography (we’ll come back to that in a bit).

waves crashing on a rocky shore - Working with Different Shutter Speeds for Landscape Photography

This also applies when photographing waterfalls and rivers. I tend to use a semi-slow shutter speed rather than an ultra-slow shutter speed when working with these scenes, as I prefer to keep some textures in the water.

As you lengthen the shutter speed you’ll see that moving elements become more and more blurry. In the image below, I used a shutter speed of 20 seconds to blur the water and give some motion to the sky. If you look at the clouds, you can see that they have been moving and it’s starting to have the “dragged sky” effect.

seascape scene - Working with Different Shutter Speeds for Landscape Photography

Keep in mind that the speed of the clouds determine how slow the shutter speed needs to be in order to pick up this motion. When clouds are moving quickly you can pick up their motion even with a shutter speed of 5-10 seconds, but to really get the “dragged sky” effect you often need to use a shutter speed (or exposure time) longer than 30 seconds.

Shutter speeds longer than 30 seconds (Bulb Mode)

In order to achieve a shutter speed longer than 30 seconds you most likely need to activate Bulb Mode.

When I first got into long exposure photography and purchased my first 10-Stop ND filters, I immediately got hooked on these ultra-slow shutter speeds. I’ll admit that I don’t do as much of it anymore (as it rarely fits with the vision I have for most locations) but it’s certainly a lot of fun to play with.

The main reason to use a shutter speed longer than 30 seconds for landscape photography is to achieve the “dragged sky” effect and to completely blur out moving elements such as water. It can also be a good way to remove people from your images (if they walk around during your 2-3 minute exposure they most likely “disappear”).

sunset on a coastal scene - Working with Different Shutter Speeds for Landscape Photography

For the image above I used a shutter speed of 180 seconds. As you can see, this has completely blurred the water and the sky is dragged across the frame.

Conclusion

Working with longer exposures can be a lot of fun but it’s not something that’s always beneficial. For example, when photographing a scene that doesn’t have any moving elements (and no clouds), there’s no need to use an ultra slow shutter speed, as it will most likely look exactly the same with a slower one.

So knowing how to select the best or most appropriate shutter speed takes practice, and comes down to what you want to achieve in your image.


For more information about this and other aspects of this type of photography, check out my Ultimate Guide to Long Exposure Photography eBook,

The post Working with Different Shutter Speeds for Landscape Photography appeared first on Digital Photography School.


Photography

via Digital Photography School https://ift.tt/29wB9CX

May 31, 2018 at 09:07AM
0 Comments

Review: Peak Design Capture Clip V3

5/31/2018

0 Comments

 
https://ift.tt/2L7JU3o

Review: Peak Design Capture Clip V3

https://ift.tt/2Lbj3TQ

0

Review: Peak Design Capture Clip V3

Published May 31, 2018 | Seth Halleran

The original Capture Clip was a darling of Kickstarter, raising nearly $15 million back in 2011. V2 debuted in 2013 and was replaced by V3 at the beginning of 2018.

First released on Kickstarter in 2011, the Peak Design Capture Clip aimed to give photographers an easier way to carry their camera. Seven years later, we now have the Capture version V3, a much sleeker and more streamlined iteration of the original product.

Key Features

  • Arca-compatible plate
  • Aluminum construction
  • Anti-slip pad on mounting surface
  • Quick release button with security lock
  • Clip fits straps up to 6.4 cm wide and 1.6 cm thick
  • System can hold up to 90 kg (200 lb)
  • Available in silver and black

Design

$69.95 gets you the Capture Clip, an Arca-compatible plate, x2 hand-drive screws, x2 4mm hex screws (not shown), a hex wrench and a microfiber pouch for storage.

V3 boasts a 'smaller, lighter and lower profile' than V2 – more specifically it's 57 g / 2 oz lighter (clip plus plate), 2.1 cm narrower, 1.2 cm shorter and 0.8 cm thinner. From a design perspective this means an accessory that looks less like a chunky piece of gear and more like an integrated piece of design affixed to your bag or strap. It is still made of all aluminum (minus some rubber bits for gripping your bag strap) and still has a smooth anodized finish like its predecessor. It is also now available in two colors; Silver and Black.

With V3, Peak Design has simplified the Capture lineup to just one product – V2 offered both the Capture Standard and CapturePro at different price points. The former had a glass-reinforced nylon back and was cheaper than the all-aluminum Pro.

Like the V2, you can still integrate a variety of add-ons to your Capture system such as the Manfrotto RC2 compatible Dual Plate or the Peak Design Lens Kit. This means you can use the Capture Clip for its base purpose but still have the option to expand its functionality well beyond just carrying a camera on your bag.

What's also nice is V3 ships with two different sets of clamping bolts, hand-driven ones and a set that are driven in using a hex key (included).

In Use

The Capture Clip, in action.

The Capture system is extremely well designed and works exactly how you would expect it to: With the plate attached to your camera, simply slide it into the clip from above. When you want to retrieve your camera, press and hold the small button on the right side while sliding your camera back upward.

The first time I attached the system to my bag, I honestly didn’t expect to love it but quickly found myself enjoying the convenience it provides. In fact, all of the following gripes I have are admittedly nit-picky stuff because frankly the Capture Clip works well.

Even with a heavy camera attached, the Capture feels very secure

Attaching the clip portion to your bag for the first time can be a bit of a hassle but the key is just to loosen it more than you think you need to. Most folks will attach it to a backpack but it can easily be attached to a messenger bag, belt or something else entirely. Once attached to something it's not hard to remove and replace. I tried it on both my Peak Design Everyday Backpack and my nearly decade old Camelbak backpack and it fit securely on both.

Even with a heavy camera attached, the Capture feels very secure. The only time I worried while using it was when pulling my backpack off my shoulders. I sometimes instinctively like to toss my bag around - not a good idea when your precious gear is connected to the front.

While writing this review, I used the Capture with 4 different cameras: a Nikon D750 w/ 50mm 1.8 (1 kg / 2.19 lb), Nikkormat FTN w/ 50mm 1.4 (1.1 kg / 2.43 lb), Bronica RF645 w/ 65mm f/4 (1.1 kg / 2.44 lb) and Hasselblad 501C w/ 80mm f/2.8 (1.47 kg / 3.25 lb). All of these felt confidently secure.

Peak Design says the Capture is rated for up to 90 kg / 200 lb so safety-wise almost anything you would put on there is a non-issue. For me personally, the Hasselblad was a bit too heavy to be comfortable. But it wasn't just the weight; I also didn’t feel comfortable with the way large cameras or those with long lenses tend to pull down, potentially jabbing into your body.

Bottom line

The Capture system not only makes it simple to carry your camera, but it means you always have a plate attached for tripod mounting.

My biggest hangup with the Capture is just getting used to having your camera on your chest (that’s where I wore it at least), but it only took me about an hour of walking around in a park to get used to it. And by later that same day – while on a different shoot – I found I was using it instinctively.

My biggest hangup with the Capture is just getting used to having your camera on your chest

Overall for the price point of $69.95 the Capture Clip V3 isn’t cheap, but it’s worth the money if you’re looking for a new approach to the way you carry your camera. And if you’re looking to add another clip to your arsenal or upgrade from a previous version, you have the option of buying just the Clip alone for the lower price of $49.95.

Peak Design continues to bring a photographers-first approach to their design with a very strong sense for what works and what doesn’t. In this writer's opinion, the new Capture Clip falls squarely in the "works" column.

What we like:

  • Very comfortable, lightweight and slim
  • Rated for up to 90 kg / 200 lbs, very secure and safe
  • Very quick learning curve and extremely easy to get used to
  • Feels great ergonomically
  • Lots of options for placement and expanding uses with other add-ons
  • Stylish, really

What we don’t:

  • Pricey
  • Gear hangs forward on chest
  • Hex screw requires you to keep the hex wrench with you


Photography News

via Articles: Digital Photography Review (dpreview.com) https://ift.tt/i0r8o5

May 31, 2018 at 08:07AM
0 Comments

Are You Traveling To Germany? Here Is A Photographers Guide To Cologne

5/31/2018

0 Comments

 
https://ift.tt/2Lcwxiy

Are You Traveling To Germany? Here Is A Photographer’s Guide To Cologne

https://ift.tt/2J3JSsN

Set on a wide sweep of the River Rhein, Cologne like many German cities was heavily bombed during World War Two. Also like may German cities a lot of the old sections were carefully and realistically rebuilt, while other areas gave birth to more post-modern looking architecture.

The end result is an eclectic looking city. Despite this, perhaps because of it, Cologne makes an interesting destination for photographers. The wide expanse of river affords excellent views for cityscapes, while the narrow streets of the old town are great for street and candid photographers.

Today we are going to take a look at what to shoot in Cologne.

Getting There

With an international airport a few kilometres from the city centre and a well served central train station, Cologne is an easy destination to reach from most parts of Europe. Budget airlines such as Wizzair serve the city from multiple locations.

From further afield direct flights into Frankfurt and a three-hour train ride will bring you to the heart of the city.

Like most German cities, Cologne is well served by local transport. Overground trains, the S-Bahn and a light railway U-Bahn allow you to get around the city easily. However, the centre of the city is compact enough to get around on foot.

Cologne Station – Excellent transport hub and photogenic too. By Jason Row Photography

The Iconic Locations

Arguably the icon of the city is Cologne Cathedral. It stands high and proud in a relatively low-level city and can be photographed from numerous locations.

Getting up close and personal some great shots can be had from Roncalliplatz to the south of the structure. This modern plaza contrasts sympathetically with the gothic spires of the cathedral. The entire cathedral is surrounded by a modern plaza and also numerous artworks which can be used as a juxtaposition to the building.

Surrounding the cathedral on the south and west is the Museum Ludwig and Kolner Philharmonie both housed in the same modern building.

Shooting from the pedestrian path beside the river gives a great contrast between the ultra modern and the ancient. From the riverbank, on both sides of the Rhein, you can shoot another of Cologne’s icons, the Hohenzollernbrucke. This is a multi-arch, multi-tracked railway bridge that spans the Rhein in front of the Cathedral. 

The riverside path is a great place to shoot the cathedral. By Jason Row Photography

Perhaps the most famous shots of Cologne are taken from the East bank of the Rhein beside the Hohenzollernbrucke and incorporating the Cathedral on the opposite bank.

The best location is on the viewing platforms to the side of the bridge and the best time to shoot is during the blue hour when both the bridge and cathedral are spectacularly lit.

The bridge itself has a wide pedestrian walkway with hundreds of thousands of love locks adorning the frame. On summer’s evening, this is a great location for shooting people and silhouettes looking back towards the cathedral.

The iconic view of Cologne is from the east bank of the Rhine. By Jason Row Photography

Back on the west bank of the Rhein, the area south of the cathedral is the restored old town of Cologne. Featuring colourful Hanseatic style architecture and pretty squares this is a great place to wander with your camera at any time of day.

Its centrepiece is the Catholic Church of St Martin, which is best shot from the pretty park on the riverbanks.

Just South of the old town is the modern Deutzer Bridge. In itself nothing spectacular but from it, you can get some excellent cityscape shots that incorporate the old town, St Martin and the Cathedral.

Dawn is a good time to shoot here as the sun rises behind you casting a soft yellow light on the pastel shades of the old town.

Dawn is a good time to shoot from Deutzer Bridge. By Jason Row Photography

Just south of Deutzer Bridge is Rheinauhafen. This is the renovated dockland area and will appeal to photographers of modern architecture where canyon like buildings provide a contrast to the architecture of the old town.

North of the city on the west bank of the Rhine is Skulpturenpark. With free admission, this pretty park is a great place to shoot modern works of art from people such as Anish Kapoor.

The modern architecture of Rheinauhafen makes an interesting contrast to the old city. Pixabay.

Further Afield, Cologne’s location makes it ideal for trips to other Rhein cities. The nearest is Dusseldorf to the north and Bonn to the south, both worth a photographic trip if you have a longer stay in Cologne. 

Like many German cities, Cologne is a heady mix of the old, the restored and the ultra-modern. While not as photogenic as nearby cities such as Paris and Amsterdam it is still a place well worth visiting as a photographer.

Cityscapes, architecture and street photographers will all enjoy what this western German city has to offer. 

The post Are You Traveling To Germany? Here Is A Photographer’s Guide To Cologne appeared first on Light Stalking.


Photography News

via Light Stalking https://ift.tt/2kwTW5i

May 31, 2018 at 08:00AM
0 Comments
<<Previous

    Categories

    All
    Bokeh Photography
    Dogs
    Film Photography
    IPhone Photography
    Photography News
    Portraits

    Archives

    November 2020
    October 2020
    September 2020
    April 2020
    January 2020
    September 2019
    August 2019
    July 2019
    June 2019
    May 2019
    April 2019
    March 2019
    February 2019
    January 2019
    December 2018
    November 2018
    October 2018
    September 2018
    August 2018
    July 2018
    June 2018
    May 2018
    April 2018
    March 2018
    February 2018
    January 2018
    December 2017
    November 2017
    October 2017
    September 2017
    August 2017
    July 2017
    June 2017
    May 2017
    April 2017
    March 2017
    February 2017

    RSS Feed

All content copyrighted (C) 2010 ~ 2020
​All Photos & Content Used Under Creative Commons
​www.RickRea.com 701-200-7831
Privacy Policy
  • Home
  • Blog
    • Social Media News
    • SEO Marketing News
    • Digital Trends News
    • Photography News
    • Mobile Marketing
    • Business News
    • Gadget News
    • Printing News
  • Contact
  • About
  • Subscribe