
|
https://ift.tt/2YDz3pn
NASA Captures Meteor Exploding Over the Bering Sea https://ift.tt/2HR0ZB4 Two things really jump out at you when you look at astrophotography. One, the amazing scale of everything and, two, how much is going on that we don’t capture. 
Image via NASA. In December 2018, a meteor exploded over the Bering Sea in central Asia. Releasing the energy equivalent of ten atomic explosions according to PetaPixel, this meteor shot up a massive fireball into that sky that NASA captured with its Terra satellite. The meteor exploded 26 kilometers, or 16 miles, above the surface of the Earth. In its wake, it left a large dark streak across the canopy of clouds which you can see in the true-color image captured by the Moderate Resolution Imaging SpectroRadiometer (MODIS). Meanwhile, the Multi-angle Imaging SpectroRadiometer, or MISR, captured a series of pictures that shows the extremely hot meteor entering the atmosphere with a streak of orange trailing behind it. As NASA explains, “The image sequence shows views from five of nine cameras on the Multi-angle Imaging SpectroRadiometer (MISR) instrument taken at 23:55 Coordinated Universal Time (UTC), a few minutes after the event. The shadow of the meteor's trail through Earth's atmosphere, cast on the cloud tops and elongated by the low sun angle, is to the northwest. The orange-tinted cloud that the fireball left behind by super-heating the air it passed through can be seen below and to the right of the GIF's center.” You can view that GIF over on NASA's website by clicking here. NASA further commented that this fireball was the largest recorded since 2013, but also noted that the phenomenon is relatively common. “The Dec. 18 fireball was the most powerful meteor to be observed since 2013; however, given its altitude and the remote area over which it occurred, the object posed no threat to anyone on the ground…Fireball events are actually fairly common.” 
Image via NASA. The post NASA Captures Meteor Exploding Over the Bering Sea appeared first on Light Stalking. Photography News via Light Stalking https://ift.tt/2kwTW5i March 31, 2019 at 11:09PM
0 Comments
https://ift.tt/2TLkU5O
Video: 'Process' shares the thoughtful, methodical work of analogue photography https://ift.tt/2OCpeDr Director Will Campbell has shared Process, a three-minute short film that dives into the passionate work of Scott Folsom, a photographer Campbell says possess 'a deep well of wisdom and knowledge when it comes to large format, analog photography and development processes.' Throughout the video, we get an abstracted behind-the-scenes look at how Folsom goes about capturing and processing his slow, methodical work. It's worth noting that despite the emphasis on large format photography in both the description and title of the film, this particular video shows Folsom is using a 612 panorama back on the rear of a 4x5 view camera. 'The modern digital camera allows us to easily shoot hundreds of frames, edit them, and upload our favorites to the internet within minutes,' says Campbell in the video's description. 'This is a very different experience to that of the large format photographer. For them the process is arduous, analog and anything but instant.' Photography News via Dpreview https://ift.tt/i0r8o5 March 31, 2019 at 05:26PM
https://ift.tt/2YCmz18
The post 5 Different Approaches to Taking Photos of Strangers appeared first on Digital Photography School. It was authored by Nils Heininger. As travel photographers, documentary photographers or photojournalists, we all share the same unique challenge: Building up a relationship with our subjects from scratch. Commercial and wedding photographers also need to create closeness to their subjects, but they usually have a foundation that connects them. Models are usually paid to cooperate. Customers of wedding photographers want good images themselves. This is a foundation on which photographers can build their relationships. Our challenge is different – we enter a new environment and have nothing but our camera and ourselves.
When we find ourselves in a special environment in a different culture and amongst strangers, we have to find strategies to approach them. A great portrait exists not only through light and composition but also the emotional connection between the photographer and photographed. If as a photographer you don’t feel comfortable shooting a situation, it influences the quality of your images negatively. Also considering moral aspects, it is always better to connect with people and be sure they appreciate (or at least tolerate) you taking their pictures. We (almost) all struggle with approaching strangers. Even Steve McCurry admitted he is often shy and feels awkward when he takes pictures. However, the good news is, there are strategies to make the best out of the situation and subsequently create more possibilities for good images. Here, I share my best strategies to get closer to people and come home with more good portraits.
1. Ask and shootThe first strategy is quite simple, yet often a challenge – just go and ask. How many times did you not have the courage to approach a stranger and ask for taking an image? And how many times did you regret it? If you are like me, then far too many. The more you approach people, the more you will realize most of them are happy to have their picure taken and might even see it as a compliment. But, what if they say no? What does it matter if they reject you? So what? There are billions of other people out there. Fear is generally one of the biggest barriers to getting good pictures. You have to overcome it. One of the best ways to do so is to go out and practice. You will be surprised how many people pose for you if you approach them the right way. Stay confident, do your thing and do it well.
The challenge with this strategy is to stay calm. When I started out, I found my images composed weakly or a little soft because I tried to get it done as quickly as possible. My hand was perhaps too shaky, and I rushed through the process without considering the right camera settings. Later, I realized it is not necessary to be in such a hurry. Yes, you should not take too much time from people. However, if you become too nervous and ruin the moment, all the time is spent for nothing. Be aware of what you do and how you do it. Stay calm and confident then you will succeed more easily. People appreciate it most if they see that you act professional and portray them in a good light.
2. Be patient and drink teaAs I find myself mostly in South Asia, drinking tea is an activity to socialize and get into contact with people. In other areas, you might replace it with coffee, maté or beer. Be mindful to the fact that taking pictures of people is not just hitting the shutter button. If it were that easy, we would not have all those amazing professionals who still stand out with their images of people. Each of these pictures involved much work behind or beside the camera. Most of the photographers who accurately capture the culture and atmosphere of a place through a local person have spent a lot of time choosing the person and building a relationship. While you can run through the streets and click away thousands of images of everyone, you may want to spend your time more efficiently. Stay calm and invest some time into building a network. Go to places where the people you want to take portraits of hang out. Socialize and take your camera out when it is time to do so.
3. Find a fixerIf you have found the right people and still could not get into contact, sometimes it is useful to find a fixer. Fixers are people who arrange access to a story for a photographer, videographer or journalist. Mostly, they belong to the area and act as a mediator between the professional and the people. Fixers can also help with translating, and they know a lot about the covered issue themselves and have an idea of what you are looking for. While fixers usually get paid in the case of professional journalism, you can also find guides, community members or other locals who can help you out. Sometimes this happens while you are drinking tea, sometimes it is enough to walk aimlessly through a street in a strange neighborhood. Find the people, who look like they could help you. Often, locals are happy to share their stories. Introduce yourself and show that you don’t mean any harm.
For example, I wanted to cover the life of a fisherman in Puri, India but I did not know anyone at the place I was visiting. When I arrived, I quickly found a boy who could introduce me to the community while I was wandering around an area where you usually do not find too many tourists. The young man asked me what I was doing, and we talked. I did not even have to find someone who connected me. The person found me within a few minutes! Even though he was not a fisherman himself, he was very helpful in giving me information about the community and connecting me to others. After a while, people got used to me. Even though the boy himself could not arrange a boat ride for me, I was able to connect to others. One morning, I finally found myself out on the sea with some fishermen.
4. Visit a festival or eventSpecial events or festivals are a great opportunity to capture the culture of a place and to get to know people. Festivals offer the opportunity to take pictures of important moments. Often, you will also be asked by people if you could send the images to them. Be helpful and share what you have. My experience is that everything you share will be paid back in multiple amounts. When I photographed the wild dances of the Dervishes at a Sufi Shrine in Pakistan, one of the performers asked me to send the images to him. As I became acquainted with him, I could stand in the first row during the next week’s event. Once connected to the people, they made sure that I could capture some great images. Often, it might be tempting to push your limits for getting the image. Always be aware of what is allowed and appreciated during certain events. Some people might not want their images captured, or you might disturb a significant moment (DSLR users will know the curse of the loud shutter noise). I have a rule of thumb for these situations – when I have an awkward feeling in my tummy or get more attention than the actual event, I’d prefer to ask someone if I should step back.
Imagine a photographer placing his camera right in front of your face before the kiss at your wedding. You cannot even see the bride properly. That would totally kill the moment. At unknown events and rituals, you have to be aware of what is going on around you. As a bad-mannered photographer, you can also ruin the name of a whole community of professionals and hobbyists. Always be kind and considerate. Others might also want to shoot wherever you have participated. If you behaved in a bad way, they may not get permission anymore. In the most extreme cases, you can even put yourself in danger if you unintendedly cross a line. Get your image but try to not focus the attention on yourself. For you, a certain event might be an opportunity for photographs. For others, it might be a very important day in their life.
5. Make a project and be open about itApproach a community and openly tell them that you want to photograph their everyday life. On the first day leave your camera at home and introduce yourself to the people. While this may be frustrating (because you will undoubtedly see opportunities you could capture), remain patient. Drink tea, talk and explain what you want to do and why. In this way, people get to know you and your intentions. You also get a better idea of what to capture and how. When I took photos in a slum, people were suspicious because NGOs go in and out taking images of poverty. I explained that I want to take images of normal life and portray them as normal human beings, which I knew they were. The results were less staged images of their everyday life, which they appreciated.
In such a project, you can even give something back to people. Print some images and hand them over to the community. You may be surprised at just how happy that makes people. Moreover, you may also find that people who did not want their photograph taken before will approach you to take their images too. It’s small gestures like these that keep you welcome in an area. Long term projects may not cover a large variety of places and people, but they can cover a deeper insight into a community and connect the audience to the subject. You don’t have to make your project too big. It all depends on your capabilities. There are many small ones which you can pursue within a week or even a day. Developing a project does not only open gates for you but also gets you out and enhances your creativity. Shooting with a concept in mind can make you feel less awkward when out on the streets. It may also help you explain to people why you would love to take their image.
In a nutshellInvest time in your photography as it is more than just hitting the shutter button. Commercial and wedding photographers need to invest time to set up a team and develop ideas for clients, and landscape photographers have to hike, look for the weather and the sun. Photographing strangers also takes some preparation, even if it is just mental preparation to get over the fear of approach. However, be patient and wait for the right moment. Do not get frustrated if you don’t get a five-star image every time. Make connections and enjoy the experience too. What are your best ways to approach strangers? Do you have similar anxieties of just talking to them? How do you get over this? Sharing troubles and advice can help us support each other. Feel free to share your story in the comments.
The post 5 Different Approaches to Taking Photos of Strangers appeared first on Digital Photography School. It was authored by Nils Heininger. Photography via Digital Photography School https://ift.tt/29wB9CX March 31, 2019 at 01:15PM
https://ift.tt/2FCLAAM
Should You Turn Noise Reduction On Or Off For Astrophotography? https://ift.tt/2JRUdg1 With the ever-increasing popularity in astrophotography, photographers are constantly on the lookout for information on getting the best night sky photograph that they possibly can. One of the settings that can be confusing for most photographers is the camera's inbuilt noise reduction. Should you turn noise reduction on or off for astrophotography? Read to find more about this setting. Night sky photography or astrophotography involves long exposures and higher iso values than normal daylight photography. As a result of these two factors, “long exposure” and high iso” there are high chances that an astrophotograph can have evident noise which can be quite an unwanted thing for anyone looking to create a neat photograph free of noise. Also taking into account some factors like the possibility of shooting the Milky Way, when you have a limited time period each year when the Milky Way is above the horizon for you to photograph, looking for the few days with clear skies in this time period when you can photograph the Milky Way, etc. it is important you do your best to get everything right in the images you are creating. Not only that, some photographers may travel miles away from their home in search of dark skies and so whatever the situation, getting your images clean without much evidence of noise is essential in astrophotography. 
Image by Benjamin Voros With the advancement in camera technologies, photographers are able to make astrophotography with cameras of almost all levels and types. These cameras come with better low light performance, allowing the photographer to shoot at higher iso values, but one of the biggest challenges faced during astrophotography is thermal and digital noise. During long exposures, the camera's sensor is exposed for a longer period of time and higher iso values are used to get the correct shutter speed without causing star trails in images (not taking into account any tracking). Exposing the sensor for long periods of time heats up the sensor causing more noise (thermal) in the form of hot pixels and using higher iso values will increase the sensitivity of the sensor also leading to more noise (digital). What is the solution to rectify this problem? Obviously, noise reduction either in camera or while post processing! Cameras These Days Come With “Noise Reduction” Features:
Long exposure noise reduction can be applied to raw files in camera whereas high iso noise reduction is only applied to jpeg files in camera. With astrophotography, the advice is to shoot only raw files. So if you are just shooting a couple of jpeg files, then you can turn on high iso noise reduction and it is better to keep it normal. Bear in mind, this can take away the sharp details from your stars. The same with long exposure noise reduction – keep it on if you are shooting a couple of jpegs.
The question is – should you turn noise reduction on or off for astrophotography. Before going into whether you should turn this feature on or off, let us quickly look at what this feature does. What Does The Long Exposure Noise Reduction Feature Do In The Camera:

Image by Patrick Untersee Here Are Some Disadvantages Of Turning On Noise Reduction For Astrophotography:
The best thing to do is, have high iso noise reduction to normal and turn off long exposure noise reduction for jpeg images. This will still consume some time while processing your images and is not recommended when you shoot star trails. For raw files, turn both “High iso noise reduction” and long exposure noise reduction” off, as you can shoot dark frames manually and remove thermal noise and digital noise can be removed while post-processing. 
Image by Denis Gažík If you are willing to wait between shots, then you can turn noise reduction on, but be warned again that sometimes the camera can render the faint stars as noise and eliminate them. Since there are some amazing applications like Lightroom, Photoshop, etc. that can perform noise reduction, it is highly recommended to shoot in raw and reduce noise while post-processing. Or, you can manually shoot the dark frames yourself by covering the lens and subtract the noise from the light frames while post-processing. This way, you do not need to shoot a dark frame after each exposure, but rather a few at the start and end of the shoot. Bear in mind that the dark frame needs to be taken at the same temperature as the light frame as the noise levels in the sensor varies with camera temperature. Another method to reduce noise in astro-photographs is to use image stacking method where you shoot a number of images at least 5 to 10 images and stack them during post-processing. The images are aligned and averaged while stacking. This way since noise is recorded in different areas in each frame, they are subtracted or eliminated in the final image. You can also use noise reduction plugins/applications like Nik DFine or Topaz DeNoise (works as a standalone application too!) for Lightroom and Photoshop. To conclude, for astrophotography, noise reduction in camera is not advisable, be it high iso or long exposure noise reduction. Do you shoot photographs of the night sky? If yes, do you use the noise reduction feature in the camera or not? Please let us know why, in the comments section below! Further Resources:
The post Should You Turn Noise Reduction On Or Off For Astrophotography? appeared first on Light Stalking. Photography News via Light Stalking https://ift.tt/2kwTW5i March 31, 2019 at 10:27AM
https://ift.tt/2UjPyaY
CP+ 2019: Zeiss interview - 'Let’s do something new' https://ift.tt/2UmYNam
Zeiss is preparing to launch its first camera for more than a decade, in the form of the ZX1 - a high-end, Android-powered compact, with a full-frame 37MP sensor and premium lens. We caught up with Senior Product Manager Elliot Shih at CP+ recently to learn more. The following interview has been edited for clarity and flow. When did the concept for this camera come about?We started about four years ago, but we have always been interested in thinking about where and when to return to the camera market, because the last time Zeiss made a camera was the Ikon film rangefinder, in around 2004. Ever since then we’ve been thinking about how and when is the tight time to return to the camera market. Also a lot has happened in the industry - as background we’re seeing higher penetration of smartphones with more capable cameras, and people are adapting to use the cameras in their phones. On the other hand we saw there is a demand among photographers for more serious photography tools. If we’re going to make a new kind of camera, it doesn’t make sense to copy something that’s already on the market The rise of the smartphone has had an impact on the point and shoot market, but there are a lot of benefits and things we can learn from such a different world. So the thought that came into my mind was - well, if we’re going to make a new kind of camera, it doesn’t make sense to copy something that’s already on the market - let’s do something new. The development of this camera wasn’t quite linear, compared to other consumer electronics products. In the beginning we went quite slowly, but now we’re at the materialization phase, and things are moving quite fast. Now every component we need is working, and we’re starting to see that this is becoming a camera that could work quite well.
This is not the first time that someone has loaded a mobile operating system into a camera - what makes the ZX1 different?With regard to earlier products, I think the mobile platform itself, as a technology enabler, is capable of also being the backbone for an imaging system. The fundamental difference is that instead of trying to make a smartphone in the form of a camera, we’ve tried to make the ZX1 work as a camera, and be positioned as a camera, and as a tool for photography. So, for example, when you first turn it on you should see the live view, not the launcher screen with all its icons. It should be a camera from inside out. That’s why we took open-source android and used it as a technology enabler, but in terms of interaction and user experience, we completely wrote everything and developed everything from scratch by ourselves. Read about what the Zeiss ZX1 is like to operate The camera operates using what we call a ‘vertical logic’. You’ll see there’s a slight bend on the rear cover glass, which provides a natural separation between the live view area and the toolbar area, to the right. You can [vertically] swipe on the toolbar area to select different tools, while on the left you can swipe to switch between different modes, like image review, where you can use all the familiar gestures you’re used to from smartphones. What are your goals for the camera, in the marketplace?As you can see, the ZX1 is a different kind of product. We’re focused on addressing the target group, and offering something different to today’s digital photographers. So we’re aiming at photographers that need a fast workflow but at the same time superb image quality, which our sensor and lens can deliver. This is our first attempt, and most of the focus is to build up our competence in terms of image processing. We’re still on the learning curve, for example when it comes to the autofocus system and the image processing pipeline. For a 37.4MP sensor its more than 70MB for each DNG file, so we have a lot of data to handle. Have you partnered with any other companies on the ZX1 or is this an entirely in-house project?The design and development are completely in-house. We’re using some external partners to support certain functions, for example the realization of the industrial design, and the design of the user experience.
Previous attempts at this kind of product failed for a lot of reasons - how have you addressed the weaknesses of those earlier cameras?Well first let’s talk about optimization around Android. There’s a fundamental difference to how this system works compared to a proprietary system [that you might find in a smartphone]. There’s a different architecture and we made a lot of effort to take out some of the elements of Android that we didn’t need. Most of the algorithms are designed for smartphone usage and not all of those are capable of running inside a device with a larger camera sensor, and much more information to handle in the imaging pipeline. That's the part that we've spent substantial effort on, to optimize in order to make the camera more responsive. We also made a lot of effort also to maintain Wi-Fi performance. There is a lot of data to transfer with this camera, so if we want the feature to be really functional we have to make sure that the Wi-Fi performance doesn’t struggle. That's why we have a plastic cover above the Wi-Fi antenna on the [metal] top plate. We’re very conscious of battery consumption [and] a lot of photographers are very sensitive about battery usage In terms of boot up time, the ZX1 works the same way as a smartphone. But we’re very conscious of battery consumption. A lot of photographers are very sensitive about battery usage so a lot of the time when they’re not shooting they simply turn the camera off. The very first boot up sequence takes a while, but when the camera is up and running, a single push of the dial sleeps the camera, but doesn’t turn it off. So the sensor is not running, the screen is off, and very little power is being used. But when you want to take a picture you just nudge the switch again and it wakes up. You can also use the switch to toggle between stills and movie mode. What kind of battery drain should people expect when the camera is in sleep mode?I think in sleep mode, during a whole day you can expect something like 10% battery drain. We do have a large battery in the camera, it’s 3190mAh, which is very substantial. In this camera a fully charged battery should last about 250 shots. Is that a CIPA figure?No, but we’d expect that to be accurate by CIPA test standards. Do you have an idea yet of how much the ZX1 will cost?Pricing is not yet decided but I think given the performance of the lens and the sensor, plus the solid build of the body and the built-in 500GB SSD, I think it will occupy a more premium price band. It will be in the same range as [the Leica Q, Sony RX1R II]. What was the logic behind deciding to give the ZX1 aperture, shutter speed and ISO dials but no exposure compensation dial?That’s one of the most frequent questions we’ve been getting. One thing we learned is that photographers are more and more conscious of stripping away features that they don’t need. So we wanted to keep the purity of the design, while still making sure this is a serious photography tool. One of the things that characterizes serious cameras are dials which provide the opportunity to control exposure directly. So we decided OK, we’ll keep the three - shutter speed, aperture and ISO as the only hardware controls. Everything else is built into the digital interface. If a photographer is manually controlling shutter speed and aperture, then the only way they have of further affecting exposure is ISO. So they can use the ISO dial as exposure compensation, effectively. Does this camera use a leaf shutter?Yes, it’s mechanically controlled up to 1/1000, and electronic will let you go to higher shutter speeds, using the toolbar [on the rear screen].
You really seem to want photographers to do everything on the camera itself - shooting, reviewing, editing and uploading. Is that correct?For this concept, yes. A photographer might still carry a more capable DSLR for an assignment, but when they are going out for a weekend trip, this is one camera that you can do everything with. Maybe it doesn’t always make sense to connect the camera to your phone using a hotspot and try to synchronize let’s say 300 Raw files on the road, but let’s give people the choice. We’ve spoken to a lot of photojournalists and they told us that sometimes they just have to rely on what they have. Sometimes they only have a phone, and with this camera they can bring everything they need. What’s the quickest way of getting images off the ZX1 to a computer or to a harddrive?In terms of transfer speed, the fastest way is the USB-C connection. With a speed of 5GB/s you’ll be able to export pictures pretty fast. What’s a bit different is that because we’re using Android, the system works like a mini computer, so we can use both master and slave mode for the USB connection. Whereas other cameras, when you connect over USB, the camera is seen as a drive: it’s in slave mode. But with the ZX1 if you plug in a USB C drive or a memory stick the camera recognizes the storage and you can select the images you want to transfer straight from the camera. The USB C connector is the only interface, so to connect to a TV, or plug in a microphone for example you’d need adapters. Can users download their own apps or extensions to the ZX1?At the moment, no. For security reasons its a closed system. We will only support selected applications that we’re working on with partners like Adobe. Editors' note: Barnaby BrittonWell; it's real, and it works. The Zeiss ZX1 is a fascinating camera, and even from our brief time with a prototype model I'd be fairly confident in saying it's the most convincing Android-powered camera we've seen yet. Of course it's also likely to be the most expensive, by far. If Mr Shih's estimate of a price comparable with full-frame compacts from Sony and Leica turns out to be true, you can expect the ZX1 to cost somewhere in the region of (at least) $4,000, which unlike Samsung's Galaxy Cameras, will put it well outside of the impulse-buy range for most photographers. But that's the future. For now, the ZX1 looks really nice. We don't know how well the sensor or lens will perform, but it's a safe bet that image quality will far exceed the abilities of even the best smartphones and likely also popular sub full-frame compact cameras such as Fujifilm's X100-Series and Ricoh's GR line. It will also work differently - very differently - to those cameras, thanks to its integrated Android operating system, which essentially makes the camera into a mini computer. Do you need half a terabyte of built-in storage? Probably not, most of the time, but assuming you can keep the battery charged, this kind of storage capacity could be appealing to photographers working remotely or on long assignments away from home. In some areas of the world, where cellphones provide the only reliable access to the Web, the ZX1 might end up being right in its element.
If you're interested in the ZX1 solely as a camera, and you don't need the ability to run processing apps, you'll have a harder decision to make. The ZX1 definitely presents an unusual handling experience, but it's not completely alien. The decision to omit an exposure compensation dial strikes us as a bit odd, but Mr Shih is correct to note that for manual exposure work, the ISO dial does just as well. For A / S-priority shooters things might be a bit confusing at first, but the ZX1 is likely to be perfectly usable, notwithstanding a moderate learning curve. When the ZX1 was first announced, a lot of commenters dismissed it preemptively as 'vaporware' - a flashy distraction that would never make it to market. It seems that the naysayers were wrong (it's nice when that happens, isn't it?) but whether the ZX1 will be a success - or lead to more Zeiss camera development in future - remains to be seen. In one sense, given how long it's been since the company last made a camera, it could be said that Zeiss has nothing to lose. But in real terms, the ZX1 represents a substantial R&D investment, and one which Zeiss will be keen to recoup. For now, Mr Shih and his team deserve credit for doing something bold and unusual. Photography News via Dpreview https://ift.tt/i0r8o5 March 31, 2019 at 09:03AM MIOPS Mobile RemotePlus Review Taking Control of Your Camera in Ways a Cable Release Never Can3/31/2019
https://ift.tt/2COojeq
The post MIOPS Mobile RemotePlus Review – Taking Control of Your Camera in Ways a Cable Release Never Can appeared first on Digital Photography School. It was authored by Peter West Carey. MIOPS Mobile RemotePlus is a handy device and app to help you take control of your camera in ways a simple cable release never can. Sleek and stylish, the unit sits on your camera’s hot shoe and can provide a variety of functions through the easy to configure app for iPhones or Android phones.
What is it?The MIOPS Mobile RemotePlus has three main components:
The app works with the unit via Bluetooth, sending and receiving information constantly while in use. It is important to note that the unit can continue on its own, after being sent a command, if you close the app or you lose connection. So if you start a 500 image time-lapse, you can effectively let the unit continue working without babysitting it. The RemotePlus will set your shutter speed for the various modes explained below, but you will still be in charge of ISO, Aperture, White Balance and any other setting you choose. Some RemotePlus modes work better with Manual mode on your camera while others, such as the Long Exposure Timelapse, will need Bulb mode. Getting StartedAfter unpacking the RemotePlus, you’ll need to connect it to your camera’s remote port. This process is different for each camera. Hook the other end of the cable into the side port on the RemotePlus, which has both a receptacle to attach to a camera hot shoe and a standard tripod threaded hole.
The app can be downloaded from either Google Play or Apple Store. The app has a demonstration mode if you want to download it before you buy the unit to see how easy it is to use. You will need to register your device with MIOPS if you want to upgrade your firmware. After signing on, you will see a screen like this one:
Choosing the MobileRemote and the app will scan for nearby remotes:
Clicking on the only unit available brings up a full menu of options:
Whoa now! There’s a lot there to parse through, so let’s take them bit by bit. What can it do?Cable Release Modes – 6 VarietiesLet’s start with the basics. While connected to your camera and smartphone, the RemotePlus functions as a shutter release for your camera in six modes: Cable Release
This mode is straightforward and perfect for those who don’t want to stand with their camera while taking a photo. Pressing the large button on the screen (see below) will trigger the shutter in whatever mode you have set on the camera. For instance, this mode is great for sitting at a campfire while your camera is set to take photos nearby.
Press & Hold
Press & Hold take things up a notch and is perfect to use when you are waiting for some action. It’s the same as pressing and holding the shutter release on your camera in Bulb mode. The longer you press, the longer the exposure. Results will vary with duration and here is one simple example of eight seconds on a freeway overpass.
Press & Lock
Don’t want to bother holding the button on your screen while waiting? Press & Lock is where it’s at. Same as above, but now you have to tap the main button on the screen a second time to stop the exposure. There is a timer shown at the bottom of the screen for your convenience.
Timed Release
Going one step further, if you know you want a 10-minute exposure, Timed Release is the correct mode for you. Just enter in the appropriate shutter release time on the screen, set your camera to Bulb mode while adjusting the ISO and Aperture to your liking. Once you press start, it’s all taken care of for you.
On the display are places for hours, minutes, seconds and decimals of a second. In this example, I chose 12 seconds for another overpass shot.
Self Timer and Timed Release & Self Timer
The Self Timer mode is just like the self-timer on your camera, but you can set the delay, up to 99 hours in the future. Lastly, the Timed Release & Self Timer combines the last two sections to allow for a delay and then a long exposure. In each of these modes the command is sent from the app and then stored in the unit, so you don’t need to be present or within range for the unit to take action. Timelapse – 4 Main VarietiesWhile the RemotePlus will not create the final video file for you, it will greatly simplify your ability to create fun and unique timelapses in a few different modes. More information on compiling the timelapse can be found here on DPS. Basic Timelapse
The Basic Timelapse mode will take care of all your simple timelapse needs. It’s there for you to point, focus, and create with ease.
On the first screen you set the interval between photos, and on the second, you set the number of photos you want to take. It’s that easy! Press Start and away your camera goes.
The two screenshots above show the app screen while the camera shoots. The circle around the interval counts down until the next shot, while the current frame and remaining time display on the bottom. Up top are the overall settings. The app has a nice feature to help reduce accidental stops; you have to press the lock button before you can click on STOP. It’s possible to still stop the app on accident, but the extra step helps. It’s up to you to set your camera on your preferred mode. Manual Mode with the White Balance set often gives the best results for consistent image quality. Long Exposure Timelapse
Long Exposure Timelapse is where things become more complex but also more exciting as far as the results. Here you will again set the interval between shots and the number of shots, but you will also set your camera to Bulb mode and set the shutter speed in the app.
After pressing Start the screen will change, as with the Basic Timelapse, but now two countdown circles will appear.
These circles will show you the amount of time left in each interval and exposure. You can use the Long Exposure Timelapse for a variety of subjects. Below are two examples I shot of the same subject, but with slightly different settings for varied effects. The first had settings of ISO 100, f/7.1 and 1/100th (Standard Timelapse Mode) while the second had settings of ISO 100, f/22 and 1/5th (Long Exposure Timelapse Mode). The difference is apparent in how blurred motion from the cars can impart more motion. Here are three more tests at 1/10th second shutter speed, .6 seconds and 1.2 seconds. All timing set from the app in Bulb Mode. Bulb Ramping Timelapse
Bulb ramping is a manner of shooting while the lighting changes. This is most often performed at sunrise or sunset and can cover an extended period, such as an hour. While the camera is in Bulb Mode, the shutter speed is gradually adjusted to keep the overall exposure consistent, so the timelapse does not change from very dark to very bright.
It’s important here to understand some limits and to plan for them with this mode. Most cameras are limited to 1/30th of a second in Bulb mode with a cable release. Check with your owner’s manual to see what limits Bulb Mode and using a cable release may put on your photography. This mode also requires planning ahead to know – or at least make a good guess – which exposure settings to use at the start and end of the ramp. The ramp is linear in its progression, so you will need to choose a time of gradually increasing or decreasing light. If the sun suddenly shines brightly on your scene once above the horizon, but then ducks behind some clouds, the effect might be rather jolting. To use this mode: The Bulb Ramping mode has four settings. The first is the interval between shots. The example below shows 30 seconds.
The second screen sets the shutter speed of the first image. Because I am using a Canon, I set it to 1/30th of a second above (the fastest Bulb will handle, even though the screen shows a decimal of .01, or 1/100th of a second). The next screen is the final shutter speed. This is where math, planning and scouting help. You will need to calculate how long you want your bulb ramp to run, from start to finish, and know what the lighting will be at the start and finish. In this case, I picked 20 seconds for an end shutter speed (left, below).
The last screen asks for the number of frames to shoot. Here, it will shoot 60 frames, one every 30 seconds. That will make for a total time of 30 minutes from start to finish. It’s important to plan ahead to make sure these shutter speeds will work for the given lighting. While you can adjust aperture and ISO to help compensate, if the end time of your timelapse is too long, your images will become blown out. Too short and you’ll be left in the dark. Planning is crucial to this mode. HDR Timelapse
An HDR Timelapse is the same as a normal timelapse, but the mode does all the shooting for you if your camera doesn’t have this ability built in. It can shoot a sequence of 3, 5 or 7 shots, for each step of the timelapse, but it does have the limitation mentioned in Bulb Ramping above; that you can not shoot faster than 1/30th of a second on most cameras. This does limit its abilities.
The brackets are set around a central time setting, such as one second (in the example below). Below that the exposure shift, in terms of EVs, is set, followed by the number of frames. The unit will keep you in check if you pick settings that won’t work with Bulb mode, such as choosing 1/15th of a second, seven frames and 2-stops of EV shift in each image. Lastly, set the Interval between shots and the number of frames. If you don’t know the number of frames you want to shoot, simply pick the infinity setting and stop the sequence when you have enough. More information on using bracketing can be found in this DPS article. Road Lapse, A Special Kind Of Timelapse
Road Lapse is a fun tool to use, not only while driving but also on a train, boat, hot air balloon or anywhere else you have a GPS signal. The app uses that signal then asks you how often you want to take a photo, be it in feet or meters. You also set the number of photos or just set it to infinity which allows you to stop the Road Lapse when you are finished.
What’s different about this mode as compared to a standard timelapse is there is no perceived slowing and speeding, such as when a car comes to a stop sign. Because the mode is distance-based, a rough calculation can be made with regard to timelapse length when the driving distance is known. For instance, one mile is 5280ft. If you set the device to shoot every 40ft, that will net you 132 images. At 30 frames-per-second, the timelapse would turn out to be 4.4 seconds long. It won’t matter if it takes you 60 seconds or 15 minutes to travel that distance, the video will be the same length. It does make things appear sped up. In the examples below, the first shows a regular timelapse in a car at night. The second video shows the Road Lapse. In the second video I stopped at four different stoplights, but you don’t even notice them. I think each mode has its strengths and weaknesses and it matters what you want to create. For a unique test, I set my camera up on a Washington State Ferry, shooting off the back with the distance set to 40ft. HDR Bracketing
HDR shooting uses the same functionality as mentioned above with HDR Timelapse. You can take a series of shots, offset by specific stops and then combine them in the computer later for an image with more dynamic range than a single image. It has the same limitations mentioned above. Sound
The Sound Mode is triggered by sound and you can choose the threshold via the app.
You will set your camera’s exposure either on Manual or another mode of your choice and leave shutter release up to the MIOPS trigger. I made some attempts at dropping (fake) ice into a glass to catch the splash. You can stop any action that makes a loud enough noise in motion with this mode.
The mode can be set to take just one photo or continuous photos until the sound drops below the threshold. You can also input a delay. Activation of the shutter will happen from 10 milliseconds to 99 hours. A better example can be seen in Erik Lindegren’s photo, highlighted on Miops’ Instagram feed.
Vibration
Like Sound, Vibration relies on your phone to trigger the unit. And like Sound, you can set the sensitivity so small bumps won’t set off the unit, but large ones will.
Again, a delay can be set and continuous shooting can also be chosen. Lightning
Most lightning photos in the past were taken by leaving the shutter open for a length of time, maybe 30 seconds. The overall exposure was balanced for this and fingers were crossed, hoping for great bolts. The problem with this method is shots during the day were difficult with long exposures without the use of a neutral density filter. Even then, a vast multitude of images had to be taken, and the frame had to be clear of other moving objects (trees, for instance) or they could blur. The Lightning trigger simplifies capturing images and can offer better exposures of daylight and dusk images. Your camera will need to be in Manual Mode where you can set the shutter speed, aperture, and ISO to your liking. Compose the shot with anticipation of where the lightning will strike. You will set the sensitivity, and that’s it. A higher sensitivity number means any small flash will trigger the unit, while a lower number means much more light (larger bolts) is needed.
Then press the “Go” button and sit back to enjoy the show while your camera does all the work. As luck would have it, a thunderstorm rolled by in the distance while I had the unit for testing. The lightning was about 10-12 miles away, and I ended up using a 10-22mm lens, with some cropping for the final images. All images shot at ISO 800, f/5, 1.3 second and 22mm.
TIP: If you are curious about where the lightning is striking and which way a storm is moving, check out Blitzortung.org for real-time updates. While watching this storm, I found the delay from the time of strike to it showing up on the map was about 5 seconds. Often the map would update before the thunder made it to me. Motion
Switching to Motion requires the use of your phone as the ultimate trigger. You can make the settings for your camera manually, or in any mode you desire, while the shutter will trigger when the view from your phone’s camera notices motion. The advantage here is that the phone can be set up remotely from the camera (within Bluetooth range, however) and made to cover a specific area. In this example, I set my camera on a tripod with a long lens to capture birds coming to my bird feeder. I prefocused on the feeder and then moved the field of view just off to the side. I then switched to manual focus to lock focus. I set the camera with a fast shutter speed and the ISO with a shallow aperture so I could capture the fast movement of the birds (ISO 1250, f/7.1, 1/1250th). I then set up my phone with an adjustable, gripping tripod, on top of the feeder, looking down. The field of view of the phone would cover the side of the feeder, where my camera was focused.
That’s the view on the phone screen while setting up the shot. As you can see, much like other modes, you can set a delay after the app notices movement (handy if you put the phone somewhere on the approach to your camera) and the number of frames the camera will snap each time. Below the screen is the Accuracy Rating. Moving it left means any little movement will set off the unit while moving it right requires a lot of movement before triggering. The results, as you can see, were easy to capture while I sat inside enjoying the action.
If the rains hadn’t started, I would have captured more. While I could have taken the shots above manually, more birds showed up when I went inside and let the camera do its thing. For skittish subjects, the RemotePlus is a definite benefit. You can use Motion in this manner for any number of moving subjects where their path is predictable. It will be a drain on your phone’s battery, though, as the camera and screen are on the whole time. Laser
The Laser trigger mode is handy if you have a laser and expect the beam to be broken at a precise location. You will need a laser source, but just about any constant-on laser can be used, such as a presentation pointer or even a laser level. Point the laser at the sensor on the front of the RemotePlus, and set your camera’s focus and mode accordingly. It’s similar to the motion feature above, but a bit more specialized for more precision.
ConclusionThis review was harder than I believed it would be because of the number of features packed into the small unit. Also, during the review, I had access to MIOPS staff for questions and found them not only responsive to feedback but updating the app as I wrote. In a company and product, I like to see that nimbleness and desire to improve. After the testing I put the Miops Mobile RemotePlus through, I would purchase one for my own photography. While it had some room for improvement (the manual sometimes lags behind the quick pace of upgrades, and the Motion feature does have a limit when it comes to Bluetooth connectivity, but that is inherent in the protocol.), I do enjoy updates of the unit, both software and firmware, regularly. The two big plusses for me are the timelapse features (including the HDR one in specific cases) which add timing capabilities that my current Canon intervalometer lacks, and the lightning shooting, especially for daytime shots.
Disclaimer: MIOPS is a paid partner of dPS The post MIOPS Mobile RemotePlus Review – Taking Control of Your Camera in Ways a Cable Release Never Can appeared first on Digital Photography School. It was authored by Peter West Carey. Photography via Digital Photography School https://ift.tt/29wB9CX March 31, 2019 at 08:05AM
https://ift.tt/2Ufsf1W
Why Creating Your Own Photographic Style Matters https://ift.tt/2I0LRjP Beyond making authors' work recognizable, a photographic style is one of the most valuable assets any photographer can build. From a very personal standpoint, I think of style as a whole world which can be seen from a diverse range of perspectives. As a photography educator, it is beautiful to see how style starts to develop in my students. From the curatorial side of the game, it is extremely satisfying to see a photograph and say “that shot looks somewhat familiar, it reminds me of…” and yup, the name that I'm thinking of is sometimes the correct one. And from the shooting side of the scope, style is a never-ending query. Style is equally revered and feared by many new and not-so-new photographers. It is hard to build, and there is no exact recipe for achieving it either, but today I'll be sharing some insightful thoughts about style that will hopefully make it easier for you. Style Isn't Achieved Immediately
Photograph by Federico Alegría We live in times reigned and dominated by immediacy, therefore being patient about something is more difficult nowadays. You do have to keep this in mind because you won't develop a style in just a few days (or even months). Building a consistent style takes years, and has more to do with the quality of the content we consume rather than showcasing our work. This doesn't apply to every photographer of course, but for many, this will sound very familiar. One starts in photography by picking up a camera and discovering how it can register things and scenes that are in front of our eyes in a slightly different way we actually see. Bokeh amazes us, and we point our cameras pretty much at anything (especially flowers and door knobs, don't know why, but it does happen like that in the majority of cases). Style will start to bloom with time after a sufficient amount of practice. It Is A Heterogeneous AmalgamAnd speaking of the quality of content consumption, let's talk a bit about aesthetics. The easiest way I have found for understanding the philosophical concept of “aesthetic” is by seeing it as the “ability” certain objects have to trigger our senses. There is no right or wrong here, as long as the content you consume is able to produce a great deal of pleasure in your mind, then it is good for you. In practical terms, content is made of pretty much anything, from movies to music, or paintings to sculptures, to even reading and of course seeing others' photographs. Everything your mind processes has the potential of adding up to your own and unique style, so don't feel bad for not coming up with something pure and unique. You'll be producing photographs with a small compass in your head guided by taste and knowledge. Your Heroes Have/Had Heroes
Photograph by Federico Alegría We tend to look at the past and current great photographers almost as a divine. But we need to understand that they too looked back and even admired other photographers and painters (and more) work. It is no secret that Henri Cartier-Bresson wanted to be a painter at first, and after seeing this photograph by Martin Munkácsi he got inspired to learning more about photography. It is nice when we can lower the pedestals and see great photographers as more humanized and close-to-the-people figures. Even a lot of the photos that history has legitimized as iconic weren't produced as isolated images as we can see in many contact sheets managed by photo editors along the way. This whole idea came up to me after watching this excerpt from a The Simpsons episode in which Homer had become obsessed with Thomas A. Edison and wanted to become an inventor himself. Now let's talk about some characteristics of style in photography: Style is Apex-lessYou won't reach a summit when it comes to your photographic style, there will always be room for improvement and learning. You could even get bored with a genre and start the challenge of mastering another one, but that doesn't mean that you'll reach a summit. We can only progress and evolve, but we'll never finish molding our style. Style Can't be TaughtSome time ago Annie Leibovitz launched a master class and many of the people that enrolled turned out to be highly disappointed because they thought she would teach people how to take photos exactly like she does. I'm pretty sure not even she herself is able to define how her art is achieved. It is just a matter of style, and it can't be learned or taught; style is just the result of introspection. Style is Easier for Third Parties to Recognize itIt is easier for a third party to define a specific photographer's style rather than doing it as an author. In relation to our own style, it will be hard to define for ourselves because we will always be trying to improve, but the great thing is that it is recognizable to the eyes of the others. So, Why is it Important?
Photograph by Federico Alegría Having a solid photographic style is important, and the main reason why is because it is the ultimate plausible evidence that our images and our work as photographers have a special value that deserves to be recognized by others. Otherwise, it is just like producing things from impulse and with no special meaning beyond encouraging our own ego without even a solid base to keep it steady. Achieving a style is something to strive for, for us creatives; being sure that the images we are producing have at least a considerable amount of meaning and concept makes the act of taking pictures a more meaningful discipline to develop in our lives. If you ask me if I know how to describe my own photographic style, I will have to say “no”. But I do know that I enjoy capturing street photos that include isolated subjects with generous contexts, somewhat deep depths of field and bi-dimensional compositions when possible. But I'm not sure if that counts sufficiently as style. And even though when people have told me that my photos can be recognized, I'm still not sure how they can do that. Further Reading
The post Why Creating Your Own Photographic Style Matters appeared first on Light Stalking. Photography News via Light Stalking https://ift.tt/2kwTW5i March 31, 2019 at 07:09AM
https://ift.tt/2V5xDSz
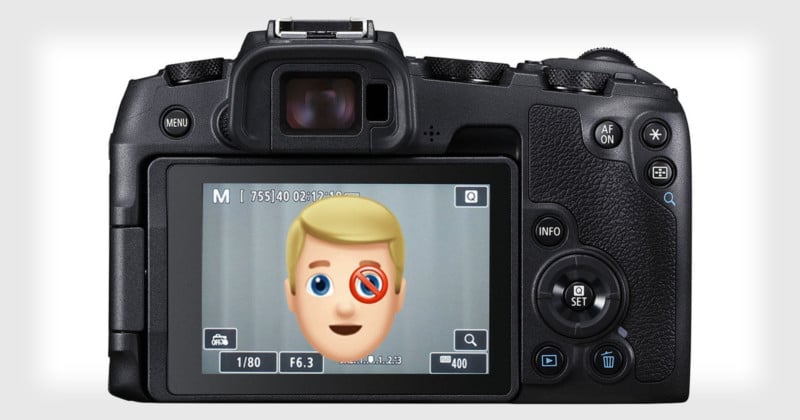
Canon’s Left Eye Problem is Frustrating Users with Mirrorless Camera Design https://ift.tt/2UmKJxq Just as much of daily life is geared towards right-handed people, cameras are often geared toward right-eyed people. Photographer Michael Andrew (AKA Michael the Maven) made this 4-minute video pointing out Canon’s “left eye problem” in its latest mirrorless cameras. Andrew focuses on the design, UI, and ergonomics of the new Canon EOS RP. Canon has taken away the joystick and has moved the selection of focus points to the touchscreen — photographers can select where they’d like to focus by touching the rear touchscreen while looking through the electronic viewfinder. The problem, however, is that left-eyed shooters will have their noses covering up the right side of the touchscreen, blocking it from being accessed with the right thumb. Focus selection can be moved to the left side of the touchscreen, but then the user is forced to choose between supporting their lens with the left or using their left thumb to touch the screen. There’s an alternative — customizing the directional pad for AF selection — but the ergonomics of that isn’t great either. In a poll he conducted among his audience, Andrew found that over 1/3 of respondents are left-eye shooters, so this is a usability issue that affects a significant percentage of photographers.
“If you’re changing your focusing squares around a lot, it’s almost a dealbreaker,” Andrew says. “I just want to make Canon and left-eyed users aware: we need a joystick. You should do a cost-benefit analysis of having that joystick in the natural resting thumb position so left-eyed shooters can have an option to move those around.” Aside from this “left eye problem,” however, Andrew says he really likes the EOS RP overall and considers it a great camera. (via Michael the Maven via Shutterbug) Photography News via PetaPixel https://petapixel.com March 30, 2019 at 12:28PM
https://player.vimeo.com/video/315269363?color=a5d2ff
A Timelapse of the Aurora Australis and Milky Way Over the South Pole https://ift.tt/2U2J3tA German timelapse photographer Martin Heck of Timestorm Films released this gorgeous 6-minute short film that showcases the beauty of the southern lights (AKA aurora australis) over the South Pole. “The South Pole is one of the coldest, driest and harshest places on earth,” Heck writes. “The Aurora Australis can be seen together with the core of the Milky Way only here in Antarctica.” Robert Schwarz, the CMB-Observatory (Cosmic Microwave Background) operator and technician at the Amundsen–Scott South Pole Station, shot the photos using Canon 6D and 5D Mark III DSLRs. He braved nighttime temperatures of -70°C/-95°F, and special equipment had to be built to keep the cameras running for the long hours of shooting. Heck handled the post-production in Adobe Lightroom, After Effects, DaVinci Resolve, and LRTimelapse. You can find more of Heck’s work on his website, Facebook, Twitter, and Instagram. Photography News via PetaPixel https://petapixel.com March 30, 2019 at 11:54AM
https://ift.tt/2OyHEoI
Kim Jong-un allegedly fires personal photographer over 'damage to Supreme Dignity' https://ift.tt/2FCPGc9
North Korea's Supreme Leader Kim Jong-un reportedly 'purged' his personal photographer, referred to only as 'Ri,' after he violated two rules related to photographing the dictator and briefly blocked a crowd's view of him. In addition to being fired from his role as photographer, Ri was allegedly banned from the Workers' Party of Korea. News of the event first surfaced from Daily NK, a Seoul-based news website from Unification Media Group. The report claims Ri was punished for causing damage to Kim Jong-un's 'Supreme Dignity' while photographing him on March 10 in the No. 10 election district. In addition to blocking his neck from view with a camera flash, Ri allegedly violated two rules that barred photographers from capturing images and video directly in front of and within 2m / 6.5ft of Kim. The Korean Art Film Studio under which Ri had worked (and from which he was subsequently fired) edited the video to delete the scene featuring Ri and the 'damages' it caused to Kim's 'Supreme Dignity.' Photography News via Dpreview https://ift.tt/i0r8o5 March 30, 2019 at 11:48AM |
Categories
All
Archives
November 2020
|


 RSS Feed
