
|
https://ift.tt/33hstJD
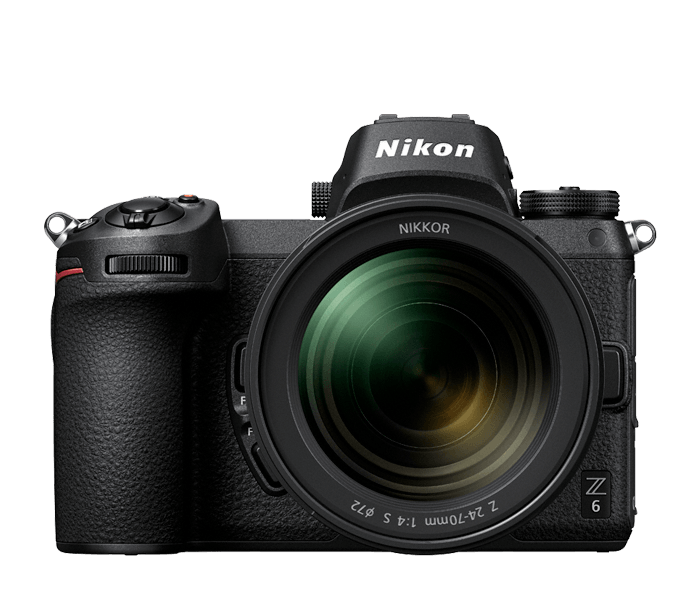
Nikon Revealing the Z6 II and Z7 II on October 14th https://ift.tt/3n3erTD Nikon has two new cameras coming this October and we’re finally getting confirmation of what was basically just a set of rumors a couple of weeks back. The full-frame mirrorless Nikon Z6 II and Z7 II will arrive on October 14 and, as PetaPixel reports, the two models are expected to basically be “incremental” updates over the current models. That said, we do have some idea of what kinds of features to expect. Nikon Rumors has found that the new Z6 II and Z7 II will have one CFexpress and one SD card slot and improved autofocus for face, eye, and animal detection. We’ve also got dual EXPEED processors, better max frame rates, larger buffer, and 4K/60p video. The website dedicated to everything Nikon also reported that the Z6 II will be the last camera to use the 24MP sensor from Sony. That’s not really much of a shocker to anyone that has paid attention to the camera market of late. So far we don’t have any idea on what kind of pricing these models are looking at but best estimates place them within the ballpark of current models and within range of competing cameras. Of course, we won’t have to wait for very long to find out what’s going on with these two cameras as the October reveal date is just around the corner. One thing is sure, even though COVID-19 has slowed down the industry considerably this year, it doesn’t seem to have put a dent into the product reveal schedule. Are you excited about the Nikon Z6 II and Z7 II? Let us know your thoughts on this in the comments section below if you like. Be sure to check out our other photography news on Light Stalking by clicking this link right here. Photography News via Light Stalking https://ift.tt/2kwTW5i September 30, 2020 at 08:04PM
0 Comments
https://ift.tt/2G4LlTr
Color labels in Lightroom Classic can serve a variety of purposes. Most importantly, I think of them in terms of what aspects of my photography would be helpful to me to represent visually. Each of us would answer that question based on our own photography and how we think about our photo libraries, and there is no one right answer. In addition to our photos, recent updates have given us the ability to apply color labels to folders and collections too, so I thought it would be worth exploring how we can make the most of those colorful labels. 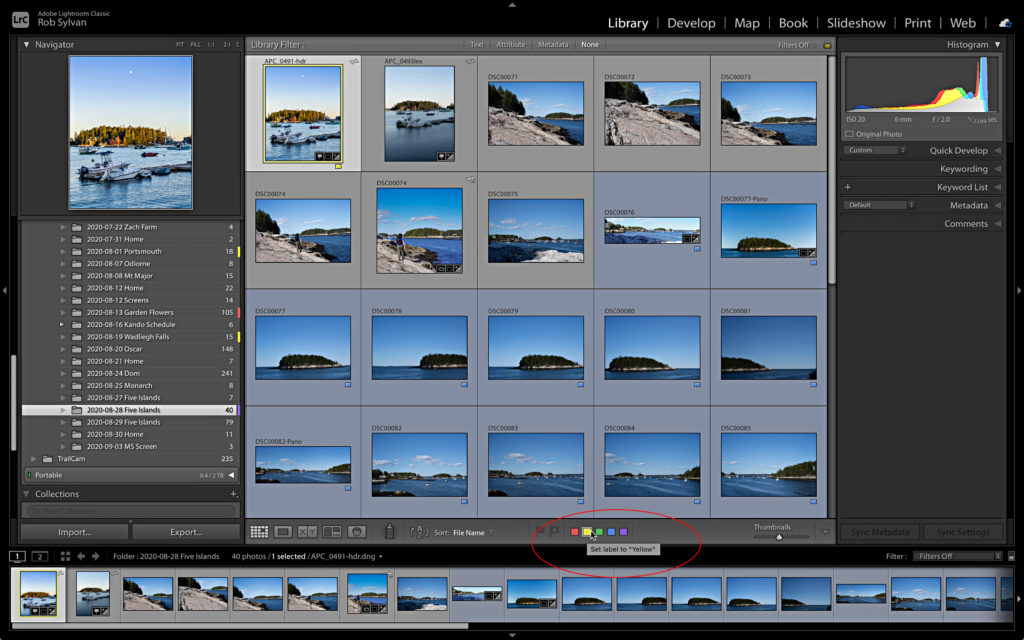
What is a Color Label?Color labels applied to photos are slightly different than the color labels we can apply to folders and collections. The colors are all the same (red, yellow, green, blue, and purple), but color labels applied to photos have both a visual color we can see around the thumbnail and an associated metadata tag that is also applied to the photo’s metadata space (color labels applied to folders and collections do not do this). It may seem like a distinction without a difference, but the difference could be useful to some. If you go to Metadata > Color Label Set, you will see that there are three different color label sets to choose from—Bridge Default, Lightroom Default, and Review Status. Lightroom Default will be checked (by default). There is also an Edit option at the bottom. If you click on Edit it will open the Edit Color Label Set dialog box. 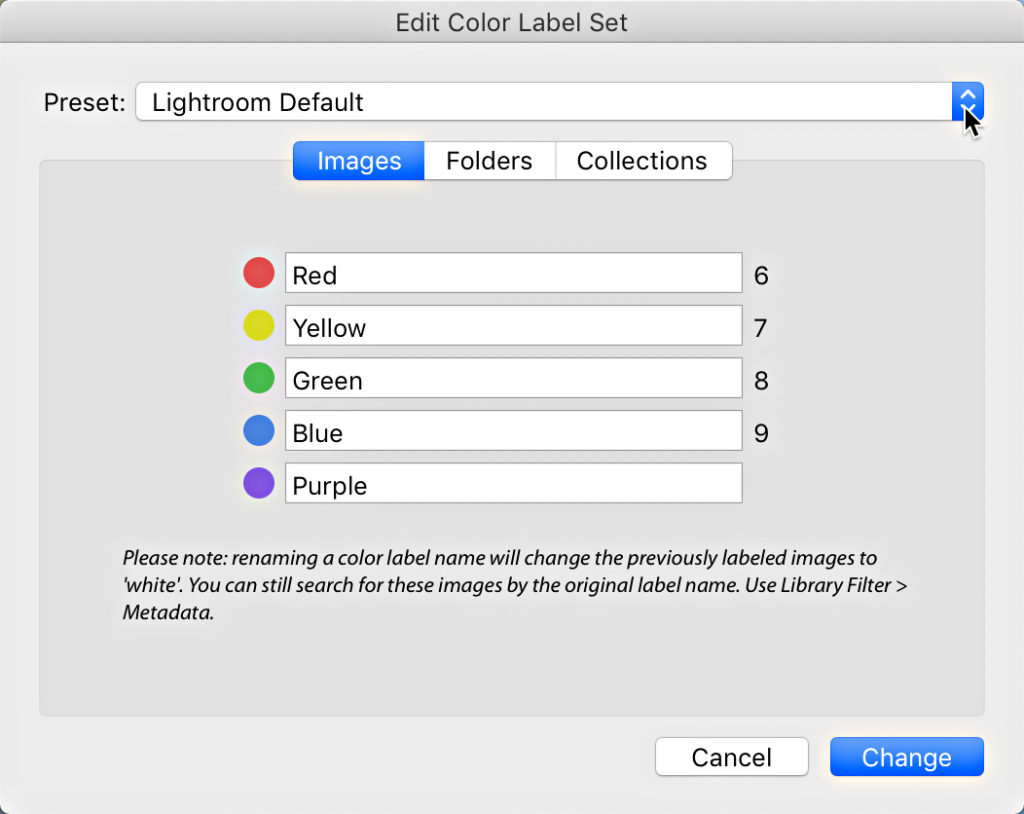
Looking at the Lightroom Default set, you will see that each color label is simply assigned the name of its color. Click the Preset dropdown menu and look at the labels for Bridge Default and Review Status. You’ll see that there are different labels associated with each of the colors in each set. These different labels may start to give you ideas about how you might make better use of the color labels too. 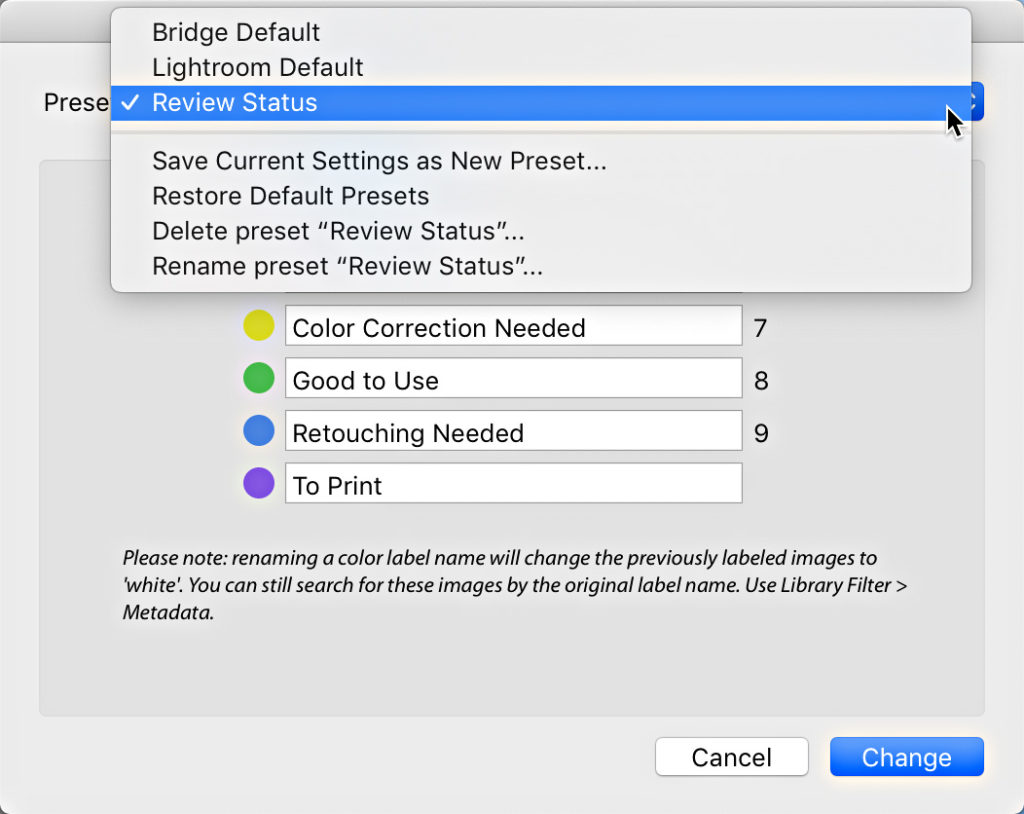
It is also possible to enter your own custom labels into each field, and save that as a new set. Note, that if you do this, any photos that had previously had a color label applied using a different set will lose the color representation (color goes to white, which is no color), though the old label will remain in that photo’s metadata. That means if I had previously applied a yellow color label to a photo, that photo will have a yellow tint around the thumbnail and the word “yellow” inserted into the Label field of the Metadata panel. 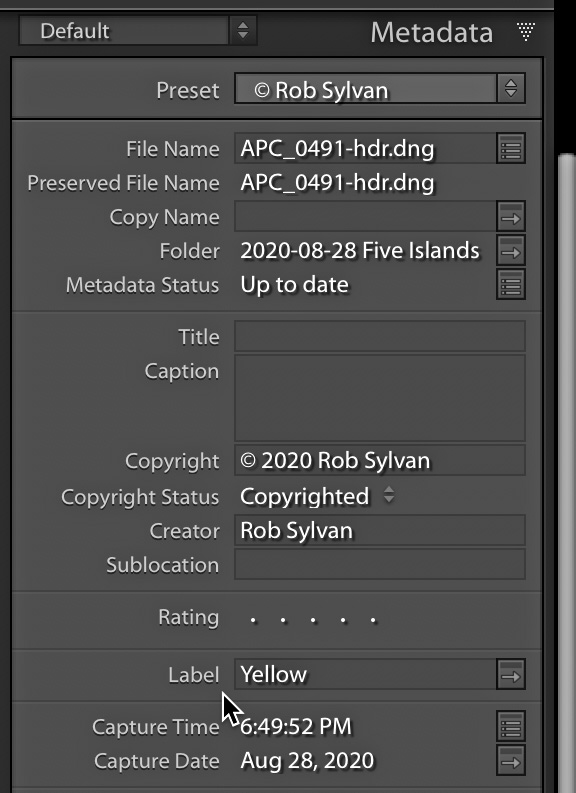
If I were to switch away from the Lightroom Default color label set to one of the others, or my own custom set, the tint around that thumbnail will go away, but the word “yellow” will remain in the metadata. This isn’t a problem per se, but worth noting before you change anything if you already have applied color labels. Also, worth noting is that the Label field is searchable via the Library Filter bar and smart collections. So, I don’t recommend going in there to change anything until you’ve given the issue some thought, and only if it makes sense to your workflow. I just leave mine on the Lightroom Default, and assign my own meaning to the colors. Putting Color Labels to UseHopefully, seeing the different options in the different label sets has started you thinking about how you might use these to your benefit. I’ve seen color labels applied to photos in two main ways, either as a workflow tool to indicate where in the workflow a set of photos are (such as red = needs editing, yellow = work in progress, green = ready to deliver, and blue = delivered), or as a way to identify photos as belonging to some larger grouping (such as red = for focus stacking, yellow = for HDR merge, green = for HDR pano merge, and blue = for pano merge). There’s really no wrong way as long as it makes sense to you and that you are consistent in your application of labels for that purpose. In my case, I like to shoot HDR, panos, HDR panos, and some focus stacking. Each of these pursuits tends to result in lots of source photos for the final merged results. I found that by applying color labels to the source photos for each kind it made it easier to look in a folder or collection and make sense of what those are all about. So, in my case I went with red = focus stack, yellow = HDR, green = HDR pano, and blue = pano (I bring purple in next week). Because of the way color labels can be used by the Library Filter bar and smart collections it also makes it a useful way to find and gather those photos together or to filter the contents of a given folder or collection. As you think about how the labels can help your workflow, be sure to consider the role of filters and smart collections, as those can really supercharge their usefulness (we’ll explore those further in part 2 of this article next week). You can apply color labels to photos by selecting the photos in Grid view or Loupe view, and clicking the corresponding color label in the Toolbar (press T if your Toolbar is hidden, and click the disclosure triangle on the right side if the color label icons are missing from the Toolbar). You can also right-click selected photos and choose the desired color label from the contextual menu. 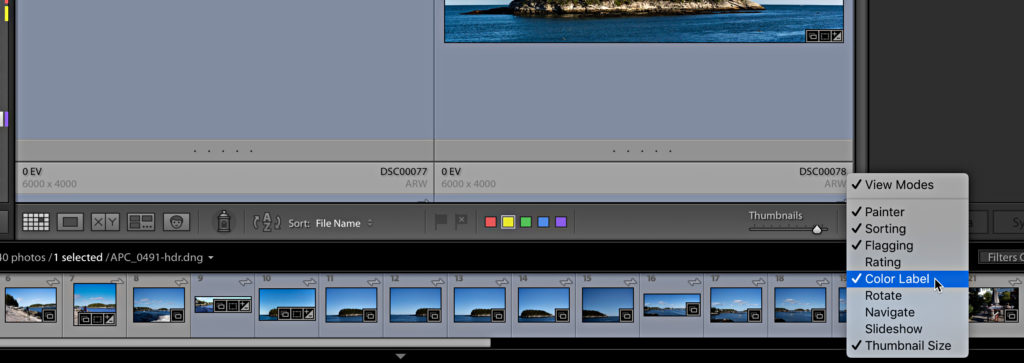
A faster way is to use the associated keyboard shortcuts. While the 0 – 5 keys correspond to star ratings, the 6 – 9 keys are for the red, yellow, green, and blue color labels respectively (no shortcut assigned for purple). You can also see the shortcuts by going to Photo > Color Label menu if you forget. Once you’ve settled on a scheme for how you want to use those labels, you want to develop a practice to use them all the time so that you get the most benefit from them. Come back next week and we’ll look at how we can expand that practice to include folders and collections, and then leverage all of that using filters and smart collections. The post Making the Most of Color Labels in Lightroom Classic: Part 1 appeared first on Lightroom Killer Tips. Photography via Lightroom Killer Tips https://ift.tt/2sh0aZ8 September 30, 2020 at 06:08PM
https://ift.tt/2GbDHGM
TTartisan releases an $80 35mm F1.4 lens for APS-C mirrorless camera systems https://ift.tt/3n4BoG9
TTartisan is back with its latest lens, an ultra-affordable 35mm F1.4 lens for APS-C mirrorless camera systems. The fully-manual TTartisan 35mm F1.4 lens retails for just $80 and is available for Canon EOS M, Fuji X, Micro Four Thirds and Sony E mount camera systems. It’s constructed of seven elements in six groups, has an aperture range of F1.4-F16, uses a ten-blade aperture diaphragm and has a minimum focusing distance of 28cm (11”).
The front filter thread is 39mm and the lens measures in at 44mm (1.73”) long, 56mm (2.2”) diameter and weighs just 180g. Below is a sample gallery of images captured with the lens, provided by Photo Rumors, an authorized retailer of TTartisan gear.
You can purchase the lens over on Photo Rumors’ online shop or any other authorized TTartisan retailer. Photography News via Dpreview https://ift.tt/2burdFr September 30, 2020 at 09:41AM
https://ift.tt/2EJUXCa
Olympus Concludes Sale of Imaging Business to JIP, Shares More Details https://ift.tt/2HGkWeV
Late last night, Olympus officially finalized the sale of its Imaging business to Japan Industrial Partners (JIP) and released a detailed press release in which they share some of what we can expect from so-called “OM Digital Solutions Corporation” moving forward. The announcement that Olympus would sell its Imaging business to JIP first hit the newswire on June 24th, but that announcement wasn’t final. The deal was still in progress, and only a “memorandum of understanding” had been signed0. That changed last night, and as the ink dries on the contracts, Olympus has shared more details about what, exactly, happens next. Whether you’re a current customer, or just hopeful for the continued existence of Olympus cameras and lenses, it’s worth paying attention.
The sale consists of an “absorption-type split,” which involves two major steps. First, Olympus will transfer the entirety of its Imaging business over to a wholly-owned subsidiary called OM Digital Solutions Corporation, which the company refers to as the “New Imaging Company.” Then, on January 1st, 2021, Olympus will transfer 95% of the shares of OM Digital Solutions to a special purpose company called “OJ Holdings, Ltd.” which was established by JIP. The sale includes “all R&D and manufacturing facilities currently dedicated to [Olympus’] Imaging business,” and the head of sales and marketing, R&D, and design departments for imaging products will all be relocated to the new headquarters of OM Digital Solutions in Hachioji, Tokyo, Japan. Production of new products will continue in Dong Nai province, Vietnam—which is where Olympus currently manufactures its imaging products—and OM Digital Solutions will become the contact point for all customer support for Imaging products that were manufactured and sold by Olympus before the sale went through. Once the sale is complete, Olympus “will concentrate on Medical and Scientific Solutions.” 
Unfortunately, the press release and statement on the Olympus website is short on details when it comes to what customers can expect in terms of new cameras and lenses. Plans to “continue providing customers with innovative, high quality cameras” are mentioned, but that’s about it. The only other hint we get is from Olympus President and CEO Yasuo Takeuchi, who shared the following statement:
We can only hope that this promise shines through. To learn more about the sale or dive into the nitty gritty details of the creation of OM Digital Solutions and the transfer of shares to JIP’s OJ Holdings company, you can read the full “Signing of Definitive Agreement for Divestiture of Imaging Business” document here. Photography News via PetaPixel https://petapixel.com September 30, 2020 at 09:09AM
https://ift.tt/2S9iek6
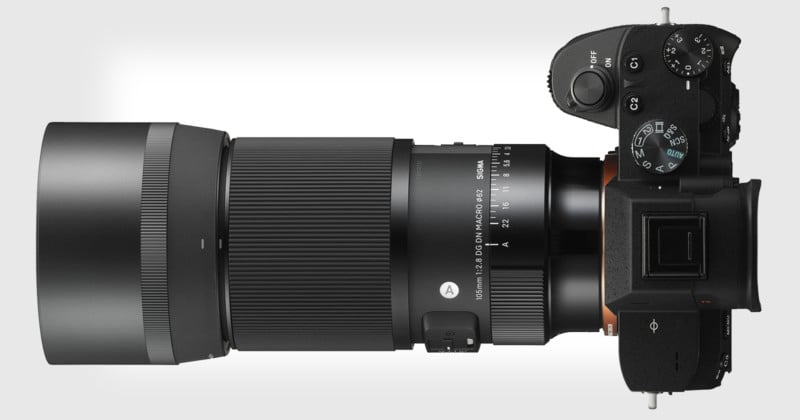
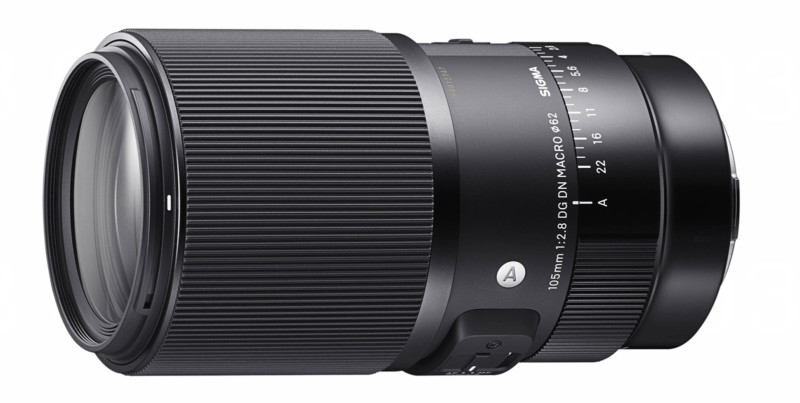
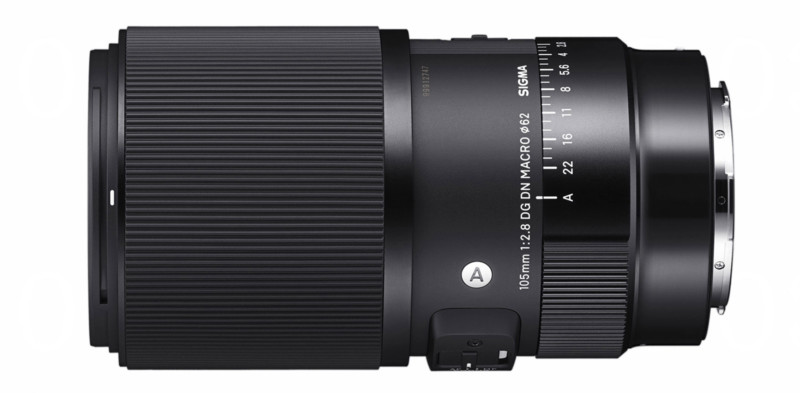
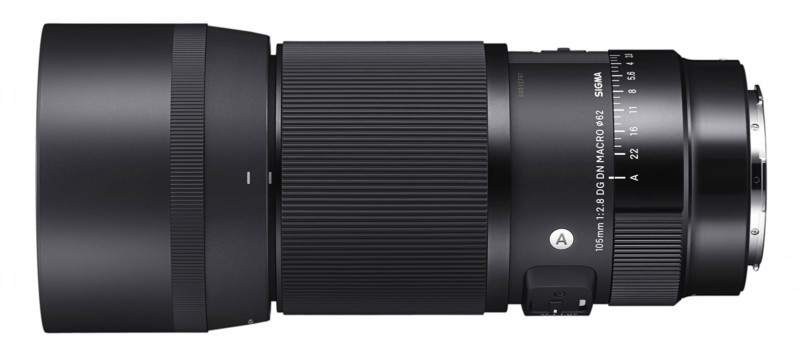
Sigma Unveils 105mm f/2.8 DG DN Macro Lens for Mirrorless Cameras https://ift.tt/30n6ZZM
This morning, Sigma officially unveiled its much-anticipated 105mm f/2.8 DG DN Macro lens for full-frame mirrorless cameras. This is Sigma’s first Art-series Macro lens for a mirrorless system, and it’s been optically re-designed from the ground up to deliver “exceptional sharpness and pleasing bokeh.” Optically, the new mid-telephoto macro lens is made up of 17 elements in 12 groups, including one Special Low Dispersion (SLD) element to minimize aberration. The construction allows the lens to achieve a 1:1 reproduction ratio at a working distance of 5.5 inches (14cm)—and if you slap a 1.4x or 2x teleconverter on the lens, you can increase that reproduction ratio all the way to 1.4:1 and 2:1, respectively. Moving on to the lens itself, the Sigma 105mm f/2.8 DG DN Macro is dust and splash proof, with a brass bayonet mount and a 9-blade rounded aperture. On the barrel, you’ll find a focus limiter switch with three settings (Macro, Portrait, or Full-Range), an Aperture Lock Switch, and the ability to choose between a “clicked” or “de-clicked” aperture action. Finally, the autofocus on the lens is run by Sigma’s Hypersonic Motor, and promises to deliver “smooth, quiet, confident autofocus in both close-up and portrait-distance settings,” even if you don’t take advantage of the aforementioned focus limiter switch. Here’s a closer look at the new lens:
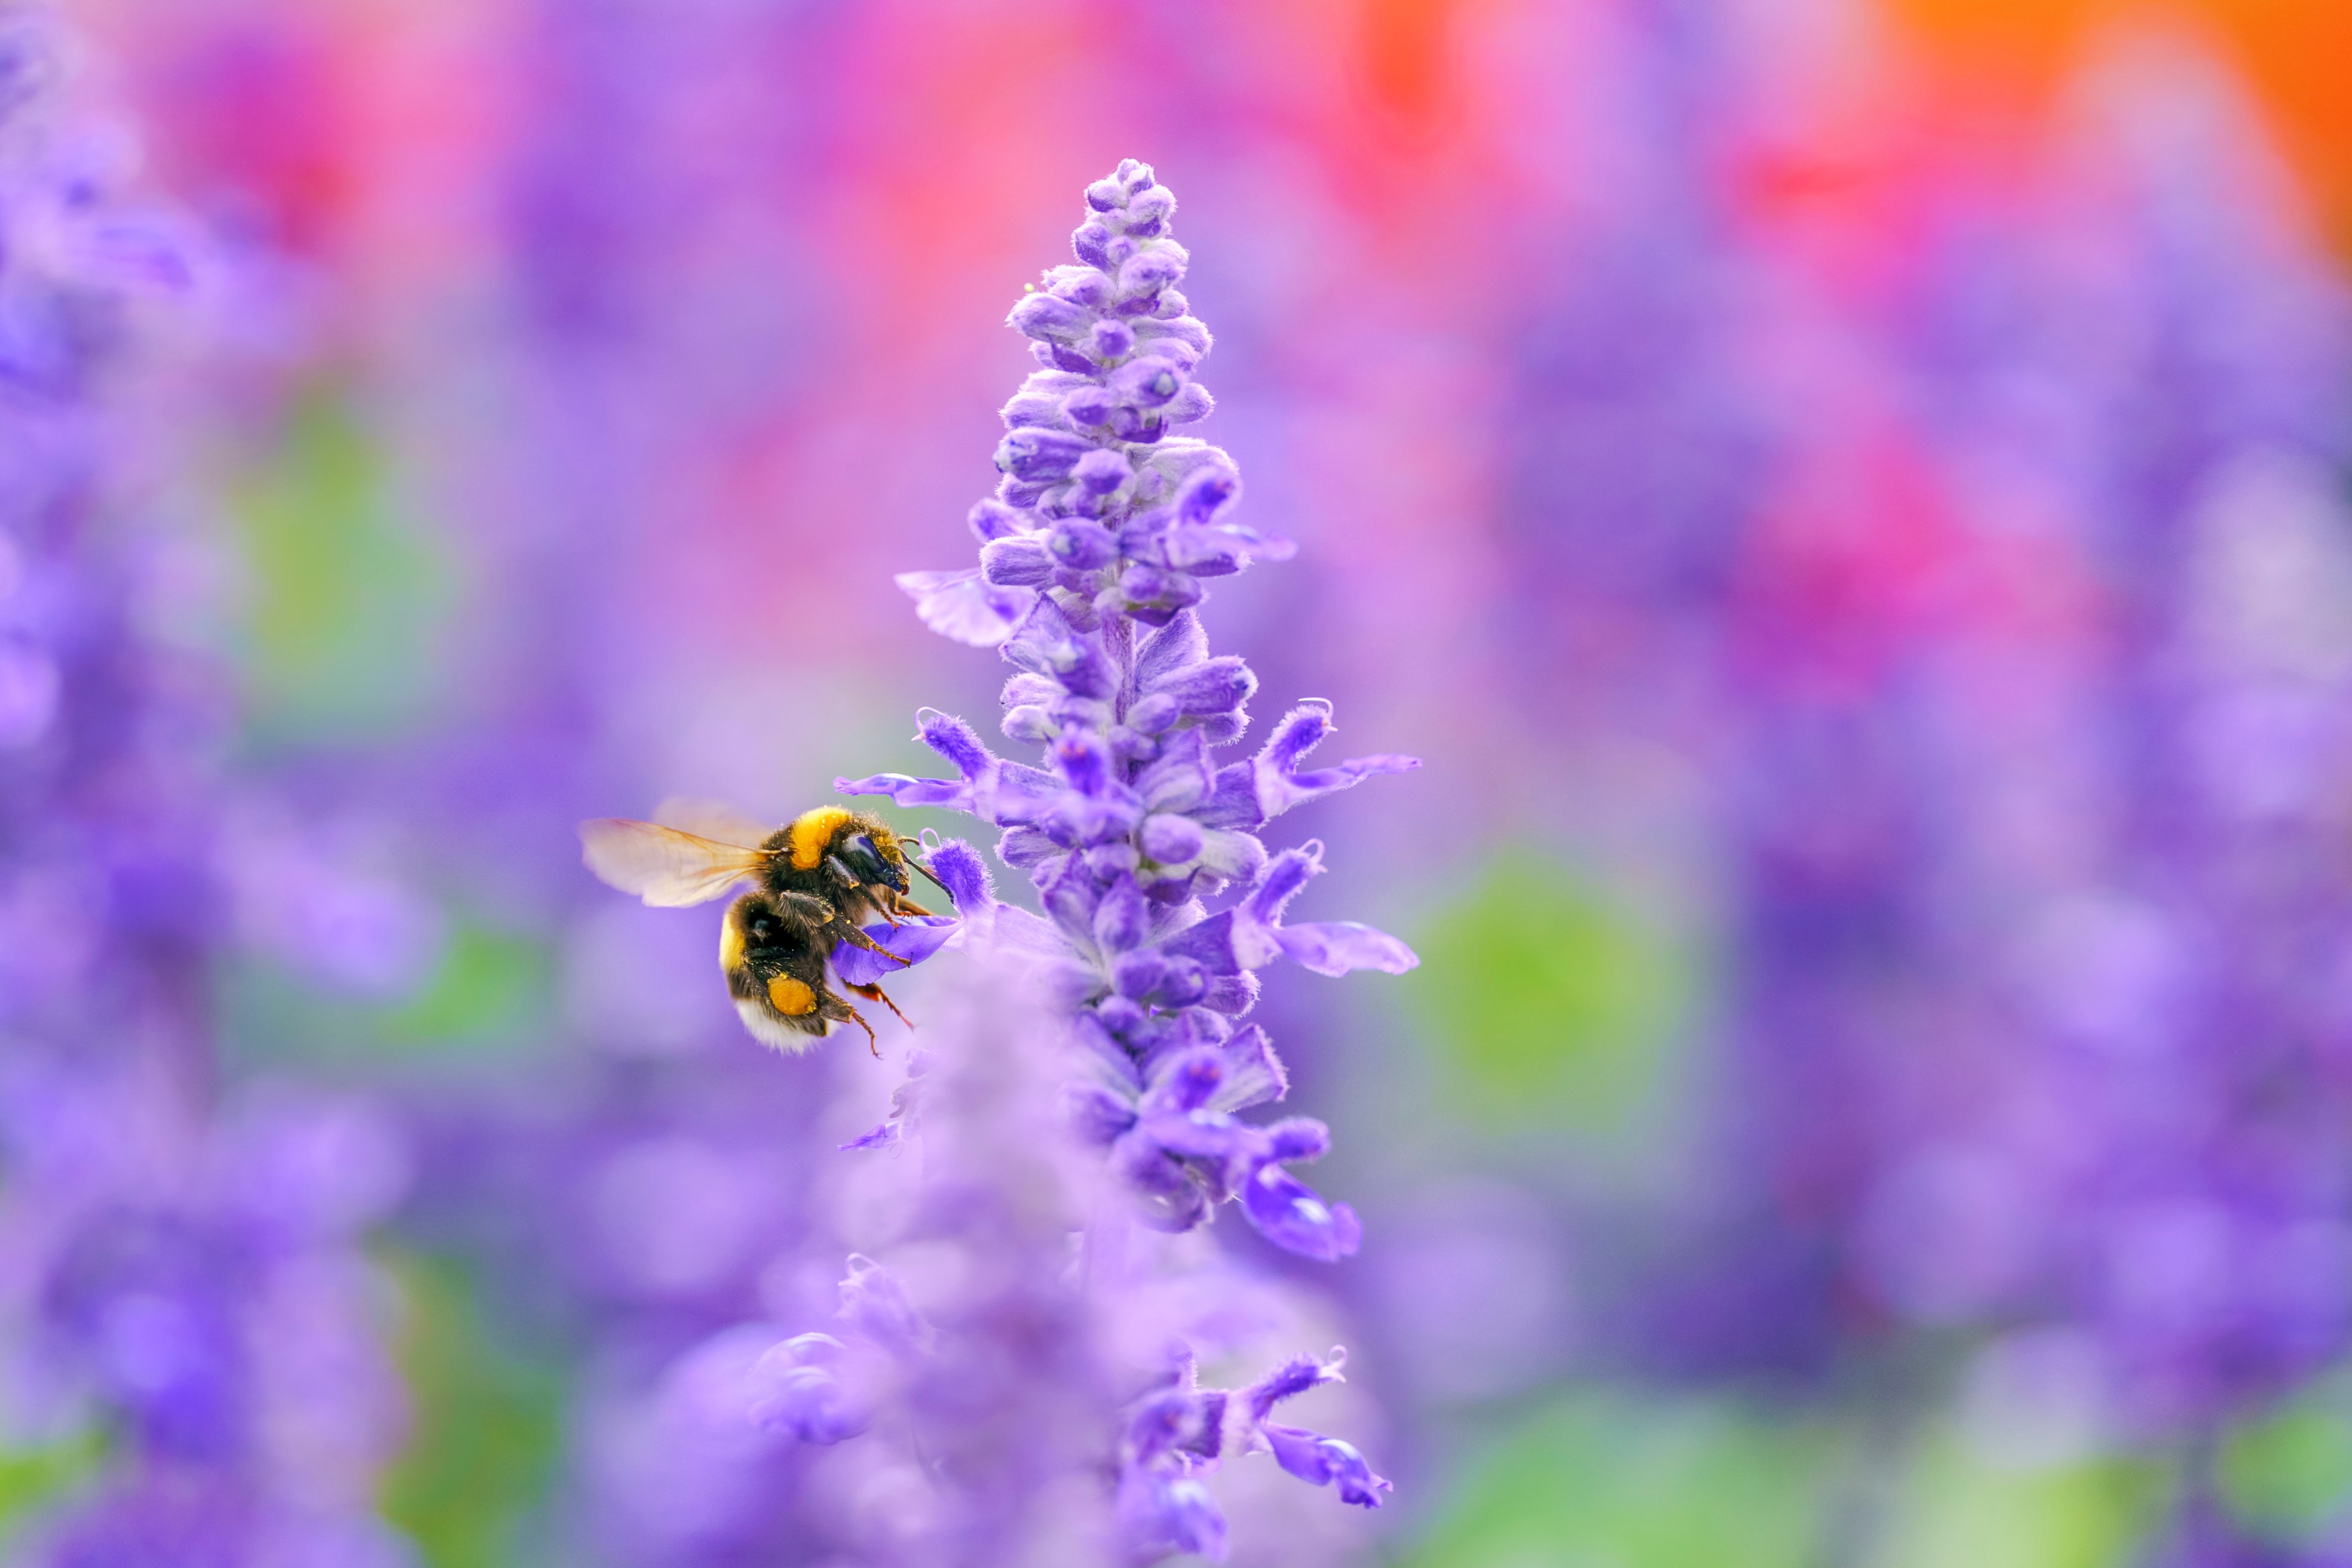
And here are some high-resolution sample photos from the Sigma website (click to enlarge):
Sigma is making some bold claims about the performance of this lens, and given its track record with the ART series, we sincerely hope that it delivers. Here’s a hands-on first look from our friends at Adorama, who set out to find out for themselves: The Sigma 105mm f/2.8 DG DN Macro lens is available in Sony E-Mount and Sigma/Panasonic/Leica L-Mount for $800, and should begin shipping in “late October.” To learn more or if you want to pre-order your own, click here. Photography News via PetaPixel https://petapixel.com September 30, 2020 at 08:24AM
https://ift.tt/3cJjJii
From SIGMA: We would like to share the results of our investigation regarding the operation of SIGMA’s lenses for Canon EF mount when used on the Canon EOS R5. We have verified the operation with our SIGMA GLOBAL VISION (SGV) interchangeable lenses (Contemporary, Art, and Sports lines) for Canon EF mounts used on the“Canon EOS R5” with Canon’s mount adapter “EF-EOS R Series”, and confirmed that there were no problems with general operations such as AE, AF, and image stabilization.
Photography via Canon Rumors https://ift.tt/2v4dYqS September 30, 2020 at 08:37AM
https://ift.tt/3jtjPgw
Sigma 105mm F2.8 DG DN Macro sample gallery https://ift.tt/3n2RTT2 Sigma's all-new 105mm F2.8 macro offers 1:1 reproduction and has been designed from scratch for L-mount and full-frame E-mount mirrorless cameras. Fall weather brings out plenty of detailed subjects for a lens of this kind, and coupled with the 60MP Sony a7R IV, well, let's just say we've seen things we can't unsee. Photography News via Dpreview https://ift.tt/2burdFr September 30, 2020 at 07:34AM
https://ift.tt/348Uq5G
Sigma 105mm F2.8 DG DN Macro for E- and L-mount arrives in October https://ift.tt/2G32rRF Sigma has unveiled an all-new 105mm F2.8 macro lens, which will provide 1:1 reproduction and will be offered for E-mount and L-mount mirrorless cameras. It features a new optical formula comprising 17 elements in 12 groups, including one SLD (Special Low Dispersion) element. The 105mm F2.8 DG DN Macro features a 14cm (5.5") working distance, an aperture ring that functions either clicked or de-clicked, and a three-zone focus limiting switch. The lens is dust- and splash-proof, and the L-mount version is compatible with Sigma's 1.4x and 2x teleconverters. The Sigma 105mm F2.8 DG DN Macro Art lens will ship in late October for $800. Press release Sigma Announces the 105mm F2.8 DG DN Macro | Art Lens, Redefining Mirrorless Macro Performance
Ronkonkoma, NY – September 30, 2020 – The SIGMA 105mm F2.8 DG DN Macro | Art lens is the first prime macro lens designed by Sigma exclusively for full-frame mirrorless cameras, as the DG DN in the name indicates. Announced today by Sigma Corporation, this lens offers 1:1 magnification (life-sized) at a 5.5-inch working distance with internal focusing, and it is available in Sony E-Mount and L-Mount formats. Exceptional focal plane sharpness with minimal aberration is achieved through a new optical formula featuring 17 elements in 12 groups with one SLD element. The lens design also features excellent peripheral brightness for pleasing bokeh, complemented by nine rounded aperture blades. The L-Mount version of the 105mm F2.8 DG DN Macro | Art lens is compatible with the SIGMA Teleconverter TC-1411 and TC-2011, increasing the maximum magnification to 1.4:1 and 2:1, respectively. "In order to capture the minute details of small subjects, macro lenses must meet an extremely high standard of optical precision, and the new SIGMA 105mm F2.8 DG DN Macro | Art lens truly delivers," says Mark Amir-Hamzeh, President of Sigma Corporation of America. "Whether you are shooting images of flowers, insects or just interesting objects around the house, the sharpness, bokeh quality and practical functionality of this lens will exceed the expectations of professionals and hobbyists alike." The Hypersonic Motor delivers smooth, quiet, confident autofocus in both close-up and portrait-distance settings, and the three-zone focus limiter switch allows for even swifter response when focusing exclusively in either the macro or more distant range. The Sigma Art line has been consistently redefining both imaging excellence and satisfying handfeel, and this new lens continues that journey. The dust and splash-proof design, aluminum and TSC (Thermally Stable Composite) construction, a brass bayonet mount, plus well-damped switches and rings demonstrate the level of build quality that the Art name represents. The Aperture Ring can be clicked or de-clicked by flick of a switch, and the lens also includes an Aperture Ring Lock Switch function. Additional benefits include a programmable AFL button on the lens barrel, and compatibility with face and eye-detection autofocus. The lens will begin shipping late October 2020. / MSRP: $799 Sigma 105mm F2.8 DG DN Macro specifications
Photography News via Dpreview https://ift.tt/2burdFr September 30, 2020 at 07:34AM
https://ift.tt/36iOEkp
The Canon EOS M50 Mark II has been confirmed through Canon product listings for dealers. This camera body has been rumored for quite some time to come in Q4 of 2020, so we should see an announcement soon. Also appearing is a new Canon Speedlite called the EL-1, we have reported a new flagship Speedlite was coming, and hopefully, this is it. It’s interesting that Canon is now using a new naming scheme for a Speedlite. Also added to the list are Speedlite accessories named SCF-EL, SBA-EL and LP-EL. I think the LP is going to be a rechargeable battery for the new Speedlite. More to come… Photography via Canon Rumors https://ift.tt/2v4dYqS September 30, 2020 at 07:19AM
https://ift.tt/2SdAA3m
The post Tips for Culling Images for Better Results and More Efficiency appeared first on Digital Photography School. It was authored by John McIntire. When it comes to a photographer’s workflow, there is one stage that might be more important than any other. It is the image selection process, also known as the culling stage. This critical stage is the point where you get your images into Lightroom (or other software) and start choosing which to work on. But while this is the stage where you choose the photos that ultimately end up representing your work as a photographer, without systems in place it can turn into a huge time sink. So focusing on the process of culling images can help speed up image selection significantly. 
This article aims to show you why having a good system for image selection can be beneficial to your photography and your portfolio. It will also provide an overview of a basic system that you can start to use in your workflow right away, and it will provide tips on how to use Lightroom’s built-in functionality for this purpose. Note: My examples here are portraits, but the system applies to just about any genre in photography. There are instances where you might not be able to apply some of these principles and the criteria you apply in different genres will be different, but they are exceptions. The forest for the treesTake a moment to imagine that you’ve just finished a big session and imported all the images into Lightroom. Now you may have hundreds of images that you have to sift through to find the ones that you want to work on. 
Without a system for culling images in place, it’s all too easy to find yourself continually scrolling through the same set of images and reviewing the same ones multiple times. This may not be a problem if you only have a handful of frames, but once you get into larger shoots, you can waste a lot of time doing things this way. Additionally, after going through the same images over and over again, it can also become discouraging. This makes it easy to give up and leave some gems unspotted, which are ultimately relegated to obscurity on your hard drive. 
So what type of system can you create? Using Collection Sets to divide up large shoots into smaller, more manageable chunks is a good place to start. This is just a small reason why you should consider developing a system for your editing process. EditingThe image selection process is also known as editing. Now, I know that the word edit (and editing) has come to mean something else in everyday vernacular for photographers. You can call it whatever you want, as I am not one to dictate or prescribe. But as you will be going about image editing in the future, consider thinking about your post-processing workflow in terms of these two job descriptions: Photo (Picture) Editor: Someone whose job it is to select photos appropriate for the use in question. Retoucher: Someone whose job it is to alter the appearance of photos and manipulate photos to achieve a final result. ToolsLightroom has a huge variety of tools that makes culling images easier. While this is not an exhaustive list, here are a few features that I use regularly: Fullscreen Mode
Being able to view a single image at a time makes this whole process go more smoothly. It also takes away the distraction of Lightroom’s standard interface on the screen. To enter Fullscreen Mode, select any single image in the Library Module and press the “F” key. Compare
The Compare feature allows you to look at two images side by side. Although you won’t use this until later in the selection process, it becomes very useful when you are trying to choose between two similar images with minor differences. To use the Compare feature, select any two images in the Library Module and press the “C” key. To get back to your normal view, press “G.” Reject
If you follow my process, you are going to use this tool a lot. When you press the “X” key while any image is selected, you flag that image as a reject. This marks the image with a black flag with an “X” in the upper left-hand corner, and it grays the image out in the Library Module. This makes it very easy to see which images you have already reviewed and marked as unsuitable. Pick
When you are going through your images, you will eventually come across a photo that you love. You’ll know that you want to work on it no matter what. In this instance, press the “P” key; the image will be flagged as a Pick. A little white flag icon will appear at the top left of the image in Lightroom. Star ratings
Because you will be going through your images multiple times, you can use the star ratings in Lightroom to mark any images you are unsure of or aren’t able to make a final decision on yet. You can mark them with one to five stars by using the corresponding number key. This makes them clearly labeled when you return to them in the future. On being ruthlessBefore we get into the actual steps of the editing process, there is one thing to discuss. Most everything outlined in this article can be changed up as required, but there is one thing that will be important for you to follow no matter what. To make this process faster and more efficient, and to ensure that you are only left with your best images, you have to be ruthless. If something is not right about an image, reject it. If you have to think about it for more than a few seconds, reject it. If you have even so much as a niggling doubt, reject it. 
A lot of the wasted time in this part of the workflow comes from hemming and hawing over an image for a length of time when the image doesn’t wind up getting used anyway. Make decisions fast. Be ruthless. The system
Now that you know the desired end result, you can get started with the actual process of image selection. The first step is to isolate the set of images you are working on from everything else. There should be no distractions. If you are working on a set from a portrait session where there were multiple outfit changes, separate each outfit into its own folder. In Lightroom, this is easy. You can create a Collection Set for your shoot, and then create a Collection for every outfit change inside that set. This will keep all of the images from a session in one place, but separated by things like outfit changes or lighting changes. CriteriaChances are that you already have preconceived notions of what you don’t like in photos. Whether these ideas come from things you’ve heard from other photographers or opinions you’ve developed yourself, it doesn’t matter. Knowing what these things are is going to help you speed through the process much, much faster. Technical: Things that fall on the technical side are relatively easy to identify. What you are evaluating for here are things like focus, exposure, the absence of motion blur, etc. When you are going through your images, learn to identify technical faults at a glance. 
Aesthetic: This one is all down to your personal tastes. If you can figure out what you don’t like, then you can spot those things in an instant and rule the photos out of the selection process. Don’t like when portrait subjects bring their hands to their face? That rules out any photos fitting that description. Don’t like it when catchlights appear in the whites of the eyes? You get where I’m going with this. 
The first pass
Once you’ve isolated the images that you’re working on, you can begin the first pass of the culling process. The only goal here is culling images as fast as possible. Select the first photo in your folder and enter Fullscreen Mode in Lightroom (press “F”). Use the right arrow key to scroll through your images one at a time. You should have an idea of what isn’t a good photo in your mind. You’re looking for things that fall into that category. Did the flash misfire? Are the eyes partly closed? Is the facial expression not flattering? Is the lighting not quite right? Is the focus off? If there’s a fault in the image, find it and press “X.” The second passNow that you have completed the first run through your images, you should find that you’ve rejected most of them. The next step is to isolate the images that you haven’t culled from the ones you need to review again. There are a few ways you can do this. You can create a new Collection and add the images that are to be reviewed. Or you could remove the rejected images from the Collection you are working in. 
You could also use the sorting options on the bottom toolbar in the Library Module. This will put any rejected images at the end of the gallery. From there, you can select all of the unflagged images and enter Fullscreen Mode again. As you cycle through the images a second time, you’ll first see the shots you have selected. For this pass, you are trying to achieve the same thing as the first: to reject as many images as possible. This time it will take longer, as these are images that you have already decided don’t have any immediate faults. Feel free to take extra time and have a careful look over the images. Just remember that you are still not picking any photos yet, merely getting rid of the ones that aren’t suitable. You can repeat this stage as many times as you need in order to narrow down your Collection to the few best images. For the sake of brevity, we’ll move directly on to the next stage and assume you’ve narrowed your images down as much as possible. The third pass
At this point, you should have a much smaller group of images to work with. (If you still have a lot of photos, go back and be more ruthless.) You can now go through and start making your final selections. It should be a lot easier now that you have a much smaller pool to go through. Use the Pick flags or star ratings to indicate the photos you want to work on and reject any photos that still need rejecting. At the end of your culling sessions, you should have a concise selection of images that reflect the best shots from a particular set. How many should you aim for?If you’re wondering how many images you should aim to have left once this is all over, the answer is: it depends. The number of final images is going to vary wildly depending on how you shoot and what you are shooting for. For example, if I am shooting for myself, I will be looking for one or two images per set. That set may start with 10 photos in it. It may start with 100. I am still only looking for one or two. If I’m doing a short portrait session for a client, I might end up with 15-20 proofs to present. If I was photographing an event, I would go through and get rid of the obvious rejects and keep everything that was left. 
There is no right answer. Only you can answer how many images you need in the end. This whole process of culling images is there to get you to those final photos faster, rather than get you to a certain number. Keeping it basicThe tools and the process outlined in this article are very basic. It’s how I do it and it’s like that for a reason. The process is uncomfortable and forces you, for a little while, to focus on your mistakes. When I am culling images, I want it completed as soon as possible, and I don’t want my tools to get in the way of the process. That said, Lightroom has a whole host of other features that could be used in the culling process. By all means, use them if they suit you. It doesn’t matter how you get the job done as long as you get it done. ConclusionI know that this can be a difficult process. You have a catalog of images on the screen that you created and poured all kinds of effort into. You just want to look through them and feel good about the photos you’ve made. You don’t want to jump in and start finding faults with 90% of them. I understand. I’m the same. However, as disheartening as it feels at first, once you start culling images and the best images from a shoot start showing themselves (usually after a short while), that allows you to focus only on the best. Trust me: The images that you cut get quickly forgotten, anyway. It’s best to be done with them fast; that way you can focus the rest of your time and effort on the images that will benefit you and your portfolio. The post Tips for Culling Images for Better Results and More Efficiency appeared first on Digital Photography School. It was authored by John McIntire. Photography via Digital Photography School https://ift.tt/29wB9CX September 30, 2020 at 05:03AM |
Categories
All
Archives
November 2020
|
||||||||||||||||||||||||||||||||||||||||||||||||||||||||||||||||||||


 RSS Feed
