RICK REA: Helping You Grow Through Online Marketing
  • Home
  • Blog
    • Social Media News
    • SEO Marketing News
    • Digital Trends News
    • Photography News
    • Mobile Marketing
    • Business News
    • Gadget News
    • Printing News
  • Contact
  • About
  • Subscribe

Photography News

Couple Falls to Death During Selfie at Same Yosemite Cliff as Viral Photo

10/31/2018

0 Comments

 
https://ift.tt/2Jvjadi

Couple Falls to Death During Selfie at Same Yosemite Cliff as Viral Photo

https://ift.tt/2ADuFwQ

A couple tragically plunged to their deaths while taking a selfie at Yosemite’s Taft Point last week. The accident came just days after an engagement photo captured at the same spot went viral online.

Meenakshi Moorthy (left) and Vishnu Viswanath (right). Photo by Vishnu Viswanath.

The Associated Press reports that husband and wife Vishnu Viswanath (29) and Meenakshi Moorthy (30) had set-up their tripod at the scenic cliff lookout on October 23rd and were shooting a selfie of themselves when they went over the edge. There are drops at the location of over 1,000 feet (300m).

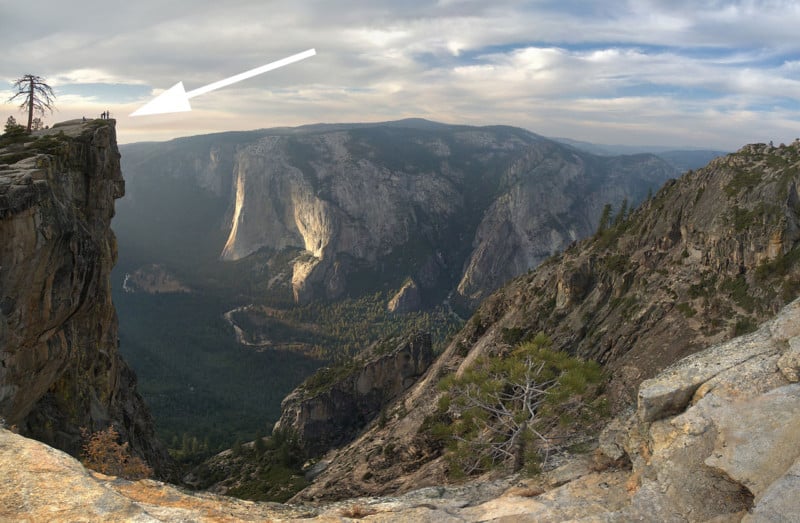
Taft Point in Yosemite National Park. Photo by Dave and licensed under CC BY 2.0
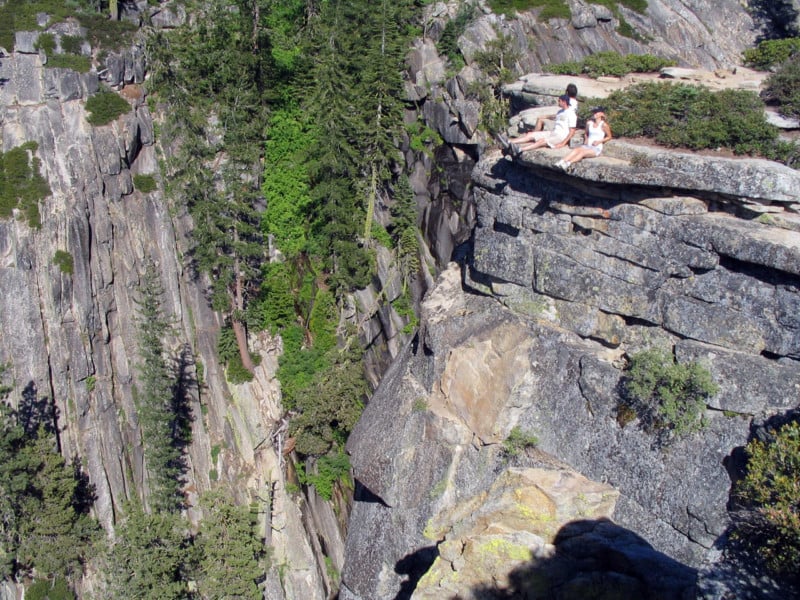
Visitors sitting at the edge of a 1,000-foot drop. Photo by Tim Bergeron and licensed under CC BY-SA 3.0

Other visitors discovered the tripod and camera abandoned at the spot the next morning and alerted authorities, who scoured the valley floor from above with high-powered binoculars before spotting the bodies about 800 feet (245m) below.

Moorthy was a self-professed “adrenaline junkie” who often posed for death-defying photos from the edge of cliffs with Viswanath, who would post them on their popular social media accounts and travel blog for thousands of followers to see.

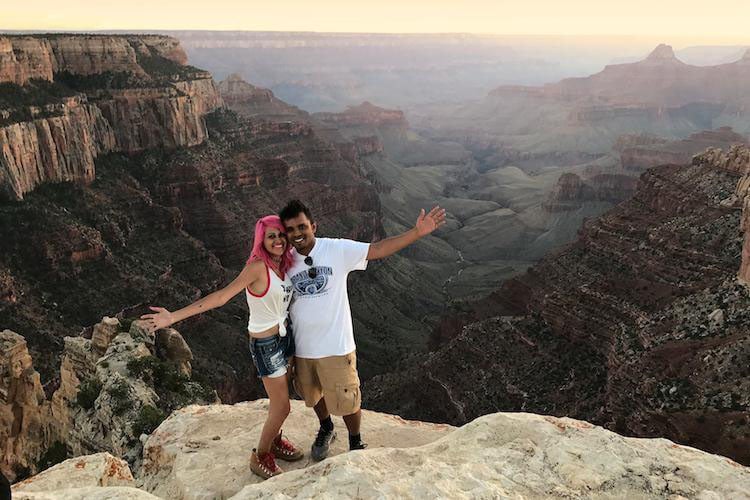
“Living life on the edge,” Viswanath captioned one photo of himself and Moorthy at the Grand Canyon:

Photo by Vishnu Viswanath

“A lot of us including yours truly is a fan of daredevilry attempts of standing at the edge of cliffs — and skyscrapers,” Moorthy wrote in the caption of a photo of herself at the edge of the Grand Canyon. “But did you know that wind gust can be FATAL??? Is our life just worth one photo?”

View this post on Instagram

CHASING SUNSETS or CHASING LIKES ??? ? … Sooo today on #socialmediabadasstribe we are talking about limits of #doitforthegram.?Yeah sure it can be limitless but guys, we reaaaallly need to have boundaries(this is handy as life lessons too but we will revisit that later?) A lot of us including yours truly is a fan of daredevilry attempts of standing at the edge of cliffs ⛰and skyscrapers?, but did you know that wind gusts can be FATAL??? ☠️ Is our life just worth one photo? … When we squirm at another selfie attempt gone south ? from a skyscraper, let’s remember to save that in our core memory ? and not the memory dump ?(I am still on the Inside Out ? train y'all ?) Same applies when we get our knickers in a twist and hog a spot till we get the perfect shot? I know I know, I am guilty as charged for all of this ?‍♀️ and if I didn’t have Mr. Two Goody Shoes, Vishnu ? with me, I am not even sure if I would have written this post. … Let us all try to be responsible digital citizens and use our “numbers” to be transparent and honest, shall we?? None of us is perfect and the more we accept it and share our flaws as much as our wins, we are one step closer to creating a sane social media without the scary brouhahas.?✨ … Still there?? Woohoo, a backflip is in order, or wait maybe a pizza? ? What about a unicorn ice-cream ? ? with some Disney-approved cotton candy ?? and pixie dust infused sprinkles ?‍♀️ if…..IF you could tell me the one time you were effin’ proud of being candid and real AF in social media? ? … PS – Not sponsored but sweatshirt is from @radearthsupply • • • #grandcanyonnps #northrim #instagramaz #visitarizona #travelarizona #shotzdelight #discovertheroad #usaroadtrip #visittheusa #outdoorsusa #exploretheusa #womenwhoexplore #iamtb #radparks #thediscoverer #gtgi #sheisnotlost #wearetravelgirls #hikemore #radgirlslife #travelreality #dreamscape @womenwhoexplore @visit_arizona @visittheusa @shotzdelight

A post shared by TravelCreatives❤️Minaxi+Vishnu (@holidaysandhappilyeverafters) on Mar 28, 2018 at 8:45am PDT

Another couple who hiked to Taft Point on the same day believes they captured photos of Moorthy just moments prior to her death — a pink-haired woman can be seen in the background of two of Sean Matteson’s selfies.

“She was very close to the edge, but it looked like she was enjoying herself,” Matteson tells AP. “She gave me the willies. There aren’t any railings. I was not about to get that close to the edge. But she seemed comfortable. She didn’t seem like she was in distress or anything.”

The couple’s death also came just days after an unexpected engagement photo from the same spot became a big news story. Photographer Matthew Dippel was near Taft Point on October 6th when he noticed a man proposing. He managed to capture this photo of the couple:

The photo went viral after Dippel appealed for public help in identifying the mystery couple. The mystery was solved within days.

A recent study by researchers in India found that there have been at least 259 selfie-related deaths around the world since 2011, and one of the leading causes of selfie death in the world is falling.


Photography News

via PetaPixel https://petapixel.com

October 31, 2018 at 11:08AM
0 Comments

How to Use Your Camera to Calculate the Speed of Earths Spin

10/31/2018

0 Comments

 
http://petapixel.com/assets/uploads/2018/10/earthspincalculatefaet-800x420.jpg

How to Use Your Camera to Calculate the Speed of Earth’s Spin

https://petapixel.com/2018/10/31/how-to-use-your-camera-to-calculate-the-speed-of-earths-spin/

Earth is spinning… and fast! It was during my first nights in astrophotography that it became very concrete for me. By taking pictures of the stars, one quickly obtains a change of star physiognomy that confirms the rotation of the earth. In this article, I describe how to use this phenomenon to measure the rotational speed of the earth with a simple camera.

To capture the maximum of light from the sky, the astrophotographer seeks to increase the exposure time to the maximum. By doing this, you quickly find that the appearance of the stars turns into a dash, depending on the focal length it takes few seconds of exposure to have this easily observable.

The principle is simple, the stars are very distant celestial objects, they are located at distances expressed in light-years. A light year is the distance traveled by light in one year, and when we remember that the light travels about 186,282mi/300,000km per second, we are quickly dizzy on the distances that this represents. As a result of all this, the stars are so far away that we can consider them fixed in the sky.

As we have observed, taking a picture of the sky in very slow pause or taking a succession of several photos of the sky, we clearly see the relative position of the stars change. We have just seen it, we consider the stars fixed in the sky, so their apparent movement characterizes very well the speed of rotation of the earth.

Without going into too much detail, the earth rotates along a North-South axis. In the northern hemisphere, this axis passes approximately through the polar star. Thus, the polar star is fixed and the stars around it trace a circular apparent path around it. That’s what we will measure.

By knowing the duration of observation (the duration of exposure of a photo or accumulation of several photos in sequence) and by measuring the angular distance traced by a star, I can easily calculate the speed of rotation of the earth.

To facilitate the measurement of the angle, I limit myself to a sequence of a few tens of minutes. As in the previous image, the dashes drawn by the stars are then very apparent.

Everyone will have his method and his favorite software, personally, I used an iOS application which has a tool to display the angle of a line. To better locate the polar star, I draw a circle centered on the latter.

The measured angle is 4.1 °, 0.072rad for a duration of 975 seconds. This gives us a rotation speed of 7.33×10⁻⁵ rad/sec. A quick search on the Internet tells us that the precise speed of rotation of the earth is 7.29×10⁻⁵ rad/sec. The difference is less than 1%.

Conclusion

Here, I showed you how to measure the rotation speed of the earth with an error less than 1% using a simple camera. This result is very interesting, especially since it can be improved by taking more care in measuring the angle.

For my part, I am all the more satisfied with the result that the method applies with standard photographic equipment (there’s no need for advanced scientific equipment) and that it allows us to apprehend this scientific truth: the Earth turns, truth otherwise difficult to perceive concretely with our senses.


About the author: Panhobby is the photographer behind PhotoPlanet360, a website dedicated to panoramic and 360-degree photos. The opinions expressed in this article are solely those of the author. You can find more of his work on his website, Facebook, Twitter, and Instagram. This article was also published here.


Photography News

via PetaPixel https://petapixel.com

October 31, 2018 at 10:16AM
0 Comments

Lens Rentals calls the Z7 the 'best built mirrorless full-frame camera weve taken apart'

10/31/2018

0 Comments

 
https://ift.tt/2CWcQKC

Lens Rentals calls the Z7 the 'best built mirrorless full-frame camera we’ve taken apart'

https://ift.tt/2P2GBkc


In case you were wondering what’s packed inside the Nikon Z7 and how well constructed it is, Lens Rentals has kindly cracked one open so you don’t have to, as promised in its EOS R teardown.

The camera equipment rental and repair business, famous for its camera teardowns, has documented the process of taking the Z7 apart, showing pictures of the weather sealing, electronic design, internal structure, and component layout of Nikon's flagship full-frame mirrorless camera.

Roger Cicala, the man behind the teardown and founder of Lens Rentals, praises the extensive weathersealing protection from ingress of dust and moisture in the camera’s construction, and says the joints in the body are overlapped, screwed together and then covered by adhesive and rubber. He's also impressed with the neatness of the electronics and the way the boards are packed into the body without leaving much space between them, especially with the in-body image stabilization.

"[The IBIS] noticeably more compact, has less travel than the Sony system, and seems more robust," says Cicala. "From our focus on repair, we see this as a good thing – early Sony IBIS systems would sometimes move enough to jam and/or break. (To be clear, that’s not an issue with newer Sony cameras. I point this out just to show that the manufacturers have been watching each other.)"

Cicala's only concerns seem to be that the diopter adjustment knob might not stand being pulled out and pushed in multiple times in rental models, and that the tripod screw isn’t as deep as some, so runs the slight risk of a long thread busting through it.

In conclusion Cicala says "I’m impressed by the very solid construction of the chassis and IBIS unit. I’m impressed with the neat, modern engineering of the electrical connections [...] I’m not here to tell you which camera is best to use or has the best performance. I’m just here to say this is a damn well-built camera, the best built mirrorless full-frame camera we’ve taken apart."

Go to the full teardown on Lens Rental's website to see more photos and a more thorough take with all his comments. And remember, don’t try this at home!


Photography News

via Dpreview https://ift.tt/i0r8o5

October 31, 2018 at 10:09AM
0 Comments

A Spooky Photo Of The Week And A Flying Fish Heres What You May Have Missed On The Forums

10/31/2018

0 Comments

 
https://ift.tt/2SzjEDp

A Spooky Photo Of The Week And A Flying Fish – Here’s What You May Have Missed On The Forums

https://ift.tt/2EVarCK

We got a lot of action this week in both the latest Mobile Monday Challenge and the Weekend Photography Challenge, we also got 115 new light stalking members that are willing to share their images and knowledge with us at the forums and our beloved shark tank!

We all have stories to share, even when some have little to do with photography too but are useful too.

So here is what you missed this week on Light Stalking

Photo Of The Week – October 29, 2018

Photo by David Chesterfield

The POTW for this week goes to David Chesterfield, who has been mastering light painting for quite some time now. This image was posted in the most recent Weekend Photography Challenge depicting spookiness (the first image there is really disturbing).

What I find really important about David's work is the careful use of light painting that doesn't feel like an improvisation at all. The light trails are were they need to be, and the color decision is fundamental for the story he wants to tell.

This is an important message for all the people out there starting in photography that feel drawn towards light painting. It has to have a meaning and a reason, otherwise is just a random assembly of light.

We hope to continue to see more spooky photographs during this last days of October, and thanks David for sharing such a high quality image with us!

What Are Our Members Up To?

Here are some great shots from the participants at the 405th-weekend photography challenge, Light and Shadows:

Photo by Dave W.

The colors in this image are extremely beautiful and everything in this photograph is well balanced, the shadows are so subtle that they even enhance the point of view and support the color scheme. This is almost beyond a photograph and very nearly a graphic design. An extremely strong image from Dave.

Photo by Pamela Winter

This is a lovely image made with a very simple, but super effective trick of light and shadow. The symbolism here is superb and this image makes us want to wish the couple the best of luck!

Photo by Erik Fransman

This image wouldn't be as great if it weren't for the long shadows projected by all the subjects in the frame. It has a sense of dynamism that draws our attention into the subject. The decision of leaving the sun in the frame feels pretty honest too.

Photo by Karenhy

This is quite a find, and the soft shadows give the image a very warm quality, even though it is an empty and stark environment.

Photo by Deborah

Simple and effective, a simple shadow can create some really interesting designs.

Photo by Kishore Jothady

The way light is captured in this image is splendid and elegant. The leading lines all supporting the idea of climbing up. Great photo!

Photo by Obsidian Urbex Photography

Nature is perfect and has always been an inspiration for architects. This staircase is an obvious Nautilus. The beautiful shadows are offset by the amazing yellow light in the center of the spiral. Strong composition also supports this beautiful, almost surreal, image.

Photo by Clive Eariss

The way the huge shadows hug the subject in this frame makes it a really interesting piece of storytelling. The glaringly modern scene is offset by the woman, who is simply going about her daily shopping. Great juxtaposition

Photo by Rob Eyers

Some could call it abstract, but the truth is that these long shadows have great character. Brilliant whites, strong shadows, leading lines…this is a stunning capture by Rob.

Please feel free to join to our friendly photography community if you haven't done already, and if you are a member, please check out the latest Weekend Photography Challenge for this week, but be careful, the first image is going to give me nightmares for sure…

Discussions You Shouldn't Miss From The Community

Lenny is up to something, don't really know what, but he is. I can pinpoint two different and extremely interesting things he is doing. The first one is a photobook (because he has been asking about mixing color and black and white photography in a book), and besides that, he is also gathering photographers near his place, which is always a great thing for photographers.

Have you ever seen a fish flying? Well, Paul captured a beautiful flying fish flying low (it can't get much higher after all is a fish). I wonder how many frames he shot to capture this splendid wild-life moment.

Photo by bucweet

Did you know that you can make your photographic workflow way easier with specialized controllers? This week Taisya raised a pretty good question about these controllers, and I remembered one that is in my wishlist for making Lightroom even better. We hope to hear more from that controller because other members commented as well, and it does look interesting.

We learn more and more with questions like this one. This week Dahlia had a thing tickling her mind, and asked about how crop factors affect the effectiveness of aperture values. In simpler words, how cropped sensors (1.5 or 1.6 APS-C) affect aperture value on lenses. A lot of valuable information can be found at this thread after her question, and we are sure that it will be helpful for many people out there because is something camera companies rarely talk about. And, did you know that cinema lenses don't have f value but a t value? That and more can be found there at that post.

We'd Love To Hear Your Thoughts

Help these photographers become even better and more passionate about photography. Share your experience, feedback, comments, and critique over at the Tank

  • Shrub on Rocks
  • Gym shoot 2 Or (3?)
  • Eyes
  • Early Morning Los Angeles
  • Palestinian Angst
  • Baba Sheik
  • A Busy Street

This forum is separate from the General Photo Chit Chat because we believe that constructive criticism is one of the best ways any photographer can have in order to progress in less time. Extended comments are way more nurturing and healthy than mere likes!


The post A Spooky Photo Of The Week And A Flying Fish – Here’s What You May Have Missed On The Forums appeared first on Light Stalking.


Photography News

via Light Stalking https://ift.tt/2kwTW5i

October 31, 2018 at 10:02AM
0 Comments

Nikon Z7 Teardown: The Best Built Mirrorless Full-Frame Camera

10/31/2018

0 Comments

 
https://ift.tt/2EVJ6Ax

Nikon Z7 Teardown: ‘The Best Built Mirrorless Full-Frame Camera…’

https://ift.tt/2QeuUnq

After disassembling a Canon EOS R, Roger Cicala over at LensRentals just did a teardown of the Nikon Z7. What he found was one of the best-built cameras on the market today.

You can read Cicala’s full Nikon Z7 teardown article over on the LensRentals blog. We also shared a different teardown of the Z7 by Kolari Vision earlier this month, so be sure to check that one out too if you’re interested in more looks and thoughts on the Z7’s build.

The $3,545 Z7 is Nikon’s top of the line full-frame mirrorless camera while the $2,299 EOS R is Canon’s mid-level one — it will be announcing its pro-grade full-frame mirrorless sometime in 2019 — so it’s not quite fair to directly compare the builds of the Z7 and EOS R. But it’s an interesting look, nevertheless.

One of Cicala’s main findings in his teardown is that Nikon has ultra-weather-sealed the Z7 — there are weather-resisting gaskets everywhere you look, and finer sealing in certain parts than the EOS R and the Sony a7R III.

“In many places the plastic shell doesn’t just interlock; it overlaps, screws together and then is covered with rubber grip and adhesive,” Cicala writes. “That should not only give a superior weather seal, but it’s also probably giving some added strength to the assembly.”

There was similarly great sealing everywhere Cicala looked.

“If there’s an edge, there’s a weather seal,” Cicala says.

“This is not marketing department weather resistance. This is engineering department weather resistance,” Cicala concludes. “[T]his is as robustly weather sealed a camera as we’ve ever disassembled.

“I don’t believe in weather resistance myself. I believe like life; water will find a way. I believe in plastic baggies and rubber bands. I am, however, a great believer in the idea that if you claim to do something, then damn well do it right. This is done right.

“I’m just here to say this is a damn well-built camera, the best built mirrorless full-frame camera we’ve taken apart.”


Photography News

via PetaPixel https://petapixel.com

October 31, 2018 at 09:52AM
0 Comments

The thing that impresses me most about Leica? Its innovation

10/31/2018

0 Comments

 
https://ift.tt/2EQg0SL

The thing that impresses me most about Leica? Its innovation

https://ift.tt/2SzAXnO

Ok, so maybe there's still room for innovation when it comes to memory card access.

It might sound odd to discuss the innovations of a company whose best-known product is anachronistic to the point that you have to take the baseplate off to change the film memory card, but I'm serious.

I know I'm supposed to be impressed by the company's history, its (rather outdated) use as a press camera and the stellar reputation of its lenses. But I'm not, especially*.

I love that Leica doesn't just have crazy ideas, but that it turns them into workable, purchasable products.

It's not that the lenses aren't great. It's just that I'm not terribly impressed a company's ability to make single focal length, manual focus lenses good when money's essentially no object and you can individually correct every one if you have to. My experience of working as an engineering journalist always reminds me that it's many times harder to produce a kit zoom that has to offer decent performance at multiple focal lengths, offers fast autofocus for both stills and video, includes image stabilization and can be made with a degree of consistency for something like $35.

But while I'm not that fussed about all that 'red dot' business, I love that Leica doesn't just have crazy ideas, but that it turns them into workable, purchasable products. Even if they're not necessarily the most affordable ones.

Take an 'e' (off the word Monochrome)

The Bayer color filter array is amazing. It lets spectrally-indifferent sensors perceive color and does so with a good level of resolution and fairly few downsides. Except that it steals around a stop of light.

I love the idea of a mono-only second camera. But perhaps not one that costs more than my (admittedly ludicrous) road bike.

So why not make a mono-only camera? None of the softness and noise that comes from demosaicing, and better, cleaner image capture because you're not letting a series of color filters absorb half your light. That's a great idea, why doesn't someone do that?

Well, Leica has, with the Monochrom series of cameras. They do exactly what you'd hope: produce super-detailed mono images.

Of course, given that you have only one 'color' channel, it becomes more important than ever to avoid clipping, so I wish there was monochrome camera that didn’t meter by looking at the light reflected off the stripes painted on its shutter blades. Also, since it would need to be a second camera for me, I'd prefer it to cost less than a small car. But I have to applaud Leica for doing it, rather than just thinking about it.

What's the opposite of Iconoclasticism?

Again, who would have thought it'd be Leica: a camera brand that added a faux winder lever onto its latest camera, that would design one of the most innovative user interfaces of the past decade?

Love it or hate it, the icon-led touchscreen interface of the Leica T series is one of the few genuine attempts we've seen to completely re-think how you should interact with a camera and its settings. Interestingly, the person I've met who dislikes it most is also one of the few I know who owns a digital Leica rangefinder (though that could be because the first iteration had some interesting quirks). Personally, though, I thought the design struck a good balance between command dials that controlled the primary exposure parameters while letting you tap and swipe the settings, just as you might on a smartphone. Certainly an ambitious thing for a 'traditional' camera company to do.

Settings? There's an app for that

On the subject of smartphones, it's long been suggested that they might provide a solution to the uncontrolled menu sprawl that's overwhelming even the best-designed modern UI. Connecting cameras to smartphones over Bluetooth and Wi-Fi is becomes ever more easy and ever more commonplace, just as the complexity of menu options becomes unbearable, so why not pass-off responsibility for settings to the phone?

Handing off responsibilities for camera settings to a smartphone app makes great sense. I'm not sure the same is true of taking away the rear screen or adding a faux-winder 'thumb rest.'

And, if looked at from a certain angle, that's what Leica's M10-D does. I'm not necessarily convinced that it made sense to keep going and take the entire LCD screen away but pushing set-and-forget settings off to a smartphone app I could get behind. An app can offer a nicer interface with better guides and instructions, meaning the on-camera interface can be stripped back to focus on the main shooting parameters. But perhaps leave me a screen, eh, Leica?

You can't be serious?

I don't want flippant tone to completely undermine my sincerity. I genuinely am more impressed with Leica's innovative thinking than the specifics of its products. I'd love to see some of them more widely adopted. Like having a 36 x 24mm image capture area, that might take off.


* Full marks to every comment or blog post concluding that I don't 'get' Leica. To be clear, I love shooting with its rangefinders. They deliver a unique shooting experience that every keen photographer should strive to have. Even if I wouldn't necessarily recommend spending the cost of a hatchback (or a nice road bike) on one. [Return to text]


Photography News

via Dpreview https://ift.tt/i0r8o5

October 31, 2018 at 08:01AM
0 Comments

5 Tips for Using Continuous Lights in Your Photography

10/31/2018

0 Comments

 
https://ift.tt/2CTXruD

Lighting is an essential building block of photography. Learning how to use light to your advantage can transform an ordinary photo into an extraordinary one. Many photographers begin their journey working with natural light and I firmly believe this is is a great place to start. But depending on the circumstance, artificial light may be needed.

When it comes to artificial light, there are many options to choose from. Speedlights, strobe lights and continuous lights are all at your disposal, not to mention the various light modifiers. But while it’s nice to have this variety, trying to work out which light source is best for your shoot can become overwhelming.

Tips for using continuous lights in your photography

The Difference Between Speedlights, Strobe Lights and Continuous Lights

Tips for using continuous lights in your photographySpeedlights are portable, battery operated lights that can attach to most cameras through the hot shoe mount. They can also be used off-camera by attaching them to a light stand and then activating them via wireless triggers.

Strobes are larger (and typically more powerful) lights that are attached to light stands and activated through wireless triggers. Both speedlights and strobe lights emit a powerful burst of light when fired.

Continuous lights emit light the entire time you have them on. Years ago these lights were commonly used in video production. After using them they’d be physically hot, and you had to wear special gloves to break them down. (I remember those days.)

Thankfully, continuous lights are now more powerful, more portable, and cool to the touch.


When to Use Continuous Lights

Tips for using continuous lights in your photography

Continuous lights are often overlooked in the world of photography. But sometimes they’re the best choice. If you’re an event photographer, you may find yourself shooting in a venue that doesn’t allow flash photography. In these cases, continuous lights may be permitted. Even if flash photography is allowed, you may still opt for continuous lights to avoid being a distraction. If it’s a sensitive event, setting continuous lights and leaving them on may be a better option.

Continuous lights are also a viable option for portrait photography, especially for beginners. When using strobe lights, you can’t truly evaluate your lighting situation until they’re fired. Because of this, they often take more time to set up and adjust. (You need to keep taking photos of your subject and adjusting the lights until they’re right.)

With continuous lights, you can see the lighting situation in real time, which helps you learn to see the best lighting situations and achieve your aesthetic goal. They generally emit an even stream of light onto your subject, allowing you to set them up once and then forget them.

And many strobe lights need a moment to power up between shoots. Those few seconds could bethe difference between a perfect shot and a mediocre one. If you’re taking photos of a subject that might move around a lot such as children or pets, continuous lights may be the answer.

Here are five photography tips to make using continuous lights easier and more effective.

1. Get stronger lights

Because of their design, continuous lights generally aren’t as powerful as strobe lights. To ensure you get a nice light source, opt for more powerful lights. I recommend an LED with at least 1000 bulbs. If it’s too strong, you can always dial it back. Better to have more than you need in these situations.

2. Soften the light

Tips for using continuous lights in your photography

We want a soft light on our subject to avoid unwanted harsh shadows. Continuous lighting is no different. Use light modifiers to soften your light as much as possible, especially if you’re taking portraits. Whether you use softboxes or umbrellas is up to you. (I like using softboxes or scrims.)

3. Check the color temperature

Unlike most photography lights, some continuous lights let you change color temperature. In most cases you’ll want to make sure they’re set to daylight (around 5600k), which will give you the most natural look. Check your lights to make sure they’re set to the right color temperature.

4. Turn off all other available lighting

Because color temperature is so important, chances are the current lighting in the space will interfere and mix the color temperatures. Turn off all other light sources in the space to ensure the only light your camera is working with is the light you’ve provided.

5. Use a three-point light system

If you’re taking portrait, I suggest using a three-point light system, especially with continuous lights as they aren’t as powerful. The two front lights will be your key and fill, while the back light can serve as a hair light or be used to separate your subject from the background.

Ready to Try Continuous Lights?

I hope you consider using continuous lights next time you’re in the studio. The results may surprise you.

The post 5 Tips for Using Continuous Lights in Your Photography appeared first on Digital Photography School.


Photography

via Digital Photography School https://ift.tt/29wB9CX

October 31, 2018 at 08:03AM
0 Comments

How The Death Of Minolta Gave Rise To Sony Cameras

10/31/2018

0 Comments

 
https://ift.tt/2yInZMh

How The Death Of Minolta Gave Rise To Sony Cameras

https://ift.tt/2qjhHxZ

Put your virtual hands up if you own a Sony camera.

Quite a few of you I'm betting.

Now keep those hands up if you remember Minolta cameras. Hmmm, quite a lot less. The thing is, that at the beating heart of your amazing Sony Alpha is the DNA of a great camera company, long since past, Minolta.

Minolta was never a giant like Nikon and Canon, they would probably be regarded as a level down from the two behemoths yet, significant amounts of the technology, not only in your Sonys but also pretty much any other modern DSLR or mirrorless camera comes from the innovation of Minolta through the 70’s, 80’s and 90’s.

Today we are going to look at how a failing film company lives on in one of the world’s most successful photographic brands. 

Minolta: The Film Days

PASM is an acronym many of us know. It stands for Program, Aperture Priority, Shutter Priority, and Manual. Despite its ubiquitousness on modern cameras, it has only been around for 40 years or so and it was Minolta that introduced it to the world.

The camera was the Minolta XD-7 (or XD-11 in the U.S.) and it was one of the best regarded and technologically advanced cameras of the time. Perhaps more than any other camera, it signaled, Minolta’s intent to innovate. 

The genesis for the PASM we know and love today. By Camerafiend CC 3.0

Another feature we take for granted today is autofocus and again it was Minolta that brought this to the photographic world. Although there had been autofocus before, these used specialized and expensive lenses with the autofocus function built into them. Here Minolta innovated and the Minolta 7000F integrated the autofocus into the camera body, leading to the lighter faster lenses we see today.

But that was not the only innovation of the 7000F. It also featured an integrated, motorized film advance into the camera body. Until then, cameras required an expensive and battery intensive attachment to power wind the film. The DNA of this Minolta innovation lives on in the continuous shooting modes that all digital cameras have today.

There is one other innovation that the 7000F introduced to the world, one that is still at the very heart of Sony cameras today, the A-mount system. It is the name that gave birth to the Sony Alpha system.

In-camera autofocus traces its roots back the Minolta 7000. By Montauk Public Domain

Minolta: Early Digital Days

Unlike some other big players in the photographic industry, Minolta was not caught unawares by the digital revolution. Indeed they launched their first digital camera way back in 1995, the 1.75mp Minolta RD-175. Not only was this a digital camera, but it was also a DLSR. It was not the first DSLR, that honor went to Kodak but it was the first DSLR that was hand portable and more importantly, affordable to the consumer market. 

The world's first affordable DSLR. By Rama CC 2.0

Even in the early days of digital, Minolta’s innovation could not be held back. Another feature commonly found on modern cameras is sensor based stabilization. This stems from Minolta’s Dimage A1, a 5mp bridge camera released in 2003.

Rather than use the more complex and expensive method of stabilizing elements within a lens, the A1 moved the camera sensor instead. Incidentally, the bridge camera is also a Minolta innovation, rising from the release of the DiMAGE 7. 

Being one of the smaller camera companies, Minolta struggled financially, to keep up with the big players. In 2003, in an attempt to boost funds, they merged with the much larger film company, Konica, becoming Konica Minolta Ltd.

However, Minolta’s earlier failed attempts to capture a segment of the professional film camera market signaled its eventual downfall. Minolta’s digital cameras were mainly aimed at the consumer market at a time when the big digital players realized it would be the professional market that would drive initial demand. 

 The Arrival Of Sony.

By the early years of the millennium, Sony was a massive, global electronic brand manufacturing a diverse range of products from audio to televisions. Their relatively small digital camera business was, like Minolta, focussed on the consumer market.

They did, however, recognize the wealth of innovation and engineering talent that Konica Minolta still possessed and in 2006 created a new partnership with them. Six months later, Konica took the decision to leave the camera business altogether and sold it to Sony. 

Sony had been looking to get into the DSLR market and Minolta was a perfect match and in particular Minolta’s technologically advanced Alpha mount. 

Within a year, Sony had their first DLSR ready for the market, the Alpha A100. It was a 10.2mp camera, very much built around an older Minolta design and featuring many of Minolta’s innovations. These included in-camera stabilization and eye start autofocus. 

Taking much of Minolta's design and technology, the A100 was Sony's first DLSR. By Holger Fink Public Domain

The A100 was the launch pad. Sony’s vast wealth allowed them to create an ambitious roadmap of camera releases. This culminated in 2008 with the announcement of a full frame DSLR with the largest pixel count yet seen, 24.6mp, the Alpha 900.

It signalled Sony’s intent to play with the big boys. 

Shots fired at the big boys. The a900. By Yorkfield CC v3.0

Using Minolta’s base technologies and their own innovations, Sony continued with their ambitious plans, releasing a wealth of well-received products both in the DSLR and compact markets. 

Realizing the potential of the emerging mirrorless market, Sony went all out on producing the world’s first full frame mirrorless camera, the Alpha 7. By now the fabled Minolta Alpha mount had been superseded by Sony’s own E-mount but, if you dig deep, you'll find a significant amount of the DNA of the Alpha 7 comes from the innovation of Minolta. 

The mirrorless revolution is being driven by Sony. By Jürgen Matern CC v3.0

Perhaps the moral of this story is that not all photographic companies that fail, end up in the dustbin of history. While there might not be very much left of companies like Kodak or Bronica, the innovation of Minolta lives on deep inside one of the most successful photographic brands of the modern era.

As someone who was a rare Minolta professional user in the 1990’s that brings a warm glow to my heart. 

As always, give us your thoughts in the comments below.


Photography News

via Light Stalking https://ift.tt/2kwTW5i

October 31, 2018 at 07:00AM
0 Comments

Efficiency Through Consistency in Lightroom Classic: Part 1

10/31/2018

0 Comments

 
https://ift.tt/2ACC4MJ

Posted By Rob Sylvan on Wednesday, October 31, 2018 in Featured, Import, Lightroom Classic, Lightroom Tips | 0 comments

We love Lightroom for the power of the Develop module, but there is so much more to love about how it can streamline our entire post processing and asset management workflows. Over the next two weeks I’m going to share some of my favorite practices for becoming more efficient. One of Lightroom’s greatest strengths is its ability to help you create a consistent foundation to your workflow that saves you time through its efficiency and gives you dependable results. In fact there’s a number of things you can do right from the start that will help you create a more consistent workflow.

Consistent Naming Practices

One of the first places is creating a consistent file naming and folder naming convention. I don’t believe that there is a single right way to name files and folders, but as long as the method you choose makes sense to you (most importantly) and it can scale up over time, then that should do the trick. Lightroom can help you with both of these jobs, so let’s look at folder names first.

Folder Naming

I like to use Lightroom to create folders as part of the import process, and I also like to use the automated date-based folder name structure as it scales nicely into the future without me having to do anything more. The one thing I don’t like about Lightroom’s automated folder naming functionality is that you can’t customize the date-generated names to include more than just a date. However, this limitation is easily overcome after import. Here’s my approach:

Step One: In the Destination panel of the Import dialog set the Organize option to By date and choose a Date Format that suits your needs.

Step Two: Select the parent folder where you want Lightroom to create these date-based subfolders.

Note: Lightroom creates the subfolders based on the capture date of the photos being imported, and these new folders will appear in the Destination panel in an italicized font.

Step Three: Configure the rest of the Import dialog options and click the Import button.

Once the import process is complete you’ll see the new folder(s) appear in the Folders panel. At this point I’ve got the date-based folders, which is great, but I also want to add a descriptive word or two to the folder name to help me know what the folder contains. This is easily done simply by ctrl-clicking (PC: right-clicking) the folder name and choosing Rename from the contextual menu that appears. This opens the Rename Folder dialog box where you can add a word or two and click Save, which renames the folder on your drive and updates the catalog to reflect this change.

For me, this process gives me the best of all worlds, which is an automated process that contains meaningful information and scales nicely into the future.

File Naming

When it comes to individual file names I also look to Lightroom to automate the process. Again, this is an area with a lot of room for individual customization as we all have our own needs to fill, but the basic process starts with creating a custom filename template that includes the information that is important to you. Once you create a filename template you can configure it to be applied from the File Renaming panel of the import screen, or you can apply it at will from the Library module after import. You’ll need to decide where it suits your workflow best, but I know some people prefer to rename after import so that they can delete bad photos then rename all remaining files with a continuous sequence number that doesn’t contain any missing numbers.

You can access the Filename Template Editor from any place you can rename photos. From the Library module, go to Library > Rename Photo(s), then click the File Naming drop-down menu in the Rename dialog box and choose Edit. From the Import screen, expand the File Renaming panel, click the Template drop-down menu and choose Edit. Once the editor is open the steps for creating a new template are the same.

Step One: Delete any existing tokens from the editing window to start fresh.

Step Two: Choose any combination of tokens to create a template that suits your desired file name convention.

Note: You can hard code data into the filename template simply by typing into the editing window. For example, I often enter a hypen or underscore separator by typing this character between tokens.

Step Three: Click the Preset drop-down menu and choose Save current settings as a new preset to save your template for reuse. Give it a meaningful name that represents the tokens used.

A simple template I use consists of the Date token in YYYYMMDD format, followed by an underscore, followed by the Filename number suffix token (this is the camera generated sequence number without the three letter prefix), which is shown in the figure. These can be quite sophisticated, but I lean toward keeping it short and sweet.

Next week I’ll explore additional tools to make your workflow more consistent, efficient, and customized to your needs.


Photography

via Lightroom Killer Tips https://ift.tt/2sh0aZ8

October 31, 2018 at 03:13AM
0 Comments

Hustlers of the world there is one mark you cannot beat: the...

10/31/2018

0 Comments

 
https://ift.tt/2ACtk9n

“Hustlers of the world, there is one mark you cannot beat: the...

https://ift.tt/2JvMrVy


“Hustlers of the world, there is one mark you cannot beat: the mark inside.”

William S. Burroughs.


Photography News

via The Impossible Cool https://ift.tt/2a18MfQ

October 30, 2018 at 11:01PM
0 Comments
<<Previous

    Categories

    All
    Bokeh Photography
    Dogs
    Film Photography
    IPhone Photography
    Photography News
    Portraits

    Archives

    November 2020
    October 2020
    September 2020
    April 2020
    January 2020
    September 2019
    August 2019
    July 2019
    June 2019
    May 2019
    April 2019
    March 2019
    February 2019
    January 2019
    December 2018
    November 2018
    October 2018
    September 2018
    August 2018
    July 2018
    June 2018
    May 2018
    April 2018
    March 2018
    February 2018
    January 2018
    December 2017
    November 2017
    October 2017
    September 2017
    August 2017
    July 2017
    June 2017
    May 2017
    April 2017
    March 2017
    February 2017

    RSS Feed

All content copyrighted (C) 2010 ~ 2020
​All Photos & Content Used Under Creative Commons
​www.RickRea.com 701-200-7831
Privacy Policy
  • Home
  • Blog
    • Social Media News
    • SEO Marketing News
    • Digital Trends News
    • Photography News
    • Mobile Marketing
    • Business News
    • Gadget News
    • Printing News
  • Contact
  • About
  • Subscribe