


Canon USA introduces new instant rebates on select RF lenses
Canon USA has started a new instant rebate program on select RF mount lenses.
|
https://ift.tt/2LitrMu
Awhile back, Adobe revamped the entire functionality behind applying camera profiles to our photos in Lightroom Classic, Camera Raw, and the cloud-based Lightroom. They really took it up a few notches by giving us the ability to create custom profiles as well as install profiles from third-party suppliers. If you’re like me, you’ve probably explored the pre-installed ones, downloaded and installed a bunch, and possibly even created some of your own. Managing those profiles over time isn’t incredibly intuitive, so here are some tips to help. Let’s start in Lightroom Classic’s Basic panel, and click the icon to open the Profile Browser. 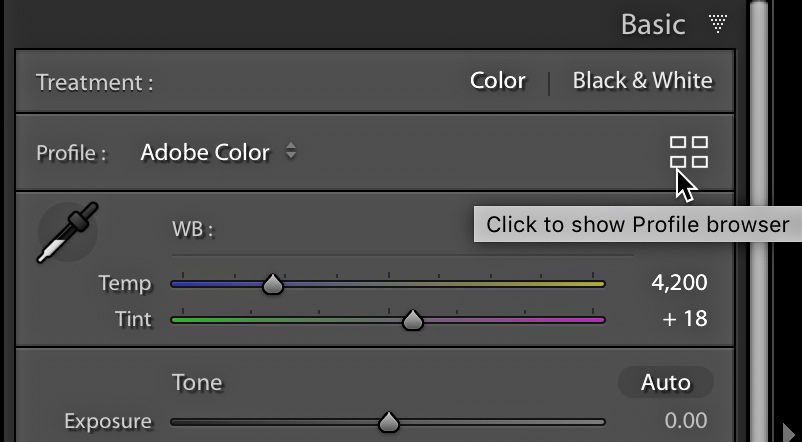
Depending on the file type of the photo you have selected when you open the Profile Browser, you will see all of the available profiles that work with that file type. For example, some profiles only work with raw photos, so if you have a non-raw photo (JPG, PSD, PNG, TIF) selected, you won’t see the profiles for raw photos. Profiles are grouped into folders, and groups of folders are separated into clusters based on who created the profiles. If you have not created or installed any new profiles, then you will just see the ones that come with the software. Up at the very top is the Favorites section (more on that later), and if you have a raw photo selected you’ll see the Adobe created cluster of profiles for raw photos under Favorites. Below the cluster for raw photos is a cluster of four profile folders (Artistic, B&W, Modern, and Vintage) that work on raw and non-raw photos alike. If you’ve installed any third-party profiles or created your own those will appear next. 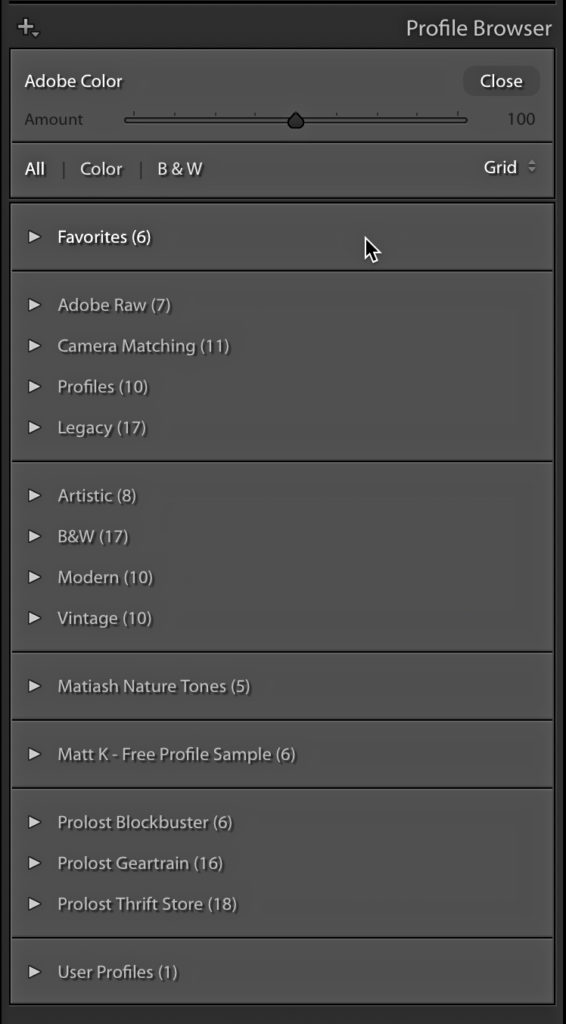
Marking FavoritesAs you explore the pre-installed profiles you may find that you have a few go-to favorites. To make those go-to profiles accessible without having to jump into the Profile Browser you can mark them as Favorites. Here’s how: Step One: Place your cursor over the profile you want to mark as a Favorite. Step Two: Click the star icon that appears int he upper-right corner of the profile to mark it as a Favorite. 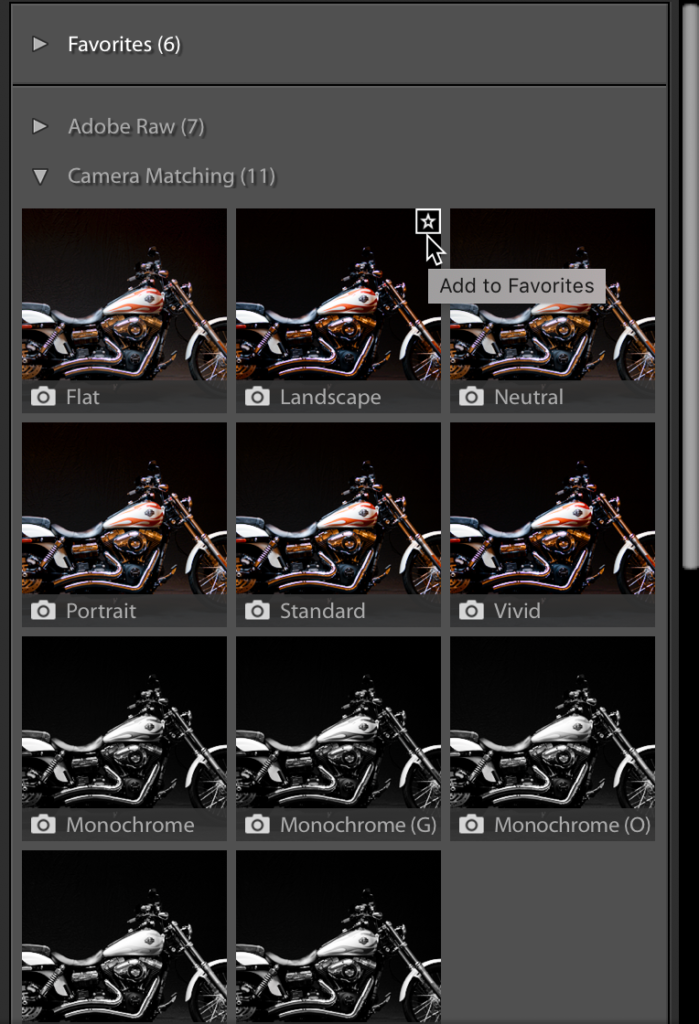
That profile will now also appear in the Favorites folder at the top of the Profile Browser, but more importantly it will also appear in the Profile drop-down menu in the Basic panel for easy application. Just click that star icon a second time to remove that profile from Favorites. Hiding Profile FoldersIf there are entire folders of profiles that you don’t use and you’d like to clean up the interface, we do have the ability to hide each folder. Here’s the cool thing, if you mark a profile as a Favorite and then hide the folder where that profile lives, the profile will still appear under Favorites. So, if you look through an entire folder, mark the ones you like as a Favorite, and then hide that folder you can still apply the ones you like without having to sort through all the profiles you don’t like. This could make your Favorites section unwieldy with too many profiles, but you get the idea. To hide entire folders of profiles, click the + sign at the top of the Profile Browser (or right-click the name of any profile folder) and choose Manage Profiles to open the Manage Profiles dialog box. 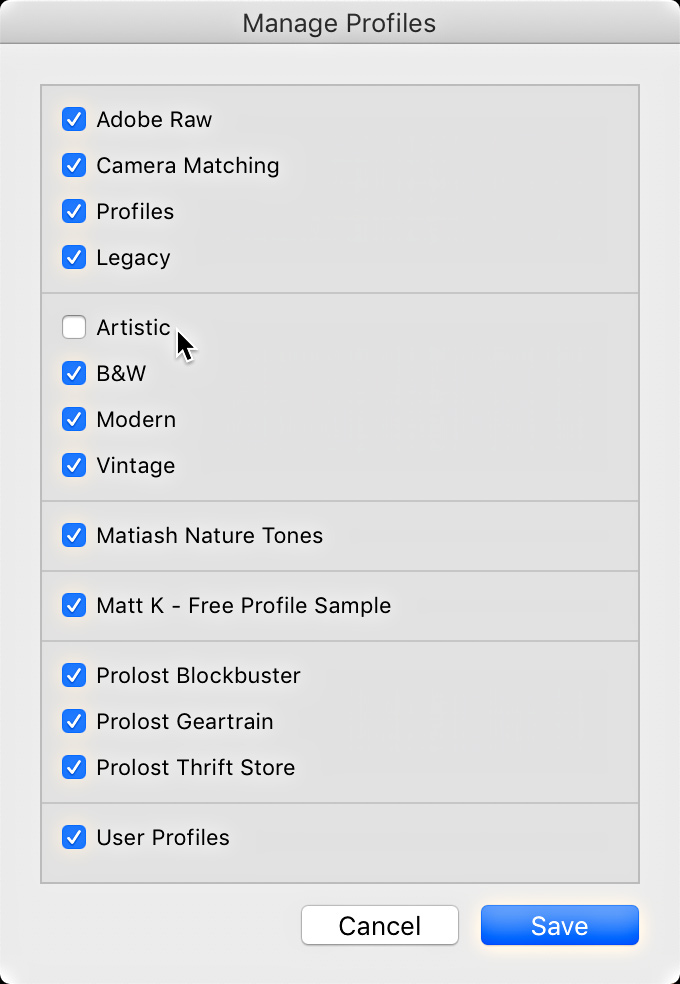
From the Manage Profiles dialog box you can uncheck the name of any profile folder to hide it from the Profile Browser. To reveal a folder again, just head back into the Manage Profiles dialog box and re-check the box next to that folder to bring it back. Note, any changes you make here in Lightroom Classic will be reflected in the Camera Raw plug-in for Photoshop the next time you launch it. The Camera Raw plug-in also has some additional options not found in Lightroom Classic, so we’ll take a look at those next week. The post Tips For Managing Profiles appeared first on Lightroom Killer Tips. Photography via Lightroom Killer Tips https://ift.tt/2sh0aZ8 September 4, 2019 at 09:37AM
0 Comments
https://ift.tt/2MUt4do
The post Your Comprehensive Guide to Photography Post-Processing Software appeared first on Digital Photography School. It was authored by Herb Paynter. My recent article, 3 Alternative Post-Processing Applications that Challenge the Adobe Throne, presented just three of the many post-processing software packages available (both free and paid) that provide excellent post-processing capabilities. In this article, I’ll give you a much longer list of post-processing software. To be impartial, I’ll list the titles in alphabetical order. 
DXO Photolab 2 A few of the titles added by readers in the Comments section of the “3 Alternatives” article impressed me with their power and innovative design. I’ve been editing digital images with every software package available since late 1986, and I thought I’d seen most of them. However, it seems that the list of capable editing software grows weekly. As you will notice, I do not mention ALL the software available for download or online use. Those that made the cut will be actual production titles with a minimum set of well-designed editing functions. To be honest, I’ve looked at a significant number of offerings that are little more than public domain routines. They are not fully implemented or even adequately defined. These were considered but not listed. Listed below is a wide variety of packages on both mobile and laptop/desktop platforms; a true variety pack that covers the field from hobbyist to professional users. No matter what your preference, you’ll find something here to tickle your fancy and meet your demands. 
ACDSee Photo Studio Professional As was welcomed in my first article, additional post-processing software titles should be added to this list by readers who have discovered (and used) them. It is important to recognize all such products in a desire for fairness and sharing information. Because this list includes many more titles, I will not mention individual features of these titles, only a brief mention of the product’s most notable features. This is where you can really contribute… I’ll rely on you to describe your favorite features and benefits of your favorite titles. Let’s make this a very collaborative group effort BUT with one important request: please be brief and succinct with your comments. Limit your comments to one or two of the features that make your favorite app stand out from all others. That way, we learn from each other without monopolizing the mutual pulpit. 
Skylum Luminar 3 List of photography post-processing softwareACDSee Photo StudioPublisher: ACDSee Systems International Website: https://www.acdsee.com/en/index/ Trial: Free/30 days Price: $60 Mac/Win/Mobile Afterlight 2Publisher: Afterlight Collective Android Website: https://play.google.com/store/apps/details?id=com.fueled.afterlight&hl=en_US Apple Website: https://apps.apple.com/app/id1293122457 Trial: Free/30 days Price: $60 Mac/Win/Mobile Affinity PhotoPublisher: Serif Website: www.affinity.serif.com Trial: Free/30 days Price: $50 Mac/Win/iPad Capture OnePublisher: Phase One Website: https://www.phaseone.com/en/ Trial: Free/30 days Price: $299 or $20/month Mac/Win DarktableWebsite: www.darktable.org Price: Free Exposure X4.5Publisher: Alien Skin Website: https://www.alienskin.com Trial: Free/30 days Price: $119 Mac/Win Computer FotorPublisher: Fotor Android Website: https://play.google.com/store/apps/details?id=com.everimaging.photoeffectstudio&hl=en_US Apple Website: https://apps.apple.com/app/id440159265?referrer=click%3D8cd7ac09-77a3-42f6-9005-ed622bd3e17f Price: Free GimpPublisher: Gimp Website: https://www.gimp.org Price: Free Mac/Win Computers Google PhotosPublisher: Google Website: https://www.google.com/photos Price: Free online Lightroom CC and Lightroom ClassicPublisher: Adobe Systems Website: https://www.adobe.com/creativecloud/photography.html Trial: Free/30 days Price: $10/mo Mac/Win 
Adobe Lightroom Tablet/Computer/Mobile Online Photo EditorPublisher: PicMonkey Website: https://www.picmonkey.com/ Trial: Free/7 days Price: Starts at $7.99/month Photo RAWPublisher: ON1 Website: https://www.on1.com/products Trial: Free/30 days Price: $80 PhotoLab 2Publisher: DxO Website: https://shop.dxo.com Trial: Free/30 days Price: $129 Mac/Win Mobile/Computer Paint Shop Pro X9Publisher: Corel Website: https://www.paintshoppro.com/en/ Trial: Free/30 days Price: $80 Mac/Win 
Anthropics Portrait Pro 2 Photoshop/Camera RAWPublisher: Adobe Systems Website: https://www.adobe.com/creativecloud/photography.html Trial: Free/30 days Price: $10/mo Mac/Win Photoshop ElementsPublisher: Adobe Systems Website: https://www.adobe.com/creativecloud/photography.html Trial: Free/30 days Price: $59.99 Mac/Win Photoshop ExpressPublisher: Adobe Systems Android Website: https://play.google.com/store/apps/details?id=com.adobe.psmobile&hl=en Apple Website: https://apps.apple.com/us/app/photoshop-express-photo-editor/id331975235?mt=8&ign-mpt=uo%3D4 Price: Free PhotoPadPublisher: NCH Software Website: https://www.nchsoftware.com Trial: Free/30 days Price: $40 PicsArtPublisher: PicsArt Android Website: https://play.google.com/store/apps/details?id=com.picsart.studio Apple Website: https://apps.apple.com/us/app/picsart-photo-studio/id587366035 Price: Free Pixlr EditorPublisher: Pixlr Android Website: https://play.google.com/store/apps/details?id=com.pixlr.express&hl=en_US Apple Website: https://apps.apple.com/us/app/pixlr-photo-collages-effect/id526783584 Price: Free online 
Pixlr Mobile Android/IOS PortraitPro 18Publisher: Anthropics Website: https://www.anthropics.com Trial: Free/30 days Price: $45 Mac/Win RAW TherapeePublisher: Softpedia Website: https://www.softpedia.com Price: Free (but only offered on Windows) Skylum Luminar 3Publisher: Skylum Website: https://skylum.com/luminar Trial: Free/30 days Price: $70 Mac/Win Computer Smart Photo EditorPublisher: Anthropics Website: https://www.anthropics.com/smartphotoeditor/product/ Trial: Free/30 days Price: $30 Wind/Mac SnapseedPublisher: Google Android Website: https://play.google.com/store/apps/details?id=com.niksoftware.snapseed&hl=en_US Apple Website: https://apps.apple.com/us/app/snapseed/id439438619 Price: Free Sumo PaintPublisher: Sumo Website: https://www.sumopaint.com Trial: Free/30 days Price: Free version, but Sumo Pro is $4/month Topaz Studio 2Publisher: Topaz Labs Website: topazlabs.com Trial: Free/30 days Price: $100 Mac/Win 
Anthropics Smart Photo Editor ConclusionSome titles didn’t make this list’s cut simply because they are only marginally useful. Needless to say, in today’s market, there is an innumerable slew of entertainment-level phone/tablet-based image “editing” apps also available. There are way too many even to mention, let alone keep current information on. Many of these apps are made for the amusement of the younger social media crowd who appreciate more unicorns and stickers than serious editing power. Not to sound judgmental, there is an app for everything and everyone, but this listing is “focused” on actual photo editing capabilities more than the social media aspect.
The post Your Comprehensive Guide to Photography Post-Processing Software appeared first on Digital Photography School. It was authored by Herb Paynter. Photography via Digital Photography School https://ift.tt/29wB9CX September 4, 2019 at 07:40AM Industry News: Nikon announces development of the D6 and AF-S Nikkor 120-300 f/2.8E FL ED SR VR9/4/2019
https://ift.tt/2Uv6lWg
MELVILLE, NY (September 4, 2019 at 12:01 A.M. EDT) – Nikon Inc. is pleased to announce the development of the Nikon D6 professional DSLR camera and Read more... Photography via Canon Rumors https://ift.tt/2v4dYqS September 4, 2019 at 07:19AM
https://ift.tt/32q9ZDl
The post Thoughts and a Field Test: The Tamron 17-28mm f/2.8 Lens for Sony appeared first on Digital Photography School. It was authored by Suzi Pratt. Sony lenses are notoriously expensive, so it’s a welcome relief that third-party manufacturers have been making solid E-Mount lenses. The Tamron 17-28mm f/2.8 is one such lens. It is the highly anticipated follow-up to the Tamron 28-75mm f/2.8, which was announced in 2018 and is almost always on backorder due to its popularity. After testing the Tamron 17-28mm f/2.8, I have no doubt that this lens will be equally popular. Read on to find out why.
The Tamron 17-28mm f/2.8 tech specsFirst off, 17-28mm is indeed a niche and unique focal length. No other manufacturer makes a lens with this range. The closest comparison is the 16-35mm f/2.8, a focal length made by Sony, Canon, and Nikon. If you’re disappointed about having less reach with the Tamron, consider that if you use this lens with a Sony full-frame, you can always shoot in APS-C mode, which gives you more range. This is one of the most useful features on my Sony a7R III. Why Tamron went for this slightly more limited focal length is puzzling, but it likely explains how they kept the lens to such a small size. In the comparison photo below, you’ll see that the 17-28mm is essentially the same size as the original Canon 16-35mm f/2.8 and the Sony 24-70mm f/4. Weight-wise, the Tamron is the lightest, coming in at 420 g (0.93 lbs). That is quite a bit lighter than Sony’s own 16-35mm f/2.8, which weighs a whopping 680 g (1.5 lbs). Since we’re on the subject of comparisons, let’s talk price. Sony charges $2,200 USD for their 16-35mm f/2.8 lens. While their lens offers more solid construction and a more flexible focal range, this is still a chunk of change. On the other hand, the Tamron 17-28mm is priced at $899 USD, which is quite reasonable for an f/2.8 lens. 
Size comparison of the Canon 16-35mm f/2.8 (left), the Tamron 17-28mm f/2.8 (center), and the Sony 24-70mm f/4 (right). Image stabilizationThe Tamron 17-28mm lens does not have optical image stabilization (OIS). However, it’s so lightweight that it’s still pretty easy to shoot stable photos and videos handheld. In fact, its size goes well with the Sony a7R III and the Sony a7 III. AutofocusThe Tamron 17-28mm f/2.8 is equipped with a smooth and quiet autofocus (AF) system. It pairs well with modern Sony mirrorless cameras, and all AF modes are available, including Eye AF. In practice, I found Eye AF to be a bit sluggish and hit or miss. But then again, I don’t consider 17-28mm to be my ideal focal range for portraits anyway, and I would rather reach for a midrange zoom or a standard 50mm lens. Best uses for the Tamron 17-28mm f/2.8A wide-angle lens like the 17-28mm is ideal for capturing landscapes, interiors, and real estate. Those are the types of photography I focused on while testing this lens. The portraiture I did was minimal, and it was mainly for the purpose of shooting at an aperture other than f/11 to see how the bokeh performed (it did very well). 
A handheld shot taken from a doors-off helicopter ride. Image qualityFor my first test shooting with the 17-28mm, I took it on a doors-off helicopter ride. If you’ve ever been on one of these, you know how incredibly windy it can be in the main cabin and how difficult it is to get any shots in focus. This is very much a “spray and pray” kind of photography scenario. To my surprise, the 17-28mm did incredibly well. From the moment I started shooting with the Tamron 17-28mm, I almost immediately forgot it was a third-party lens. Autofocus was snappy (I wasn’t using Eye AF), there was zero lag or miscommunication between the lens and the camera, and the image quality was stunning. Photos were tack sharp, there was no distortion, and the colors even seemed to pop a little more than usual.
Physical constructionSince this lens is so compact and lightweight, don’t expect all-metal or polycarbonate materials like Sony uses in their GM lenses. However, the build quality of the Tamron 17-28mm still feels very solid in the hands, and I think it would hold up well over time. Tamron says the 17-28mm is equipped with “moisture-resistant construction” and a hydrophobic fluorine coating to repel dirt and fingerprints. Not much else is said about weather sealing, and I wouldn’t feel comfortable subjecting this lens to extreme weather conditions.
6-year Tamron warrantyOne of the biggest benefits of buying a Tamron lens is their generous 6-year warranty. Effective for six years from the date of purchase (in the USA only), Tamron lenses are “warranted against defective materials or workmanship.” Meanwhile, Sony provides 1 year of warranty on their lenses. A match made in photographer heavenBased purely on specs, this lens pairs beautifully with the Tamron 28-75mm f/2.8. In fact, Tamron claims the combined weight of both of those lenses equates to less than 1 kg (2.2 lbs), which is incredibly light for two f/2.8 lenses. Both lenses also take the same filter size of 67mm, making it easy to swap polarizers and ND filters. This feature alone makes it very compelling to invest in both lenses.
ConclusionDuring the reigning days of DSLRs, many photographers scoffed at third-party lenses, saying that “you get what you pay for.” Perhaps back then they had a point. But today, third-party lenses have really stepped up their game, and the Tamron 17-28mm f/2.8 is one of the best examples of superior third-party glass. If you’re in the market for a wide-angle lens for your Sony body, you can’t go wrong with this lens. For more information on the Tamron 17-28mm f/2.8 lens for Sony, check out this video I filmed, along with some additional sample photos below: ?
The post Thoughts and a Field Test: The Tamron 17-28mm f/2.8 Lens for Sony appeared first on Digital Photography School. It was authored by Suzi Pratt. Photography via Digital Photography School https://ift.tt/29wB9CX September 4, 2019 at 05:11AM
https://ift.tt/2zKCSOl
 | Canon Rumors") Canon USA has the refurbished copy of the Canon EF 200-400mm f/4L IS USM 1.4x for $8799 (Reg $10999). This lens does not come refurbished direct from Canon very often, Canon EF 200-400mm f/4L IS USM 1.4x features:
Canon EF 200-400mm f/4L IS USM 1.4x $8799 (Reg $10999) Photography via Canon Rumors https://ift.tt/2v4dYqS September 3, 2019 at 08:27AM
https://ift.tt/2PFvKO1
The post A Step-by-Step Guide to Achieving the Perfect Starburst Effect appeared first on Digital Photography School. It was authored by Simon Ringsmuth. Adding a starburst effect to your images is a great way to spice things up and really grab the attention of your viewers. Seeing rays of light slice through your photo is one of the most enjoyable tricks to pull off, especially if you haven’t really done this sort of thing before. While some software programs let you do this on your computer, the real magic comes when you do it by knowing how to use your camera.
Step 1: Find a light sourceCreating the starburst effect isn’t difficult. But it does require a bit of training and practice to pull off. You’ll need a few basics to get started: First, you’ll need a bright source of light, such as the sun. A street lamp or really powerful flashlight will work too, but the sun is nice because it’s always available and doesn’t cost money to use. If you don’t mind shooting pictures at night, you can get a starburst effect quite easily with a street lamp or other source of light. However, night photos might not look as interesting or visually compelling as shots of the sun. Ironically, you also need something to block most of the sun. This is because the sun itself is too large and bright to give you good starburst shots; just a sliver of its light is all you need. Buildings and trees work great, but whatever you use can’t be too far away. If the thing blocking the sun is separated from you by too great a distance, you won’t get the starburst effect. 
The effect isn’t as pronounced in this image, but it’s definitely there. Using a structure to block most of the sun is a great way to help you achieve a good starburst. Step 2: Choose a small apertureAs far as your camera goes, the one setting that really matters is your aperture. To get a good starburst, your aperture should be small, such as f/11 or f/16. This means you will need a camera with aperture control, such as a DSLR or mirrorless system. Nearly all mobile phones use wide apertures and very few of them allow you to have any control over the aperture at all. So if you want to pull off a cool starburst effect in-camera, you’re going to need a dedicated camera and not just a phone. Step 3: Set up for your starburst shotThe basic setup for a starburst effect photo is also fairly simple and works best when the sun is lower on the horizon during the morning or late afternoon. You can do it at other times of day, but it’s a little more difficult to find objects that obscure the sun when it’s directly overhead.
To achieve the starburst effect, position yourself so that the sun is off in the distance and the object obscuring it is not too close and not too far. Then set your aperture to f/11, point your camera in the direction of the light, and take a picture. Take care to not point your camera directly at the full sun, as it could damage your sensor or your eyes. Just a sliver of the sun and a small aperture is all you need. Step 4: Experiment with different setupsIf the object you use to block most of the sun is too far away, the starburst effect will be much more difficult to achieve. In the shot below, you can just barely see the points of light emanating from where the sun is peeking over the clouds. It’s subtle and can work if it suits your compositional goals for the image, but I don’t find shots like this to be nearly as fun as other starburst images.
There’s a lot of creative things you can do when you start experimenting with starbursts. In the picture below, the sun was obscured just a bit too much by the tree branch. The cicada exoskeleton looks fine, but the photo lacks something in the way of a visual spark.
I adjusted the position of my camera by mere millimeters so as to get the tiniest bit of the sun poking out below the branch. The result is a much more compelling photo:
The addition of a starburst adds a whole new dimension to the photograph and elevates it to a whole new level. Note: How aperture alters the starburst effectTo see why a small aperture is important, look at the following photos, which were taken just a few seconds apart. The first used a large f/1.8 aperture, and as a result, the sun is a large yellow blob in the sky and not all that interesting. This is similar to the type of picture you could take on a mobile phone since most of those have large apertures ranging from f/1.8 to f/2.8. 
I took this photo with an f/1.8 aperture at 50mm. Stopping down to f/11 changes the image dramatically. Not only is the foreground and background in focus, but the sun is now a brilliant star pattern. This is a direct result of the smaller aperture. 
I took this photo with an f/11 aperture at 50mm. A similar effect is seen in the two photos below. Taken at different locations, they illustrate the effect quite clearly. The first shows a row of lights fading into the distance, and because I shot it at f/1.8, they appear as blurry orbs. This isn’t a bad thing, as my intent was for the viewer to focus on the light in the foreground. 
I took this photo with an f/1.8 aperture at 50mm. The next image shows a similar row of street lights, but the small aperture I used caused every point of light in the image to appear as a starburst. 
I took this photo with an f/13 aperture at 50mm. Even the green traffic lights far in the distance are starbursts. You can see how this dramatically alters the overall effect of the picture. If I had used a larger aperture, it would be an entirely different image. ConclusionMy favorite part of shooting starburst photos is how easy it is once you get the hang of it. It’s also rather gratifying to know you can do it just by manipulating your camera.
Have you tried using the starburst effect in your images? What tips or tricks do you have for the DPS community, or for others who might not have done this type of photography before? Leave your thoughts in the comments below!
The post A Step-by-Step Guide to Achieving the Perfect Starburst Effect appeared first on Digital Photography School. It was authored by Simon Ringsmuth. Photography via Digital Photography School https://ift.tt/29wB9CX September 3, 2019 at 07:40AM
https://ift.tt/2ZCPmXT
The post How to Use a Pinhole Body Cap for Awesome, Creative Photography appeared first on Digital Photography School. It was authored by Charlie Moss. Making a pinhole body cap is a rite of passage on any digital photographer’s journey. It’s a great way to get some of the unpredictability of analog photography without spending loads money on film or having to wait for the results to come back from a lab.
But how do you make a pinhole body cap? And what do you shoot once you’ve made your pinhole body cap? That’s what you’ll discover in this article. What is a pinhole body cap and how do you make one?First things first: Let’s talk about pinhole body caps and how you make one. For that, you need to know what a pinhole camera is. A pinhole camera is essentially a light-proof box with a small hole in one side. Light passes through the hole and projects an image on the opposite side of the box. It’s a tiny camera obscura – an optical phenomenon that has been known and used for hundreds of years. If you put photographic film or paper inside the box, you can record the image that the camera obscura produces! So by modifying a camera body cap, you’re essentially creating a digital version of the camera obscura. It’s very easy to do! You just need to buy a cheap body cap for your camera (don’t worry about it being on-brand and don’t destroy the one that came with your camera) and put a hole in the middle of it.
I use a tiny drill bit (and a holder meant for model-making) to put the smallest hole I can create in the center of the body cap. Then I take a small piece of black construction paper and put a hole in it with just the very tip of a skinny sewing needle. Next, tape the construction paper into place on top of the hole you’ve just drilled, lining up the two holes as carefully as possible. Finally, place the body cap directly onto the camera body and you should be ready to go! (Note: On some digital cameras, you may need to use a setting that allows you to shoot without a lens attached. If you’re struggling to find this, check your camera manual.) What’s so special about pinhole shooting?There are a few great features of pinhole camera photography that you might want to think about as you plan what to shoot. Using a pinhole body cap is completely different than shooting with a traditional lens. 
Concentrating on shape and texture can create striking pinhole body cap images. Almost infinite focusThe first thing to note is that pinhole cameras have an incredibly large depth of field. You can’t focus a pinhole body cap, but that’s okay. You don’t need to. You’ll get images that are sharp throughout. (However, this means you’ll lose any shallow depth of field or bokeh effects.) Instead of blurring out any inconvenient backgrounds, you need to work with your surroundings in mind when you compose images. No distortionIf you’re using a wide-angle pinhole body cap (the focal length of your pinhole body cap is the distance from the pinhole to the sensor), then there will be no lens distortion. When you are shooting architecture, the walls of the building will appear completely straight rather than curved as they would with many wide-angle lenses. 
Using hard light to create contrast can be a way to make images appear sharper. It is possible to increase the focal length of your pinhole body cap by using extension tubes and the like (or a cardboard toilet roll with the inside painted black). Test out different focal lengths and see what you can achieve! Long exposure timesThe downside of all that depth of field is that you’ll generally need a pretty long exposure time for most shots. This does mean that you can work with interesting blur effects. If you’re shooting urban spaces you can also blur out most of the people in the image, too. On the other hand, you generally need to take a tripod with you when you go out shooting with your pinhole body cap. The exposures will probably be too long to handhold your camera. 
Asking your subject to move while photographing them can produce interesting effects. It can be interesting to explore either intentional camera movement effects or long exposures on moving subjects with a pinhole body cap. I particularly enjoy using a pinhole body cap to shoot portraits of people. Try looking at the portrait work of Victorian photographers who used wet plates, or the more modern long exposure portraits (with a large format camera) by Sally Mann. These can provide some inspiration for your pinhole photography of people. Help! All my images are soft!The sharpness of a pinhole image depends largely on the size and accuracy of the pinhole you create when building your pinhole body cap. Unsurprisingly, putting a hole in a piece of construction paper is a pretty inaccurate way to build photographic equipment. The smaller the pinhole, the more accurate the image will be. And the neater the edges of the pinhole, the more perfect the circle around your image will be. 
These two images are a direct comparison of a 35mm lens on a Fujifilm body (about a 50mm equivalent) and a pinhole body cap on the same body. The camera wasn’t moved between shots, and both images were cropped the same. Ultimately, you’re going to need to embrace the heavy imperfections of this style when you plan what you’re going to shoot. Images will be in focus, but they will be very soft – and that’s not something you can correct afterward! If you really enjoy digital pinhole photography then you may want to explore some of the laser cut pinholes that are available on the market. They are very tiny, accurate circles and will create a more technically perfect image. Of course, the smaller the pinhole, the longer the exposure you’ll need. This is because less light is hitting the sensor, so everything is a trade-off. With extremely tiny pinholes you can be looking at exposures of many minutes rather than a few seconds. Seeing the world differentlyI find that using a pinhole body cap forces me to approach photography differently. Because of the soft quality of the images and the large depth of field, I tend to focus on things like color and shape rather than the subject matter itself. It’s a great way to think about different kinds of composition rules.
If you end up with a pinhole that isn’t quite circular (like most of mine), that can also be a good thing to experiment with. Finding objects that fit inside the pinhole shape you’ve made can create some really unusual images. What are you waiting for?Time to get out and shoot! One of the best ways to improve your pinhole body cap photography is simply to head out and start capturing a ton of images. You need to learn how the things around you will translate into pinhole images. It’s only then that you’ll start to see the possibilities for pinhole photography. Don’t be discouraged at first. It takes time to hit your stride with this style of photography. You may need to let go of some ingrained inhibitions and embrace the imperfections and flaws instead of aiming for technical excellence. But eventually, you’ll be capturing some stunning photos! We’d love to see your pinhole images! Share with us in the comments section.
The post How to Use a Pinhole Body Cap for Awesome, Creative Photography appeared first on Digital Photography School. It was authored by Charlie Moss. Photography via Digital Photography School https://ift.tt/29wB9CX September 3, 2019 at 05:10AM Initial testing shows Canons new 32.5mp APS-C sensor improves dynamic range over predecessor9/2/2019
https://ift.tt/2HEYCzk
cgarcia, a contributor over the FredMiranda.com forums has done some initial tests on dynamic range from Canon’s new 32.5mp image sensor. There is good news and better news from his findings. cgarcia used sample images from DPReview to run the tests, and compared to the EOS 80D at base ISO’s, there is a small improvement in dynamic range. Canon EOS 90D ISO 100:
Canon EOS 80D ISO 100:
However, the better news is that dynamic range at higher ISO shows a big improvement over the 24mp image sensor in the EOS 80D. 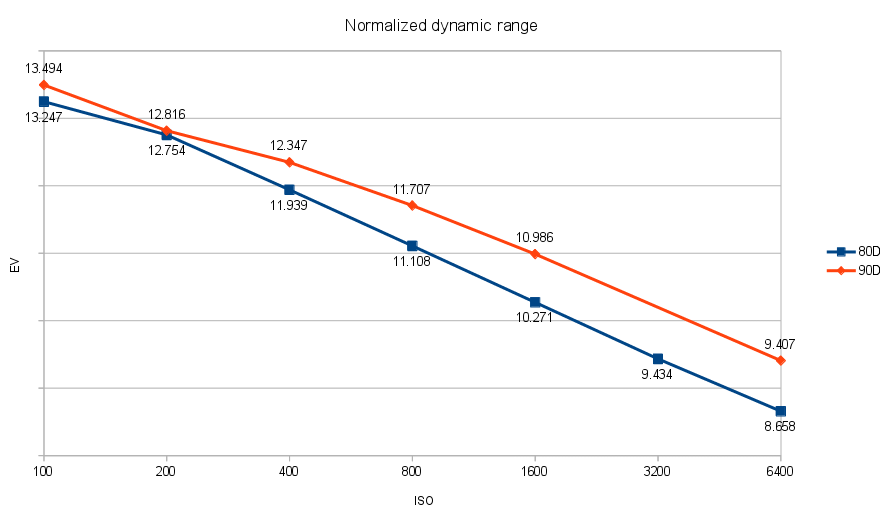
There will definitely be a lot more analysis of the new sensor in the coming months, but for all of the dynamic range junkies out there, there seems to be a solid improvement over the previous generation of APS-C sensors. Preorder the Canon EOS 90D and Canon EOS M6 Mark II Photography via Canon Rumors https://ift.tt/2v4dYqS September 2, 2019 at 01:52PM
https://ift.tt/2PBVUB9
 JavaScript is disabled. For a better experience, please enable JavaScript in your browser before proceeding. Canon USA introduces new instant rebates on select RF lensesCanon USA has started a new instant rebate program on select RF mount lenses. Photography via Canon Rumors https://ift.tt/2v4dYqS September 2, 2019 at 01:35PM
https://ift.tt/2UmZGgq
The post How to Use Pinterest to Grow Your Photo Business (Step-By-Step Guide) appeared first on Digital Photography School. It was authored by Darina Kopcok. Do you use Pinterest to market your photography services? You should. Because here’s the thing: Millions of potential clients use Pinterest. In fact, 250 million people around the world use Pinterest every month, and this number continues to grow. Most people think of Pinterest as a social media platform, but it’s actually a search engine that’s driven by search and discovery. Statistics show that nearly half of online users search in Pinterest before turning to Google. It has an incredible power to drive traffic to your site and grow brand awareness. Visitors from Pinterest convert into leads or sales faster than those from social media networks. Why? One reason is that Pinterest has a much longer shelf life than social media. Once an image is uploaded to an Instagram or Facebook feed, it gets buried quickly. With Pinterest, your pins will have staying power and benefit you more the longer they’re around. Now that you know why Pinterest is so great… …let me tell you how you can gain traction on Pinterest, fast.
Step 1: Get a business accountIn order to use Pinterest effectively for your photography business, you’ll need to sign up for a free Business account. A Business account will allow you to monitor your analytics from within Pinterest. This will give you important information about the boards and pins that are most popular with your audience. These insights can help you increase your engagement and pin more effectively.
Step 2: Create a succinct Pinterest profileYour Pinterest profile needs to be short and to the point. It needs to let people know what you do. Are you a wedding shooter? Do you specialize in personal branding portraits? Include it in your profile. For example, my main income comes from commercial and still-life photography, but I’m also a photography mentor. This third aspect of my business is the focus of my Pinterest account. Therefore, it’s the focus of my profile biography. Step 3: Organize your board for your viewers
If you want to promote yourself as a photographer, you must always keep your target audience in mind. Your boards are not for you; they’re for your viewers, and so you need to speak to what they might be looking for when they log onto Pinterest. This doesn’t mean you can’t have boards on crafting and cooking. It just means that you need to hide these non-business boards from public view. Just remember, all of your visible boards must be relevant to potential clients. Since I’m a food photographer, most of my boards feature beautiful images of food, organized into topical boards such as Salads, Desserts, Main Dishes, etc., as well as themes such as food photography lighting and styling. And since I mentor food bloggers and emerging photographers, I also have boards such as Learn Food Photography as well as Blogging Tips. Use basic names for your boards that will be searchable and easy to find. Your boards should be organized from most relevant to least relevant, not by alphabetical order. Have your first board feature your own photography only; you want to show potential clients what you can do. Clean up your own boards and create new ones. You’ll quickly see a big difference in your Pinterest traffic.
Step 4: Use keywords in your descriptionsPinterest works similarly to Google – users search for specific content they’re interested in by using keywords. In fact, keywords are the number-one tool for content discovery. That’s why each of your boards should have a description using keywords or using hashtags created from keywords. Also, use as many keywords as possible in your pin descriptions. General keywords make your content easier to discover. You can also use keywords to attract potential clients in your region. If you live in Portland and want to attract brides in your area, use keywords like “Portland Bride” or “Portland Weddings.” Add them to all of your descriptions and alt tags. Local keywords are underused and undervalued, especially in small markets, so they can make a big difference.
|
Categories
All
Archives
November 2020
|


 RSS Feed
