
|
https://ift.tt/2ltuUW5
The post An In-Depth Look at Kenko DG Auto Extension Tubes appeared first on Digital Photography School. It was authored by Megan Kennedy. Extension tubes are neat little photographic accessories that allow you to create macro-like images without a macro lens. Are you considering getting into macro photography but don’t have the funds for a dedicated macro? Extension tubes could be the way to go. There are plenty of different makes and models of extension tubes. The variety we’ll be looking at here are by a Japanese company called Kenko, which produces some of the most popular extension accessories available, the DG Auto series.
What are extension tubes?An extension tube is essentially a hollow spacer that locks between a lens and camera body. An extension tube adjusts the minimum focusing distance (the closest point a subject can be from the camera’s sensor while still being able to focus) by moving the lens further from the camera sensor. You can stack extension tubes for greater magnification. The thicker the stack of tubes, the closer you’re able to get to a subject and still achieve focus. 
A comparison reveals the different capabilities of the Kenko DG Auto extension tubes. Taken with a Canon 50mm f/1.8 II. Why use extension tubes?There are numerous benefits that extension tubes have over a conventional macro lens. Generally, extension tubes are much cheaper than a dedicated macro lens, making macro photography a lot more accessible. Another benefit is the lack of additional glass between the lens and the sensor. You won’t have to sweat about the quality of extra glass degrading your image. The lack of glass also means extension tubes are quite durable. Finally, extension tubes are light and easy to carry. So if you don’t want to lug around heavy lenses, extension tubes can be a great option.
What are the drawbacks of extension tubes?Extension tubes are suited to lenses with small or medium focal lengths and generally work best with prime lenses. Extending the amount of space between the sensor and the front lens element results in a reduction of light reaching the sensor. This requires an adjustment in shutter speed, ISO, or aperture to compensate. But when aperture controls the fine depth of field balance in a macro image, your only real options are a longer exposure, more noise, or a combination of both. Also, because extension tubes increase the magnification of the lens, they magnify any flaws in a lens’s design. In addition, extension tubes require you to remove your lens from the camera body each time you want to adjust the lens extension. This increases the chance of dust settling on the camera sensor. While some extension tubes (like the Kenko DG Autos) offer autofocus compatibility, the results are generally mixed. Switching to manual focus is your best bet, and this isn’t entirely a bad thing, but it can slow you down in the field. 
Not all macro photography has to be razor-sharp. For a softer effect, try adjusting your focus to just in front of your subject. How do the Kenko DG Auto extension tubes perform?ConstructionAvailable for Canon, Sony, and Nikon makes, Kenko DG Auto extension tubes usually come in a set of three: one 12mm tube, one 20mm tube, and one 36mm tube. These can be used individually or in a stack.
Each tube has a diameter of approximately 62mm with clear alignment markings to show where you should connect the tube to the camera body and lens. Unlike some cheaper plastic varieties of extension tubes, the Kenko DG Autos all have metal mounting mechanisms. 
The 36mm Kenko DG Auto extension tube has a grip running around the outside of the tube. Out in the fieldFor my close-up photography, I’ve been pairing my Kenko DG Auto extension tubes with my trusty Canon 50mm f/1.8 II. Without the added complications and weight of a zoom lens, the setup is simple and easy to assemble. The wide maximum aperture of the 50mm also helps compensate for the reduction in light that reaches the sensor as a consequence of the extension tubes. One thing I look out for with the Kenko DG Autos: I ensure each tube has clicked firmly into place. While I haven’t had any accidents (thankfully), the mounts can be a bit soft sometimes. The potential amount of switching between extension tubes during a single shoot makes the chance of a misalignment higher, so make sure you fully lock each component. 
A beautiful and rather patient bottle fly. This image required my 12mm, 20mm, and 36mm extension tubes attached. Kenko DG Autos are designed with all the circuitry and mechanical coupling to maintain autofocus and TTL auto-exposure (provided there is enough light). However, as I mentioned before, the autofocus can still be a bit iffy. Plus, when taking an extreme close-up, there is such a small area of sharpness that any extra control over the focus of your composition is crucial. I still switch to manual focus 90% of the time for that degree of control. As with all close-up photography, I use a tripod in a lot of cases to reduce camera shake. In addition, because of the reduction in light reaching the sensor, I often have to compensate with a longer exposure – which makes the tripod a valuable piece of equipment to have on hand. PriceThe Kenko DG Auto set is markedly cheaper than offerings from Canon. While a Canon EF 25 II extension tube is about $150 USD on Amazon, the Kenko DG Auto set (the 12mm, 20mm, and 36mm) is priced at just over $100 USD. Given that the tubes contain no glass, they have no optical difference and are very similar in construction. The largest difference between the two brands online is the release levers. The Canon tube release lever is reportedly smoother to that of the levers on the Kenko tubes. 
A flower head photographed with a 36mm Kenko DG Auto extension tube ConclusionExtension tubes have made macro photography much more accessible. If you’re interested in macro photography, it may well be worth investing in the set offered by Kenko. For their price and utility, the Kenko DG Auto extension tubes are a definite staple in my photography kit.
The post An In-Depth Look at Kenko DG Auto Extension Tubes appeared first on Digital Photography School. It was authored by Megan Kennedy. Photography via Digital Photography School https://ift.tt/29wB9CX September 2, 2019 at 05:10AM
0 Comments
https://ift.tt/2kmFTQJ

Comrades, today is Labor Day in the United States, and our offices are closed, so we’re taking today off here at the blog as well so we may partake in the American rituals of this important national holiday. Tomorrow, I’d like to invite you to visit my other blog (scottkelby.com) where Dave Williams, who is British and therefore immune to US holidays, writes a travel photography tips column (he is traveling the US West right now — make sure you’re following “@capturewithdave” on Instagram). know what else happens tomorrow? I’ll be celebrating being married 30 years to the girl of my dreams. Sounds like just a perfect day! ? By the way: I looked up Labor Day in WikiFakeia, and here are a few interesting tidbits about this American Holiday:
Well, there you have it. If it’s on WikiFak -Scott P.S. We’ve already approved nearly 800 Photo Walks The post Happy Labor Day, Lightroom Lovers! appeared first on Lightroom Killer Tips. Photography via Lightroom Killer Tips https://ift.tt/2sh0aZ8 September 2, 2019 at 03:26AM
https://ift.tt/34hrR5a
 Canon has made the manual for the Canon EOS M6 Mark II available for download. Key Features:
You can download the manual here. Preorder the Canon EOS M6 Mark II: Photography via Canon Rumors https://ift.tt/2v4dYqS September 1, 2019 at 01:54PM
https://ift.tt/2zMh9p3
The post 3 Tips for Becoming a Unique and Successful Photographer appeared first on Digital Photography School. It was authored by Kevin Landwer-Johan. If you want to become a successful photographer, then there are a few things you absolutely must know. That’s what you’re going to learn in this article: Three key tips for becoming a truly masterful photographer. 
© Kevin Landwer-Johan Will it be a fast journey? Probably not. But it doesn’t have to be difficult, either. If you enjoy photography, then you’ll have a ton of fun! So if you’re ready to become a unique and successful photographer… …then let’s get started. Tip 1: Don’t get hung up on what you ‘should’ doMany photographers read tutorials and watch videos. Then they try to mimic exactly what is being taught. They try to create the same photos the instructor is telling them to. But if you learn photography this way, you’ll end up having photos that look like everyone else’s. You won’t discover a unique style of your own. Sure, it’s good to study and learn from those who have more skill and understanding. But there is no formula for perfect photography. There is no absolutely correct way to make a picture. Whether you’re taking a senior portrait or photographing products for a catalog, there are no hard and fast rules. There are guidelines. If you follow some of them you’ll make sharp, well-exposed photos that are well-composed. But if you try to rigidly stick to a method, you will not make creative photos. 
© Kevin Landwer-Johan Every scene you photograph is different. Even if you photograph the same garden or building every day, things will change. The light will be different. It may be sunny one day and raining the next. Your subject may change over time. So you must take what you’ve learned and adapt it to the situation. Apply photography techniques that best suit your subject and the current circumstances. 
© Kevin Landwer-Johan Obtain the skills and learn the rules. Know these things well, so your thoughts aren’t consumed by them each time you want to take a photograph. But don’t apply a set of rules to your photography. Doing this may bring technically correct results. But often photography which is only technically correct is rather dull and boring. You can find examples of very similar sets of images posted on social media and photo-sharing sites, and in all manner of ‘how to’ photography books. They all look repetitively similar because the photographer has only followed the rules. Instead, apply your own creative thinking. Consider the rules, but don’t apply them unless they enhance your photo the way you want them to. Tip 2: Put feeling into your photography for masterful imagesIf you want to be a truly great photographer, learn how to infuse your photography with feeling. Put something of yourself into your pictures. This is what will make your photos unique. Nobody else has the same worldview you do. This is not an easy concept for many photographers to grasp, but all you need to do is look at some of the best photos. The ones which attract you the most. Ask yourself why you like them so much. Look at the greats. Admire the work of Irving Penn, Ansel Adams, Henri Cartier-Bresson, and the like. What is it about the way they have seen the world and photographed it that makes their photographs special? 
© Kevin Landwer-Johan Look at favorite photos you have taken. What’s special about them? Are they only technically correct, or is there more to them? Do they capture a unique moment? Do they include feeling? Photos which embody emotion are more powerful. Capturing the moment that conveys emotion, regardless of technical considerations, often results in the most compelling photographs. Technical imperfection can even enhance the feeling in a photograph. A moment of laughter mistakenly overexposed can add to the spirited feeling. An underexposed photo of someone feeling sad will add to the expression of their despair. 
© Kevin Landwer-Johan Here’s the bottom line: If you can include feeling in your photos, if you can communicate something to viewers about your perspective, then you’ll be well on your way to being a truly successful photographer. Tip 3: Study your craft and photograph oftenHere’s the great thing about photography: The more you pick up your camera, the faster you will develop as a photographer. Your technical skills will improve, and your ability to see what makes a great photo will improve, too.
I suggest you commit yourself to learning a new photography technique every month, or even every week. Get the new technique ingrained into your subconscious mind so you don’t have to concentrate on what camera settings to use. Then the settings will come to you automatically, even when you do choose to use Manual mode. Reaching a high level of ability takes time. Like any artist, you have to start by mastering the essentials. Once you have, you will be free to express yourself. Learning to play the piano or to dance well involves hours and hours of patient, determined practice. Photography is the same! The more you study and practice with your camera, the more expressive you will become with it. The less you have to think about the adjustments you need to make, the more focus you can give to being creative. So engross yourself in your favorite genres of photography. Photograph often and with the desire to make improvements each time you do. Over time your photographic skills will advance. And, pretty soon, you’ll be a successful photographer. 
© Kevin Landwer-Johan ConclusionI believe we are all inherently creative. We are created to be creative. This means that every one of us has the potential to be a great photographer. You just have to work hard at your photography. Eventually, you’ll be creating stunning, unique photos.
The post 3 Tips for Becoming a Unique and Successful Photographer appeared first on Digital Photography School. It was authored by Kevin Landwer-Johan. Photography via Digital Photography School https://ift.tt/29wB9CX September 1, 2019 at 07:39AM
https://ift.tt/2zIdngu
The post 5 Basic Post-Processing Tips to Instantly Improve Your Photos appeared first on Digital Photography School. It was authored by Nisha Ramroop. Are you a beginner looking to improve your post-processing skills? That’s what this article is all about. In it, you’ll discover five post-processing tips that will immediately take your photos to the next level. Best of all, these tips aren’t even difficult to follow, and they require nothing more than the most basic image-editing program. Let’s dive right in.
1. Straighten your horizon for professional-looking photosWhen the horizon isn’t straight, even the untrained eye picks up that something is off. They might not know exactly what’s wrong, but they’ll be aware that the scene seems out of order. Which is why you absolutely must make sure your horizon is straight. Fortunately, it’s very easy to correct the horizon; you can do it in any post-processing program. Here are the instructions for straightening the horizon in Photoshop: Step 1: Select the Crop tool Step 2: Click the Straighten option at the top Step 3: Click one side of your horizon and drag across the horizon line before you release Your horizon will instantly straighten!
2. Adjust the white balance for natural-looking imagesWhite balance is a setting used to balance the color of the light you shoot, in order to get it close to a neutral white. You see, when the color of your subject is distorted by the existing lighting conditions, you need to use the white balance setting to save the day. Now, one way to set the white balance correctly is to get it right in-camera. However, some photographers prefer to shoot in RAW with an auto white balance setting, and then adjust the white balance afterward. If that’s your preference, then you’ll need to choose your white balance in a post-processing program. It’s generally easy to select a white balance option that adjusts for the lighting of your shot. You’re also free to experiment with different white balance options so you can choose the one that most reflects your creative vision. For instance, the scene below has a Fluorescent white balance applied to it using Adobe Camera Raw.
And here’s the same scene but with a Shade white balance applied:
3. Boost your contrast to create images that popDo your images look a little flat? One of the simplest ways to make your photos pop is to adjust the contrast. A contrast adjustment further separates the darkest and brightest areas of your image. In other words, it makes the dark tones darker and the light tones lighter.
Increased contrast, therefore, makes tones stand out and gives your photos a more three-dimensional feel. Compare the image above to the image below; I added contrast to the second image, which gives it a subtle pop.
Pretty much every image editor has a contrast slider. And boosting the contrast is often as simple as pushing the slider to the right. So just remember: If you’re struggling to make your photos more lively, try increasing the contrast. It’s a simple post-processing tip, but one that really works! 4. Boost the saturation or vibrance sliders for better colorsThe saturation and vibrance adjustment sliders usually sit next to each other and can be confusing. Both of these add an extra color punch to your image, but they do so in different ways. You see, saturation adjusts the intensity of all the colors in your image at once. If you push the saturation slider, you’re going to see color saturation increase across the board. Therefore, it’s an adjustment you want to use sparingly. Vibrance, by comparison, is a “smarter” saturation tool, one that adjusts only the duller colors in your image. Increasing the vibrance will boost the less-saturated colors, but won’t affect colors that are already saturated. Look at these two photos:
I boosted the saturation of the photo on the left, and I boosted the vibrance of the photo on the right. Note that when you lower the saturation of your colors, your image takes on a more muted effect, like this:
In general, boosting the vibrance or the saturation will instantly improve your images. 5. Sharpen your photos for the best display on the webYour images are most likely going to be displayed on the internet. However, when you export your photos from most image-editing programs, you’re going to end up with blurry photos. Unless you sharpen for the web, that is. There are a few ways to sharpen in Photoshop. Here is one you can try: Step 1: Resize your image to the size you want it displayed. (If you sharpen your high resolution/original image and then resize it, the image will appear to lose its sharpness. Sharpening an image at your display resolution works better.)
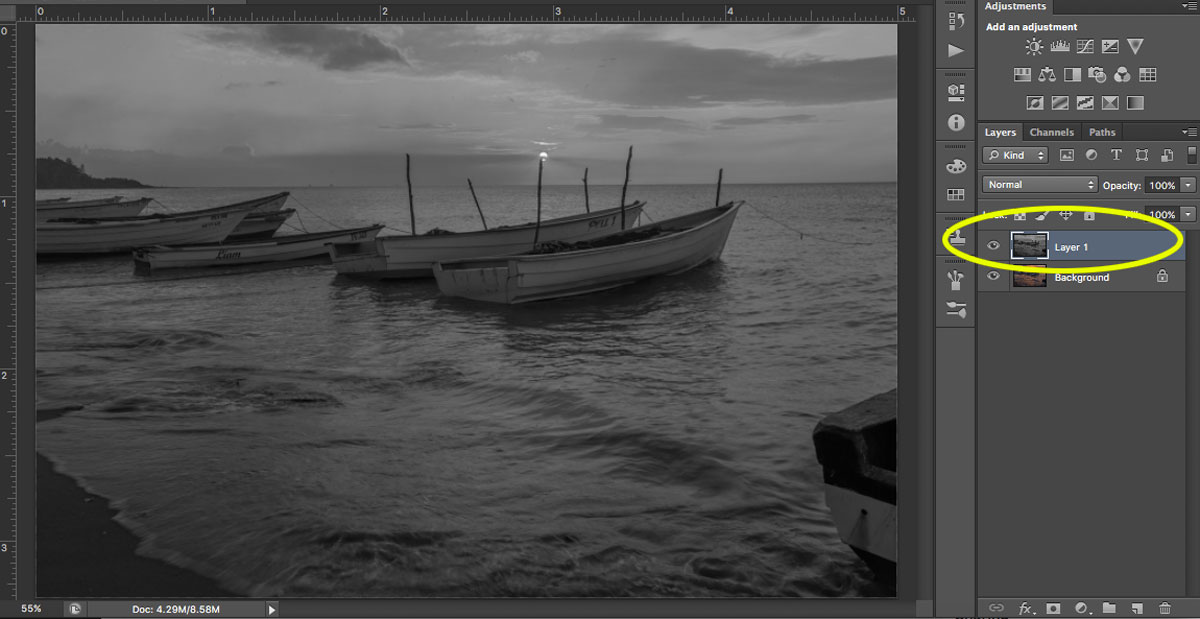
Step 2: Duplicate your layer. Step 3: Desaturate your new layer (from Menu, Image > Adjustments > Desaturate).
Step 4: Change your blend mode to Overlay. (Alternatively, you can use the Soft Light blend mode for a more subtle effect.) Step 5: Now apply a High-Pass filter (from Menu, Filter > Other > High Pass) and choose a radius around 2.0 for an image of 730 pixels (on the long side). The Overlay option you chose above allows you to see how the radius affects the image so you can play around with it. Note: The bigger your image, the larger your radius will be. If the sharpness doesn’t look good on the entire image, you can use a layer mask and paint black over the areas where you want to hide the effect. Step 6: Save for the web (from Menu, File > Save for Web). Check the Convert to sRGB box if unchecked. ConclusionIf you’ve just begun your photography journey or if you’re looking to improve your basic editing skills, then these post-processing tips are a great place to start. In fact, basic editing is often all you need to dramatically improve your photos. So follow these tips, and watch as your images improve! The post 5 Basic Post-Processing Tips to Instantly Improve Your Photos appeared first on Digital Photography School. It was authored by Nisha Ramroop. Photography via Digital Photography School https://ift.tt/29wB9CX September 1, 2019 at 05:43AM |
Categories
All
Archives
November 2020
|


 in cities all over the world as part of my 12th annual Worldwide Photo Walk. If you’re relaxing this Labor Day, why not


 RSS Feed
