
|
https://ift.tt/3jBMShu
The post 11 Easy Creative Photography Techniques You Can Try on Any Camera appeared first on Digital Photography School. It was authored by Simon Bond. A lot of photography techniques can be complex and require a steep learning curve. But in today’s article, you’ll learn 11 easy creative photography techniques you can start using today! The techniques described below all require minimal extra equipment and don’t require additional post-processing. Read on to get the most creativity from your camera with these easy-to-use techniques. 1. Reflection
This is an easy creative photography technique to learn and is popular among many photographers. The main requirement is finding a reflective surface, though this is not all there is to it. Consider the following, and you’ll be capturing amazing reflection photos in no time:
2. Silhouettes
The next option on this list of easy creative photography techniques is silhouettes. Silhouettes occur when you photograph against the light. The key is to find an interesting shape, and then make sure the background is brighter than the object itself. You’ll often need to get down to a low angle and then photograph up toward the sky; that way, you can ensure the silhouetted object stands out against the bright background. Also, when photographing silhouettes, make sure you expose for the bright background. This will turn the subject into a dark silhouette. 3. Repetition
A great design element to add to your frame is repetition. This is something you’ll usually need to look for, but it’s sometimes possible to create your own repetition. There are possibilities for this both in nature and in the man-made world. Repetition may take the form of a line of trees, or of many bricks in a wall. The question, then, is how you’ll use this repetition. Here are a few ways you can work with repetition to improve your photos:
4. Refraction
This is a form of photography that can be practiced with a camera as simple as a smartphone. You’re probably thinking of lensballs, but refraction photography can take many forms, including:
5. Contrast
Contrast is a great concept to use in your photography. The most obvious way to use contrast is by emphasizing dark and light areas of your photo through things such as silhouettes and shadows. But this is not the only way contrast can be used in your photography; anything that has an opposite can be used. You might choose to contrast something old with something new, for example. 6. Framing
The world is full of frames, from pictures on the wall to window frames. These frames can be used in photography, which is another easy creative photography technique. You can achieve a great framed photo with any kind of camera. Good options for this include doorways and windows. You can even become more creative and make your own frame using objects that contextualize the scene behind it. 7. Panning
Panning is a form of intentional camera movement. The technique involves following the motion of a moving object and using a slower shutter speed to blur the background behind it. As long as your camera allows you to use a slow shutter speed, this is a technique you can try. Those using a smartphone should download an app that allows you to use a slower shutter speed to take a photo. 8. Point of view
Changing your angle can give you dramatically different results, and it doesn’t matter which type of camera you use for this technique. It’s easy to photograph from a standing position, but try some of these alternative angles:
9. Lines
Using powerful lines in your photos will almost always give you a strong composition. The trick, of course, is to utilize those lines correctly using the focal length available to you. Here are some of the lines that can be used in your photography:
10. Shadows
Photographing shadows requires a strong light source. This can be the sun, but an external flash is another option. The best time of the day to photograph shadows is therefore when the sun is at a low angle: an hour after sunrise or an hour before sunset. Shadows can be formed and used in different ways. You might photograph a person’s shadow, shadows formed from trees, or the way shadows emphasize the shapes of hills. 11. Minimalism
Keeping your composition nice and clean is the key to a good photo. This means that one of the best easy creative photography techniques is minimalism. You can create minimalism even in the most cluttered environment as long as you frame your photo correctly. This style of photography requires that you give your subject some room to breathe. Focus on the main subject and position it in front of an uncluttered background. Try out these easy creative photography techniques, yourself!There are so many ways to be creative with photography. Which techniques do you like to use? Are there any simple-to-apply techniques you’ve tried that didn’t make this list? Share your thoughts in the comments! And if you have any photos that illustrate these techniques, share them in the comments, too! Then get photographing with these easy creative photography techniques! The post 11 Easy Creative Photography Techniques You Can Try on Any Camera appeared first on Digital Photography School. It was authored by Simon Bond. Photography via Digital Photography School https://ift.tt/29wB9CX October 29, 2020 at 04:10AM
0 Comments
https://ift.tt/2HIk7mi
With the October 2020 updates to Lightroom Classic, Lightroom, and Adobe Camera Raw we saw the addition of the new Color Grading panel. Color Grading is a replacement and improvement over the old Split Toning panel. In this article we’re going to look at it in Lightroom Classic, but it functions essentially the same way in all the apps I just mentioned. Replacing Split ToningWith Split Toning you could add a tint into the shadows and/or highlights of an image for creative or corrective effects. Color Grading does all of that, plus it allows the addition of a tint into the midtones as well. Even more, we can also adjust luminance within each range of tonal values. Aside from the ability to add tint into shadows, midtones, and highlights you can also add a tint globally as well. These additional controls provide an amazing array of creative and corrective possibilities. So, say goodbye to the Split Toning panel, and say hello to Color Grading. Note, in the Lightroom apps you’ll need to expand the Color panel to find the Color Grading panel nested inside (as shown here in the Lightroom for desktop app). 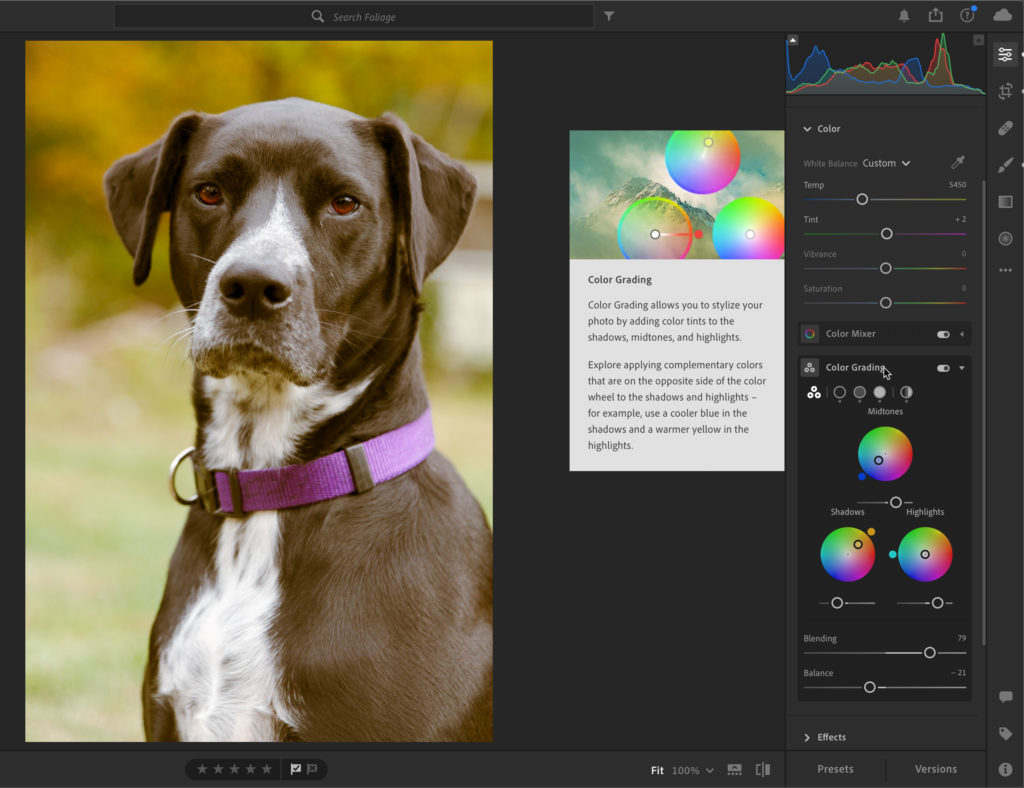
But wait, what about all of my pre-existing presets that contain Split Toning adjustments, you might wonder? Those all still work with Color Grading. If you apply an old preset with Split Toning you’ll see the preset settings applied to Highlights and Shadows (as configured in the preset), Midtones wil be zeroed out, and the Blending slider will be set at 100 to mimic the same look provided by the Split Toning panel. Let’s get more oriented to the Color Grading panel. The Color Grading PanelThe buttons at the top of the panel provide control over how the contents of the panel are displayed. The first button of three circles takes you to the default view of seeing all three color wheels (note, due to the smaller screen, the mobile apps don’t have this view). Clicking any of the next three buttons (circles) will zoom the view to just the color wheel and controls for Shadows, Midtones, or Highlights respectively. The button on the far-right side is for viewing the Global tint color wheel and controls. 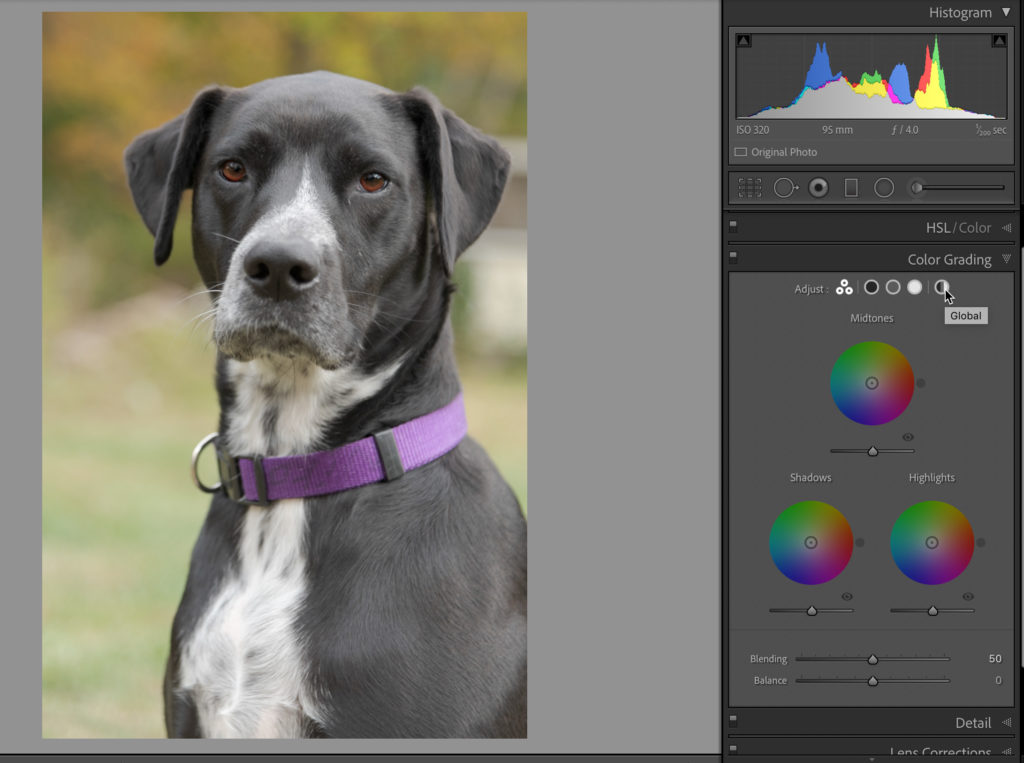
In the center of the panel, by default, are three color wheels for choosing a tint to apply to Midtones, Shadows, or Highlights as labeled. In this view, below each color wheel is a Luminance slider for adjusting the brightness of each range. One way to select a hue is to simply click into a color wheel and drag around within the wheel until finding a desired hue and saturation you prefer. Dragging around the wheel changes the hue, while moving from the edge toward the center reduces saturation. It is very what-you-see-is-what-you-get, but we’ll explore some other options for choosing a tint later on. 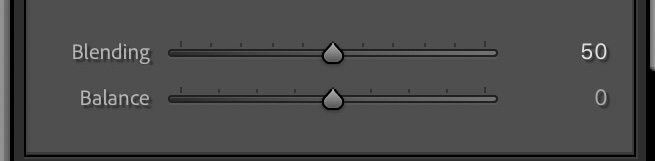
At the bottom of the panel are sliders for Blending and Balance. The Blending slider controls how much mixing of tint happens between the tonal ranges. For example, if you were to apply an old Split Toning preset you would see the Blending slider move to 100 to have the maximum amount of mixing of Shadow and Highlight tints (any existing midtone tint would also be removed as that is not included in Split Toning presets). If the Blending slider was then reduced to 0 the mixing of tints would stop. The Balance slider can be used to shift what pixels are considered Shadows or Highlights for tinting purposes. At the extremes, setting Balance to 100 forces the Highlight tint across almost all pixels in the image, while setting Balance to -100 forces the Shadow tint across almost all pixels in the image. Let’s look at an extreme example, where I applied a very saturated magenta tint to the Highlights and a very saturated green tint to the Shadows: Balance at 100 shows the magenta tint applied to the Highlights across entire photo. 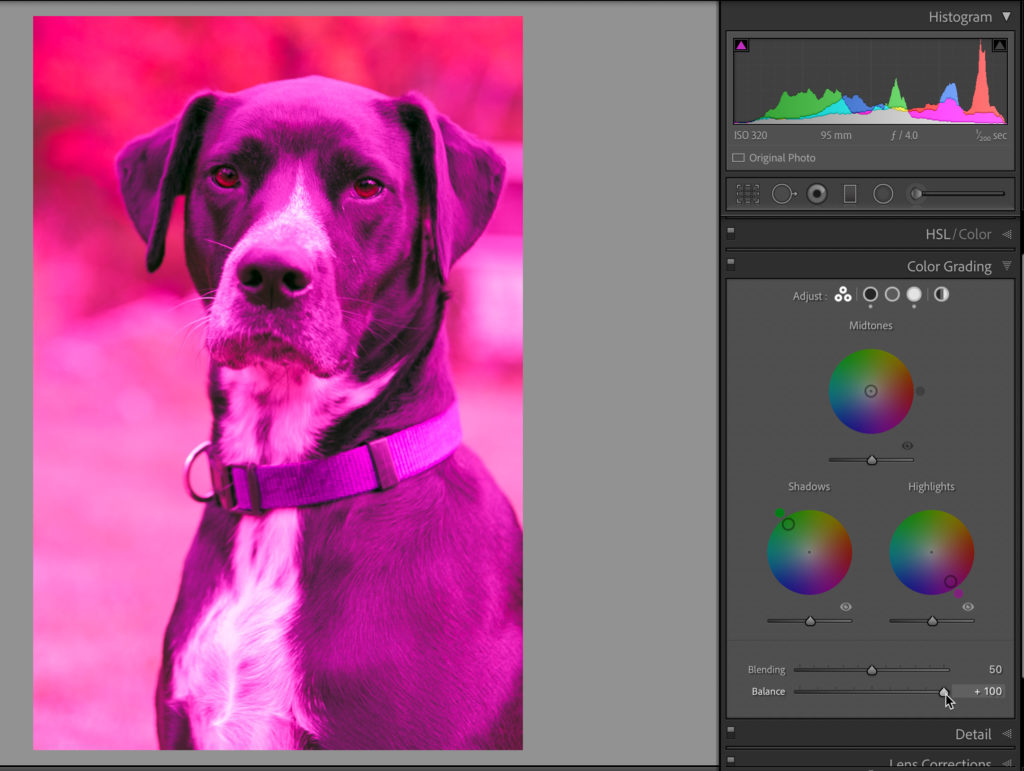
Balance at -100 shows the green tint applied to the Shadows across entire photo. 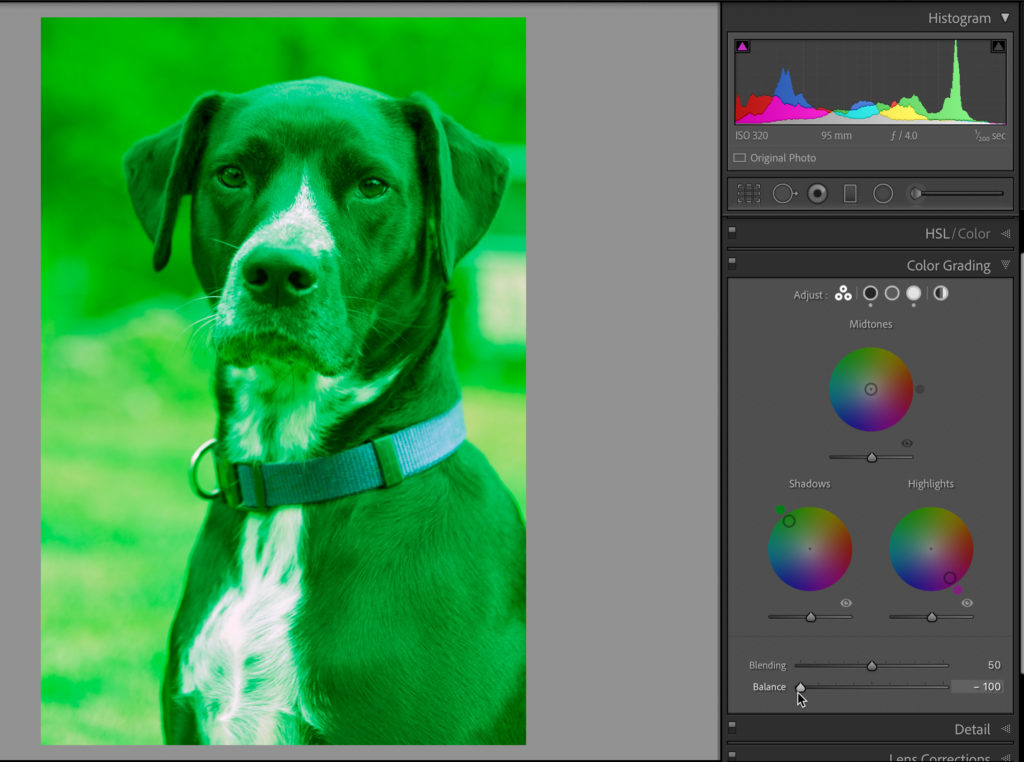
Even adjusting the Blending slider to increase or decrease mixing will have minimal affect when Balance is at the extreme ends. But if I put the Balance slider at the default of 0, then we can see both tints applied to the highlights and shadows within the photo. 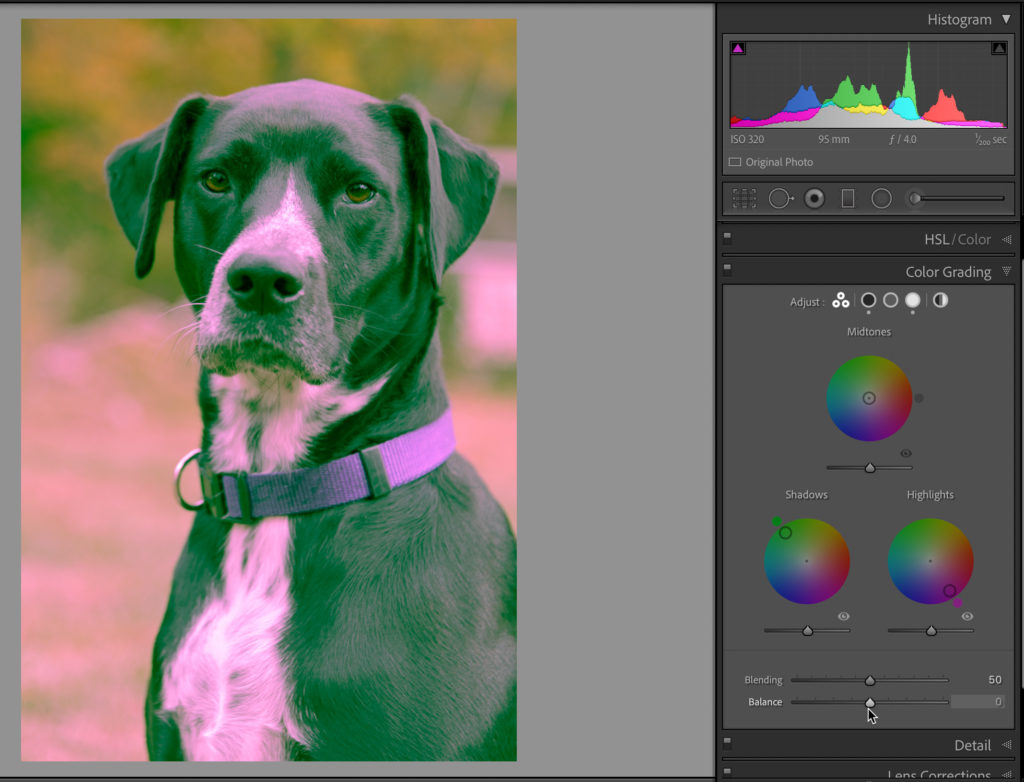
These controls deserve a lot of experimentation and observation to get a feel for how they work independently and together. Luckily, it is pretty fun to play with, and the results are updated live as you adjust. I recommend placing a different and discrete high saturation color into the shadows, highlights, and midtones, and then experiment with the Blending and Balance sliders to see how they work together. I’ll double-click the word Adjust at the top of the panel to reset the entire panel and remove all color grading, so we can explore it further. New Color Grading PresetsI always think it is worth experimenting with the presets that are included in the software. You may not like the final looks, but they can still be instructive for learning a new tool. If you expand the built-in Creative preset group there are three new presets for Color Grading, which are called Cool Matte, Cool Shadows & Warm Highlights, and Warm & Moody. Note, these presets contain other panel settings too, but I’m just focusing on how Color Grading is used. You can hover your cursor over each one to see how they affect the selected photo, but with Lightroom Classic you need to click on one to see its settings (though on Lightroom for Mac/Win just hovering your cursor over the preset shows the settings in the panel too). For example, clicking the Cool Matte preset applies a different blueish tint to the Shadows and Midtones respectively, a yellowish-green tint to the Highlights, leaves Blending at the default of 50, and sets Balance at +21 to increase the range of what tones are considered Highlights, which increases the prominence of the Highlights tint. 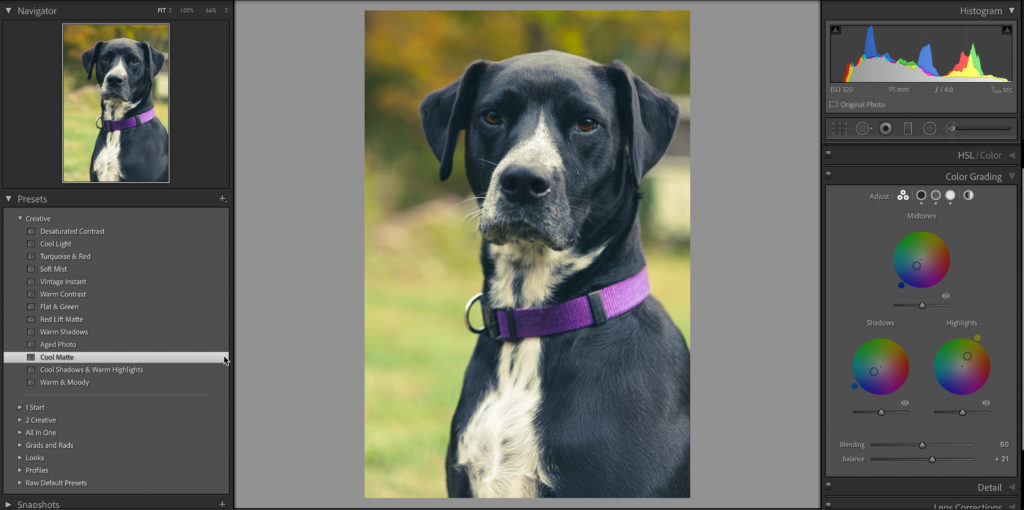
It is worth noticing that you can see a small dot appear under each circle along the top of the panel representing the different color wheels that have a tint applied. You can also click and hold the eye icon under each respective color wheel to turn off the tint from that color wheel and see a before and after view of how each tint affects the photo. Come back and join me next week as we explore more ways to use this exciting new panel. In the meantime, go experiment on your own and have fun! The post Introducing Color Grading appeared first on Lightroom Killer Tips. Photography via Lightroom Killer Tips https://ift.tt/2sh0aZ8 October 28, 2020 at 03:30PM
https://ift.tt/35FvLGp
San Jose, USA, October 28, 2020 – Lexar®, a leading global brand of flash memory solutions, today announced the Lexar Professional 1066x microSDHC/microSDXC Cards SILVER Series. Designed for your action cameras, drones, and Android™ smartphones, the Lexar® Professional 1066x microSD™UHS-I Card SILVER Series lets you quickly capture and transfer high-quality photos, including Full-HD and 4K UHD video2 with speeds up to 160MB/s read, and up to 120MB/s write1. The card is U3, V30 and A23,4 rated for high-speed performance. This card gives you the speed and storage you need to capture more adventures on the go. Key Features:
Capture high-quality images and extended lengths of Full-HD and 4K UHD video with write speeds up to 120MB/s. This card is Class 10, UHS Speed Class 3 (U3) and Video Speed Class 30 (V30) giving you the performance you need to shoot faster and longer. With Application Performance Class 2 (A2) rating3, the Professional 1066x microSD™ UHS-I Card SILVER Series is also great for use with applications on your Android smartphone. Quickly run and store apps directly on the A2 memory card using an Android Adoptable storage enabled device4. “As action cameras, drones and smartphones become more essential for content creators, it’s our goal at Lexar to continue creating solutions that customers demand in order to create high-quality images and stunning 4K video. And with high-capacity options up to 512GB, users can rest assure they will have sufficient space to capture what they love most,” said Joel Boquiren, General Manager of Lexar. Lexar® Professional 1066x microSDHC/microSDXC UHS-I cards SILVER Series is available this month for purchase online at an MSRP of $19.99 USD (64GB), $34.99 USD (128GB), and $59.99 USD (256GB) with 32GB and 512GB to be announced at a future date. Photography via Canon Rumors https://ift.tt/2v4dYqS October 28, 2020 at 12:42PM
https://ift.tt/31PrdfD
Last month, Canon released new firmware for the Canon EOS R6, version 1.1.1. Jordan and the folks at DPReview have now done an extensive review of the latest firmware version for the Canon EOS R6 and came away quite impressed with what Canon improved with the new software. Check out the video above for the full review. Photography via Canon Rumors https://ift.tt/2v4dYqS October 28, 2020 at 11:49AM
https://ift.tt/31S2rLX
The long-rumored Canon RF 50mm f/1.8 STM and Canon RF 70-200mm f/4L IS USM will likely be announced sometime in the next couple of weeks. These lenses have been delayed a couple of times already this year I have been told. As noted by Nokishita today, the lens hoods for each lens have been added to Canon’s product catalog. Lens hood ET-83G (WIII) and Lens hood ES-65B will be for the RF 70-200mm f/4L IS USM and RF 50mm f/1.8 STM. Both of these lenses will be small, especially the RF 70-200mm f/4L IS USM which I have been told is basically the “size of a Coke can”. More to come… Photography via Canon Rumors https://ift.tt/2v4dYqS October 28, 2020 at 07:26AM
https://ift.tt/3kA7hEZ
The post Color Management in Affinity Photo: The Ultimate Guide appeared first on Digital Photography School. It was authored by Glenn Harper. In terms of color management, no photo software is more complete than Adobe Photoshop. It’s easy to take this for granted until you switch programs (which you might do to escape subscription costs). That’s why this article looks at color management in Affinity Photo, a popular standalone alternative to Photoshop. 
Choosing a working color space in Affinity (Photo Persona)The working color space you use in an editing program is a bit like a box of crayons. You are defining how big a box you use to describe your photos. Even if you can’t see all the colors inside that “box” on your screen, sometimes there is good reason to use them. Choose your working space based on the likely output for your images. For example:
Each choice has its own pros and cons. The ability to make this choice seems mundane until it’s taken away. Some programs force you to use sRGB as the working space, for instance, which means you forfeit many of the colors digital cameras can capture. So what does Affinity give us here? Setting the working color space in Affinity is simple, though it’s not labeled a “working space” as such. You simply go to Preferences>Color>RGB Color Profile. By default, this is set to sRGB. You can change it to suit your photography and the purpose of your photos, as detailed above. Do the same with the 32bit RGB Color Profile setting. 
Other color preferencesFor most of us, the color preference settings in Affinity can be left alone, except perhaps for the RGB Color Profile option at the top. That said, you’ll generally want black point compensation switched on. You also won’t want the software to convert all open files to the working color space. And it’s better to be warned if a photo without an embedded profile is being assigned the working profile. This gives you a heads-up that the color may display incorrectly. Note that each of the above options can be ticked on and off in the Color Preferences window. Monitor profileAffinity Photo accesses the default monitor profile assigned in your operating system. Unlike Photoshop CC (but like Lightroom), I don’t believe you can confirm the prevailing profile via Affinity itself. Past and present monitor profiles appear in drop-down menus, but you should never select these; the monitor profile is automatically applied. Your monitor profile is a key component of color management in Affinity Photo. 
Soft proofing (Photo Persona)Soft proofing lets you preview the output color of your photos, whether the output is an inkjet printer, an RGB printer like those often used in minilabs, or even a specific audience (e.g., color-blind individuals). Soft proofing is available in Photoshop CC and Lightroom, but isn’t offered by many other programs. What about Affinity Photo? In Affinity Photo, soft proofing comes in the form of an adjustment layer. You won’t find it among the menus at the top of the screen like in Photoshop. This is quite handy, because it’s so easy to flick layers on and off to see the effect of soft proofing and edits. 
Color blindness settings in Affinity are located among the built-in LUT adjustment layers. The LUTs help you visualize colors as seen by three types of dichromats: protanopes, deuteranopes, and tritanopes. 
Simulating dynamic rangeThe simulate paper color option you get in Photoshop is already applied in Affinity. You can’t switch it off. But you do have the option of switching on black point compensation. This reduces the dynamic range of your screen image to mimic the look of paper and ink. It makes the on-screen photo look duller. That’s why professional photographers sometimes avoid showing clients the comparison. 
Gamut differencesThe Gamut Check option in Affinity Photo shows you which colors are not reproducible with any given output. You can fiddle with the color of the photo until all color is in gamut, but you’ll often do more harm than good. It’s better to rely on the rendering intent setting if you want colors to be as close as possible to the original. The relative colorimetric rendering intent keeps colors looking relatively accurate and shifts non-reproducible colors back into gamut, but you’re free to pick the rendering intent that looks best to you. 
Creating a duplicateWhen soft proofing, you may want to work on duplicate images side by side, so you can reference the original color and tone. In that case, create a duplicate image in Affinity by hitting Select All>Copy>New from Clipboard. You can make adjustments to the soft-proofed image by adding extra adjustment layers to the background layer. 
Convert and assign ICC profile settingsAs with Photoshop, color management in Affinity Photo includes the ability to assign or convert ICC profiles. The distinction between these two is important. You’d assign a profile if the photo you open has no embedded profile; you give it one that looks okay. This only becomes permanent if you save changes to the image. 
When you convert from one profile to the other and know what color space the image is in, use Convert ICC Profile. One way of confirming the current profile is to look for it in the drop-down list. It should be highlighted: 
The choice of rendering intents when converting between ProPhoto RGB, Adobe RGB, and sRGB working color spaces is usually moot. By default, these matrix profiles use a relative colorimetric rendering intent. The same situation exists in Photoshop. Embedding profilesThe process of embedding ICC profiles is uncomplicated: You just check a checkbox. This is true whether you’re using Save As in Photoshop or exporting files from Affinity. In Affinity Photo, the Embed ICC Profile option is under the More heading when exporting. It’s checked by default. There aren’t many instances when you’d deliberately leave the ICC profile out of images. Ironically, photo libraries and gallery websites might do this because the profile adds a couple of kilobytes to each file. In those instances, it’s an economical choice. In the past, photographers removed profiles to avoid confusing minilab printer drivers. 
Many people’s color woes when publishing photos online stem from not embedding the profile. This is less critical when publishing sRGB images, but photos in larger color spaces will often look dull unless the profile is present. Simple features, such as the ability to embed or remove ICC profiles, are often absent in photo-editing programs. But here, Affinity keeps pace with Adobe. Affinity RAW processing color (Develop Persona)The Affinity Photo Develop Persona assigns the ROMM RGB color space to RAW files. ROMM RGB is the original name for ProPhoto RGB. This color space encompasses the output of a digital sensor, whereas smaller spaces such as Adobe RGB and sRGB do not. Histogram comparisonIn Lightroom, the histogram is in Adobe’s proprietary “Melissa RGB” space. This is the same as the Affinity histogram, but with an sRGB tone response curve applied, which adds slightly more editing headroom in the shadows. Extra marks to Adobe for cleverness. The Affinity RAW histogram is more akin to that of Adobe Camera RAW. If you convert to ProPhoto RGB or ROMM RGB in Affinity, the histogram should stay the same. 
Recent versions of Lightroom enable users to preview the output histogram by turning on soft proofing. In other words, you’ll see which colors will be clipped, if any, in your destination color space. This might influence the edits you make prior to converting the file or even the color space you select. Does Affinity allow this? If you select an output profile in Affinity Photo’s Basic panel, the histogram changes accordingly. With certain colors, you’ll see sRGB pixels move to the edges of the histogram. This tells you they are nearly or completely clipped. Running the cursor along the histogram shows you how many pixels are present at any level. ROMM or ProPhoto RGB is especially useful for preserving detail in bright yellows. 
A common misconceptionYou needn’t convert RAW files to the same profile as your working RGB space in the Photo Persona. This is a common misconception. Affinity can open and handle images in any color space, just like Photoshop. The working space only represents your most commonly-used color container. Color management in Affinity Photo: ConclusionI’ve used many photo-editing programs, and some are more frustrating than others in terms of their color preferences and controls. Color management in Affinity Photo differs from that in Photoshop, but it doesn’t cut any major corners that I’ve found. So use it with confidence! And if you have any questions at all, be sure to leave them in the comments section! The post Color Management in Affinity Photo: The Ultimate Guide appeared first on Digital Photography School. It was authored by Glenn Harper. Photography via Digital Photography School https://ift.tt/29wB9CX October 28, 2020 at 04:09AM
https://ift.tt/3jCe0wJ
Unexpected Places to Create Impressive Photos on Campus
Spectacular pictures are not only unusual shots taken high in the mountains or at the seaside. There are thousands of ideas, and we picked up the most unusual ones for students.
Fashion changes and even picture styles are undergoing a change. The photos with everyone standing in a row and looking frowningly at the lens went out of fashion a long time ago. These days, creative photos having a fascinating plot and an interesting composition are relevant. You feel proud to show such photos to friends and post them on Facebook or Instagram.
No time for shooting? Order paper online to get some free time and carefully study the following article to create an impressive picture on campus. Below you will find a selection of funny and unusual ideas for a photoshoot on campus that will come in handy to boast a college entry or successfully pass exams.
Libraries Are Not for Bookworms
College libraries are not only for hard study and getting help with statistic homework. Picking up dozens of favorite books, a cup of coffee, or tea, you can take an atmospheric picture. You can ask your classmate for help or make a picture yourself.
College Labs
Do you want an exemplary picture that shows your serious attitude to study? Shooting in a science lab in front of various flasks can be the first photo in your science portfolio. Your academic supervisor will hardly ever take a picture, but a good photo can take a lot of effort, as we know.
Gym Picture for True Athletes
If you are keen on sports, it might be relevant to get a picture of the sport style. For example, the photo where you are depicted in the foreground with a ball in your hands, the background is a little blurred, but the colleges name stands out clearly. Such a picture can be not only a good advertisement but also a way to collect plenty of positive comments on your social profile.
Or as long as you are good at doing sports tricks, you may impress the audience with a lovely collage depicting you doing captivating stunts. Do you need some time to practice? Get help from homework experts, seeking the help, “I need urgent help! Could you do my homework for me online?” and invest your time wisely!
Green Lawn as a Perfect Photo Zone
Of course, thousands of students have a picture on the lawn where they are shot in the same position. But you can be original if you combine three colors on it like the blue sky, green lawn grass, and a small part of the college building. Bright colors and a
College Theatrical Stage
Even if you are not a theatre fan and do not play in college performances, it’s not a reason to refuse from a shoot made on the stage — no need to join a row of actors at the end of the play. You may generate a couple of fresh and good ideas by creating a
Do you feel like having no time to waste on creating an ideal list because of the heavy workload? Place your order on papercoach.net, and you will get an appropriate professional writer to complete the task! The problem has been solved, so hurry up to prepare your ideas.
Autumn Paths
Do you notice how seasons reflect on your pictures? No? Try to create a natural photo zone when a college campus territory is covered with multi-colored leaves, and you immediately see how a usual place can be transformed. To make a picture full, you might take a warm blanket and a cup of your favorite hot drink. If the weather is rainy or windy, you can take a picture with a nice umbrella and prove that even nasty weather can’t put you in a bad mood.
Sunrise Over Campus
If you are a lark, you will definitely like this photo idea. What could be more original than taking a photo against the rising suns background as an orange ball? While students and teachers are sleeping peacefully, you are taking bright and memorable shots.
But if you want your photo-dream to come true, you will need to get up too early to take the appropriate image, get everything ready for the photo-zone, take enough pictures to have something to choose from. Besides, you will need to find a partner who will agree to become a patient photographer for you as selfies will be monotonous and not as exciting as you desired.
Photography via One Big Photo http://onebigphoto.com October 27, 2020 at 09:14PM
https://ift.tt/3e2xiKt
After months upon months of speculation, I have finally confirmed that an APS-C RF mount camera is coming, and it’s planned to be launched in the 2nd half of 2021. As for anything product-wise during the pandemic, these announcements are a moving target. My source has confirmed that it will be the smallest EOS R system camera, but will pack a punch for both sports shooters and videographers. I will note that “smallest” doesn’t necessarily mean that it’ll be all that much smaller than the EOS RP. The same source also said that there aren’t any plans for RF-S lenses, but that there will be lenses that will suit both the APS-C and full-frame shooter. The same source also said it will use a new APS-C image sensor with DPAF II, but specifications beyond that are very vague. The image used for this post is a mockup and not the actual camera.Photography via Canon Rumors https://ift.tt/2v4dYqS October 27, 2020 at 01:10PM The future of DSLRs may lay with Pentax as Ricoh gives us a teaser for the Pentax K-3 Mark III10/27/2020
https://ift.tt/34Aclnf
RICOH COMPANY, LTD. and RICOH IMAGING COMPANY, LTD. have been developing a new PENTAX K-series digital SLR camera, which will be positioned as the flagship model of the APS-C-format SLR lineup. Currently, in development, the new camera now has its official name: the PENTAX K-3 Mark III. Designed to be a camera embodying The Five Principles of PENTAX, it will incorporate an array of functions and features to highlight the significance of SLR photography, and to optimize the joy taking pictures for everyone with a passion for photography. The product prototype was exhibited last year during the PENTAX 100th Year Anniversary event. At the event, we announced that it would be launched by the end of 2020 — and it is now in the final stage of development. Once the development is complete, we will streamline the camera’s production system. It has taken a bit longer than expected, so we appreciate your patience and wish to share already an overview of the product, as per the specifications below.
We’ll provide you with more product information, such as the scheduled market launch date, as soon as the information is confirmed. Finally, we invite you to visit our RICOH IMAGING website for more information on the new PENTAX APS-C-format digital SLR flagship and to get ready for the arrival of this new camera, which we expect to set a new standard for the future of SLR photography. Overview of the new product in development:
The five principles of PENTAX:
Photography via Canon Rumors https://ift.tt/2v4dYqS October 27, 2020 at 11:38AM
https://ift.tt/34xBBKI
I have confirmed that Canon is still on schedule to release new firmware for the Canon EOS R5 in November, I was unable to confirm the same for the Canon EOS R6. Here’s a reminder for what to expect for the next Canon EOS R5 firmware.
Photography via Canon Rumors https://ift.tt/2v4dYqS October 27, 2020 at 11:22AM |
Categories
All
Archives
November 2020
|
 RSS Feed
