
|
https://ift.tt/37AlvSG
It’s “OK.” The frame rate of what you see in that live view window is a lot slower than I was expecting (check out the video below as see if you agree), and while the folks who have been waiting forever for this feature will probably be fine with it, it’s not a big advantage for what I shoot, and I think the slow frame rate would get on my nerves, so I’ll be skipping it for now, but I would expect that it’ll get faster in a future update (that’s no inside intel — I just think they’ll get some feedback on this). NOTE: There’s no audio — this is just to see the frame rate example. Now that you’ve seen it — am I being too picky on the frame rate thing? Let me know in the comments below. Update on Monday’s Post about the Sony Tethering Plug-in (and why Nikon Users Might Want To Use It)Well, it appears the folks at Tethertools got wind of my post on Monday (since they contacted me), but luckily they only had one thing they wanted to address — my comment on why a Nikon user would want to use their Smart Shooter 4 plug-in, since Nikon’s have been able to tether straight into Lightroom for like 11 years. Here’s the line from their Website that had me scratching my head:
Well, they told me what it is that Nikon users would love, and I have to admit, I think they’re right (just based on how many Nikon users have complained about this Lightroom tethering feature that Canon shooters get they Nikon users don’t. The mystery is solved!What Nikon users get with this plug-in is the ability to simultaneously write to their camera’s memory card, and the computer they’re tethering with. Something they’ve never been able to do in Lightroom (but Canon shooters have been able to do from the start). So, that’s the advantage (and why they point it out on their site). You can download a free trial version from their Website. Thanks to Jessica at Tethertools for reaching out and letting me in on the secret (it’s not really a secret, but that sounds a look more interesting to call it that). Here’s wishing you a safe, happy, fun weekend. -Scott P.S. The Flash Conference (featuring Joe McNally) is coming next month. Hundreds of photographers have already signed up — don’t miss out on this live, two-day, two track event. Here’s the link for more details and tickets. The post I Tried Lightroom’s New Live View Tethering Feature, and… appeared first on Lightroom Killer Tips. Photography via Lightroom Killer Tips https://ift.tt/2sh0aZ8 October 23, 2020 at 03:42AM
0 Comments
https://ift.tt/2IWatNd
Canon Watch is reporting that a Super35 8K Cinema EOS camera is currently in field testing. I have been unable to confirm this information, so please treat it accordingly. Unnamed Canon 8K Cinema EOS camera specifications:
I do not believe that the Cinema EOS C90 will be an 8K camera, so if this information is correct, it’s a new camera for the Cinema EOS lineup. 8K is coming sooner than later from Canon, the EOS R5 can’t be the only camera in their lineup capable of capturing 8K video. I don’t think we’ll see anything officially announced until at least April of 2021. Photography via Canon Rumors https://ift.tt/2v4dYqS October 22, 2020 at 06:35AM
https://ift.tt/3mamyMX
The post Manual Exposure Cheat Sheet for Beginners: How to Expose Manually appeared first on Digital Photography School. It was authored by Kevin Landwer-Johan. Photographers are visual people. Learning is often made easier for us with the help of graphics and images. In this article, I want to break down this classic manual exposure cheat sheet: 
Beginner photographers, and even more experienced ones, often think that Manual mode is complicated. It’s not. But to learn how to use Manual mode well, you need to understand a few basics. These are the three camera controls that manage exposure: You also need to use the exposure meter, LCD, or viewfinder to assist you in choosing the best settings. If you read the light, you can then set your exposure. This manual exposure cheat sheet will help you understand these few essentials. 
Reading the lightAll modern cameras have a built-in exposure meter. This tool indicates when you have your settings balanced to achieve a good exposure. In most cameras, it looks something like this: 
Some cameras use a number system and a + or – symbol to show the exposure value. Whatever display method your camera uses, you are aiming to have the meter read “0.” This is the indication you have a good exposure. If the display indicates the exposure is toward the – side, your photo will be underexposed. If it’s showing that the exposure is toward the + side, your photo will be overexposed. This is a very simplified explanation of the metering system. To gain a more in-depth understanding of how it works, please read this article: Understanding Exposure Metering Modes. With many cameras, you can also use the rear LCD to help you determine the best exposure settings. Additionally, mirrorless cameras allow you to see the effect of changes you make via the viewfinder. To discover if your camera has this function, turn on Live View and set your camera to Manual mode. Now adjust your aperture and/or shutter speed. Can you see the brightness value of the LCD change as you do this? If so, you can use your LCD screen and/or viewfinder to help you manage your exposure settings. If you are new to using Manual mode, this method will make learning easier. Whether you look at the exposure meter graphic or use your viewfinder/LCD to help you choose your settings, treat these as a guide. Your camera does not know what the main subject of your composition is. You must control the exposure so the most important part of your image is well exposed. 
Adjusting your apertureEvery lens has an aperture. This is an adjustable diaphragm that controls how much light can enter the lens. Each aperture setting corresponds to an f-stop. A smaller f-stop number indicates more light will enter the lens. A higher number means the opening is smaller and less light will enter. 
On this manual exposure cheat sheet, you can see there is a range of aperture settings. The smallest aperture setting, on the left, is f/16. To the right of the graphic is the widest setting, at f/1.4. Not all lenses have the same aperture settings. Some will have wider or narrower minimum and maximum settings. Along with governing the amount of light that enters the lens, the aperture setting influences depth of field (DOF). DOF is the amount of the photo that is acceptably sharp. The wider the aperture setting you choose, the shallower the DOF will be. You can see this on the cheat sheet graphic of the person and tree. At f/16, both the person and tree are sharp. At f/1.4, the person is sharp and the tree in the background is out of focus. A narrow aperture setting allows less light to enter the lens. It also means you’ll have more of your photo in focus. A wide aperture setting allows more light into the lens and the DOF is shallower. You can adjust the aperture setting to help balance your exposure and control how much of your composition is in focus. The amount of DOF can be used creatively in your photographs. 
Setting your shutter speedInside your camera, there’s a shutter. This typically consists of two “blinds” that open and close when you press the shutter release button. Opening the shutter exposes the camera sensor to light, which allows it to create an image. The duration the shutter is open for controls how much light will affect the sensor. If the shutter is open for too long, the photo will be overexposed. If the shutter is open for a duration that is too short, the photo will be underexposed. Your choice of shutter speed can also affect how sharp your photos will be. If you choose a shutter speed that’s too slow and your camera moves during the time the shutter is open, your photo will be blurred. This is known as camera shake. If you have a moving subject and use a slow shutter speed, your subject will be blurred. This is known as motion blur. Using a faster shutter speed will help you avoid camera shake and unwanted motion blur. 
In the manual exposure cheat sheet, you can see the graphic of a person running. At a shutter speed setting of 1/1000s, the figure is sharp. At a setting of 1/60s, the figure is blurred a little. At a shutter speed of 1 second, the figure is very blurred. The relationship between how fast your subject is moving and the shutter speed will determine how much blurring occurs. You can adjust the shutter speed to help balance your exposure and to control blur from camera shake or motion. Motion blur and camera shake, or a lack thereof, can be used creatively in your photography. 
Determining your ISOISO settings control how responsive your camera’s sensor is to light. A low number means your sensor is going to be less responsive than when you use a high number. I prefer to use my ISO as a foundation for my exposure. I generally only adjust it when lighting conditions change significantly. Outside on a sunny day, you will want to choose a low ISO. Inside or at night, you will want to choose a high ISO. 
Unlike your other two exposure settings, ISO has no creative influence on your photos. It will affect the technical quality, though. At higher ISO settings, digital noise will start to appear in your photos. The color and contrast will also tend to flatten out. In the manual exposure cheat sheet, you can see that lower ISO settings mean the sensor is less responsive compared to higher ISO settings. To avoid seeing digital noise in your photos, always aim to use the lowest ISO setting you can. 
Stop! This is importantEach incremental change indicated by the manual exposure cheat sheet is one “stop.” The term “stop” in photography is the measurement of exposure. Plus one stop means the exposure is doubled. Minus one stop means the exposure is halved. A stop can be controlled by aperture, shutter speed, or ISO. If you adjust one setting by plus one stop, you can always achieve the same initial exposure by adjusting another setting by minus one stop, and so on. As you can see on the cheat sheet, the increments I have used for the shutter speed and ISO are clearly half or double the adjacent numbers. The f-stop numbers appear a bit random, however. This is because they indicate the aperture opening size in relation to the lens focal length. But each f-stop setting is either half or double the setting on either side of it. 
Manual exposure cheat sheet: ConclusionManual exposure of your photographs is not so complicated. All you need to do is manage the relationship between the three exposure settings. The relationship between aperture settings, exposure, and depth of field is plain to see on this cheat sheet. How your choice of shutter speed affects both exposure and blurring is also well illustrated. Keep your ISO in mind and make it as low as you can. But don’t hesitate to alter it when you need to. Print the manual exposure cheat sheet to make learning and mastering Manual mode a little easier. It will not happen without some commitment and practice. But once you become familiar with Manual mode and manage your exposures well, your photography will become more creative. The post Manual Exposure Cheat Sheet for Beginners: How to Expose Manually appeared first on Digital Photography School. It was authored by Kevin Landwer-Johan. Photography via Digital Photography School https://ift.tt/29wB9CX October 22, 2020 at 04:08AM
https://ift.tt/31tIlqS
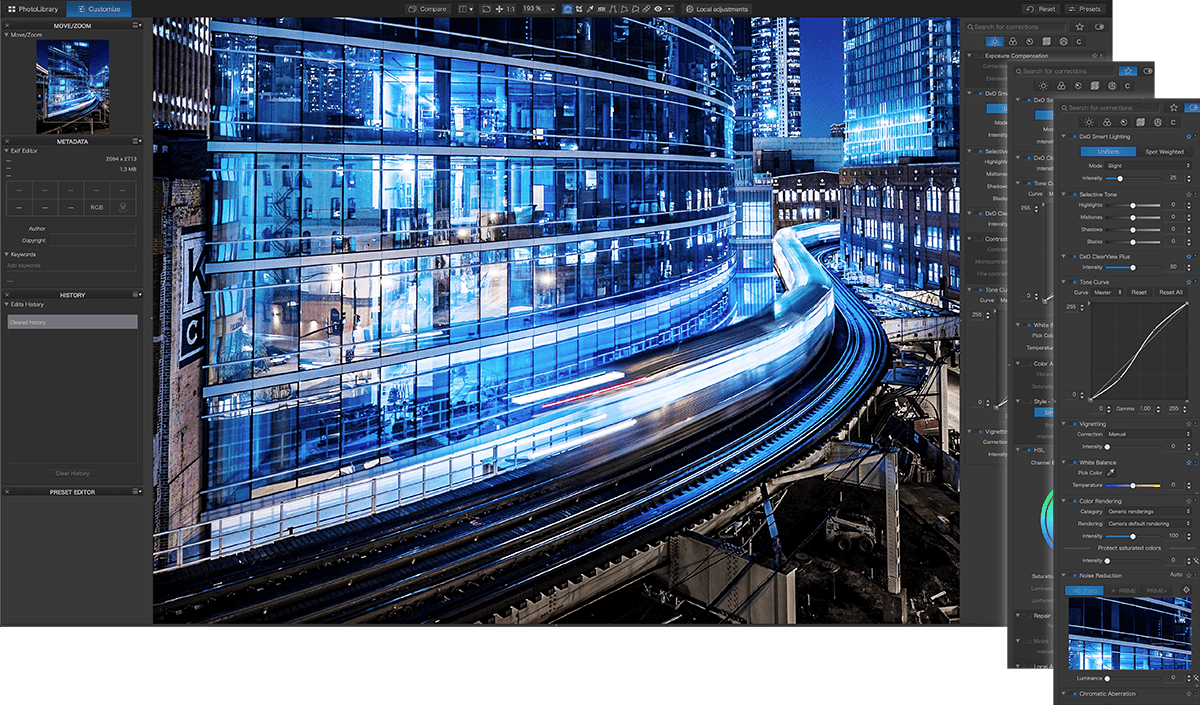
DxO PhotoLab 4: revolutionary in every respect Today, DxO, one of the most innovative companies in the field of photography and image editing, is unveiling DxO PhotoLab 4, a major update of its multiple award-winning photo-editing software. This latest version features DxO DeepPRIME, a revolutionary demosaicing and denoising technology based on artificial intelligence and trained with deep learning. DxO PhotoLab 4 has also added a new dynamic interface system called DxO Smart Workspace, enriched its photo library with a batch renaming feature, and created an even simpler workflow by adding a new and exclusive editing history tool called DxO Advanced History and the ability to selectively copy and paste specific settings. Lastly, the new DxO Instant Watermarking feature lets users sign their photos by adding a watermark directly to the image. Get DXO PhotoLab 4 // Free One Month Trial of DXO PhotoLab 4
DxO DeepPRIME has revolutionized denoising and RAW conversion technologyTrained using the millions of photos DxO’s laboratories have analyzed for more than 15 years, DxO DeepPRIME employs cutting-edge artificial intelligence and drastically improves digital noise reduction while also delivering more effective demosaicing. The resulting photo quality is nothing short of spectacular, especially for photos taken in low light conditions that require brightening certain areas, photos with small pixels, and photos taken with early-generation cameras.
To reduce noise and demosaic RAW images, DxO DeepPRIME was trained using several billion samples. Since its founding in 2003, DxO has earned an international reputation for calibrating hundreds of cameras and thousands of lenses using a protocol that is more extensive than any other in the industry. DxO has measured the distortion, vignetting, chromatic aberrations, loss of sharpness, and digital noise generated by each equipment combination and in every situation with an extraordinary level of precision. Using a traditional approach, these two operations are performed separately, with each one introducing artifacts that degrade the quality of the other. With deep learning, DxO DeepPRIME has adopted a holistic approach that combines the two steps into one in order to deliver exceptional performance. With DxO DeepPRIME, all information in a photo, especially photos taken in low light, is rendered beautifully. Color details are better preserved, and the transitions are more natural and regular. Compared to DxO PRIME, DxO’s previous denoising algorithm and the current standard among photo-editing software programs, DxO DeepPRIME delivers a gain of around two ISO sensitivity values at a comparable level of quality. “There are a number of applications for DxO DeepPRIME,” explains Jérôme Ménière, CEO of DxO. “DxO DeepPRIME creates new creative opportunities by helping expert photographers overcome digital noise or a lack of light. For amateur photographers, DxO DeepPRIME compensates the drawbacks of the smaller sensors on compact and bridge cameras, which can typically only take high-quality images in bright light. Lastly, it can also be used to revamp photos taken by less advanced cameras from the start of the digital era.” DxO Smart Workspace: You are unique, your workspace should be tooDxO’s dynamic Smart Workspace is based on a groundbreaking system of filters that can be accessed directly from the toolbar. It allows users to show tool palettes by correction type, only display their pre- selected favorite palettes, or only show palettes with activated corrections. In addition, DxO Smart Workspace can also instantly open the desired palette when users search for a tool in a dedicated search field.
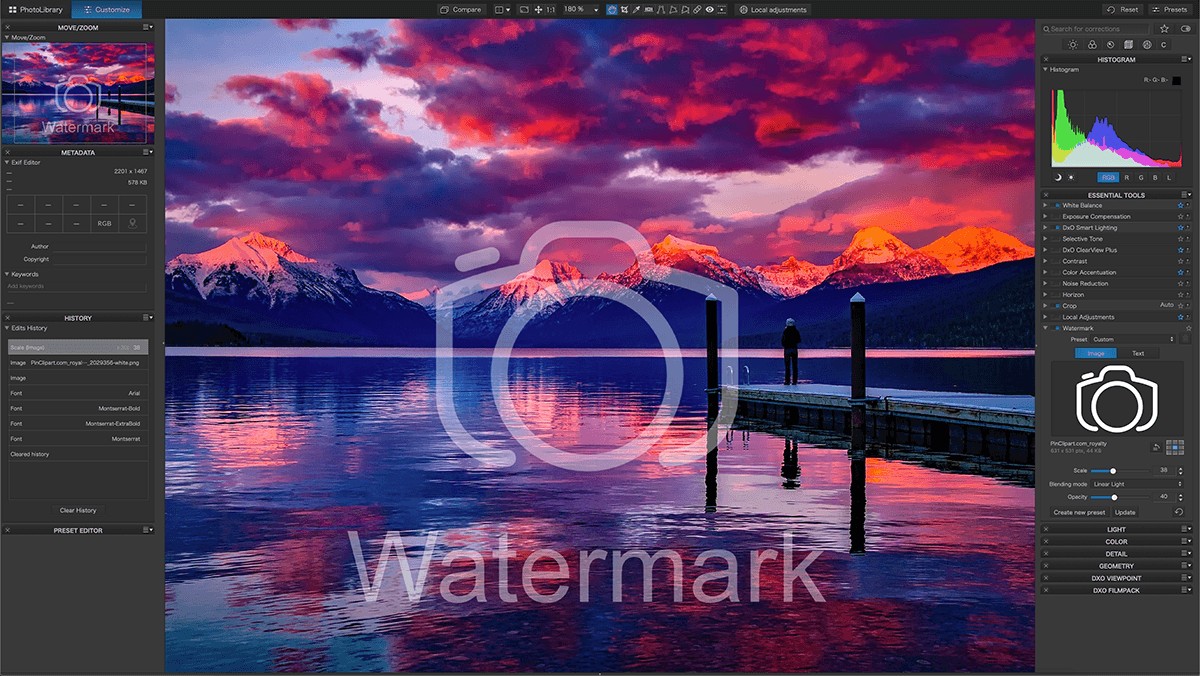
With its display filters and exclusive search feature, the dynamic DxO Smart Workspace feature helps users significantly increase their productivity and provides them with a workflow adapted to each individual’s needs, regardless of their level. It also makes transitioning from other software programs to DxO PhotoLab smoother by helping photographers quickly get their bearings. Get DXO PhotoLab 4 // Free One Month Trial of DXO PhotoLab 4 Batch renaming: Work faster and betterDxO PhotoLab 4 lets users edit the names of multiple files in a single step. From the DxO PhotoLibrary or directly from the Photo Browser, users can select several files, then use a dedicated dialog box to rename them, add text before or after the existing names, and number them. By offering both editing features and the option to search and replace, DxO PhotoLab 4 lets photographers edit series of images and effectively manage their photo libraries, resulting in a substantial increase in productivity. DxO Advanced History: Your personal editing memoryThe new History palette in DxO PhotoLab 4 lists all corrections applied to an image successively and by chronological order. In this way, it saves every edit that has been made to a photo. It also displays the editing values next to each state of the image as well as the difference compared to previous values. This lets photographers navigate to different moments in the editing process without losing sight of every change that has been made to the photo. For complex edits, such as presets or several settings from the same tool, DxO PhotoLab 4 is the only photo-editing software that includes grouped adjustments in its history. These edits can be hidden as needed. Selective copy and paste: Batch processing is now even faster and more flexibleThe ability to selectively copy and paste settings is a DxO PhotoLab 4 feature that lets users synchronize the settings of several similar images by applying a specific selection of individual edits from one photo to another. From the Photo Browser, users can select the specific edits they want to apply to one or several other images by editing type, such as lighting, color, detail, local adjustments, geometry, or watermarking. DxO Instant Watermarking: Your photos deserve your signatureMost photo-editing programs let users add a watermark but do not let them directly preview the final version. They also don’t allow users to manage blend modes. The powerful and flexible DxO Instant Watermarking tool lets users embed a text and/or image in the background of one or several photos at the same time and then instantly view the result. The placement, orientation, scale, margins, and opacity of the watermark are fully configurable. DxO PhotoLab 4 is the only tool to offer seven blend modes that take into account background lighting to ensure the image or text signature is easily visible.
New camera supportDxO PhotoLab 4 continues to add the latest cameras to the list of equipment it supports. It has added support for the Canon EOS R5, EOS R6, and EOS 850D, the Nikon D6 and Z5; the Olympus OM- D E-M10 Mark IV; and the Panasonic Lumix S5 cameras. More than 60,000 camera and lens combinations are now available. Price and availabilityThe ESSENTIAL and ELITE editions of DxO PhotoLab 4 (PC and Mac) are now available for download on DxO’s website (https://shop.dxo.com/) for the following launch prices until November 19, 2020: You do not need a subscription to use DxO PhotoLab 4. You can install the program on two computers with the DxO PhotoLab 4 ESSENTIAL Edition or on three computers with the DxO PhotoLab 4 ELITE Edition. Photographers with a license for DxO OpticsPro or PhotoLab 3 can purchase an upgrade license for DxO PhotoLab 4 by signing into their customer account on https://ift.tt/3kjiZDv. A fully-functional, one-month trial version of DxO PhotoLab 4 is available on the DxO website: https://www.dxo.com/dxo-photolab/download/. Photography via Canon Rumors https://ift.tt/2v4dYqS October 21, 2020 at 12:22PM
https://ift.tt/34fjV6p
DPReview has completed its review of the Canon EOS R5. They come away very impressed with the camera, with the caveats that we’ve read about ad nauseam. A couple of new things I hadn’t read about the EOS R5 from the DPReview is that dynamic range dips a bit when shooting with the 20fps electronic shutter. There is also non-optional noise reduction applied to RAW files. Outside of those two things and how the camera handles heat for 8K and 4KHQ, there really isn’t much negative to say about the camera. From DPReview:
Another batch of Canon EOS R5’s hit retailers this week, but from my understanding, the backorder lists are still pretty long. Hopefully, that changes before the end of 2020. Photography via Canon Rumors https://ift.tt/2v4dYqS October 21, 2020 at 12:06PM
https://ift.tt/35dTgpW
The post 3 Lightroom Tools to Enhance Your Nature and Wildlife Photography appeared first on Digital Photography School. It was authored by Shreyas Yadav. Do you want to bring out texture in your images of flowers, butterflies, plants, or macro subjects? Are you looking to remove haze from your beautiful landscape images? Do you want to reveal fine detail in your wildlife images? Then you’re in the right place. 
Because today I am going to share with you three Lightroom tools for nature photography. I use these three tools to enhance my own nature and wildlife images. And I am sure these tools will be helpful to you, as well. And the best part is? All of these Lightroom tools are easy to apply. It doesn’t matter if you are a beginner or an intermediate-level photographer; you can pick up these tools and start enhancing your nature images right away. Note that these three Lightroom tools can be applied to an overall image (as a global adjustment) or to a targeted area of the image (as a local adjustment). Let’s do this! The 3 Lightroom tools for nature photographyHere are the three Lightroom tools that will instantly enhance your nature photos:
To access these tools, head to the Develop Module, find the Basic Panel, and scroll down to Presence: 
TextureTexture has a subtle sharpening effect. It brings out the finer details. You can use the Texture tool in Lightroom to subtly add sharpening to flowers, patterns, plants, and more. By default, the Texture slider is set to “0.” Drag the texture slider to the right to increase the texture effect. Or drag the Texture slider to the left to reduce its effect. Here is an example of the Texture slider in action. First, take a look at this chameleon photo without any added texture: 
Then, as you increase the texture, the chameleon details appear sharper: 
Here’s a final before and after: 
ClarityThe effect of the Clarity slider is more prominent than the effect of the Texture slider. What does Clarity do? It primarily increases the midtone contrast. Now, the Clarity slider is set to “0” as a default. To add Clarity, drag the slider to the right: 
To reduce the effect, drag the Clarity slider to the left. Since the effect of the Clarity slider is strong, make sure you use Clarity in moderation. If you capture a well-exposed image with a relatively centered histogram, then the Clarity slider will improve the midtone contrast and can bring out additional details in your picture. Here’s an image without the Clarity slider applied: 
As well as its corresponding histogram: 
And here’s the image with the Clarity slider applied: 
And its corresponding histogram: 
As Clarity increases, the midtone contrast increases, too; notice how the center of the histogram has expanded. Additionally, after increasing the Clarity, details on the bird have begun to pop. DehazeThe Dehaze slider is quite helpful for landscape images. When out photographing, you may end up with haze in the atmosphere. Additionally, fog or rain will make an image look hazy. You can use the Dehaze slider to reduce the haze. To apply the Dehaze effect (and reduce the haze), drag the Dehaze slider to the right: 
To reduce the Dehaze effect (and increase the haze), drag the Dehaze slider to the left. As you increase the Dehaze effect, haze in the picture will be reduced, and the overall saturation of the image will increase. If the saturation increases too much, then bring down the Saturation slider slightly. Note that the Dehaze slider will shift the histogram to the left (toward the side of the histogram representing the darker tones in the image). When I was photographing the scene below, there was mist and drizzle over the forest valley. Here’s the image prior to applying the Dehaze effect: 
And here’s the same image, but with the Dehaze effect applied:
As I increased the value of the Dehaze slider, the haze was reduced. The difference between the original and edited images is quite significant. You can also use the Dehaze slider for early-morning images, wildlife during the winter season, photos captured in the rain, and wildlife captured from a distance. The elephants pictured below were moving along the riverbank. I was photographing them from a boat at a far distance, it was evening, and there was a slight fog in the atmosphere, hence the image appears a bit hazy: 
But, thanks to the Dehaze slider, the haze in the picture is reduced: 
The Lightroom tools for local adjustmentsThere you go! Those are the three Lightroom tools for nature photography that will instantly enhance your photos. But here’s one more thing you should know: Texture, Clarity, and Dehaze aren’t only available as global adjustments. They’re available as local adjustments, too. You can apply local adjustments using a Graduated Filter, a Radial Filter, or an Adjustment Brush. As you apply your local adjustments, you can shift the Texture, Clarity, and Dehaze sliders. Let me give you an example. Here’s an unedited image: 
After making global adjustments in Adobe Lightroom, I used a local (targeted) adjustment on the sky: 


Note that these local adjustments include the Texture, Clarity, and Dehaze sliders. Here is the final image: 
So you can use these three tools when adding local adjustments, too! Lightroom tools for nature photography: ConclusionI hope these three Lightroom tools will help you enhance your nature and wildlife images. Now I would like to hear from you: Which of these Lightroom tools for nature photography are you going to try first? Let me know by leaving a comment below. The post 3 Lightroom Tools to Enhance Your Nature and Wildlife Photography appeared first on Digital Photography School. It was authored by Shreyas Yadav. Photography via Digital Photography School https://ift.tt/29wB9CX October 21, 2020 at 04:08AM
https://ift.tt/2HaekWw
Canon today released new firmware for the Canon 6D Mark II Firmware Version 1.1.0 incorporates the following enhancements and fix:
Download firmware v1.1.0 for the EOS 6D Mark II at Canon USA Photography via Canon Rumors https://ift.tt/2v4dYqS October 20, 2020 at 07:54PM
https://ift.tt/2HlRdIl
Canon today released new firmware for the Canon EOS 5D Mark IV. Firmware Version 1.3.0 incorporates the following enhancements and fix:
Download firmware v1.3.0 for the EOS 5D Mark IV at Canon USA Photography via Canon Rumors https://ift.tt/2v4dYqS October 20, 2020 at 07:40PM
https://ift.tt/2H9DYdX
Our exclusive affiliate partner Adorama has stock of the Canon EOS R6 body only. Act quickly, they won’t stay in stock for long. Key Features Read more... Photography via Canon Rumors https://ift.tt/2v4dYqS October 20, 2020 at 05:59PM
https://ift.tt/34brE5w
DJI has announced the DJI Pocket 2, and has brought a whole set of new features to the sequel of the very popular original. Pricing for the DJI Pocket 2 starts at $349 USD and shipping will begin in the next couple of weeks. Learn more about the DJI Pocket 2 DJI Pocket 2 – What’s New Fast Wake – Pocket 2 wakes up faster so you can start shooting in seconds Bigger Sensor – A new 1/1.7″ sensor on the Pocket 2 lets you shoot in all types of lighting conditions and a wider FOV means better selfies 8x Zoom – Pocket 2 supports 8x zoom and 4x lossless zoom DJI Matrix Stereo – Pocket 2 uses a 4-way array of microphones to capture beautiful surround sound audio Four Array Microphone – DJI Pocket picks up beautiful stereo sound. Audio Zoom – If you zoom in on a subject Pocket 2 automatically increases pickup from the mic facing that direction. SoundTrack – DJI Pocket 2 can adjust the direction of audio enhancement based on the direction the camera is facing. Directional Microphone Switching – puts you in control of what is being recorded. Maybe you’re filming away from you but want to provide narration of what the camera is recording. No problem. Just chose the microphone facing you and you’ll have perfect audio. 64MP Stills – 4K60fps Video – The larger camera sensor of the Pocket 2 means more beautiful images and video regardless of the time of day and you can toggle between 64MP and 16MP stills.
Active Track 3.0 – DJI keeps refining subject tracking, and ActiveTrack 3.0 can better detect adults, children, even pets and it’s smart programming means it can anticipate motion continuity when your subject moves behind an object. Joystick Control – The multi-use Mini Control Stick lets you tilt, pan and zoom all with one thumb control. Built-in Wireless Connectivity – No need to purchase a separate wireless module. Connect your smartphone or other wireless accessories (like the Wireless Mic) and access all of the features of the Pocket remotely. 8x Slow Motion – Our beta version of the original Osmo Pocket had 8x Slow Motion, but DJI never rolled it out to the masses. It’s back and fully available in the Pocket 2 at 1080p! Hybrid AutoFocus 2.0 – This feature lets you autofocus more quickly and accurately on a subject. It makes a world of difference when you’re tracking and want clear footage between transitions. Photography via Canon Rumors https://ift.tt/2v4dYqS October 20, 2020 at 10:25AM |
Categories
All
Archives
November 2020
|


 RSS Feed
