
|
http://bit.ly/1W8eji3
The Story of How Top Photographers Posed for Baseball Cards in 1974 http://bit.ly/2TebdwW In the mid-1970s, 134 of the top photographers and curators in the world of photography posed for an unusual set of baseball cards that now sell for thousands of dollars as a complete set. The SF Museum of Modern Art just released this 4-minute video in which photographer Mike Mandel shares the story of how these cards came to be. When Mandel was studying photography in the early 1970s, photographers didn’t receive much attention compared to artists working in other mediums, but things were starting to change. As a baseball fan, Mandel decided to poke fun at the fact that photographers were starting to receive recognition by creating a series of baseball cards of famous photographers. In the 1974, Mandel spent $1,700 in savings traveling 14,000 miles across the United States to visit photographers. One of the renowned photographers who was enthusiastic about the concept was Imogen Cunningham. 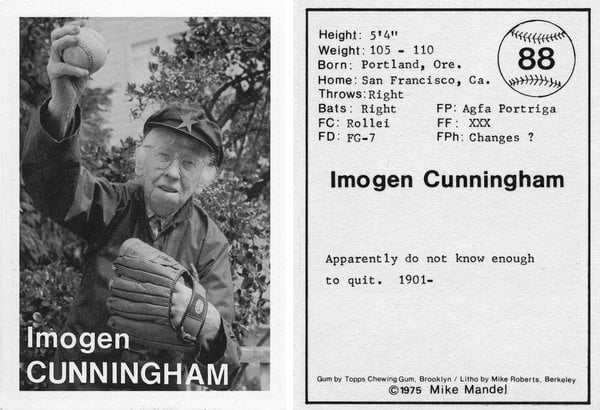
Mandel was then able to get Ansel Adams onboard by sending him the portrait he had taken of Cunningham. After waiting three months to book a shoot with Adams, Mandel was humiliated to find that his portraits of Adams were all completely underexposed. Mandel waited three more months for a second shoot, which finally produced a good portrait for a card. 
After shooting portraits of them and collecting “stats” and quotes, Mandel self-published 3,000 copies of each card. Those cards were packaged in sets of 10 with sticks of bubble gum donated by Topps and sold for $1 in museums and art galleries. Take a look at eBay these days, and the original cards will cost you a pretty penny. Individual cards sell for tens of dollars and full sets are being offered for over $3,000.
In 2015, Mandel re-released the card collection in new boxed collections called Good 70s with 10-card packs packaged with other items. The cards are “part of the history of photography,” Mandel says. “It’s really quite humbling that any project that you do still has some significance to people […]” Photography News via PetaPixel https://petapixel.com December 27, 2018 at 10:50AM
0 Comments
http://bit.ly/2Q3vOC5
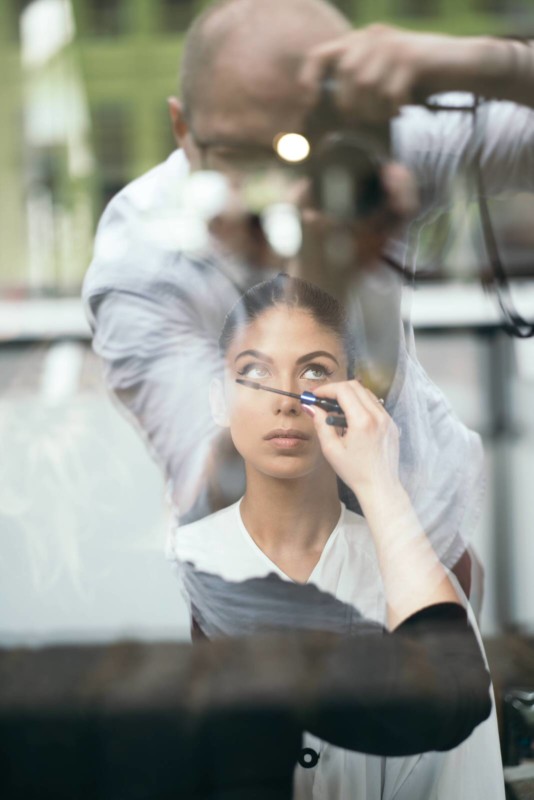
5 Tips for Shooting Fashion Behind the Scenes http://bit.ly/2SuN19q
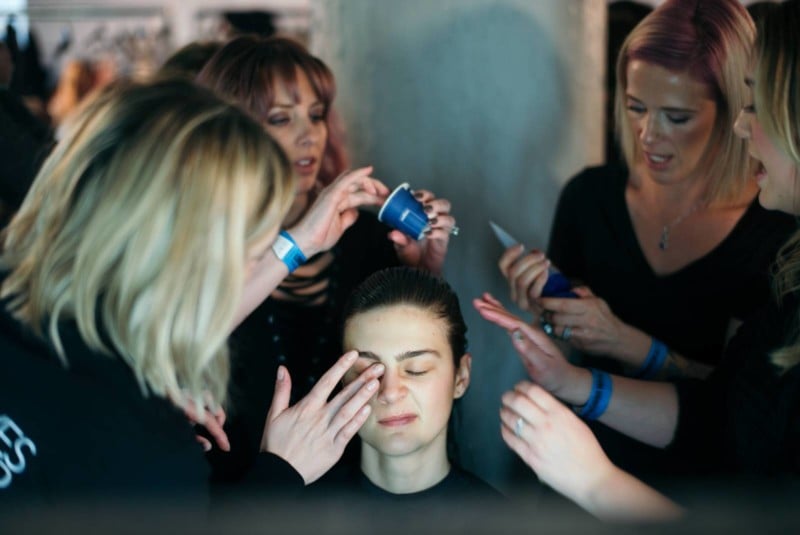
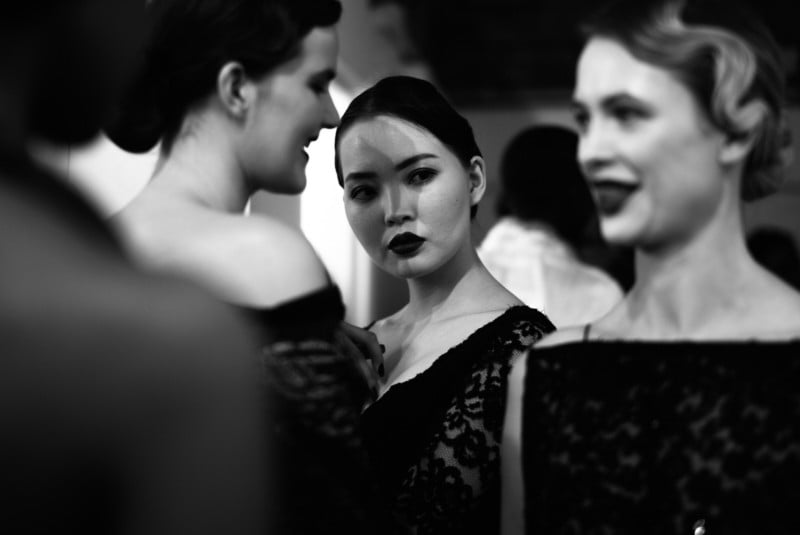
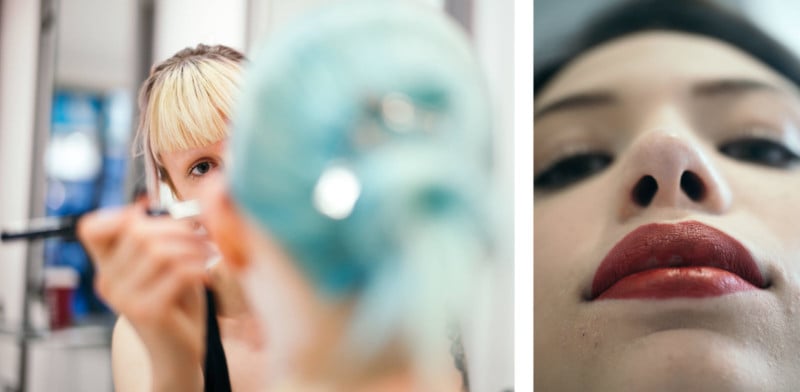
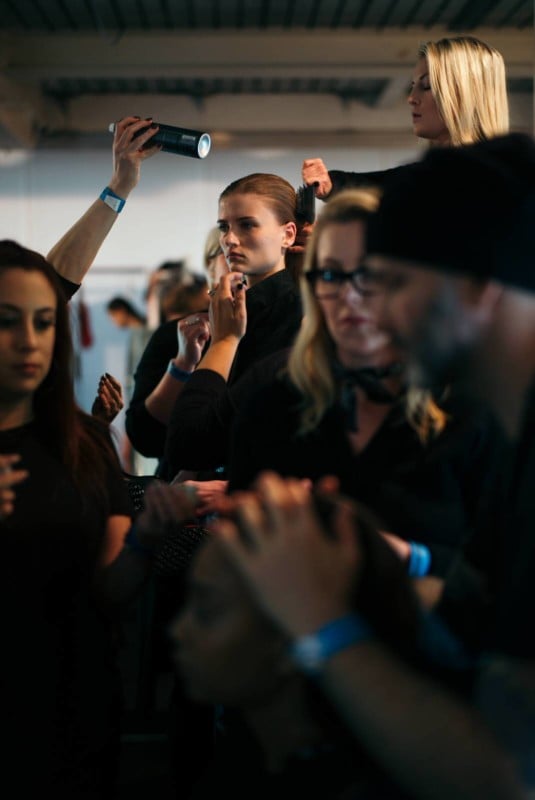
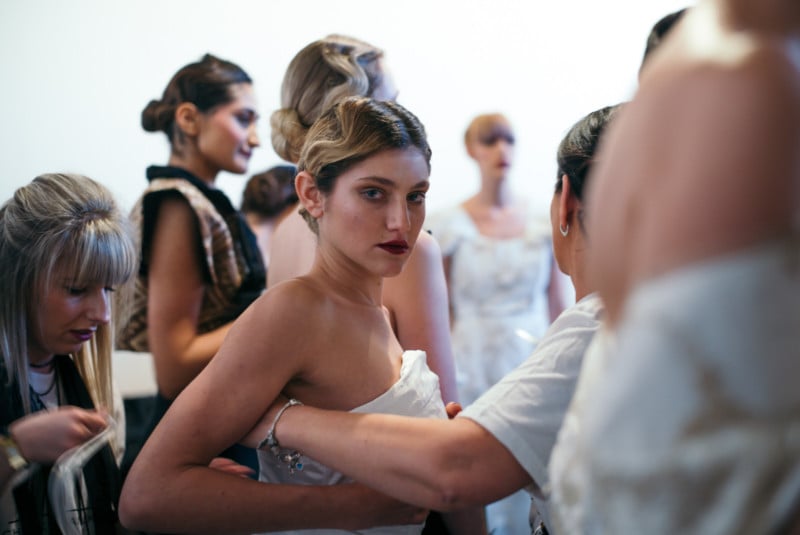
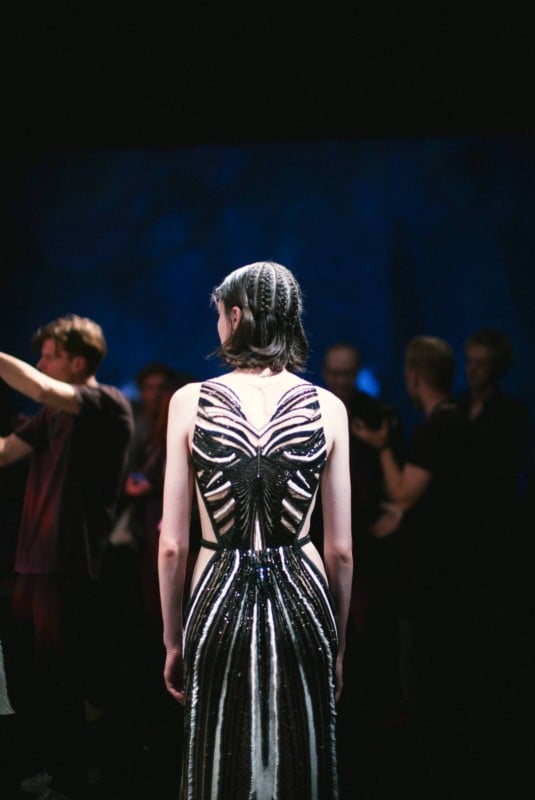
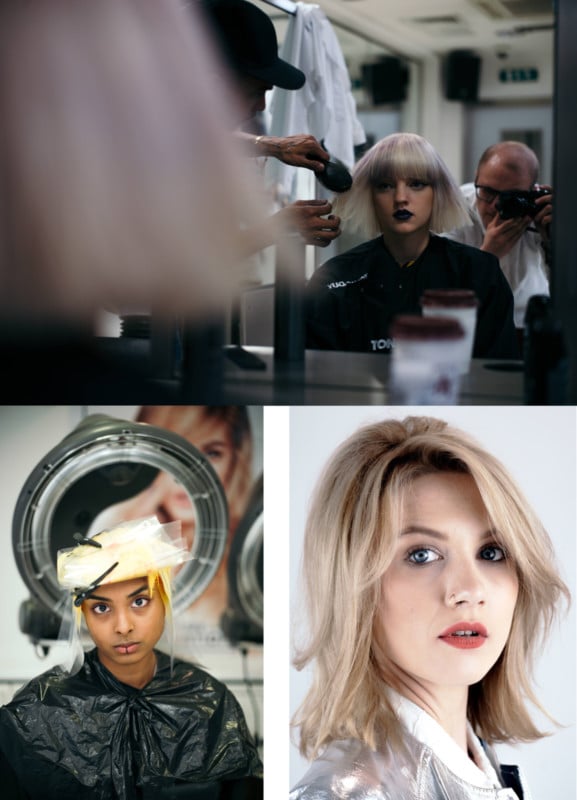
One of my favorite environments for photojournalism is the world of fashion, which I fell into almost accidentally when I first started out as a photographer. It has been one of the most interesting, rewarding experiences both artistically and personally, and I would like to share some thoughts on working in that scene. I shot my first London Fashion Week in 2016, not long after graduating from university with a degree in Advertising. I researched and contacted the PR companies directly with my portfolio, as well as some notes on my intended coverage. At the time I never considered that there might be something to see other than the presentations and catwalks, but I was wrong. At the first show I ever worked at, presented by Marta Jakubowski, I found that although I was having a great time securing editorial images of the actual presentation I was finding it far more interesting to shoot the moments between models changing positions or the designer altering the scene – these were far more dynamic and told more of a story than the simple posed portraits. The “moneymaking” editorial shots were fairly easy and non-time consuming as everything including the lighting is already set up when you arrive. It’s just a matter of covering the room methodically to capture every model and every detail in the collection before most photographers are “done” and move to the next show. However, I wanted to come away with more than just editorial work and began to negotiate access to backstage at the events I was attending in the hopes of a better collection of storytelling images. Since 2016 I’ve shot at over forty fashion shows, covering backstage on around half. I have a few series in the works from these, which I’ll hopefully run as books and in gallery spaces. Over that time my workflow has evolved, and there are a few tips I’d like to share with anyone interested in shooting in similar environments. When you get backstage there are a number of factors that can limit the quality of images you come away with, most pressing of which is time. You’ll have maybe an hour if you’re lucky between arriving and the show starting, and unless you’re only there for the backstage images you’ll need to be heading out directly to get a good spot if it’s a catwalk, or to queue if it’s a presentation space. 1. Look at Faces, not the Fashion
The best storytelling moments can be seen in people’s faces, and I think this is true in most forms of photojournalism. Photographing in a room full of the highest class of models wearing some of the most stylish or outlandish designs can be very distracting. It can be tempting to go for “easy” shots, not too dissimilar to editorial images you’d likely be duplicating later on during the show itself. By watching peoples faces you can pre-empt these moments and take advantage of the unique moments and expressions occurring in this informal setting to capture some genuine interactions – laughter, stress, the frantic movement of the make-up team and the designers. 2. Know Your Lenses
Backstage environments are often very cramped, and it helps to carry the smallest gear possible. This will mean having less of a physical footprint, making it easier and faster to navigate the room. It will also mean fewer lens changes and more time spent concentrating on the scene than worrying about gear. I prefer to use a 50mm but will also use a 90mm to really isolate my subjects.
However, I know many other photographers who will use anything from 24mm to 35mm in order to photograph a bit more of the context. I’ve even worked next to photographers shooting with large fisheye type lenses paired with creative flashes and gels, and even prisms for special effects. It really is a matter of personal preference, and I do urge you to experiment with different options. When it comes to taking it seriously however you must put that experimentation to practice and use lenses you have a deep literacy with. 3. Situational Awareness
Backstage, especially during early prep, is one of the most hectic and crowded environments I have ever worked in, and that includes riots and protests. Maintaining situational awareness while working is always important, but even more so in such enclosed spaces. Trip hazards like wires, makeup stands, and other people will be prevalent. It’s also good to keep out of the line of view of fellow photographers, to be mindful that they have just as much right to be there as you. It can also be good to keep track of who is good to be shot and who may be busy or unready for the camera. Some models may be waiting for things on their face to dry or for a fitting to be completed and so they may be unable to react to the camera. 4. Use a UV Filter
This is a slightly more technical tip, but still very useful for keeping your gear safe and ready to shoot. The air backstage is often full of chemicals, all kinds of hairspray, perfumes, and other substances. Keeping the front of your lens covered with a clear element makes it easy to quickly clean and keeps the actual front element free from anything that may corrode the coatings or glass. I usually keep a UV filter on my lenses as a transparent lens cap so I never have to fumble with anything and risk losing a shot. 5. Respect Everyone
Although this tip applies to basically every genre I think the stakes can be much higher in a fashion environment. As a photographer, there is an implicit threat that a “bad” photograph could show someone in a poor light, which could affect a models career. You are there by invitation, in someone else’s workspace, and usually one of the least important people in the grand scheme of the preparation going on. Mutual respect can go a long way to helping everyone around you feel comfortable with your role and leads to people being more likely to help you by giving you space or being patient while you frame an image.
Recently I’ve made more of an effort to help people feel more at ease with my presence, and it’s really paid off in my images. Usually, when I arrive I’ll go around to the models and introduce myself with a smile, tell them I’ll be floating around taking photos, and that they can feel free to wave me away if they don’t want one taken at that time. By identifying myself, I become part of the scenery rather than just being the abstract idea of a photographer moving around the room. I think that because the event does not end at the BTS – there is the actual show afterward – having these interactions early on means that it becomes easier to apply a storytelling approach to the editorial images as well. Interacting with the models in a showroom means you can nail images with more expression, and more precise poses than the other photographers in the room.
One of the best things about shooting this kind of environment is that there are so many different styles and approaches that can be used by different documentarians. I’ve seen videographers, podcasters recording audio, and even painters rendering these backstage scenes. Just because I approach things a certain way doesn’t mean that I won’t continue to explore different methodology to improve the way my images communicate.
My recent BTS projects have all involved the use of my Hasselblad XPan and Ilford black and white film, which has given me some really unique results. I’ve even shot BTS for my own editorial shoots, including for the Toni & Guy Academy, which I found fun – switching between BTS and editorial as and when models were finished with the stylist.
I look forward to seeing how my work continues to develop in this field and to sharing my future work with you! Thanks for taking the time to read my thoughts on shooting BTS for fashion events! About the author: Simon King is a London based photographer and photojournalist, currently working on a number of long-term documentary and street photography projects. The opinions expressed in this article are solely those of the author. You can follow his work on Instagram. Simon also teaches a short course in Street Photography at UAL, which can be read about here. Photography News via PetaPixel https://petapixel.com December 27, 2018 at 10:00AM
http://bit.ly/2CC8gRi
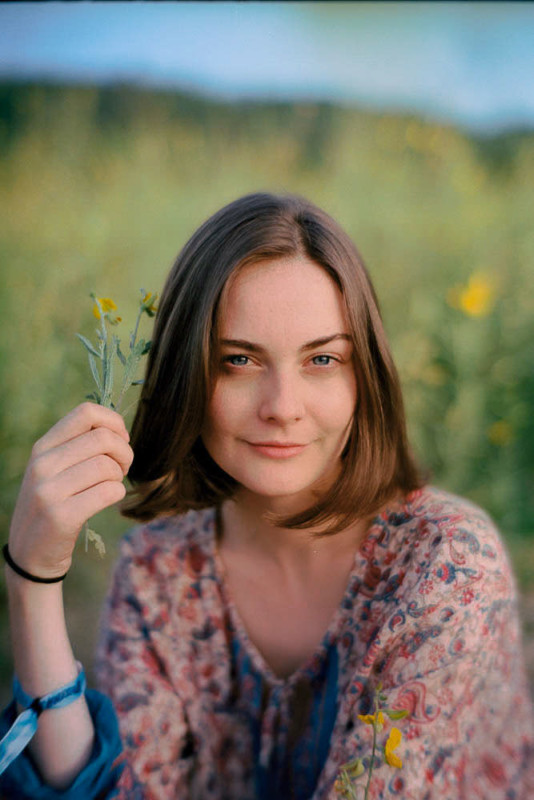
A Guide to Shooting Portraits with Kodak Ektar 100 http://bit.ly/2EQ4LIo
Kodak Ektar is the reason I fell in love with film photography. My first roll completely blew all of my digital shots out of the water. I was used to the ugly JPEGS that my old Nikon D40 spat out and Ektar just gave me what I wanted — sharp pictures, with silky grain and a look that I didn’t know how to edit for.
I followed the recommendation I received by the person who sold me it: use it to shoot things and places and was not disappointed:
The tones are fantastic, with dark shadows and highlights that retain their detail. The sharpness and grain are top notch.
But the real reason to use Ektar is the color. Golden hour looks truly golden with this film, contrasted with beautiful, calming blue notes.
But when it comes to shooting people Portra is the far more popular choice for most. Not that I don’t think it has its place as a film stock, but I have scanned so many rolls of other people’s Portra that I’m tired of the look that it renders. Portra seems like a ‘safe’ choice, and it’s pastel colors and muted tones can diminish the potential of a vibrant scene that I find so appealing in a portrait. Many will insist that Ektar is a landscape or still life film and that its tone is too red to capture pleasing skin tones. I completely disagree: Ektar is made for the digitization, and is optimized for scanning and adjustment. If you know how to expose it properly and manage your color space you can take beautiful portraits with it.
That common complaint of too much red saturation can be resolved by overexposing your skin tones by ⅓ of a stop and shooting in white or yellow light to balance the saturation of red. Meter at box speed and avoid shooting in heavy shadows. Also — I usually lose the lens hood — the additional saturation they give is not what you want for pictures of people. 
If you’re still finding the red too saturated, you can also ask your lab nicely to try to take more red of their scans. I also recommend finding the right scanner for the job — I find that the Fuji machines don’t do as good a job as Noritsu when it comes to rendering Ektar in the most balanced color space. You can check what machine your lab uses by looking at the metadata in Lightroom. 

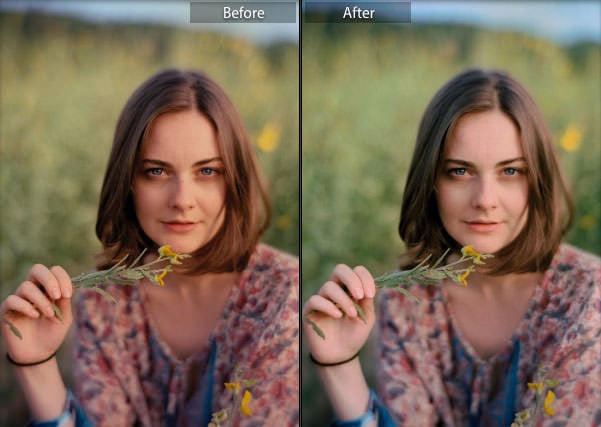
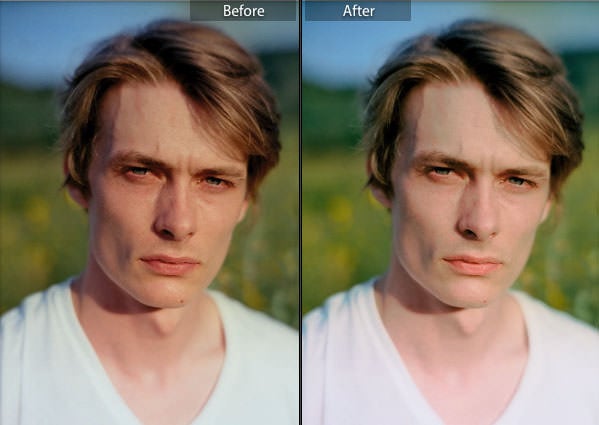
If your raw scan isn’t color fixed for skin tones, you can always adjust in Lightroom. I have a preset which you can download here that I used to fix my portraits, but this may still need a bit of tweaking to get the look you desire. The following images I shot at Wonderfruit Festival in full sun (both Anna and I had to try not to squint while looking into the camera. My Taipei lab does not leave metadata on my files, but I have a feeling that the scanner they used was a Pakon 135, judging by the look of the color. The examples below demonstrate before and after my Lightroom color fix.
So there you have it: Ektar is a bold and interesting film, with striking color and great versatility. It’s much like shooting a slide film like Provia, with a greater dynamic range and much lower cost. Ignore those who will tell you its only good for landscapes — shot the right way, it can be used for all situations and used to great effect for portraiture. About the author: James Cater is a digital and analog photographer, film lab operator, and model. The opinions expressed in this article are solely those of the author. You can find more of Cater’s work on his website and Instagram. This article was also published here. Photography News via PetaPixel https://petapixel.com December 27, 2018 at 09:32AM
http://bit.ly/2Ah90tG
How to Make a Camera Lens Lamp http://bit.ly/2RirgfX After Canon handed out camera lens mugs at the Vancouver Winter Olympics in 2010, novelty lens look-alike mugs and cups have flooded the market. If you’ve received one or more of them as gifts, one thing you can do is turn them into camera lens desk lamps. Filmmaker and freelance media producer Dave Knop of knoptop made the 5-minute video above showing how this do-it-yourself project is done.
You’ll first need some basic tools, including pliers, a screwdriver kit, a power drill with bits, scissors, and a glue gun. Oh, and you’ll need an existing, working desk lamp to modify (preferably an LED one) since you’ll be switching out the lamp shade (and possibly destroying it in the process). After removing the existing lamp’s shade and severing the wiring, you’ll need to drill the same holes you find in it into the camera lens cup. If the openings match well enough, you’ll be able to reassemble the system with your new lens shade in the original one’s place. The result is a lamp that adds a fun touch to any photographer’s home or studio:
You can find more of Knop’s videos by subscribing to his knoptop YouTube channel. Image credits: Still frames from video by knoptop Photography News via PetaPixel https://petapixel.com December 27, 2018 at 09:08AM
http://bit.ly/2GHX21V
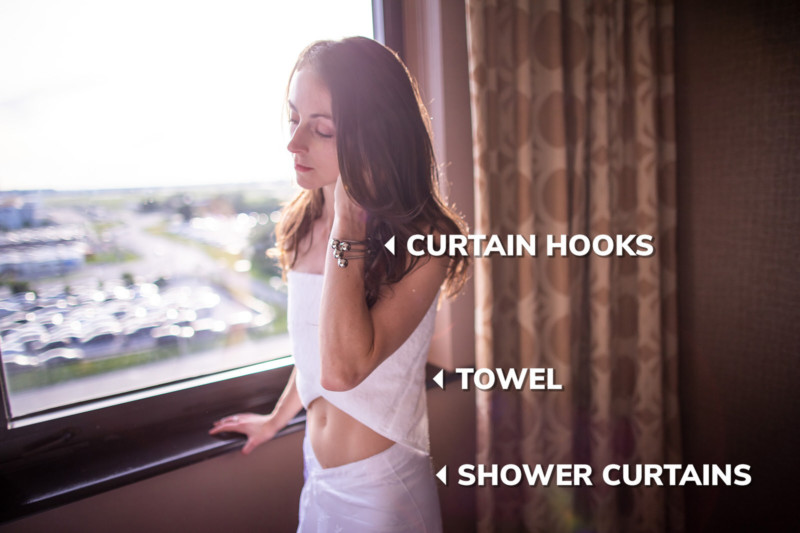
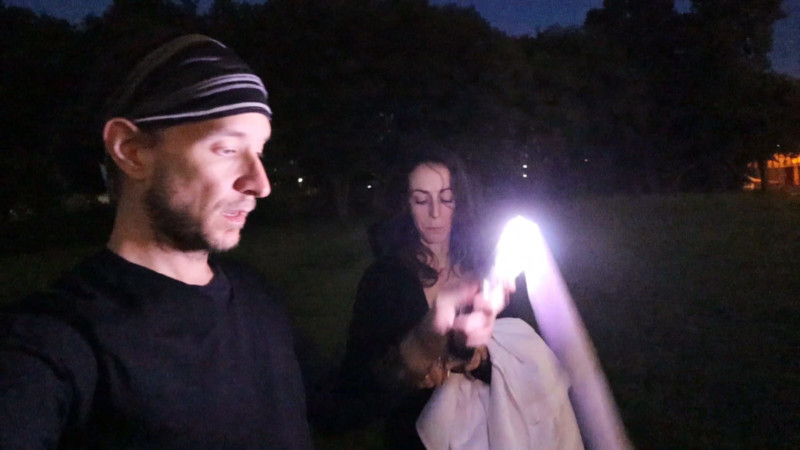
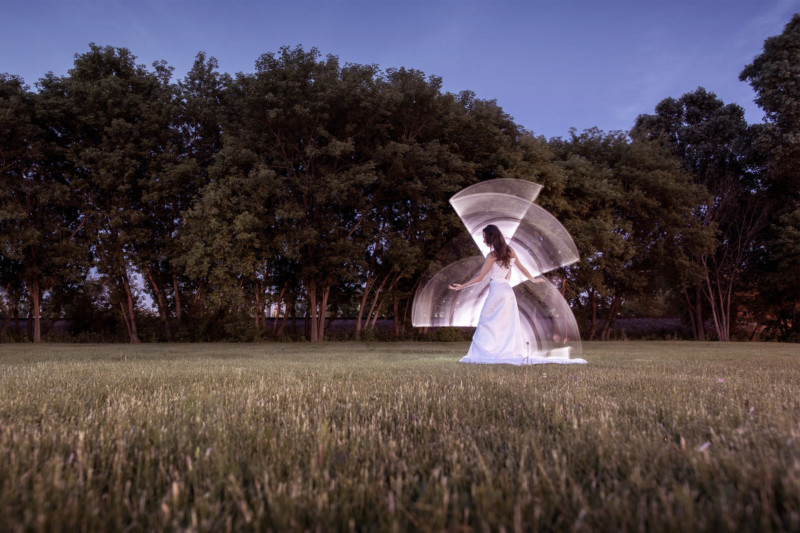
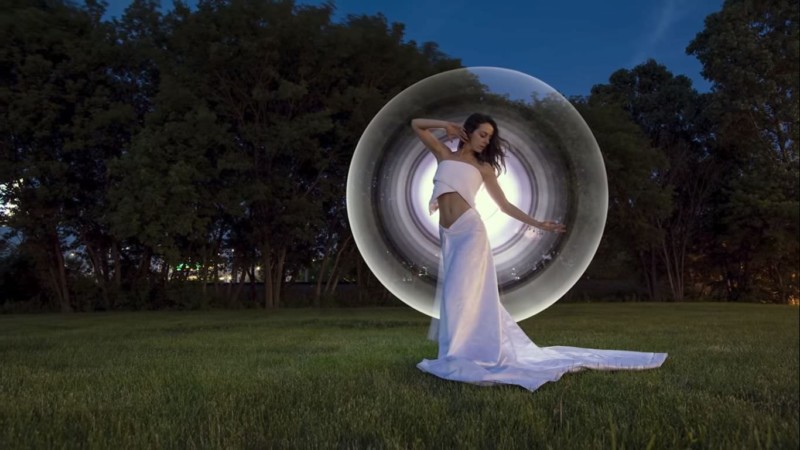
Light Painting with a Paper Tube and a Shower Curtain Dress http://bit.ly/2Vdz2XF After our flight to NYC got canceled last summer, we got stuck in Chicago for one night with no light painting tubes, no dress, no tripods, and no battery chargers. During the shuttle ride to the hotel, we started joking about using a bed sheet to fake a dress and to use whatever we could find in the hotel room as a light-painting tool. It turned out that the shower curtains and hooks were amazing.
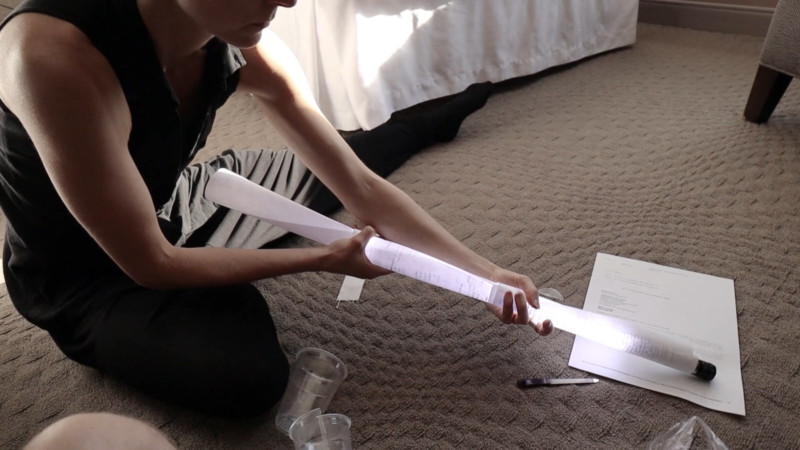
We also tried using our plane ticket printouts to roll our own light tube. Well, it worked!
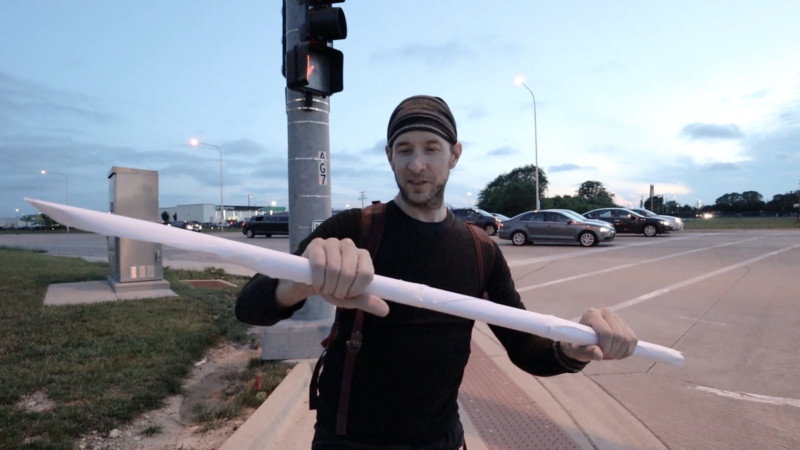
The point we were trying to make with this shoot is to show that no matter the conditions, there’s always a way to see the positive side and make the best out of it.
I really want to emphasize this: don’t wait for the perfect conditions, don’t wait until you have the right equipment. Just go out and shoot. Just do it. About the author: Eric Pare is a Canadian photographer and visual artist who has received widespread attention for his light painting photography. He shares his work and knowledge online through his learning group, gear page, Instagram, YouTube, and website. Photography News via PetaPixel https://petapixel.com December 27, 2018 at 08:27AM
http://bit.ly/2BKHDYI
These Photography Links Will Make You Smile http://bit.ly/2GGHISV The folks at Toad Hollow Photography are back at it after a few weeks away with a fresh new list of tutorials, special features and great photography for everyone to enjoy. This weeks list is full of great pictures and articles from contemporary photographers and writers all over the world. We really hope you enjoy checking out this weeks list as much as the Toad did in bringing it to you. TUTORIALS How to Portray Motion in Your Photographs Using The Panning Technique – learning how to master panning with your camera is a very satisfying skill that can produce truly stunning shots that portray a strong sense of motion juxtaposed against a crisp and clear subject. This brief tutorial covers the key points that are required with this technique to really get the most out of your shots. 
Gidzy How to Control Your Portrait Backgrounds With a 70-200mm Telephoto Lens – often when it comes to shooting portraits most of us do not consider using a telephoto lens. This tutorial shows us just why this particular lens selection can make for powerful portraits. A great video feature is included in this tutorial to walk us through the concept. 10 Tips on How to Improve Your Photography Game in the Next Year – as the year draws to an end it is a perfect time to reflect on our experiences of the past year and look forward to continuing with our photography passion in the new year ahead. This article covers a set of tips that can help you achieve your goals next year and is accompanied by some stellar shots captured during this past year. 
Le Anh Tuan Tips from a Tokyo street photographer: an insider’s guide to people-watching, and where to eat and drink – street photography is a terrific genre of photography that poses challenges that are unique to this particular style, and having someone with great insight who shares tips and tricks can be very helpful for those looking to capture their own street scenes. This article covers this topic in good detail and includes a handful of amazing shots. Frequency Separation to remove Chromatic Abberation and Color Fringes – this tutorial includes a video segment that is just over 6 minutes in length and shows us how to use frequency separation to fix chromatic aberrations and color fringes. The video walks us through the process in a timely manner with great insights on how to apply this technique. 
patrickkavanagh Essential tips for winter landscape photography – this article covers a terrific set of tips and tricks for landscape photography during the winter months. Each of the points discussed includes a great sample shot to show us how the process can deliver stunning images. 5 Guides To Great Light For Your Photography – we often hear how light is the most important element to great photography. This short article includes a set of great shots that illustrate the topic covered here on lighting. SPECIAL FEATURES Coast Guard training in massive surf captured in stunning photos – check out this set of amazing shots that show a Coast Guard boat in training as it traverses incredible pounding surf. At times only the masts of the boat are visible through the roiling waters, leaving everyone to wonder who in their right mind would head into conditions like that on purpose. 
Graham Winterflood Young & Wild: 16-Year-Old Wildlife Photographer on How to Capture Awesome Images of Animals – this article features an interview and series of shots from a budding wildlife photographer who has a distinct vision and set of skills that bring her subjects to life. It is truly wonderful to see young people like this with a strong passion to continue the work of greats who came before her. 
driver Photographer These are the best bird photographs of 2018 – as promised this article shares an awesome set of photographs that feature various birds in their natural habitats. The photographs selected and posted here include tight portrait style shots as well as wider compositions that include some great context. Steve McCurry's illustrious 40-year career, in pictures – Steve’s body of work is definitely one that I am endlessly fascinated by as his compositions bring to life far reaching places and people as seen by him over the course of an extensive and successful career. Many of the shots are quite candid, revealing images that are full of rich artistic tension that leaves the viewer yearning for more. 
Mathias Appel Photographer Audun Lie Dahl Captures Stunning Arctic Wildlife – as the far reaching northern parts of our world continue to go through drastic changes, collections of photographs like this serve as haunting reminders of what we could lose in the near future. This series is absolutely amazing, featuring native wildlife of the region in their natural habitat. GREAT PHOTOGRAPHY Singapore city-state – Manjik photography shares a wide panoramic format shot of a city skyline in Singapore during the blue hour, visually exploring all the rich inherent drama found in this contemporary view. The terrific details of the modern architecture blend with all the other key elements in this shot to deliver something truly unique. 
Edna Winti St. Peter's Anglican Church . . . – Vancouver Island based photographer ƊƦคƓ๏ƝŦlץƊгєคɱʂ88 visits one of our favorite local spots in the Cowichan Valley, St. Peter’s Anglican Church. This composition features a wonderful bench in the foreground as the beautiful church sits in the background. Our gallery at Toad Hollow featuring this heritage church can be found here at “The Anglican Parish of St. Peter, Quamichan”. Mountain lake – this shot of a rugged landscape scene is dominated by blue tones, adding to the cinematic feel of the beautiful setting. Maxim K’s shot also features a small water pool in the foreground which creates muted reflections of the mountains in the backdrop for further interest. 
sunoochi The Church of The Baron, Romania – Obsidian Urbex Photography takes us on a haunting exploration of a long abandoned and desecrated church in Romania. Years of neglect and vandalism have taken their toll, and only a skeleton of the original building remains as an eerie link to the past and those who built this place. Nordsternhaus / Hamburg – a beautiful winding staircase leads us upwards as repeating shapes and geometry play with our visual senses in this great architectural study of the abstract in this shot from Herbert A. Franke. Part way up we see a person looking back at the camera, adding a touch of context and scale to this great photograph. 
Erik Drost Lines of Palouse – the Palouse region in the northwest area of the United States is a photographer’s dream. In this shot by Michael Criswell, the rolling hills create abstract lines and shapes that draw you into the frame looking for some of the great details that reveal themselves if you spend time looking. Dawn on Matterhorn – incredibly jagged mountains jut out from the horizon in the distance in this wonderful shot from Daniel Metz. As the snow capped mountains sit in a pool of warm light in the backdrop, a small pond of water sits in the foreground creating a soft reflection of the setting that finishes off the scene just perfectly. 
Andrew Dartford Library – built in the early 1900’s this red bricked single story library is a classic example of great architecture from the period. This post features a set of shots from this storied location as captured and shared here by Mark Summerfield. Millennium – Brett Gasser uses a wide angle lens to capture this shot from under a concrete bridge, forming a perfect leading line across the river where the city comes out from under the horizon line. This shot is full of rich and crisp details, both in the bridge and in the buildings in the backdrop. 
Jocelyn Erskine-Kellie the emerging light of dawn – Frank King captures and early morning look of a pedestrian bridge as the colors of dawn cover the space in beautiful tones. The waters in the foreground of this shot benefit from the long exposure time as the colors and lights leave reflected streaks. Sunset on the Ancient Deck – a highly stylized shot from ITG photography is presented here that accents a strong color palette that creates a certain feel in this shot that highlights a pier that leads out to the water. The people on the pier are all metered and processed to be silhouettes, adding a great touch of artistic tension to the picture. 
Rachael Webster By the Sea – Lisa Gordon shares a wonderful set of shots captured on the shores of the sea in 2018. This set covers a wide range of visual topics ranging from vignettes to wide shots that show the epic beauty of these water-side locations. In the water – this shot uses reflections in the water as primary compositional elements by reflecting the outlines and details of trees that live in the water, isolating the trees from the surroundings to create something that elicits a strong feeling. Tiger Seo finds this scene draped in a thick fog which removes the backdrop beyond the trees, creating the overall ethereal feel of the frame as a whole. 
Rob Bixby Subway – Andy Hooker (LensScaper) captures a great black-and-white shot captured in the monochromatic subway station that is full of great leading lines and shapes. In this shot we find a solitary man walking away from the camera, creating a perfect mood for the overall scene. Tigre De Sibérie – this beautiful portrait of a Siberian Tiger is framed very tightly, revealing the character and spirit of this gorgeous cat at is lounges about in the snow enjoying its habitat. Andre Villeneuve captures this creature at a moment of serenity, yet still we find that the frame reveals the underlying nature of the tiger as it ponders its next adventure. Dawn At The End Of The Pier – Jason Row uses a drone to capture this shot of a seashore in England with an amusement park perched at the end of the pier as a large city emerges in the distance in a thick layer of fog. The terrific perspective afforded by getting the camera airborne adds so much context to the image, giving us all a sense of how truly big the overall setting is. 
John Brighenti More aGlow – Tim Stanley visits a small local store that specializes in selling objects that utilize Honeycomb Calcite which went lit create great mood lighting reminiscent of candlelight. This quaint composition takes advantage of this great lighting, sharing a still life type shot full of peaceful and ethereal feelings. Tulip Staircase – a white staircase that winds its way upwards leads our eye into the frame where blue wrought iron railings punctuate the clean scene with splashes of color. As our eyes follow David Abbs’ composition upwards we find a great vanishing point that is accented by a flourishing detail in the ceiling. Photography News via Light Stalking http://bit.ly/2kwTW5i December 27, 2018 at 08:02AM
http://bit.ly/2BGmqiO
Gear of the year - Carey's choice: Panasonic GX9 http://bit.ly/2rVIYrd The Panasonic Lumix DC-GX9 is one of those rare cameras that seems to be more than the sum of its parts. It's not a market leader in any specific area, it's not particularly inexpensive, and I've used and reviewed cameras that offer objectively better results than the GX9 is capable of. And yet, there's something about its combination of features, build, form factor, image quality and controls that make it a camera I really enjoy using and want to carry around with me wherever. Maybe most importantly, I think this is the first Panasonic camera I've truly felt this way about. 'They've got a great personality'
That's a phrase that isn't exactly positive in the dating world, but bear with me - we're talking about cameras, after all. There are subtleties and intangibles - 'personalities' - cameras have about them that can impact how they make a photographer feel. And while Panasonic has made some mighty fine cameras over the past few years, I've never really felt that emotional pull to pick them up and go out shooting just for fun. Back when the Panasonic GX85 came out, I thought that was the one. That was the Panasonic camera that I'd want to pick up and take with me, even if I'm just going out for a bite to eat. But there were some issues with that camera - one issue specifically - that really turned me off, but Panasonic has addressed them in the GX9, and then some. Enough already, what's so good about it?
First of all, my hat is off to the folks at Panasonic for their work on the JPEG engine. When I started at DPReview, I hadn't been fond of Panasonic colors, particularly the skin tones, and while the noise reduction did a so-so job of reducing noise, it did a tremendous job at smearing away detail. This was the single biggest issue I had with the GX85, honestly. I'm happy to say that's no longer the case. Even just previewing images on the rear of the camera, I can see that the color out of the standard picture profile is rich, warm and doesn't render my friends as green-skinned zombies. Plus, the shadowy regions of my images no longer look like mush. This all means I'm likely to transfer images to my phone without needing to process Raws (though the GX9 can do that in-camera), and then post straight away to social media or send them to a friend. And the less processing I need to do, the more images I'm going to take. Beyond that, I'm really happy to see the return of the addictive tilting viewfinder, though it's a tad small. The controls aren't quite as customizable as some competitors', but the highly customizable touchscreen makes up for this somewhat. And personally, I prefer the tilting screen mechanism on the GX9 to fully articulating screens on other models. And when the screen is tilted out, the eye sensor disables so you don't accidentally trip it when shooting from the waist. Why this still isn't standard practice, I have no idea. But it only got a silver award!
I know, I know. I was the lead reviewer for the GX9, and after all this gushing, I still only gave it a silver. But remember at the top, how I said it wasn't a market leader in any particular way, and wasn't particularly inexpensive? Then, consider that cheaper competition can often give you better outright image quality. And even though the awards are weighted more toward subjective rather than objective criteria - that was all just too much for me to ignore. Bam, silver award. But there are a few other considerations I'd like to see addressed in the GX9's successor. First of all, enough with the field sequential electronic viewfinder. Second, this camera launched at $999 with a kit lens - for that price, I expect a dedicated battery charger in the box, particularly with battery life this limited (though USB charging is handy for topping up on the go). Lastly, if you're one of those folks that love Panasonic for their video chops, the GX9 is not the camera for you. It's not really geared for hardcore videophiles, but even for casual shooters, it's disappointing to see the newer model step backward in video capability with a 1.2x crop compared to the GX85. The wrap
In the end, the GX9 is very capable camera. It's not necessarily the sort of camera I'd be eyeing for high-end, paid professional gigs - though I'm sure the GX9 could handle them in a pinch - but it is the sort of camera that I enjoy for personal, casual photography. It's also something I would absolutely recommend as a second body for more established shooters wanting a smaller package. More to the point, I also think the GX9 is a good sign for Panasonic going forward. They tried splitting the GX lineup in two with the high-end GX8 and midrange GX85, but then decided that wasn't working, and quickly iterated to come up with a fantastic middle-ground in the GX9. I personally appreciate that level of responsiveness, and in my opinion, the GX9 really is the best of both worlds for those cameras. Well, almost. For the last time - let's ditch the field sequential viewfinder. Sample galleryPhotography News via Dpreview http://bit.ly/i0r8o5 December 27, 2018 at 08:01AM
http://bit.ly/2QUDbRM
 Hi-Lows-Note via Northlight Images has uncovered a patent for an RF mount macro lens. The optical formula is for an RF 90mm f/2.8L IS Macro. Northlight points out that the image stabilization group (L12) is further forward than the normal positioning for IS groups. Japanese Patent Application No. 2017-108266 shows two different optical formulas. Specification and lens arrangement of embodiment 3
Specification and lens arrangement of embodiment 1 Photography via Canon Rumors http://bit.ly/2CsmGDw December 27, 2018 at 07:25AM
http://bit.ly/2BGgHtk
The post The dPS Top Post-Processing Photography Tips of 2018 appeared first on Digital Photography School. It was authored by Caz Nowaczyk.
This week on dPS we’re featuring some of the top articles in different categories that were published on the site over 2018. We’ve already shown you the dPS Top All-Round Photography Tips of 2018, and The dPS Top Camera Gear Tips of 2018. This one is all about the best post-processing tips of the year. Here are the top post-processing photography tips articles of 2018:1. 4 Tips to Organize Your Photos in Lightroom2. How to Create Silky Split Toned Black and White Photos Using Luminosity Masks
3. 6 Essential Steps in any Post-Processing Workflow4. How to Turn Your Photos into Painterly Style Watercolor Art5. Rescue an Image with Split Toning in Adobe Lightroom6. How to Create Realistic Bokeh and Blur Effects using Photoshop
7. Five Common Portrait Retouching Mistakes to Avoid8. How to Choose Your Lightroom Export Settings for Printing9. How to Edit Food Photography Images Using Lightroom10. How to Take Control of Color in Lightroom11. An In-Depth Look at the Range Mask in Lightroom Classic CC12. Unlocking the Power of the Basic Panel in Lightroom13. 4 Tips For Better Black and White Photos In Lightroom14. How to Reduce Digital Noise in Astrophotography Using Exposure Stacking
15. 5 Lightroom Tips and Tricks for BeginnersNext up, we’ll show you the dPS Top Landscape Photography Tips of 2018. The post The dPS Top Post-Processing Photography Tips of 2018 appeared first on Digital Photography School. It was authored by Caz Nowaczyk. Photography via Digital Photography School http://bit.ly/29wB9CX December 27, 2018 at 07:13AM
http://bit.ly/2Q9lhWg
Yesterday’s poll (you can still vote in that one) covered Canon’s 2018 lens offerings, today we’re asking what your favourite third-party lens of 2018 is. We have limited the selection of the contenders to autofocus lenses for the Canon EF mount from Sigma, Tamron and Rokinon (Samyang). Even if none of these lenses suits your personal shooting needs, you can still vote for the lens you think is the best designed, hits a need in the market or just seems the coolest. We will announce the results on Monday, December 31, 2018.
The Contenders
Sigma 14-24mm f/2.8 DG HSM Art $1199 SIGMA 14-24mm F2.8 DG HSM Art Lens, the ultimate ultra-wide-angle zoom. While minimizing distortion, this lens offers outstanding F2.8 brightness throughout the zoom range and delivers top-level image quality at every focal length and every shooting distance. For these reasons, it is the definitive wide-aperture ultra-wide-angle zoom lens.
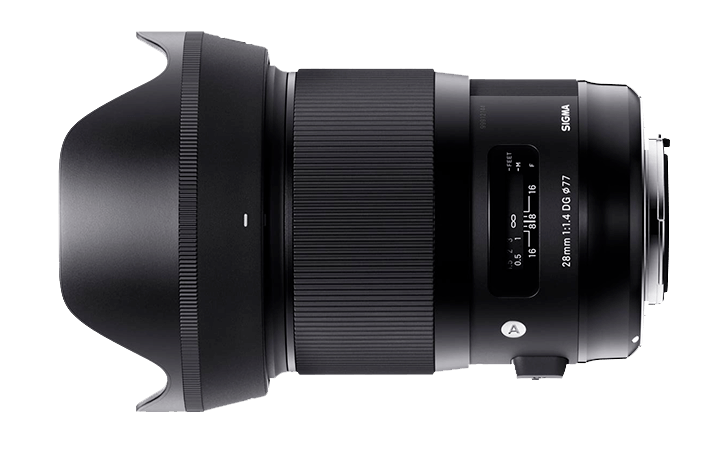
The classical angle of view with the latest lens design 28mm angle of view used to be a representative wide-angle in the era of film cameras and attracts many fans even today. To accommodate the request from many photographers who expressed the strong interest in using the familiar 28mm with Art line quality, SIGMA produces the SIGMA 28mm F1.4 DG HSM | Art, based on the know-how gained through the development of the Art F1.4 prime lens lineup released so far.
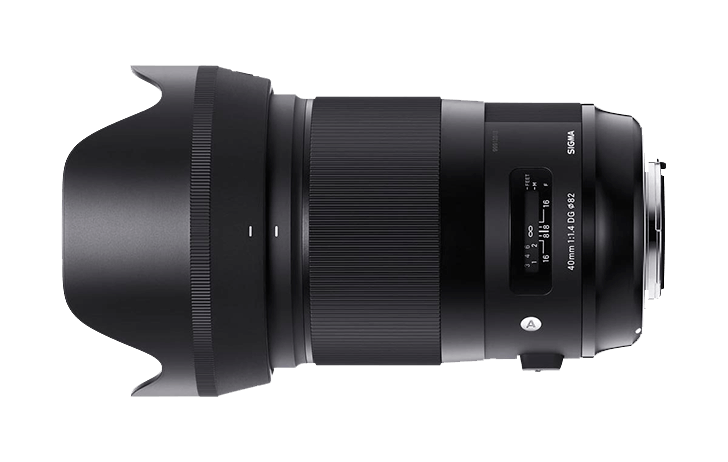
Sigma 40mm f/1.4 DG HSM Art $1399 Inherits the development philosophy behind the SIGMA CINE LENS
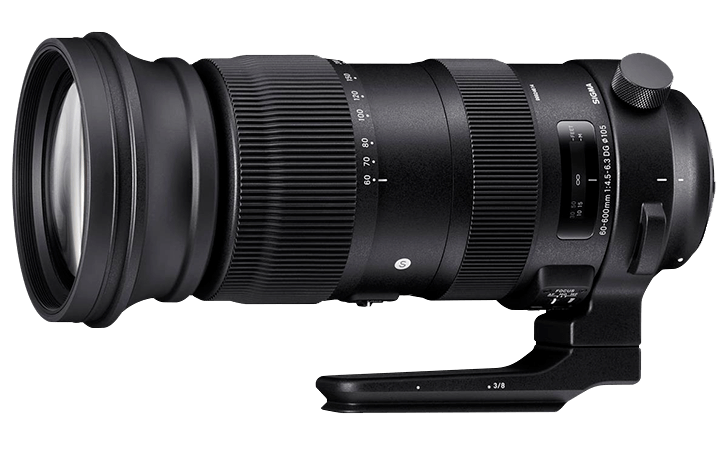
Sigma 60-600mm f/4.5-6.3 DG OS HSM Sports $1999 Characterized by its massive zoom range, the Sigma 60-600mm f/4.5-6.4 DG OS HSM Sports Lens is a versatile piece of glass that is designed for shooting a wide range of subjects. It offers up to 10x zoom—a first of its kind for hyper-telephoto zoom lenses with a maximum focal length of 600mm—and is part of Sigma’s line of high-quality Sports lenses from its Global Vision series.
Sigma 70mm f/2.8 DG Macro Art $519 The long-awaited first macro lens in the Art line. In recent years, macro lenses in the standard range have tended to employ inner focusing with the goal of maximizing autofocus speed. In contrast, the new SIGMA 70mm F2.8 DG MACRO | Art lens is designed to prioritize optical performance, fulfilling the demanding image quality requirements that define the Art line.
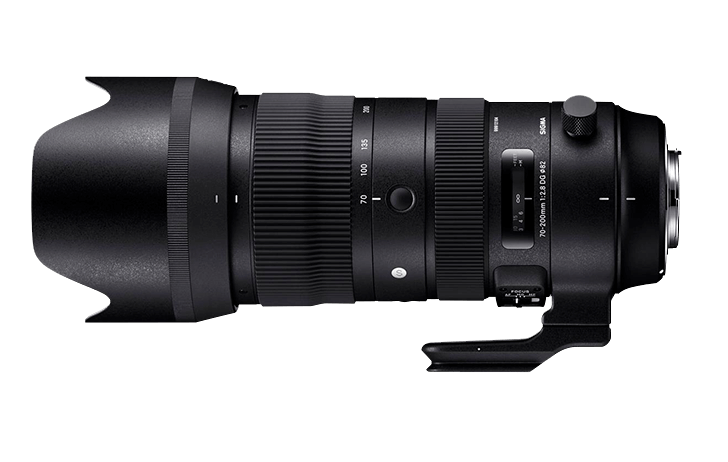
Sigma 70-200mm f/2.8 DG OS HSM Sports $1499 The Sigma 70-200mm f/2.8 DG OS is the ideal lens for a variety of shooting styles that demand speed and versatility. It features a wide focal range of 70-200mm and a maximum aperture of f/2.8 for shooting in low light conditions and increased control over depth of field.
Sigma 105mm f/1.4 DG HSM Art $1499 Since introducing its first SIGMA Global Vision F1.4 lens in 2012, the 35mm F1.4 DG HSM | Art, SIGMA has been adding wide-aperture F1.4 options to the lineup. Now, with the introduction of the new 105mm F1.4 DG HSM | Art, SIGMA offers a total of nine lenses with F1.4 brightness, including six for full-frame cameras and three for APS-C cameras.
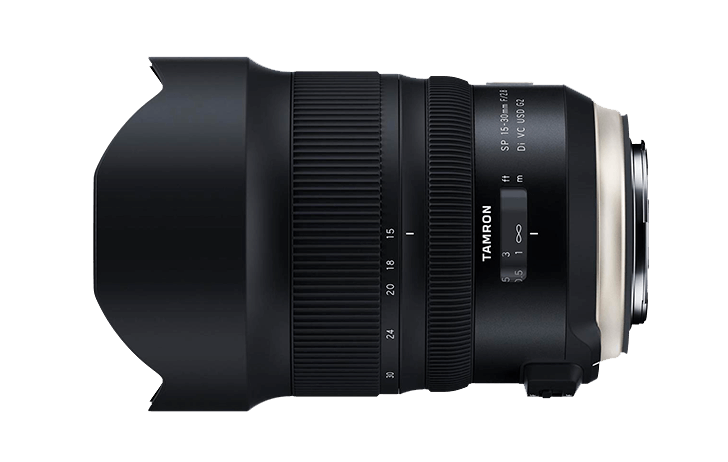
Tamron SP 15-30mm F/2.8 Di VC USD G2 $1299 The second-generation Tamron SP 15-30mm f/2.8 Di VC USD G2 for Nikon and Canon DSLR cameras is a handy and versatile lens designed not only to cover a range of breathtaking ultra wide-angle perspectives for full-frame camera systems but also to capture sharp and clear imagery with its sophisticated optics.
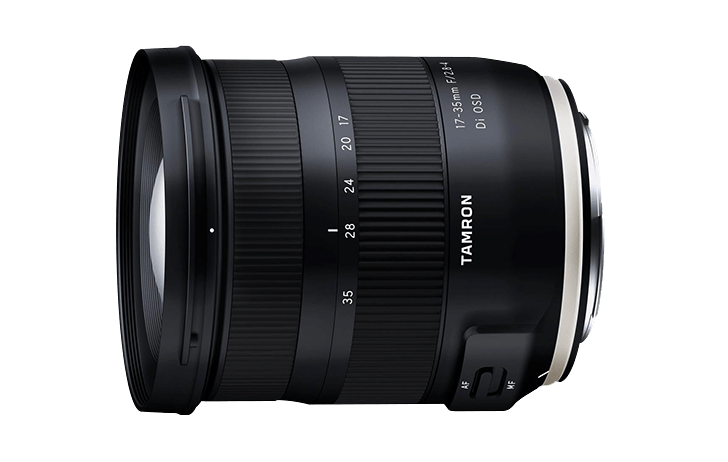
Tamron 17-35mm F/2.8-4 Di OSD $599 The new Tamron 17-35mm f/2.8-4 Di OSD ultra wide-angle lens (Model A037) is designed to combine superb image quality with maximum portability. With a compact body weighing 460 grams and a filter diameter of 77mm, it can capture more of the world in amazing detail without adding unnecessary bulk to your camera bag.
Tamron 70-210mm F/4 Di VC USD $599 Tamron’s new 70-210mm F/4 Di VC USD (Model A034) is a compact telephoto zoom lens for full-frame DSLRs that achieves superb optical performance with high contrast and resolution throughout the entire zoom range.
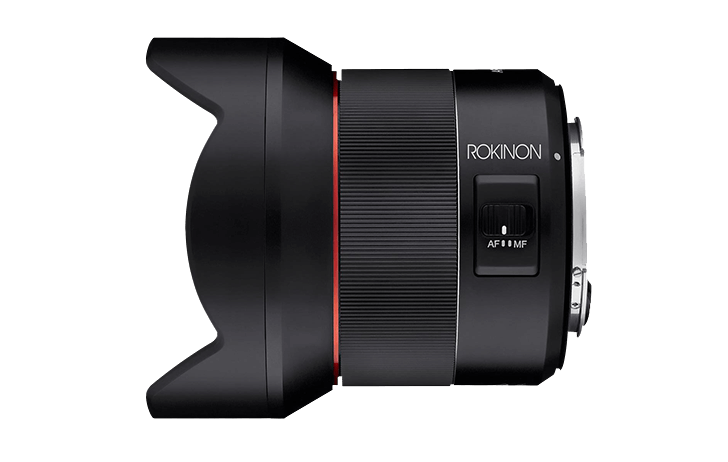
New 14mm F2.8 AF Full Frame Ultra-Wide for Canon EF-Mount. This 14mm prime is not only Rokinon’s first autofocus lens engineered for Canon, but it also is their first model to offer weather sealing. Built for the rigours of professional use and uncompromised optical performance, it easily meets or exceeds the performance characteristics of other professional / “luxury” ultra-wides.
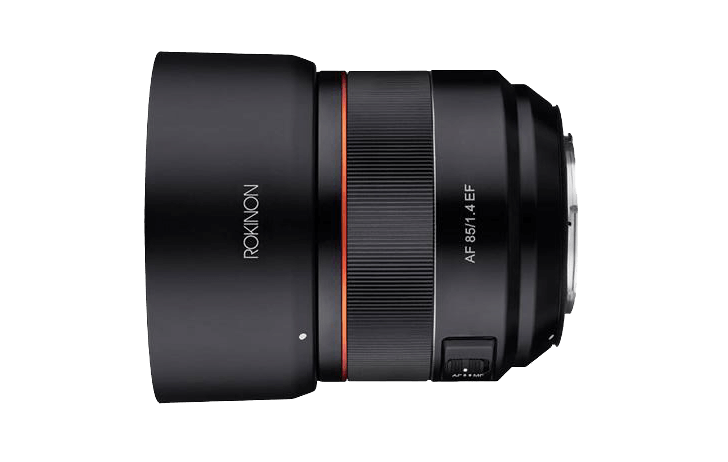
An ideal lens for portraiture, the Canon EF-mount AF 85mm f/1.4 EF from Rokinon is a short telephoto prime distinguished by its bright f/1.4 maximum aperture. This fast design, while benefitting its use in low light, also affords notable control over depth of field for selective focus applications. Photography via Canon Rumors http://bit.ly/2CsmGDw December 27, 2018 at 06:39AM |
Categories
All
Archives
November 2020
|


 RSS Feed
