
|
https://ift.tt/31ZjeKu
The Canon Cinema EOS C500 Mark II will be announced on or around September 5, 2019, ahead of IBC in Amsterdam. Below are the specifications that we’ve been told but have been unable to confirm. The image, however, is exactly what the Cinema EOS C500 Mark II will come as. 
Canon Cinema EOS C500 Mark II rumored specifications:
Photography via Canon Rumors https://ift.tt/2v4dYqS August 26, 2019 at 07:40PM
0 Comments
Specifications and pricing for the Canon RF 15-35mm f/2.8L IS and Canon RF 24-70 f/2.8L IS8/26/2019
https://ift.tt/2Hp40GH
 Great news, pricing for the new RF lenses is less than our currency conversion pricing in USD! Canon RF 24-70mm f/2.8L IS USM
Canon RF 15-35mm f/2.8L IS USM
Photography via Canon Rumors https://ift.tt/2v4dYqS August 26, 2019 at 06:01PM
https://ift.tt/2HsvDPv
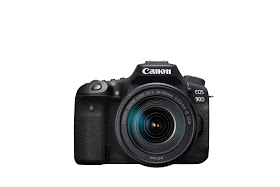
VIDEO Here are some images and pricing for the Canon EOS 90D.
Photography via Canon Rumors https://ift.tt/2v4dYqS August 26, 2019 at 06:01PM
https://ift.tt/2NybyLb
 Canon has decided to release an interim financial report for the time period of January 1, 2019 – June 30, 2019 for the following reason.
You can download the full report from Canon Global here. Photography via Canon Rumors https://ift.tt/2v4dYqS August 26, 2019 at 01:23PM
https://ift.tt/2KXMko4
The post 4 Necessary Reasons to Look Through Your Old Photos appeared first on Digital Photography School. It was authored by Simon Ringsmuth. As photographers, we mustn’t live with our heads stuck in the past. If we’re not trying new ideas, exploring new techniques, or finding ways to push ourselves to be better, we might quickly find ourselves drowning in a sea of irrelevance and mediocrity. However, there is a time and a place to look in the rear-view mirror. Looking back at some of your old photos can have incredible benefits, aside from just happy feelings of nostalgia. Sometimes the best way forward is to look at the path we have taken. Even though to look through your old photos can be embarrassing, there are some clear benefits to doing so.
1. It helps you realize you weren’t that badI’m a pretty self-conscious guy, and as such, I don’t like looking at pictures of myself. I always find something to criticize, even if they are things that no one else would ever notice! Looking back at some of the earlier pictures in my photography portfolio is the same way. Sometimes seeing the pictures I shot is enough to make me cringe. So I want to throw my old albums out the window! This is precisely why it’s good to dust off your old photo albums or look through the image folders on your computer you’ve been neglecting for years. Looking through the images you shot when you were new to photography, can more often than not, let you see how you really weren’t as bad and probably much more talented than you realize. 
I shot this in 2013. While I had a lot to learn about lighting and editing, it’s actually a pretty decent image. If the thought of looking at your old pictures makes your skin crawl, there’s a good chance you might have been a lot better than you thought. While your early images were probably not perfect, they can be a source of encouragement. You see that you clearly did have some skills – even if they had a little way to go before maturing. 2. You can learn from your mistakesEven though your older pictures might not be as bad as you think, you can learn a lot from going through your earlier work. Over the years, you have almost certainly improved your techniques in terms of lighting, composition, framing, or even just posing your clients. 
I shot this in 2014 when I didn’t know how to use a reflector but brought one with me to the session anyway. The colors on his face just don’t look right. I know how it can be painful or embarrassing to scroll through your photos from five or ten years ago. It’s almost like looking through your high school yearbook and cringing at the silly hairstyles and weird fashion choices from days gone by. If you do this with your images, instead of turning away from your mistakes, learn from them. Realize what not to do now and in the future. The image below is a good example of this. While my clients were happy, and so was I at the time, when I look at this picture now all I see are errors to fix. I shot it with a 50mm lens at f/2.8 and focused on the man in the back, which meant everyone else is out of focus. I didn’t have a sense of how to pose, nor was I really paying attention to lighting. The list goes on. However, rather than pretend this session didn’t exist, I use it as a learning opportunity. 
One of my first portrait sessions, shot in early 2013. Here’s another illustration of how much I have learned since my early days, especially when it comes to formal sessions. Why is there an orange shoe in the middle of the picture? Also, why is there a giant tree growing out of the head of the child on the left? Why did I use a 1/80th shutter speed? The world may never know the answers, and I certainly don’t. However, when I see this old picture, it helps me also see what I can do differently today. 
Another family portrait session from 2013. Don’t judge me…I was new and didn’t know what I was doing. My clients liked it though! 3. It helps you refine your editing styleIn addition to photography style and techniques, searching through your old pictures can give you a great deal of insight into your editing process. It’s not easy to see slow, incremental changes over time. However, when you compare your current editing style to that of when you first started, you might be surprised. You may even be shocked at the difference. This can be a learning opportunity and help give you insight into how you might continue to refine and hone your edits. I took the following picture in the summer of 2013, and I clearly remember spending a long time working with it in Photoshop. The result is what you see here: over-saturated sky, poor dynamic range, and a weird color balance that seems unnatural and icky.
When I edited this RAW file, I was way, way over-thinking the process and ended up with kind of a mess. I can still see myself hunched over an old iMac, refining my selections, creating new layers, and fiddling with color edits ad nauseam. Now I’d just pull this into Lightroom, tweak a few sliders, and end up with a much cleaner and more pleasing image. Here’s another picture that, upon first look, makes me want to chuck my computer out the window and never look at my cameras again. 
Shot in the fall of 2014, when I still had an awful lot to learn. This picture is practically a textbook example of what not to do when shooting or editing a picture. Aside from all the issues in the image itself (soles of shoes, people sitting on an old canvas, awkward posing and hand placements, an disregard for background objects), the editing was atrocious. My subjects are underexposed. The white balance is all wrong, and there’s no sense of contrast. Moreover, I didn’t bother using any noise reduction, so their faces are kind of patchy if you zoom in to 100%. I’m a much better editor now than I was back when I shot this seven years ago. When I look at this picture and others like it, I can immediately see how I have changed my editing process over the years. It gives me a few ideas of what I should continue refining in the future. 
When I edited this picture in 2013, I didn’t know what I was doing. But looking back at it helps me remember what to do, what not to do, and what I can change in my current style. 4. Early photos can inspire you!There’s a lot I wish I could take back about my early photography. However, I feel some of my work now lacks something: a spark of life and a sense of abandon. When I first picked up a camera, I would see photo opportunities everywhere; inside my home, walking around the neighborhood, even my office at work. With clients, I had a much more carefree attitude, shooting whatever I wanted, whether I thought it would look good or not. It was a carefree time when I didn’t worry about (or even know about) proper technique, good lighting, high ISO values, rolling shutter, or any of that. Like a kid in a candy store, I remember latching on to anything and everything around me. I even set my alarm early so I could take pictures of my kids’ toys in the living room before the sun came up. 
I took my camera to a sporting event back in 2014 and shot everything I could see, even if I didn’t know what I was doing. Including these bocce balls sitting on astroturf. I kind of miss that approach, and looking at photos like this helps rekindle it. When I started taking pictures more seriously, I saw the world differently. Every tree, building, or animal was a fun and exciting photographic opportunity. I’ve lost that over the years. Now I think I over-analyze situations – trying to find the perfect moment, subject, or lighting condition. Going back through old photos takes me back to a time when I didn’t care about any of that. I just took pictures of what I thought was fun and interesting. It has inspired me to be a little more creative and a little less analytical with my photography now. 
I spent half an hour trying to capture this image with my brother in the summer of 2014. We had such a fun time doing it! I need to do more shots like this… Looking at your old pictures can bring up some strange emotions, and it can certainly be awkward or feel silly. But buried in your images from days gone by is a treasure trove of education just waiting to be unlocked. 
This image of a tree borer I took in 2013 remains one of my favorite insect pictures I have ever taken. ConclusionThe next time you pull up your photo library on your computer or scroll through images in your photo app, go back to your earliest pictures and see what you can learn from them. You might be surprised at how enjoyable and educational your trip down memory lane can be! Do you ever look through your old photos? What have you learned from them? Share with us in the comments!
The post 4 Necessary Reasons to Look Through Your Old Photos appeared first on Digital Photography School. It was authored by Simon Ringsmuth. Photography via Digital Photography School https://ift.tt/29wB9CX August 26, 2019 at 07:39AM
https://ift.tt/2KUNfoZ
The post Firecrest 77mm 16-Stop Stackable Neutral Density Filter Review appeared first on Digital Photography School. It was authored by John McIntire. There is something about long exposure photography that is just, for lack of a better word, appealing. Blurring moving elements (like water, clouds, tourists and moving cars) in your images can create an ethereal or even surreal aesthetic that many photographers, myself included, are drawn to. Formatt-Hitech’s Firecrest 16-stop neutral density filters take long exposure photography to the extreme. By allowing ten-minute exposures in the middle of the day, these filters open up long exposure techniques to normally impossible times. And it does it with fantastic results. In this article, I’ll review the Firecrest 77mm 16-stop Stackable Neutral Density Filter. What is it?
A neutral density filter is a piece of material (glass or resin in most cases) that you affix to the front of your lens. What they do is cut down the amount of light hitting your sensor, increasing the amount of time you need to expose for. Doing this allows you to get longer exposures than you would normally be able to, making it easy to blur water and clouds in a satisfying way. Most ND filters come in a range of one to three stops. However, five and ten-stop filters are also very popular amongst landscape photographers. During golden hour and blue hour, when light levels are generally quite low, these strengths of filter make it easy to achieve exposures that last for several seconds. 
An exposure time of 408 seconds in the middle of the day is impossible without a specialist filter such as this one. What a 16-stop filter allows is extremely long exposures even in the brightest of lighting conditions; including midday sun. For example, with a 16-stop filter, an exposure of 1/2000th of a second becomes 30 seconds. In comparison, with a 10-stop filter, that 1/2000th of second exposure becomes 1/2 of a second. You can probably already see the advantage that the denser 16-stop filter provides. To drive it home, look at the sunny 16 rule, which says that on a bright sunny day, an exposure of f/16 at 1/125th of a second should give you close to a correct exposure (it usually does). With a 10-stop filter, that becomes 8 seconds. That might be good enough in many cases, but it also won’t completely blur anything other than the fastest moving elements. With 16 stops, that 1/125th of a second becomes 8 minutes and 44 seconds, ensuring anything moving in your frame is either blurred or disappeared. What is this good for?
A 16-stop ND filter allows you to blur moving objects in your frame, which can lead to more pleasing images. Being able to blur details out of clouds and water allows you to remove details that might detract from your subject. This lends itself well to minimalist styles of photography. If that fits your taste, the results can be stunning. Exposures of this length not only blur moving elements within your frame but can also completely remove other moving things. Boats in rivers, tourists in front of landmarks, and anything else that might move through your frame during the exposure time disappears. A filter of this strength is also good for things like star trails at night. Before you consider
You may need some extra specialist equipment before you get started, such as the trigger that allows the control of your camera with a phone. The one thing that you need to know before you consider purchasing a filter like this is that you will need some extra equipment you may not already have. A high-quality tripod is an absolute must as you will need to keep your camera absolutely still during the long exposures. The other thing you need to take into account is some way of controlling your camera. Because many cameras are limited to exposures of 30 seconds, you will need a way to keep the shutter open in bulb mode for the duration of the exposure without touching the camera. There are many options out there, including remotes and cable releases. I used the Pulse time-lapse trigger from Alpine Labs, which lets you control your camera with your phone. There are others available too, like the MIOPS trigger. An exposure calculator is also an absolute must as you will need to be able to calculate how long your exposures need to be. There are plenty of free options available for both Android and iOS. The Filter
After shopping around for a bit, I decided on Formatt-Hitech’s circular screw-in Firecrest 77mm 16-Stop stackable neutral density filter. This filter has a few features that make it stand out. Since I knew that I would not be using any other filters in conjunction with this one, I wanted a circular screw-in variety. That’s because I thought that the length of the exposures might create the opportunity for light leaks with my normal filter system. I might be wrong on this, but it’s not a chance I wanted to take. Formatt-Hitech claims their filter is truly neutral (including in the UV and infrared spectrums) and that there are no color casts. This is important to me as my Lee Big Stopper (10-stops) always adds a strong blue cast that is painful to deal with. I won’t go into details about the coatings as you can find them on the product listings. Does it do the job?
The Formatt-Hitech Firecrest 77mm 16-Stop stackable neutral density filter is certainly a capable piece of kit. That’s an emphatic “yes” from me. While there are some downsides to the filter, it provides all of the quality you could expect. The few places it does fall short are all easy to overcome and well worth the little effort to do so. ProsExposure times
The exposure difference between a 10-stop and 16-stop filter can be a bit staggering at first. Just as the exposure calculator said, the 16-stops of ND filter provides really long exposures even in daylight. 1/125th of a second becomes nearly nine minutes, while 1/15th of a second becomes nearly one hour and thirteen minutes. Attaches well
It still takes care, but the filter attaches easily enough. It’s easy enough to attach the filter to the filter thread of your lens. It does require care as it is easy to slip (I’m sure that’s more me than the filter), but with this technique, there’s no reason to go fast anyway. Color casts
The color represented without the 16-stop filter. 
Color represented with the 16-stop filter. I won’t say there is no color cast, but they are very minimal if they appear. Comparing shots with and without the filter side by side, it does seem that there is a slight, slight shift towards blue and green. However, I am not sure if that’s an optical illusion. Either way, it’s easy to deal with. ConsThere are some downsides of both the filter and the technique. However, their effects are minimal and easy to overcome. Extra equipment
As mentioned, to get started with this technique, it’s not just the cost of the filter you need to take into account. If you don’t have a good enough tripod or some variety of release to trigger your camera, you will have to shell out for those. Light leaks
Circled is a pair of light leaks that appear at either edge of the frame. Despite opting for the circular filter to avoid light leaks, they did appear in my images at the left and right of the bottom third of the frame. They were minimal and easy to deal with in post-production, but they are there. I have done some research, and it seems there’s a chance these leaks are coming from where the lens attaches to the camera body. If that’s the case, you can fix it by covering the join with black material. Formatt-Hitech also sells an accessory that fits around the front of the lens and filter to help prevent light leaks. Exposure times in low lightWhen it comes to shooting later in the day when the exposure times get longer, and the light changes rapidly, it’s likely your required exposure time will change partway through your exposure. For example, if your metered exposure when you start is 1/125th (8 minutes and 44 seconds), and the light levels drop to 1/30th (if the sun moves behind a cloud for example) during that exposure, the new time is 36 minutes and 24 seconds. This means that your image will be quite underexposed. Because of this, I’ve found this technique works better in the middle of the day when light levels are consistent. Noise and hot pixelsHere, you can see a combination of noise and hot pixels after an 8-minute and 44-second exposure. Noise and hot pixels have little to do with the filter itself. Extremely long exposures with digital cameras open you up to problems with noise. The longer your shutter is open, the more noise appears in your frame. Software is very good at dealing with this, but you do need to be aware of it. This is especially true if you opt to up your ISO in lower light levels to keep the exposure time in the minutes rather than in the hours. Direct light
Taken in overcast conditions, the technique has emphasized the flatness of the light. 
In direct sunshine, contrasty conditions get emphasized. What I’ve found with this technique is that it works best with direct light on your subject. If the conditions are overcast, or the light is otherwise dull, the long exposure tends to emphasize the flatness of the scene. Of course, that won’t always be the case and please don’t take that as a rule of any sort, it’s just an observation. If you live somewhere that is sunny and bright most of the time, this won’t pose you much of a problem. However, I live in Yorkshire and overcast days are the rule rather than the exception. PriceI do not include the price of the Firecrest 77mm 16-Stop Stackable Neutral Density Filter as either a pro or a con. At $125, it’s probably not going to be an impulse buy for most photographers. However, for what it is, what it does, and how well-made it is, it is well worth that price. It’s also roughly the same price as filter offerings from companies like Lee Filters. Overall experience
Overall, the Formatt-Hitech Firecrest 77mm 16-Stop Stackable Neutral Density Filter does exactly the job I bought it for. In the end, the Firecrest 77mm 16-stop Stackable Neutral Density Filter does exactly what I wanted it to when I bought it, and it does it well. The complications aren’t hard to overcome, and it is well worth the extra effort. At $125, it is well within reach of anyone who wants to have a serious attempt with the techniques it offers. I also found that I really appreciate the side effects of the technique. Because the exposure times are incredibly long, you can spend a couple of hours on location and come away with only a handful of images. This slow-treacle approach to photography is enjoyable and turns the whole experience into a mindful one. If you like the effect of streaky clouds and flat water, or you are into minimalist photography, this type of filter may be indispensable for you. Do you do long exposure photography? Do you use a 16-stop filter? What are your experiences? Share with us in the comments!
The post Firecrest 77mm 16-Stop Stackable Neutral Density Filter Review appeared first on Digital Photography School. It was authored by John McIntire. Photography via Digital Photography School https://ift.tt/29wB9CX August 26, 2019 at 05:09AM
https://ift.tt/2KXa1fW
I’m just back from Photoshop World (it was incredible — I’ll share some pics and stories in a few days), but today I’m sharing a skin softening technique I picked at the conference from one of the instructors — Dutch photographer, and author of the book “Mastering the Model Shoot,” Frank Doorhof. It’s very simple, but very effective. 
It’s a combination of three slidersYou use the Adjustment Brush to paint over the skin, avoiding detail areas like eyes, lips, eyebrows, hair, etc.), but using just these three sliders:
It’s a danceIt takes a little experimenting and tweaking with the sliders to get the right amount for each for the particular image you’re working on. I’ve found it only takes a few seconds to get it dialed in, and the results usually better than just using the Texture slider by itself. Give it a try and see what you think. Thanks to Frank for sharing this technique. I’m off to Boston and Philly this weekNo rest for the weary — just back from Photoshop World, and Wednesday I’m off to Boston for my seminar there Thursday, and then Friday I’ll be in Philadelphia for my new “Ultimate Photography Crash Course” seminar. If you’re in either one of those cities this week, come out and spend the day with me. Tickets and details here. Have a good one everybody! -Scott The post Enhanced Skin Softening Technique in Lightroom appeared first on Lightroom Killer Tips. Photography via Lightroom Killer Tips https://ift.tt/2sh0aZ8 August 26, 2019 at 03:26AM
https://ift.tt/2LaEc2c
The post How to Plan and Pull-Off a Toddler Photo Session appeared first on Digital Photography School. It was authored by Mat Coker. Toddlers are filled with volatile emotions. They can be shy, moody, defiant, chaotic, unpredictable, and in need of bribes. So a toddler photo session can be a challenge. But when you build a photo session just for toddlers, it’s far less challenging and lots of fun. It is also the perfect opportunity to get creative. Here’s how to let your inner child create a toddler photo session that’s fun for you and toddlers.
1. The big ideaThe first step is to plan out the photo session. I think that a themed lifestyle or documentary session is perfect for toddlers. The big question is, how do you come up with an idea or theme for the session? Many photographers choose a theme themselves, such as princesses or pirates. The benefit of choosing your own theme is that you get to exercise your creative vision (designing the set, costumes, etc.) and let people choose to be part of it or not. Of course, one downside is that it’s a cookie-cutter approach that gives every child similar portraits. If you want to choose something unique to the child, keep in mind that every toddler has something they love to do. Go with that as the theme for the session. If they love dinosaurs, then find a way to make dinosaurs part of the session. If they love to play with big-rigs and diggers, then make those part of the session. Whatever it is they love, try to make it larger than life for the session. 
When I found out that this little guy loved watching football with his Mom and Dad, I knew we had to visit an actual football field for his photo session. Start with a small everyday experience and take it to the next level (I’d love to hear some of your ideas in the comments). 2. The toddler photo sessionWhen it comes to pulling off the session, start by being prepared. This seems obvious, but many photographers come unprepared, and it can ruin a session. If you are prepared, then you won’t have to think about it during the shoot. The less you have on your mind, the more room you have to be creative. GearPack the right gear and check twice that you’ve got it all.
Part of being prepared is being familiar with your camera and knowing what settings to use. I keep things as simple as possible with aperture mode and exposure compensation. I only use manual mode when I need it. 
Even though props for the session should be prepared in advance, you should still allow room for spontaneity. Dressing up as a firefighter was not part of the plan, but it was the best part of the session. ChaosGenerally, you’ll need to embrace chaos as part of the toddler photo session. Toddlers are emotionally volatile, and the session may take many twists and turns. This is one of the reasons that I love lifestyle sessions. It easily allows for pauses, breaks, and spontaneity. Go with the flow and don’t try to force anything. If you design the session for the toddler, then it should be fun. They should be happy, and it should be the perfect environment for them. Even a studio can be fun. Keep the parents informed, but don’t feel the need to explain things to the toddler. You don’t even need to tell the toddler it’s a photo session. If it’s a lifestyle or documentary session, just let them be themselves.
CreativityUse many creative elements with your photography. Go for a variety of angles, close-ups, storytelling, wide angles, and beautiful light. 
Part of your creativity is in choosing the environment and backgrounds for your session. I used a combination of background, composition, and moment for these two photos. The moment began with him confronting his opponent’s mascot and ended with him making a run for it. Beware of yourselfYou’ve got to be able to handle any problems that arise and still get great photos. Before a toddler photo session, I do some reflection. What could go wrong with this session? Has anything gone wrong in the past? What is the worst that could go wrong? But most importantly, how will I respond? I make this decision in advance so that I don’t have to think in the moment. Do the thinking while things are calm, and you’ll make better decisions. Consider answering these questions in advance:

As much as we all love nature, there are many harmful elements out there for toddlers. Keep parents close by and make sure they are comfortable with where their toddler is exploring. 3. The editWhen it comes to the edit, be ruthless in narrowing down your photos. Most photographers are happy if they keep 10% of their photos from a session. Some are satisfied with less. Don’t be afraid to cut, cut, cut! Your final selection of photos should have lots of variety to it.
When it comes to touching up your photos, I recommend a simple edit with Lightroom or a similar program. How do you know what to do with a photo? Keep these two principals in mind. When it comes to editing you’re either:

The main things I did with this RAW photo is I cropped it and warmed it up with the temperature slider. Generally, I would say if you need to do a heavy amount of fixing or editing of a photo, you should just leave it out of the final collection. If you constantly have to fix certain elements of your photos in editing, this is a good clue as to what you need to learn to improve your photography. Editing should be about finishing touches, with fixing as a last resort. A perfect session for you and toddlersFollow your nature as a creative person and the nature of the toddler you are photographing. Design everything for the toddler, and you’ll have an amazingly creative toddler photo session that will leave everyone wanting more. Do you have any other tips for a successful toddler photo session? Share with us in the comments below!
The post How to Plan and Pull-Off a Toddler Photo Session appeared first on Digital Photography School. It was authored by Mat Coker. Photography via Digital Photography School https://ift.tt/29wB9CX August 25, 2019 at 07:39AM
https://ift.tt/2KVZ6Dr
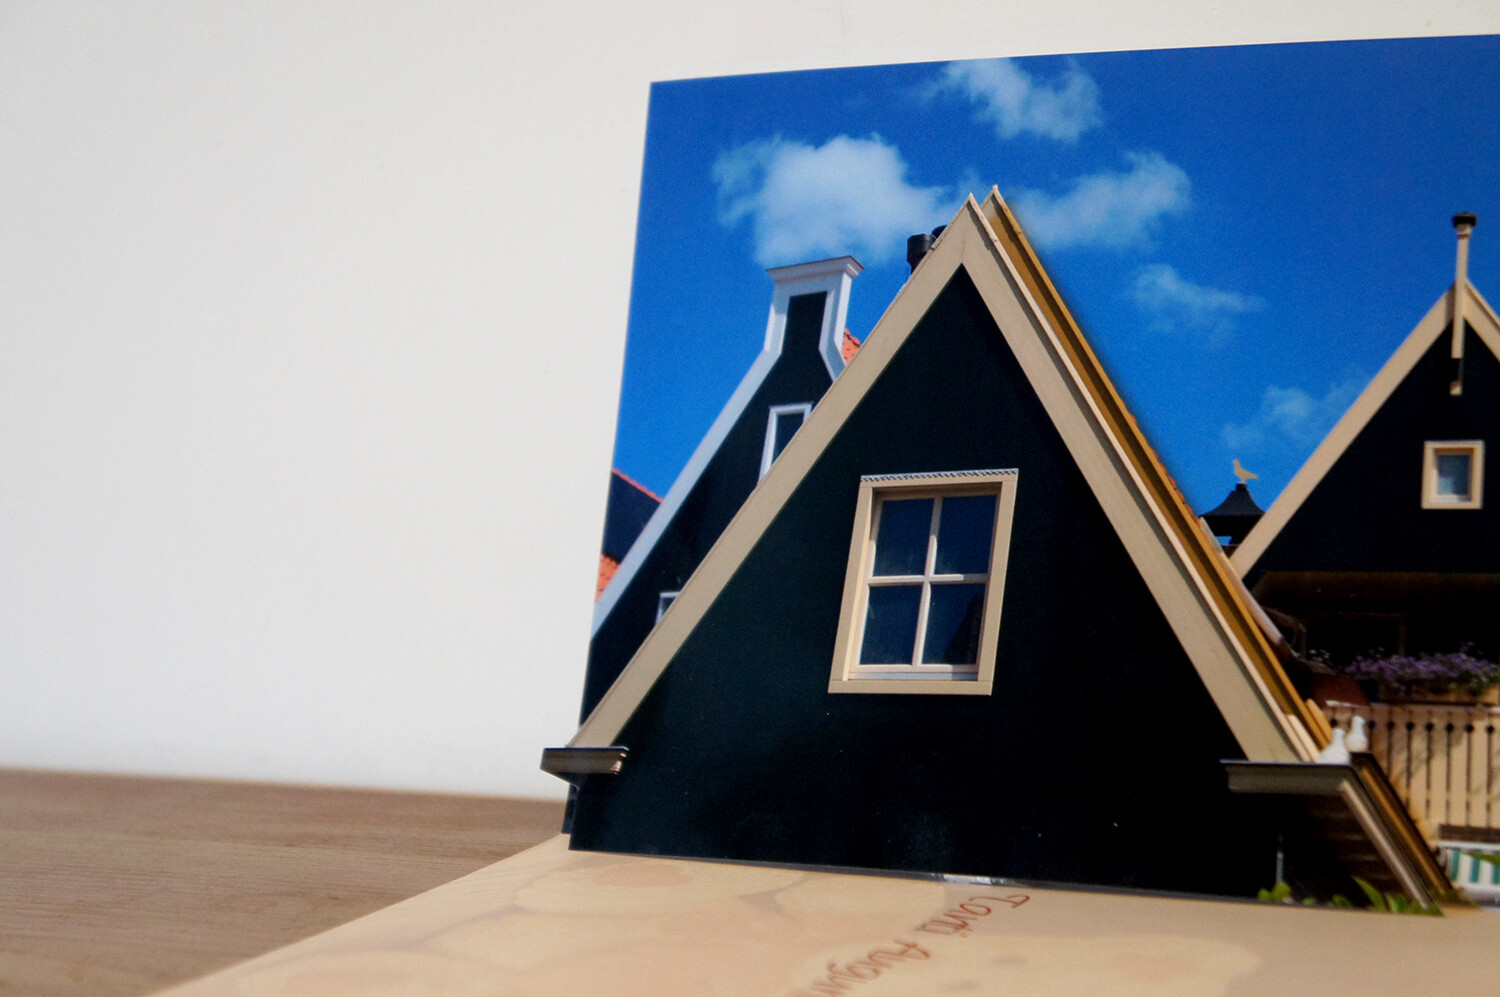
The post How to Make an Awesome Pop-Up Card with your Photos appeared first on Digital Photography School. It was authored by Ana Mireles. If you can cut and fold a piece of paper to make a pop-up, why can’t you make it to an image? A photograph translates our three-dimensional world into a two-dimensional representation. With a pop-up card, you can present it with tridimensionality. Here are some ideas to bring your photos to life by turning them into an awesome pop-up card!
From paper crafting to paper engineering, this creative practice can be as complex as you want. I will show you two basic techniques that you can apply to your own images. Keep in mind that each image will need specific measures and some testing before you get it right, so be patient! What you need to make your awesome pop-up cardI recommend you print some copies of the photo in black and white on a cheap paper so you can do your testing without spending much. Then get scissors, a precision cutter, ruler or measuring tape, double-sided tape, and a cutting board.
1.Single image pop-up cardChoose the right imageBecause you want to give it a third dimension, images that have a clear separation of elements will work best. For some guidelines on this check out the article How to Use Figure to Ground Art Theory in Photography. Print your image at least two times, and one for each layer you want to add.
Layers and more layersThe more elements you separate into layers, the more interesting and elaborate your card will look. I promised to keep it simple so I’ll just add one layer to show you the process, then just repeat it as many times as you want. Cut out the element of the layer that will pop up. In this case, I’ll cut the house in the front.
Cut also a stripe of paper, either from the photo or any other thick paper that will hold the layer up. The longer you make it, the bigger the separation to the background. Fold and pasteNow paste the background to the card which can be store-bought or just a piece of colored paper folded in two that you can later write your message on. Place the base of the photo on the crease where the card folds.
Fold the paper stripe into a square. Then paste one side to the background and one to the bottom side of the card. This will serve as support to the pop-up cutout.
Paste the other side of the square to the background, and the bottom part to the card. Making sure the cutout matches the original image when you position it. That’s it. Do the same for any elements you want popping out.
2. Multiple image pop-up cardThis technique is great when you want to showcase many images. For example, an anniversary or a birthday where you want to sum up the highlights of the year. It’s also useful when you want to make a themed card to communicate a concept. Create the layoutThe first thing you want to do is choose your images. Then arrange your images in a grid. To automatize this process you can use Lightroom. If you need some direction just follow the instructions of How to Create Contact Sheets in Lightroom. Set it to the size of the card you’re going to use: for me is an A3 so 4 columns and 3 rows should look nice, but this is entirely up to you.
Note that the outer images of the middle row will get folded in half, so use images that fit this crease, or leave it black. FoldFold the paper vertically in half, and then each side again in half towards the opposite direction. As a result, you will have an accordion where the folds separate the columns.
CutUnfold the accordion and just leave it in half. If you do it in a way that the images are towards the outside, you won’t have to measure and just guide yourself by the images. Cut horizontally between rows reaching the middle of the outer image. Then fold inwards the piece you just cut.
PasteNow put some double-sided tape into the side edges and fix it to the card. Make sure the fold in the middle of the accordion coincides with the fold of the card.
I hope you enjoyed reading How to Make an Awesome Pop-Up Card with your Photos and that you enjoy making pop-up cards yourself! For future occasions, if you want to go deeper into this craft side of photography I’ll leave you some links to check out. Additional readingIf you’re feeling creative and want to do other types of cards, check out these amazing tutorials:
The post How to Make an Awesome Pop-Up Card with your Photos appeared first on Digital Photography School. It was authored by Ana Mireles. Photography via Digital Photography School https://ift.tt/29wB9CX August 25, 2019 at 05:09AM
https://ift.tt/2zhB53d
The post The Canon 90D Unveiled Through Leaked Promo Video appeared first on Digital Photography School. It was authored by Jaymes Dempsey. After months of rumors and speculation surrounding Canon’s new DSLR offerings, we finally have something certain to report: The specs of the Canon 90D, as indicated by a promotional video leaked from Canon.
If you’re a Canon user, you’re going to want to pay attention. Because the Canon 90D is a seriously impressive piece of kit, one that seems to be a combination of the Canon 80D line and the Canon 7D line, and one that will carry on many of the best features from both camera lineups. Here’s the promotional video in full: ?
Now, what’s so special about the Canon 90D? First, the resolution is bound to impress: The 90D is slated to have a 32.5-megapixel sensor, which is a huge step up from both the Canon 80D (at 24.2 MP) and the Canon 7D Mark II (at 20.2 MP). The increased megapixel count means increased crop capabilities and an increased potential for large prints. High megapixel counts usually result in slower continuous shooting. But not for the 90D, which fires off 10 frames per second. This is enough for any type of action photography: sports, wildlife, bird, and more. Plus, the Canon 90D features 45 autofocus points, all of which are cross-type. Together, these features should be a potent combination in the hands of a dedicated photographer. Add to this 100% viewfinder coverage, impressive battery life of 1300 photos, and an articulating screen, and you’ve got yourself a winner. You should also remember that the Canon 90D will offer dual pixel autofocus, which practically guarantees fast and efficient focus while using Live View. Who should get the Canon 90D?I’d recommend grabbing the Canon 90D if you’re a hobbyist or semi-professional photographer. Better yet, you should be interested in action photography of any kind. The strong autofocus and 10-fps continuous shooting is too impressive not to pass up. Plus, if you’re looking for a bit of a megapixel boost compared to an older Canon, the 90D is the way to go. Now I’d like to ask you: What do you think of the Canon 90D? Will you be looking to purchase it? And what are your favorite Canon 90D features? Let me know in the comments! The post The Canon 90D Unveiled Through Leaked Promo Video appeared first on Digital Photography School. It was authored by Jaymes Dempsey. Photography via Digital Photography School https://ift.tt/29wB9CX August 24, 2019 at 05:09AM |
Categories
All
Archives
November 2020
|


 RSS Feed
