
|
https://ift.tt/2ZvOJ15
The post Canon and Sony Announce New DSLRs and Mirrorless Cameras appeared first on Digital Photography School. It was authored by Jaymes Dempsey. Last week, we reported Canon 90D specs based on a leaked promo video. And this week, we can talk about the Canon 90D with complete certainty, because it has now been announced alongside the (mirrorless) Canon M6 Mark II. 
The original Canon M6, to which the Canon EOS M6 Mark II is the successor. Canon EOS 90DThe new Canon 90D will start shipping in September, so you still have a few weeks to decide whether it’s the right piece of kit for your needs. But the specs are looking pretty enticing. They include (but are not limited to):
The continuous shooting speed capabilities are impressive. At 11 frames per second, you should be able to capture action scenes with ease, especially when paired with the 45 cross-type autofocus points. The price isn’t bad, either, coming in at $1199 USD. Here’s the bottom line: You should keep your eye on the Canon 90D if you’re looking for a faster action camera but don’t want to pay for an ultra-high-end model. Canon EOS M6 Mark IIAround the same time that the 60D was announced, Canon also unveiled the Canon EOS M6 Mark II, which is a mirrorless camera with an APS-C sensor, designed as a followup to the original EOS M6. The EOS M6 Mark II is aimed at an enthusiast audience, costing just $850 USD and including no electronic viewfinder. The rest of the specs are a nice list, as the EOS M6 Mark II features a 32.5-megapixel sensor, a tilting touchscreen, and 14 frames per second continuous shooting. You’ll like the EOS M6 Mark II if you need a nice portable, walkaround camera. Sony a6600 and a6100Finally, Sony also made a big announcement: Two new mirrorless cameras, the a6600 and the a6100. Both cameras feature APS-C sensors, though the a6600 is marketed at more serious audiences. It packs 24 megapixels and in-body image stabilization, along with 11 fps continuous shooting and a high-quality electronic viewfinder. The Sony a6100 is also a 24-megapixel camera that shoots at 11 fps, but it lacks in-body image stabilization. For all you photographers out there looking to upgrade, you’ve got some tough choices ahead of you! The post Canon and Sony Announce New DSLRs and Mirrorless Cameras appeared first on Digital Photography School. It was authored by Jaymes Dempsey. Photography via Digital Photography School https://ift.tt/29wB9CX August 28, 2019 at 10:28PM
0 Comments
https://ift.tt/2ZpHpoL
My post from last week generated a few questions, so I thought I’d follow up with some answers and some more tips. Exposure LockWhen faced with a tricky exposure situation and you want to ensure the camera doesn’t change its exposure settings due to changing light (like on a partly cloudy day) you can frame up your photo, tap on the subject to set exposure, then tap the exposure lock icon (the lock to the right of the shutter button) to lock in your settings. The camera will hold those settings until the exposure lock icon is tapped a second time. You can still dial in exposure compensation while locked (swipe left or right). 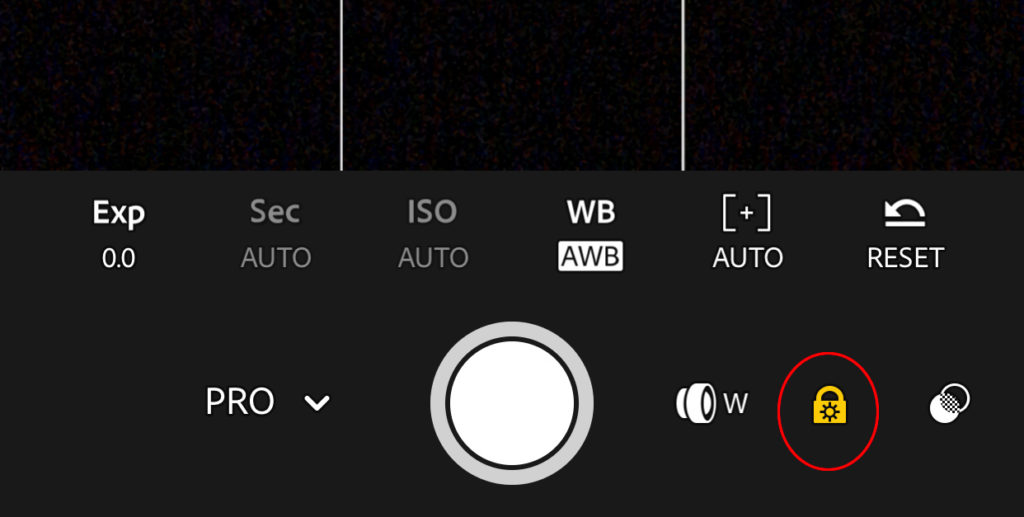
In-Camera HDR ModeOne of my favorite features is the ability to shoot in HDR mode. This allows you to shoot in raw (DNG) and when you press the shutter button the camera takes three photos exposing for the highlights, shadows, and midtones, then automatically aligning and blending them into a single DNG photo with a much higher dynamic range than any single photo, but with all the benefits of a raw photo for editing purposes. You can even shoot handheld, so no tripod needed. 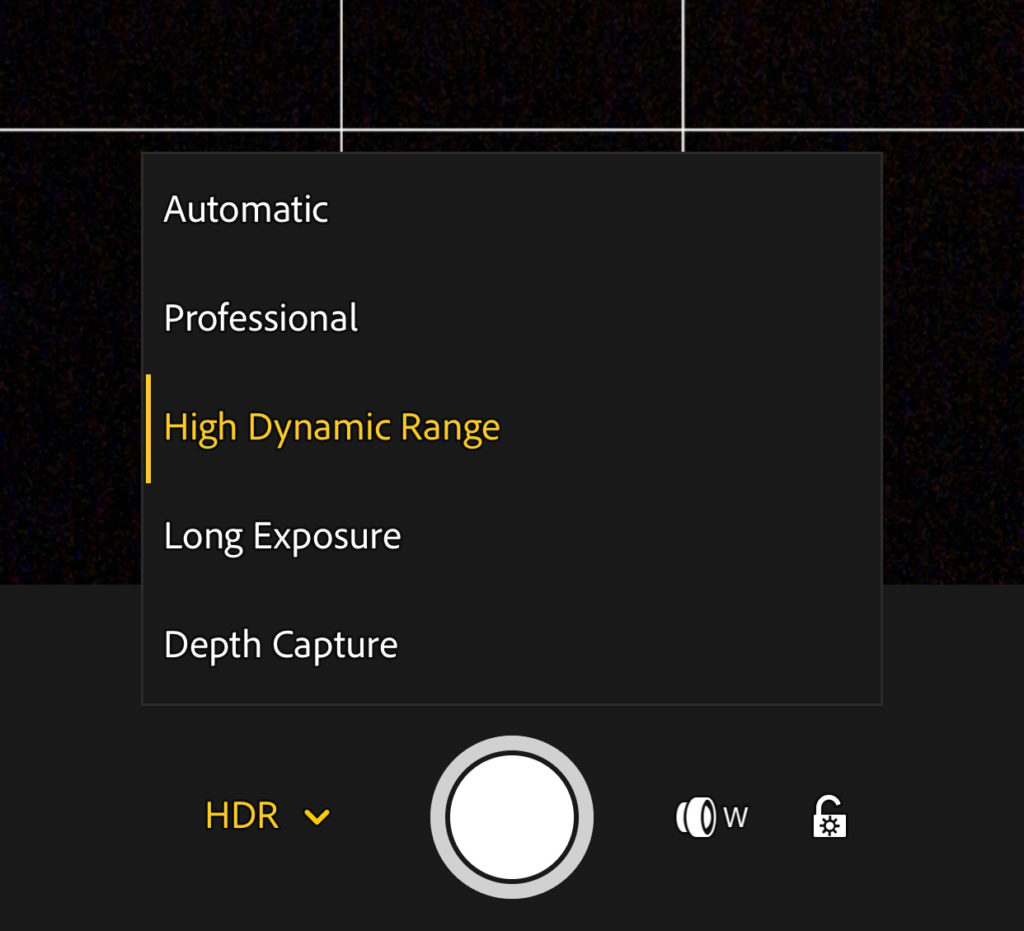
Use this mode when photographing a scene that has really bright highlights (such as clouds in the sky on a sunny day) and dark shadows (such as shaded areas on the ground). Not ideal for moving subjects, but don’t be afraid to experiment and see what is possible. I’ve been consistently impressed with this feature. Head over to the original announcement of this feature to see if your device is supported. Switch LensesIf you have a dual lens device you can switch between the wide and telephoto lenses by tapping the lens icon that appears to the left of the shutter button. 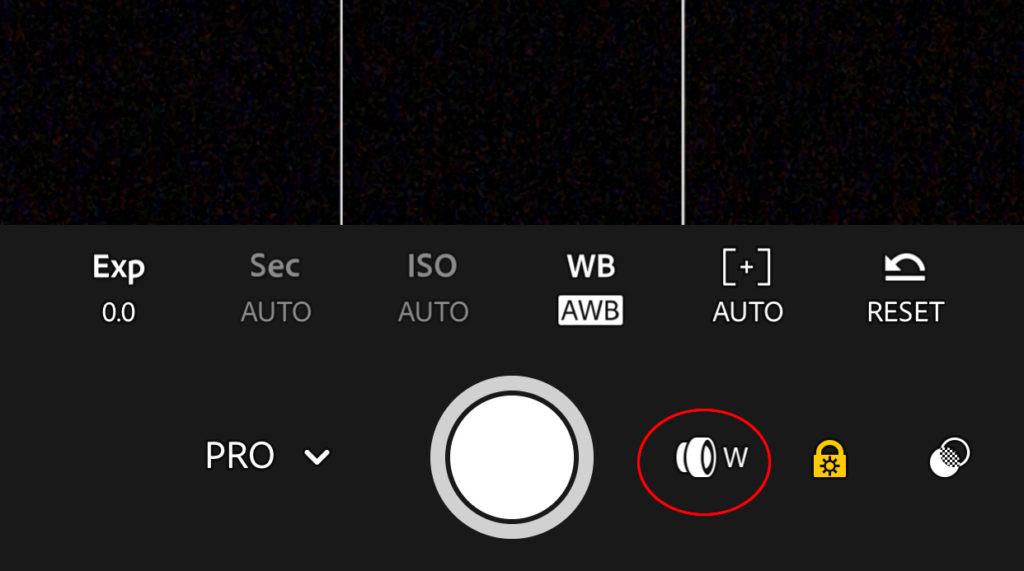
Take a SelfieYou can switch between the rear and forward-facing cameras on your device from within the camera app by tapping the camera icon in the upper-right corner of the interface. “Selfie” is also an option in the widget and 3D touch options I cover in the next section for faster access. 
Camera Launch ShortcutsBeyond tapping the blue camera icon in the app to open the camera, there are a few shortcuts to know when you want to open the camera quickly. These do vary with your operating system, so let’s look at iPhone first. If you have a device that supports 3D touch you can do a long-press on the Lr app icon to access a shortcut for jumping right to the camera. 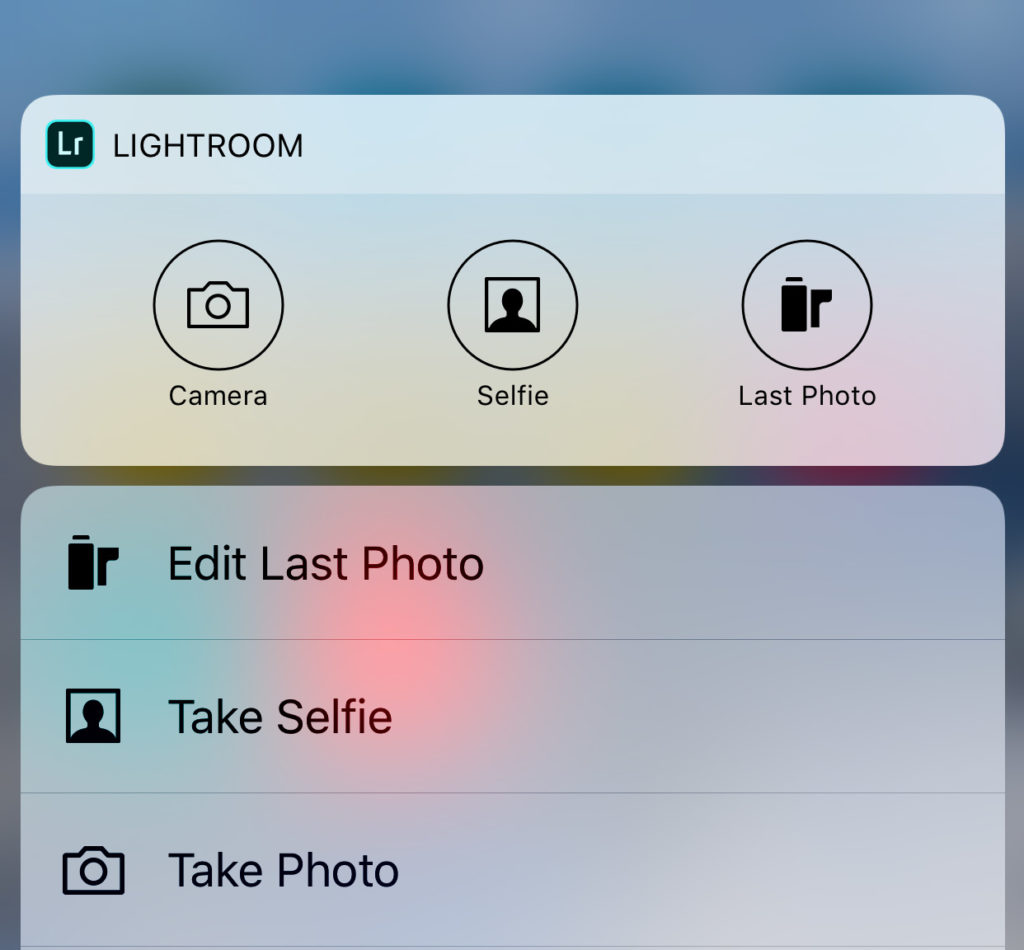
Additionally, on iOS you can configure a Lightroom widget on the home screen that will allow you equally fast access to the camera. Head here to learn more about configuring widgets on iOS. In a somewhat similar fashion on Android, you can add a Lightroom camera widget to the Home screen. Head here to learn more about adding widgets on Android. Once configured you’ll be ready to capture anything that comes your way! The post Five More Useful Things in the Cloud-based Lightroom Mobile App appeared first on Lightroom Killer Tips. Photography via Lightroom Killer Tips https://ift.tt/2sh0aZ8 August 28, 2019 at 08:49AM
https://ift.tt/3464njc
The post The Highline Ballhead Review: The Best Bargain Ballhead in 2019? appeared first on Digital Photography School. It was authored by Rick Ohnsman. The Highline ballhead is billed by its creators, Colorado Tripod Company, as “ultralight,” with an “increased range of motion.” But does the ballhead live up to the hype? That’s what this Highline ballhead review is all about. I recently received a ballhead of my own, and I’ve been putting it through its paces. In the next few sections, I’m going to take you through my experiences with the Highline ballhead. And I’ll let you know if it’s something you should consider purchasing. (Spoiler alert: It’s a bargain worth checking out.) 
Two views of the Highline ballhead. The Highline ballhead overviewFirst things first: Where does this new ballhead come from? The Highline ballhead is produced by the Colorado Tripod Company (CTC). The CTC caught the attention of photographers when they announced on Kickstarter they would be producing the “world’s first titanium tripod system.” For the purposes of this article, I will focus on the aluminum version of the Highline Ballhead, as that is the product I received for review. However, a titanium version is available from CTC. As for the specs: The Highline ballhead is has a 70 lb (32 kg) load capacity, though the ballhead itself weighs just 16 oz (0.45 kg). The head is cut out of aluminum. The ball itself is 1.89 in (4.8 cm) in diameter. My first impressions of the Highline ballheadThe Highline ballhead makes a great impression from the get-go. Opening the box, I found a quality neoprene drawstring bag with the Colorado Tripod Company logo printed on it. Inside the bag was the ballhead, as well as a plastic zip bag containing two Allen wrenches for working with the hex-head screws on the head. The bag also contained an adapter so the head can be mounted on tripods with 1/4-20 screws (without the adapter, the head mounts on the larger 3/8-16 screw used by most tripods). 
I was impressed with the quality right out of the box. I was immediately struck by the appearance of the ballhead, both in the quality of the parts and the beautiful gunmetal-gray finish. The design is clean and uncluttered, the knobs well-placed and sized for easy operation. All the components are metal; you won’t find a plastic piece on the entire ballhead. My first thought? This is a well-designed and well-built piece of photo equipment. The CTC describes the Highline as a traditional ballhead but with some special features. Striking is the large 48mm hollow ball and the ability of the locking mechanism to provide a 54-pound load capacity, much greater than most tripod heads of this size. The CTC indicates the Highline head is made for photographers with large camera equipment. I mounted my Canon 6D and my Canon 70-200 lens, but the head had no problem at all holding it right where I wanted. 
With a DSLR (the Canon 6D here) and a large lens (the Canon 70-200), the Highline was more than up for the job. Photographers want a tripod head that can lock in place with little droop or movement. The Highline satisfies this requirement, even with a full-sized DSLR and large lens. This is how things look when the camera is mounted from the photographers POV:
Note the clamp-lock knob at the top left, main ball adjustment knob on the left side, and the pan-lock knob at the rear. The drag adjustment knob is at the front and is not seen in this shot. Camera mounting, knob placement, and performanceCTC engineers designed the Highline so the camera can be held and controlled with your right hand and the tripod head knobs worked with your left hand. The largest knob is used to release and tighten the ball. Its large size and knurled grip makes it easy to use, even with gloves. On the rear of the head is the smaller pan-lock knob. This knob releases the head to be rotated around its vertical axis, such as when doing panorama shots. The base of the head is also marked out in degrees, which is helpful for pano shots. On the opposite side of the head is the drag control. Adjusting this knob changes how freely the ball can be moved. This is a great aid in setting up the feel and control of motion while compensating for the size of the camera and lens used. Once the camera is mounted and the drag knob is adjusted, you’re free to use the large knob for moving/locking the ball position. At the top of the head is the clamp and camera mount plate. I was very pleased to see an Arca-Swiss type mount being used. This has become a standard mount in the photo world, so you don’t need to worry about mounting incompatibilities. The mounting screw has a D-ring on it for tightening without tools. Open the clamp knob fully and tip the plate into the clamp, then tighten the knob most of the way. The camera can be moved forward and back, but will not fall out of the clamp. Balance the camera and then fully tighten the clamp knob. 
The monogramming was a nice touch. And note the D-ring for tightening the mounting screw when you don’t have tools. What to like about the Highline ballheadThe Highline ballhead is a great piece of photo equipment, so there’s a lot to like. As I’ve mentioned above, the Highline ballhead features excellent build quality, fit, and finish. The control knobs perform smoothly, are easy to grasp and operate, and the mechanism allows the ball to move smoothly and lock exactly where you want it without any droop. 
Using the large drop slot, shooting straight up or straight down is very easy. For a head its size, the Highline is also quite light. Even the aluminum version comes in at 18 oz (510 g). And the titanium version of the ballhead shaves 40% off that weight, coming in at just under 12 oz (340 g). 
The Highline had no problem locking and holding the camera just where I wanted in portrait orientation. The head also performs beautifully even with a good-sized DSLR and big lens. My current tripod is an aluminum MeFoto Globetrotter Classic, but while the MeFoto stock head isn’t bad for the money, it feels a little wimpy. Switching out the MeFoto head for the Highline made a world of difference: The Highline head worked great with the same camera/lens combo and fit very well on the Globetrotter tripod. In fact, I will be using this combination as my new everyday camera support system. (Or at least until I consider the CTC Centennial tripod!) Finally, the price is the best part of the Highline ballhead. Though I can’t say I’ve tried every comparable ballhead out there, I’ve never found a better ballhead at this price point. The aluminum version of the Highline sells for just $129.00 USD. I consider that a screaming deal for a product of this quality. Note that the titanium version of the Highline ballhead is $499.00 USD. If shaving six ounces off the weight is important to you and the cost is no object, go for it. As for me? I’m gonna be quite happy with my aluminum Highline! What’s not to like about the Highline ballhead?The Highline ballhead is nearly perfect, but falls short in a couple of areas. What don’t I like about it? First, I prefer a lever lock to the Highline’s twist-knob lock. However, the twist-knob lock should be fairly easy to switch out. And I spoke with Eric Ellwanger of CTC; Eric said CTC is already working on their own lever-lock clamps and should offer them as an option for new ballhead buyers before long. If CTC makes one with the same quality shown in the Highline head and at a decent price, sign me up! (For those who have already purchased a head, CTC will allow those users to send in their clamps for a rebate if they’d like to switch to the lever-lock style.) Another small nit: CTC touts the large elongated slot on the right side of the Highline head as a great feature, because it allows the camera to be flipped over into portrait configuration and gives extended motion. But I, like many other photographers, have mounted an L-bracket to my camera to allow easy switching from landscape to portrait orientation. I like that the L-bracket allows me to keep the center mass of the camera over the center of the tripod regardless of orientation. It also better supports panorama work, keeping the nodal point of the camera more centered over the rotation axis. 
I still prefer using an L-bracket, which keeps my camera centered over the center axis of the tripod. Because the Highline clamp is an Arca-Swiss type, my L-bracket mounts with no problem. In other words, for photographers like myself, the elongated slot is a bit redundant. It’s not a big issue, but I thought I’d bring it up. What is the availability of the Highline tripod head?The Highline was originally a Kickstarter product. This means that the first orders go to Kickstarter backers, which potentially limits availability for consumers. However, CTC says they are about caught up with Kickstarter orders and are now taking orders on their website as well as Adorama Camera. If you check the CTC website, you may see that the Highline heads are available to purchase. Alternatively, the heads may be on backorder. Regardless, CTC says their machines are running 24/7 now. So if you want a Highline ballhead, place your order on Adorama or on the company website, and you will be billed when it ships. Highline ballhead review: conclusionThere’s nothing I like better than a quality product at a great price, and the Highline tripod ballhead absolutely delivers. Also, note that CTC is working on two other versions of the Highline: a smaller version and a larger version. I can see a smaller version being more practical for smaller mirrorless or bridge cameras. As for a larger version, I have trouble imagining a camera that needs more stability than what the current Highline ballhead can provide! So if you’re in the market for an excellent ballhead at a bargain price, go have a look at the Highline tripod head. It may be the right product for your needs. The post The Highline Ballhead Review: The Best Bargain Ballhead in 2019? appeared first on Digital Photography School. It was authored by Rick Ohnsman. Photography via Digital Photography School https://ift.tt/29wB9CX August 28, 2019 at 07:39AM
https://ift.tt/30G2zeO
The post 5 Tips for Shooting Waterfront Cityscapes at Blue Hour appeared first on Digital Photography School. It was authored by Joey J. When you hear the term “cityscape photography,” what kind of image comes to your mind? It could be those photographed from elevated viewpoints or light trail of city traffic. To me, nothing beats the beauty of waterfront cityscapes – especially those photographed at blue hour. 
Hong Kong skyline (18mm, f/10, 199 seconds, ISO100) 
Gyeongbokgung Palace (Korea) (24mm, f/8, 30 seconds, ISO100); 
Shanghai skyline (18mm, f/11, 164 seconds, ISO100).
In order to capture stunning waterfront cityscape photography, there are a few key points to get right. Shooting Waterfront Cityscapes at Blue Hour1. Good sky and lightMichael Freeman, the author of Capturing Light: The Heart of Photography, has this to say.
This is very true with waterfront cityscape photography as well. If you want your photo to look good, only shoot on a (mostly) clear evening (dark clouds are our nemesis!). The quality of light on sunny evenings is much nicer than that of cloudy evenings, which can be easily noticeable in the resulting photos. 2. Sunset directionOver the years of shooting cityscapes at blue hour, I’ve come to realize one thing affects the results rather significantly – where the sun has set. If the sun has set towards the direction you’re shooting, you typically see beautiful twilight hues leftover from the fading sun, which makes your blue hour photos extra special. 
Singapore skyline (18mm, f/5.6, 409 seconds, ISO100). The sun went down on the right edge of the frame, adding a beautiful gradient of colors ranging from reddish-orange to deep blue. On the contrary, your cityscape photos at blue hour will look dull and monotonous if the sun sets behind you (i.e., you’re shooting towards the sky that is 180-degrees opposite of where the sun has set). In such a scenario, the quality of light is inevitably affected. The sky lacks the beautiful hues you typically see in the sun-setting side of the sky. With the sky like that, your photos won’t get much better no matter how hard you try editing in post-production. 
Shanghai (China) skyline (18mm, f/13, 163 seconds, ISO100). Despite shooting on a clear evening, the sky looks noticeably dull, as this is the sky that is 180-degrees opposite of where the sun went down (the sunset occurred behind me shooting). 3. Long exposureWhat I particularly like about waterfront cityscapes is it lets me create silky smooth water effects by doing a long exposure. As seen in the photo below, such smoothed-out water adds a dreamy feel that is very distinctive to long exposure photography. It’s the very reason I fell in love with waterfront cityscapes. 
Marina Bay (Singapore) (35mm, f/11, 194 seconds, ISO100). By default, the limited available light at blue hour allows your shutter speed to naturally get longer, especially with the use of a small aperture like f/13. That said, without using a neutral density (ND) filter, the shutter speed probably won’t go beyond several seconds. This isn’t long enough to achieve a silky smooth water effect that you see in the photos above. 
Marina Bay (Singapore) shot with 2 seconds of exposure (at f/13) without using any neutral density filter. This is way too short to a create silky smooth water effect. If you don’t own an ND filter yet, get yourself one! There are different densities available (2, 3, 6 and 10-stops are popular), but I’ll recommend a 6-stop ND filter (especially if you’re only getting one), as it hits a sweet spot for photographers shooting waterfront cityscapes. Let’s say that you get a base shutter speed (when no filter is attached) of 2 seconds, which is quite a typical scenario around 10 minutes before the end of dusk (check your local dusk time at gaisma.com). As seen in the photo above, 2 seconds of exposure hardly smooths out the water, but by attaching 6-stop ND filter, the exposure gets extended to 128 seconds (2 minutes 8 seconds). Each “stop” of ND filter approximately doubles the exposure time (2 seconds > 4 seconds [1-stop] > 8 seconds [2-stops] > 15 seconds [3-stops] > 30 seconds [4-stops] > 64 seconds [5-stops] > 128 seconds [6-stops]), which is long enough to create silky smooth water effect. 
Neutral density (ND) filters help extend shutter speed lengths by reducing light entering the camera lens. I own 3 and 10-stop ND filters as well, but the 3-stop is too mild (2-second exposure can be extended to 15 seconds only) while 10-stops is way too strong (2-second exposure can be extended to a whopping 34 minutes, 8 seconds). I have found 2 to 3 minutes of exposure is enough to create a silky smooth water effect. You could go longer like 5 to 6 minutes (I won’t go beyond 7 minutes, as long exposure noise starts to creep in), but it won’t change much beyond 2 to 3 minutes. 4. Reflections on waterColorful reflections of city lights reflected on the water are one thing that gives your blue hour photos a “WOW” feeling. That said, this doesn’t always happen. Even when you shoot the same city view from the same spot for two evenings in a row, you may get completely different results when it comes to the clarity of reflections on the water. To achieve good photographic results, like in the first photo below, the water has to be relatively still. If the water surface is rough, you hardly get any reflections (the second photo below). Unfortunately, this isn’t something we can control, so we need a bit of luck here. 
Marina Bay (Singapore) (TOP: 18mm, f/13, 142 seconds, ISO100; 
19mm, f/13, 162 seconds, ISO100). 5. Having thin cloudsWhile long exposure works best with water, it also works well with clouds, too. This might not be as important as other points above, but if the sky has some clouds, long exposure helps get them rushing across the sky. It adds interesting movement to your photos, as seen below. 
Singapore skyline (18mm, f/10, 257 seconds, ISO100). Alternatively, if you want a greater effect, try evenings with more clouds. That said, if too cloudy, your photos will look just flat and ugly (as the quality of light is severely affected) or might come out crazy like the photo below. I prefer a clear sky with no clouds or just a little bit of thin clouds. 
Singapore skyline (20mm, f/5.6, 412 seconds, ISO100). ConclusionI hope these tips help you capture epic waterfront cityscape photos at blue hour! Looking back, my love for waterfront cityscapes comes from earlier days shooting sunny beachscapes, which was the primary reason I got into photography a decade ago. Over the years, my interest has shifted from sunny daytime beachscapes to cityscapes at blue hour, but I’m still in love with water! I frequent cityscape photography spots located at the waterfront locally as well as on trips abroad. Lastly, if you have any questions or info to share about shooting waterfront cityscapes at blue hour, feel free to do so in the comments below.
The post 5 Tips for Shooting Waterfront Cityscapes at Blue Hour appeared first on Digital Photography School. It was authored by Joey J. Photography via Digital Photography School https://ift.tt/29wB9CX August 28, 2019 at 05:09AM
https://ift.tt/2Pjn7IL
 RF 15-35mm F2.8 L IS USM and RF24-70mm F2.8 L IS USM Lenses Further Cement the Company’s Commitment to the EOS R Full-Frame Mirrorless Camera System MELVILLE, N.Y., August 28, 2019 – The time has come and the wave of momentous advancements in the world of the EOS R full-frame mirrorless camera system continues as Canon U.S.A., Inc., a leader in digital imaging solutions, today announced the introduction of the RF15-35mm F2.8 L IS USM and RF24-70mm F2.8 L IS USM lenses. With their large, bright F2.8 aperture, a zoom range that covers a wide range of shooting scenes and image stabilization (IS), as well as Nano USM – these lenses are sure to become workhorse lenses for professional and advanced amateur photographers. “As the emergence of mirrorless cameras continue accelerating the market and with Canon’s deeply rooted heritage in optics, we are excited to expand the lens offerings and acquiesce the needs of EOS R users,” said Kazuto Ogawa, president and chief operating officer, Canon U.S.A., Inc. “The technical improvements and features within these new RF lenses are needed to drive the market forward.” RF15-35mm F2.8 L IS USM
RF24-70mm F2.8 L IS USM
Free Firmware Update
The firmware update aims to add detection of the subject’s eye when the subject is at a distance, improve overall AF frame tracking for moving subjects, as well as improve initial subject recognition and start tracking when subjects are at a distance. Pricing and Availability Photography via Canon Rumors https://ift.tt/2v4dYqS August 27, 2019 at 11:22PM
https://ift.tt/2Pyi5IL
You can now preorder all of the new Canon gear from our exclusive affiliate partner Adorama. Canon EOS 90D Body $1199 Canon EOS 90D w/18-55mm Read more... Photography via Canon Rumors https://ift.tt/2v4dYqS August 27, 2019 at 11:07PM
https://ift.tt/2znUBL9
 Both Cameras Feature a 32.5 Megapixel APS-C CMOS Sensor, High-Speed Continuous Shooting, Dual Pixel CMOS AF and Uncropped 4K UHD Video Recording Capability MELVILLE, N.Y., August 28, 2019 – It is often said that in life, having two options is generally considered a good thing. Today, Canon U.S.A., Inc., a leader in digital imaging solutions, introduced two advanced amateur ILC cameras, the EOS 90D and EOS M6 Mark II. These two models usher in the next generation of Canon APS-C sensor cameras and share many similar characteristics, while also being uniquely different at the same time. Both cameras are designed to fit the needs and preferences of a variety of photographers taking into account their skill level and subject matter. Preorder the Canon EOS 90D “As camera technology continues to evolve, we find ourselves in a constant state of innovating and challenging the status quo to meet the various desires of our end-users,” said Kazuto Ogawa, president and chief operating officer, Canon U.S.A., Inc. “With the introduction of these cameras, Canon is reaffirming its continued commitment to a broad range of photographers by offering them the digital imaging tools required to meet their needs.” The EOS 90D and EOS M6 Mark II include many core features that are identical and hold true to Canon’s imaging excellence. These features include:
The Performance DSLR Way: The EOS 90DThe EOS 90D DSLR camera is ideal for the advanced-amateur photographer who values the look-and-feel of the DSLR body and benefits such as an optical viewfinder, 3.0-inch vari-angle touch screen LCD, addition of the multi-controller and a shutter button feel of professional EOS cameras. Now capable of shooting up to 10 frames-per-second (fps), a drastic increase from the 7.0 fps with the EOS 80D, users can capture all of the action on the sidelines of a football game or wildlife while on safari. Assisting in a photographers’ ability to capture the action is the 45-point all-cross type AF system, 100 percent viewfinder coverage and now supports up to 27 points in f/8 metering. In addition, the new AE sensor boasts an impressive 220,000 pixels and utilizes EOS iTR AF (face priority) detection. Together, these two features allow for the detection and tracking of faces in various environments and shooting situations while using the viewfinder. The Compact-and-Lightweight Way: The EOS M6 Mark IIBringing the controls and functionality of a Canon EOS DSLR into a compact mirrorless camera, the EOS M6 Mark II is destined to wow advanced-amateur photographers. With its enhanced usability, the EOS M6 Mark II is capable of shooting up to 14fps with AF and AE tracking as well as capturing a remarkable 30fps when using RAW Burst Mode with pre-shooting capabilities. The camera also features touch-and-drag AF when using the optional EVF-DC2 electronic viewfinder . A popular and notable benefit of Canon mirrorless cameras allows photographers to select AF positions with the touch of a finger. The EOS M6 Mark II also includes Canon’s Dual Pixel AF with Eye AF Servo to help ensure images are in sharp focus and a 3.0-inch, touch-panel LCD screen with tilt-option to help ensure a user’s portrait or selfie game is and stays on point. Pricing and AvailabilityThe Canon EOS 90D is scheduled to be available mid-September 2019 for an estimated retail price of $1199.00 for body only, $1349.00 for EF-S 18-55mm f/3.5-5.6 IS STM kit and $1599.00 for EF-S 18-135mm f/3.5-5.6 IS USM kit*. The EOS M6 Mark II is scheduled to be available late September 2019 in both black and silver for an estimated retail price of $849.99 for body only, $1099.00 for EF-M 15-45mm f3.5-6.3 IS STM and EVF-DC2 kit and $1349.00 for EF-M 18-150mm f3.5-6.3 IS STM and EVF-DC2 kit*. Preorder the Canon EOS 90D For additional information, please visit, usa.canon.com. #†Based on weekly patent counts issued by United States Patent and Trademark Office. *Specifications, availability and prices are subject to change without notice. Actual prices are set by individual dealers and may vary. Photography via Canon Rumors https://ift.tt/2v4dYqS August 27, 2019 at 11:07PM
https://ift.tt/342vPOZ
The post How to take Great Flower Photos without a Macro Lens appeared first on Digital Photography School. It was authored by Ana Mireles. Are you interested to try some flower photography but you get discouraged by guides telling you to get a macro lens? I was too at first, but macro is not the only way to get some amazing pictures. Keep reading for some tips on how to take great flower photos without a macro lens or buying any new equipment or accessory. 
Flower Photography Detail Close Up Detail and depth of fieldOne of the reasons photographers recommend a macro lens is to capture small details with shallow depth of field. Some offer alternatives like extension tubes or reverse rings that allow you to focus while being very close to your subject. This is, in fact, a nice look for flower photography, but if you’re not ready to invest in new gear, there are other ways to get it. 
Focal Distance: 55mm, f/13, 1/400th, ISO 640 I shot this image using a 55mm lens with f/13, 1/400th shutter speed and 640 ISO. As you can see, I managed to get reasonably close, so never let the lack of equipment prevent you from practicing. You can start by using a wide aperture and the longest focal distance you have to experiment from there. In order to make the best out of the equipment you have, check out the article How to Control Depth of Field in Your Photography. Draw inspiration from natureNow that we’ve covered the macro effect, let’s broaden the horizon and think big. There’s much more to flower photography than just the details. Flowers come in all shapes and colors, so include all those natural elements and use them to your advantage.
CompositionThere are many rules that you can use as guidelines to create interesting images. To learn more about them I recommend the article How to Apply Compositional Theory to Still Life Photography. In this photo below, I lowered my point of view so I could create three different segments following the rule of thirds: flowers, trees, and the sky. 
The Rule of Thirds and point of view help your composition. Color contrastUsing color as a compositional element is very easy to do when photographing flowers. Because they are so vibrant, you’ll always find one that stands out. You can put contrasting colors next to each other to make elements stand out while still being in harmony. You can start by isolating a subject against the background and work your way up to include more elements.
Tones or patternsAnother way to use color in your images is to use only one to dominate the image. It may sound easy and perhaps dull, but in reality, if you incorporate different tones of the same color or a pattern, it can become a subject in itself. Megan Kennedy wrote a number of articles here on DPS called Master Colors Series covering the psychology and evolution of each color. Check them all out for inspiration!
The cultural aspectNow that we’ve passed aesthetics and are into content let’s say that flowers are much more than just pretty subjects. They speak their own language as we have given them all sorts of cultural meanings. The color, the season, and even the presentation change our perception. We use them in joyous celebrations and on the occasion of grief, passing through all other kinds of events. When you incorporate this matter on top of the visual aspect, things can become really interesting. Still lifeDefining the line between photography genres is always a tricky subject. Are all flower photography images a still life? No. Are all still life images flower photography? Also, no. But the two genres often intersect, so play within that field to stage your images. You can use different elements, adjust the lighting and even some post-production. To get you started here are some Simple Methods for Creating Better Still Life Images. 
Still life is great for flower photography ConclusionI’m not suggesting you shouldn’t buy a macro lens or any other gear and accessories, especially if you are planning on becoming a professional. However, there’s much versatility in flower photography so you can do without them. Of course, you can also look into many creative techniques like double exposure, light painting, or dynamic zoom. Do you have other ideas to take flower photos without a macro lens? Share in the comment section!
The post How to take Great Flower Photos without a Macro Lens appeared first on Digital Photography School. It was authored by Ana Mireles. Photography via Digital Photography School https://ift.tt/29wB9CX August 27, 2019 at 07:39AM
https://ift.tt/2L04jdy
 VIDEO Here are some images of the upcoming Canon EOS M6 Mark II. The official announcement for this camera will be this week and shipping will likely begin in late September. Pricing has yet to leak out. Photography via Canon Rumors https://ift.tt/2v4dYqS August 27, 2019 at 06:17AM
https://ift.tt/2L7utK6
The post How to Choose the Perfect Photography Background appeared first on Digital Photography School. It was authored by Kevin Landwer-Johan. Choosing the perfect photography background is as important as choosing your subject. A background is usually best if it helps enhance your main subject and complements it. First, you need to consider your subject and your intent for taking photos of it. Then, consider how your subject works with the background. Are your subject and background conflicting? If they are, you must then use some method of controlling the background. 
© Kevin Landwer-Johan Some subjects will look great in a photograph against their natural backdrop. A pink flower against foliage, for example. Others you’ll have to work with to make them stand out or to better relate to their surroundings. This depends on your intent. What’s your intent for the subject?Do you want your main subject to be the focus of the viewer’s attention? If so, you must manage your technique in making the photograph so that your subject is most obvious. Isolating your subject can be achieved in many ways. Some of the main ways to accomplish this are:

© Kevin Landwer-Johan In this example, the coffee cups are on a plain black background. Lack of detail and high contrast ensures the main subject stands out. Alternatively, you may decide to incorporate your background into the meaning of your photographs. Placing your main subject in context with its surroundings can often add depth of meaning. A typical example of this is an environmental portrait. This style of photography uses the background and surroundings to add narrative to the image. 
© Kevin Landwer-Johan In this portrait of a copper craftsman working on his art, the environment helps build a story. His father looking on, the tools and other items on the shelves behind, are all an essential part of the portrait. My intent was to tell a story illustrating his occupation. If I’d photographed him against a plain background, the photograph would contain very little narrative. How point of view determines backgroundNaturally, where you choose to stand will determine what is behind your main subject. When you find an interesting subject, don’t only photograph it from one perspective. Move around it. See how it looks if you stand on the other side. The background may be completely different. Even a slight change in your position can alter what will be visible in the background. Move to your left or right. Shift your view up or down a little. How does this change the relationship between your subject and background? 
© Kevin Landwer-Johan Coming at a low angle to make this landscape, I’ve included the ice boulders, mountains, and glacier in the background. The composition gives context to the ice in the foreground. If I had stood in the same place, looking down at the ice boulders, there would have only been rocks in the background. Moving closer or further away from your subject also determines what’s in view behind your subject. Changing your lens focal length does too but in different ways. Moving closer with a wide-angle lens has a very different result than standing in the same spot and zooming in. Always experiment to see what will be included and excluded. How contrast determines backgroundIf your main subject is darker or lighter than the background, this can determine the significance of the composition. A dark subject against a light background looks very different than a lighter subject against a dark background. Generally, a dark background helps isolate a subject. It can also allow for more detail to be visible in the subject. 
© Kevin Landwer-Johan 
© Kevin Landwer-Johan Choice of exposure can affect this, as in the photos above of the tree. Both were taken a few minutes apart. All I did was to expose for the tree in the first image and let the sky become overexposed. In the second photo, I exposed for the sky to show the detail in the clouds. In both images, the tree is isolated, but the feel of the photos is very different. Controlling depth of field to determine backgroundDepth of field control is a good way to manage your background. Choosing how much or how little is in focus allows you to manage your intention. By completely blurring a background, you effectively isolate your subject. Partially blurring the background leaves some idea of what’s in the background. But it doesn’t have to be distracting. 
© Kevin Landwer-Johan In this close up of the detail on an old bicycle, I waited until the person on the other bike rode past. My settings were such that it’s obvious it’s a bike in the background. If I’d chosen to take the photo with a shallower depth of field, the passing bike might have blurred completely. Then it would not have added anything to the photo. If I’d had everything in sharp focus, the passing bike would have been distracting. Learn to control how much or how little of your composition is in focus. This is an essential tool in determining your background. 
© Kevin Landwer-Johan ConclusionMaking intentional choices about the background is essential to making strong photographs. I am often surprised when I’m teaching photography workshops how little attention people pay to the background. It’s easy to become transfixed on a wonderful subject. Focusing on other aspects of photography like exposure, you must remember to look at the background as well. Be intentional. Include only what you want to see. Limit or exaggerate the amount of background detail depending on what you want. The amount of control you have over the background will determine the strength of your photographs. Do you have any other tips for choosing the perfect photography background? Share with us in the comments!
The post How to Choose the Perfect Photography Background appeared first on Digital Photography School. It was authored by Kevin Landwer-Johan. Photography via Digital Photography School https://ift.tt/29wB9CX August 27, 2019 at 05:09AM |
Categories
All
Archives
November 2020
|


 RSS Feed
