
|
https://ift.tt/2H1vYoW
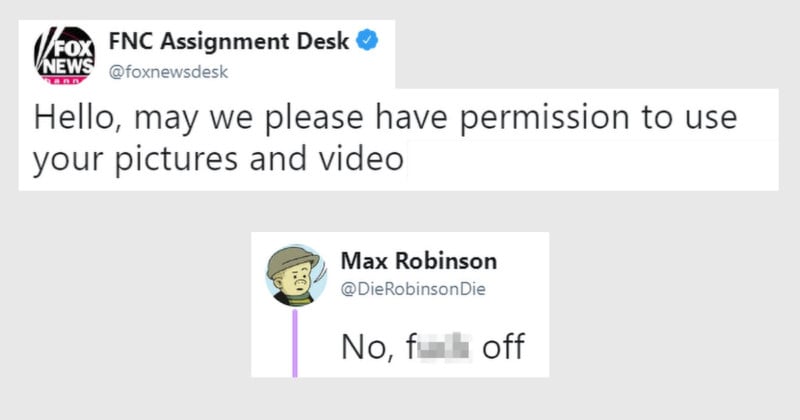
He Said No, Fox News Used His Images Anyway https://ift.tt/2LGt10B
Over the weekend, Ellicott City, Maryland was pummeled by massive rainfall, which triggered devastating flash floods through the historic district of town. Resident Max Robinson was trapped in an apartment building near Main St and Maryland Ave when he started documenting what transpired on Twitter. Note: This article contains strong language. As the social media coordinator for Howard County Recreation and Parks and contributing journalist to the Baltimore Beat, Robinson was no stranger to social media norms and intellectual property rights. So when he received a request for free publication of his work on “Fox News Network, LLC & Fox News Edge affiliates use on all platforms” in exchange for credit, he responded quickly and tersely.
But the request seems to have been perfunctory because Fox News used his content anyway.
The National Press Photographer Association’s General Counsel and photographer advocate Mickey Osterreicher didn’t take kindly to the blatant disregard, accurately pointing out that under U.S. Copyright Law 17 U.S. Code § 504, willful infringements can lead to statutory damages up to $150,000 per instance.
Photographers started tweeting at Max Robinson to protect his IP and lawyer up. Even “copyright troll” Richard P. Liebowitz reached out.
Ever since Daniel Morel won a $1.2m judgment against AFP, media organizations have been wary of posting content found through social media. The practice of assigning a junior producer to acquire free rights through a tweet or DM is sadly still prevalent – particularly when it comes to breaking news – and is certainly not confined to Fox News. But the blatant use of Robinson’s photo/video after he specifically denied them permission has become pretty rare given the huge legal liability that it presents. Statutory damages are only applied to content that has been registered with the U.S. Copyright Office. But content creators have up to 3 months to register their works after publication or 1 month after learning of an infringement. In other words, register your copyright. About the author: Allen Murabayashi is the Chairman and co-founder of PhotoShelter, which regularly publishes resources for photographers. The opinions expressed in this article are solely those of the author. Allen is a graduate of Yale University, and flosses daily. This article was also published here. Image credits: Photo by Max Robinson (@DieRobinsonDie) Photography News via PetaPixel https://petapixel.com May 29, 2018 at 10:31AM
0 Comments
https://ift.tt/2sr8uVk
Watch a Photographer Shoot 7 Urban Portraits in a 24hr Photo Challenge https://ift.tt/2shlrS2 We recently challenged photographer Steven John Irby (AKA Steve Sweatpants) to step outside his comfort zone. Irby usually shoots candid street photos and is the mastermind behind Street Dreams Mag, but we tasked him with shooting 7 creative urban portraits of one model in the city of Barcelona. In addition to focusing on the model, we wanted Steven to connect with the city of Barcelona through this challenge. The 8-minute video shows how Irby fared. Here are the 7 portraits Irby ended up with (watch the video above to see how they were made): Portrait #1
Portrait #2
Portrait #3
Portrait #4
Portrait #5
Portrait #6This was a slow-motion video portrait that can be seen in the video above. Portrait #7
Many thanks to Irby for participating in this challenge. You can find more of his work on Instagram and via Street Dreams Mag. You can also find out more about the Sony RX100 V premium compact camera here. A big thanks to the Sony Alpha Collective for sponsoring this challenge. Credits: Photographs by Steven John Irby. Video produced by Matthew Rycroft Photography News via PetaPixel https://petapixel.com May 29, 2018 at 10:16AM
https://ift.tt/2sr7a4O
NEMO is a Drone Capable of Underwater Diving Up to 100 Meters https://ift.tt/2xrlsrO We bring you plenty of tales of drones conquering the air but what about drones under the sea? NEMO hopes to make that next frontier a reality with its underwater-capable drone that can dive up to 100 meters deep according to the Kickstarter behind the project. But that’s not all – the NEMO hopes to marry these capabilities with photo and video capture devices in a real tour-de-fore in a completely unique and competitively priced offering in the consumer drone category. 
Image via NEMO Kickstarter. It promises stable shots, so no need to worry about the waves messing up your video as well as a 4K camera to capture it all. Another awesome feature sure to have diving enthusiasts salivating is the VR Goggles which allow the user to see exactly what the drone sees underwater. How’s that for a unique drone? Of course, the team is also promising a long battery life as well as a modular system for swapping out power packs. Bold claims, to be sure, so what is the Kickstarter promising will deliver on these capabilities? For backers of the project, the basic kit, costing $USD 999, will get you a smartphone app to use for controlling the drone, the private WiFi connection, the NEMO drone, 1 battery and a 30m tethering cable, the retail cost of which will be an estimated $1799. That’s pretty expensive, but don’t worry – this isn’t some pie in the sky dream project without testing or prototypes. NEMO has videos of real-life usage and reactions from those same users so you can judge for yourself if this is something for you. The team behind NEMO is shooting for a delivery date of July 2018 pending the successful completion of their Kickstarter project this May. You’ve got a few more days to support it if you’d like to do so and you can do that by clicking here. 
Image via NEMO Kickstarter. The post NEMO is a Drone Capable of Underwater Diving Up to 100 Meters appeared first on Light Stalking. Photography News via Light Stalking https://ift.tt/2kwTW5i May 29, 2018 at 10:00AM
https://ift.tt/2L21WnK
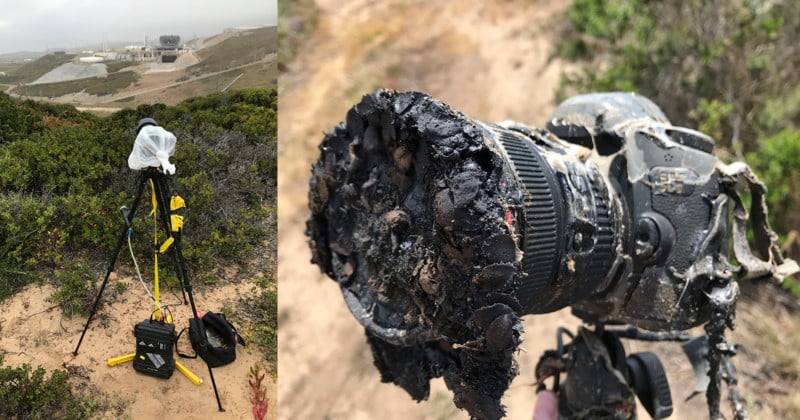
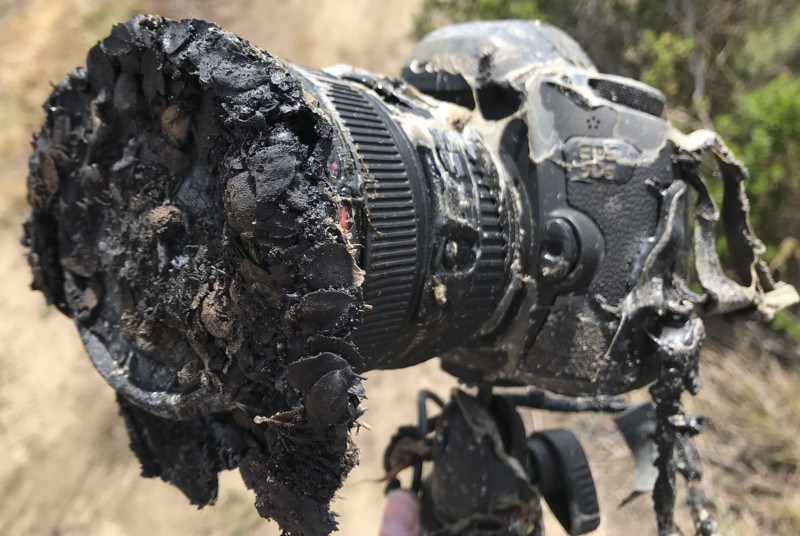
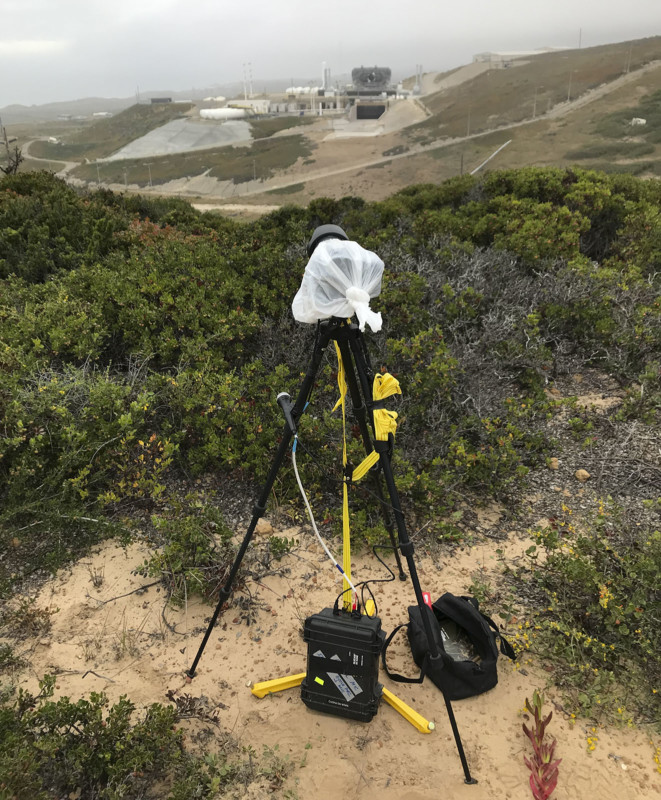
How a Rocket Launch Melted a NASA Photographer’s Canon DSLR https://ift.tt/2IQnVBc
One of the viral stories on the Web last week was how NASA photographer Bill Ingalls had his remote Canon DSLR melted while shooting a SpaceX rocket launch. NASA has since revealed more details regarding exactly what happened. When the photo of Ingalls’ charred camera first started making the rounds, most reports stated that the camera was placed too close to the launchpad (we initially shared this detail as well before Ingalls clarified it for us). One of the reasons for this misinformation was CBS news correspondent Peter King, whose Tweet helped bring the photo to everyone’s attention:
“He tries to get his remote cameras as close to the launch pad as possible for great results,” King wrote. “This would illustrate the unfortunate result of an attempt at an extreme closeup.”
Not so, says NASA. “NASA photographer Bill Ingalls has been shooting for the agency for 30 years,” the space agency writes. “He knows where to set up his cameras…” What actually happened was that the launch sparked a fire, and the fire is what melted the camera (placed a quarter of a mile away). “I had six remotes, two outside the launch pad safety perimeter and four inside,” Ingalls tells NASA. “Unfortunately, the launch started a grass fire that toasted one of the cameras outside the perimeter.”
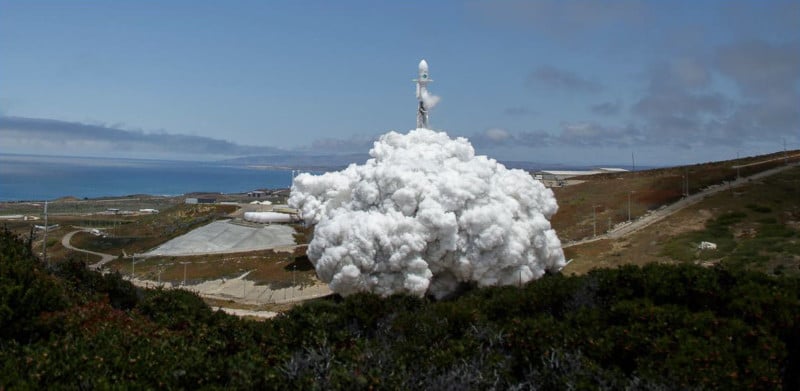
“Once the fire reached the camera, it was quickly engulfed,” NASA says. “The body started to melt. When Ingalls returned to the site, firefighters were waiting to greet him. Recognizing the camera was destroyed, Ingalls forced open the body to see if its memory card could be salvaged. It could, which is how we can see the fire approaching the camera.” Interestingly enough, of the 6 remote cameras that Ingalls set up, only the one farthest from the launch pad was damaged at all. That camera and lens may soon be on display at NASA’s headquarters in Washington, DC. Image credits: Photographs by NASA/Bill Ingalls Photography News via PetaPixel https://petapixel.com May 29, 2018 at 09:56AM
https://ift.tt/2L3NueJ
When people start photography, or even after they have been doing it for a while, they find a time when they want to start learning how to do some processing on their computer. Then they are faced with a heap of options. There are so many choices and trying to work out which one to choose can be hard. One option that is becoming very popular is ON1 Photo Raw 2018.
You can buy the software outright, so you don’t need to worry about any monthly subscription costs like others are offering. It is easy to learn and you will find that ON1 can likely do everything you need to do. One of the best aspects is the community of photographers around the program as well. 
Having fun with layers and the textures. Here is a beginner’s guide to help you find your way through ON1 Photo RAW 2018 and give you the confidence to start working on your photos. You can download the program from their website. There is a 30-day free trial available to see if you like it before buying, which of course you will. You can also just pay for it which isn’t very expensive either. Finally, if you do purchase it you will have the peace of mind knowing it is backed by a 30-day money back guarantee. Browse ModuleThis is where you start when you open the program. Here you can find all your folders that contain your images. This is where you should start exploring what is possible inside ON1 Photo RAW. You can’t break anything and it is good to see what is available. Hover over all the menu items along the top of the main window. You will see File, Edit, Album, etc., each of those has different options. While you may not use many of them at first, it is always good to know what is there. It will help you understand what is available and if you watch the many ON1 videos you will understand what they are saying and how easy it is to learn. 
In the Browse module. Hover along the top to see what is in each of the menus. 
An image with only basic adjustments made to it using ON1 Photo RAW 2018. The most important thing to do is to find where your photos are located. Then click on Browse and look below. You may have to go searching, but just use the same process that you would if you were looking for them on your computer. Again, it’s simple. Just point Browse to where your photos are located for them to appear. You don’t have to import photos to start working. You can add folders, subfolders, albums and smart albums (collections) so that they are easier to find in the future as well. 
In Browse, you can see all your folders and subfolders. Now it is time to pick a photo. Once you have one selected, double-click on it, press Enter, or you can just go to the side panel on the right, go to Develop, and your image will open there. Watch the short video below on the Browse module. DevelopIn this module, you can start to make changes to your images. This is where you can begin the process of creating the image that you had in your head when you took it. This is also where the first steps in raw processing will occur if you are shooting raw files. Overall SettingsIn Develop you can make many of the most common adjustments. Most images need something, whether that is changing the exposure, or perhaps bringing out the shadows, and you can do it all in the Develop module. If you’re just starting out with editing, the Tone and Color Mode is a good place to begin. From there you can make many adjustments to your image that will help make it look a lot better. 
Overall Settings is where you can make most of the adjustments you will need to do. You should play with all the sliders to see what they each can do. Don’t worry about going too far, nothing is fixed, and you can undo everything. In the photography industry, we call that non-destructive editing. You aren’t doing anything to your image that is permanent. When using the sliders you don’t have to click on the actual pointer, just click anywhere you want and the pointer will catch up to you. You can slide along underneath it as well. 
You will make the changes by using the sliders in the appropriate panels. Go to the ExtremesAnother reason for going too far is that it can help you work out where you need to be with your image. Take the slider to the max, and then you bring it back to where you think it should be. As you do this, you will start to understand what each slider is for and how you can use it. Don’t forget to try it in both directions. 
Take the sliders to the extreme, see how far you can go. Don’t forget to bring them back. Resetting or UndoingIf you want to go back to where you were at the start simply go to the top of the section (where the heading is) for example, Tone and Color. On the right, you will see a half-circle with an arrow. Click on that and everything will be reset. 
Press the icon in the top right of the adjustments window to reset everything you have done. For individual sliders, if you would like to reset just one, double-click on the name of the slider. You can see in this section you can also change the white balance, vibrancy, and saturation. You can add structure to the image, though this should always be applied with caution. Many people think it will help sharpen their image, but if the image is not sharp already structure will not do that. What it does do, is give your sharp lines more definition. 
This is the section where you can change the color aspects of your images, like White Balance. There are a couple of other settings used for portraits. If you are doing photos with people you should try them out and see how they work with your images. Lens CorrectionsMost lenses affect your images and it is in the Lens Correction area of ON1 Photo RAW that you can correct that. Most of the time the software can detect your lens is, but if you use an unusual lens then you may have to add its profile or tell the program which lens was used. You don’t have to do this, but if you are using a wide-angle lens then it can be good to apply this setting. 
Lens Correction is where you can fix the distortion that your lens can cause. DetailsThe Details section is where you can reduce noise in your photos and do some sharpening. Both need to be used with caution. Overdoing it can cause unwanted halos and give your images a weird harsh texture. As with the other sections, you should play around with all the sliders to see what they each do. Some will seem to make a difference, while others will look like they’ve done nothing. To really see what they do try enlarging the image to 100 or 200 percent. Some of them only work on individual pixels. 
Details is the area where you can sharpen your image and reduce the noise in it. Along the top of Details, you can see a default, low, high, and other options. These are like presets that you can use, or you can set your own and save it. 
Using Detail to help reduce noise and sharpen the image. Show MoreUnder Overall Settings, you will see a button that says Show More, click it. More adjustments will then be shown. If you select one a new window will appear under the others. Scroll down so you can make the necessary changes. Like many of the other settings try them all to see what you can do. 
Under Overall Settings, you will see Show More. You will be given more options for adjustments to your image. Local AdjustmentsIf you would like to make adjustments to particular areas of your image only, then this is the place for you to do so. Local Adjustments allows you to target parts of your images as opposed to global edits that apply to the entire image. 
Local Adjustments is next to the Overall Settings tab. If you decide that you want to make a certain part of the image darker or lighter (or add vibrance or detail) then choose Add Layer and a brush will come up. The brush has feathering which you can change to suit your image. The solid circle in the middle is how big the solid part will be and the dotted line around the outside is how far the feathering will go. To change that you can do it along the top, click on Feather, and move left or right to change the size. 
The brush comes with feathering and it is good to know how to adjust it. 
Along the top is where you change the brush settings. Choose a setting that will make a big a difference for your image, like lighten or darken. Brush it over the area you want to change, this is how to make your selection. This is a good way to figure out and select the area that you want to edit or adjust. 
In Local Adjustments, you can make the selection of the part of the image you want to work on. Once you have the area you want to adjust selected, you can change the settings however you want. Undo the lighten or darken, go to the adjustments in that window and make the changes you really want. You can add as many layers as you want to make lots of changes to different parts of your image. Experiment with this. Have a go at all of them to see how they work. It is a good way to learn what is possible. When you are done testing, you can delete any unwanted layers. Click the cross in the top right corner of each one. Tools in the Develop ModuleOn the left side of the program, there are some tools. Some of them you can use straight away, other tools you can only use within the Local Adjustments tab. Straightening Your ImageOne of the questions that I get asked the most is “Why are all my images crooked?” It is such a common problem and something everyone does. Part of my answer is that it is so common, that most editing software has very easy ways to correct it. ON1 Photo Raw is no different. The first tool in the left-side panel is the Crop Tool. Click on it and then look at the top panel across the image where you will see a small level. Click on that. 
To make your image level you need to click on the crop tool first, and then look for the level icon along the top. Pick a straight line to use in your image, like the horizon, or a tall building. Click on one end of your straight line, then hold and drag down to the other end. Keep the line along the straight edge and then click at the other end. You will see the image straighten, then just press enter to apply and crop it. The image should now be level. 
Click along a straight line to make the image level. Sometimes it can take a few times to do this, so if it doesn’t look level then just undo and repeat. 
The image is now level or straightened. 
Making an image straight and level. ? Removing things from your imageIt is in the section, that you will find the tools you need to remove unwanted items from your images. The Healing Brush, the Eraser, and the Clone Stamp are all here. Again, you should play around with them to see how they each work and the effect they will have. 
The tools you will use to remove unwanted things in your images. Use Ctrl/Cmd+Z to undo what you have done. The first two options, Erase and Heal are like brushes so you can apply them to the items you want to remove. The third one is called Fix, but you need to take a sample of the image to copy over the unwanted thing. You can do this by looking for an area that can be copied and then apply Fix to that area. Once you have selected the area press Alt or Option and a circle with a cross will appear, click on that area. Now you can release the Alt or Option key and then click on what you want to get rid of. 
Using those tools to remove a duck from this image. It might take a few attempts, so don’t be discouraged. Just make sure that what you are replacing the area with something that will match. PresetsThere are a number of presets that you can apply to your image. These are great when you first start as they can really show you what is possible with the program. You can add a preset, but each time you add a new one it will cancel out the previous one. If you want to stack presets on top of each other, simply right-click on the preset thumbnail preview, and choose Insert Preset. On the right-side, you will see a number of new windows appear with all the adjustments that were made to help get that effect. If you study them you will start to understand how ON1 Photo RAW works and what you can apply to your own images. 
ON1 Photo RAW comes with a series of presets. As all the adjustments are there from the preset, you can also make your own changes to fine-tune the preset to your liking You might find parts of it are not exactly how you would like them. 
The preset Firenza was added to this image. When you go to Develop you can see all the presets on the left. Click on the different folders and quite a few of them will come up. You can see them applied to your image in small preview versions. 
There are many different presets that you can use. You can see a small version (thumbnail) of each as a preview of how it will look applied to your image. However, if you would like to see them a lot bigger then all you need to do is click the square in the top right corner of the window with the presets. It has four small squares inside a larger one. 
Click on the four dots in the upper left corner to get bigger previews of the presets. This will give a grid view and you can see how each one will look applied to your image. This is a much easier way to plan and choose which one to use. 
The larger previews. If you would like to see even bigger versions then simply click Ctrl or Cmd and the plus key. You can really see how the preset will look on your image. To exit, press Escape or the arrow in the top left corner. 
Applying the preset to your image. Moving on to EffectsOne of the first things you will notice in the Effects Module is that there are more tools available. There are brushes and gradients that have masks attached to them. The mask will make it easier to make changes and corrections later on if you decide you don’t like them. Masks are good to use, but you do need to get used to them. It takes a bit of practice. 
When you go to the Effects Mode you get a lot more tools to start using. Many come with masks. Presets and FiltersOver where the presets were in the Develop mode, you will now find a series of Filters that can be applied to your image. As you did with the previous module, you can click on one, then the four preview thumbnails of the filters for that set on your image. 
In Effects, you also get to use special filters to apply to your images. You can also select the filters on the right under Overall Settings. If you know which one you want to choose then you can just select it there. When you do make the selection you will see that a new window will open up. In there you can adjust the filter as you want it. You can change the opacity, along with other settings that are used to make the filter. You don’t have to accept everything the filter gives you, feel free to tweak the options to your liking. 
Click on the four dots again to get larger previews. 
Over on the right under Overall Settings and Local Adjustments, there is a button called Add Filter, click it to see a list of the ones available. Once again, you should try them all and see how they work. Try adding several filters to the same image. If you don’t like it you can press Ctrl/Cmd+Z to remove it. Otherwise, click the cross in the top right corner. 
For each filter there are windows where you can make adjustments to the filters you have applied. Working with LayersLayers can be scary, but once you know what they are and how to use them you will see a lot more opportunities open up for your image. 
The Layers Module has a lot more tools and adjustments you can use. Plus it also gives you the added bonus of being able to apply other images and work with layers. You can change the sky if you aren’t happy with what is there in your shot. ON1 makes this very easy with the masking brush. You can make it so that you only mask particular colors, for example, so you can remove just that one and show the image that is below. To replace your sky or to add textures you have to be able to work with layers and learn about blending them. It can be very hard to grasp at the beginning, but if you keep experimenting you will figure it out. 
Here you can see the effect of several textures added and blended to completely change the look of the image. Resizing ImagesThis is where you can resize your images depending on what you are going to do with them. For most of us, that is probably going to mean doing images for Social Media. However, there are a lot of other options available so you can prepare your images for printing or whatever you need. If you want big prints, Resize uses Genuine Fractals® technology to enlarge your images. 
Resize is where you can get your image ready for social media or printing. The ON1 RAW CommunityIf you really want to go to this level then consider watching the many videos available on their YouTube channel or on their website under product training. ON1 also has a great community (called ON1 Plus Pro, which is $149 annually, regular price) and always includes the latest edition of ON1 Photo RAW as a perpetual license. Or you can buy the lower priced standard membership, ON1 Plus, for just $49.99 per year without the upgrade to the next version of ON1 Photo RAW. ON1 Photo RAW 2018 is available for $119.99 for new customers and an upgrade price of $99.99 for previous owners. The entire community is always happy to help you learn. The membership also includes different coaches, themes, and topics each month to teach to the Plus community. Some of the names coming to ON1 Plus this year include Matt Kloskowski, Tamara Lackey, Don Komarechka, Colin Smith, Hudson Henry, Colby Brown, James Brandon, Jim Welninski, and Dan Harlacher the Product Director. You will find many videos that take you through the more complicated parts of the program step by step. Dan has a great voice and is a great instructor. They are all really good. Editing Your PhotosWhether you are a beginner or more advanced user, ON1 Photo RAW will have what you need. It isn’t a hard program to learn, especially with all the added support that ON1 offers. If you are a very beginner then it is the perfect place to start and grow into. Disclaimer: ON1 is a dPS advertising partner. The post ON1 Photo RAW 2018 – A Beginner’s Guide appeared first on Digital Photography School. Photography via Digital Photography School https://ift.tt/29wB9CX May 29, 2018 at 09:06AM
http://img.youtube.com/vi/V6RgB7BSaps/0.jpg
Wildlife photography in Yellowstone with Jake Davis and the Panasonic Lumix G9 https://ift.tt/2L4rTTH April in Yellowstone National Park is a unique time. The park, which covers 3500 sq mi / 5600 sq km in the western US, is still quiet before the busy tourist season, and the weather fluctuates wildly from day to day. Wildlife photographer Jake Davis showed us around Yellowstone during this unusual period, capturing the local residents in all kinds of conditions with the weather-sealed Panasonic Lumix G9. This is sponsored content, created with the support of Amazon and Panasonic. What does this mean? Photography News via Articles: Digital Photography Review (dpreview.com) https://ift.tt/i0r8o5 May 29, 2018 at 09:05AM
https://ift.tt/2kxtdD6
1 Tip for Landscape Photography That Opens Up a Whole New World https://ift.tt/2LE1Pji
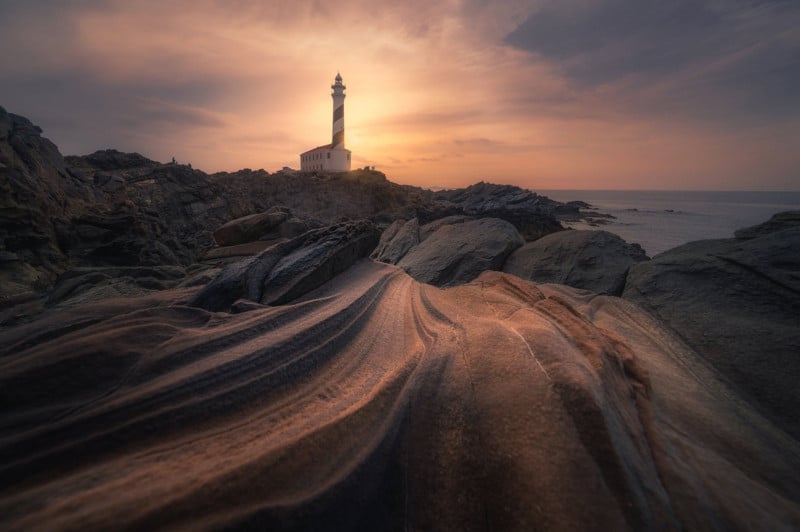
I have only 1 tip that will hopefully inspire you and help you to improve your landscape photography: use a wide angle (preferably 16mm or wider, full frame equivalent) and get extremely close to objects. Get as close as the lens can focus (or even closer). With this technique, you can find foregrounds literally anywhere. Small textures can look huge in a photo. Try to get very low to the ground and look through your camera’s viewfinder or live view to see how the foreground looks in the picture. When you get to a location, look for small details on the ground instead of the “main” subject and view you will focus on. Here’s an example of what you can capture:
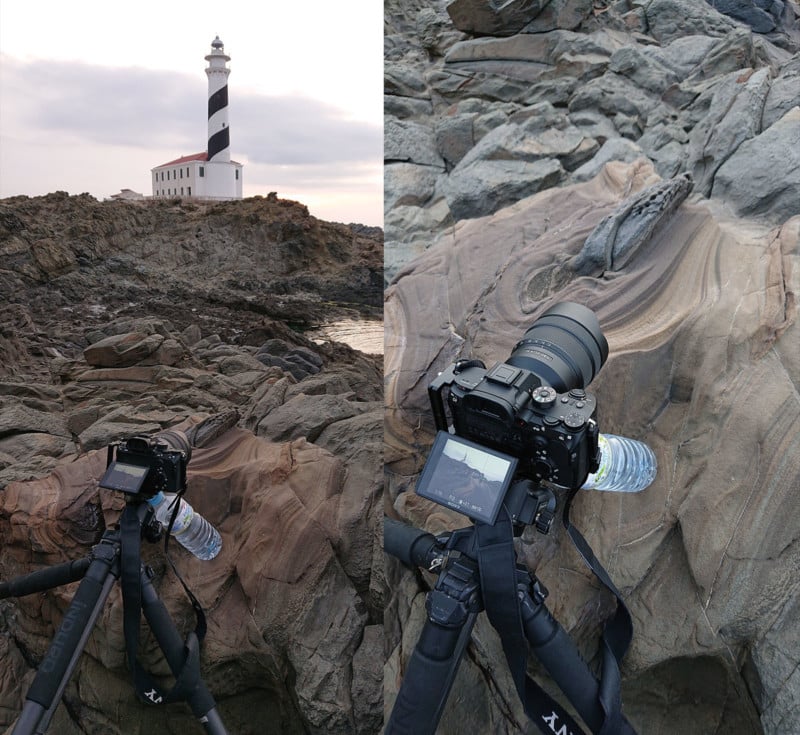
And here’s a behind-the-scenes shot of how the above photo was made:
I found a cool rock texture that I used as a foreground. The wider the focal length, the more intense the foreground effect will be. I guide a lot of workshops and I always find this tip is one of the most helpful ones for the students. About the author: Albert Dros is an award-winning Dutch photographer. His work has been published by some of the world’s biggest media channels, including TIME, The Huffington Post, The Daily Mail, and National Geographic. You can find more of his work on his website, or by following him on Facebook and Instagram. Photography News via PetaPixel https://petapixel.com May 29, 2018 at 08:53AM
https://ift.tt/2kzfEmM
Sit Back, Relax, and Consume The Coolest Photography Links Of The Week https://ift.tt/2H1yOdF We have had another terrific week in the world of photography with tons of new material being created and posted by some of the best photographers and writers working in the field today. This weeks list has a wide variety of topics in it, covering tutorials, special features and as always, great photography. We really hope you find the time to explore and enjoy this list of links as much as the Toad did himself in bringing it to you. TUTORIALS 5 Essentials When Shooting Video With Your Stills Camera – many of us who have focused on still photography are now looking to enter the exciting world of videography. This genre of imagery requires a completely different approach to it, and here we find a great primer that will give you some foundational ideas on how to get started and create compelling videos. 
Giuseppe Milo 20+ gorgeous backlit rainy photos and a tutorial on how to take them – rain can create an incredible ambience that makes photographs look great when shot properly. This in-depth presentation includes a great set of photographs to view, along with a 20-minute video tutorial that takes you through all the key aspects of trying this for yourself. This Fiery Wedding Portrait Was Made with a Single Long Exposure – a love scene framed with incredible flames comes to life in this tutorial that reveals the finished shot, as well as all the great details that went into the making of this shot. A brief video presentation is included here for added interest and sharing how it all came together. 
Rajarshi MITRA How to Create a Soft Light Blurred Background in Photoshop – this article takes you through a series of detailed steps that shows how to create a soft and blurred background to help a subject pop out of the frame. Each step includes screenshots of Photoshop in action, allowing you to follow along as the process unfolds. Learn How to Create Better Subject Separation With Rim Lights – rim lighting is key for studio portraits, helping to create a great looking shot where the subject pops out from the background. This short video tutorial takes us through the process of setting up and adjusting power levels for speedlights, and shows the great results you can expect from this technique. 
AirHaake Add style to your natural light photographs – I love this highly cinematic looking shot that features a model in an architecturally fascinating old church. Each step of the stylization techniques used is discussed along with screenshots to show how the process unfolds, allowing you to see how you can apply these processes to your own pictures. 
john mcsporran How to Create a Great Product Photography Shot Using Speedlights – product photography is a genre all it’s own as we see here in this short video tutorial that takes us through all the steps in creating a great shot. The best part of this presentation is in how the gear used isn’t terribly expensive or complex, and when used properly the results look terrific. SPECIAL FEATURES Faraz Azhar’s Black and White Urban Geometry is a Solitary Study of Shapes – sweeping shapes and lines dominate the photographs shared in this collection of black-and-white shots that feature architectural designs from all over. The application of monochrome to this study allows the designs to breathe in the frame, with some of the photos showcasing a wide view of the overall design while others focus on features and how the light plays with them. 
Theo Crazzolara Elinchrom and Red Bull Team Up for an Amazing Whitewater Photoshoot – the team at Red Bull never cease to amaze me with the great photographs they create that always feature various sports activities in action. This feature shares a trio of shots captured during a whitewater adventure, along with a brief video tutorial that takes us quickly behind the scenes. ‘Ghosts of the Arctic’: A Photographer Hunts for Photos in the Polar Winter – the depths of winter create amazing scenes that sometimes appear to come from another planet. This set of shots features various aspects of life and nature in these remote regions and is accompanied by an amazing 6-minute video presentation as well. GREAT PHOTOGRAPHY Brand New Day – long exposure photography can create stunning results, as we find here in this great oceanscape piece from Ricardo Mateus. The main subject in this shot is an often-photographed bridge in Portugal that creates a perfect natural leading line and vanishing point, with an emphasis on the silky waters from the exposure time and a wonderful sunrise creating color on the horizon. 
Bernard Spragg. NZ Inside the Antiquarium – Jim Nix takes us inside an amazing place in Munich, Germany, revealing architectural features and wonderful artistic details that help to make the space feel very grandiose indeed. Paintings adorn all the facets in this immense space, and the sheer scale reveals the attention to detail that went into creating every inch of this dramatic interior. The Edge of Truth – TJ Drysdale shares a cinematic feeling landscape shot that includes a rugged and rocky shore in low light conditions. The blue hues create a dramatic canvas for the image to work against, and for those who look closely you will see a girl standing on the edge of a cliff looking outward. 
Theo Crazzolara Darkwater – Ehpem takes an expedition to a remote and beautiful part of Canada on the west coast, capturing this black-and-white landscape shot on film. The rich contrasts found in this picture do a great job of showing the natural textures of this rugged location along with the black outlines of tree stalks that inhabit the shoreline. Connetquot River State Park Preserve – an inviting and beautiful scene awaits you in this great shot from Sam that looks out over a wooden pier onto a lake scene full of warm tones. A soft fog lingers over the landscape to add to the ethereal sense of the overall picture. 
Jan Arendtsz Selfie Stick – contrary to the name of this post, here we find a great inside shot of the Texas State Capitol building in Austin from Michael Criswell. Michael uses an extremely wide lens to capture this shot that reveals the great details of this building from the roof to the floor far below, revealing the wonderful features that comprise the building’s design. U Bein bridge (Myanmar) – this is a truly mesmerizing black-and-white shot, one that exemplifies the concept of artistic tension with the people who are walking across a wooden bridge. The wood posts the hold up the bridge are the first thing that captures the eye here, but as you look deeper you will find a story begin to emerge. 
Jay Huang Wrapped in Clouds – Barbara Youngleson explores the beautiful coastline of New Zealand in this shot that looks over the waters towards islands and mountains covered in trees. The muted colors in this picture do a great job of expressing the raw drama found in this part of the world. 
Pedro Szekely La Madeleine – right in the heart of France, we find this amazing architectural design that Manjik photography then processes using predominantly blue tones to highlight the inherent drama of the sweeping space and its fine details. The repeating patterns and shapes found here create a bit of an abstract looking shot, but the real delight is found in the old architecture of this place. Heart’s Afire – this is a great and apt title for this breathtaking shot captured deep in the Antelope Canyons in Arizona. Edith Levy’s shot captures the essence of this location, using the natural rock formations to bounce light and color throughout, creating natural abstracts that are a delight for everyone who appreciates this type of picture. 
driver Photographer Road – Luis Valadares captures this photograph from an extremely low perspective, just inches off the road surface, creating a perfect leading line and vanishing point as you follow the dotted lines of the roadway through to the end. Dramatic trees line the ribbon of asphalt here, creating a perfect frame for the overall composition. Lonely Beetle – the remnants of what once was a VW Beetle now sit in the rubble of a building long forgotten in this compelling and dramatic shot from Urban Vagabond. The skeleton of this once active car create a dramatic subject to see amidst all the decay and patina of this brick garage, and it certainly won’t be anytime soon that this car hits the open road once again. 
Pedro Szekely Reflections in Blue – gentle purples and blues come to life in this serene shot of a swan swimming in still waters in this gorgeous shot from Roeselien Raimond. A soft and nearly still reflection mirrors the picture, finishing it off perfectly. Encounter at Low Tide – racoons are one of those creatures that can really appear to be very cute from afar, but they certainly aren’t something to trifle with up close and personal. Laurie MacBride shares a great shot of one as it scours the shore for a meal looking rather upset at being interrupted in the midst of dinner. 
Giuseppe Milo room with a view – a stark and cold landscape greets you in this great shot from Jens Klettenheimer captured on the edge of the world in Norway. Little red houses dot the shores in this winter image, creating dashes of color that help to draw you into the frame and also provide context and scale. Sun Nap – there is something inherently interesting and satisfying about pictures captured on film, the grain creates a very unique look that adds some subtle texture in a way that is nostalgic and quite pleasing. This shot from Mark Garbowski is a great example of this, featuring a seaside scene with a bench in the foreground playing host to someone who is lying on it taking in the day’s ambience. Hourglass – incredible natural lines and shapes take hold in this mesmerizing shot from Danilo Faria taken in the world-famous canyons of Utah and Arizona in the United States. As the eye follows the leading lines carved into the canyon walls after untold years of erosion you will find a splash of terrific orange color as natural light streams in from an opening above. 
mike goehler I tried to catch some fog . . . – a small island outcropping poses in the foreground of this shot from Vancouver Island’s own ƊƦคƓ๏ƝŦlץƊгєคɱʂ88, revealing silhouettes of trees as far in the background we see a forest emerging in the thin mist. This shot reveals a glimpse of the nature of life on the west coast of Canada just perfectly, drawing you in with our own form of serenity that can only be found in nature itself. what now! – wonderful spirit and personality are captured in this frame from Mark Bridger that features an owl perched atop a tree stump looking back directly at the camera. There is something truly special in these birds and how they interact with their environment, and this shot does a perfect job of capturing that essence. Yaquina Head Lighthouse – Newport, Oregon – blue skies and dancing grasses frame a wonderful lighthouse found on the coast of Oregon in the United States in this shot from Len Saltiel. This structure stands over 90 feet tall, warning sea-going travellers about the dangers of the coast, and it also provides a terrific subject to capture in photography. The post Sit Back, Relax, and Consume The Coolest Photography Links Of The Week appeared first on Light Stalking. Photography News via Light Stalking https://ift.tt/2kwTW5i May 29, 2018 at 08:00AM
https://ift.tt/2IV6zyZ
 We’re told that the next Cinema EOS camera body will be the EOS C300 Mark III, and that we will not be seeing a direct replacement to the C100 Mark II. The new camera body will apparently see a bump in resolution, but specs beyond that are hard to come by as always. This source suggests that the new cinema camera won’t be announced until after Photokina. Photography via Canon Rumors https://ift.tt/xgIh23 May 29, 2018 at 07:55AM
https://ift.tt/2slThVj
Ep. 282: You Use It Today, but by Another Name – and more https://ift.tt/2IUwffj
Episode 282 of the PetaPixel Photography Podcast. Featured: Photographer and educator, Karl Taylor In This EpisodeIf you subscribe to the PetaPixel Photography Podcast in iTunes, please take a moment to rate and review us and help us move up in the rankings so others interested in photography may find us. Show Opener: Sponsors: Stories: Pricing and availability for Sigma’s “Bokeh Master”. (#) The Northrups hold a company’s feet to the fire and makes them pay. (#) The Leica M7 gets the axe. (#) This might be the perfect jacket for photographers…or not. (#) Drone owners in the US may have to make a significant change. (#) My other podcast with Brian Matiash, the No Name Photo Show. Connect With UsThank you for listening to the PetaPixel Photography Podcast! Connect with me, Sharky James on Twitter, Instagram and Facebook (all @LensShark) as we build this community. We’d love to answer your question on the show. Leave us an audio question through our voicemail widget, comment below or via social media. But audio questions are awesome! You can also cut a show opener for us to play on the show! As an example: “Hi, this is Matt Smith with Double Heart Photography in Chicago, Illinois, and you’re listening to the PetaPixel Photography Podcast with Sharky James!” Photography News via PetaPixel https://petapixel.com May 29, 2018 at 06:57AM |
Categories
All
Archives
November 2020
|


 RSS Feed
