
Canon USA restocks refurbished RF lenses including the RF 50mm f/1.2L USM and RF 28-70 f/2L USM11/5/2020
https://ift.tt/3oYQYE9
Canon has restocked some popular RF mount lenses at the Canon USA store. These lenses come with a full 1-year warranty from Canon USA. Photography via Canon Rumors https://ift.tt/2v4dYqS November 5, 2020 at 05:44PM
0 Comments
https://ift.tt/3mSCDHu
Canon has released new firmware for the Canon EF 100-400mm f/4.5-5.6L IS II USM which fixes an issue with the IS jumping. Firmware Version 1.0.7 Read more... Photography via Canon Rumors https://ift.tt/2v4dYqS November 5, 2020 at 10:45AM
https://ift.tt/3oVOg2p
SHENZHEN, China, Nov. 4, 2020 /PRNewswire/ — Today, DJI, the global leader in civilian drones and creative camera technology, launched DJI Mini 2, a high-performance camera drone that packs impressive new features into a small, portable design in the safest drone category weighing less than 249 grams. The successor to DJI’s original Mavic Mini, DJI Mini 2 is easy to fly, with improved imaging capabilities, powerful flight performance, and significantly enhanced transmission technology for longer and more reliable connection. Intelligent, pre-programmed modes have been optimized so that you can capture eye-catching footage with just a few taps while beginner tutorials and learning tools help get new pilots up to speed on how to fly this fun new drone. Supported with a wide array of fun, safe, and creative accessories, DJI Mini 2 users can make the system their own with personalized items or show it off with the illuminated display case. Learn more about the DJI Mavic Mini 2
“Mavic Mini was a monumental breakthrough for DJI and for drone pilots across the world, as its unprecedented combination of weight, safety, performance, and overall value became the entry point for countless new drone pilots and fans,” said DJI President, Roger Luo. “DJI Mini 2 enhances those key aspects, packing larger drone performance in an approachable, small design in the safest drone category that is perfect for beginners and will also impress more experienced pilots.” Mini Design, Impressive ResultsJust like the original Mavic Mini, DJI Mini 2 features the iconic folding design that makes traveling with a drone incredibly easy. The lightweight system adds minimal weight to your bag and can easily be brought with you in case the opportunity to fly arises. Small yet mighty, DJI Mini 2 has impressive upgrades to vital flight performance features compared to the original version. OcuSync 2.0 transmission technology has now been incorporated. OcuSync 2.0 is DJI’s world-renowned transmission technology responsible for ensuring stable, long distance, and reliable connection between the remote controller and the drone. Dual-frequency technology[1] automatically switches between channels to help against interference. DJI Mini 2 has a maximum transmission range of 10[2] km[3], which is a 150% increase in transmission range when compared to the original Mavic Mini. Upgraded motors provide 31 minutes of flight time, faster acceleration and speed, along with the ability to withstand winds up to 24mph. Surprisingly Easy to Fly, Reassuringly SafeDJI Mini 2 was made to be fun to fly, simple to operate, and safe for everyday use, whether that is daily life or an exciting adventure. A live feed from the drone’s camera is sent to your mobile phone so that you can see exactly where Mini 2 is and what it sees. Simplified buttons and functions keep things streamlined and easy to understand compared to more advanced drones. Like all DJI drones, high-grade positioning and vision sensors help Mini 2 hover precisely in place. GPS keeps track of where the drone is while the vision sensors on the bottom map out the ground below it and assist automated landing. DJI drones are renowned for their safety features so that both new and experienced pilots can enjoy the flying experience. Some of these features include GEO fencing, which keeps drones out of sensitive areas like airports, Return to Home, a feature that can be activated so the drone returns to the pilot, and Altitude Lock, an adjustable limit on how high the drone can go. Together, these modes and features make DJI Mini 2 not only a thrill to fly but safe for all skill levels. Learn more about the DJI Mavic Mini 2 Vivid Photos, Steady Video Footage All At Your Finger TipsCapture those moments in detail with the help of the 1/2.3-inch sensor capable of recording 12-megapixel images and a maximum video resolution of 4K/30fps @100 Mbps. Additionally, images can be saved in standard JPEG as well as RAW for advanced users who want to edit footage further. Shake-free, smooth footage is possible because of the class-leading 3-axis gimbal, which compensates for drone movement, wind, and more. While recording in 1080p resolution, pilots can get closer to their subject without actually having to move the drone thanks to the 4X Zoom (2X lossless in quality) option. Pre-programmed intelligent modes mean the drone does the hard work of capturing beautiful footage with set movements and imaging features. Make your content stand out with just a tap thanks to these pre-set modes including: – QuickShots: Pre-programmed movements and image capture modes.
– Image modes: Different photo modes for different scenarios.
Easy To Create, Easier To Share With The WorldSharing is caring, and the DJI Fly app and DJI Mini 2 have a ton of enhancements that make sharing immediately on social media easy and intuitive. Now, your cell phone can connect directly to the drone without the remote controller, and after capturing that shareable footage, download images at a high-speed rate of 20 MB/s once landed safely. Once the images are downloaded to your phone, apply your own edits with the dedicated editing tools in the DJI Fly app or use the new Enhanced Photo option, which applies edits automatically to make it pop. Video footage can take up a lot of space so now, pilots can choose to trim it before downloading using Trimmed Download. DJI Mini 2 is not only simple to fly and fun to operate, the footage you record with it can be shared with all your followers in a matter of seconds. Add-Ons To Make DJI Mini 2 Your OwnNew and updated accessories for DJI Mini 2 help get the most out of its size. These accessories include:
DJI Care RefreshDJI Care Refresh is now available for DJI Mini 2. For an additional charge, DJI Care Refresh offers comprehensive coverage as well as up to two replacement units within one year. The 2-year plan provides 3 replacement units in 2 years and extends the original warranty period by one more year[4]. Receive your replacement even sooner with DJI Care Refresh Express. DJI Care Refresh also includes VIP after-sales support, and free two-way shipping. For a full list of details, please visit https://www.dji.com/service/djicare-refresh. Price and AvailabilityDJI Mini 2 is available for purchase today from store.dji.com and from authorized retail partners. DJI Mini can be purchased in two options. The standard package includes DJI Mini 2, remote controller and one battery for the retail price of $449. The Fly More Combo is also available, which includes three batteries, charging hub, DJI Mini 2, a carrying case and remote controller for the retail price of $599. Additional info here: https://store.dji.com/product/mini-2 Photography via Canon Rumors https://ift.tt/2v4dYqS November 5, 2020 at 08:39AM
https://ift.tt/3mSHoAU
Canon has released new firmware for the Canon EF 400mm f/4 DO IS II USM, which fixes an issue with the IS jumping. Firmware Version Read more... Photography via Canon Rumors https://ift.tt/2v4dYqS November 5, 2020 at 08:30AM
https://ift.tt/3p0lKws
Last week I wrote an introduction to the new Color Grading panel, and this week I wanted to follow up with a deeper look. Applying Your Own Color GradeFor the most control over all aspects of the tint you want to apply I recommend zooming into viewing just the one color wheel you want to adjust (you can only see one color wheel at a time on mobile). I’ve reset the settings on the photo of my sweet dog, and applied the Adobe Neutral profile to make it as flat as possible. I’ve also tried to neutralize the white balance too. Starting from this flat and neutral place, let’s go through the process of color grading the image to along with the fall colors in the photo itself, and give it more life. Color grading is much more about creative looks and styles, and as such, it can be very subjective. I’ll use settings that are stronger than what I might normally choose to make it easier to see, but just keep in mind that you can turn down the visibility of a tint by reducing its saturation. After clicking the button for Shadows to enlarge its color wheel, I can also more easily see the Hue and Saturation values when they are applied. If you click the associated disclosure triangle, those fields expand into sliders. On the left side of the panel you’ll see a Color Swatch, which we’ll put to use shortly (note, only Lightroom Classic has this cool feature). 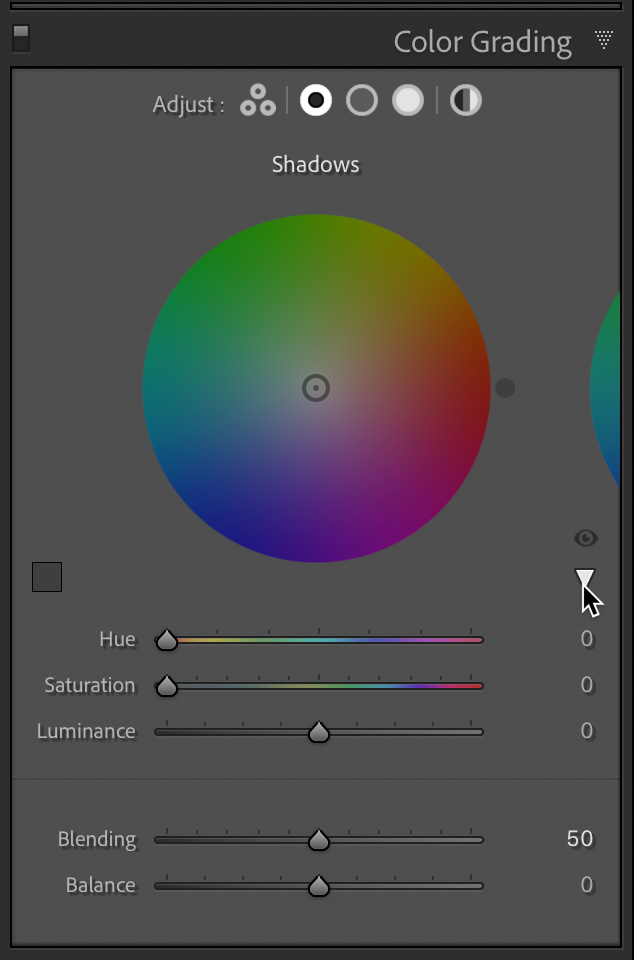
What I’d like to do is use the warm golden color from the leaves in the background as the tint I want to add into the Shadows. Clicking the Color Swatch opens the Color Picker, which contains an eye dropper for sampling color from the photo as well as some saved swatches. To sample a color from the photo, click on the Eye Dropper and hold down the mouse as you drag out onto the photo. As you move the cursor over the photo you’ll see the color wheel change to reflect the hue and saturation of the pixels under the cursor. Release the mouse button when you find a tint that you like. 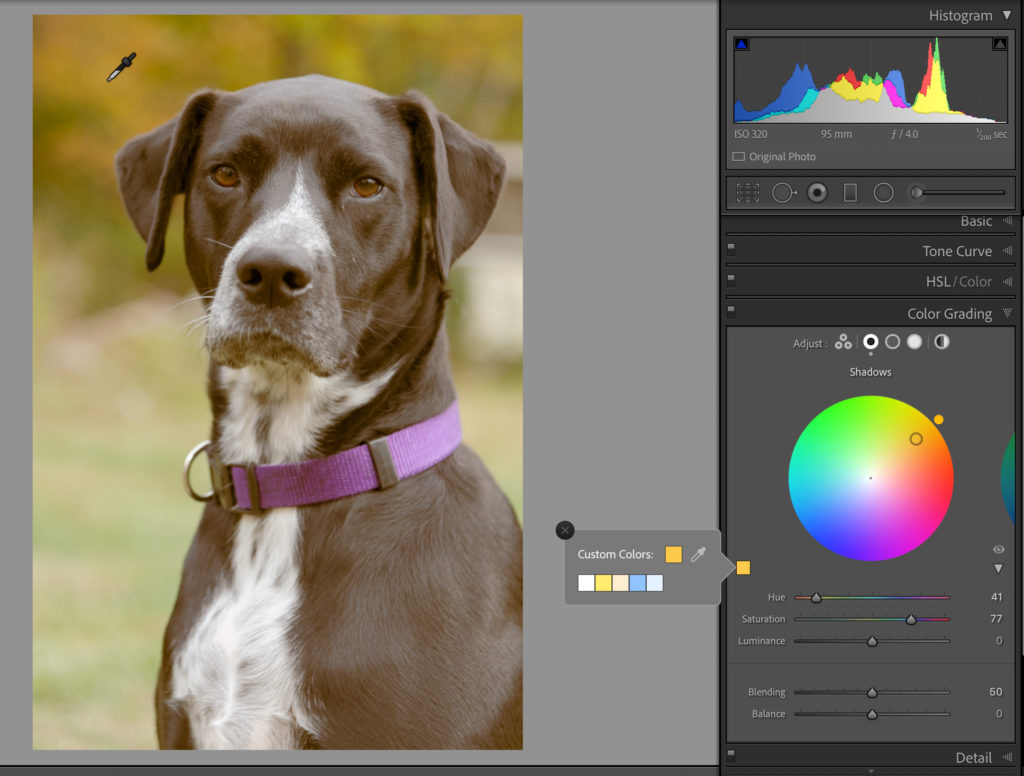
You can then fine tune the hue and saturation with the sliders to dial in just the right amount for your vision. I like to save adjusting the Luminance sliders after I’ve added a tint to each range I want to affect. Notice that when zoomed into one color wheel you’ll see the edge of the next color wheel on either the left or right (or both) sides depending on which color wheel is active. You can click the edge of the other color wheel to switch to the neighboring wheel. The circles at the top of the panel will show a darker center for whichever color wheel is active. Moving on to the Midtones, I decided to pick a complimentary color to the hue I added to the shadows. With these color wheels, the complimentary color is just 180 degrees around the wheel from the selected color. So, if I applied an orange-yellow to the Shadows, then opposite that on the color wheel would be a nice blue. A visual way to achieve this is to right-click the first color wheel with the tint applied (the Shadows in this case) and choose Copy Settings from the contextual menu. Then right-click on the color wheel you want to change (Midtones in this case) and choose Paste Settings from the contextual menu. Now you have the same settings on both, but to choose the complementary color, just move your cursor to the opposite side of the color wheel and click. The Saturation value will remain the same, but the Hue will change to the color where you clicked. 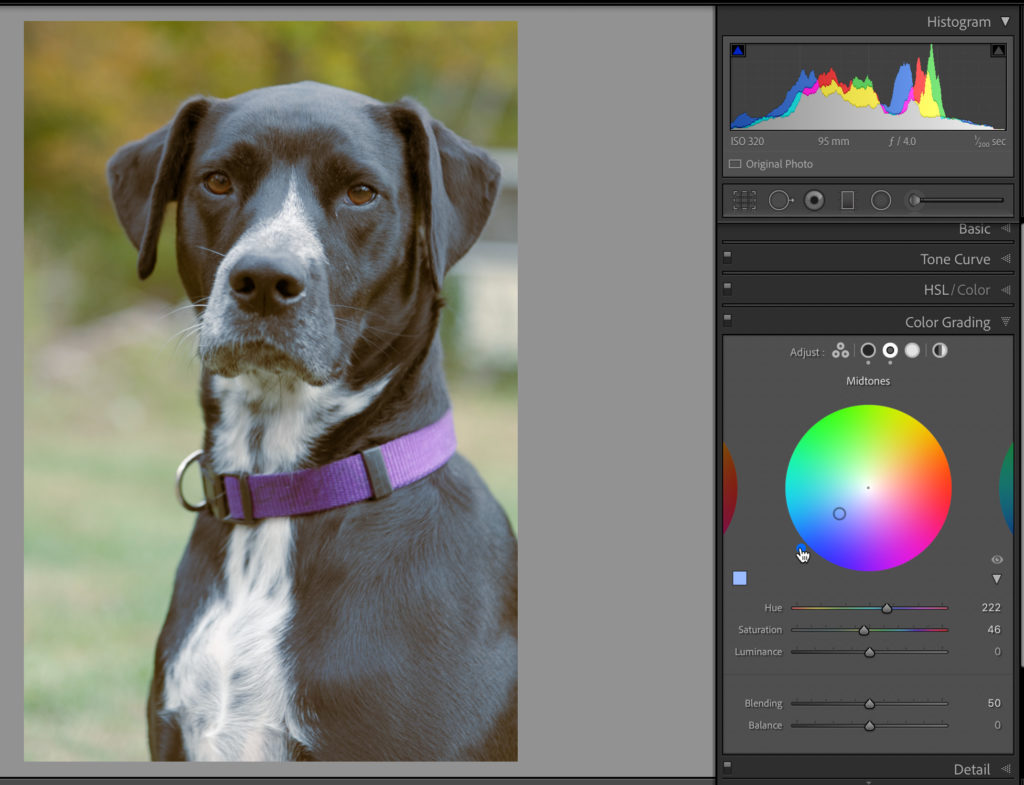
For the Highlights, I used the Color Picker to select a hue from the white fur on her chest, with a really low Saturation value. With a tint for all three tonal ranges selected, I clicked the button with three circles to see all color wheels at once. Now, I can use the eye icon to briefly disable the tint on each color wheel to see how it looks, and fine tune saturation as needed. Clicking the dot that represents the Saturation level within the color wheel locks in the Hue, and allows you to tweak Saturation easily. To lock in Saturation and adjust Hue, hold the CMD key (PC: CTRL), and click and drag to tweak Hue. Once I’m happy with those values I’ll move on to adjusting the Luminance slider for each tonal range to dial in the desired look. In this case, I reduced the Luminance of Shadows and Midtones, and brightened up the Highlights. 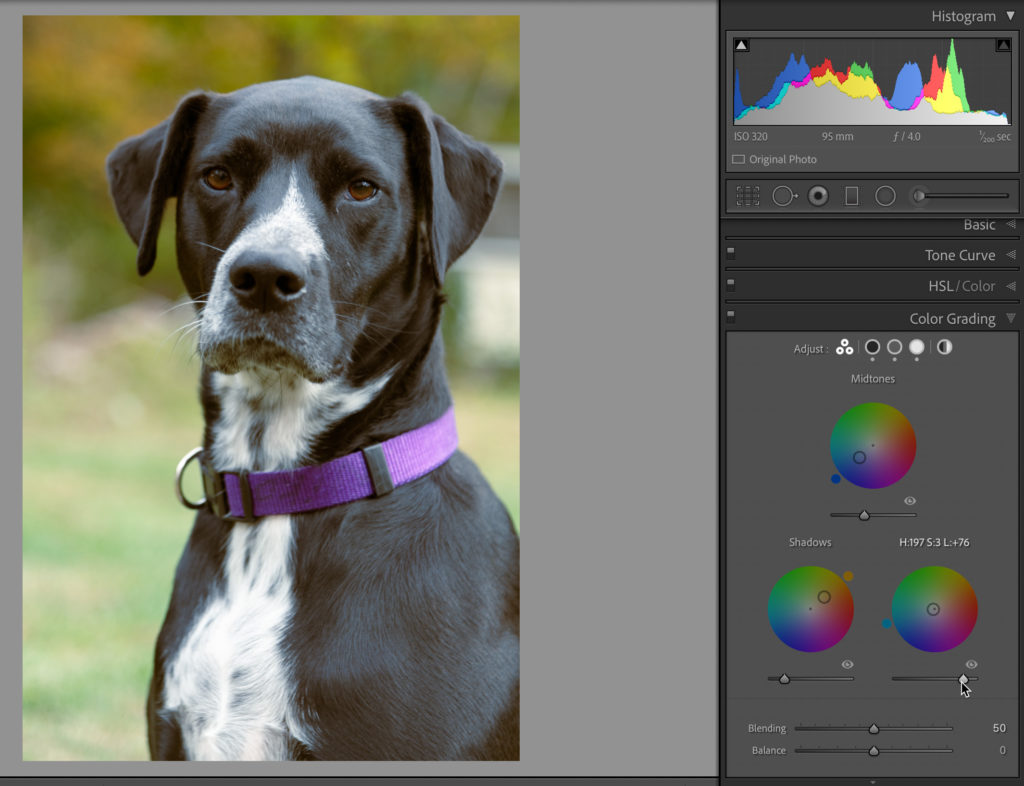
As a final tweak, explore how the Blending and Balance sliders provide fine tuning control over the blending of tint between tonal ranges and how much influence you want to give to one tonal range over the others. Here’s a Before and After view showing the results of the adjustments I made to Blending and Balance. 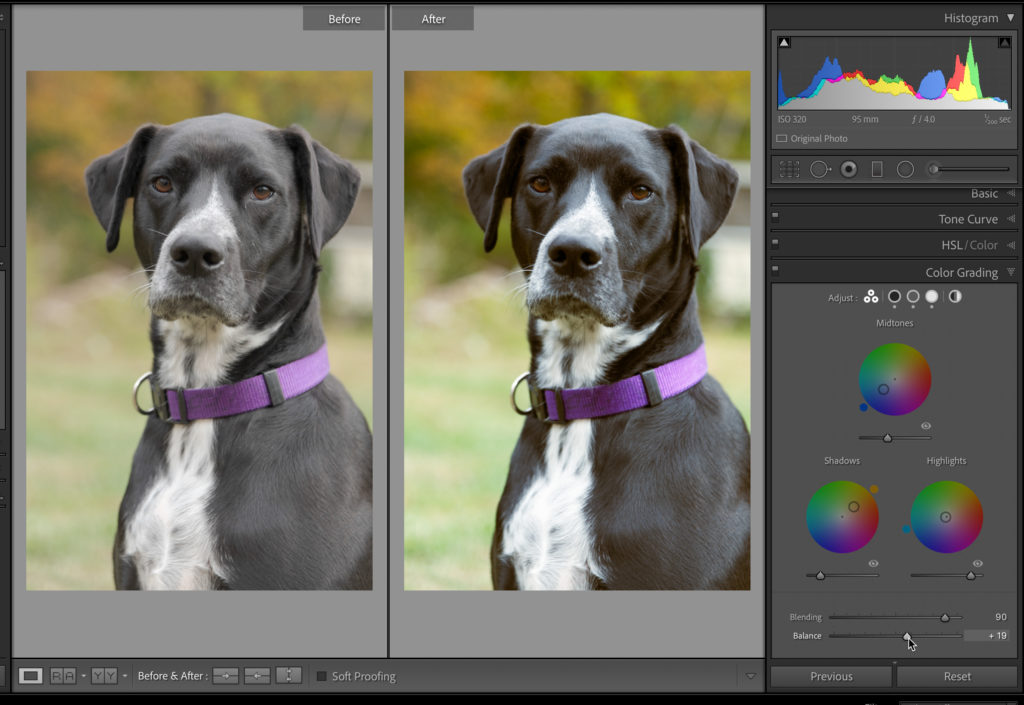
You can take it even further by adding a global tint on top of what you’ve already added to each tonal range, but I did not elect to do that to this photo. The Global color wheel works in the same way as the others, but the effect is, well, global. I’m very excited by how much you can do with just this one panel, and the possibilities are almost endless. Just thinking about ways you can combine the effects produced by this Color Grading panel with Profiles, HSL, and the Tone Curve gets me thrilled to explore and experiment further! Be sure to save settings combinations you discover in your own custom presets as you go. The post Color Grading Continued appeared first on Lightroom Killer Tips. Photography via Lightroom Killer Tips https://ift.tt/2sh0aZ8 November 5, 2020 at 07:50AM
https://ift.tt/2TTfqse
A new Canon Japan patent shows the optical formulas for various RF 50mm f/1.4 designs as well as an RF 35mm f/1.4. This patent deals with increasing focusing speed when using lens designs with large diameter elements. I don’t think any of these optical formulas will become products, so the dream of a new 50mm f/1.4 from Canon probably won’t be coming true any time soon.
Photography via Canon Rumors https://ift.tt/2v4dYqS November 5, 2020 at 07:50AM
https://ift.tt/2TXsblv
The post How to Use Framing in Your Compositions to Improve Your Photography appeared first on Digital Photography School. It was authored by Simon Bond. Photos look great when framed on the wall, but that is not the only way to use frames in photography. The world is full of frames, and they can be used in your photos to make the composition stronger. In this article, you’ll learn how to find frames. You’ll also learn how you can work with frames to enhance your images. So let’s use framing in your compositions! 
What is framing?Framing, as the name suggests, is when you surround your main subject with a border of some kind. The frame could literally be a picture frame you hold up in front of the camera. However, there are lots of other ways you can create frames in your compositions. For instance, you can photograph through a window frame, a doorway, or a gap in a wall. And you can always create your own frame, which you’ll learn about in a moment. Why add a frame?A frame is used in your image to draw the eye to your main subject. The subject could be a model standing in a doorway or architecture framed through a window. Plus, a frame can add to your image. The right frame can add context, which creates a further narrative element. 
Where to find framesHere’s the next question: Where can you find a frame that will work for your photo? I’ve already mentioned a few classic ideas, but let’s look at those (and others!) in more detail below:

How to photograph with a frameOn the face of it, photographing with a frame is easy: Simply compose a photograph in front of something like an arch or window. However, you need to consider some key compositional and technical questions. For instance, what’s the subject in the frame? And how large or small should your frame appear?

Creative framing in your compositionsWhen a frame isn’t available, you have another option: Create your own! This creative approach to framing in your compositions can lead to the best results. That’s because you’ll have more control over the frame itself. You can control the size and shape of the frame. You’ll also be able to precisely match the frame to the image you are trying to create. The following are some possible ideas for more creative framing:

Get framing!Now that you know all about framing in your compositions, it’s time to get out and practice what you’ve learned. Do you enjoy using frames in the photos you take? Is there another approach you use when looking for frames? Have you ever tried creating your own frame so that it matches the photo you’re taking? Share your thoughts in the comments! And if you have photos with frames, please share them, too! The post How to Use Framing in Your Compositions to Improve Your Photography appeared first on Digital Photography School. It was authored by Simon Bond. Photography via Digital Photography School https://ift.tt/29wB9CX November 5, 2020 at 03:12AM
https://ift.tt/36ljWFZ
The November 2020 issue of Photoshop User is now live on the KelbyOne site and KelbyOne Mags for iOS and Android. Welcome to “The Magazine for Lightroom & Photoshop Users!” Starting this issue, we’ve rolled in all the content from Lightroom Magazine to create a bigger and better magazine for KelbyOne members. So whether you use Lightroom, Photoshop, or both, there’s something here for you! Plus, we take a look at all the latest updates announced at Adobe MAX, we offer tips for moving files back-and-forth between Lightroom and Photoshop, we discuss when it’s best to use Lightroom vs. Photoshop, we take a deep dive into the new Color Grading panel in Lightroom, we explore using the new live shapes and Triangle tool in Photoshop, and so much more! You’ll also find a brand-new column on “Going Mobile” by Bryan O’Neil Hughes! 
Cover image by KelbyOne member Dan Brannon KelbyOne Pro & Plus members have access to more than 85 back issues of Photoshop User magazine all the way back to January 2012, plus all 64 issues of Lightroom Magazine. Not a Pro or Plus member yet? Click here for more information. The post The November 2020 Issue of Photoshop User Is Now Available! appeared first on Lightroom Killer Tips. Photography via Lightroom Killer Tips https://ift.tt/2sh0aZ8 November 5, 2020 at 02:24AM
https://ift.tt/3jYTPt8
Los Angeles, California, November 4, 2020 – Tokina has today expanded its range of class-leading superfast aperture cinema prime lenses with the introduction of the new Tokina Cinema Vista 40mm T1.5. The much-requested 40mm focal length is considered by many to be the perfect ‘normal’ lens to portray a natural field of view on a large format cinema camera – and joins the existing seven-strong set of 18mm T1.5, 25mm T1.5, 35mm T1.5, 50mm T1.5, 85mm T1.5, 105mm T1.5, and 135mm T1.5 high resolution (8K+) Vista prime lenses. The mid-wide image created by the Vista 40mm T1.5 does not distract the viewer and offers a unique perspective when compared to the staple 35mm and 50mm focal length lenses. 
Tokina Cinema Vista lenses have become an increasingly popular choice for productions, earning a reputation for elegant and highly detailed images. Lens distortion and chromatic aberration are well-controlled, with minimal focus breathing, soft pleasing flare, and gentle roll-off from subject to background. The Vista 40mm T1.5 inherits these characteristics, giving cinematographers more creative freedom to choose their point of view while maintaining complete control of their image. Having tried the lens, cinematographer Phil Holland said:
The Vista 40mm T1.5 has an area of definition of 46.7mm which easily covers RED Monstro 8K VV and ARRI Alexa LF Mini 4.5K Open Gate formats. The lens also has an area of illumination that will cover larger formats up to Alexa65 2:1 Open Gate. The lens retains the same form factor as other Vista Prime lenses with a 114mm front diameter and weight of approximately 2.25kg (5 lbs) which is similar to others in the series. It is available in interchangeable ARRI PL, EF, MFT, Sony E, and ARRI LPL mounts.
The Tokina Cinema Vista 40mm T1.5 will be available from Tokina Cinema USA at an MSRP of $7,499.00 USD. Photography via Canon Rumors https://ift.tt/2v4dYqS November 4, 2020 at 11:32AM
https://ift.tt/32fdQ8y
Canon has officially announced the Canon RF 50mm f/1.8 STM and the Canon RF 70-200mm f/4L IS USM and both are available for preorder. Shipping Read more... Photography via Canon Rumors https://ift.tt/2v4dYqS November 4, 2020 at 09:38AM |
Categories
All
Archives
November 2020
|

 RSS Feed
