
|
https://ift.tt/2M5IES9
The post Basic Photo Retouching in GIMP appeared first on Digital Photography School. It was authored by Ana Mireles. Do you feel your photos are good but not great? Do you think something is missing in your images? You may just need a little post-production to give your images the punch they need to become eye-catching. Keep reading to learn some basic photo retouching in GIMP – a free software – that will make your photos pop.
GIMP is an image manipulation software you can download for free. If you’re not familiar with it, check my previous article, A Brief Introduction to GIMP. There are many things you can do with it. To start you up, I decided to do a quick overview of the most common adjustments for photo editing. RotateMost times you take a photograph without a tripod, you’re bound to have the horizon line leaning towards one side. You can easily fix this common problem by using the rotation tool. First, you may want to turn on the visibility of the grid. For this go to View -> Show Grid. If you want to make it wider or narrower, go to Image -> Configure Grid.
Now, to straighten the image, click on the rotation button from the toolbox to open the tool’s setting window. Then you can either drag the slider or type the degree of the angle you want. The last two options are there to re-position the rotation center point if you want. You can also do this by dragging the image itself.
CropAfter the rotation or other transforming methods like perspective, some parts of the canvas remain empty, and you need to crop them out. For this, click the Crop tool from the toolbox and drag around the part you want to keep. The part that will be cropped out becomes shaded. To fine-tune the selection click, and drag the edges. When you’re satisfied click on the image to apply the crop.
To keep an eye on the composition while cropping, you can put some guides to use as points of reference. For example, to play with symmetry put a guideline at 50%. Alternatively, put one at 33% and another at 66% if you want to follow the rule of thirds. You can do this by right-clicking the image window to open the main menu. From there, you need to go to Image -> Guides -> New Guide by percent.
LayersFor retouching, it’s always best to work on layers. That way, you can always go back if you don’t like how things are going. First, make sure the layers dock is visible. If it’s not, open it from Windows -> Dockables. From there you can add a new empty layer from the blank page icon. Duplicate the current layer with the symbol of 2 squares, or delete it by dragging it into the paper shredder one.
By the way, if you don’t want to cancel the entire process you’ve done on a layer, you can go to the tab, Undo, and do it step by step. The Undo tab keeps a history dialogue allocated as a dock containing your latest actions. If the dock is not there, you can open it from Windows -> Dockables.
Color AdjustmentsIf your image is not well exposed, you can find the Adjustment tools to fix it in the Color menu. To access it, right-click on the image window and choose Colors. Then choose the tool that best suits the adjustment you need to do. To see these options more in-depth check the article Make your Photos Sparkle with GIMP. For now, I’ll just show you the Levels tool, which I find to be one of the most versatile.
LevelsWith Levels, you can fix the color balance and tonal range of your image. GIMP gives you different choices to modify the Levels from the same window. You can move the sliders, enter the values underneath, use the eyedroppers to set the brightest, darkest and middle tones, and even use the auto-mode. They all make similar changes, but they can be more or less precise. Remember to have the preview box checked so you can see the changes take effect before you apply them.
FiltersYou can also apply a great variety of filters; from correcting ones like sharpening an image, to special ones like coffee stains. You can find all these options in the Main Menu -> Filters. Feel free to experiment with them.
Finally, you can switch to the Multiple Windows Mode (in case you weren’t using it) by going to the menu Windows -> Single Window Mode and uncheck it. Then open the original file and a second window will open with the image so you can compare the side-by-side before and after images.
I hope you learned some useful tips to fix or boost your images. If you’re interested in doing some more in-depth work on GIMP Check out the tutorials: Have you used GIMP? What are your thoughts? Do you have any other tips to share in the comments? We’d love to hear from you.
The post Basic Photo Retouching in GIMP appeared first on Digital Photography School. It was authored by Ana Mireles. Photography via Digital Photography School https://ift.tt/29wB9CX July 24, 2019 at 05:14AM
0 Comments
https://ift.tt/2SxyPxk
Happy summer to all fellow northern hemisphere inhabitants. I hope you are finding fun ways to beat the heat and enjoy whatever summer has in store for you. I was grateful to get to spend some time in a lake up in Maine last week with friends and family, and editing some of the photos from that trip inspired this week’s Lightroom killer tip. I brought my little waterproof point and shoot camera along to the lake, and it was great fun treading water while snapping photos of the kids and dogs playing. The only downside was the my horizon line was even more off than usual, which I guess can be somewhat forgivable under the circumstances. 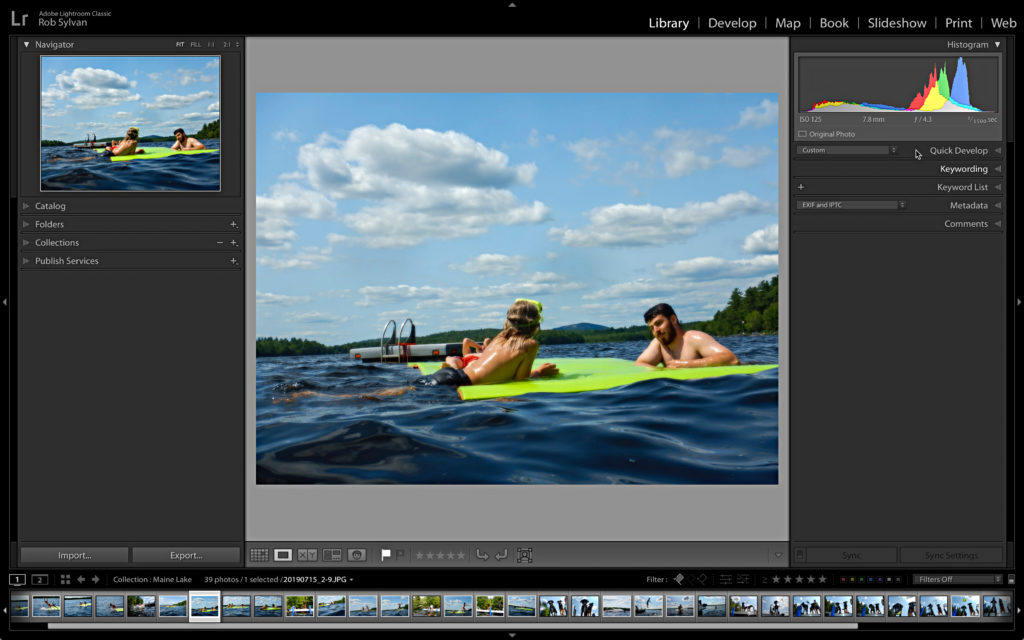
Lightroom Classic has a few ways to correct crooked photos, but I remembered I had made a preset for just this task awhile ago, so I thought I’d see how it worked in this situation. I selected all of the thumbnails in Grid view of the Library module (didn’t worry if I included some that were reasonably straight), expanded the Quick Develop panel, and selected my preset from the Saved Preset drop-down menu. 
It wasn’t perfect, but it was fast, and for this batch of fun family photos it was good enough. 
For the few that needed a little more help, I just selected them, pressed the R key to jump to the Crop tool, and manually nudged them to a better place. Here’s HowIt isn’t possible to save a crop or the Auto straighten function in the Crop tool as a preset, but it is possible to use the Level function (part of Upright) in the Transform panel and save that as a preset. Here’s how to create one of your own: Step One: Select a photo that needs to be leveled and go to Develop. Step Two: Expand the Transform panel and click the Level button. Step Three: Click the + sign on the Presets panel and choose Create Preset (or Develop > New Preset) to open the New Develop Preset dialog. Step Four: Click Check None to clear it, and then check just the box for Upright Mode under Transform. Choosing Upright Mode ensures a photo specific level function is applied to each photo. 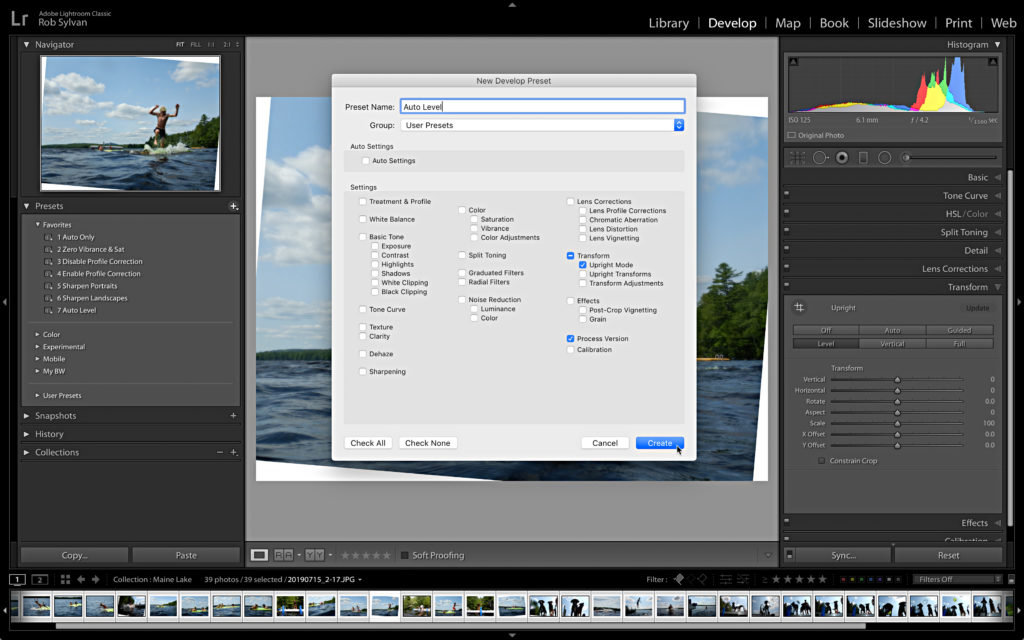
Step Five: Give the preset a meaningful name and add it to a preset group to keep your panel tidy. Now you might be wondering about adding in the Constrain Crop check box, but in my experience that option doesn’t seem to be included in the preset. It may be a bug. So, if the correction on your photo needs cropping, you’ll need to do that manually by checking that Constrain Crop box (in either the Transform panel or in the Crop tool). Final caveat, this doesn’t always work as well as you’d hope, so be sure to go through all the photos and fix any that were made worse by the auto level function. It isn’t something I use often, but I find it handy when I need it. Enjoy! The post Fun Auto Straightening Tip appeared first on Lightroom Killer Tips. Photography via Lightroom Killer Tips https://ift.tt/2sh0aZ8 July 24, 2019 at 03:04AM
https://ift.tt/32ON2ef
 Lensrentals.com continues to release new MTF charts for various prime and zoom lenses. This time, they test 70-200mm f/4 lenses from Canon, Nikon and Sony. The Canon EF 70-200mm f/4L IS II USM does extremely well. From Roger:
Buy the Canon EF 70-200mm f/4L IS II | Rent the Canon EF 70-200mm f/4L IS II Photography via Canon Rumors https://ift.tt/2v4dYqS July 23, 2019 at 03:53PM
https://ift.tt/32ISfnD
 Skylum will be releasing version 4 of their hugely popular Luminar software in the fall of 2019, preorders for the new version have gone live today. There are two ways to preorder Luminar 4: Press Release: Utilizing the proprietary technology based on machine learning, Luminar 4 will be the first photo editor to have a fully automated Sky Replacement tool to save the artists hours of editing. BELLEVUE, WA – July 23, 2019 — Today, Skylum announces the upcoming release of Luminar 4, set to ship this fall. Skylum continues to push innovations forward through machine learning tools. In addition to the new AI Sky Replacement tool, Luminar users can expect to see more machine learning present in Luminar 4. With its easy-to-use interface and sensible workflows, Luminar 4 is a great choice for creatives looking to move their photography forward.
“With Luminar 4 we continue to empower everyone who loves photography to make incredible images faster and easier,” said Alex Tsepko, CEO of Skylum. “No one needs a “simply another photo editor” these days. That’s why with every Luminar update we bring photographers something truly meaningful, something that will really level up their creative skills. In Luminar 2018, Skylum introduced the AI Sky Enhancer filter, helping to add depth and color back into flat or blown-out skies. Earlier this year, Skylum added the Accent AI 2.0 filter to Luminar 3, a powerful content-aware filter powered by machine learning to automatically enhance images. Now, with Luminar 4, AI Sky Replacement offers the first automatic tool for replacing skies. Machine learning tools like these are the foundation of the Luminar platform, helping to save photographers hours of manual labor so they can achieve their creative dreams. Why AI Sky Replacement? While the development of AI Sky Replacement has been equally challenging, Skylum’s machine learning technology means that photographers can apply a realistic sky to their photograph in mere seconds, freeing up time to be more creative. There are two ways to preorder Luminar 4: Photography via Canon Rumors https://ift.tt/2v4dYqS July 23, 2019 at 12:21PM
https://ift.tt/32IaCcB
The post Why You Shouldn’t Delete Your Images Too Quickly appeared first on Digital Photography School. It was authored by Nils Heininger.
There are many reasons why you might want to delete images: They show the same subject, again and again, they are technically inferior, or you simply do not like them. However, don’t hit the delete button right away! Here are some reasons why you shouldn’t delete your images too quicklyIsn’t it hard to stay organized? Since the age of digital photography, it is quite easy to get “just one more shot” of your subject. These few shots quickly add up to hundreds, even thousands. Considering the huge file sizes of modern cameras, that’s a lot of memory. Not only is your hard-drive full of bytes, but you also have to keep an overview – a few stars here, a few flags there and a red label for your beloved ones. It’s often hard to avoid the data mess. 
At first, I rated this image with one star. Recently, I rediscovered it and was happy that I did not delete it Sometimes, I feel like deleting all the images I assume I will not use anymore. Why should I keep images that I don’t sell, show to my friends and family or use in any other way? It’s the same subject, just from another perspective. I have five images from a nicer angle, in a better light and with fewer people in it. Here is my hint: Wait a little while, and stay organized. Don’t delete everything in the first place. There are some reasons why you might want to keep your images. 
A picture I rejected because it was a byproduct of a hike to shoot the Milkyway over a river bend. Your client wants a specific pictureIf you are documenting something, or you do travel photography, you should be careful what you delete. Never get rid of any image before completing the job. You may think the light in the image of person XY was not too nice or the photograph is not perfect, but maybe it tells a story. Your client or editor might ask you, “Is there an image of this person XY, while he looks a bit sad?” or “Is there an image of a person wearing this weird hat, which is so typical for people working in this area?” You may remember that person XY wore that hat. Then you look it up and realize that you deleted the image because you did not find the light appropriate. My friend, you missed a chance to satisfy an editor. Even after delivering a project, it is smart to keep all of your images. You may want to sell some of them to someone else. People could approach you to ask if you have an image of this one shop because they make a follow-up story on yours. We never know what the future brings. Don’t delete what others might ask for. Demands of editors can be unpredictable. 
I shot this image as a byproduct of covering a desert safari in India. It was useless for this topic, but it might be useful for another project about the desert region. Blindness for the beautySometimes, while you are working on a project, you get used to the beauty that you create. You are completely sucked into a breathtaking work environment, and every shot amazes you. Later, you look at your images and search for the best ones (which you should do) but ignore the second-best ones. Make sure you do not delete them. When I was in the Indian Himalayas on a motorbike tour, every mountain peak was worth shooting. The light was appealing, and the blue sky was full of little cottonwool clouds. I shot away hundreds of images during the daytime and edited the best in the evening. I recently looked at the old folders and found some amazing images that I rated with two stars just because the others outshined them. 
This picture almost ended up in the bin. Luckily, I checked the folder after a few years. Maybe you want something specific at one point in time, and you simply cannot see other forms of beauty then. The image may be surrounded by too many other nice ones that distract you at that moment. When you open your old folders a few years later, you may be happy that you kept them all. Don’t delete what you might value later. Did you think about stock?If you worked on commission, you might have a deal that your client takes a bunch of images out of your primary selection. You probably shot far more pictures than needed (you should!). What can you do with the rest? Did you ever think about uploading them on a stock photography platform? You may be able to get a little money from all those images that your client rejected or that you didn’t even send to them because there were better ones of the same subject. 
I chose an image of me sitting under the stars for an article about the desert. This “dismissed” one of me standing on the dune might work well in stock. Always give your clients the best quality and the best compositions. If your contract does not stop you from using the other images, why would you want to waste them? When you make three images of subject A, but just one is good enough for your client, maybe the other two might be good enough for stock. Don’t delete what you might use afterward. An image contains memoriesMaybe the best reason to keep your images is the simplest – for yourself. When I look back at any image, it triggers my memory. These rivers are meeting in the Himalayas. It’s not the best image because it’s too dark, with bad light. Yet, they make me remember the feeling I had when I stopped to take the image. They remind me of the taste of the air, the feeling of empty solitude and the discovery of my dire sunburn where my scarf did not cover my neck. 
Technically, a bad image, yet, the broken bridge reminded me of the struggle to get up this mountain and shoot better images. I laughed out loud when I rediscovered it. Little details in images make you remember big stories. They evoke feelings. You can smell the flowers again, which you see in the frame of that horribly composed landscape-image. You remember the way that tea vendor smiled, even though the image is a little soft or blurry because you had to shoot with one hand while balancing your teacup in the other. Don’t delete what your older self might love to see. 
It is very hard to compose with one hand while reaching for tea with the other. ConclusionYou never know what will happen and how you will look at your images at a later point in time. If you have completely identical pictures, well, hit that Del-Button. If they differ, mark them differently. You can check your old files after a few years and decide what you want to delete for good. Maybe you will find something useful even if it is just for a blog post about why you should not delete images. All the images in this article were once ready for deletion. I resisted, and today, I am happy about it. 
Be careful what you delete. One day, you might regret it. What about you?Did you ever have any regret after deleting images? Do you find pleasure in it? Is there a method, which helps you to avoid deleting the wrong pictures? And when did you last review your old images? I would love to hear your stories in the comments below.
The post Why You Shouldn’t Delete Your Images Too Quickly appeared first on Digital Photography School. It was authored by Nils Heininger. Photography via Digital Photography School https://ift.tt/29wB9CX July 23, 2019 at 07:14AM
https://ift.tt/32JA1T5
The post 5 Tips to Improve your Seascapes appeared first on Digital Photography School. It was authored by Nisha Ramroop.
The term seascape is used to describe a sub-genre of landscape photography, where the subject is (or is composed with) the sea, beach or ocean. Similar to landscape shooting, there is a certain amount of planning that goes into having a good day “at sea”. Here are a few tips to help you on your next salty excursion. 1. Angles and perspectivesSo how do you want to tell your seascape story? There is the obvious option of shooting at sea level. You should include foreground elements to give your scene some depth and interest.
When you shoot from above, you are able to capture coastline shapes to your advantage. These include the shoreline, cliff edges or other rocky outcrops, and the way the land and sea meet. The ocean works well as your foreground or middle ground in the frame. Use the textures around you as well at different angles. Most seascapes are shot at wide angles to capture the entire scene. Waves also make interesting seascape images. You can do this using a telephoto lens or by getting in the water with your camera properly housed in an underwater case. The latter is not as easy because it requires a whole other skill level. 2. Shutter speedSince seascapes are all about water or using the water element in your composition, shutter speed is an important consideration. In regular landscapes, your shutter speed affects mostly your sky, whereas, in seascape photography, you now introduce another major moving element. Thus learning to photograph water, and how shutter speed affects it, will go a long way towards your seascapes. You can freeze those crashing waves in time or shoot longer exposures for an end result of smooth, silky water. It all depends on your desired result.
3. Chasing tidesWhen you go out to shoot landscapes, most likely you check the weather forecast beforehand. For seascapes, it is a good idea to also check the times for high and low tides. The tides may enhance interesting land features at your location. Some areas may work well with both high and low tides, while others may only be accessible during the low. This is a good reason why scouting a location helps with planning your outing. Similarly, shooting the same area at different tidal times can also be an interesting photo project.
Tidal pools also make great foreground subjects, and as a bonus, it can be reflective as well. 4. How wet?Sometimes you need to get your feet wet to fully capture the beauty of the ocean. Other times, you may even get in knee-deep. Saltwater is the natural enemy of electronics though, so keep your gear safe, and more importantly, yourself! It is better to shoot crashing waves from a distance. If you venture close, choose a dry, safe position and have someone help you look out for rogue waves. Wet rocks can be slippery, so be careful walking on them. Keeping your gear dry is also a challenge, especially the front lens from sea spray. Plastic bags or waterproof covers and microfiber cloths come in very handy!
Tripods in the ocean are a tricky thing to maneuver with the ebbs and flows of the waves, but once you get a sound footing, you are all set. If you are shooting on the beach, use tripod feet, or implant the feet a couple of centimeters into the sand to increase stability. When shooting in the sea, wash off your tripod with fresh water as soon as you can. Keep in mind that salt and sand can still get into the leg joints/extenders and affect slide and lock features. Do you get in the water more often than not? Then a good recommendation is to get a cheap, sturdy tripod that is replaceable. If not, you will need to disassemble your tripod to clean it properly. 5. Let’s reflectWhat could be better than an amazing sky? How about its reflection in a large body of water? The magic of reflections is real, and an expanse of the ocean provides a fantastic opportunity to capture it. When you use other foreground elements such as rocks, keep an eye out for pools and puddles formed within them to add some extra interest.
Wet sand and rocks can also be reflective as waves recede or at low tide. All of these elements can come together to create an awesome composition. Wet rocks are yet another reason to go out shooting after it rains. ConclusionSeascapes are definitely worth the effort. The ocean is always changing, and you can get totally different captures at sunrise and sunset or between high and low tides. Seascapes also work during the day when the sun is high and is enhancing those beautiful ocean blues and greens, at varying depths. Plan in advance what you want to capture. What angles are interesting? Can you do something different than what has been done before? When getting your feet wet, do so safely for both you and your gear. But most of all, have fun! Respect the ocean, and you can make amazing images while listening to its soundtrack.
The post 5 Tips to Improve your Seascapes appeared first on Digital Photography School. It was authored by Nisha Ramroop. Photography via Digital Photography School https://ift.tt/29wB9CX July 23, 2019 at 05:20AM
https://ift.tt/2Swtm9Z
It’s named the Color Mixer in Lightroom CC (the Cloud version), and simply the Color Panel in Lightroom Classic, and the video above (from Adobe’s own Michelle Wei & Josh Haftel), shows how to adjust individual colors using the panel. NOTE: Their tutorial is using Lightroom CC (the cloud version), but the HSL / Color Panel works the same way in Lightroom Classic, but the interface looks slightly different (click directly on the word ‘Color’ in HSL / Color). Across of the top of CC’s panel are color swatches in circles; in Classic they’re rectangles. Click on one of those rectangles in Classic and you’ll see the same sliders appear that you see in the video. Thanks Michelle and Josh. Hope you have a better-than-average Tuesday! -Scott The post How to Use Lightroom’s Color Mixer appeared first on Lightroom Killer Tips. Photography via Lightroom Killer Tips https://ift.tt/2sh0aZ8 July 23, 2019 at 03:17AM
https://ift.tt/2JHzE3Q
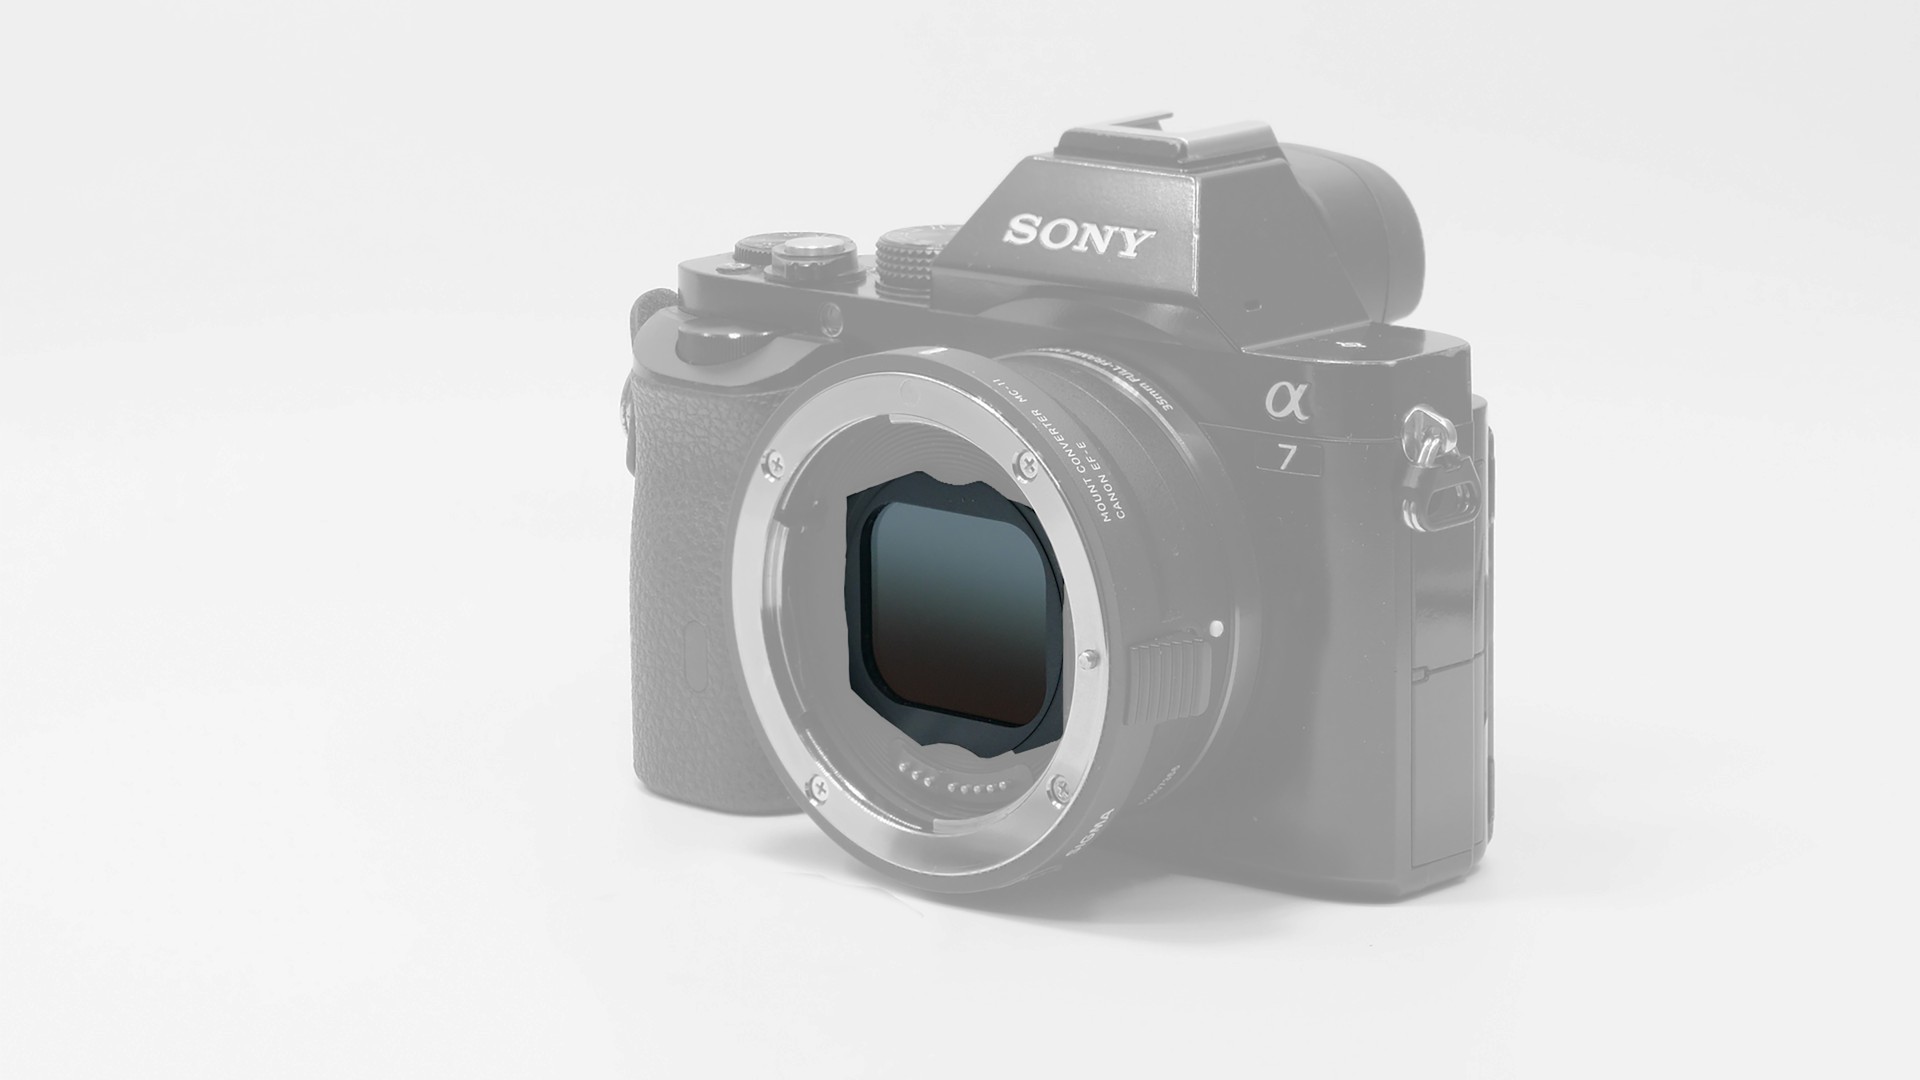
Irvine, California, July 15th, 2019 – Aurora Aperture Inc. today has introduced a revolutionary filter system, the Aurora Aperture Adapter Mount Format (AMF) filter for mirrorless mount adapters. The AMF filters drop into mirrorless camera mount adapters such as the Canon Mount Adapter EF-EOS R, the Nikon FTZ, the Sigma MC-11 for Sony E, and the Sigma MC-21 for the L mount. “In 2017 we introduced a rear mount filter system for the Canon EF 11-24mm F4L USM: The Aurora CR format, an industry-first rear mount glass filter,” said Jeff Chen, founder and CEO of Aurora Aperture Inc. “The Aurora Aperture CR format filters solves the problem of needing a huge filter adapter and massive filters for lenses that have protruding front elements. Due to the recent pivot of mirrorless camera development and releases from Canon, Nikon, Panasonic, Sony, and others: we’ve invented the Adapter Mount Format for the mirrorless mount adapters which enables mirrorless camera users to use a single set of filters for all their DSLR lenses regardless of the filter thread size.”
One Mount One FilterDesigned in California, the Aurora Aperture AMF drop-in filters offer many advantages over traditional front mounted lens filters. Since a drop-in filter goes inside a mount adapter, users only need one set of filters per adapter instead of specific thread sizes for each lens. It not only saves users from having to buy multiple sets of filters or large diameter filters – but it also means awkward to use step-up rings are no longer necessary. The drop-in filters are very compact and lightweight, meaning that they’re easily carried. They cost much less than traditional front mount filters, especially in comparison to large filter thread sizes. Any DSLR lens that can be mounted on the four supported mirrorless mount adapters can be used with these drop-in filters, whether the lens has a front filter thread or not. This is especially beneficial for ultra wide-angle lenses without a front filter thread which would otherwise require massive filters on a bulky adapter. Available Filters
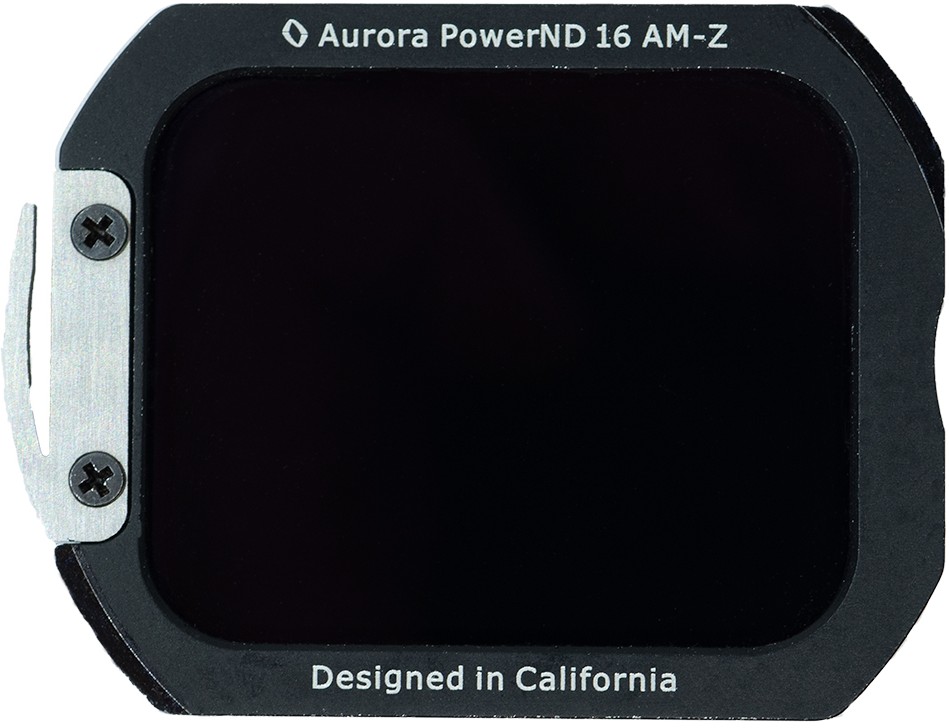
Schott B270® glass is used as the foundation of the AMF filters except for the PowerDusk which is based on neodymium glass. Multi-layer nano-coatings are used for light reduction so the filters are able to meet high-resolution demands of 4k/8k video and the high pixel density of modern-day sensors. A PFPE based nano-coating is applied to both optical surfaces, ensuring the protection of filter against water, oil, dust, and dirt. This coating allows the filter to be easily cleaned as substances do not adhere as easily and are removed with little effort. The PFPE based nano coating has a 110-degree static contact angle, one of the best in the industry. Aerospace-grade 7051 aluminum alloy is used for the filter frame. This material is practically twice as strong as 6000 series aluminum alloy used in conventional lens filters. Availability and PricingThe AMF Filters will be available through a kickstarter.com crowdfunding campaign starting in July 2019. The general public and dealer availability start in October 2019. The price will start from $44 and goes up to $83 per filter, depending on the type of filter. https://www.aurora-aperture.com info@aurora-aperture.com
Aurora Aperture AMF Filter for Canon EOS-EF to R adapter
Aurora Aperture AMF Filter for Nikon FTZ Adapter
Aurora Aperture AMF Filter for Sigma MC-11 adapter
Aurora Aperture AMF Filter for Sigma MC-21 adapter
Photography via Canon Rumors https://ift.tt/2v4dYqS July 22, 2019 at 09:49AM
https://ift.tt/2ObmiRQ
 Canon doesn’t have refurbished gear sales very often, so if you’re in the market for any cameras or lenses, today is the day to buy. Below are some of the highly desirable items still in stock. There is lots of other gear still available at the Canon USA store. Photography via Canon Rumors https://ift.tt/2v4dYqS July 22, 2019 at 09:15AM
https://ift.tt/2StyA6x
The post Understanding Exposure Metering Modes appeared first on Digital Photography School. It was authored by Kevin Landwer-Johan. Your camera’s metering modes vary the way it measures the light. This affects the way exposure information is provided. Every modern camera has a built-in exposure meter. Sometimes it’s also referred to as a light meter. 
© Kevin Landwer-Johan Understanding how to control the exposure metering modes on your camera allows you to take better photos. If what you are photographing contains very little contrast, your camera will make a good exposure in the default mode. When you compose an image with contrast, your camera may not make the exposure you want it to. Selecting the best metering mode allows you to take more pleasing photographs. There are three basic exposure metering modes on most cameras. These are:
Choosing the most appropriate mode is a matter of choosing your main subject and making the right settings accordingly. 
© Kevin Landwer-Johan How do different exposure metering modes work?1. AveragedThis mode is named differently depending on the brand of camera you use. Nikon calls it Matrix Metering. On Canon cameras, it’s called Evaluative Metering. Sony and Pentax use the term Multi-Segment Metering. Olympus calls it Digital ESP Metering. Each manufacturer has different algorithms to determine the outcome. Essentially they all do the same thing. The camera partitions the viewfinder into zones and measures the light in each. It compares these light readings. Then it averages all the information to provide what it decides is the best exposure setting. Most cameras have this mode as the default. This is how my camera is set most of the time. Using this mode will give you an overall idea of what your exposure settings need to be. When the light is fairly even, using this exposure meter mode works well. 
© Kevin Landwer-Johan 2. SpotUsing this mode, your exposure meter will measure the light from a small area – usually about 3.5% of the frame. You need to place the spot exactly where you want to take your reading from. This will most often be your main subject. The position of the spot within your frame varies from camera to camera. In some cameras, the spot moves with the point of focus. On other cameras, it remains fixed in the center of the frame. It’s important you know where your spot is, otherwise your exposure can be incorrect. Consult your camera manual or do an online search to find how your camera’s spot meter is positioned. 3. Center-WeightedThis mode reads the light from an area in the center of your frame. The percentage of the area varies from camera to camera. It is typically around 60%. Some camera models allow you to vary the area it covers. This mode is good if you compose with your subject in the center. I rarely compose that way, so never use this mode. 
© Kevin Landwer-Johan How to use the Exposure MeterHalf-pressing the shutter release button activates the exposure meter. It will turn off automatically after a time. So if you are not seeing the information it provides, it may have switched itself off. In your viewfinder or on the monitor you’ll see the information displayed like this on most cameras.
Sony cameras use numbers and the + and – symbols to display the exposure information. If you set your camera to manual exposure, you will see the information displayed when the meter is on. When in an auto mode this information may not be displayed. This is because the camera determines the exposure. Using manual mode a ‘0’ in the display indicates when the exposure is correct. When the display shows a row of dots stretching towards the – symbol, your image will be underexposed. When the display shows a row of dots stretching towards the + symbol, your image will be overexposed. Using this information, you can make the required adjustments to your aperture, shutter speed, and/or ISO. 
© Kevin Landwer-Johan Why are there different Exposure Meter Modes?Photographs are captured by digital cameras recording reflected light. Light and the tone of your subjects is variable. You need to set your exposure according to how bright or dark your subject appears. Making a composition with very little tonal variation when the light is flat, your camera will easily make a correct exposure. When there’s high contrast, particularly when the light is harsh, it can be more difficult to get a correct exposure. In high contrast situations, it’s important to manage your exposure meter. You must read the light from the most important area of your composition. Choosing Averaged or Center-Weighted Metering can often result in poorly-exposed photographs. Spot metering is most useful when you’re photographing a composition where there’s a lot of contrast. Taking a spot meter reading from the main part of your composition will allow you to expose it well. Portrait photography is one example of when it’s helpful to switch your metering mode to spot. The face of the person is normally the most important part of your composition. You want the person’s skin tone to be exposed well. By placing the spot meter on your subject’s face and taking a meter reading, you can adjust the exposure accordingly. If you are using an Auto Mode, your camera will make the setting adjustments for you. 
© Kevin Landwer-Johan Using spot metering on a camera when the spot is fixed in the center of the frame, you need to point it where you want to take the reading from. Using an Auto Mode when you recompose to frame your subject, you’ll need to hold the exposure lock button. If you don’t lock the exposure, your camera will readjust the settings. In Manual Mode, the settings remain constant until you change them again. Illustrative examplesPhotographing a person against a dark or light background requires careful metering so their skin tone looks natural. 
© Kevin Landwer-Johan Here’s a portrait of Masu. She is a Kayan woman living with her family in Thailand. I positioned my spot meter to take a reading from her face. In this case, my exposure setting was 1/640th of a second at f/4 and my ISO was set to 400. If I had used Averaged or Center-Weighted metering, my exposure would have been incorrect. The camera would have accounted for a large portion of the black background. Placing the spot meter on her face was important. If I’d left the spot in the center of the frame my reading would have been incorrect. It would have read the light reflecting off the black. This would give a reading which would have led to an overexposed skin tone. 
© Kevin Landwer-Johan With Masu standing against the white background, I made my exposure metering the same way. The settings are identical to the settings I used for the black background. This is because the light had not changed, only the background. ConclusionChoosing the right exposure metering mode helps you better control your exposures. It’s important to look at the light and tone in your composition. Then determine the most important area to expose for. The more contrast there is, the more important it is to meter well.
The post Understanding Exposure Metering Modes appeared first on Digital Photography School. It was authored by Kevin Landwer-Johan. Photography via Digital Photography School https://ift.tt/29wB9CX July 22, 2019 at 07:44AM |
Categories
All
Archives
November 2020
|


 RSS Feed
