
|
http://bit.ly/2ZBgGkD
The post Weekly Photography Challenge – Food appeared first on Digital Photography School. It was authored by Caz Nowaczyk. This week’s photography challenge topic is FOOD! 
Photo by Darina Kopcok Go out and capture your lovely cafe lunch, or restaurant dinner, something you have baked/made yourself. Just be sure you do it creatively! They can be color, black and white, moody or bright. You get the picture! Have fun, and I look forward to seeing what you come up with! 
Photo by Nisha Ramroop Check out some of the articles below that give you tips on this week’s challenge. Tips for Shooting FOOD
Weekly Photography Challenge – FOODSimply upload your shot into the comment field (look for the little camera icon in the Disqus comments section) and they’ll get embedded for us all to see or if you’d prefer, upload them to your favorite photo-sharing site and leave the link to them. Show me your best images in this week’s challenge. Share in the dPS Facebook GroupYou can also share your images in the dPS Facebook group as the challenge is posted there each week as well. If you tag your photos on Flickr, Instagram, Twitter or other sites – tag them as #DPSfood to help others find them. Linking back to this page might also help others know what you’re doing so that they can share in the fun. The post Weekly Photography Challenge – Food appeared first on Digital Photography School. It was authored by Caz Nowaczyk. Photography via Digital Photography School http://bit.ly/29wB9CX June 21, 2019 at 02:17PM
0 Comments
http://bit.ly/2N2IgWo
 MELVILLE, NY, June 20, 2019 – As image sensors are a driving force in innovating industries, Canon U.S.A., Inc., a leader in digital imaging solutions, is pleased to announce two new CMOS (complementary metal-oxide semiconductors) sensor products, the ultra-high resolution 120MXSI and ultra-high sensitivity 35MMFHDXSMA. These sensors help expand the company’s lineup of industrial vision products, and offer integrators and end users additional capabilities when developing solutions in a variety of applications1.
“As a result of Canon’s success in developing and manufacturing advanced CMOS sensors for our own purposes, we expanded to create a business platform offering select sensor capabilities for use in industrial vision applications,” said Kazuto Ogawa, president and chief operating officer, Canon U.S.A., Inc. “These two new CMOS sensors reflect Canon’s dedication to this new business, and reinforce our commitment to developing high-quality imaging solutions.” 120MXSI The 120MXSI sensor is built with the ability to produce clear, high-quality images, making it a great fit for integrators and end users developing applications such as machine vision, security, robotics, precision agriculture and healthcare. This 120-megapixel sensor is capable of simultaneous and discrete image capture in both the visible and near-infrared spectrums2 at a maximum frame rate of 9.4 frames per second. 35MMFHDXSMA The 35MMFHDXSMA sensor is capable of capturing monochrome imagery in extreme low-light environments where subjects would be near impossible to recognize with the naked eye. Removal of the color filter array doubles the sensitivity of the previously announced 35MMFHDXSCA sensor, providing even greater low-light capabilities. This sensor can meet a wide range of ultra-high-sensitivity needs when used as a component to support a multitude of applications developed by integrators and end users, including astrological observation, natural disaster monitoring, security and object detection, molecular and cell biology, and industrial vision. The 120MXSI and 35MMFHDXSMA CMOS sensors will be showcased in the Canon Booth #1611 at the Sensors Expo & Conference, which, according to its organizer, is the industry’s largest event dedicated to sensors, connectivity and IoT, taking place from June 26-27, 2019 at the San Jose McEnergy Convention Center in San Jose, California. For more information on Canon sensors, please visit canon-cmos-sensors.com. Photography via Canon Rumors http://bit.ly/2CsmGDw June 21, 2019 at 01:52PM
http://bit.ly/2KvEWB3
MELVILLE, NY, June 20, 2019 – The high demands of complex lighting and harsh environments require sensors capable of delivering high-dynamic range (HDR) and high-image quality in adverse temperature conditions. To answer this application need, Canon U.S.A. Inc., a leader in digital imaging solutions, is pleased to announce that its parent company Canon Inc. is pursuing the development of the 3U3MRXSAAC, a 2.8-megapixel, 1/2.32-inch CMOS sensor ideal for HDR imaging.
“As Canon evolves in the sensor market, we are dedicated to utilizing our expertise to develop products built to meet current growing market trends,” said Kazuto Ogawa, president and chief operating officer, Canon U.S.A., Inc. “The 3U3MRXSAAC CMOS sensor under development reflects the continuation of our business strategy that leverages the high-quality imaging technology Canon is able to achieve.” The 3U3MRXSAAC CMOS sensor being developed will be equipped with an HDR drive function that can achieve a wide range of 120 dB at low noise levels. This HDR function will reflect a greater ability to extract usable information even when there is a substantial difference between the lightest and darkest parts of an image. Even during normal drive operation, the sensor can achieve a dynamic range of 75 dB—greater than the sensors on many conventional digital cameras. Additionally, the 3U3MRXSAAC CMOS sensor will also be capable of operating in environments with extreme temperatures ranging from -40 degrees Celsius to 105 degrees Celsius. Typically, in high-temperature conditions, the increase in dark current noise (noise that occurs due to heat, even when no light reaches the sensor) can affect the quality of the image. However, the 3U3MRXSAAC CMOS sensor will be equipped with functionality that helps correct black levels (the luminance level of the darkest portion of an image) in real-time to help maintain high image quality. With a diagonal size of 1/2.32 inches (7.75 mm), the 3U3MRXSAAC CMOS sensor will feature approximately 2.8 million effective pixels (1936 x 1456), a pixel size of 3.2 μm x 3.2 μm and a frame rate of up to 60 fps (30 fps during HDR drive operation). The sensor will be compatible with the MIPI CSI-2 interface used by consumer-oriented cameras for a wide variety of purposes. For more information on Canon sensors, please visit canon-cmos-sensors.com. Photography via Canon Rumors http://bit.ly/2CsmGDw June 21, 2019 at 01:52PM
http://bit.ly/31RnGvR
The post Tiniest Interchangable Lens Micro Four Thirds Cameras for Travel with Amazing Quality appeared first on Digital Photography School. It was authored by Caz Nowaczyk. In this video by MarkusPix, he looks at some of the tiniest ILC micro-four-thirds cameras and shows how well they hold up on his travels when taking some portraits. In the video, he specifically looks at the Panasonic Lumix GX1 (2012), GX850 (2017), GM1 (2013), GM5 (2014) and uses the M Zuiko 45mm f/1.8 lens (which he describes as a great portrait lens). He also uses the Godox Ad200 with the world’s smallest flash trigger – the FlashQ. ? Panasonic Lumix GM1 (2013)He states that the GM1 is one of the smallest and lightest ILC M4/3 cameras in the world. It has no viewfinder, hot shoe or image stabilization. However, the GM1 has a 16mp CMOS sensor, with a shutter speed of up to 1/16,000th, face detection, built-in wireless, built-in flash, video, and time-lapse recording. Panasonic Lumix GM5 (2014)Mark also states that the GM5 is one of the smallest and lightest ILC M4/3 cameras in the world. It has similar features to the GM1 but the GM5 has an electronic viewfinder and a flash shoe. Panasonic Lumix GX1 Black (2012)The GX! has a hotshot and can take an optional EVF (you can’t use a flash while using the optional EVF as it connects to the flash hotshoe). It has some similar features as the above cameras, but it also has optical image stabilization and built-in flash. The battery door opens all the time and the menu is confusing. Panasonic Lumix GX850 (2017)The GX850 (also known as the GX800 and GF9) has no EVF or hotshoe, but has a tilting screen, better LCD resolution, focus stacking and face detection. The images are very sharp. It also has a built-in flash. So check out his experiments and see if you think these cameras would make a great (lightweight) travel companion. Have you used these cameras? Do you agree? What are your thoughts? Or do you have any cameras you’d add to the list? Share with us in the comments below. You may also find the following helpful:
The post Tiniest Interchangable Lens Micro Four Thirds Cameras for Travel with Amazing Quality appeared first on Digital Photography School. It was authored by Caz Nowaczyk. Photography via Digital Photography School http://bit.ly/29wB9CX June 21, 2019 at 09:12AM
http://bit.ly/2N3nxlz
 It looks like the next RF lens to hit the market will be the RF 24-240mm f/4-6.3 IS, a lens that will be highly desirable to Canon EOS R shooters. The RF 24-240mm f/4-6.3 IS will come kitted with the Canon EOS RP body as well, which is a likely pair for a lot of shooters. Pricing for the lens and EOS RP kit have yet to leak. Along with the lens and kit, lens hood EW-78F is also coming. Photography via Canon Rumors http://bit.ly/2CsmGDw June 21, 2019 at 07:10AM
http://bit.ly/31Q72we
 It’s finally happening, the Canon PowerShot G7 X Mark III has appeared on dealer order sheets and will likely be announced alongside the PowerShot G5 X Mark II. There have been no reliable specifications for the long rumoured and most popular G series PowerShot camera. Photography via Canon Rumors http://bit.ly/2CsmGDw June 21, 2019 at 07:10AM
http://bit.ly/2XWYkdr
Spoiler Alert: you can’t sync Collection Sets because Collection Sets can’t sync to Mobile — only individual Collections in Lightroom Classic can sync with mobile, but there is a workaround, and that’s what we’re covering today. 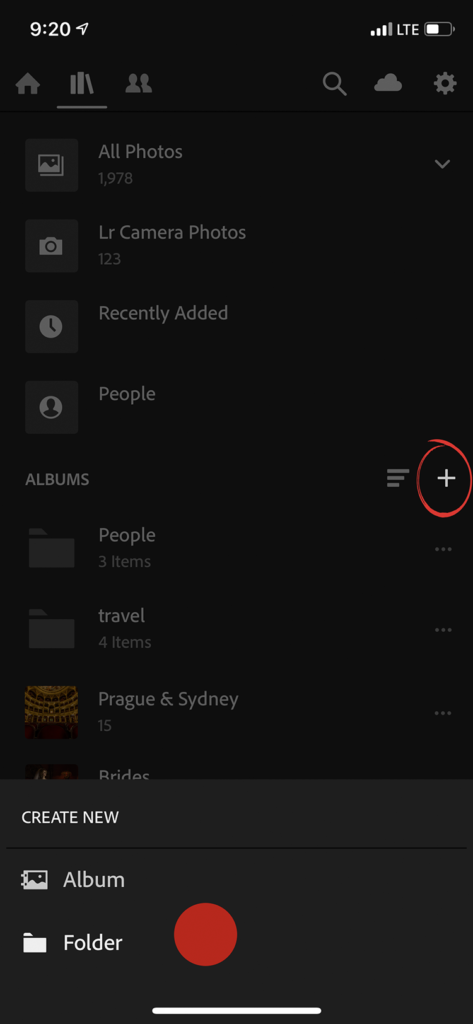
STEP ONE: In the Albums section of Lightroom on your mobile device, click the Plus Sign (shown circled here in red) to bring up the ‘Create New’ menu at the bottom of the window (seen above). Tap on Folder (that red dot above represents where I’m tapping). This creates a new Folder, which is Lightroom on Mobile’s name for “Collection Sets.” It will prompt you to name your new folder (I named mine ‘Automotive’). 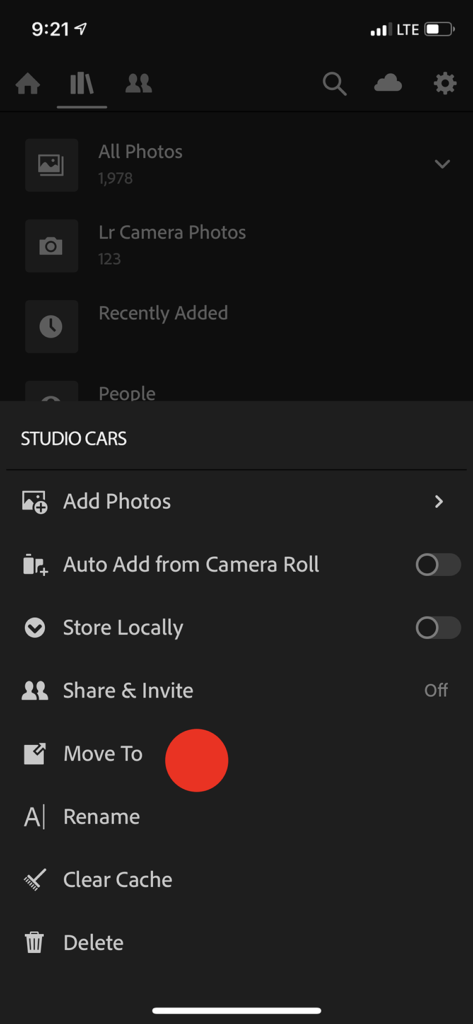
STEP TWO: Now tap on the Collection you want to appear within that Folder (Collection Set) you just created (Collections are called ‘Albums’ on Lightroom mobile. Don’t get me started). Then tap the three dots to the right of the Collection’s (er…..Album’s) name and from the pop-up menu that appears, tap on ‘Move To’ (as seen here). 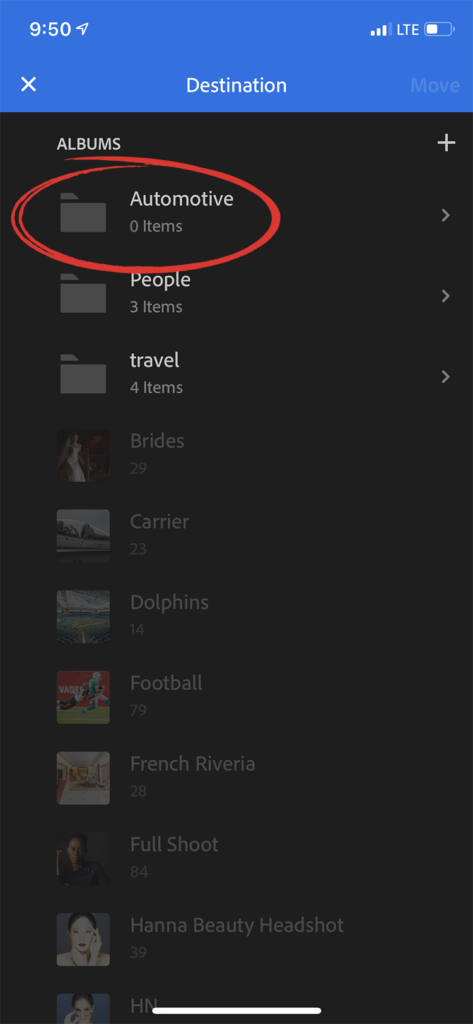
STEP THREE: When you tap ‘Move To’ it will ask where you to choose the Destination you want to move that Album to. In our case, it would be the Automotive Folder we just created, so tap on that Folder. 
STEP FOUR: Here (above) you can see we’ve moved the Studio Cars album into the Automotive Folder (or in regular Lightroom Classic speak: “We moved the Studio Cars Collection in the Automotive Collection Set.” Same exact stuff, just with different names. Thanks, Adobe). 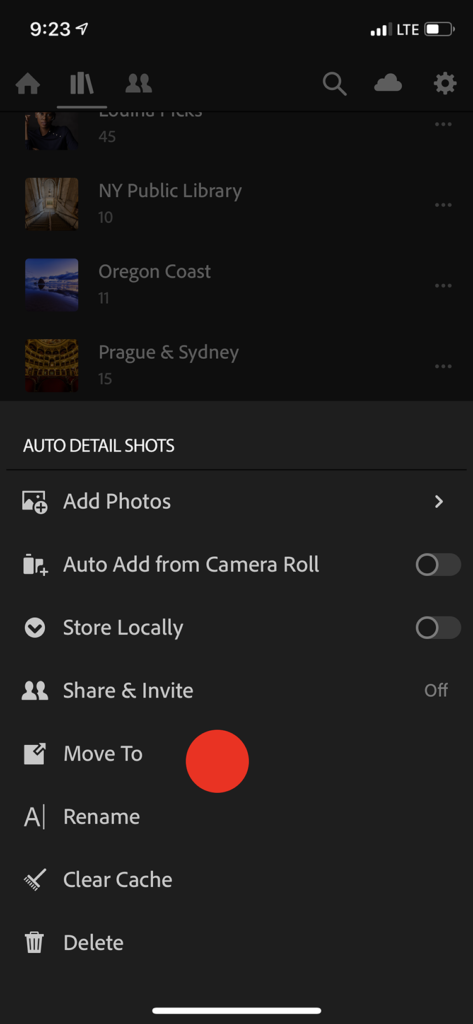
STEP FIVE: Now let’s continue the process, adding another Album to our Folder. Tap on the Album you want to move (in our case, I tapped on the ‘Auto Details Shots’ Album. Next, tap on the three dots to the far right of its name, and again tap on ‘Move To” then when it asks that Destination, tap on the Automotive Folder. 
Above: Here are the final result of me moving three Albums, (1) Auto Details Shots (2) Studio Shots, (3) and ‘Wheels’ into the Folder named ‘Automotive’ (this is just like moving three collections into a Collection Set in Lightroom Classic). Hope you found that helpful. Have a great weekend everybody, and we’ll catch you back here on Monday. -Scott P.S. Chicago area photographers — I’m heading up there next month with my new full-day seminar, “The Ultimate Photography Crash Course.” Details and tickets right here. The post How to Sync Collection Sets to Lightroom Mobile appeared first on Lightroom Killer Tips. Photography via Lightroom Killer Tips http://bit.ly/2sh0aZ8 June 21, 2019 at 03:37AM
http://bit.ly/2x9jQje
The post 5 Scenarios Where You Should Use Luminosity Masks appeared first on Digital Photography School. It was authored by Christian Hoiberg. The world of post-processing is a big world with endless possibilities. Every photographer applies photo editing tools in their own way, and we all have different purposes of what we want to convey through our photography. For me, post-processing is a way to overcome certain limitations found within the camera and to better represent what I experienced in the field. For this purpose, I use both Adobe Lightroom and Adobe Photoshop. 
I used Luminosity Masks to selectively process this image While I do most of the work in Lightroom, there are several techniques I apply that can only be done in Photoshop. Some of these techniques are quite popular, while other techniques are the result of spending too many hours playing around and trying various things. The one thing I often notice when viewing images from aspiring photographers, or when talking post-processing with my workshop clients, is that every effect is applied globally. I believe that is a BIG mistake. Certain effects should only be applied to specific parts of an image. That’s where Layers and Masks in Photoshop come in handy. However, I like to make my selections more accurate than just painting with a black/white brush on a Layer Mask, which is why Luminosity Masks have become an important part of my workflow. I’m not going to get into what they are and how to create them in this article. If you don’t know how to create them, I suggest you read this article first so that what I discuss in this article makes sense to you. I will be covering 5 scenarios where you should use Luminosity Masks. 1. Use Luminosity Masks to apply contrastLet’s step out of Photoshop and into the Lightroom RAW editor for a moment to take a look at what happens when you increase the contrast slider:
Pulling Lightroom’s Contrast slider to the right brightens the brights and darken the darks, without taking into consideration how dark the darks are and how bright the brights are. That will quite often result in shadows becoming pure black and the brightest highlights becoming pure white. Yes, you can avoid this by adjusting the slider more gently or playing with the Highlights/Shadows sliders (which I often do in addition). However, there’s another way that’s even better: apply contrast using a Luminosity Mask. I’ve already applied contrast and made basic raw adjustments when opening this file in Photoshop. So when I now keep working with the contrast, I don’t want to affect the brightest highlights or the darkest shadows. That means that I only want to apply contrast to the midtones. This is easily achieved in Photoshop by creating a Midtones Luminosity Mask (I often go for Midtones 2, but make sure to create the other masks as well) and applying it to the Curves Layer Mask (you can also use a Levels or Contrast Adjustment Layer): 
The Midtones 2 Luminosity Mask applied to the Curves Layer Mask Looking at the mask above, we can see that we’re not affecting the darker parts of the image when adjusting the contrast. The effect will also be less visible in the brightest parts. If you’re not quite sure what you’re looking at above, remember this phrase when talking about Layer Masks: White Reveals, Black Conceals. 2. Selectively work on color balanceThe second adjustment that should be done through a Luminosity Mask is Color Balance. Globally working with color will often result in strong color casts. Let’s say that you want to cool down the shadows of an image by using a Color Balance Adjustment Layer. The common method would be to set the color balance tone to Shadows and pull the cyan slider to the left and the blue slider to the right, such as this:
Doing this simple adjustment has given a nice cold color cast to the shadows but, unfortunately, it’s affected more than just the darker parts of the image. Also, less dark areas (areas which are not considered bright), have been affected more than I wanted. Even the highlights seem slightly faded.
If I make this exact same adjustment through a Darks 3 Luminosity Mask, the result is quite different:
Notice that the colder color cast has been applied to the darkest parts of the image, which is what I initially aimed for. The midtones and highlights are entirely left alone and remain the same as they did before applying the adjustment. 3. Darken a bright sky with Luminosity MasksAnother good use of Luminosity Masks is to darken a too bright sky (in this scenario, it’s important that there’s still information to be pulled out of the bright parts). A quick look at the RAW file below shows us that the left side sky is slightly too bright. I still want it to be brighter than the right since the sun sits just left of the frame. However, I want to get some of the details back from the overly bright areas.
Using a Curves Layer Adjustment without a mask will affect other parts of the image too. So, again, let’s do it through a Luminosity Mask. The Brights 4 mask seemed best for this particular image:
Remember, only the white parts of the mask will be affected by the adjustment. As you see above, that means that the majority of the image won’t be affected whatsoever. With the Brights 4 Luminosity Mask selected, create a Curves Adjustment Layer and darken by pulling the middle part of the line downwards. We’ve now successfully darkened the bright sky:
4. Blend multiple images using Luminosity MasksDigital cameras have had a great boost in improvement in a short time, but there’s still one thing that they struggle to do: capture the full dynamic range when working with bright skies and dark foregrounds. This certainly is something camera manufacturers are working on. I’m blown away by how far its come, but it’s still not good enough for many of the scenarios landscape photographers work in. The workaround is to capture multiple exposures of the same frame with different shutter speeds. Typically, you capture one dark, one base, and one bright image. You then blend these images in post-processing where both the foreground and sky is correctly exposed. There are a million ways to do this, but one of the most accurate is to use Luminosity Masks in Photoshop. It might sound advanced, but let me show you just how easy it is. Let’s say we want to blend these two images to get back the lost information in the blown out sky. (To keep this simple, I only blend two exposures here. But, I strongly recommend the 3rd exposure as well to use in the brightest part):
I prefer to have the bright layer on the top and paint in the darker exposure, but either way is perfectly fine. If you prefer having the dark exposure on the top, just do the opposite of what I explain in the next few steps. Here’s how you easily blend the images using Luminosity Masks:
That’s it! Not to hard right? In a matter of minutes I was able to blend the two images above into this:
As mentioned, this image still needs one darker exposure to be painted back into the brightest area close to the suns’ position. This is quite easy, and all you need to do is have another darker layer at the bottom and use a more restricted Brights mask on the middle layer to reveal it. 5. To apply Glow EffectsThe final adjustment I strongly recommend doing selectively rather than globally is any glow effect. There’s no need to add a strong Orton Effect to the shadows of a picture, right? There are two “guidelines” that I follow when creating a glow effect:
Since there might be highlights in the foreground, I’m going to combine a Luminosity Mask and free painting on the mask in this scenario. Again, this is quite easy and you can achieve it by following a few quick steps:
By following these simple steps we have added a nice soft glow to the highlights of the image.
The point of adding a glow effect, in my opinion, is not to make the entire image look soft and hazy but to add a little extra depth and atmosphere. I have achieved this by selectively applying it. What next?These are just a few adjustments that I recommend applying through a Luminosity Mask. They have become an essential part of my processing workflow during the past several years. I use them in one or another way for the majority of my images. Sometimes I apply to sharpen through them, other times contrast. There really are endless opportunities.
The post 5 Scenarios Where You Should Use Luminosity Masks appeared first on Digital Photography School. It was authored by Christian Hoiberg. Photography via Digital Photography School http://bit.ly/29wB9CX June 20, 2019 at 02:12PM
http://bit.ly/2N0iO44
 A patent showing a new style of teleconverter from Canon has appeared at the Japanese Patent Office this week and translated by Canon News. Canon is showing off a teleconverter that can switch between 1.4x and 2.0x, which would be a great way to increase the usability, flexibility and efficiency of using teleconverters. If you’re on location with both Canon teleconverters, it adds to the risk of dust getting inside the camera body. If you’re switching between 1.4x and 2.0x teleconverters, you may also miss the shot. Adding teleconverters to big lenses increases the size, weight and bulk of lenses as well, so simply putting built-in teleconverters into every super telephoto lens probably isn’t the answer either. Canon has been working very hard to reduce the size and weight of their big white lenses. I couldn’t figure out in this patent if you could also switch to 1.0x, so you could, in theory, leave the teleconverter attached to your favourite lens if you so desired. Photography via Canon Rumors http://bit.ly/2CsmGDw June 20, 2019 at 12:23PM
http://bit.ly/2WWA7Cx
The post Tips for Creating Better Documentary Travel Photos appeared first on Digital Photography School. It was authored by Kevin Landwer-Johan. Good documentaries tell a story, often with the help of a narrator. To add interest to your travel photos you can employ the same techniques. Showing your family and friends endless pictures of your recent adventures may seem exciting to you. You were there. You had the experience. They didn’t. If you want them to sit through your latest travel slideshow, you need to make it interesting. 
I had a lovely conversation with this man. He and his wife come to sell vegetables at their market stall each day. © Kevin Landwer-Johan Here are some tips on how to add more interest to your photos and create better documentary travel photos. Tell a story with your photographsPlanning your trip took time and effort. Deciding where you wanted to go, what you wanted to see and how long you would stay. Why not include your photography in the planning stage as well? Think about why you’re going and what you’ll be doing. How can you turn this into a story? Think about adding a connecting thread of what interests and attracts you most to each location you’ll visit. Make a list of some themes you can follow. Each day you are traveling, check your list and make sure to include some of the items in your photos. You might want to photograph:
Consider what’s most relevant to the places you’ll go. Which of these interest you the most and will make the best photo opportunities. Plan to spend more time at these locations. 
Many tourists choose to rent bicycles for sightseeing in Chiang Mai because the city is mostly flat. © Kevin Landwer-Johan Get the whole pictureOne trick I learned when starting out in video production was to always capture wide, medium and close-up angles. This allows for more flexibility to build up the whole picture when editing. The same works when creating documentary travel photography. I often encourage our travel photography workshop participant to imagine they are working for a magazine. They need to produce a series of images for their editor to show the essence of each place they visit. Only capturing wide or close-up details is not going to build a complete picture. 
Close up of large red chilies. The larger the chilly, the milder it is. © Kevin Landwer-Johan You need to get in close. Show the texture and patterns. 
Muang Mai Market in Chiang Mai is the biggest and busiest food market in northern Thailand. © Kevin Landwer-Johan You need to stand back to encompass the whole scene. 
Owners of small shops, restaurants, and household shoppers all come to buy produce at Muang Mai market. © Kevin Landwer-Johan You need to come in tighter and capture what’s happening at that place. Include your travel companionsTraveling with other photographers usually makes life easier. You can take your time rather than being hurried along by someone taking snapshots with their phone. One way to make the most of your time with non-photographer travel companions is to include them in your photos. Make them part of your story. I don’t mean for you to just take cheesy social-media-styled pictures of your partner. Put them in the story. Show what you’re doing and the interesting aspects of the places you visit. Having the people you’re traveling with in some of your photos makes them more personal. Including them in some activity helps tell the story. Photograph them ordering meals or coffee. Take pictures of them boarding the boat or rickshaw. Make photos about what you are doing together, not only of what you are looking at. 
My wife and I enjoyed meeting the locals at Pompee village when we traveled to Myanmar. © Kevin Landwer-Johan Take time outIf including your travel companions is not possible, take time out for photography. Arrange time each day to spend time with your camera with no other objective. Rushing from place to place without taking the time to engage in your photography story is frustrating. Give yourself permission to enjoy using your camera. This may mean having to wake up earlier than others you’re traveling with. It might be ducking out of the restaurant while you’re waiting for your lunch or dinner to be prepared. You will find it’s worth it because you will get better photographs when you can take your time. 
This ornate temple complex on the outskirts of Chiang Mai includes examples of Lanna and Shan temple architecture. © Kevin Landwer-Johan Book a photography workshopMany popular travel destinations offer opportunities for travel photography workshops or photo tours. Investing in either of these will undoubtedly mean you will come away with better photos. You’ll be experiencing the location with a photographer who knows it more intimately. They will be able to take you to the most interesting places at the best times for photos. Taking a photography workshop you’ll also learn some new skills. Being on vacation is a great time to learn because you can put into practice what you learn immediately. A good travel photography workshop will incorporate teaching camera and photography skills. You’ll also learn local cultural information which will improve your photography experience. 
Kevin Landwer-Johan teaching a photography workshop in Chiang Mai, Thailand. © Pansa Landwer-Johan Take more photos and edit themTake more photos than you think you need to. Then choose the best. Don’t go crazy and make snapshots of everything you see. A good subject does not make a good photograph. You don’t want to return home with hundreds of photos you could have made with your phone. When you find something interesting to photograph, look at it from different angles. Consider how it will look from different points of view. Walk around and make a series of photos. Wide, medium and close up of the same subject. Taking time to do this will mean you have more to work with to help tell your story. If you’re not taking enough photos, you may regret it later when you see gaps in your narrative. Weeding out the rubbish photos and only showing the best ones is important. No one will want to look through all the photos you take. Be discerning and be selective about which ones you choose to share. This will help you in taking better photos next time you travel too. 
Tuk-tuks are an iconic part of Chiang Mai’s public transport. © Kevin Landwer-Johan Caption your photographsCaptioning your photographs is like adding a narrative to your story. Include details of the location and maybe the time of day when it’s relevant. Think about how you can add information which will enhance your photograph. Don’t always include the obvious. You don’t need to describe what can already be seen. A caption may be a few words or several sentences. Your caption should be succinct and informative. Don’t waffle or include irrelevant information. Use your captions to support your photos and enhance your story. 
I found an alternative point of view to take this photo of a tuk-tuk. © Kevin Landwer-Johan ConclusionVacation travel is usually exciting. You see and experience new and interesting things more frequently than when you’re at home. This trends for more interesting photographs. You want to put together a documentary travel photography story that will not put your family and friends to sleep. Tell your story well and you’ll inspire them to travel too.
The post Tips for Creating Better Documentary Travel Photos appeared first on Digital Photography School. It was authored by Kevin Landwer-Johan. Photography via Digital Photography School http://bit.ly/29wB9CX June 20, 2019 at 09:12AM |
Categories
All
Archives
November 2020
|


 RSS Feed
