
|
https://ift.tt/2U48JpK
The post Photoshoots that Go Wrong – the Challenges and Beauty of Working in Photography appeared first on Digital Photography School. It was authored by Erin Fitzgibbon. The illusion of perfect experiences
I haven’t used any images from the anecdotes I discuss. I don’t want to create targets. Instead, the images in this article are from successful photoshoots but also some very challenging shoots. It’s time to talk about the photoshoots that go wrong. Most people write about the tricks and tips that guarantee success. That’s an illusion. I won’t say the word “lie” – it’s too harsh. Those articles promise success where none can be assured. Don’t get me wrong – the advice is useful and good to know. It does help the shoot go smoothly; however, life has this funny way of throwing a wrench into even the best-laid plans. Sometimes no matter what you do or how prepared you are things can and do go wrong. It’s okay! It doesn’t mean you’re a bad photographer. It’s just a part of the daily grind. It is real life and you cannot escape this reality. Sometimes photography, just like every other endeavor, hands you a bag of hammers. The important thing is to handle the situation. You need to come out of the proverbial lion’s den with all your faculties intact. Hopefully, the following stories will lift your spirits. I also hope they will give you some inspiration and some courage to continue when all you see before you are roadblocks and negativity. Knowing you’re not the only one may make it easier to get out bed tomorrow and to keep working hard. Note: As I mentioned in the photo caption above, I haven’t used any images from the anecdotes I discuss here. I don’t want to create targets. Instead, the images in this article are from successful photoshoots but also some very challenging shoots. The family that hates each other
The oldest boy was being rather grumpy in this session. Allowing him to poke and pester his brothers actually made for a great image. This is the family that loves each other. The total opposite of the family in the anecdote below. When you shoot family portraits you witness some interesting family dynamics. Most of the time scenarios are pretty average. Perhaps there’s a bossy mom or a grumpy. You might run into the moody teenager or difficult children. All of these issues are relatively easy to manage. Bossy moms need a little encouragement to focus on being relaxed. Grumpy dads are easy to appease with a few jokes and a promise that the session will be over quickly if he can try to have fun. Teenagers are usually easy to bribe if you take a few photos and then promise to give them their favorite for social media. However, what happens when you meet the family from hell? What do you do when the situation is far more complicated than you expected? Imagine trying to get images that portray love and caring in a family when there is none present. Imagine a situation in which family members are staring each other down across a picnic table. I never imagined that I would meet one of those families until I did – and it shocked me. The family members were making thinly veiled insults towards each other. When I asked them to pose, they began to throw a few snide comments my way. I was not impressed. When clients don’t treat you with respect, it’s really difficult to create images that are appealing and unique. It seemed like a situation in which nothing was going right. Truthfully, nothing was. The shoot became far worse the moment the grandmother pulled out her point and shoot camera. She proceeded to stand behind me and shoot over my shoulder. Normally, I would have stopped the shoot and walked away. The clients would have received a refund when I returned home, and that would have been the end of the whole event. I should have followed my instincts and walked away, but I didn’t. Knowing when to get out of or turn down a job is as important as taking amazing photographs. The only thing that stopped me was the woman who booked the shoot. I’d known her for a long time and felt wrong about lumping her in with her mother in law. That was my mistake. The advice is simple. Never let personal relationships affect your professional nature. The client was being rude and overstepping her boundaries. That was reason enough to walk away. Instead of creating the best possible images I made the bare minimum effort and didn’t try to add in any of my usual fun creativity. The shoot ended with the client receiving some pretty basic images. The behavior of a client affected my ability to produce the best possible portraits. That’s not good. Never allow that to happen. If you can’t produce great images in the situation, then don’t take them. Don’t deliver sub-par work. It will only affect you later on. Those who view your work won’t know that the client was impossible; they’d see the photo online and assume your talent is limited. 
In this session the challenge was lighting. It was rather harsh in the end. The client who wants you to “Photoshop” them until they look 20 againWe’ve all run into this situation. We end up with clients who want you to turn them into something they are not. They show you pictures of themselves from 20 years earlier and 30 pounds lighter. They expect you to create the fountain of youth for them. This becomes the challenge. You have to convince your clients that they are beautiful just the way they are. That’s probably more than you can accomplish in 90 minutes. The advice is simple – be gentle, be kind. Do your best to put the client in poses that show off their best features but at the same time be firm. If you create portraits that address the insecurities of your client, and the images are photoshopped and look fake, it will once again reflect badly on you. Instead, work with the client to achieve the look while still holding to your vision. The work must reflect your skills and aesthetic as well as satisfy the client. In this case, I asked the client to show the photos to her friends. I knew the images were great, but the client couldn’t accept her own body. The comments and praise from friends helped. She purchased the images, but I’m pretty sure she did so to be polite. A few months later, I saw her new real estate signs around town, and in the end, she had used a different photographer. The images were highly photoshopped and looked nothing like her. There’s nothing you can do when a client wants a certain look. You either have to deliver or hold to your vision. Part of me wishes I had caved and given her what she wanted. Perhaps I would have landed more jobs from her if I had, but it just didn’t feel right. I didn’t want to create an image that wasn’t true to the beautiful person I saw before me. The lesson in this situation is that photography cannot repair someones damaged self-image. Be prepared for the client who dislikes your work. 
I find photographing animals quite challenging. I’m able to connect with humans much more easily. The day the hurricane blew through townThis final scenario presents a situation in which no matter how much you prepare, you cannot prevent mother nature from wreaking havoc on your photoshoot. The family requesting the portraits had just the one day available. Family members were visiting from the west coast of Canada, and it was a do-or-die type of scenario. There was no option to reschedule, and just our luck, the remnants of a hurricane decided to blow through the Toronto area making the option for shooting outdoors impossible. The challenge here was to create a warm family atmosphere despite the raging wind and rain outside. The family was understanding, but they were adamant they needed their photographs completed then. The hurricane forced us to have to improvise a setting and deal with bad lighting. We moved some furniture and tried to create a nice setting with a large couch. I moved the couch to face the large window to add natural light to go with my flash. My strength as a photographer is in shooting solely with natural light and in outdoor settings. I don’t do well inside in confined spaces without the opportunity to improvise and add some physical activity. However, we had no choice. In this case, the resulting photographs were not up to my usual standards, and I was unsatisfied with the work. While the client seemed satisfied with the product, there was the issue of personal pride in the work. This experience resulted in a personal decision to improve my studio photography skills so that in the rare circumstance when I cannot shoot outdoors, I can still create work with which I’m satisfied. The lesson here is knowing your limits and then working to improve your skills. 
The skies opened up suddenly and we had to rush to finish the shoot in the pouring rain. In ConclusionPhotography can be unpredictable. That very factor makes it exciting. For those of us who crave some variety and challenge within our work, we embrace this fact about the photography world. It can cause frustration and anger, and sometimes you might wish you had a different career or hobby. Then in the next moment, the truth hits you, and you know the unpredictable challenges keep you going. You’d be bored otherwise. The idea of knowing how each day begins and the end makes you cringe. So take a deep breath and dive into the business. You can handle all the challenges life throws your way. 
The challenge here was pure exhaustion. We had been working for 6 hours without a break. The post Photoshoots that Go Wrong – the Challenges and Beauty of Working in Photography appeared first on Digital Photography School. It was authored by Erin Fitzgibbon. Photography via Digital Photography School https://ift.tt/29wB9CX March 28, 2019 at 08:07AM
0 Comments
https://ift.tt/2HKVVOE
Put The Kettle On – Here Is Your Light Stalking Community Update https://ift.tt/2HKVxQc As we keep sharing what we know about photography with the world, we can see how our beloved photography community grows as time goes by. Adding value to the photography world in our small way here at Light Stalking is extremely rewarding and as always we hope you find it worthy as well. Today we bring you the highlights from our community from last week. Here you'll find some of the most interesting shots from Tersha's last challenge on Portraits as well as some fascinating discussions from our photography forum. Also, you'll find a nice selection of images from the Tank! So let's get to it! Photo Of The Week – March 25, 2019
An amazing capture from @billyspad is this week's photo of the week. With @kent still on leave, @federicoalegria chose this stunning portrait and here is what he had to say about it This week's POTW is a shot by @billyspad. He shared this one at the Weekend Challenge (426th) it is, at first sight, it is a very strong portrait with a huge environmental feeling in it. The image captures a fleeting moment of the fisherman's everyday nature. The lighting and the way the image has been post-processed enhances the dramatic feeling of the ordinary moment. In Barthes' words, I personally think that this image's punctum is not only the cigarette but the thick cloud of smoke that fills the fishermen's mouth. Being able to capture such a fast moment is the best evidence we have about the importance of being always prepared to use our cameras. Thanks, Billy for sharing this great photograph with us. Cheers! What Are Our Members Up To?These are some of the wonderful shots from our 426th Challenge – Portraits!!! There is so much talent on display in this challenge that it is definitely worth your time to take a look through the entire thread.
Portraits aren't exclusively for humans, and this beautiful shot is a great example of that. Everything depicting someone is a valid portrait, and lovely doggos are of course part of the family and photo-worthy.
This could be considered to be a Light Stalking's iconic portrait! Lighting enhances the drama and gives us a very accurate clue of John's personality.
It is just hard to not notice this striking portrait, you can feel that he'll start moving or just keep laughing. Sharpness in this shot is superb, and the expression on Rob's friend is priceless. What a brilliant capture
Powerful and almost surreal. This is a really great portrait. It captures youthful fun in one shot
Hi there Cider! Dogs have distinctive facial features, just like us, and I immediately recognized Cider while browsing all these amazing photographs.
Intimate portraits are always great storytellers. This shot has a great deal of environmental portrait as well. You get the impression that this is where you'll usually find this gentleman
It is amazing how a single photograph can capture so much of someone's nature. This is a great capture by Chris Pook
Shots like this are the ones that tend to fit between and within several photographic genres. The action captured by Dave here is quite something, and it helps to tell the story in a better way.
Capturing someone's expression is one of the main goals of portraiture, and here we have a great example of how it is done!
This portrait is extremely cinematographic and had to be included in this list. There is fantastic storytelling here, and the lighting is just gorgeous! Discussions You May Have Missed From The Light Stalking CommunityBucweet shared with us some nice highlights from the 2019 Sony World Photography Awards in this post. These awards have been growing larger and larger as the years go by, and apparently, this year isn't an exception to the rule. Sony has made some really nice contributions to photography in the last decade, so it really makes sense to have an award directed by them. Also, thanks to a Marie Kondo's episode at his place, we now can enjoy some magnificent photographs of the Canadian air force. Sit back and relax with these amazing images! Who could have imagined that Chris Pook was also into studio photographs! Here he shared with us some nice photos of some really powerful looking motorbikes! Check them out, they are completely different from the usual journalistic imagery shared by our mate. David, the great light-painting master, has been getting highly sophisticated with Arduino for making his water-drop photography more efficient and easy to control. Check out this amazing shot he shared with us earlier this week! Also, he shared a series of liquid light photos. We'd Love To Hear Your ThoughtsWe have great news for you, you can get better in photography in a sort of fast way. Of course, we are talking about constructive criticism, and this one goes in two ways. You can critique other people's work, or you can receive critique on yours. The first one enables you to have a better photographic understanding simply by reading images at a slow pace. The other one is more obvious, you get valuable feedback and you improve on the things that you consider to be valuable to apply. Of course you need to be open to receiving critique in order for this to work, otherwise, you'll just be stuck within your own ego. In order to take advantage of this enhancing nature criticism has, we have built a dedicated place called the Shark Tank, and despite the intimidating name, it is a friendly place to hang around. Here you'll be able to share images and opinions on others' work, but please, keep them beyond gear related questions. Here are some of the most interesting shot shared during last week on the Tank:
The Shark Tank is a great place to learn and to discuss, so please read the instructions in order the get a better critique experience. Share your comments, opinions, and doubts on any or all of the images above. We also will be delighted to see some of your own images. Don't be shy, critiques are given to photographs and not photographers, so don't be afraid of sharing. We and many other members will be more than pleased to help you out; after all, we all are in love with photography. Don't forget to participate in the newest challenge published by Tersha on Emptiness!!! Please remember to join our friendly photography community if you haven't done already. Today We Leave You With…Sea LionsThis shot shared by Dave really made me want to relax. What a beautiful experience to have so many sea lions in one shot. Photography News via Light Stalking https://ift.tt/2kwTW5i March 28, 2019 at 07:01AM
https://ift.tt/2TFcddd
 Press Release: United Kingdom, Republic of Ireland, Thursday 28th March 2019 – Canon Europe announces the release of two instant camera printers, the Canon Zoemini S and Canon Zoemini C. Building on the success of the original Canon Zoemini which launched in 2018, the new product range of all-in-one instant camera printers are the perfect pocket-sized companions for encouraging creativity with easy to print, peel-and-stick photos on the go.
The Canon Zoemini S is ideal for those wanting to capture, print and share their holiday adventures, a spontaneous selfie, photos with friends or an Instagram-worthy plate of food. Consisting of an eight-megapixel camera, front-mounted mirror, ring-light and remote shutter capability, the Canon Zoemini S is easy to use and will ensure its users are ready to take the perfect selfie in an instant. The Canon Zoemini S comes in three stylish finishes; rose gold, matte black and pearl white and fits seamlessly into the palm of a hand, pocket or backpack for exceptional portability. Whether out shopping with friends, celebrating a birthday party or attending a music festival, Canon Zoemini S and Canon Zoemini C users can shoot and print mini photos in a matter of moments on 2×3-Inch (5 x 7.6cm) Zink™ sticky-backed photo paper. Capturing everyday moments has never been easier or more fun with these compact and lightweight gadgets, so friends can share their stories whenever the mood takes them. The Canon Zoemini S is supported by the free-to-download Canon Mini Print App (iOS/Android), which enables users to print their images directly from a smart device using Bluetooth® as well as edit from an array of creative filters and frames. Users can also remove the challenge of capturing group selfies, simply by using the Canon Mini Print App’s remote shutter and self-timer function, so no one will be out of shot. In addition to Instagram and Facebook, the Canon Mini Print app enables users connect with Google Photos and Dropbox, so they can print physical copies of treasured memories while out and about. For those seeking a streamlined version of the Canon Zoemini S, the Canon Zoemini C is available without the Canon Mini Print App compatibility and packs a five-megapixel camera, a selfie supporting reflective mirror and a Micro SD card slot. The Canon Zoemini C is available in four eye-catching colours; bubble gum pink, bumblebee yellow, mint green and seaside blue for instant keepsakes on the go. Both the Canon Zoemini S and Canon Zoemini C come with 10 sheets of sticky-backed, smudge and tear-proof Zink™ printing paper, making it easy to print and decorate anything from a bedroom wall to a fridge or smart device. Additional paper is available to purchase in packs of 20 or 50. Pricing & Availability: The Canon Zoemini S & C will be available from Canon’s online store and official Canon retailers from Thursday, 25th April 2019 with the following RSPs:
For more information or to locate your nearest retail outlet, please visit:
What’s in the box:
About Canon Mini Print App A mobile device must be connected to the Canon Zoemini Photo Printer via Bluetooth® and the Canon Mini Print App, available for free on the App Store and at Google Play. Compatible with mobile devices running iOS 9.0 or later, and Android devices running Android 4.4 or later. Canon Zoemini S & C Imagery: To view all imagery of the Canon Zoemini S & C, please click here. Photography via Canon Rumors https://ift.tt/2v4dYqS March 28, 2019 at 05:58AM
https://ift.tt/2YoUDhc
 Zeiss is apparently working on a new line of lenses for mirrorless cameras dubbed “Ventum”. Above is the first image leaked of the new series of lenses. It’s unknown at this time which mounts these lenses are going to be made for, but there’s some hope that the RF mount (Canon), Z mount (Nikon) and L mount (Sigma, Leica, Panasonic) will be in the mix. If this line of lenses does come to the RF mount, let’s hope there’s autofocus. More to come… Photography via Canon Rumors https://ift.tt/2v4dYqS March 28, 2019 at 05:50AM
https://ift.tt/2uw97hs
 Press Release: (New York, New York) March 26, 2019 – ROKINON is proud to announce its new 14mm f/2.8 and 85mm f/1.4 full frame lenses built for the Canon EOS R mirrorless system. This ultra wide-angle and fast telephoto are the first 14mm and 85mm prime lenses with precision manual focus control to be available in Canon RF mount. Both lenses sport a new exterior design with a contemporary look that matches and handles well with Canon’s new full-frame mirrorless cameras.
The new ROKINON 14mm f/2.8 Canon RF mount ultra wide-angle lens provides a dramatic rectilinear 115.7° view that can focus as close as 11inches and is perfect for astrophotography, landscapes, extreme sports, interiors, and real estate imagery. Its advanced 14 element-10 group design utilizes four highly specialized element types [High Refractive Index, Hybrid Aspherical, Aspherical and Extra-Low Dispersion] to produce sharply defined images with minimal distortion and chromatic aberrations. Features include a built-in petal shaped lens hood and a rear gelatin filter holder. The new ROKINON 85mm F/1.4 Canon RF mount telephoto lens offers a very fast f/1.4 maximum aperture for effective low light shooting, fast shutter speed capture, and precise selective focus control. Its optical design consists of 9 elements in 7 groups including one Hybrid-Aspherical element to reduce chromatic aberrations for increased clarity and sharpness. Features include a removable lens hood, a curved blade diaphragm for pleasing bokeh, and a non-rotating 72mm filter mount for easy use of polarizing and other filters that require precise positioning. This ROKINON short telephoto for Canon RF mount makes it a highly effective optic for travel, candid, portrait, and close up photography. These first two ROKINON full frame lenses designed for Canon RF mount will be available in April from authorized ROKINON dealers. Preorder at Adorama: Photography via Canon Rumors https://ift.tt/2v4dYqS March 28, 2019 at 05:10AM
https://ift.tt/2WvKP3s
By Richard Harrington
We’ve all faced the same problem: photographs that lack contrast; images where the shadows and highlights look flat and the details are muddy. While the problem is common, the solutions are many. In this article, I want to show you several easy fixes (using built-in tools) — including some uncommon ones — that you should explore. We’ll also take a look at Aurora HDR, which works as a plugin to both Lightroom Classic and Photoshop. The ProblemYou open up an image and it just feels flat. Your mind doesn’t remember the scene this way, but your camera sure does. What’s the problem? It’s all about dynamic range. 
Dynamic Range ExplainedThe dynamic range of your photo is the difference between the maximum and minimum values. In simpler terms, are the black points rich and the white points bright? Here’s a simple example where you can see which gradient has a true black and white point. 

In most situations, a photo with a wide dynamic range feels rich and deep. Once adjusted, this low-depth image takes on a richer feel. Note that this isn’t just about moving the Contrast slider. It’s about extending the histogram to ensure a full balance.
There are several ways to improve the dynamic range of your images: You can change how you capture your images, change how you process them, or both. There’s no right answer, as it really comes down to how much effort you’re willing to put in and the results you want to get. Toss in the limiting factors of your camera and shooting style and you’ll quickly discover that one size does not fit all. Why HDR Isn’t a Bad WordFor many photographers, the term HDR (high dynamic range) causes their blood pressure to rise. I encounter photographers all the time who tell me how HDR is awful. A fad. A gimmick. Absolute garbage. They cite garish examples where the colors and details have been pushed to cartoonish extremes. Sure, if we judge HDR by its worst examples, that’s totally valid. But it’s akin to assuming that Photoshop is only capable of examples like this or this. Don’t blame the tool for a lack of good judgement by the user. For the record, I strongly prefer the third image below. 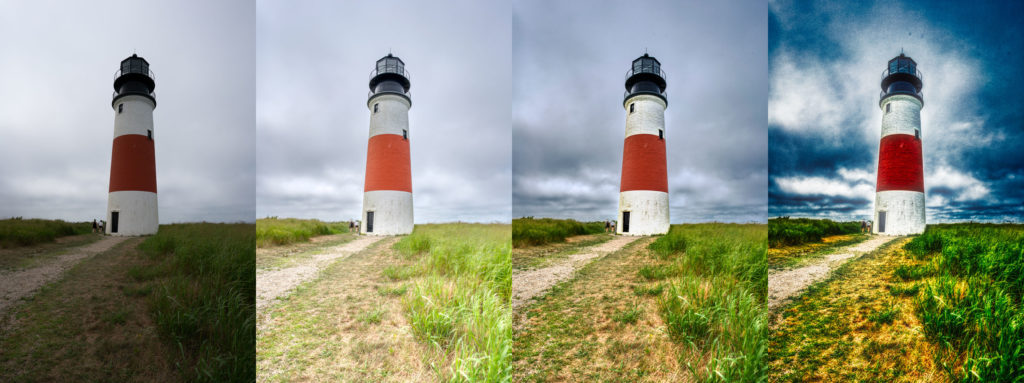
HDR has been around for a long time. Photoshop CS5 introduced Merge to HDR Pro back in 2010 to create 32-bit files. Lightroom and Adobe Camera Raw more recently (version 6 in 2015) added an advanced option to create floating 16-bit DNG files from several raw images. This feature has received additional updates in Lightroom and now can even be used to create panoramic HDR images. Using HDR imaging techniques really makes a difference in your photos. If you use the Shadows and Highlights sliders, you’re effectively using a less powerful version of HDR. Why not take these controls further and get even better results? When done correctly, HDR is naturally beautiful! Let’s explore the options you have built into Lightroom.
Built-In MethodsGetting proper dynamic range in Lightroom has gotten easier as the application matures. Let’s take a quick look at the built-in options. These all work best with a raw file, so be sure to capture raw in-camera. These days, even smartphones and drones can capture DNG files, which result in superior quality. 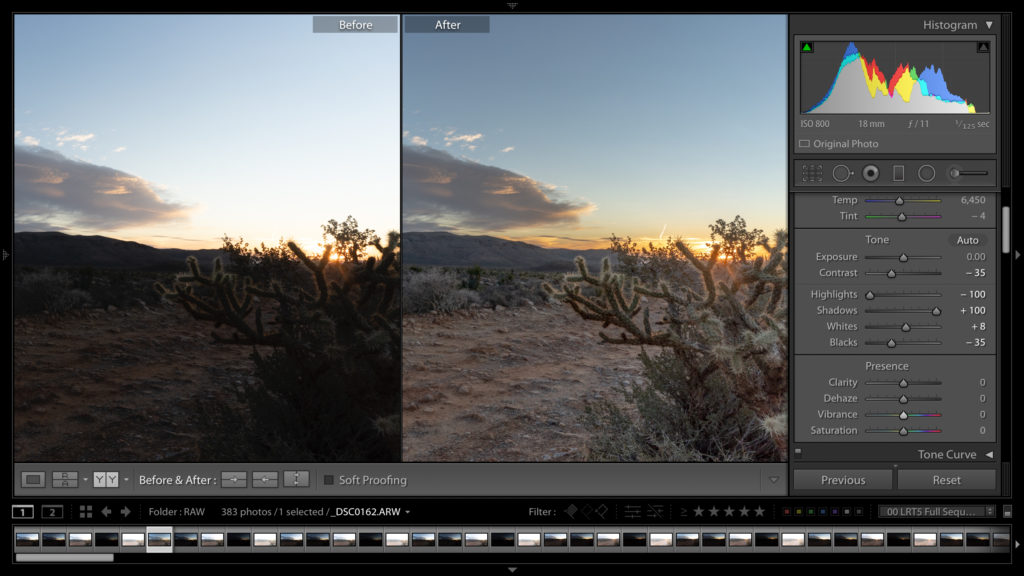
Tone Controls: Shadows & Highlights, Whites & BlacksThese four sliders are the key to getting your dynamic range correct. Typically, it’s a give and take. For example, if you pull the highlights to the left to recover, you should pull the shadows to the right to lift.
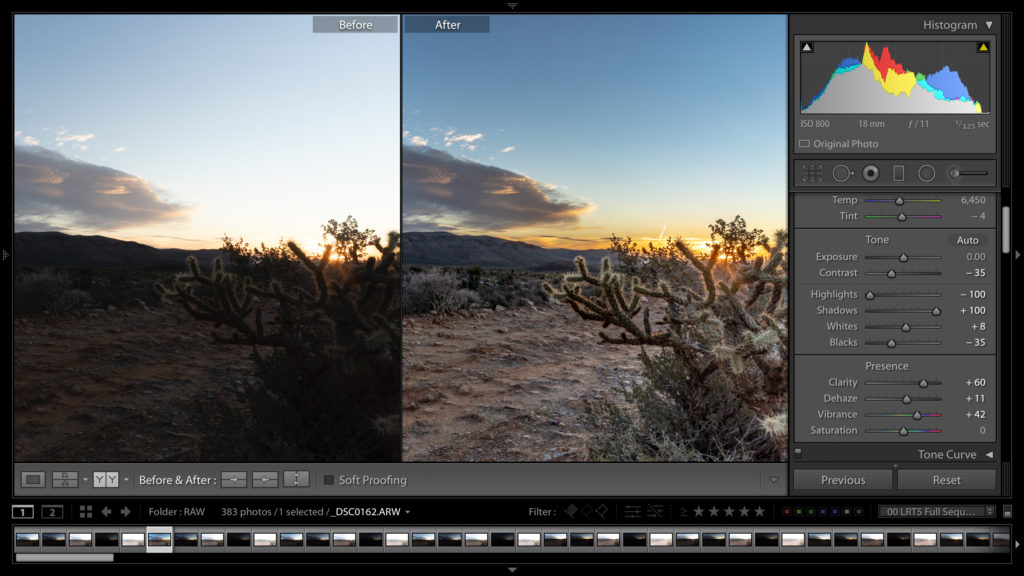
Presence Controls + ContrastThe Presence controls generally affect the depth and color saturation of the image. I typically combine these controls with the Contrast slider.
Merging ExposuresIf you’re using a newer version of Lightroom (or the Creative Cloud version), you’ll find the ability to merge exposures. The approach here is simple: To increase the dynamic range of a photograph, simply capture more information in the field. 
the same. Here are the controls on a Canon EOS 5D Mark IV. In the field: Look for a setting on your camera called Automatic Exposure Bracketing (AEB). This option allows your camera to quickly switch through several exposures while shooting in a burst mode. Most cameras have this feature, but the number of shots and the exposure difference between each shot can vary between models. 
In Lightroom: The process to create a basic HDR image is pretty easy. Step One: Select the images you want to merge. You can use Cmd/Ctrl-click to choose multiple photos. Step Two: Choose Photo > Photo Merge > HDR, or press Ctrl+H. A new dialog box will open. After a few seconds, a preview image should appear. 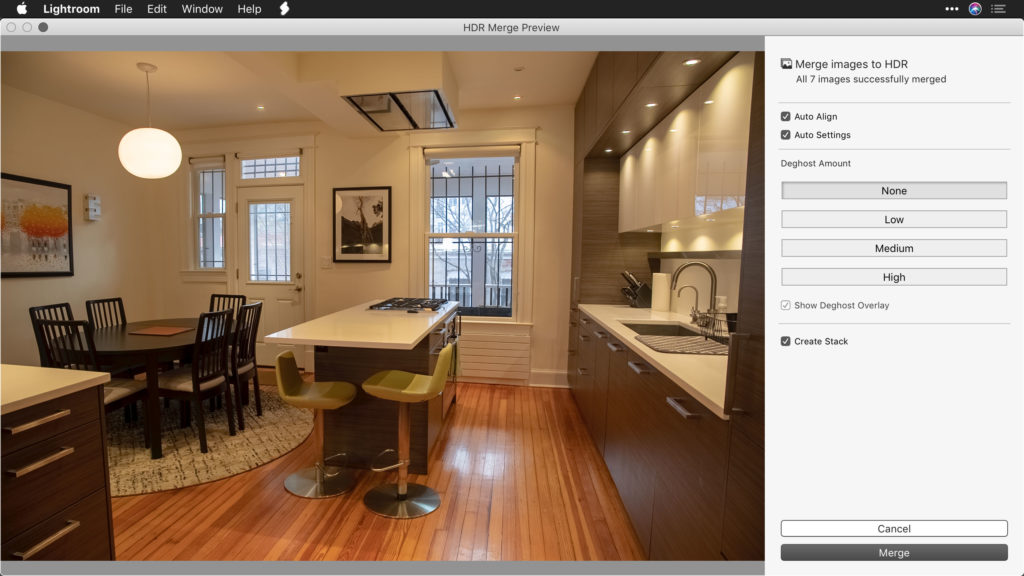
Step Three: Choose the Auto Tone option if you want Lightroom to create an evenly toned merged image. Step Four: Choose the Auto Align option if you were shooting handheld. Otherwise, you can leave it unchecked. Step Five: If there were moving objects in the scene (like a tree blowing in the wind or people walking), try one of the Deghosting options. Step Six: Click the Merge button to generate a new DNG file and add it to your Lightroom catalog. Step Seven: Adjust this new image like a regular raw file. You should see more flexibility in the dynamic range, however. Using Aurora to Push Dynamic Range FurtherWhile I’m a huge fan of Lightroom’s HDR toolset, I often want to take things further. For this, I turn to Aurora HDR from Skylum. It’s a plugin that works seamlessly with Lightroom. You can use Aurora’s Quantum HDR engine to:
While Aurora has been around for many years, the latest version changes everything. The Quantum HDR engine is a technological breakthrough. Not only are the best parts of each photo used when merging, details that are harmful are left out. This means no halos and less noise. In fact, the software use artificial intelligence to recognize key parts of the image and automatically create the best photo. If you haven’t seen it, you just have to give it a try. Alternative Raw DeveloperIf you’re facing a tough exposure, there’s an alternative to fighting it in Lightroom. Sure, you could use Tone and Curves and localized adjustments, but that takes time and doesn’t always work. Instead, I just kick the raw file over to Aurora and let it solve things. This approach is really Expanded Dynamic Range photography; the image is maximized from a single raw photo. Step One: Select the image in Lightroom. Step Two: Choose File > Plug-in Extras > Transfer to Aurora HDR 2019. The raw image will be opened in Aurora HDR. Step Three: In Aurora, choose the Color Denoise and Chromatic Aberration Reduction options from the gear menu. 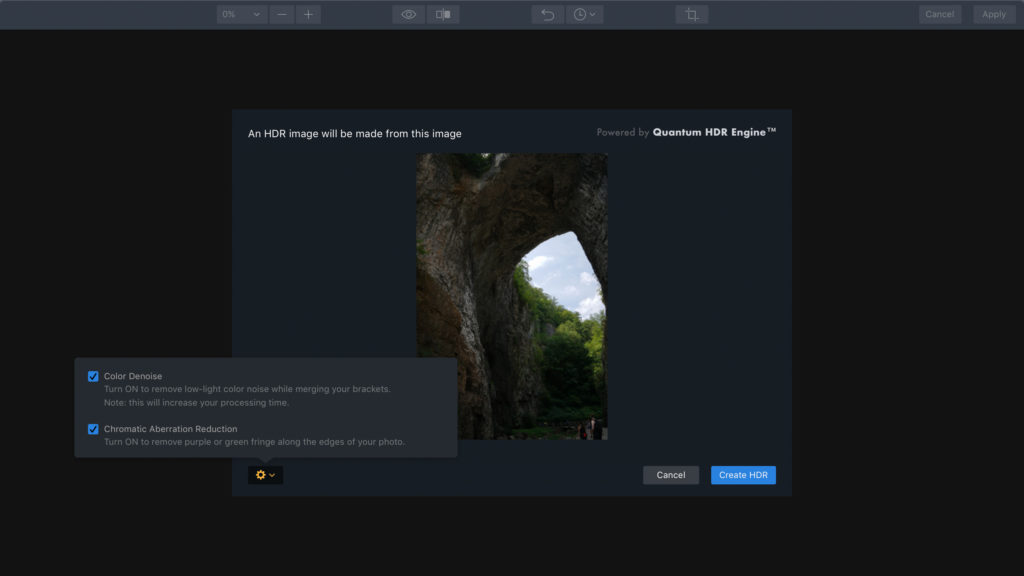
Step Four: Click Create HDR. The full range of details in the raw file will be analyzed and recomposed into a proper exposure. 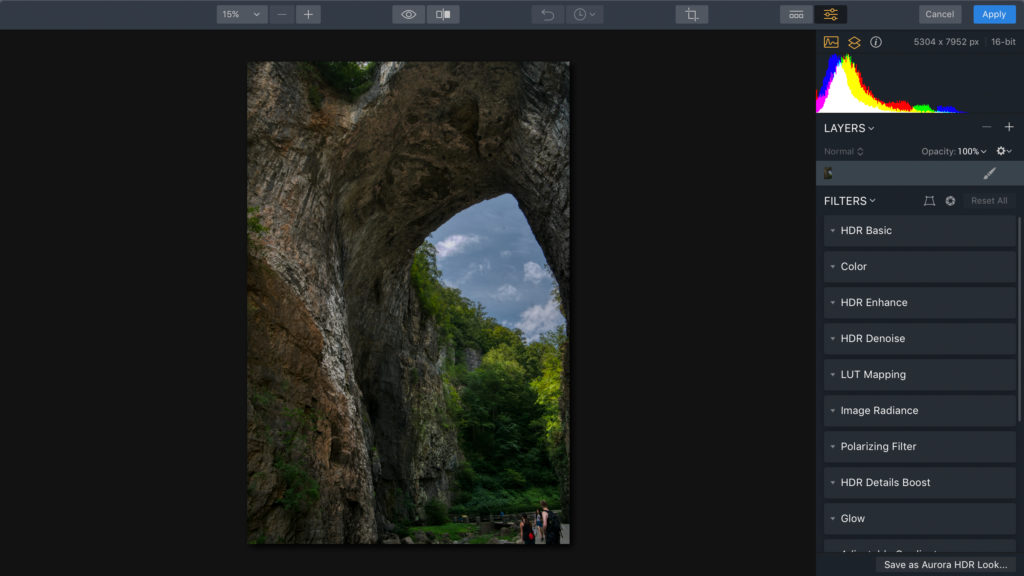
Step Five: Feel free to use an Aurora HDR Look to quickly enhance the image, or use the manual controls to dial in the perfect exposure.
Running as a PluginSometimes I get to the end of my workflow in Lightroom and I just want some more pop. The Artistic and Dramatic Looks in Aurora are great for creativity. I also love black and white photography, and Aurora’s support for Lookup Tables (LUTs) makes for compelling black and white conversions. 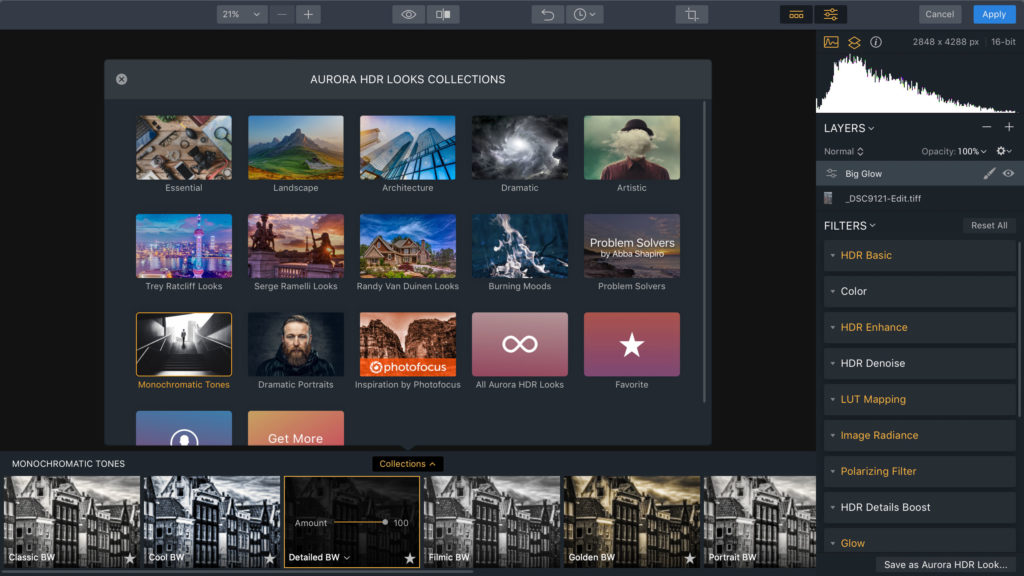
To apply a Look in Aurora: Step One: Select an image in your Lightroom catalog that you’d like to enhance. Step Two: Choose Photo > Edit In > Aurora HDR 2019. Step Three: In the new dialog box, choose to edit a TIFF image in 16-bit color using the Adobe RGB color space. 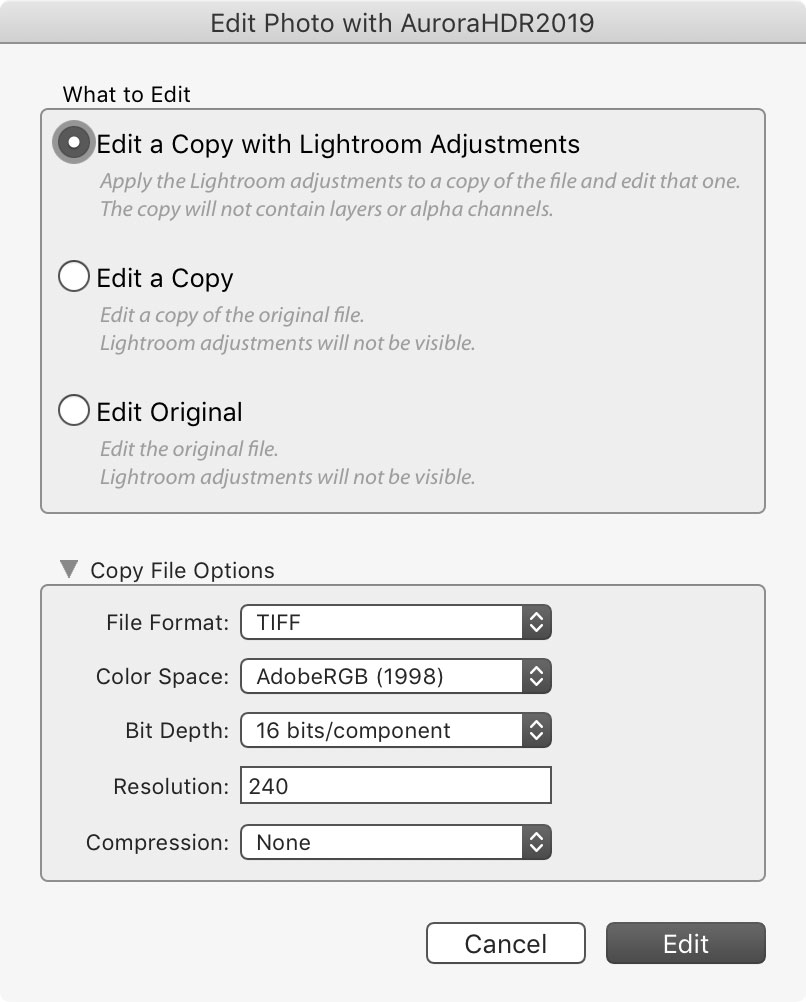
Step Four: In Aurora HDR, if the Looks panel isn’t visible, choose View > Show Aurora HDR Looks. Step Five: Click the Collections button to browse categories or download more Looks. Step Six: Click on a Look in the browser. Step Seven: Use the Amount slider to adjust its intensity. Step Eight: Use the manual controls as desired to further enhance the image. Step Nine: Click Apply to return the image to your Lightroom catalog. 
Developing an Advanced DNGI love the ability to merge panoramic photos right inside Lightroom. I use it all the time with my drone photographs. Most drones have panoramic shooting built right in. If not, a gentle tap on the control stick will let you pan the drone between shots. Just be sure to capture DNG files for the maximum benefit. To develop a panoramic DNG: Step One: Select the panoramic images in your library. Step Two: Choose Photo > Photo Merge > Panorama, or press Ctrl+M. A new dialog box will open. After a few seconds, a preview image should appear. 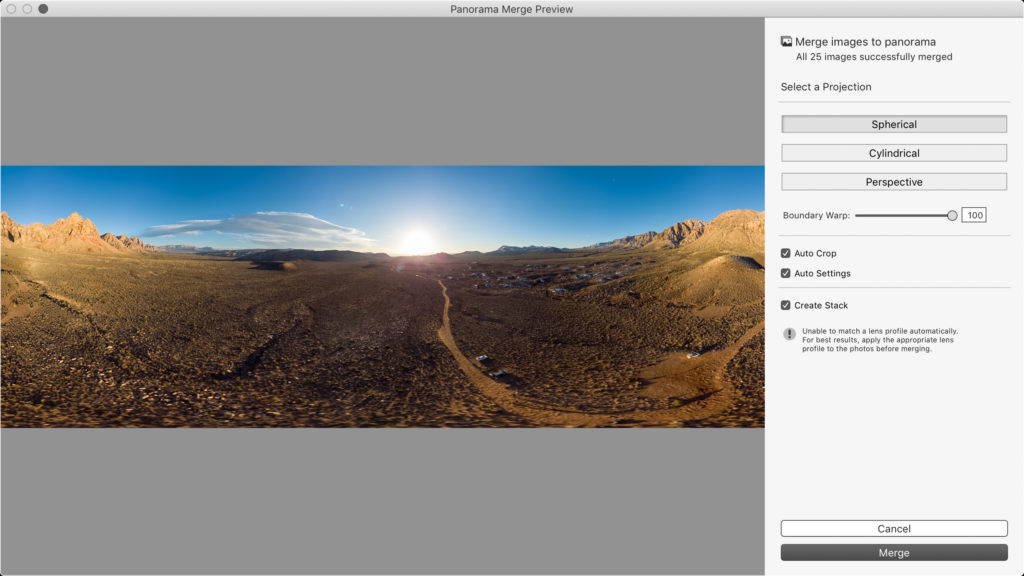
Step Three: Choose a projection method. Spherical and Cylindrical usually work best. Step Four: Adjust the Boundary Warp settings and the Auto Crop to taste to give a full image. Step Five: When ready, click Merge. A new DNG file will be created. Step Six: Select the new file and choose File > Plug-in Extras > Transfer to Aurora HDR 2019. The raw file will be handed off to Aurora, where exposure and detail can be maximized. Step Seven: In Aurora, choose the Color Denoise and Chromatic Aberration Reduction options from the gear menu. Step Eight: Click Create HDR. The full range of details in the raw file will be analyzed and recomposed into a proper exposure. 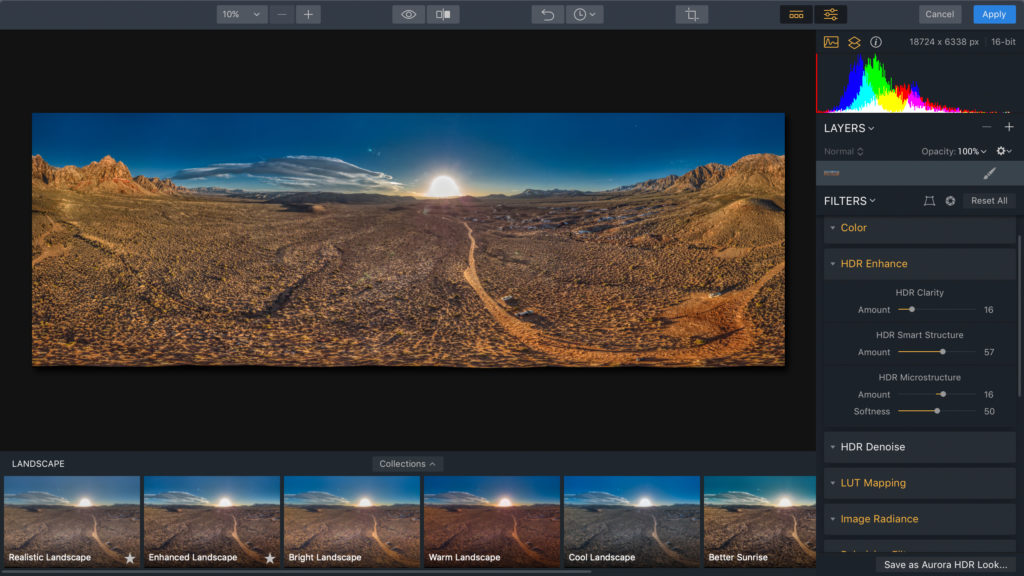
Step Nine: Use Aurora HDR Looks or the manual controls to refine the image’s appearance. Step 10: Click Apply to return the image to your Lightroom library.
Merging BracketsWhile Lightroom offers a compelling solution for HDR merging, it still only creates 16-bit files. These new DNG files are quite useful, but merging with Aurora HDR allows you to create a 32-bit image. To merge brackets in Aurora HDR: Step One: Select the source brackets in your Lightroom library. The files should all be in the same format. Step Two: Choose File > Plug-in Extras > Transfer to Aurora HDR 2019. 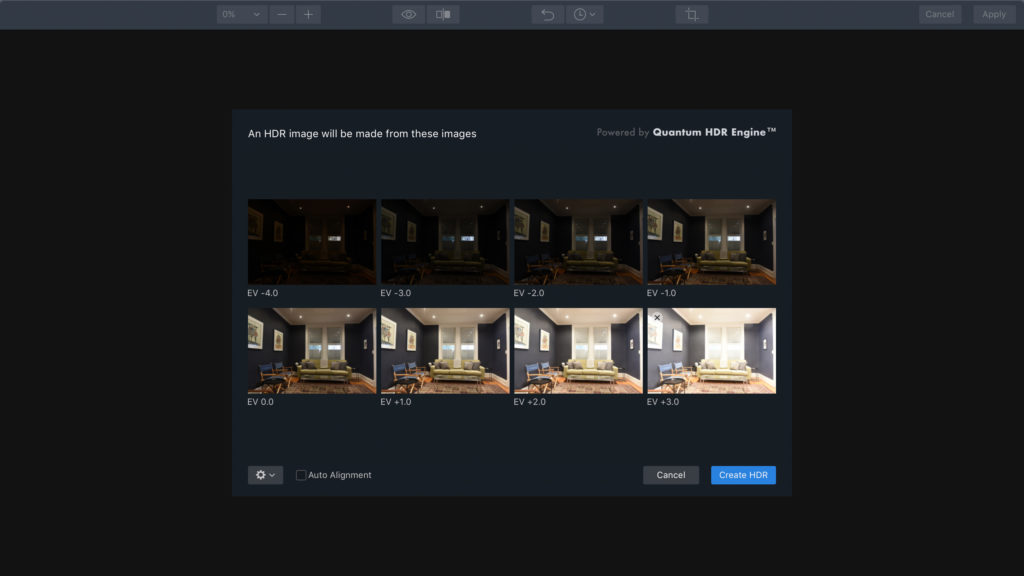
Step Three: Choose options in the merge dialog.
Step Four: Click Create HDR to merge the files. The full range of details in the raw files will be analyzed and blended into a proper exposure. 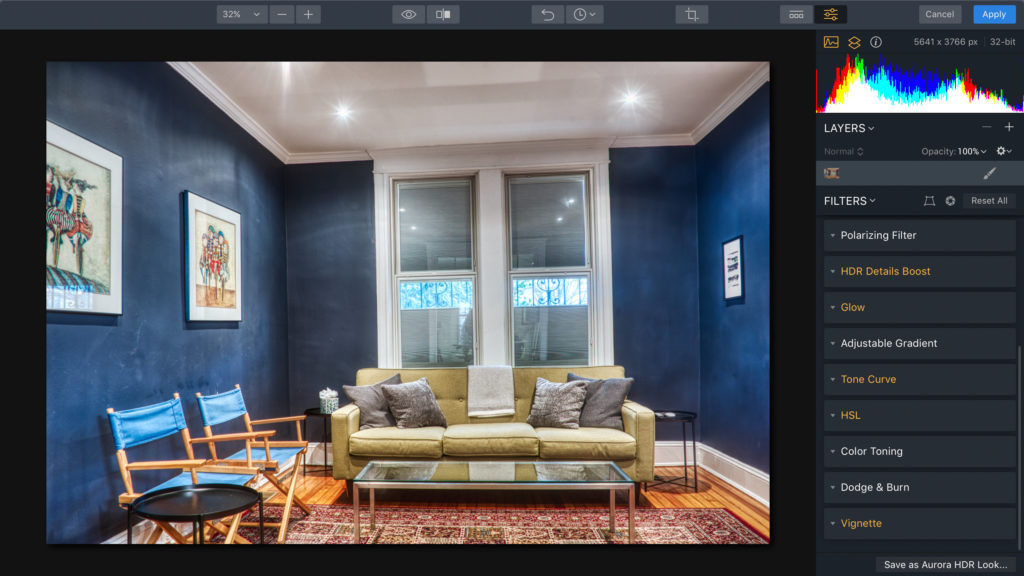
Step Five: Use Aurora HDR Looks or manual controls to refine the image’s appearance. Step Six: Click Apply to return the image to your Lightroom library. 
Step Seven: Take advantage of Lightroom adjustments like Upright and Sharpening. Now You TryI’m sure you have images in your library where dynamic range is challenging. Try out the techniques in this article and see if they make a difference. Better yet, the next time you’re shooting, give bracketing a try. And don’t forget to give Aurora a chance. It’s perfect for unlocking the hidden beauty in your photos and gives a huge boost to natural light photographers. The power of HDR can be our little secret. The post How to Recover Shadows and Highlights Like a Pro—A Guide to Maximizing Details for Any Photograph Using Aurora HDR appeared first on Lightroom Killer Tips. Photography via Lightroom Killer Tips https://ift.tt/2sh0aZ8 March 28, 2019 at 03:40AM
https://ift.tt/2JJL9tD
Panasonic S1 10-bit and V-Log paid upgrade coming in July https://ift.tt/2UY89pW
Back when Panasonic announced its DC-S1 full-frame mirrorless camera the company said that a paid upgrade that would add some significant new video features was coming in the future. Today, the company said that videophiles will be able to purchase the upgrade this July, at a price to be determined later. The features that the update brings are:
Prior to this upgrade, V-Log was only available on professional Panasonic video cameras, such as the EVA1. V-Log provides an extra 2-stops of dynamic range compared to V-Log L found on the GH5/GH5S, which should result in improved highlight retention in high dynamic range scenes. As mentioned above, pricing has yet to be determined, though Panasonic says that it will be announced sooner than July. Press Release Panasonic Releases the Software Upgrade Program for LUMIX S1 in July 2019 to Expand Its Video PerformanceNewark, NJ (March 28, 2019) - Panasonic has announced that the company will release a software upgrade key for the full-frame mirrorless camera LUMIX S1 in July 2019. As scheduled, this paid firmware upgrade is to further expand the video performance of the LUMIX S1 for advanced video recording. The optional Software Update Key will be available for purchase from authorized Panasonic dealers. Functions available with the upgrade program are as follows. - 4:2:2 10-bit 4K 24p/30p internal video recording - 4:2:2 10-bit 4K 60p HDMI output - Full V-Log recording ・Design and specifications are subject to change without notice. To learn more about Panasonic’s line of LUMIX Digital Cameras and other consumer electronic products, please visit www.shop.panasonic.com and www.lumixlounge.com. You can also follow Panasonic on Twitter (@mypanasonicNA) and Facebook. Photography News via Dpreview https://ift.tt/i0r8o5 March 28, 2019 at 01:00AM
https://ift.tt/2CRaVXh
How And Where To Buy Your New Photography Equipment. https://ift.tt/2JLB9A4 For those of us of a certain age, buying camera equipment used to be so simple. You would see a review in a photography magazine, phone a few stores and visit the one with the best price/service. There, the shop’s experts would let you play with the camera and lens to get a feel for it, give you lots of advice, then hopefully sell it to you. Move forward 20 years and not only do we have many many different ways of purchasing our equipment, we also have much more equipment to choose from. If you feel like it’s a bit of a minefield out there when it comes to buying gear, then you are probably right. Today, we will attempt to condense down the process of deciding how and where to buy your new photographic equipment, highlighting some of the pros and cons of each. Narrow Down Your Choices.Before you go too far, you really need to fine hone your choice of equipment. Here, the marvels of the Internet can be both your friend and your foe. The go-to choices for helping you decide are both forums and reviews. There are some things to remember, however, when looking at both reviews and forums. Review sites, especially the biggest ones, tend to rely on advertising revenue. A significant percentage of that revenue may come from photographic manufacturers. If they are heavily favouring several particular brands in advertising, there is the chance they will be doing more favourable reviews for said brands. When it comes to forums, we are all aware of the term fanboys. Asking advice on a Nikon forum about buying a Nikon camera is unlikely to yield too many negative comments. Ask the same advice on a Canon forum and you will be reliably informed that you are buying the worst camera in the world. Ironically one of the better places to find good advice is on more general, well moderated photographic groups on Facebook. Don’t ignore reviews from lesser known photographers, often these guys and girls have bought the equipment themselves and can be less biased towards a particular brand. YouTube can often be a useful place to watch such reviews as legally, YouTubers are supposed to declare any paid or sponsored content. With your decision made or at least narrowed down, where do you buy the product? Bricks And Mortar StoresThe beginning of the digital age and maturing of the Internet created the perfect storm for bricks and mortar retailers. In a few short years, we went from virtually every decent sized town having a proper camera store to a point where some major cities did not even have one. The sheer growth of digital photography has halted, perhaps even reversed that trend to a certain extent. Those bricks and mortar stores that survived, did so because they recognised the advantages of the Internet and perhaps also realised the size of the future second-hand market. Today, most many large cities will have at least one decent photographic store, perhaps more. These are more likely to be part of a chain than real independents, but to have survived they must be competitive and have good customer service. There are some very significant advantages to buying your equipment in a real store. The first is as simple as the fact that you can pick it up and try it. The advantages of this cannot be overstated, especially when buying a camera body or lens. You may well be using that camera for years ahead, it has to feel right in your hands. The other main advantage is being able to talk with an expert. A good camera retailer will not only have a great knowledge of the products available but will be able to determine what’s right for you. That’s an invaluable thing to have. The downside of the bricks and mortar stores is, of course, the price. However, these days that premium price is not often as big a gap as you might expect. Stores that have expanded to the Internet now have a much larger market and that in turn gives them better buying power. Assuming you have no local store, or you prefer to buy online, what are your options? Buying OnlineThe real minefield when buying photographic equipment is the Internet. So what are your main choices when shopping for gear online?
The online retailers from real stores will still probably be your safest bet. The price might be slightly higher but they will often ship very quickly and have an excellent returns policy. They are also probably the easiest to research in terms of customer satisfaction. Dedicated online photographic retailers can be a good place to get a better deal. However, you need to research the retailer carefully. There are some very professional looking stores that merely switch and bait or even worse. The best retailers will have been around for a few years and have a good reputation. There is no denying that you can get some amazing deals on Amazon. Most photographic items will be sold through third-party retailers on the site so again due diligence is important. Check the seller’s rating and the number of sales, also check that it ships from your own country and that delivery is free. Although eBay still has some great camera deals, Amazon seems to have stolen much of its thunder when it comes to buying new products. However, eBay remains king for secondhand and refurbished equipment. Many of the independents that sell through Amazon also sell through eBay so it worth checking which site is giving the best deal. 
eBay is another option but buyer beware. Buying new through listings sites is not recommended. However, there are plenty of great deals to be had on secondhand products. Always use caution when buying from listings sites. If meeting in person, do so in a public place and check the product over carefully. Buyer Beware When Buying OnlineThere is a couple of things that you should look at very closely when purchasing online. Firstly, what is the returns policy? If the online retailer is going to charge you a 30% restock fee for a return then you need to be 100% sure you are buying the right thing. Also, take care to look at their returns policy on faulty goods. Secondly, if the price is very competitive, there is a good possibility that the product is a grey import. Depending on the manufacturer, your warranty may not be valid for the country you purchased it in, meaning costly courier serviced overseas for any repairs, or worse, no free repairs at all. Buying Equipment In SummarySo lets quickly go over the pros and cons of online and bricks and mortar stores. Buying At A Real StorePros
Cons.
Buying OnlinePros
Cons
Personally, if I have the opportunity to buy from a real bricks and mortar store, I do. The price premium is often well worth the advice and help that you will receive. The added bonus is that you can try the product before buying. If your preference is for online retailers, then do your research, do not be swayed by highly competitive prices, rather looks for the best deals amongst the well know and trusted online retailers. Photography News via Light Stalking https://ift.tt/2kwTW5i March 27, 2019 at 10:01AM
https://ift.tt/2HVwvgj
Canon Asia pre-announces EOS R firmware update with better Eye-Detection AF, bug fixes https://ift.tt/2CGbTWd
Canon Asia has shared a notice on its website informing EOS R owners that firmware version 1.2.0 for the full-frame mirrorless camera will be available sometime in the middle of April 2019. According to the notice the update will include improved Eye-Detection AF that supports Servo AF when shooting still images and it will now be an available option when shooting video, regardless of the Movie Servo AF mode. Canon has also implemented bug fixes for the following issues: 1. Under certain conditions the electronic level displayed in the electronic viewfinder did not display properly. DPReview will keep an eye out for an announcement on the release and cover it when it's live, but you can also keep tabs on the EOS R firmware page throughout April. Photography News via Dpreview https://ift.tt/i0r8o5 March 27, 2019 at 09:59AM
http://img.youtube.com/vi/asX6h-aRY0Q/0.jpg
DPReview TV: Fujifilm XF 16mm F2.8 quick review https://ift.tt/2uwPhCZ Want a compact, wide angle prime for your X-mount camera? If so, Fujifilm's new XF 16mm F2.8 might just be the lens for you. In this quick review, Chris and Jordan put it to the test – which, somehow, involved shooting through the glass floor of a skyscraper. Get new episodes of DPReview TV every week by subscribing to our YouTube channel!
Sample gallery from this week's episodePhotography News via Dpreview https://ift.tt/i0r8o5 March 27, 2019 at 08:06AM |
Categories
All
Archives
November 2020
|


 RSS Feed
