|
http://bit.ly/2Tje3RA
How to Use Facebook Automated Rules to Manage Facebook Ads http://bit.ly/2B2TP7x
In this article, you’ll discover how to use Facebook’s automated rules to save time managing Facebook ad performance. Why Use Facebook Automated Rules to Manage Facebook Ad Campaigns?There are two main phases of Facebook advertising: setup and management. The setup phase is the foundation of your advertising and includes activities such as audience research; creating saved, custom, and lookalike audiences; Facebook pixel and conversion tracking setup; and, of course, creating your actual campaigns in your Ads Manager dashboard. The management phase encompasses all of the activities you do once your campaigns are live and delivering, and your ads are embedded in the Facebook ad algorithm. This is the most important but time-consuming task of running successful ads. Managing your Facebook ads means that you continuously analyze the performance of your ads in each of your campaigns and, based on the findings, implement changes such as tests or optimizations to improve results. Not actively managing ad campaigns is one of the biggest mistakes marketers make with Facebook advertising. If you just set up a campaign and let it run without any analysis or changes, it will decrease in performance over time due to ad fatigue. If you create automated rules in Ads Manager, Facebook will automatically update or notify you of changes to your campaigns, ad sets, and ads, and undertake the actions you specify. They give you more control and reduce the time you have to spend manually managing your campaigns.
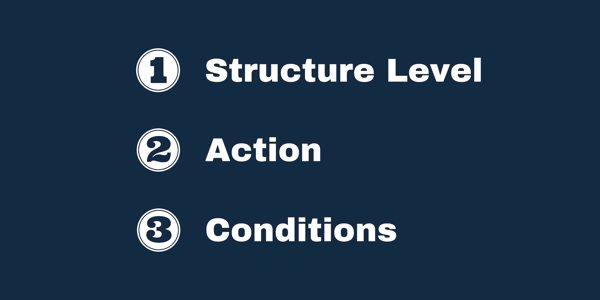
Creating automated rules involves three main parts:
This article focuses on creating rules to help reduce manual analysis based on the metrics used to measure your return on ad spend (ROAS), as well as other ad analysis metrics. You can apply rules to all of your campaigns, ad sets, or ads, or to specific ones using the Conditions field. While automated rules reduce the time needed to manage your ads, you should still monitor overall performance of your ads to make sure that they’re meeting your marketing goals.
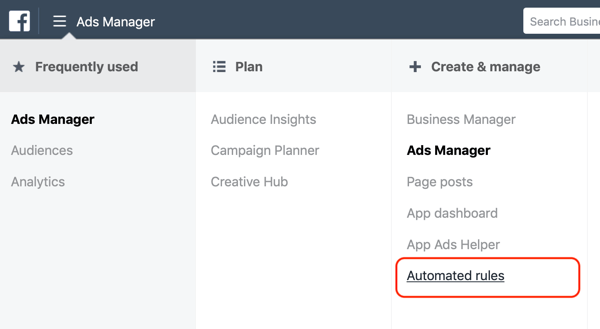
Which Facebook Ad Performance Metrics Matter?Before I walk you through how to create different automated rules, it’s worth outlining the metrics these rules will be based on. ROAS is the overall measure of the effectiveness of your Facebook ad campaigns. It’s the most important metric because it tells you how profitable your ads are and their monetary impact on your business. Facebook has two core ROAS metrics: mobile app purchase ROAS, which is linked to your mobile app events, and website purchase ROAS, which is linked to the standard purchase conversion event. If you sell anything online, you should be using the purchase standard event action to track all purchases for volume and value. (Here’s how to install conversion tracking if you haven’t already set it up.) ROAS is expressed as a ratio, so 2.5 would be a 250% return on ad spend, for example. After you’ve analyzed your ROAS at the campaign and then ad levels, the other four core ad metrics to analyze are cost per results, relevance score, frequency, and CPM. For a full, in-depth review of these metrics, click here, and for a complete guide on measuring your ROAS, click here. How to Find Automated Rules in Facebook Ads ManagerNow let’s look at where to find automated rules in Ads Manager and dive into the different rules you can create to save time managing your campaigns. In your Ads Manager dashboard, navigate to the main menu and select Automated Rules under the Create & Manage column.
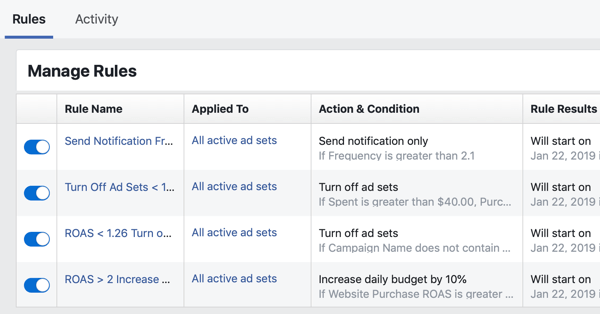
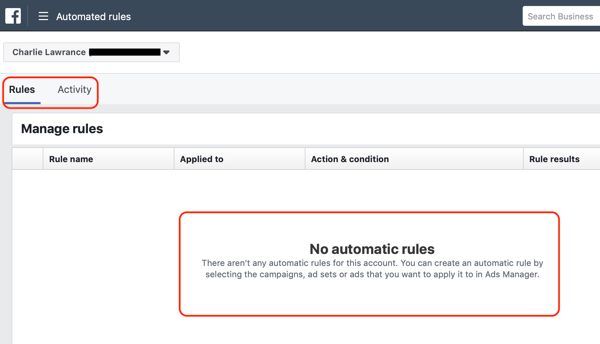
In the Automated Rules dashboard, you’ll see two tabs. The Rules tab lists your rules and whether they’re active or inactive, and the Activity tab shows the history of the changes in your rules. When you first navigate to the automated rules dashboard, both tabs will be empty and you’ll see a message that says “No Automatic Rules.”
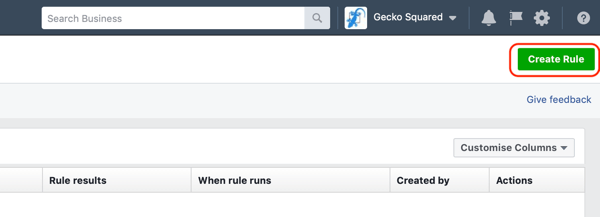
To create a new rule, simply click the Create Rule button in the top-right corner.
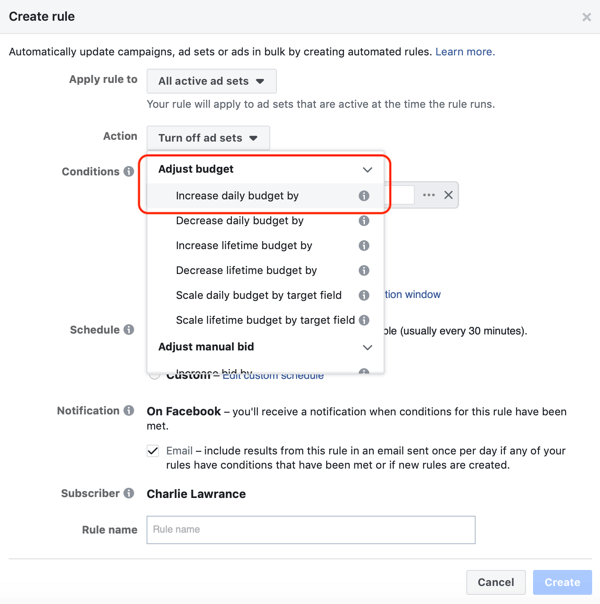
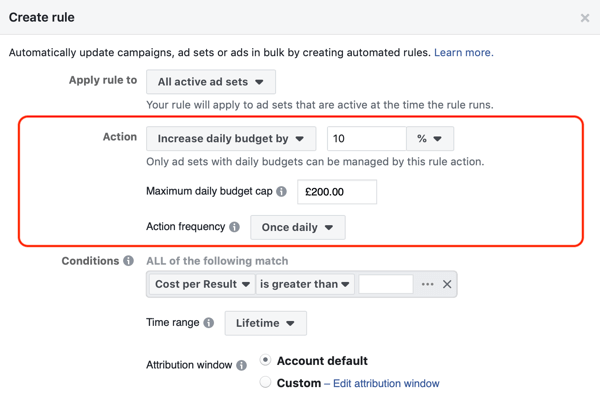
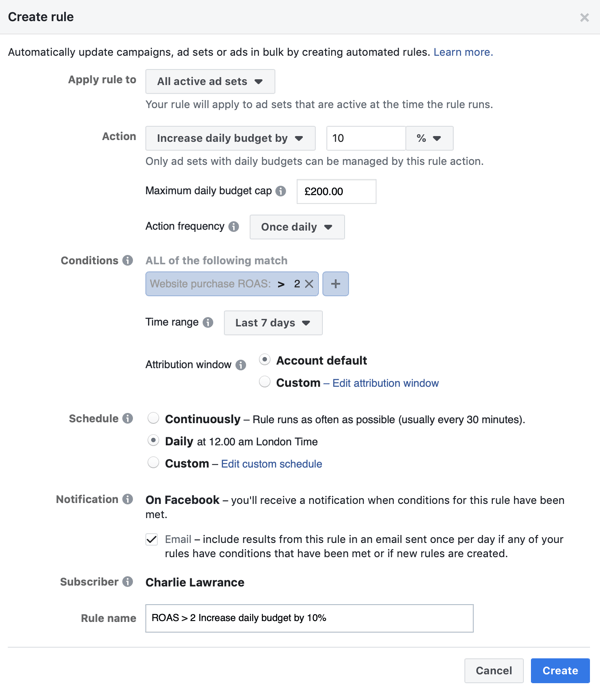
The Create Rule window will then appear. From here, set up these four rules to help manage your campaigns. #1: Increase Daily Budget When ROAS Is Greater Than 2This first rule will increase the daily budget for ad sets that are delivering a 2X ROAS. In the Create Rule window, select All Active Ad Sets from the Apply Rule To drop-down menu. Next, under Action, select Adjust Budget > Increase Daily Budget By, and in the field next to it, enter a percentage between 10 and 20. When first scaling, it’s a good idea to start with 10% to implement a slow scale. You can increase it as much as you like, but the higher the percentage increase, the longer your ad sets will take to settle at the new budget in the ad algorithm.
Below Action, you’ll find two options: Maximum Daily Budget Cap and Action Frequency. Set a maximum daily budget cap of at least twice your current budget. So if you’re spending $100 per day on each ad set, set a maximum budget cap of $200. Then set your action frequency. This is the minimum amount of time the same action can be taken on a rule. By default, it’s 12 hours. However, increasing the budget by 10% every 12 hours would be too fast, so change the action frequency to Once Daily.
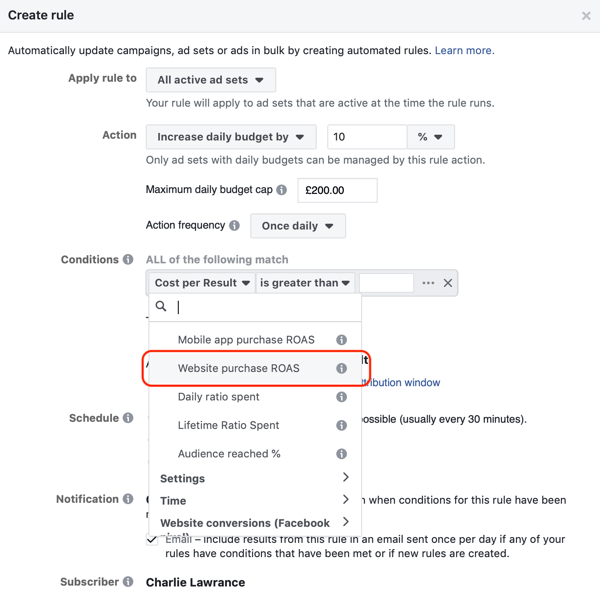
Now let’s move on to the Conditions section of the rule. This is what needs to occur for the action you just created to be implemented. In the first drop-down list, select Website Purchase ROAS. You’ll then be presented with a number of conditions such as Greater Than, Smaller Than, Between, and Not Between. Select Greater Than and in the number field to the right, enter 2, which means ROAS greater than 2 (or 200%).
Because you only want to scale ad sets that are consistently delivering a 2X ROAS or more, and also exclude the possibility of statistical chance, choose Last 7 Days from the Time Range drop-down list. Next, leave the attribution window at the default and set the schedule to check the rule daily. Leave the Notifications setting as the default with email included and then name your rule. When you’re finished, click Create.
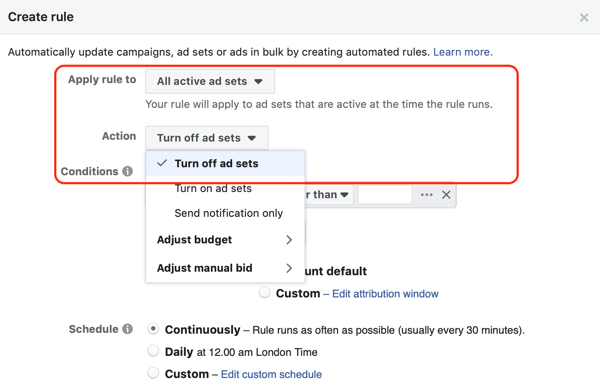
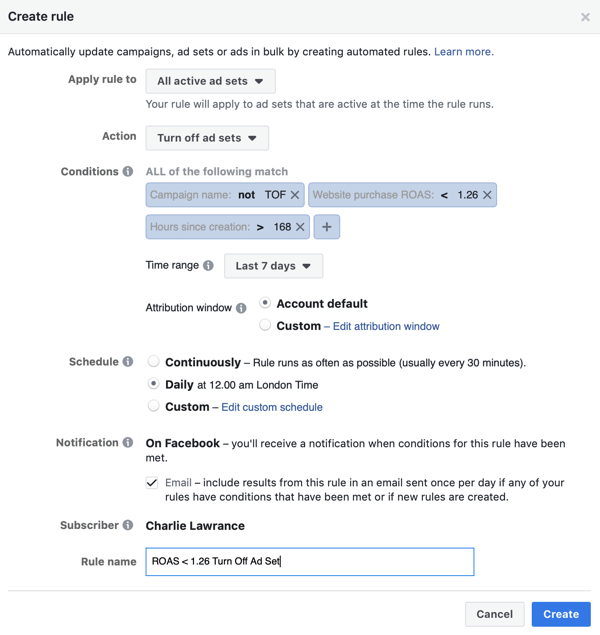
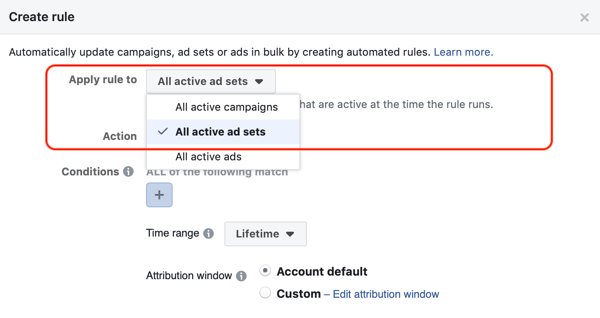
To summarize, you’ve created a slow scale rule that will increase the daily budget by 10% every 24 hours of any ad set where the ROAS over the last 7 days is greater than 2. #2: Stop Ad Sets That Fall Below Your Minimum ROASThis rule will turn off ad sets when the ROAS falls below your acceptable minimum. In the Create Rule window, select All Active Ad Sets from the Apply Rule To drop-down list. Then from the Action drop-down list, choose Turn Off Ad Sets.
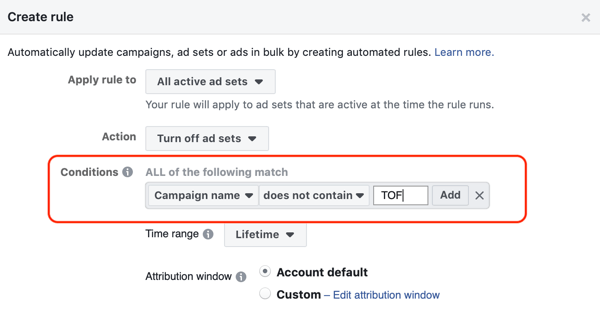
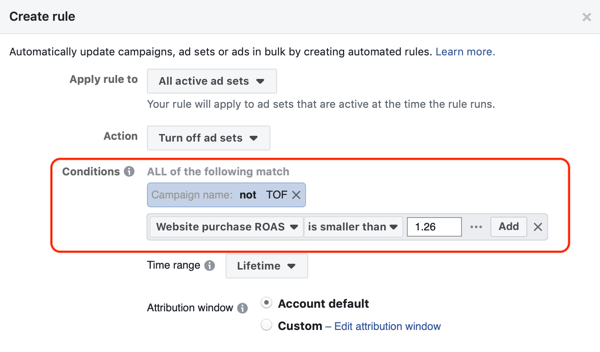
Experience 3 days with the best social marketers. Discover the latest tactics and improve your marketing know-how! When creating an ROAS-based rule, with the action of pausing any underperforming ad sets, you only want to apply the rule across new customer acquisition campaigns that are aimed at generating sales, not awareness campaigns that are “warming up” cold audiences by showing them content. This is because awareness campaigns will have a negative or breakeven ROAS and you don’t want them paused by your rule. Pro Tip: This is where having a consistent and proper campaign naming structure is really helpful. If you name campaigns by their place in your sales funnel—TOF for top of funnel (awareness), MOF for middle of funnel (customer acquisition), and BOF for bottom of funnel (website remarketing customer acquisition)—you can easily exclude all TOF awareness campaigns. In the Conditions section, the first condition you want to set is to target only your customer acquisition campaigns. From the first drop-down list, select Settings > Campaign Name, then choose the condition Does Not Contain, and in the adjacent field, type in TOF. This means the rule will apply only to campaigns where TOF is not in the name, which is all of your customer acquisition campaigns.
To properly use this rule, you need to calculate your minimum viable return, which is your lowest acceptable ROAS that still allows you to make a profit on your purchases. To calculate this, you need to find your average Facebook purchase value, cost of goods sold, and gross margin. To keep things simple, suppose you generated 3,000 purchases from your Facebook ads in the last 3 months and they had a $150,000 purchase conversion value. Therefore, the average order value is $50 ($150,000/3,000). It costs $10 to make and ship the product, so you have a $40 margin. This means you have to acquire customers for less than $40 to make a profit on the first purchase. The breakeven point would be 1.25X ROAS ($50 divided by $40) and anything over 1.25 would be profitable. Therefore, 1.26 is your minimum acceptable ROAS. In the Conditions section, click the blue + icon to add another condition to your rule. From the drop-down menu, select Website Purchase ROAS under Most Common. Then choose Is Smaller Than and enter the minimum acceptable ROAS (1.26 for this example).
The final condition you want to set is to run this rule only on ad sets that have been running at least 1 week. Click on the blue + icon again and from the first drop-down list, select Time > Hours Since Creation, then select Is Greater Than, and enter 168 (which is the number of hours in 7 days). Finally, under Time Range, select Last 7 Days (this is the default analysis window for ROAS measurement). Keep the attribution window at the default (28-day click and 1-day view) but change the schedule of the rule to check daily, as opposed to continuously. Finally, name your rule and click Create.
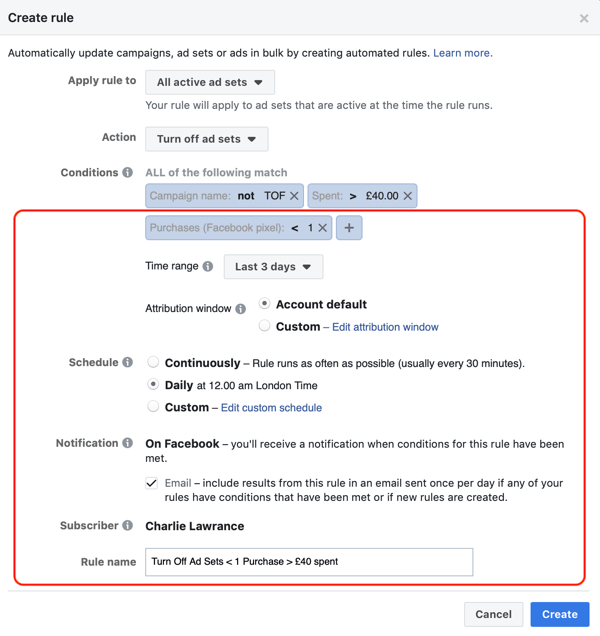
To summarize, you’ve created a rule that will turn off only your customer acquisition ad sets when the ROAS over the last 7 days falls below your minimum acceptable ROAS. #3: Turn Off Ad Sets When Spend Is More Than 2 Times Your Cost Per Purchase AND There Is Fewer Than 1 PurchaseThis rule helps you better manage your budgets and kill underperforming ad sets. Use it if you have trouble calculating your minimum acceptable ROAS and can’t use rule #2. In the Create Rule window, choose All Active Ad Sets from the first drop-down list. Select Turn Off Ad Sets as your action and move on to the conditions section.
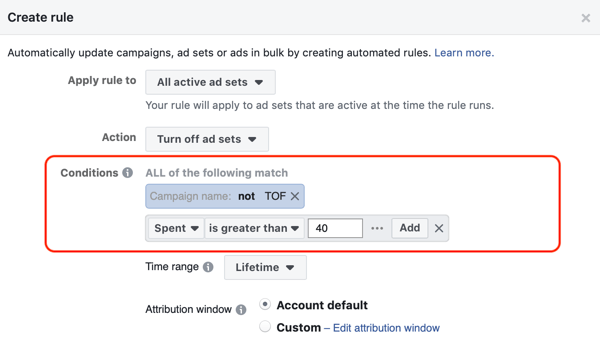
Again, as with the previous rule, you only want this to apply to your customer acquisition campaigns. So the first condition is to only include those campaigns by adding a naming condition. In this case, set a condition to exclude your TOF awareness campaigns. The second condition you want to set is an ad set spend level up to two times higher than your current cost per purchase. To do this, select Spent from the first Conditions drop-down list; then select Is Greater Than; and finally, enter your value, which is two times your cost per purchase. So if your current cost per purchase is $20, enter $40 in the Spent condition.
The final condition to set is a minimum purchase volume. Again, add in a new condition and from the first drop-down list, select Website Conversions > Purchases (Facebook Pixel). Next, choose Smaller Than and in the field box, enter the number 1. In the Time Range section, select Last 3 Days from the drop-down list and then leave everything else at the default, apart from changing the schedule to Daily. Then add a name for your rule and click Create.
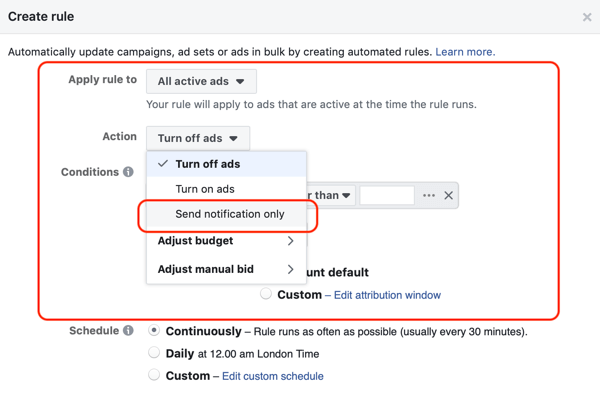
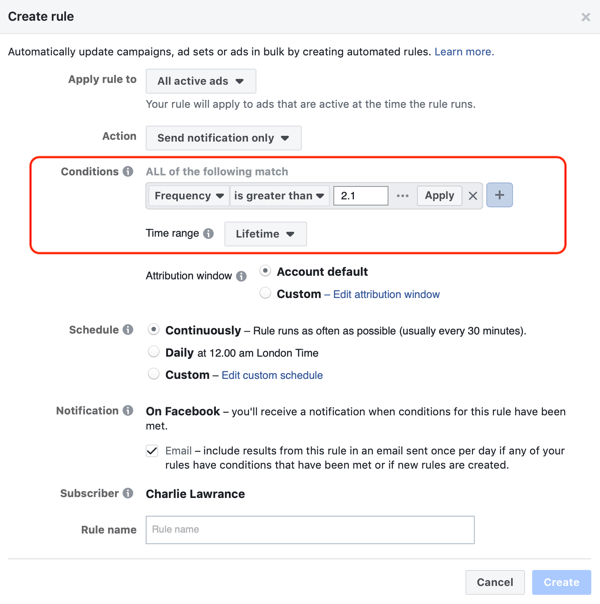
To summarize, this rule will turn off customer acquisition ad sets that have fewer than one purchase over the last 3 days and have spent at least two times your cost per purchase. This is a great rule for turning off ad sets that don’t perform well in the first week or those that experience a sudden negative change in results due to ad fatigue issues. #4: Get Notified When Ad Frequency Is Above 2.1This next rule will decrease the amount of time you spend checking your ad frequency. By implementing this rule, you’ll automatically be notified if any ads trigger the frequency condition. This also helps improve your efficiency because you can catch the changes in an ad’s performance faster, and therefore reduce wasted ad spend. In the Create Rule window, choose All Active Ads and under the action, select Send Notification Only.
The condition for this rule is to notify you when the frequency of an ad hits 2.1. Remember, the higher your frequency climbs, the more times your audience is seeing your ad. When it rises over 2, you can start to experience negative changes in ad performance, so now is the time to analyze your results. In the Conditions section, select Frequency and the Is Greater Than parameter and set the condition value to 2.1.
For the time range, select Lifetime because frequency is a lifetime metric, starting at 1. Leave the attribution at the default but change the schedule to Daily. Finally, name your rule and click Create. Because this rule affects active ads only, if, based on the findings of your analysis, you decide to create a new ad test and change the creative (for instance), make sure you pause the old ad so it doesn’t keep triggering the rule. To summarize, you’ve created a rule that will send you a notification and email when an ad’s frequency goes above 2.1. You’ll then be able to do further ad analysis to determine what changes to make to your campaign. ConclusionAutomated rules can significantly reduce the amount of time you spend managing your ad campaigns. By implementing ROAS-based rules, you can scale winning ad sets faster and also reduce wasted ad spend by stopping underperforming ad sets earlier than with manual analysis. The frequency rule helps reduce the amount of time you spend checking that metric and will automatically notify you when you may start to encounter ad fatigue issues, highlighted by an increasing frequency. What do you think? Do you use Facebook automated rules? Which of these four rules will help you better manage your campaigns? Please share your thoughts in the comments below. More articles on Facebook advertising:There are 17 tracks of content available to you at Social Media Marketing World. Don't miss this event! Social Media via Social Media Marketing | Social Media Examiner http://bit.ly/1LtH18p January 28, 2019 at 05:01AM
0 Comments
Leave a Reply. |
�
Amazing WeightLossCategories
All
Archives
November 2020
|



 RSS Feed
