
|
http://bit.ly/2RX1sXD
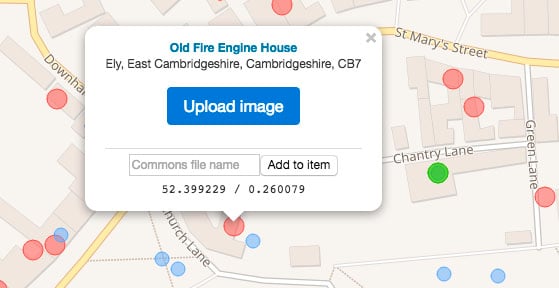
WikiShootMe Shows You Local Wikipedia Spots In Need of Photos http://bit.ly/2MFvwRO
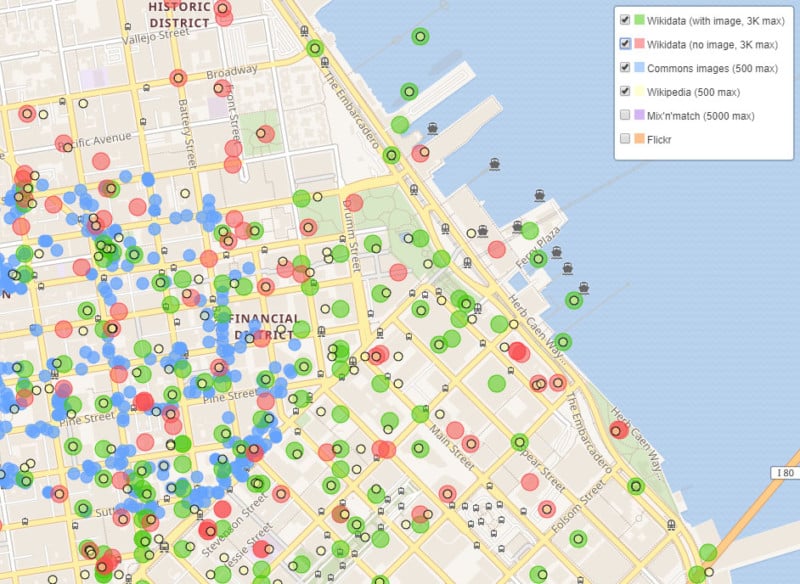
Interested in contributing your photographic talents toward the collective knowledge base of humankind? Check out WikiShootMe. It’s a tool that can show you locations near you where Wikipedia is lacking photos in. A project of the Wikimedia Foundation, WikiShootMe features a map-based interface that’s littered with circles that represent different types of objects. Larger green circles show Wikidata items that already contain photos. If you’d like to find photo ops to shoot as a volunteer, look for the larger red circles, which show Wikidata items (which are used in Wikipedia articles) that are still in need of a photo. The different types of objects are on different overlay layers that can be toggled on and off.
Clicking a circle brings up information about that object (including the coordinates where it’s located) and provides a way for you to upload your own photo of it.
Users can even create new objects on the map for other people to contribute photos to as well. You can find more detailed instructions on how to contribute your images here. Head on over to WikiShootMe if you’d like to start browsing for nearby spots to visit and shoot. (via Wikimedia Foundation via Reddit) Photography News via PetaPixel https://petapixel.com January 30, 2019 at 12:53PM
0 Comments
http://bit.ly/2Ga9uW9
The post 11 Influential Portrait Photographers you Need to Know appeared first on Digital Photography School. It was authored by Caz Nowaczyk. There are some fantastic portrait photographers out there capturing cutting-edge, unique portraits. These photographers have been influential and you can explore and learn something from each of them. They are in no particular order. Here are 11 influential portrait photographers you need to know:1. Sue BryceSue Bryce is a fine art portrait photographer with a classic portraiture style, while still looking quite modern. Her lighting techniques are soft and beautiful.
2. Lindsay AdlerBased in New York City,Lindsay Adler, is a fashion portrait photographer with works appearing in Harper’s Bazaar, Elle, and Marie Claire.
3. Lee JeffriesUK photographer, Lee Jeffries, is well-known for his “Homeless project.” In this project, Jeffries captures close-up portraits of homeless people living on the streets. His extreme close-ups that reveal all on his subjects faces are emotive and spectacular.
4. Derrick FreskeBased in Los Angeles, California, Derrick Freske does fashion portraiture. He uses interesting lighting techniques, including the use of colored gels, and light reflections.
5. Mark SeligerMark Seliger has photographed celebrity portraits for Rolling Stone, GQ, Vogue and Vanity Fair. He has photographed the likes of Kurt Cobain, Leonardo DiCaprio, Charlize Theron, and Nicole Kidman, to name a few.
6. Annie LeibovitzAnnie Leibovitz is a celebrity portrait photographer that has been photographing famous types for decades. Making the transition from film to digital, Leibovitz has continued to inspire photographers around the world. Her photographs have been published in Rolling Stone and the New York Times. She has photographed celebrities including Tom Cruise, Meryl Streep, Anne Hathaway, and Brad Pitt. She also photographed Beatles singer and songwriter, John Lennon, on the day he was murdered (wikipedia).
7. Flora BorsiHungarian photographer, Flora Borsi is well known for her fine-art portraiture series, “Animeyed.” In this series, Borsi uses animal eyes to replace one eye of her human subject. You may recognize Borsi’s work on the Adobe Creative Cloud package.
8. Tina EisenBased in London, UK, Tina Eisen is a fashion/beauty photographer who has made portraits for some big commercial brands.
9. Patrick DeMarchelierPatrick DeMarchelier is a fashion/beauty portrait photographer whose works have been in Vanity Fair and Harpers Bazaar.
10. Marco GrobSwitzerland born, Marco Grob, is based in New York. Moving from fine art still life photography, into portraiture, he has photographed celebrities including George Clooney, Sandra Bullock, Sir Elton John, and Justin Beiber. He has also worked with Marvel Studios, Warner Bros and Netflix.
11. Tatiana LumiereTatiana Lumiere is a fine art and beauty portrait photographer based in Pennsylvania, USA. She specializes in “glamour portraiture with a dreamy, elegant and sensual twist.”
Feature image: © Kevin Landwer-Johan The post 11 Influential Portrait Photographers you Need to Know appeared first on Digital Photography School. It was authored by Caz Nowaczyk. Photography via Digital Photography School http://bit.ly/29wB9CX January 30, 2019 at 12:12PM
http://img.youtube.com/vi/DnGCzmaKoVw/0.jpg
SwitchPod is a 'minimal' handheld tripod that switches modes in seconds http://bit.ly/2DLi2Bn
A new Kickstarter campaign is seeking funding for SwitchPod, a handheld 'minimal' tripod that switches from handheld mode to tripod mode in only a couple seconds. The device requires almost no effort to convert, enabling users to seamlessly transition from recording while holding the device to recording from a flat surface without pausing to adjust the stand. SwitchPod is compatible with any camera, including smartphones and DSLR models; the company behind it emphasizes high portability, a "nearly indestructible" aluminum alloy design, and support for weights up to 100lbs / 45kg. The tripod features a 1/4-20" standard screw for directly attaching a camera, as well as support for ball heads and quick release plates.
Two additional 1/4-20" threads on the tripod's legs enable users to attach accessories, such as a light and microphone, plus the leg design makes it possible to clip SwitchPod to a bag using a carabiner. Other features include a tightening knob, non-slip feet, two sets of finger grooves for grasping the tripod in different positions, and a circle pad to protect the camera's base. The tripod weighs 11.1oz / 315g and measures 11in / 28cm long in handheld mode.
The SwitchPod Kickstarter campaign has exceeded its funding goal, but is still open to new pledges. Backers who pledge at least $79 USD are offered a single SwitchPod as a reward; shipping is estimated to start in August 2019. Disclaimer: Remember to do your research with any crowdfunding project. DPReview does its best to share only the projects that look legitimate and come from reliable creators, but as with any crowdfunded campaign, there's always the risk of the product or service never coming to fruition. Photography News via Dpreview http://bit.ly/i0r8o5 January 30, 2019 at 12:09PM
http://bit.ly/2DIYspj
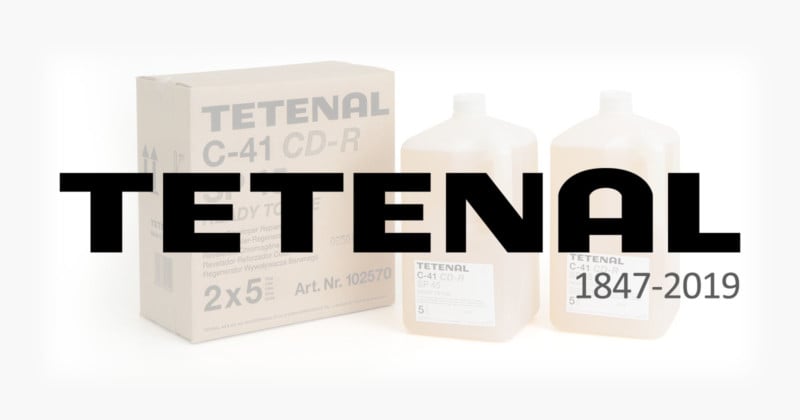
Photo Chemistry Giant Tetenal Closing Shop After 172 Years: Report http://bit.ly/2GaXe7R
In late 2018, it emerged that Tetenal, one of the largest photo chemistry companies in the world, was in serious financial turmoil. It now appears that efforts to save the business have failed, and Tetenal will reportedly be closing up for good after a whopping 172 in the analog photography industry. The German photo industry publication foto-contact.de reports that Tetenal employees in Norderstedt, Germany, have been informed that Tetenal is set to be wound up and closed on April 1st, 2019. The company had reportedly been searching for investors to keep it afloat after seeking insolvency protection in October 2018, and while there had been parties that expressed interest, Tetenal failed to secure any binding commitments. Without a lifeline, the business is now forced to cease operations. Tetenal’s business was established by Berlin-based entrepreneur Theodor Teichgräber back in 1847 when he began selling photographic chemicals for wet plate collodion photography through his drug wholesale store. The Tetenal trademark was registered 63 years later in 1910. The demise of Tetenal may have a huge ripple effect on the film photography industry, as the business produced chemicals for major brands such as Ilford and Kodak. It remains to be seen just how much damage the closure has on the industry, but the loss of such a long-standing name certainly can’t be good for film as it struggles to make a comeback. (via foto-contact.de via Emulsive) Photography News via PetaPixel https://petapixel.com January 30, 2019 at 12:02PM
http://bit.ly/2RrKrji
Triple Processing a Single RAW Photo http://bit.ly/2Wu1s01
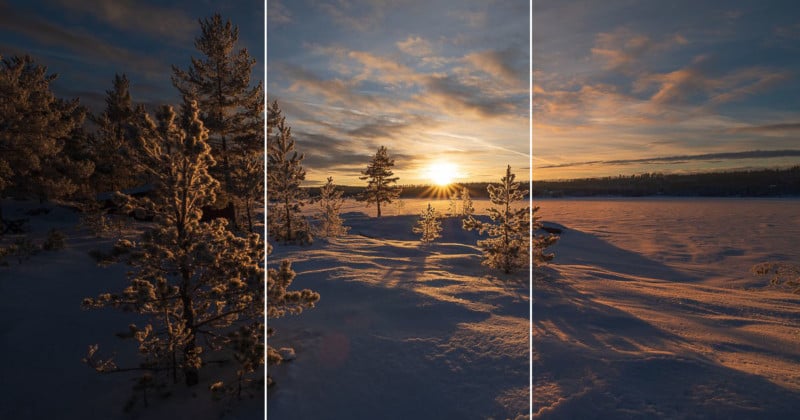
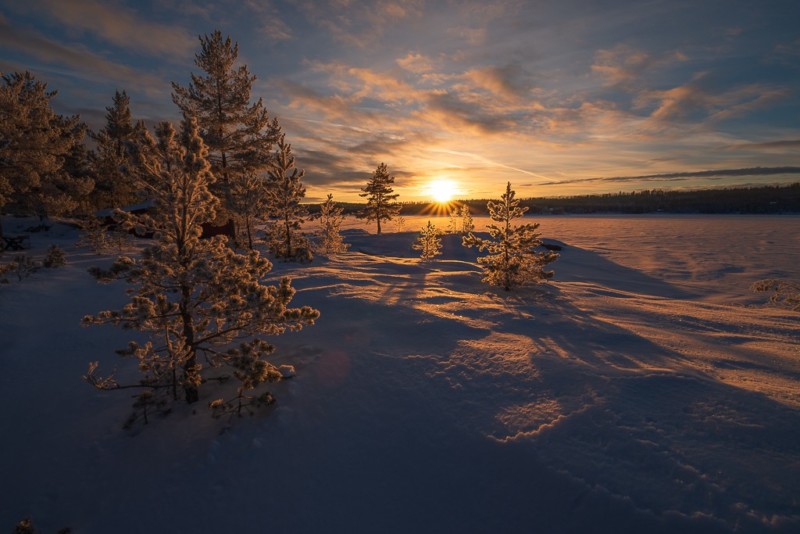
Occasionally when examining a raw file I get a reasonably clear idea on how I would like the end result to be. In this instance I had an inner picture of trees glowing from the sun, rather dark shadows and a sky with nice color contrast. Note: This tutorial is meant for advanced users of Photoshop who are well familiar with layers, masks and luminosity masks. In order to achieve this I opted to create two virtual copies in Lightroom from the original raw file. I could alternatively have achieved what I was looking for using Smart Objects, but envisioned that Virtual Copies would be the better option for the image I had in mind. The first image is my shadows copy. Here I made sure I had no black clippings but yet so dark shadows that they would work as a nice contrast against the trees and thus enhance the glow I had in mind.
The second image is my sky copy. Split toning and a gradient for the sky where I increased Clarity created the effect in the sky I was looking for.
The third copy is for the trees. I took down the exposure quite a bit (-1.55) something which left my shadows very dark. Further I set Lights to +100 and in the HSL section I set orange Luminosity to +100. This created a nice starting point for how I envisioned the trees.
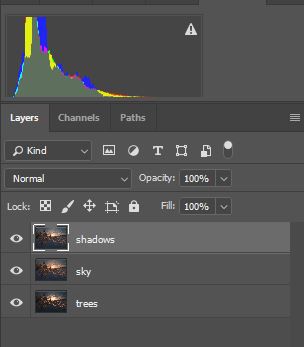
In Photoshop I organized the layers are shown below.
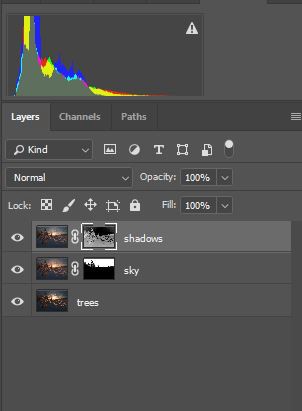
I turned off my top layer and simply used the Quick Selection tool plus Select and Mask to create a mask for the sky. With the top layer still turned off I used a Darks 5 Lumenzia luminosity mask to target the darkest shadows so that my shadows copy would brighten the very dark shadows from the trees copy. If the top layer had been visible when creating the darks mask the mask would not have mirrored the darkest parts from my trees exposure.
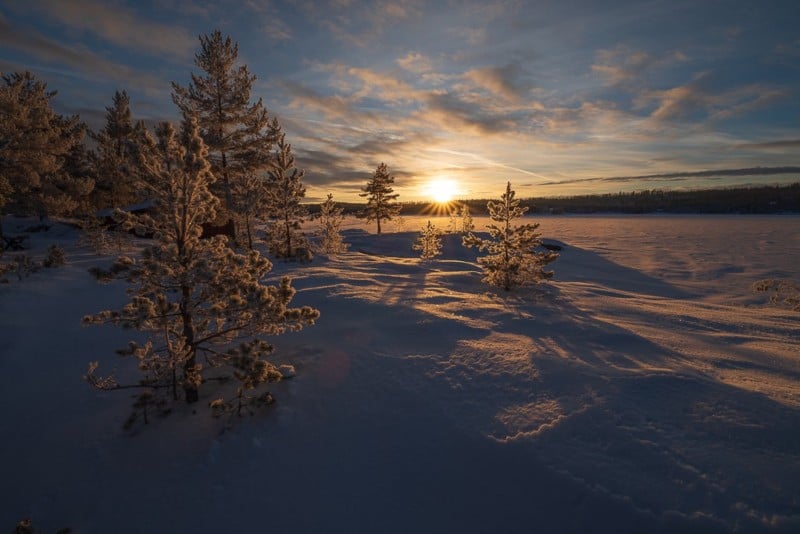
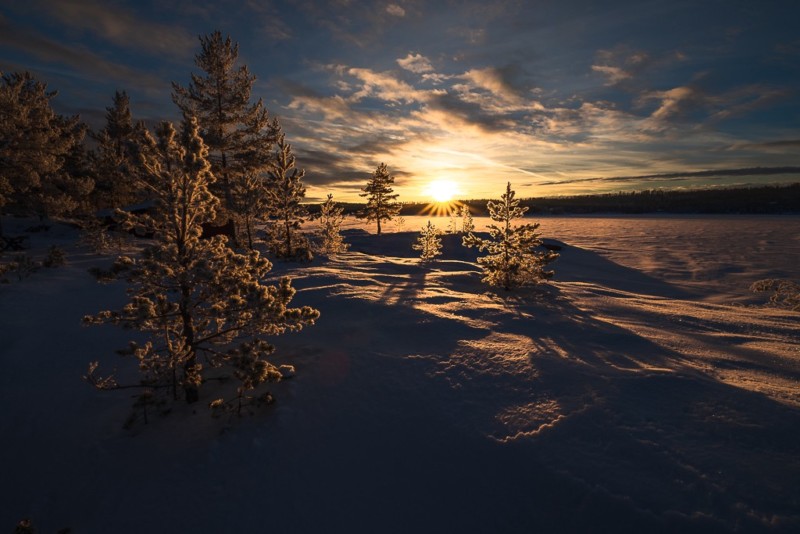
Happy with the blend of the tree images, I embarked on the rest of my editing in Photoshop. At the end of my post-processing, I arrived at this final image: 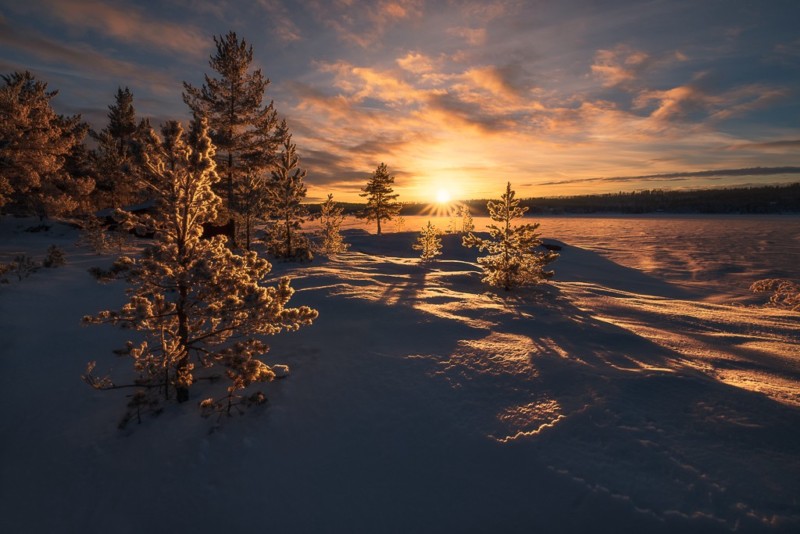
About the author: Ole Henrik Skjelstad is a landscape photographer and math teacher from Norway. The opinions expressed in this article are solely those of the author. You can find more of Skjelstad’s work on his Flickr, 500px, and Instagram. This article was also published here. Photography News via PetaPixel https://petapixel.com January 30, 2019 at 11:33AM
http://bit.ly/2MEAePG
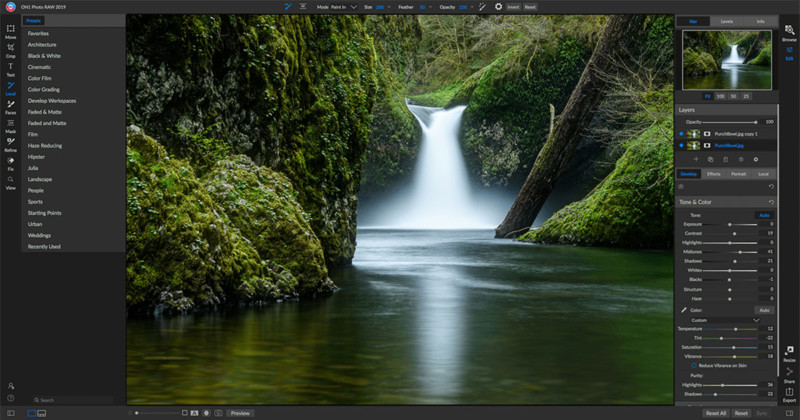
ON1 Photo RAW 2019.2 Brings New AI Masking Feature http://bit.ly/2Gbd2HE
ON1 just announced the latest update to Photo RAW 2019. Version 2019.2 brings a new AI-powered masking feature and new performance enhancements. The new AI Quick Mask tool lets you create high-quality masks. All you need to do is provide a few strokes as guidance, which gives the AI an idea about color, tone, and textures to figure out the boundaries in the shot and the detailed mask you want. The masks are created “in a fraction of the time compared to other masking techniques,” ON1 says. In the area of performance, a computer’s video card (GPU) is now utilized to help boost the speed of common tasks — things like returning to Browse, copy and pasting layers and masks, exporting, and plug-in functions. The full list of new features and camera incompatibilities can be found here. ON1 Photo RAW 2019.2 is available starting now as a free upgrade for ON1 Photo RAW 2019 owners or $100 if you’re a new customer. Owners of previous ON1 products can upgrade for $80, and there’s also a subscription-based membership for $130 a year. Photography News via PetaPixel https://petapixel.com January 30, 2019 at 11:21AM
http://bit.ly/2FZbZvj
An In-Depth Look at Architectural Photography http://bit.ly/2HGb7xl
Architecture is an art form, it is a branch of science, it is a business, it is the architect’s personal expression as well as that of the commissioner. So, it is not surprising that I see architectural photography as overlapping various forms, kinds, branches of photography. This post will help me crystallize my ideas of architectural photography as I get ready for another round-table discussion at the Film Photographers Association. Fair warning: it is a long post! But in addition to carefully worded information, there is also an excellent collection of photographs from professional architectural photographers published with their permission. The photographers’ names are in the captions of the photographs. If known, the architect’s name is included before the photographer’s name. ArchitectureWhat exactly is architecture? Architecture is a blend of art and science that creates spaces for human experiences. It defines function, form, space, detail, material, and decoration/ornamentation that collectively help create the human experiences. Each element in the above shortlist has significance and each architect expresses them differently in line with the practice of their art. Through the millennia, architectural styles have gone through changes leaving traces of earlier experiences on the new creations until the new ones become strong enough on their own and then shed the lineage. Many decades ago, I visited the underground cities of Derinkuyu and Kaymakli in Cappadocia, Turkey. I don’t mean a small cave where a few people lived, I mean levels of living, producing, trading spaces, even underground burial grounds, and tunnels that connected the above two cities that are 4-5 miles apart. Even there, one could see the effort to contribute to the human experiences. Below left is a drawing showing 18 levels of a town that could house upwards of 20,000 people. Underground architecture? 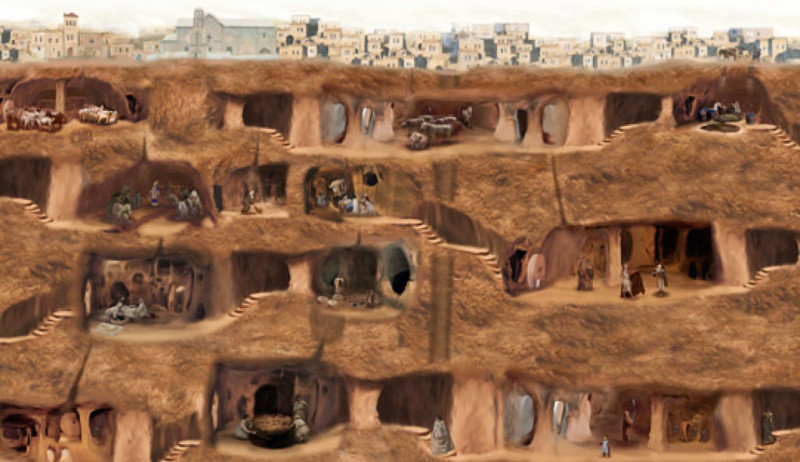
On one floor, for instance, was a cavity on the wall, about 5′ x 5′ and about that tall with a foot high ledge in the front. The ledge had a hole at the bottom that connected it to the outside and it was directly above a hole on the floor. Whatever for? It turned out that they would put grapes on the floor of the opening in the wall, go and stomp on it to crush the grapes to squeeze the juice which would run out of the hole and drip through the hole on the floor to the level below where they had huge amphoras to catch the juice! This is the winery! 
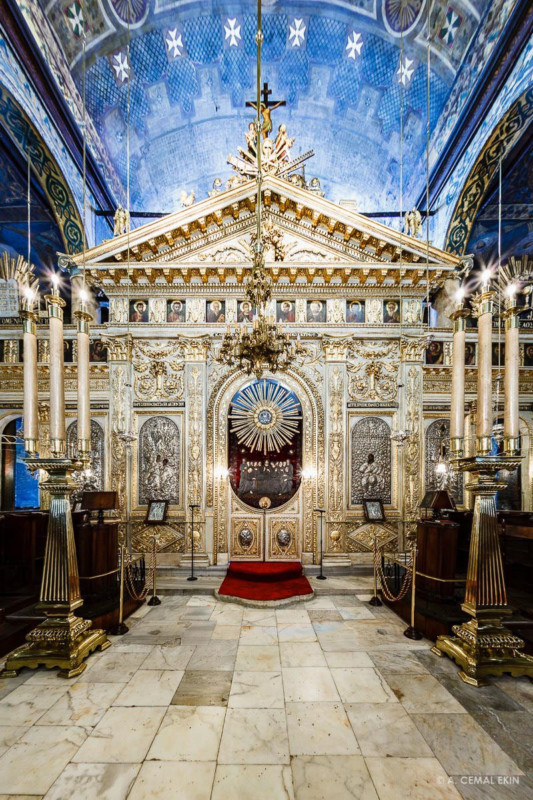
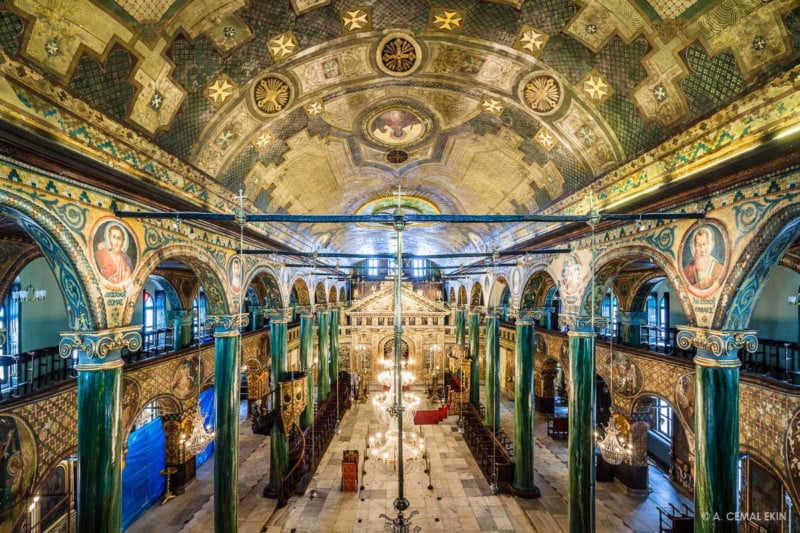
Well, we have come a long way from Derinkuyu, but the idea of creating space for human experience remains at the heart of architecture as I see it. When I say “space” I do not limit it to just the volume but the material, shape, form, function, detail, and ornamentation all combined. Photography of Architecture or Architectural PhotographyI see a symbiotic relationship between architecture and photography. Architecture is location-bound and needs visibility. Photography provides “mobility” to architecture and also uses it as a subject for its own purposes. We mostly appreciate and enjoy architecture thanks to photography. There is a rich selection of architectural beauty that most of us will not get a chance to see if it were not for photography. That said, not every photograph that depicts a building or other kinds of architecture qualifies to be called architectural photography. This is not unique to architecture as we do not call any photograph of an individual a portrait. The intention of the photographer and her/his ability to embed that into their photography makes the difference. As photographers, they “read” their subject, the architecture, and interpret the work for us to appreciate it fully. The architecture may be the subject of different kinds of photography like travel, documentary, art, product. or architecture photography. In this day of photographs flooding the Internet, one can imagine millions of selfies taken in front of almost that many architectural works. They essentially serve as a record and give bragging rights to the taker “I was in front of …” My main interest in this article lies in the last instance where the photograph is taken for architectural purposes. Clearly, this kind of work features a “product” and certainly qualifies as product photography but the sheer magnitude of the subject differentiates it from a bottle of soft drink or a fancy watch. There is, however, a good deal of overlap between the product photography and architectural photography aspects as they both try to convey a message to the viewer about the architecture and its architect. The distinguishing factor between this kind and the art photography in architecture lies in what will come forward, the photograph or the architecture; the photographer or the architect. Now, I am not suggesting that a superb architectural photograph may not be a fine art photograph. But, successful architectural photography requires that the architecture be primarily admired. This may depend, to a large extent, on how the viewer approaches the photograph. Famous architectural photographer Julius Shulman cites an instance when a viewer exclaimed “what a beautiful photograph” after looking at one of his works. That, he says, made him embarrassed and aware that he and his work need to fade behind the architecture and the architect. The opening photograph that I took in Panagia Isodion church in Istanbul, for instance, will be seen as an architectural photograph as it presents the architecture, its structure, detail, materials, etc. A different view I photographed in the same place is below. It is more of an art photograph because the viewer first sees the unusual treatment of the subject. And, even the frame is not rectangular! Hard to focus on the architecture. 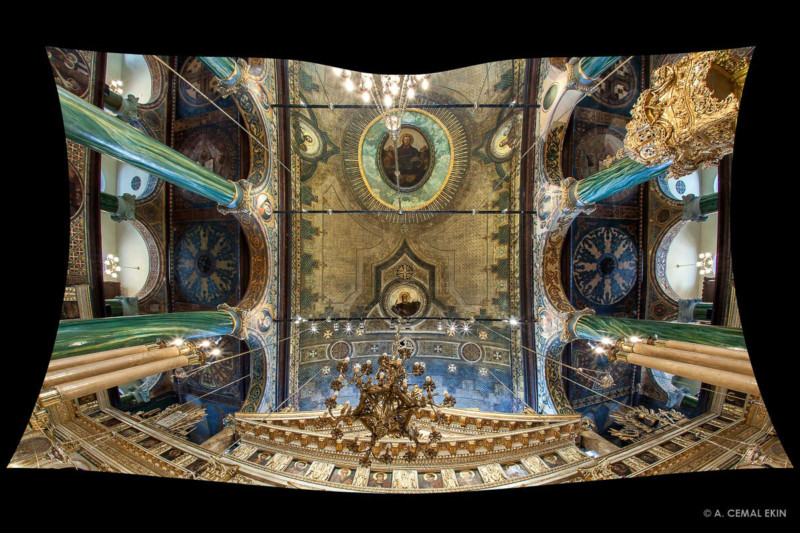
Up to this point, I tried to establish a backdrop for architectural photography. Now we will focus more on photography specific issues. It is important, however, that we keep the idea of architecture and that we are talking about architectural photography not photography of architecture. There are many photographs in the body of the post as well as a gallery that presents a large collection from five photographers. The photographers’ names are in the captions of the photographs which will appear when you click to enlarge them and all of the images are clickable. If known, the architect’s name is included before the photographer’s name. 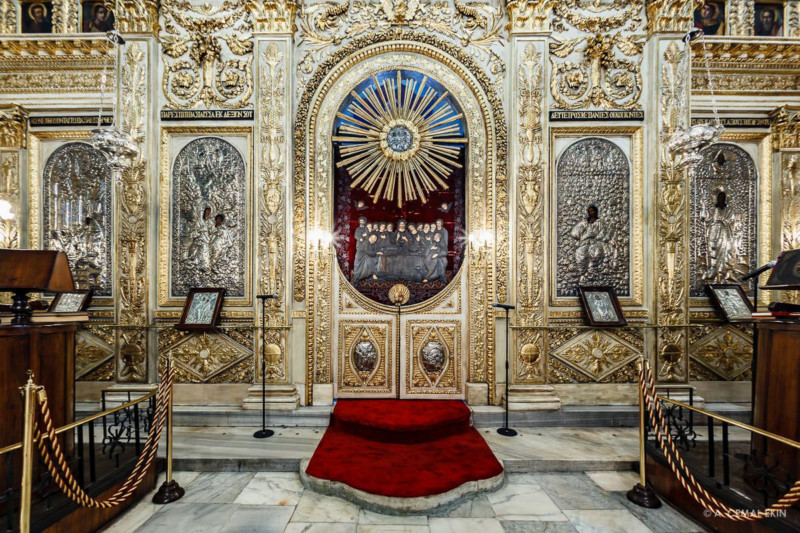
How to Approach Architectural PhotographyThere are photographers whose prime subject is architecture. They know their subject, they have the right equipment, they have made enough mistakes to become experts in their field. Some even have formal education in architecture. When photographing architectural subjects, there are points to remember some of which may go against the practice in other kinds of photography. What I present here will share how I see architectural photography based on my opinion, a little experience, a fair amount of reading and looking at a lot of such work. So these are not rules, just points to remember, nor are they particularly authoritative as I am not a professional architectural photographer. Think about them, take what makes sense to you, leave the rest behind. Remember, It is a Commissioned ProjectArchitectural photography should be approached as a commissioned project by an architect even when just trying to learn and experience what it is. Understanding the narrative the architect may have in mind for different purposes is of utmost importance. Never lose sight that the finished work will speak for the architect, not for the photographer. By this, I do not mean that the photographer will not bring his or her sensibilities to the final product. That is necessary and almost required. But viewers looking at the end results should primarily be impressed by the architecture, not the photograph, which becomes the messenger. We Need to Learn to Read the Architecture RightTrained architects and architectural photographers can extract much more information from this than us casual architectural photographers. But, this does not mean we should not try. I have written several articles here on reading photographs, now I am suggesting the same for another art form. Think first of the function of the structure, how well does the execution convey that? Louis Sullivan coined the phrase “form ever follows function.” The architectural form may convey this function, can we capture that? What kind of spaces does the design create, how and how well are they connected? What is the context for the structure, would this design be the same at any other place? Can we, should we convey this context, this location? Is there an inspiration for the architectural design coming from its context and environment? What are the materials used and how do they contribute to the fulfillment of the intention of the architect? When I looked at the photograph by Arnaud Marthouret below, the connection between the building design and the rocky ledge on top of the hill was the first thing I noticed. Of course, I followed that thought for the photographer for choosing the vantage point to make the connection. It is quite possible that I may be reading too much into this but better too much than too little in my opinion! 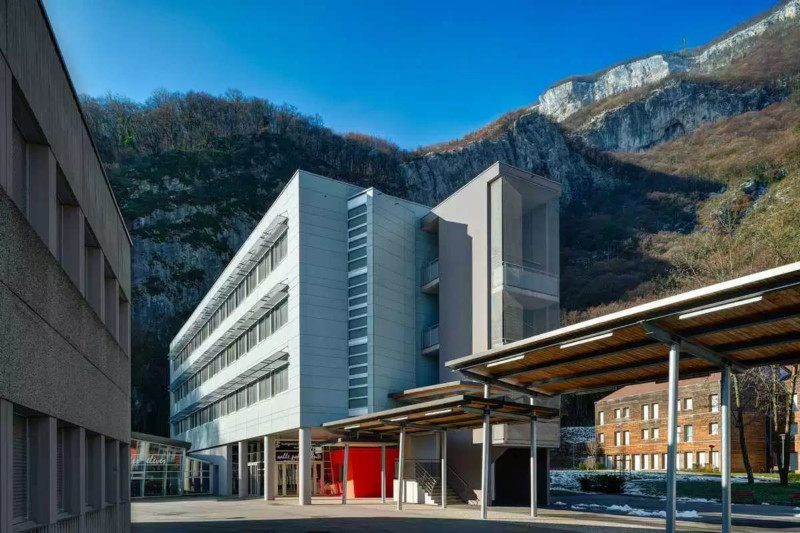
All these are issues that would help the photographer to find the proper vantage points for photographing this structure. In the photograph on the right above, Peter Sieger shows us what appears to be the living quarters of a residence punctuated by an Eames chair no less. We also see the outdoor space connected through large sliding doors and the stairwell on the right implies that there is another floor below. This kind of connectivity is inherent in architecture and its photography needs to convey the same. Time of Photograph Controls the Light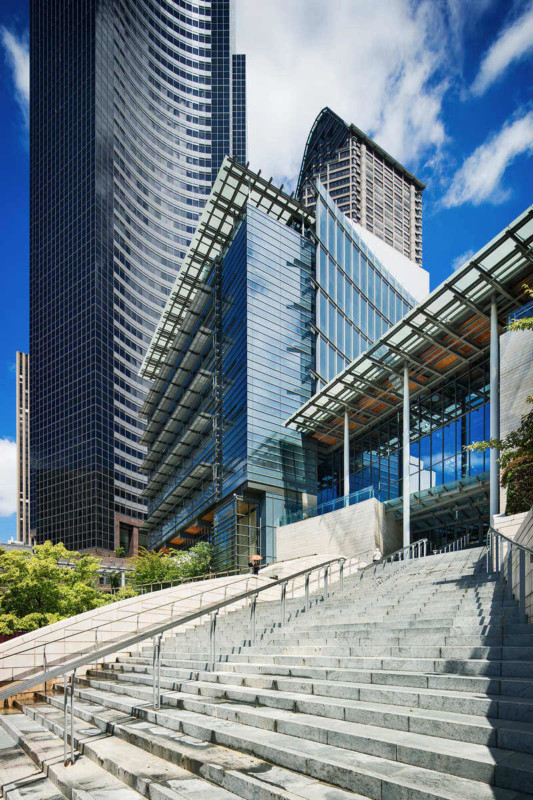
The exterior of buildings is typically photographed under daylight although dusk and night photography may be suitable for some. In general, photographers seek softer light to avoid strong shadows and use this light to define its form or shape, or texture or detail. When photographing buildings, our main light is the sun and we can only position our tripod and time the photo session to get the best light angle. To a large extent, reflectors, secondary fill lights, and so on are out of the question although under some conditions other buildings around the subject may help reflect some light. To emphasize the form, you will need more than one side of the building showing and the light needs to hit it in such a way to convey its form. This will benefit from shadows cast by various design elements, balconies, overhangs, inset windows, windowsills, etc. The shadows cast by these elements should not interfere with other important design elements by covering them. If there is ornamentation as an integral part of the design, we must pay attention not to obscure them in full shadows. All these require different angles of light, thus different times of the day and possibly different vantage points. Look at the photograph by Peter Sieger and notice how the form of the building and its linear accents both vertical and horizontal come forward with light and shadow on the structure. Judging by the short shadow of the railing, the time seems to be mid-afternoon and the sun high. Respect the Scale, Proportion, and PerspectiveThe vantage point selected, camera format and the lens choice should not distort the proportion intended by the architect. There may be a temptation to exaggerate the angle of the roof, or some protruding parts for artistic reasons but we must question whether that will respect the intended scale and proportion. In order to convey a sense of scale, we may consider including known elements like a human figure, a popular model car, a mailbox, a phone booth (what am I talking about!) These elements will help the viewer better appreciate the size and the scale of the structure we are photographing. 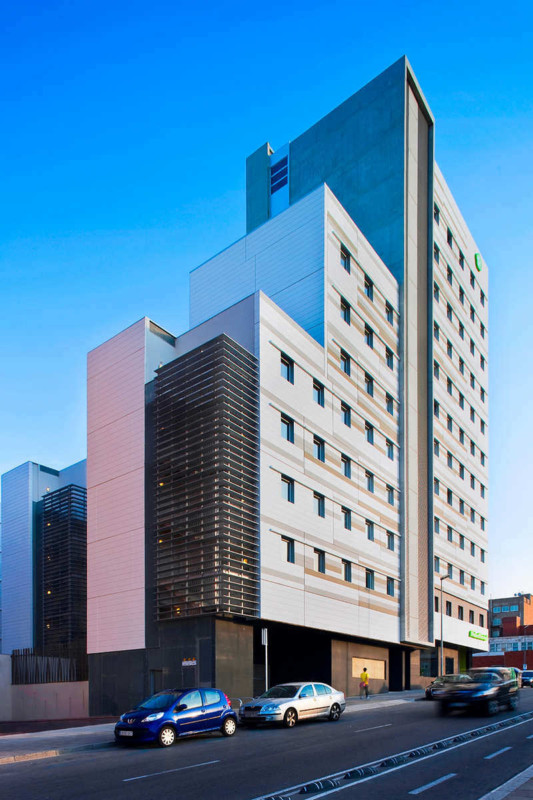
This brings another question to the table about the use of human figures to convey the function of the building. (Read Peter Sieger’s take on this.) Some argue favorably, some do not like the idea but do consider whether adding people will enhance the photograph. Meticulous interiors photographed equally meticulously may require professional models in order to do justice to the photographic and architectural structure. Sometimes the inclusion of people may become unavoidable when photographing exteriors or public places. In the photograph on the right, David Cardelus positioned his tripod at a slightly lower point probably to show the hill-top position of the hotel. The inclusion of the cars and a person going by provides a sense of scale. Now, imagine the same photograph from the other side of the building! It would probably look like a wedge of Swiss cheese as the shorter side would get significantly shorter yet and the tall edge would be towering. That, I believe would have seriously distorted the sense of scale, but, I may be wrong. Do Not Ignore Detail and Decoration
Some architects like Antoni Gaudi or Louis Sullivan integrate detail and decoration into their structures, and in a very organic way. Looking at the detail and ornamentation in their work is like looking at the bark of a tree, it is very much an extension of the core structure. Such detail deserves the same level of attention given to the structure itself. Without these elements, their work is not the same. Can you imagine La Sagrada Familia without its mesmerizing detail? In his post, “Photographing Gaudi,” David Cardelus says, “In the case of photographing the works of Gaudí this idea is especially important given the density of concept and detail in all of its buildings.” It is that density and that level of organic integration of the detail with the core structure that makes the photographic attention not highly deserved, but absolutely essential when photographing their work. Learn to Use the Right Equipment and ToolsAlthough some architectural photographs deliberately use low angles, looking up to make the structure soar to the sky with converging verticals, the general practice is to keep verticals vertical. This requires either a view camera with full front and back movements or a tilt-shift lens on a 35mm digital or film camera. These allow including more of the building height without tilting the camera upwards which keeps the correct perspective by eliminating the converging verticals. Perspective correction can also be done in post-production in Photoshop or Lightroom but we must be careful so as not to distort the correct aspect ratio of the building. Simply making verticals vertical by using the Transform tool in Lightroom will most likely result in the building getting skinnier. This needs additional correction by changing the aspect ratio using the appropriate slider. 
Sometimes that may not be enough and careful introduction of horizontal “correction” may be applied to repair the unwanted shift in the width. Photoshop has even stronger tools for dealing with this. Its Adaptive Wide Angle filter has been my favorite since I first saw it when I was in the beta-test group of Photoshop 6 many years ago. It is still an excellent tool which can be augmented by the free transform and warp tools if necessary. I am not even mentioning the necessity of a tripod and a remote release for serious architectural work although documentary or artistic photographs of buildings can be handled without one. I took the photograph on the right with a hand-held camera looking head on to photograph the facade of the church. Needless to say, it was distorted with converging lines. I corrected it in Lightroom using the circular windows as guides to make sure the building did not look narrower than it was. How Much Change in Post-ProcessingHow much post-processing modification to apply to the images captured in the field occupies the minds and the blogs of many photographers. Architectural photographers are no exception. The dilemma is an ethical one, “is removing something from the photograph altering the meaning of the image?” I believe it depends to a large extent what is being removed from the photograph and why. 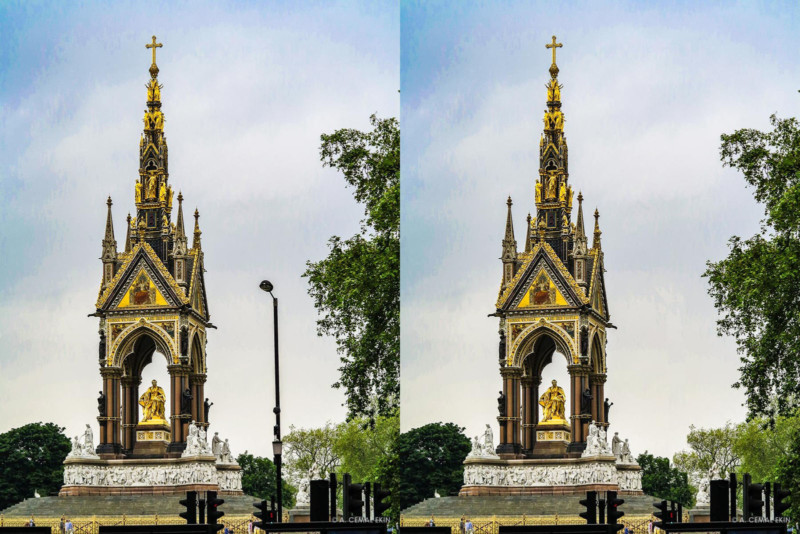
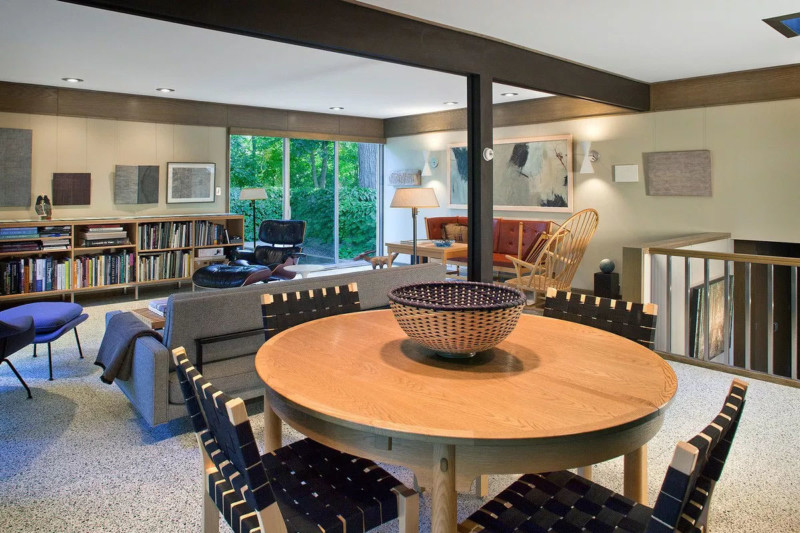
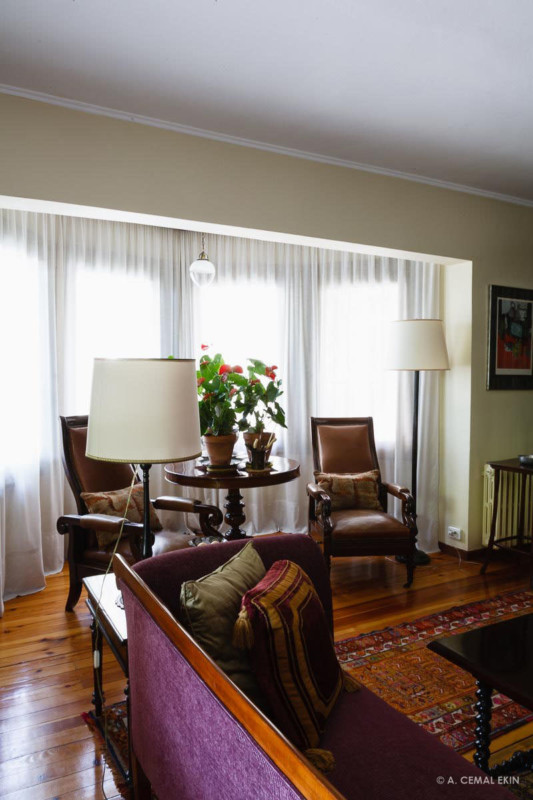
In one of his posts, Peter Sieger talks about removing some cords from the area below a desk in an office. If the photograph were to be used to promote safety procedures and measures in an office environment, that removal may alter the meaning of the image. However, I see no reason for concern in removing the same wires from a photograph that presents the architectural qualities of the office. I arbitrarily removed a lamp-post from the photograph of the Albert Monument in London which significantly alters the environment, the context. Therefore, not an appropriate level of image alteration. Yes, it was quickly and crudely done to make it somewhat obvious! Treat Interior Lighting CarefullyToday, one of the obsessions of photographers is to “open up the shadows” to show more detail. This may be quite important in documenting something but when photographing interiors of buildings respect the shadow and let it be! Remember, shadows help create the form, texture, shape and all are important in architecture. When possible, use available light and when augmenting it with artificial light do not fight the natural or available light. A properly lit interior will look just right, with shadows not fighting in different directions. It is not unusual to have stronger light sources be inserted in the existing lighting fixtures to maintain the natural look of the surroundings. It is important to preserve the mood of the space without converting the photograph into a documentary image that records what is in the room for insurance purposes! Here are some examples of interior photographs, and I reluctantly put a couple of my works along with that of a fine professional, David Cardelus. Note how carefully he framed the photograph that uses symmetry in an ironic way; it is there but not exactly! And how the light falls off in distant parts of the room away from the windows. My photograph of the interior of Panagia Isodion Church in Istanbul serves as a reminder that interior photographs may offer a significant amount of detail to photograph, and the Melin Residence is there to remind us that the available light is OK! 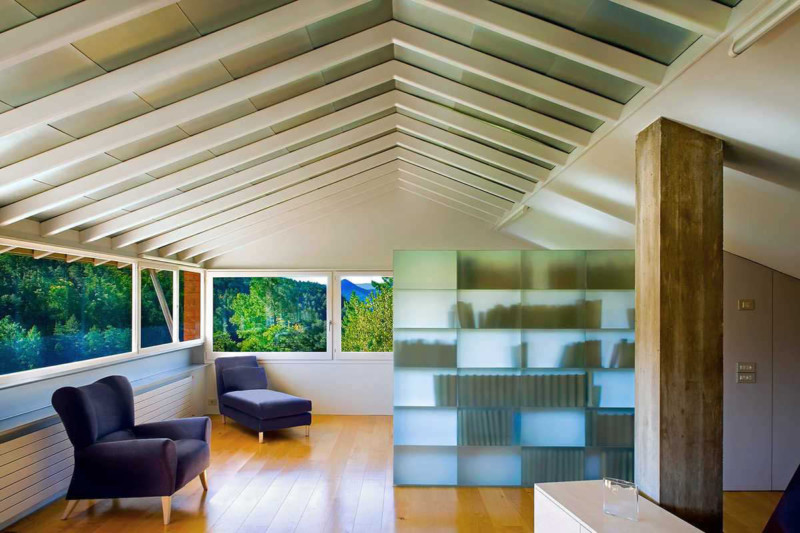
Camera HeightSometimes the camera height is determined by the subject as in the photograph of Park Güell below. By carefully adjusting the height of his camera Peter created a very interesting photograph, almost an illusion. On other occasions, keeping the camera elevated shows more of the horizontal surfaces and gives shape to tabletops, desks, and the floor as I did in the photograph of one of the floors of the Salt Lake City Public Library. Keeping it low emphasizes vertical elements, like the fronts of the desks, bookcases, columns, and the like. So, the tripod does not determine how high the camera will be set but your vision for the photograph. In his photograph, professional photographer Aaron Usher keeps the camera high enough to delineate all the elements. Aaron and Arnaud seem to follow a piece of advice from Julius Shulman who said that he would pull a couch to make room for his tripod behind it. Arnaud also shows the effect of including a person in an interior photograph. Take your pick. 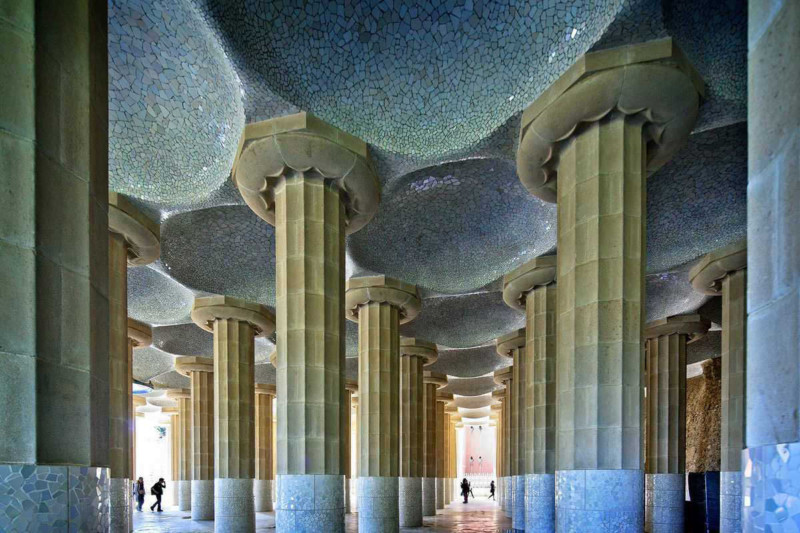


Camera AngleBy camera angle, I mainly refer to the horizontal angle. When photographing the exterior of buildings, the facade or its elevation may have a strong interest to keep the camera parallel to it. This yields a single-point perspective photograph which may be quite suitable for many occasions from large palaces and places of worship to modest residences. This angle emphasizes the lines, shapes, texture, the color of the structure as its form would be hidden behind the elevation view. In order to present the form of the structure, on the other hand, we need suitable lighting as mentioned above and proper camera position which will yield multi-point perspective as more than one side of the structure is shown. Showing the height, width, length of the building accompanied by proper lighting angle will create a feeling of volume or the form of the building. Interiors of large structures may also benefit from this treatment but not all the time. In the Church of St. Anthony of Padua – Istanbul, I decided to use the single point perspective with a hand-held camera in dim light. Luck! With a little more luck (read as a tripod!) I could have lined up the tops of the pews better. Note also in Arnaud’s photographs how changing the height and the angle of the camera can provide much different information. 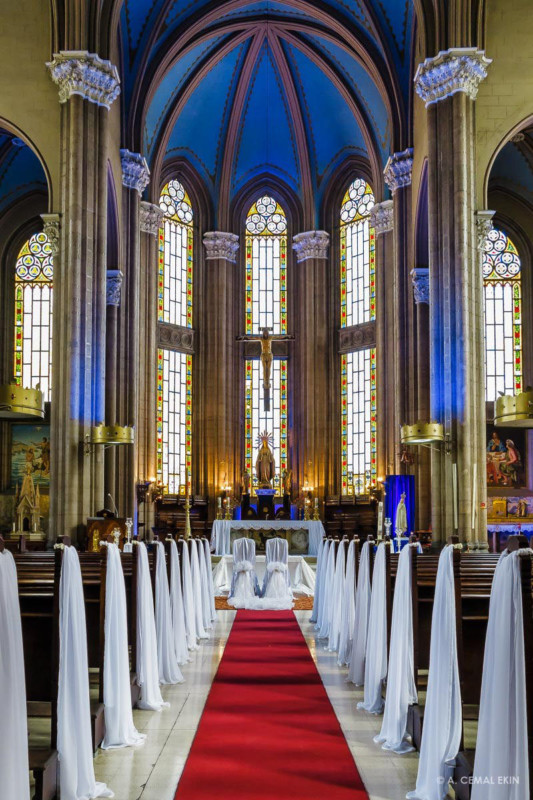

What Else?There is a view that architects design “from a teaspoon to a city” coined by the Italian architect Ernesto Nathan Rogers. And, you will see the marks of their hands from the outside to the inside of the structure, its interior decoration, furniture, to the chandeliers and the decorations on the walls. So, an architectural photographer has to be willing and able to photograph them all. The bank tellers’ cages must be fitting for a Sullivan designed bank, the furniture for a house designed by the minimalist architect Mies van der Rohe must reflect the same sensibilities. Le Corbusier, the world-famous architect has a furniture line, and I even sat in a Le Corbusier chaise lounge at a friend’s house! All these are within the scope of architectural photographers with the same sensibilities that we may aim at their buildings. 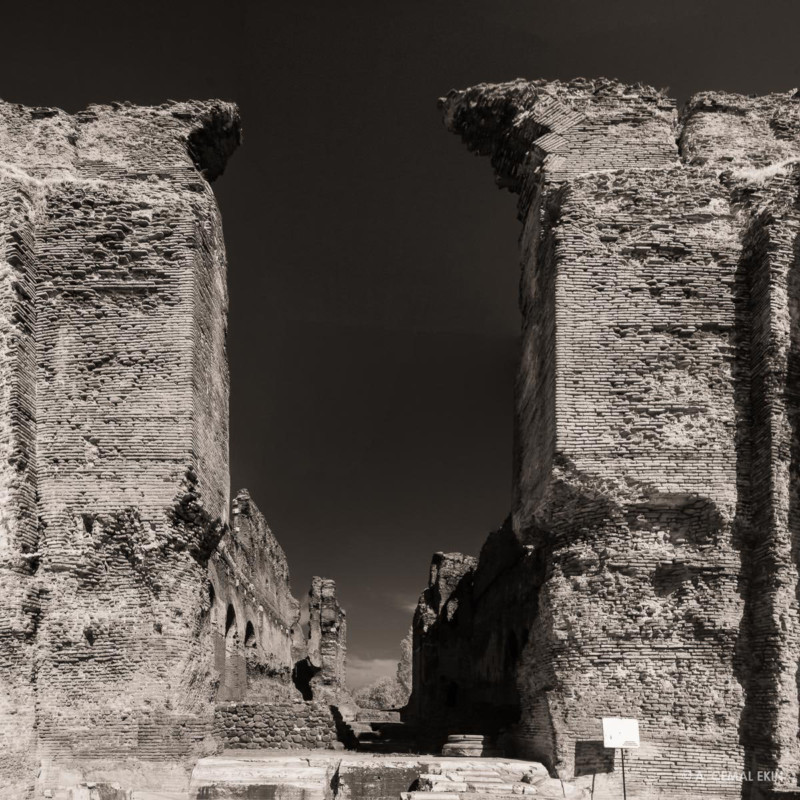
Photographing ancient ruins or structures will also benefit from the same approach as if they are just built. Reading them with an eye toward understanding their function, style, space, form, etc. will help in photographing them with the same respect we show to the current buildings and artifacts. Granted, photographing in the narrow hallways of Derinkuyu may not be the easiest thing, devoid of daylight but Red Basilica in Pergamon can be fully explored, this in infrared. The ancient ruins deserve the same attention and respect we give to contemporary works. Famous Architects and PhotographersThis conversation will not be complete without mentioning the people who make all this happen, the architects and the photographers. The list is long, space is short! I will mention a few names and a few articles to get your thinking kickstarted. Architects The Internet is full of lists of the most important architects of the 20th century, so I will not list them here beyond a few names I know in this article. Here are some of these lists and significant names. I strongly suggest you look at the works with an eye not to like or dislike them but to understand their design sensibilities. The list is not in any particular order.
Photographers Architectural photographers bring us closer to the architects and their works. I have enjoyed the work of Julius Shulman since I stumbled on his Visual Acoustics movie years ago, and then acquired several of his books. Then on a PBS program, I learned about Pedro Guerrero and how he photographed Frank Lloyd Wright and his works, very interesting. I got a couple of books on him too. Around the same time, I became familiar with Ezra Stoller, another master in this field in the 20th century. When you visit their indicated Web sites you will see their wonderful work. I have seen many photographs in this genre and very recently found the works of Peter Sieger, David Cardelus, and Arnaud Marthouret. I have known Aaron Usher for some years now and he is the local go-to person for this kind of work. I suggest all of them very highly for your viewing and learning pleasure. Shulman, Stoller, and Guerrero have iconic photographs you may have seen. If you can find their movies, I highly recommend them as well. Here are some links to visit:
And, I have not even scratched the surface for either list! Keep looking, architecture and its photography can be very rewarding experiences. A Few MoviesIf you have it in your NetFlix, Kanopy, or other sources, I highly recommend the following movies that are about architects and architectural photographers.
Don’t Forget The Seed GermLest we forget that architecture is an expression of a seed idea, as Louis Sullivan called it the seed germ, I would like to close with the following Sullivan drawing and his idea that shaped his art.
Thanks: I am grateful to my friends Mete Turan, professor of architecture and Aaron Usher, architectural photographer; Peter Sieger; David Cardelus; and Arnaud Marthouret for their time, and thank the photographers for allowing me to use and enjoy their work in this post. About the author: A. Cemal Ekin is a photographer based in Warwick, Rhode Island who has been shooting for roughly 60 years. He retired as a professor of marketing emeritus from Providence College in 2012 after 36 years of service there. Visit his website here. This article was also published here and here. Photography News via PetaPixel https://petapixel.com January 30, 2019 at 10:34AM
http://bit.ly/2BdtlQS
4 Core Lessons I Learnt From Creating A Showreel – By Jason Row http://bit.ly/2RnTBgV To photographers, a portfolio is an extremely important tool. It’s our way of showing the world what we are capable of, where we specialise and how our creative thought processes work. A showreel works on the same principle but for motion not stills. With so many photographers crossing between the two mediums on a daily basis, today I am going to share with you my experiences in creating a showreel to showcase my stock video footage. 
Creating A Showreel Is The Motion Equivalent Of A Portfolio. Photo by Andre Hunter 1. The Basics – What Do You Want To Say?Despite having a reasonable amount of experience in editing, I had never put together a showreel. The first stop was a little Internet research to find out the absolute basics. Perhaps the most important thing I learnt in my initial research was not to make the showreel too long. I also learnt that despite being a showcase of your very best work, it should still feel like you are telling a story, that is the video has a clear opening, middle and ending. Like in a photographic portfolio, you should choose footage that shows off your abilities. As a recently qualified CAA drone pilot, this meant showcasing plenty of aerial footage but also footage captured both on a gimbal and a static tripod. As a travel stock photographer and videographer, my showreel needed to highlight that my work was intended for stock agencies rather than for specific clients. It needs to make potential video buyers want to check out more of my work at stock agencies. 
I Did Plenty Of Research Before Embarking On My Project. Photo by João Silas 2. Choose Your Clips CarefullyBefore I even opened up my editing software, I spent the best part of a day selecting potential clips. As I had in mind telling a visual story from before dawn through to night, I created folders for Twilight, Dawn, Day, Sunset and Evening and moved suitable clips there. In editing, you need a lot more footage than you intend to use, so I selected everything that I felt would work within the brief I had set myself. In reality, this was a couple of hundred clips of varying lengths but all were suitable for inclusion. 
Spend Plenty Of Time Narrowing Down Your Clip Choice 3. Find A SoundtrackThis was perhaps the hardest part of the entire process. In my mind, I wanted a cinematic soundtrack that started slow, had a sudden increase in pace and then slowed down for the finale. It needed to have some nice chords running through, with which to transition the visuals. As the project was not a paying gig per se, I tried first looking for Creative Commons based music. This is music that has been released as free to use on sites such as Youtube. Indeed Youtube has a well-curated collection of free music for you to use in your projects. However after two days of searching, test editing with various free tracks, nothing was working well for what I had in mind. I spent another half day searching various music stock agencies before stumbling across a track at Pond5 that I knew was right. As with most stock agencies, you can download a preview version that has a voice-over watermark. This allowed me to edit the video and be 100% sure that the track was right before paying for the license. 
Finding A Suitable Soundtrack Was The Hardest Part 4. Edit, Edit Then Edit Some MoreWith the soundtrack in place, it was time to bring all of the media together for editing. My editing suite of choice was Final Cut Pro X although there are many options. If you are on a tight budget yet want a fully professional level video editing suite, check out DaVinci Resolve 15 from Blackmagic. Its free and extremely powerful. Apart from FCPX, one of the best-paid options is Adobe Premier. The editing was perhaps the most enjoyable aspect of the entire process. There are a couple of reasons for this, firstly the preselection of clips and audio had narrowed my focus to exactly what I wanted. This eliminated the frustrating aspect of going back to search for other clips that might work better. Secondly, I had no time restrictions. Having editing for clients with deadlines, I know that working under pressure can sometimes stifle your creativity. In this case, by having no restrictions on myself I could take my time and get it right. Overall the edit took around five days. I would spend a couple of hours editing, preview it on a 4K TV, make notes on the issues then step away for a few hours. That stepping away is an important aspect of creating a showreel. It’s very easy to get so involved in the project that you do not see its flaws. By breaking from it for a few hours, you can come back and see it in a new light. It’s also important to see the film away from the editing suite. I would put mine on a USB and preview it on my TV screen, it gives you a much better understanding of how the visuals and audio are working with each other. 
Step Away From The Edit And Come Back To It Overall the editing took around 5 days, working several hours a day. I would do an edit, preview it, correct issues, experiment with different clips. Eventually, I was happy with the end result and published to Youtube and Vimeo. I also added it to the video work page on my own photographic website. Overall I have enjoyed my experience in creating my first showreel. It has been a relaxing yet educational journey. If you are contemplating making a showreel and have questions, I am happy to answer them in the comments below, although I would not consider myself an expert just yet. And here is the end result – thanks for viewing! The post 4 Core Lessons I Learnt From Creating A Showreel – By Jason Row appeared first on Light Stalking. Photography News via Light Stalking http://bit.ly/2kwTW5i January 30, 2019 at 10:01AM
http://bit.ly/2Gd8MHx
Samsung starts production of world's first 1TB eUFS storage module for mobile devices http://bit.ly/2Tm50j7
Samsung announced it has started mass-producing the world's first 1TB embedded Universal Flash Storage 2.1 (eUFS) module for mobile devices. Given we are now pretty close to the launch of the new Galaxy S10 flagship series, it looks like there is a chance we might see a 1TB option for at least one of the S10 devices. Samsung says the new module is the same size as the 512GB variant in the Galaxy Note 9. The increase in density has been made possible using V-NAND technology that vertically stacks NAND cells in order to maximize density and efficiency. According to Samsung the new module offers sequential read speeds of up to 1000Mbps and write speeds of 260Mbps, enough for the continuous recording of high-speed video at 960fps. In terms of both storage capacity and transfer speeds the new module should also make an interesting combination with Samsung's new 8K-capable Exynos chipset. According to Cheol Choi, Samsung's executive vice president of Memory Sales & Marketing, “the 1TB eUFS is expected to play a critical role in bringing a more notebook-like user experience to the next generation of mobile devices.” Photography News via Dpreview http://bit.ly/i0r8o5 January 30, 2019 at 09:54AM
http://bit.ly/2FZaAF1
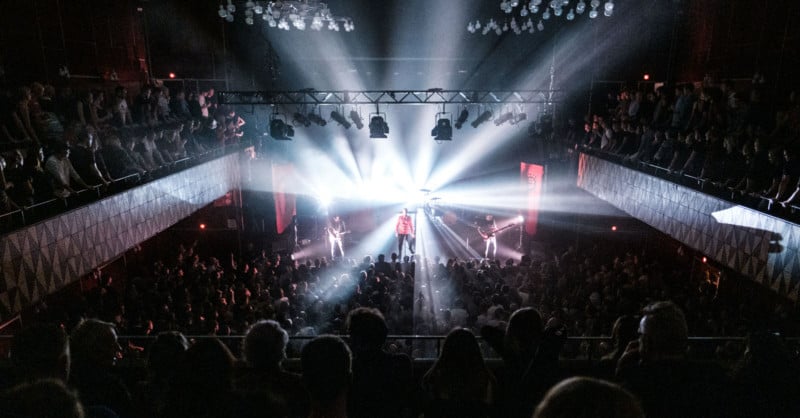
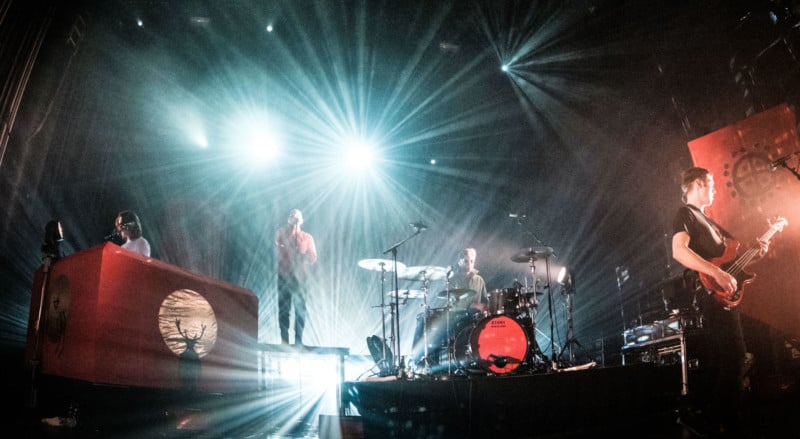
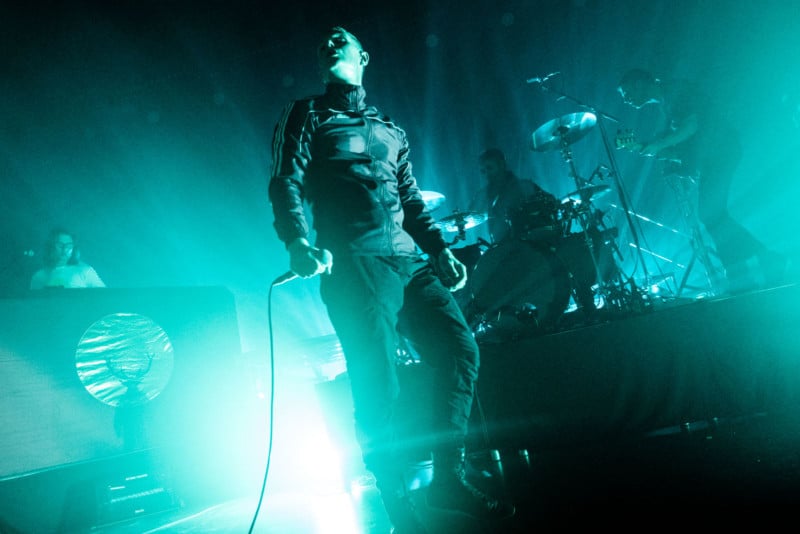
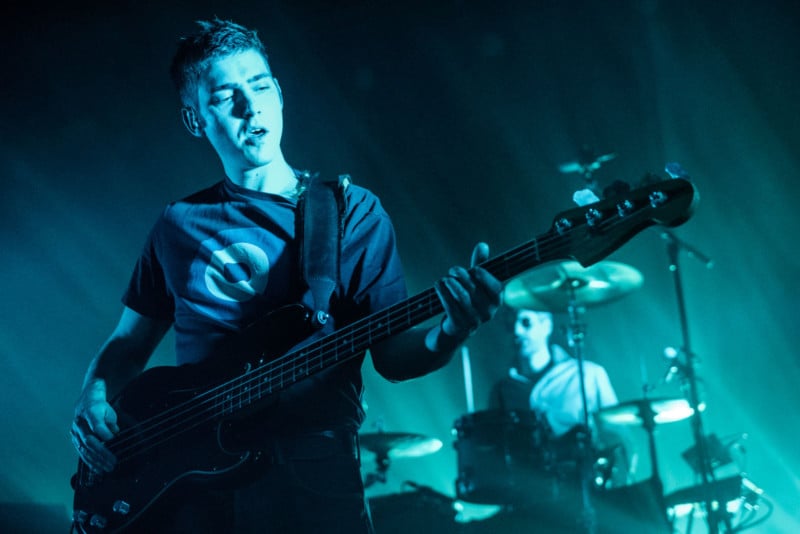
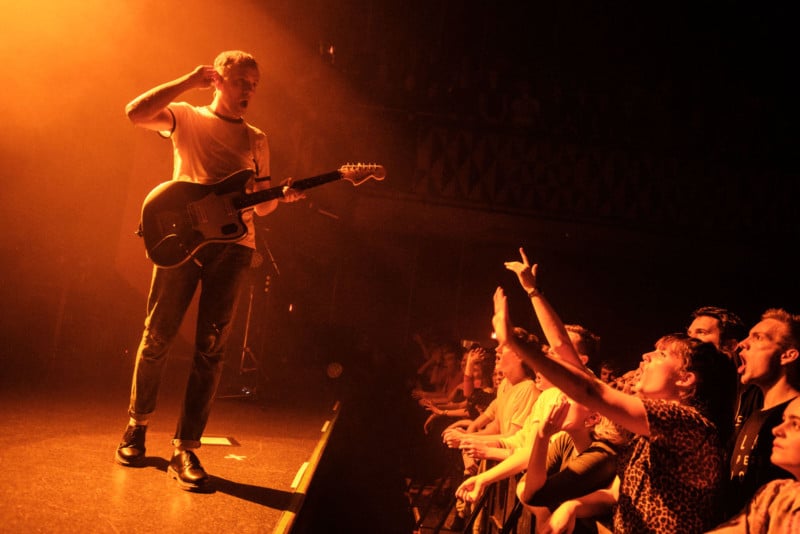
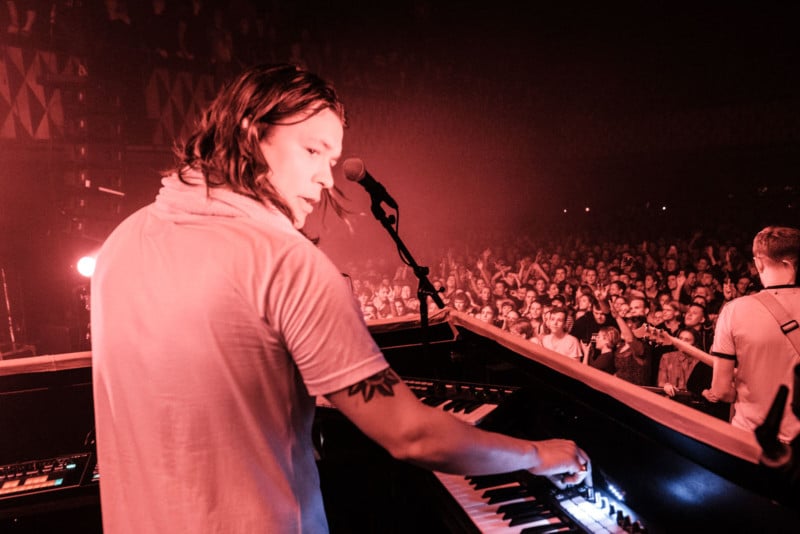
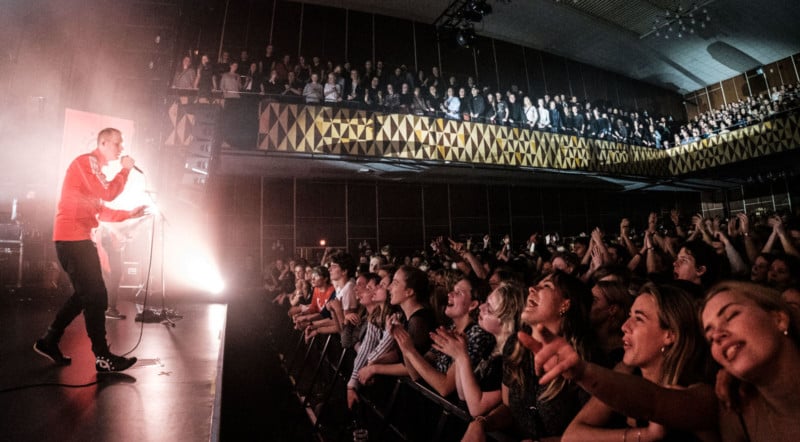
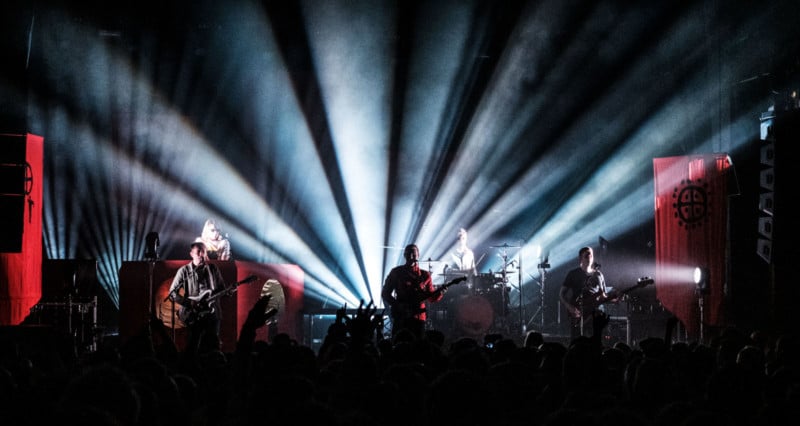
Turning Every Frame from a Concert Into a Timelapse of the Show http://bit.ly/2TlmwUr What would it look like if I made a timelapse out of every single picture that I captured during a concert? I had occasionally been toying with this idea since I saw a wedding timelapse by photographer Kevin Mullins a while ago. I recently documented two concerts in a row for Denmark’s best live band, The Minds of 99. I worked for the band and had full access during the shows, so this was the perfect opportunity. I took every single picture from the first of the two shows, minus all the backstage photos, and turned 90 minutes of concert into just over 3 minutes of timelapse video. I actually only remembered the timelapse idea after the shows so I did not photograph them with the timelapse in mind. This was photographed in the way I normally cover a concert. There are 1,564 pictures in this video representing every single frame from the 90-minute-long concert. I shoot mostly on single shot mode, except for during strobe lighting, so that is a shutter click roughly every 3.5 seconds. I use Fujifilm cameras and lenses exclusively and I photographed this concert using Fujifilm X-T3 and X-T2 cameras with Fujinon XF16mm f/1.4 and XF35mm f/1.4 lenses. I was using both cameras at the same time with one hanging on each shoulder, so there are obvious jumps as I swap cameras, from the 16mm to the 35mm view and back again. Other obvious jumps happen of course, when I go from stage to the pit, to the front of the building, to the balcony etc. All photos were shot in RAW format. I applied a slight preset during import in Lightroom that just applied the Fujifilm Classic Chrome color profile and desaturated the strong colors that are present due to LED lights and haze. Just to make the images more viewable in this time-lapse. There was no cropping and no other post-processing at all — everything else, including the exposure and white balance, is straight out of camera. Except for the few images in here that are part of my picks, those had been fully developed before I thought of the timelapse idea. I shot the entire show on auto white balance and almost the entire show on auto shutter speed. I then use the exposure compensation wheel on the Fujifilm cameras to go from +3 to -3 or somewhere in between depending on what I want to expose for. The Fujifilm X-cameras keep up with mad changing lights really well, so this system works for me. Finally, I then almost blew up my aging MacBook by exporting 1564 JPEGs and loading them into iMovie to create the timelapse! The exported movie was finalized with titles and soundtrack in Premiere Pro CC. Nested in among those 1,564 frames are my fully processed picks from that night.
You can view my blog post with 50 selected and edited images from the 2 concerts. This way you get to compare and see what I picked out of the 1,564 stills (some of these 50 are from show number 2). I have been a professional music photographer for seven years and am always looking for ways to improve and develop my work. Besides looking rather cool and being fun to put together, I was surprised by how useful this timelapse is for me. I can see clearly how I move and what I look for. If you are an event photographer I highly recommend trying this out. About the author: Flemming Bo Jensen is a music photographer and Fujifilm ambassador based in Copenhagen, Denmark. The opinions expressed in this article are solely those of the author. Jensen works with the biggest festivals and artists in Denmark. You can find out more about him through his website and by following him on Facebook and Instagram. Credits: Timelapse and photos by Flemming Bo Jensen. Soundtrack: ‘Fuglebur’ by The Minds of 99 and used with permission. Photography News via PetaPixel https://petapixel.com January 30, 2019 at 09:51AM |
Categories
All
Archives
November 2020
|


 RSS Feed
