
|
https://ift.tt/2FBWcRc
 We have been told that Canon is hard at work on another f/2 zoom for the RF mount. This would go with the already available and incredible Canon RF 28-70mm f/2L USM. The focal length of this zoom lens is unknown at the time of writing this. However, the source did say this could end up being a “second holy trinity” of lenses for the RF mount. The current “holy trinity” is generally accepted to be the RF 15-35mm f/2.8L IS, RF 24-70mm f/2.8L IS and RF 70-200mm f/2.8L IS. More to come… Photography via Canon Rumors https://ift.tt/2v4dYqS June 27, 2019 at 11:48AM
0 Comments
https://ift.tt/2KFqG97
The post Why Hiring an Assistant at Weddings Makes you a Better Photographer appeared first on Digital Photography School. It was authored by Jackie Lamas. It’s no mistake that many wedding photographers have assistants and even second shooters at weddings. The reason being is that photographing a wedding longer than 5 hours on your own can be very challenging, especially since there are many important wedding details and moments that need extra coverage. 
Hiring an assistant means you have help carrying your gear and keeping distractions at bay so you can photograph the important moments smoothly. What is an assistant?A photography assistant is not to be confused with a second shooter. While sometimes used interchangeably, the two terms are actually different, and it’s really important to know the difference. An assistant is an extra pair of hands available for you during the wedding day. They may be in charge of carrying the equipment, helping with setting up additional cameras and being available for any need that the photography may have during the wedding day. 
Assistants can help gather details during a wedding day and help with styling as well. Many assistants are aspiring wedding photographers or seasoned wedding photographers. It can vary in the level of experience. This is something that you should look into while interviewing or hiring an assistant. Assistants can also help with styling certain shots like the wedding rings, or help to gather flowers. They can also help with posing families during that portion of the wedding day.
Assistants also offer a second point of view. They offer ideas to get better shots or additional photos that perhaps you had not thought of previously. They are also helpful when you need an opinion and also someone to talk to as weddings can run up to 12 hours or more depending on how much you are covering. What is a second shooter?A second shooter is a second photographer. Usually, the second photographer is solely responsible for taking photos of the event alongside you, the main photographer. 
A second photographer can get those in-between candid moments that happen when the main photographer is busy photographing something else. The second shooter helps to get a different angle of the same setup. Or perhaps they can be trusted to photograph a portion of the day alone while you cover another. For example, if you’re photographing the bride and her bridesmaids, the second photographer may cover the groom and his groomsmen. Also, if you’re photographing the bride and groom together, the second photographer can shoot from a completely different angle. This gives the final images more variety of the same moments throughout the wedding day. 
Having a second photographer can get images from a different angle. Sometimes the assistant can also be a second photographer during certain parts of the day but perhaps not the whole day. For example, you can hire a second photographer and an assistant so that the two jobs don’t overlap during the day. That way, you have both a second pair of photos taken while having someone help carry your equipment and to help you set up. Be clear about expectationsThis brings me to this very important point; be clear about expectations when you’re looking to hire an assistant. Make sure that you outline what their responsibilities are. 
An assistant can help carry gear when the terrain is less than ideal for your gear to be in. Like a sandy beach near the ocean. Perhaps you’re only looking for an assistant? In that case, be sure to outline that their responsibilities will not include photographing the event at all. They will only be there to help with setting up, carrying equipment, and helping the main photographer during the event.
If you’re looking for a combination of the two, outline that from the beginning. Make sure to advise them to bring useful equipment if you will have them use their own. Also, specify which parts of the event they will be covering. Perhaps you need them to be an assistant during most of the day but will need them to be a second photographer during the ceremony only. 
Be clear about what your assistant should help you with. For example, posing the family or helping to fluff out the wedding dress. Also, be aware that it is very difficult to be a second photographer and an assistant simultaneously. You will need to be very clear about what you need from the person helping you at the event. Be a team playerAll photographers work and handle their businesses differently. However, when you are photographing a wedding, it’s best to make it clear that you and your assistant are a team. You are both there to work at the wedding together.
This creates an openness for the assistant to help with styling, and to offer their opinion or aesthetic input. This can be really helpful during the wedding day. Working together rather than bossing or ordering the assistant around can be really helpful since the assistant will feel included and part of a team. Keep in mind the level of experience the assistant may have, which can also help you immensely during the event. Most seasoned wedding photographers have, at some point, been second photographers or assistants themselves. They are eager and accommodating on wedding days. If they are seasoned pros and are helping you out, consider their input.
When you are hiring someone who is just getting started, it’s important to talk with them before starting the photography. State your expectations, where gear is in your bag, how you approach the wedding day, and what you’ll need from them. Some assistants are barely getting their feet wet and may need extra coaching. If this is the case, approach them with the mindset of being a team. They will work harder for you and be more willing to anticipate your needs. Assistant contractIt is very important to have a contract drafted for the assistant position. Too often does it happen when images get published, used, sold, or otherwise from assistants who weren’t the main photographer.
A contract can outline image delivery expectations if they helped photograph a portion of the event, and what their pay is to be. The contract can help you set boundaries, and outline their responsibilities, as well as set the pay for the event. Don’t skip on this tip! All too often we hear horror stories of assistants that never returned the equipment, didn’t deliver images and got paid what was due! 
Having a contract is good to have for all parties involved. PaymentEven though you can hire someone who is just getting started in the wedding photography business, this doesn’t mean that you can pay them less than you would expect to be paid if you were assisting. They give you a pair of extra hands and help you for hours carrying most of your equipment, so pay them accordingly. Some more seasoned wedding photographers may have a going rate. However, it’s good to research your area for the going rate, either hourly or a set rate for the entire event.
Take into consideration the following:
If the assistant will be there with you during the dinner portion of the event, make sure you let the bride and groom know. That way, they will know you have an assistant also eating at the wedding, even if it’s a vendor meal. If they aren’t going to stay for dinner, make sure you state what meals you’ll be covering or if you will be paying for their meal at all. 
An assistant can help make a first look go smoothly by helping with positioning the bride and making sure to be available to switch lenses, cards, batteries, etc. It’s also really important to state how the assistant will be getting paid. Will they be paid by bank transfer, deposit, invoicing, or any other method? That way they know when and how they will be getting paid for assisting at the event. Having an assistant makes you a better photographerThe reason to have an assistant at a wedding is that it ultimately makes you a better photographer. It frees you up from carrying your equipment so that you can focus on taking important photos rather than checking to see if your camera bag is within reach.
Assistants can help with lighting, adjusting extra cameras, or even helping style the bride’s veil during the portraits. Having an extra pair of hands makes it easier for you to focus on getting the shot without having to do it all on your own. Also, having someone there to help with making sure that the wedding photography goes smoothly and quickly will help you to focus on what really matters – getting the shot. Moreover, having someone to talk to during the long wedding day can help you stay focused and in the present moment. In ConclusionHiring an assistant during a wedding event can help you be free to really focus on photographing each and every special moment of a wedding day.
They can help by carrying your equipment, be a teammate and help with lighting or offer ideas. An assistant can be an extra pair of hands and eyes during the day too. Have you hired an assistant before? If so, what additional tips would you include?
The post Why Hiring an Assistant at Weddings Makes you a Better Photographer appeared first on Digital Photography School. It was authored by Jackie Lamas. Photography via Digital Photography School https://ift.tt/29wB9CX June 27, 2019 at 09:13AM
https://ift.tt/2X54JSK
 Canon continues to work on sensor-based image stabilization, which is a feature we expect to see in the next major EOS R camera body release. Canon has been working on getting the in-body stabilization to work with its in-lens stabilization technology. This USPTO patent takes things one step further, as Canon appears to be working to get three stabilization systems working together. These three systems would be:
Canon News breaks down what this patent likely means:
Photography via Canon Rumors https://ift.tt/2v4dYqS June 27, 2019 at 07:24AM Celebrate the Birth of the Portrait Zoom: The New TAMRON 35-150mm F/2.8-4 Di VC OSD (model A043)6/27/2019
https://ift.tt/2YcBMWk
For the first time ever, a dedicated portrait lens that allows you to zoom through various composition options as the creative alternatives zoom through your head. The versatile 35-150mm zoom range incorporates the 85mm focal length (optimum for portrait shooting) and covers everything from full-body shots that include the surrounding area to sharp head-and-shoulders shots. With this single lens you can make the most of every moment you spend with any subject. Combined with potent VC (Vibration Compensation), fast F/2.8 aperture (F/4 at 150mm end) and compact design, this is the only zoom you’ll ever need for portraits, street, landscapes, travel, family snapshots and across a wide range of photography subjects. It’s also the ideal “normal zoom” for your first full-frame DSLR body. High resolution plus luscious bokeh Beautiful balance between subject sharpness and background bokeh. Tamron’s new zoom contains three LD (Low Dispersion) and three aspherical lens elements to quash optical aberrations, a circular aperture and legendary BBAR Coating to suppress ghosting and flare—even in backlit situations. The contrast between in-focus areas rendered accurately down to the fine details and backgrounds that gently blend into the scene produces a single high-quality image. The optical performance meets and exceeds the demands of today’s high resolution 50+ megapixel DSLRs. Your portraits will positively pop! 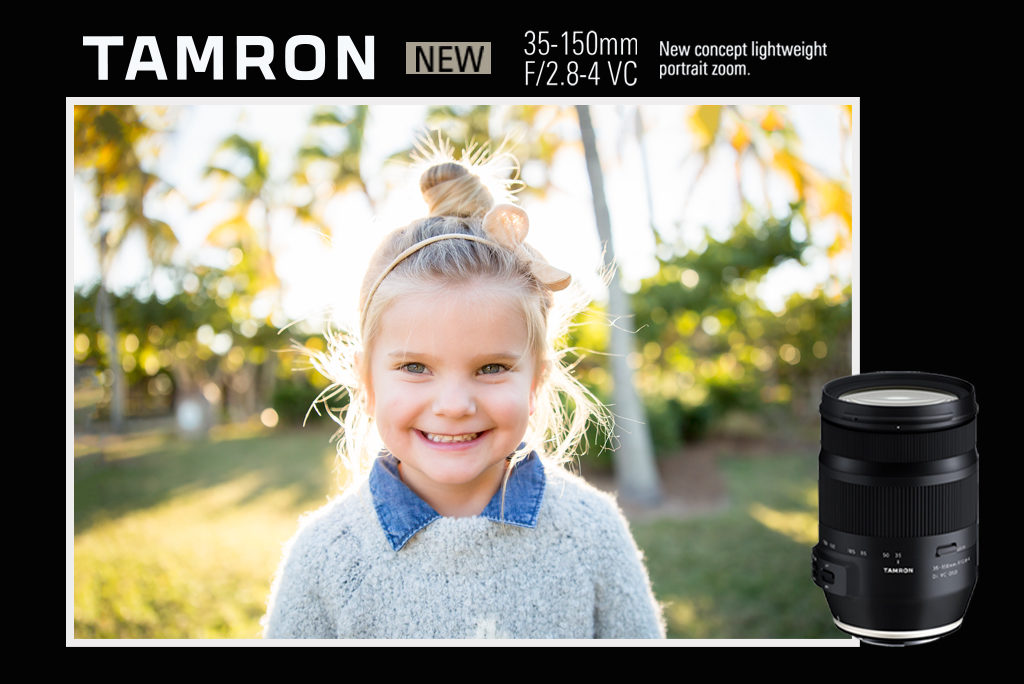
Enhanced AF operation and VC For fast and steady operation, this fast-handling zoom incorporates Tamron’s Dual MPU (Micro-Processing Unit) system that consists of a dedicated AF lens control MPU and dedicated vibration compensation MPU to achieve both superior AF performance and effective vibration compensation. This ensures accurate focus even in scenes with continually moving subjects or under low-light conditions. Pack a pair and photograph everything! This compact zoom travels light, measuring only 4.9 in long and weighing a scant 1.7 pounds. When combined with Tamron’s versatile ultra-wide-angle 17-35mm F2.8-4 Di OSD you can cover the entire range from 17mm to 150mm, all at a maximum aperture of F/2.8 (F/4 at zoomed end). The whole bundle weighs less than 3 pounds! They’re the perfect combo when you want to travel light or when shooting with two DSLR bodies. The portability and extensive zoom range are a photographer’s dream come true and flawlessly designed for everything from landscape and street photography to architecture and portrait photography. Click here to learn more about the new TAMRON 35-150mm F/2.8-4 Di VC OSD (model A043). The post Celebrate the Birth of the Portrait Zoom: The New TAMRON 35-150mm F/2.8-4 Di VC OSD (model A043) appeared first on Lightroom Killer Tips. Photography via Lightroom Killer Tips https://ift.tt/2sh0aZ8 June 27, 2019 at 03:25AM
https://ift.tt/2NpUo4i
The drowning deaths of a migrant father and young daughter at the US southern border showed the tragic peril of those trying to seek asylum. Here is selection of images from this month focused on the continuing immigration issue.  A migrant mother and children rode in a freight train on their way north in Palenque, Chiapas state, Mexico. The group’s next stop will be Coatzacoalcos, Veracruz state. Mexico has deployed 6,500 National Guard members in the southern part of the country plus another 15,000 soldiers along its northern border in a bid to reduce the number of migrants traveling through its territory to reach the United States. (Marco Ugarte/Associated Press) Photography via The Big Picture https://ift.tt/14DjxgC June 26, 2019 at 02:57PM
https://ift.tt/2X6v0oq
 We’ve previously reported that Canon will be introducing an RF 500mm f/4L IS USM as their first super telephoto lens for the RF mount. Now we’re hearing that an RF 300mm f/2.8L IS USM will also be launching sometime in 2020, and the source has claimed that this lens will come with a “new and unique” feature for super telephoto lenses, unfortunately, no details about this were given. I think we’re going to see a lot more professional lens announcements in 2020 for the RF mount. The source did clarify that new versions of the EF 300mm f/2.8L IS II and EF 500mm f/4L IS II aren’t in the plans for Canon. Photography via Canon Rumors https://ift.tt/2v4dYqS June 26, 2019 at 02:45PM
https://ift.tt/2ZN9MZz
The post 5 Tips for Better Travel Photography appeared first on Digital Photography School. It was authored by Jeremy Flint. Travelling with you camera is one of the highlights of embarking on any trip at home or abroad. Whether you enjoy visiting interesting places, soaking up the sunshine or embarking on adventurous activities, here are some tips for better travel photography. 1. Do your research
Provence, France © Jeremy Flint One of the most fundamental aspects of travel photography is to do your research about the destination you are visiting. Finding out about a location and obtaining information about a place and its attractions will help you to plan your trip. From this information gathering process, you can learn more about your destination. Ask yourself what you most want to see. Spend your time visiting the places that interest you. 2. Decide what to photograph
Provence, France © Jeremy Flint There are two approaches to consider when deciding what to take pictures of when on location. Firstly, you can come up with a plan for the things you want to photograph. Alternatively, you can be more spontaneous and walk around and photograph anything you see that inspires you. The advantage of the latter is that you can be more creative with no pre-conceived ideas of what you are going to photograph. 3. Manage your expectationsIf you are visiting somewhere for a short period of time, you may not have enough time to cover all of the touristic sights and highlights. Therefore, you will need to decide in advance where you would like to visit and photograph and what your photographic priorities are. Be realistic with your time. It will be a more enjoyable experience. Don’t try to do so much that you end up exhausted after the trip. You will often find that you won’t have enough time to cover everything on your first visit. I recommend choosing one or two places that you would really like to see and photograph. Just go there in case you end up running out of time. By visiting fewer places, you may do more justice to your photos – particularly if you can stay around to combat frustrations of travel photography such as adverse weather conditions. Moreover, you can always visit again to cover the areas you miss. 
Palawan, The Philippines © Jeremy Flint On a recent trip to the Philippines, I was pushed for time and decided to base myself in one place where I visited and photographed my surroundings. This made for a much more enjoyable trip. I wasn’t rushing around trying to see everything in one go, and I could take advantage of any favorable weather. Ultimately managing your expectations depends on your goals, what you want to photograph, and how much time you want to spend at different locations. 4. Embrace the culture
Papua New Guinea © Jeremy Flint Visiting a new location with your camera should be about more than just taking pictures. When visiting foreign lands, you are bound to come across cultures that are different from those found in your home town and country. To make the most of the place you visit, be open to the culture that is present. Experiencing a culture first-hand is as much a part of the enjoyment and wonder of a new place as it is to photograph its landmarks. On a recent visit to Romania, I wanted to photograph the country’s attractive landscapes. While there, I was bowled over by the kindness and hospitality of the people. By embracing the local culture, I found the trip to be so much more rewarding. Be open and flexible. Allow time for cultural experiences to happen. 5. Enjoy your trip
Palawan, The Philippines © Jeremy Flint Whilst taking photos is all part of the fun of documenting your adventures, be sure to have some non-photography time too. Have you ever been on your travels only to find you feel worn out after the trip from doing too much photography? Well, try not to spend all your time behind the camera taking pictures. To enjoy your travels more, take time out from photography and enjoy the sights and surroundings without your camera. You will feel more refreshed, and your creativity may be better as a result of it. ConclusionTravel photography is one of the most enjoyable aspects of photography, particularly as you have the opportunity to visit places near and far with your camera. For better results in recording your journey, research your destination in advance. Decide what you would most like to photograph. Be realistic with what you expect to capture, embrace the culture and most importantly enjoy your trip! Share your travel photos and any other tips for better travel photography in the comments below.
The post 5 Tips for Better Travel Photography appeared first on Digital Photography School. It was authored by Jeremy Flint. Photography via Digital Photography School https://ift.tt/29wB9CX June 26, 2019 at 02:18PM
https://ift.tt/2XB6MCb
The post 5 Photography Rules for Capturing Photos Your Audience Will Adore appeared first on Digital Photography School. It was authored by Jaymes Dempsey. It’s hard to stand out as a photographer. These days, you have so many photos to compete against; the internet is drowned in smartphone snapshots (with layer upon layer of filters). So how do you create images that cut through all the noise? How do you create art that will truly stun your audience?
In this article, you’ll discover 5 simple photography rules for capturing photos – which will ensure that your photos are truly special. Let’s dive right in, starting with… 1. Do everything you can to emphasize your subjectIf you want to capture photos that stand out, then this is your number one rule: Pick a subject. Something that stands out in your photo. Something that acts as an anchor point. And make that subject stand out as much as you can.
You see, it’s your main subject that actually captivates people. The rest of the scene exists to enhance that main subject. But how do you enhance your main subject? Start by making sure that your main subject is extremely sharp. Make sure it’s the sharpest part of the photo, in fact.
And make sure that your main subject has some color. Color draws the eye! Third, make sure your main subject is bright and well-exposed. A dark subject (especially if it’s surrounded by a dark background) just won’t work. If you do include a dark subject, then make sure that the background is extremely bright.
On a related note, more contrast is nearly always better. If you can incorporate some ultra-dark tones and ultra-light tones in your photos, your photo will instantly improve. Ideally, your background and your main subject will contrast heavily. Last, keep your background as clean as possible. It doesn’t have to be completely uniform but should be simple and well-organized. When in doubt, go for a monochromatic background, such as black, white, or green. 2. Use complementary colors to make your photos popYou already know how important it is to include contrast. But there’s a special kind of contrast that deserves its own mention:
Color contrast refers to the addition of colors that sit opposite one another on the color wheel (also known as complementary colors). You’re probably familiar with color contrast, even if you don’t know it. We see complementary color pairs all the time: red and green, blue and orange, yellow and purple.
Now, color contrast is perfect for creating stand-out photos. It catches the eye, and it practically forces viewers to look more deeply. One thing to note, however, is that you shouldn’t use too many contrasting colors. I recommend simply including two complementary colors (and potentially a third non-complementary color). If you incorporate too much contrast, the photo will become too powerful, and the colors will start to clash. I also recommend you limit the amount of the complementary colors that appear. If you have two complementary colors, include a lot of one color, and a little of the other. This will prevent the photo from overpowering the viewer.
Finding contrasting colors might seem difficult. But with a little effort, you should be able to incorporate a contrasting color pair. And you’ll love the effect! 3. Use negative space to stun viewers from a distanceNegative space is emptiness in a photo. By this, I’m referring to empty sky, empty water, or even an empty background – it all counts as negative space.
And negative space is extremely valuable, for a few reasons. First, it gives the main subject some breathing room. It also makes compositions feel calm and more stable (which is generally nice to have in a photo). But the best thing about negative space is that it is a place where the eyes don’t rest – thereby directing the viewer straight to the main subject.
So here’s what I recommend: When you’re deciding on a composition, incorporate at least some negative space into the photo. If you can, create a lot of empty space – but even a little space will go a long way. It’s best if the negative space exists around the main subject. That way, attention is immediately directed to the focal point of the photo. But any negative space is good!
4. Include leading lines to draw in the viewerI’ve talked a lot about emphasizing the main subject of your photos. This is because the most striking photos hit the viewer over the head with their subject. They pull the viewer in and direct them through the frame – right to the focal point. That’s the mark of a powerful photo.
And here’s another great way to emphasize your subject: Use leading lines. Include them whenever you can. Leading lines are lines that draw the viewer through the frame. They can be anything vaguely line-like: A river, an outstretched arm, even a flower petal.
Whenever you find a photo-worthy scene, search for leading lines. And incorporate them into your composition. Ideally, the leading line moves toward your subject. But you can also include leading lines that take the viewer around the frame. Most scenes have some sort of leading line. You just have to look hard enough! 5. Always shoot in the best light you can findOut of all the rules in this article, I think this one will give you the biggest bang for your buck. Because it’s so easy to shoot in the best light – you just have to know what the best light is. And once you know this… Your photos will never be the same. Seriously. So, what is the best light? The best light is the hour after sunrise and the hour before sunset, known as the golden hours.
These are the times when the sun is low in the sky, and casts a golden glow over the landscape. If you shoot during the golden hours, your subject will be bathed in beautiful light. And you’ll absolutely love the images you capture.
Now, there are other times when the light is good, depending on your genre of photography. If you’re a street photographer, you should try shooting during the middle of the day, when the light is sunny. If you’re a flower photographer, you should try shooting when the sky is heavily overcast.
If you’re a portrait photographer, you should also try working on overcast days. But even though these types of light do work… …the golden hours are perfect, without fail. They’ll always get you something wonderful.
Photography rules for capturing photos your audience will adore: conclusionStanding out in the crowded field of photography is a difficult task. But if you apply these simple photography rules, you’ll have a much, much better chance. So take these rules to heart, get out, and start shooting! Excitement awaits.
Have any more rules for capturing photos that your viewers will adore? Share them in the comments!
The post 5 Photography Rules for Capturing Photos Your Audience Will Adore appeared first on Digital Photography School. It was authored by Jaymes Dempsey. Photography via Digital Photography School http://bit.ly/29wB9CX June 26, 2019 at 09:13AM
https://ift.tt/2Yeo2KC
I’ve pulled together some of the recent questions (and answers) on Lightroom Classic that people have sent into me recently in the hopes that it may help others in the future. Change Size of FilmstripThe height of the Filmstrip that appears along the bottom of the interface in Lightroom Classic can be resized to a limited degree, but it isn’t necessarily intuitive. 
Just place your cursor over the line separating the top of the Filmstrip from the rest of the interface above (the cursor will change to a double-headed arrow), then click and drag upward until you reach your desired size or you hit the upper limit (which isn’t very far). 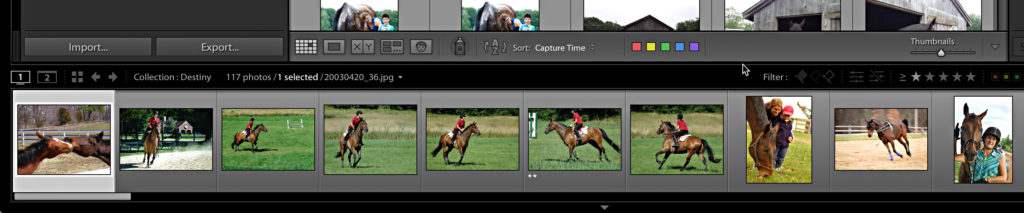
Missing Tool From ToolbarJust above the Filmstrip in Lightroom Classic is the Toolbar. The first thing you have to remember is that the tools that appear on the Toolbar change depending on the module you are in and what view or tool you are using. For example, within the Library module the contents of the Toolbar changes when switching between Grid and Loupe views. 

Assuming you are in the right module and view for the tool you need, and you still don’t see it, then click that disclosure triangle at the far-right end of the Toolbar and click on the tool you want to be visible on the Toolbar. 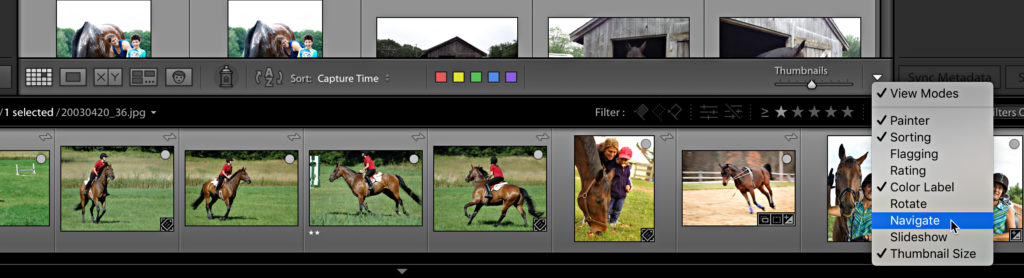
If the entire Toolbar is missing press the T key to show it (or hide it). Adding Multiple Graduated FiltersNext, switch over to the Develop module and selecting the Graduated Filter (pressing M while in Library will switch you to Develop with this tool active). You may not often have the need to add more than one Graduated Filter, but if you do, then all you need to do is press Enter/Return after adding the first filter to switch into New mode for adding an additional filter. Alternatively, clicking the New button at the top of the editing panel will do the same thing. 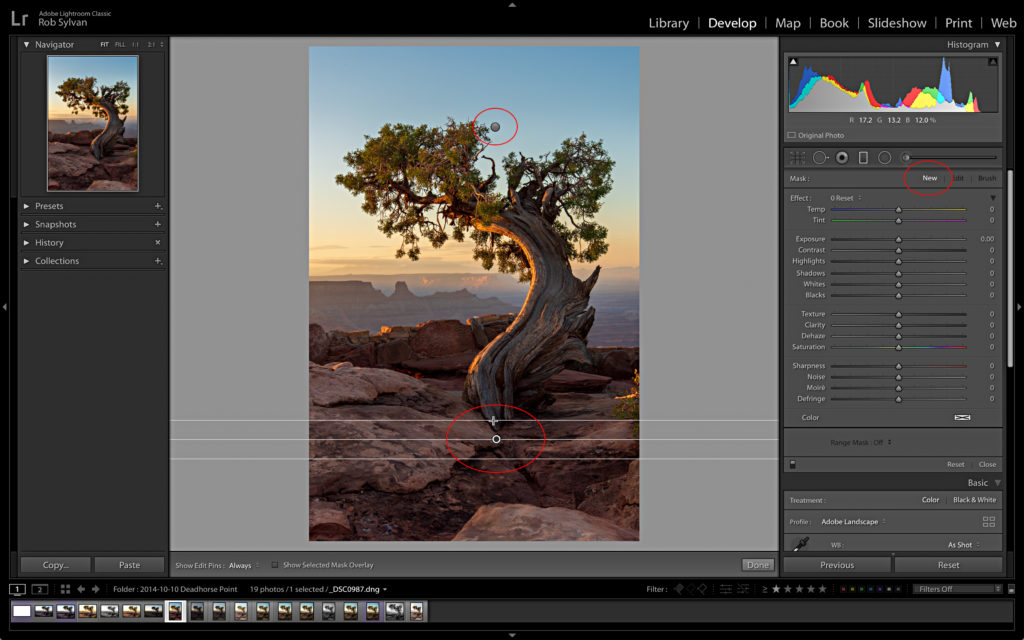
Adding Filenames to a SlideshowAdding photo specific information to each slide in a slideshow isn’t terribly obvious. Once you switch to the Slideshow module you should see an ABC button in the middle of the Toolbar (remember, press T if the Toolbar is missing). 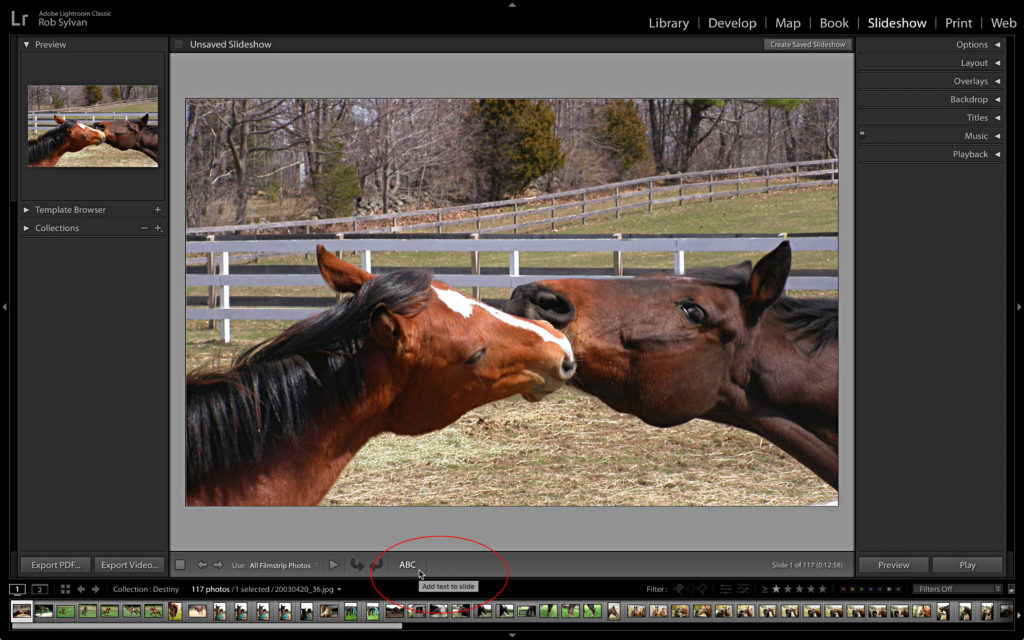
Clicking that ABC button engages the Custom Text field for input, and a reasonable person would think that is the place to add the text they want to show for the active/selected photo. However, what you are really doing is adding that custom text to every slide in the slideshow. 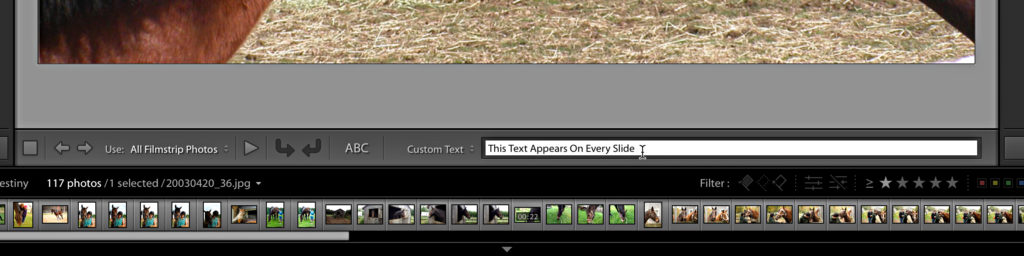
Instead of enter text in the Custom Text field, click the associated drop-down menu and choose the desired text template from the menu (for example, Filename in this case). 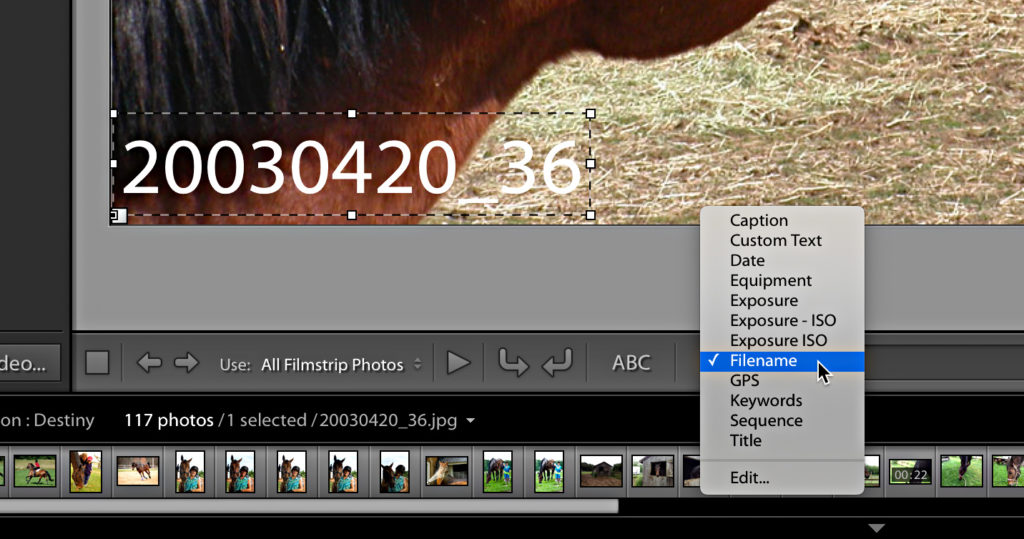
This will add the chosen text template to the slideshow. Text templates can pull filenames, captions, titles, and more from each photo as it appears in the show. Note, if you choose a metadata-based template (like caption or title) then you need to add that information to each photo via the Metadata panel in the Library module in order for it to appear. You can also edit and customize text templates to fit your needs. The post Lightroom Help Desk Roundup appeared first on Lightroom Killer Tips. Photography via Lightroom Killer Tips https://ift.tt/2sh0aZ8 June 26, 2019 at 03:08AM Once 500PX Photoshop Master Now Facing Discipline for Photomanipulation from 500PX Moderators6/25/2019
https://ift.tt/2ZRmuqr
The post Once 500PX “Photoshop Master” Now Facing Discipline for “Photomanipulation” from 500PX Moderators appeared first on Digital Photography School. It was authored by Jaymes Dempsey. Michael Karcz is about to be banned from the 500PX community. His account will likely be deleted. All based on what the 500PX moderators deem to be “non-photographic content” on his page. Michael Karcz is a well-respected photographer on 500PX. He is known for his fantasy-style images, which involved extensive use of Photoshop to create alternate realities. He has garnered thousands of followers and millions of views.
And in an article published four years back, 500PX heaped praise on Karcz, referring to him as a “Photoshop master” with “formidable Photoshop skills.” What changed? On Karcz’s end, nothing. His account has been business-as-usual in recent months. He never attempted to hide the process behind his images. Karcz writes on Facebook: “I marked each work as photo-montage and placed in a category that most closely matches content – fine art.” 
Karcz’s gallery on 500PX. Instead, the reversal is due entirely to 500PX’s new orientation, which rejects anything seen as non-photographic content. And this includes Karcz’s work, which relies heavily on Photoshop. Here’s the initial message that Karcz received from a 500PX representative:
And when Karcz asked for further explanation, this was the reply from 500PX:
Karcz is understandably frustrated by this about-face. For years, 500PX was a platform to share his work. And now, without warning, he’s been turned away, despite investing time and energy into building a 500PX following.
Karcz writes: “I never concealed how my work is created, and evidence of hypocrisy is an interview with me in 500px, which was later also found in the Huffington Post. What I use are photographs, and the photomontage is the starting medium.” He goes on to argue that his photomontage technique has been “used almost from the beginning of photography, by those who wanted to show something more [than] realism.” What are your thoughts? Should Karcz’s work be allowed on 500PX? And if not, how should 500PX deal with once-accepted photographers who have been dedicated members of the community? The post Once 500PX “Photoshop Master” Now Facing Discipline for “Photomanipulation” from 500PX Moderators appeared first on Digital Photography School. It was authored by Jaymes Dempsey. Photography via Digital Photography School http://bit.ly/29wB9CX June 25, 2019 at 05:53PM |
Categories
All
Archives
November 2020
|


 RSS Feed
