
|
https://ift.tt/2yWIlUA
These Photos Show Why Everyone Wants to Go to Iceland https://ift.tt/2yWHJ1e
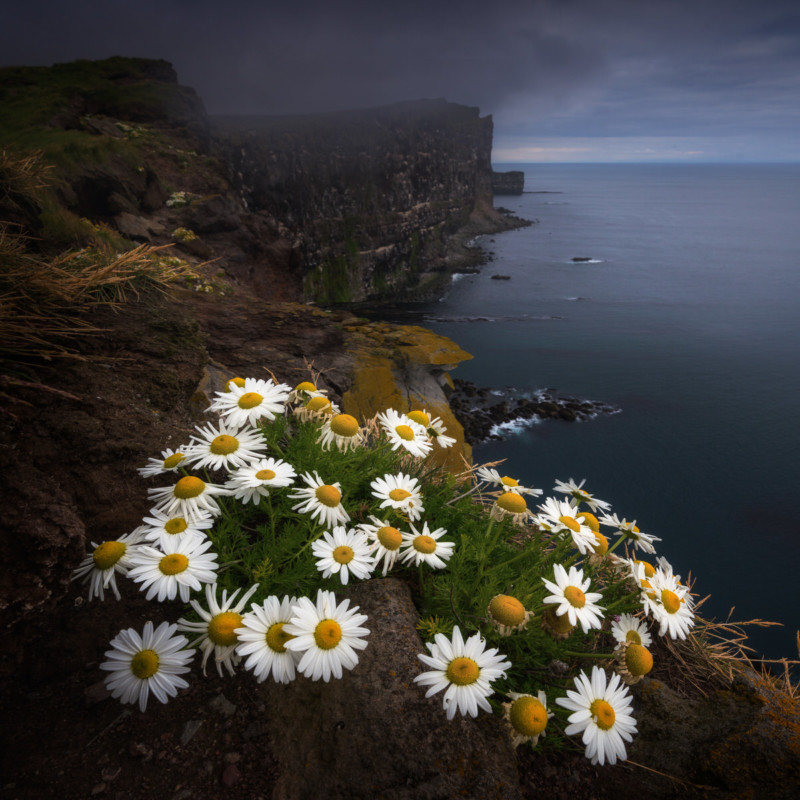
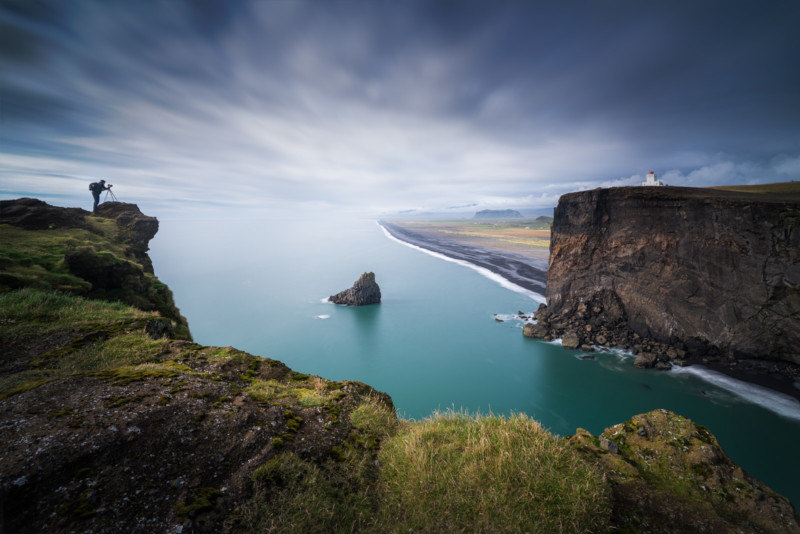
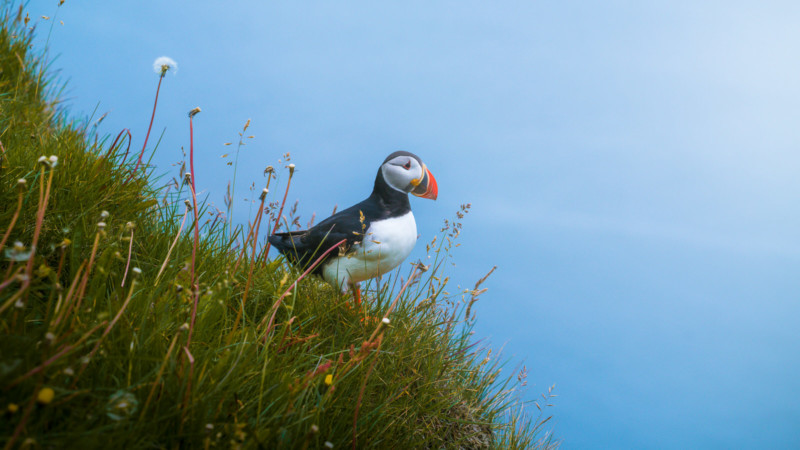
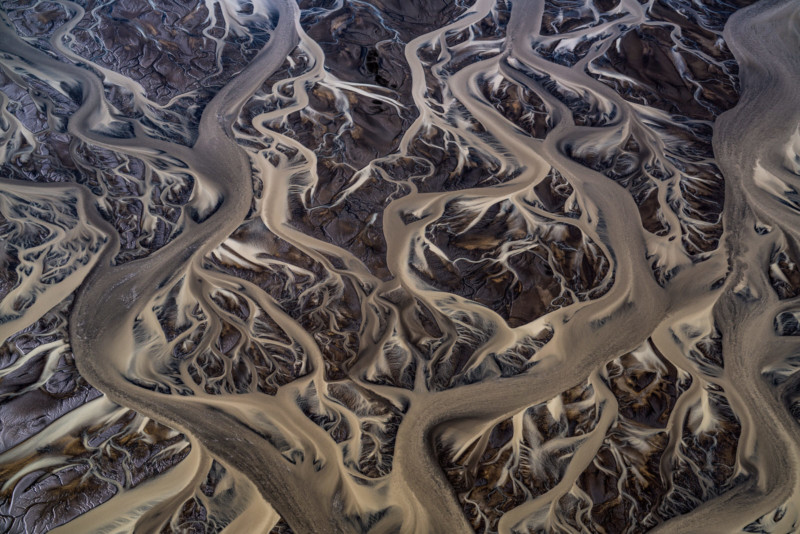
Iceland is booming. More than 2 million tourists visit Iceland every year. This comes as no surprise. As I am regularly guiding tours in Iceland, I have visited the country quite a few times over the years and the beauty of the country is simply out of this world. The moment you step out of Reykjavik is the moment you enter some a fantasy movie with beautiful scenery on every corner. For people who have not visited Iceland yet, here are a bunch of images that just might convince you to. Iceland has an insane coastline with high cliffs all around the island.
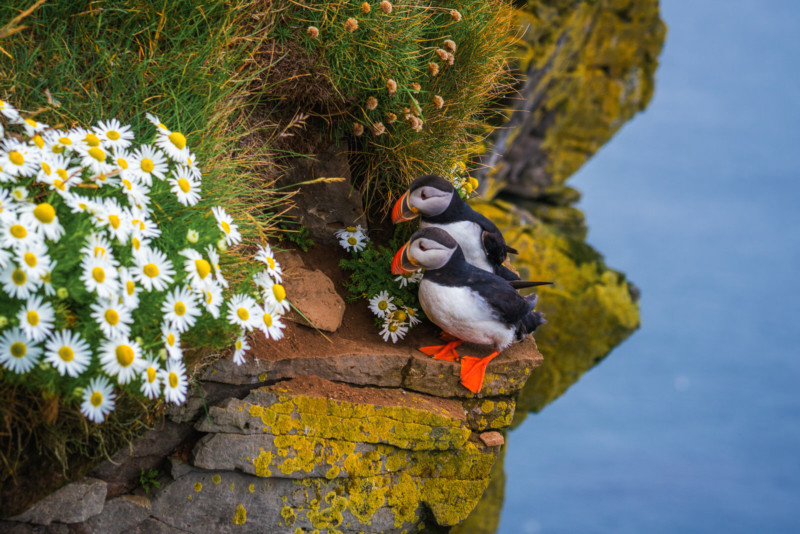
Among those rough cliffs lies a great contrast: one of the cutest birds you will ever see in this world: the puffins!
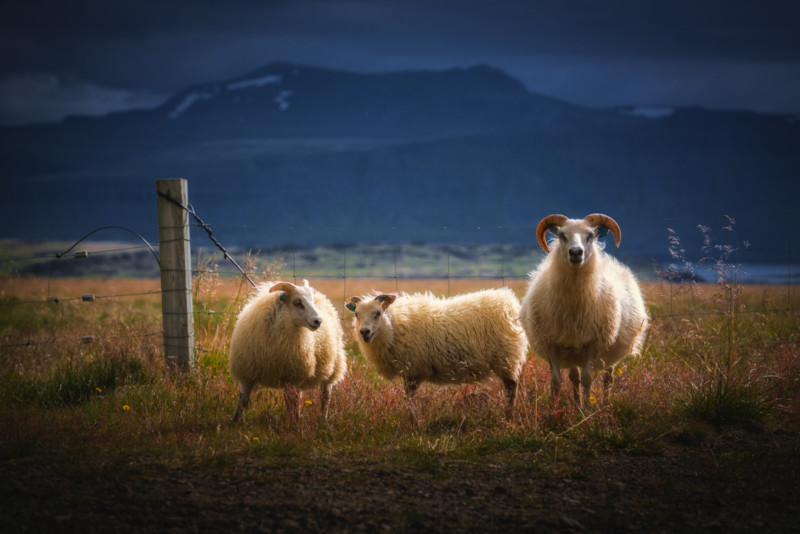
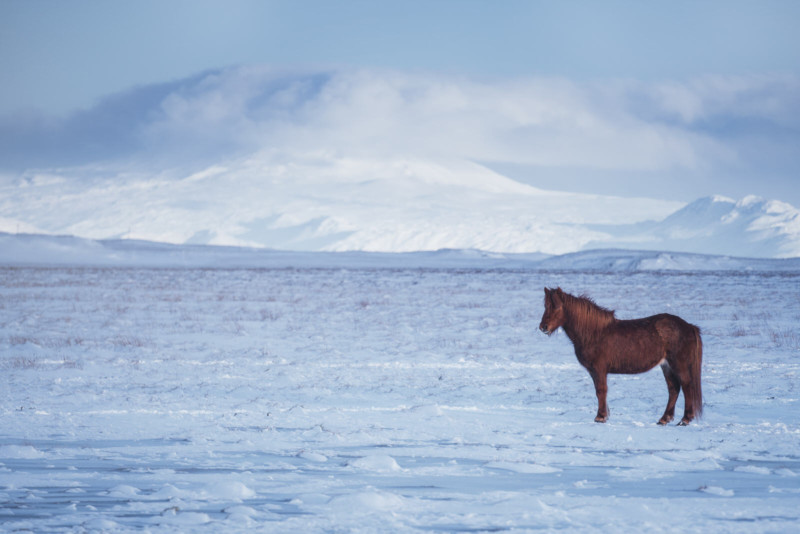
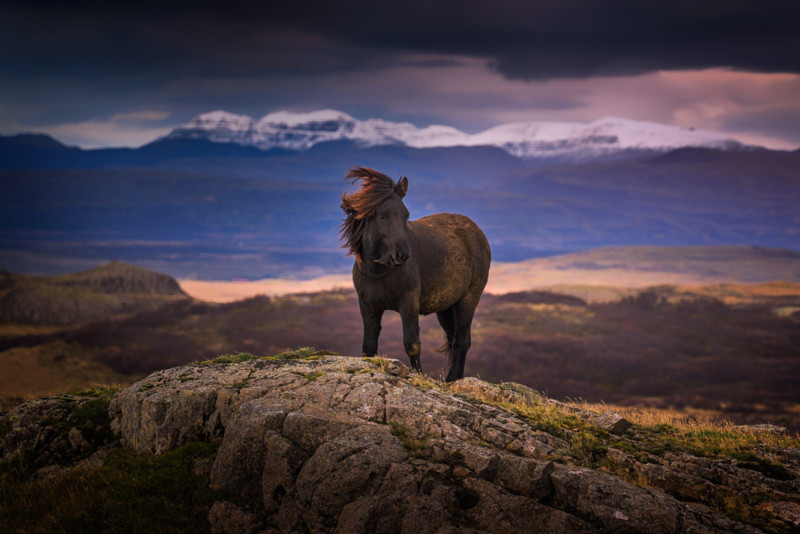
But Iceland also has a lot of sheep and horses that you can find next to almost every road.
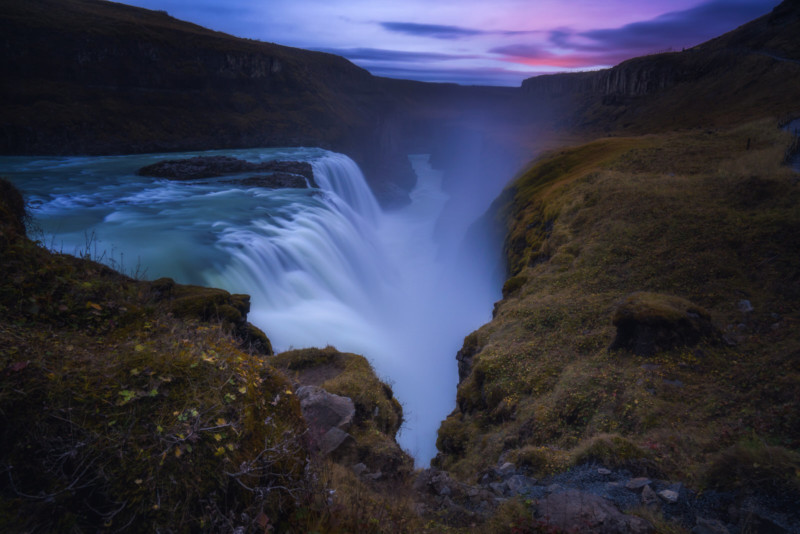
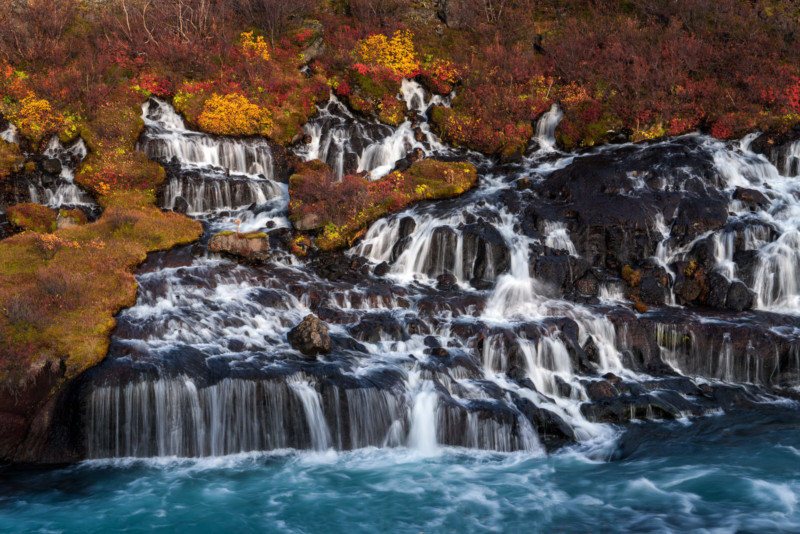
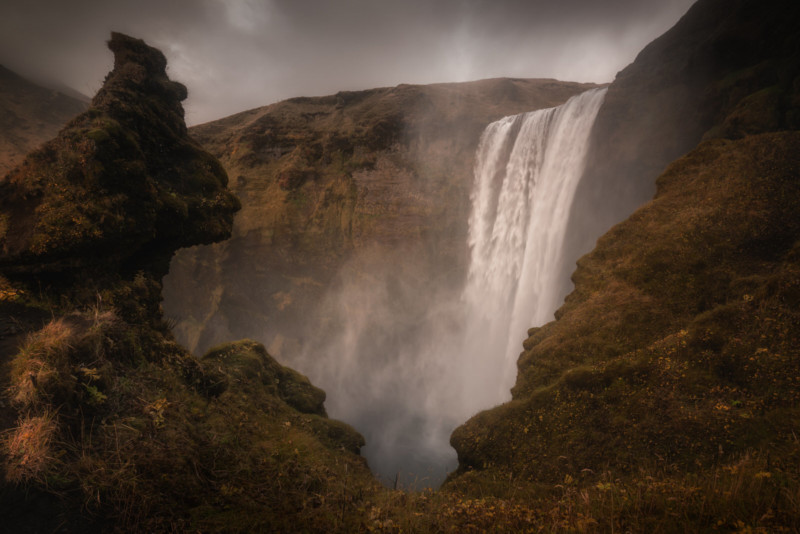
Inland you can find big and small waterfalls each with its own unique characteristics.
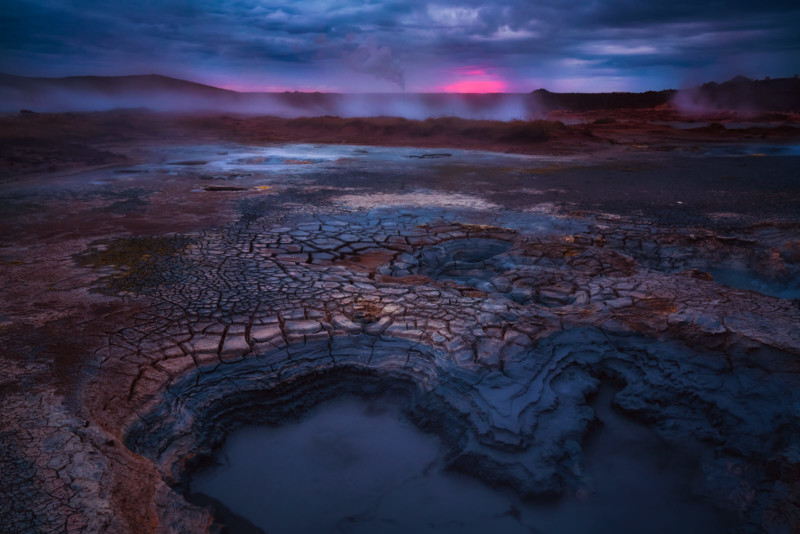
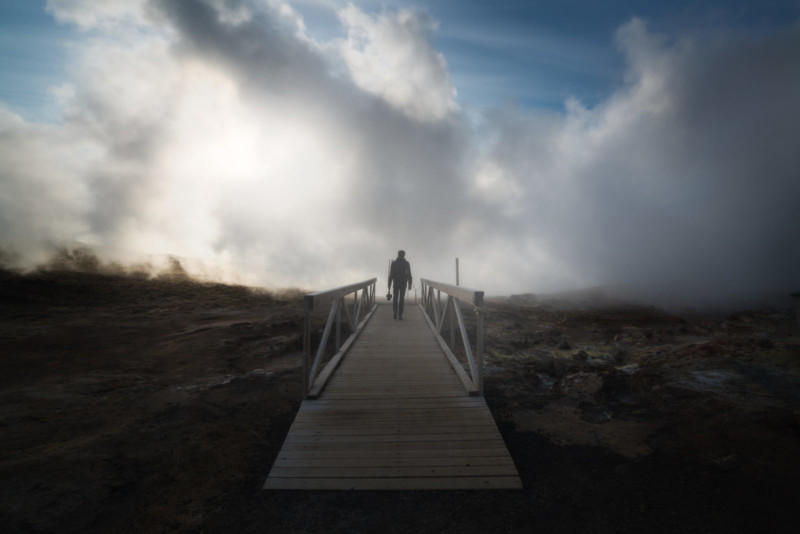
Iceland is known for its geothermal activity areas. They look like something from another planet.
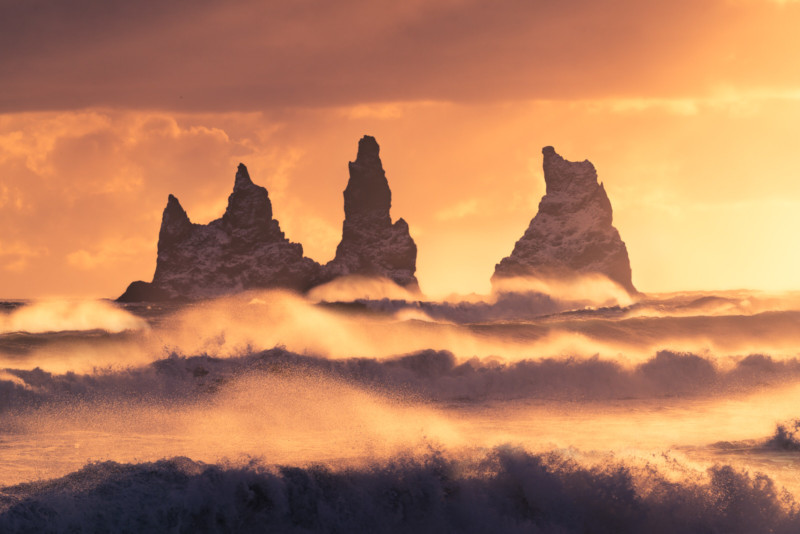
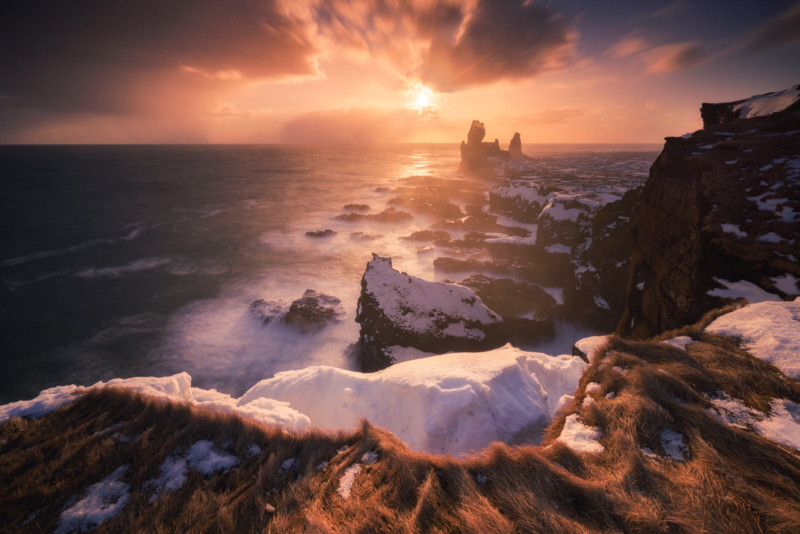
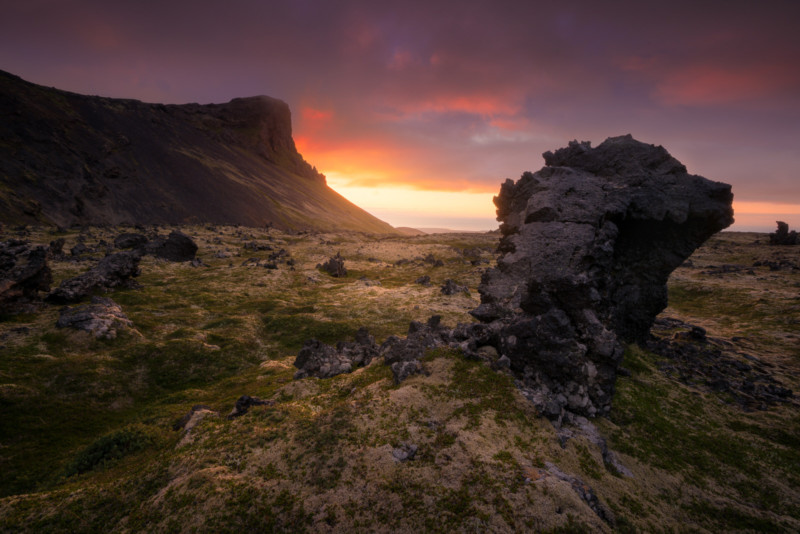
You will find amazing rock formations on every corner. It doesn’t matter in which season you go, as the landscape always looks beautiful.
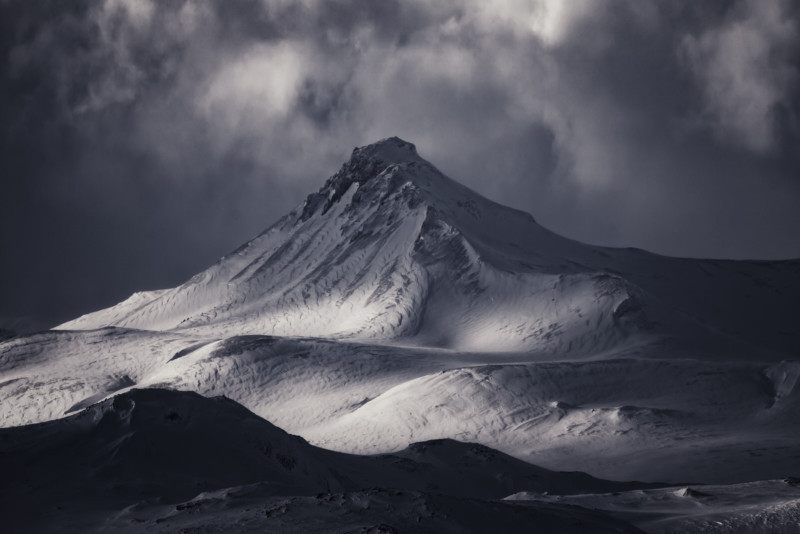
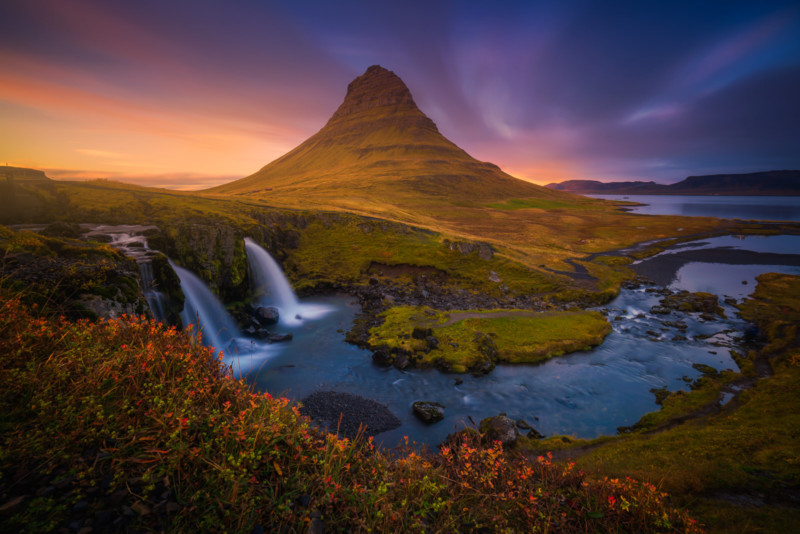
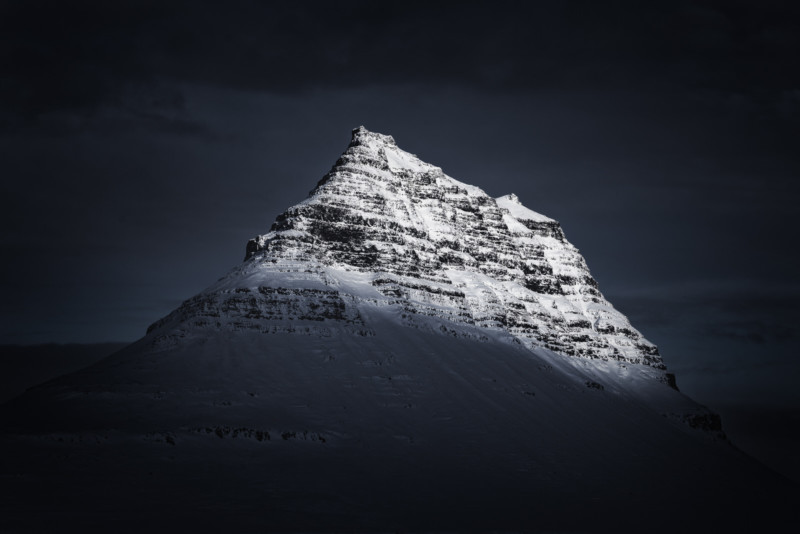
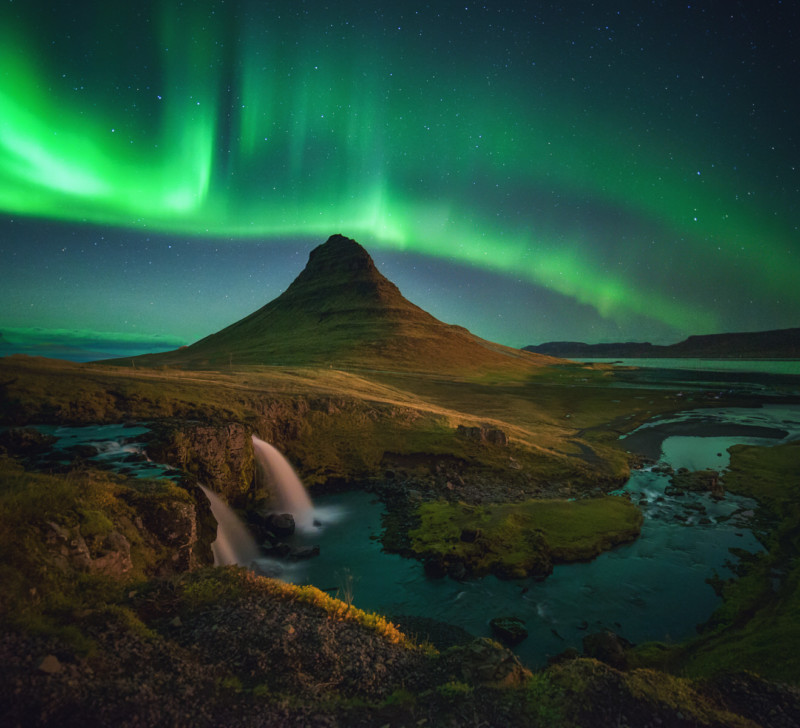
Iceland’s most iconic mountain is shaped like an arrowhead. It’s called Kirkjufell (church mountain).
Although it looks different from every angle.
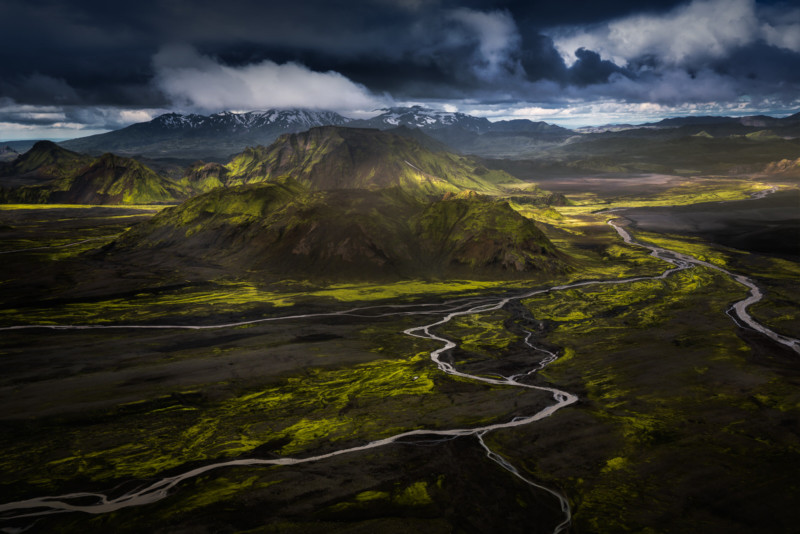
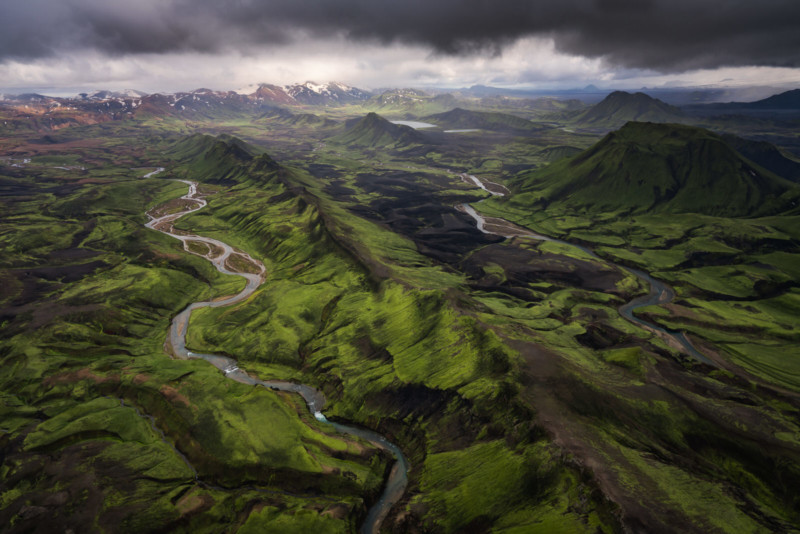
In the center of the country is the so-called ‘Highlands’. The weather is always changing here. It is the rough part of Iceland and beautiful to explore. Fewer tourists, rougher terrain!
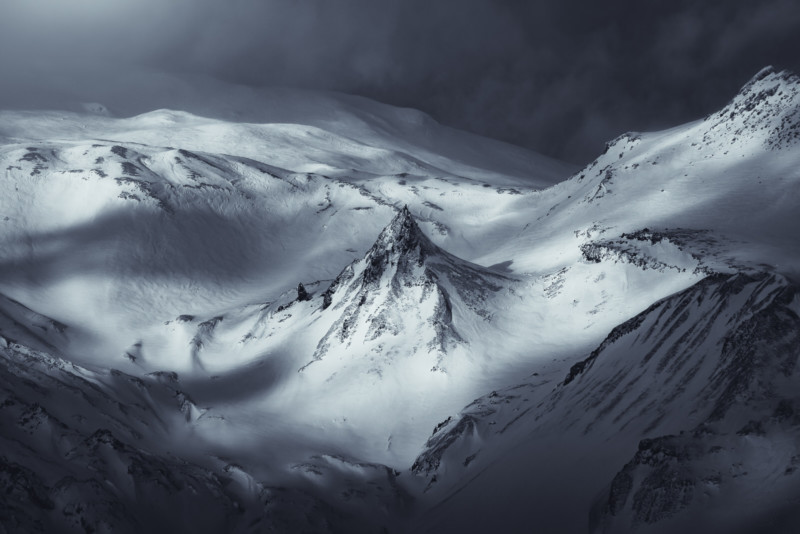
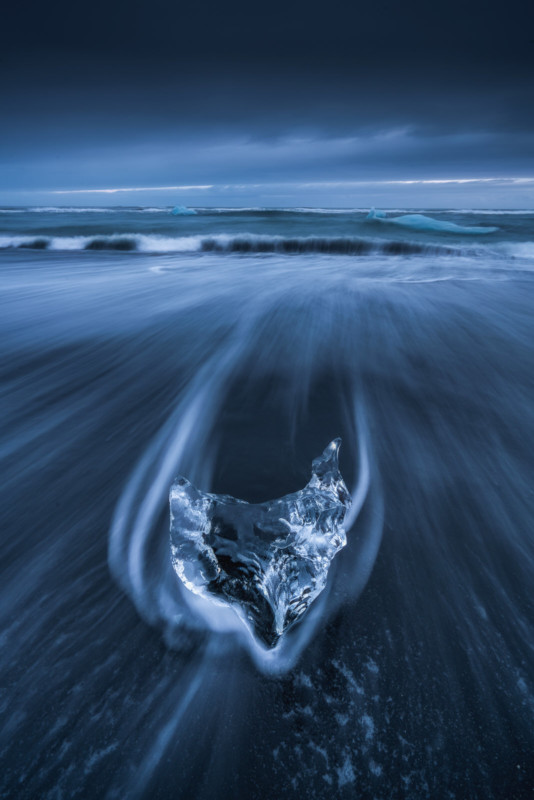
Of course, Iceland has a lot of ice! It has big ice chunks from the glaciers all year, even in summer.
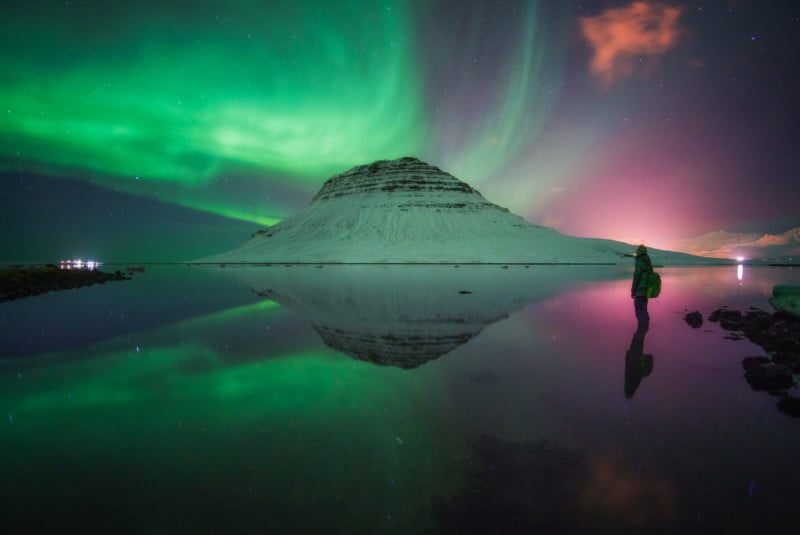
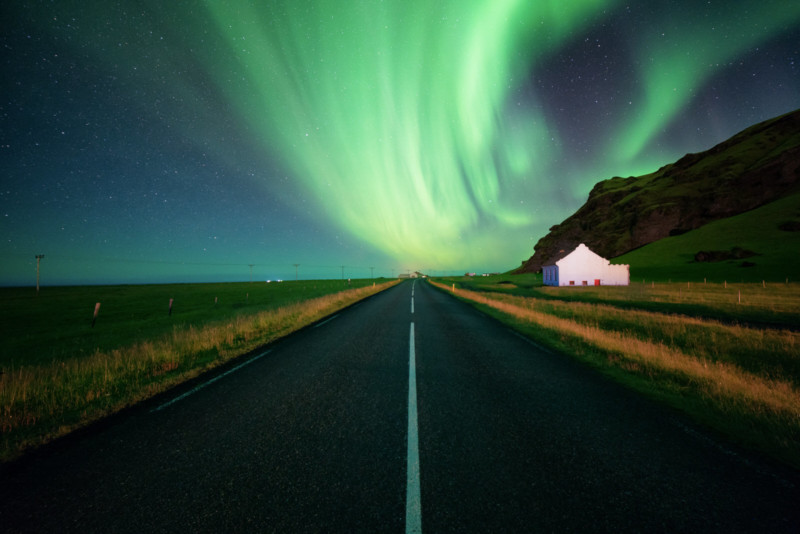
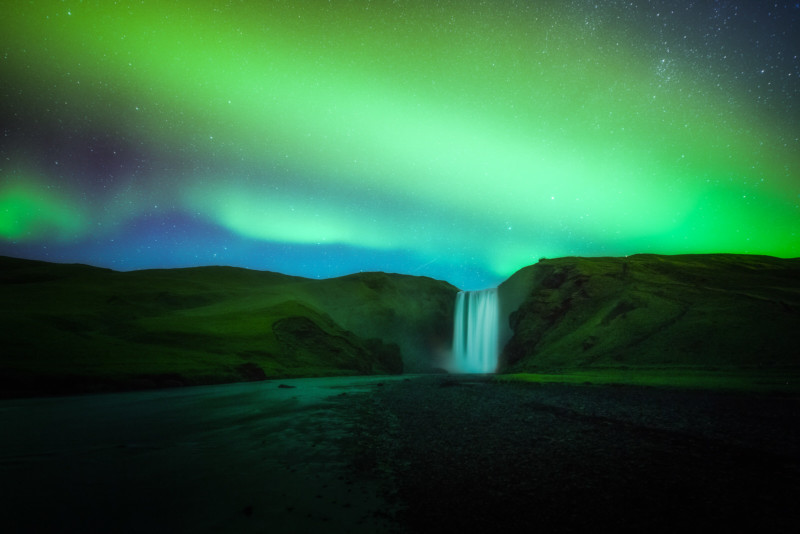
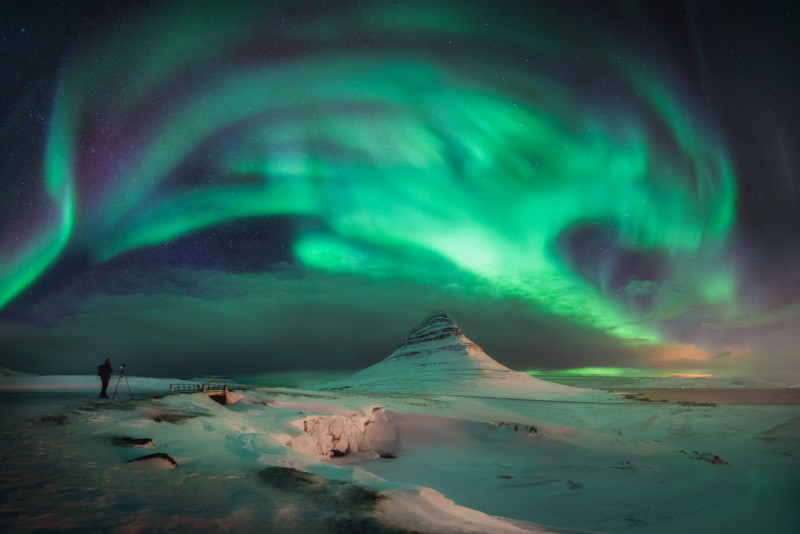
And of course, Iceland has the northern lights in the winter months! Something a lot of people visit the country for.
I’m looking forward to going back each year even though I have seen a lot of the country. Yes, it gets crowded nowadays, but there are still lots of things to explore if you know where to go. And with the unpredictable weather, each visit is very different. P.S. If you’re interested in joining me on a trip, check out my photo tours. I still have space for September 2018. About the author: Albert Dros is an award-winning Dutch photographer. His work has been published by some of the world’s biggest media channels, including TIME, The Huffington Post, The Daily Mail, and National Geographic. You can find more of his work on his website, or by following him on Facebook and Instagram. Photography News via PetaPixel https://petapixel.com June 29, 2018 at 09:26AM
0 Comments
https://ift.tt/2tQVuc3
Here is a fun tutorial to try if you enjoy food photography. Anyone can photograph a sandwich on a plate, but you can you make it explode and capture all the layers in a photo? Here’s how it’s done as shown by photographer Skyler Burt. How to do itIf you enjoyed that and want to brush up on your food photography in general, check out these dPS articles:
The post How to Create an Exploding Sandwich Food Photo appeared first on Digital Photography School. Photography via Digital Photography School https://ift.tt/29wB9CX June 29, 2018 at 09:12AM
https://ift.tt/2KfuJci
2018 National Geographic Travel Photographer of the Year winner announced https://ift.tt/2Ku4wD6 2018 National Geographic Travel Photographer of the Year winners
Nature 1st Place – and Grand Prize winner Reiko Takahashi's image of a humpback whale calf's tail has been named Grand Prize winner of this year's National Geographic Travel Photographer of the Year contest. Her caption for the photo reads: I was fortunate to have encountered a humpback whale with her calf on my first day snorkeling near Japan’s Kumejima Island. Most of the time, the calf stayed close to her mom. At one point, the calf began jumping and tapping its tail on the water near us—it was very friendly and curious. Finally, the mother, who was watching nearby, came to pick up the calf and swim away. I fell in love completely with the calf and it’s very energetic, large and beautiful tail. Winners in three categories have also been chosen, from over 13,000 total entries. Takahashi's photo, titled Mermaid, also took first place in the Nature category – Cities and People round out the categories. Take a look through the winning images above and see more outstanding photos from the weeks leading up to this announcement at National Geographic's website. 2018 National Geographic Travel Photographer of the Year winners
Nature 2nd Place Thousands of flamingos are seen taking off from the colorful Lake Natron in Tanzania. Before taking off, flamingos need to take a short run on water to build up some speed. At that moment, their long, red legs create a series of water ripples on the surface of the lake. Looking down from the helicopter, these ripple lines look like giant aquatic plants flowing in the water. This photo was taken from a helicopter. 2018 National Geographic Travel Photographer of the Year winners
Nature 3rd Place These natural sand towers, capped with large stones, are known as the Earth Pyramids of Platten. They are situated in Northern Italy’s South Tyrol region. Formed centuries ago after several storms and landslides, these land formations look like a landscape from outer space and continuously change over the years and, more accurately, over seasons. This natural phenomenon is the result of a continuous alternation between periods of torrential rain and drought, which have caused the erosion of the terrain and the formation of these pinnacles. As the seasons change, the temperatures move between extremes and storms affect the area, pyramids disappear over time, while new pinnacles form as well. 2018 National Geographic Travel Photographer of the Year winners
Cities 1st Place This is a view of the main street from a tram in Nagasaki on a rainy day. The tram is vintage, but retrofitted with modern ticketing equipment. A conductor is no longer on board—only the lone driver. The quiet streetscape seen through the front windshield of the tram somehow caught my attention. This view presents quite a contrast to busy urban centers in Japan, such as Tokyo and Osaka. The ride on a vintage tram through the relatively quiet main street was a memorable experience during our week-long visit to the historic city of Nagasaki. 2018 National Geographic Travel Photographer of the Year winners
Cities 2nd Place Teotihuacan means 'the place where the gods were created,' and that's the exact feeling visitors have when they walk along the Avenue of the Dead at this Mexican archeological site. This pyramid was dedicated to the god of Sun, and I found it mesmerizing how the rising sun in the picture conquered just half the image, while the other half is in the shadows. I have always loved archeology and ancient civilizations, so I couldn't wait to visit Mexico and explore the remains of the pre-Columbian civilization. I planned my visit to Teotihuacan at sunrise, to get a combination of golden sunlight, play of shadows, and few crowds around. I flew my drone to see if the image I had in my mind was really out there: luckily for me, this frame was just waiting for my camera! 2018 National Geographic Travel Photographer of the Year winners
Cities 3rd Place On an early morning, I wanted to photograph the fog, which is epic in Dubai every year from December to January—and almost every photographer’s dream in this part of the world. Sadly, I could not get access to the rooftop and so I peeped through the glazed window on a lower floor. I was overwhelmed and excited to see how beautiful the city looks, and my excitement was quadrupled as soon as I saw the reflection of the road and building on the building that I was in. I immediately opened the window to the maximum permissible amount and clicked a single shot with stretched hands. 2018 National Geographic Travel Photographer of the Year winners
Cities Honorable Mention In this photo, I tried to bring the intense and stacked living conditions that Hong Kong is famous for into perspective for the viewer. With so many people living in small spaces, it's strange to see all these amenities empty. As a solo traveler, I’m often alone in crowds and this photo resonates with me. I barely scratched the surface of this incredible urban environment, but this image really summarizes my experience here. 2018 National Geographic Travel Photographer of the Year winners
People 1st Place For a long time, I have been fascinated by the ancient Mongolian method of hunting with Golden Eagles. In early 2018, I followed one family of eagle hunters during their migration from winter camp to spring camp. Mongolia is sparsely populated, but the inhabitants have a very hospitable and welcoming culture. Tea for Kazakh culture is one of the attributes of hospitality. Tea isn't just a drink, but a mix of tradition, culture, relaxation, ceremony, and pleasure. Damel, seen here wrapped in heavy fur clothes, drinks a cup of tea to keep warm from the chilly temperatures in Western Mongolia. 2018 National Geographic Travel Photographer of the Year winners
People 2nd Place Since 2016, I've been involved with Haitian immigrants and refugees living in my city, Estrela. I have become friends with some families, and especially with twin sisters, Leïda and Laëlle. They say living in Brazil is like living in paradise—very different from the reality of their country of origin. They dream of becoming models and teachers, as a way to earn money to bring their other relatives from Haiti to Brazil, to live all near one another. On this day, they were playing in front of their home, improvising exercises to develop their imagination and creativity, as if they were actresses, and playing an imitation game with poses. Laëlle reached for Leida's face and lifted her head up, showing her where she should look. At this brief moment, I took the photo. 2018 National Geographic Travel Photographer of the Year winners
People 3rd Place This photograph was taken from Dhaka's airport rail station during the Eid vacation. People were returning to their village homes to spend Eid with families, and the rush at the last hour was immense. One man caught my attention: he was dangling on a train's handle with his family, trying to get inside the train. At that time, rain started and the train began to slowly move. The family had tickets to board the train, but couldn’t get to their seats. There are many people like him, who come to Dhaka for work—leaving their families and home villages—so when they get vacation, they don't want to miss the opportunity to spend time with dear ones, no matter what. Photography News via Articles: Digital Photography Review (dpreview.com) https://ift.tt/i0r8o5 June 29, 2018 at 08:06AM
https://ift.tt/2tOxp5B
6 Tips To Improve Your Architectural Photography https://ift.tt/2MsNFko Architectural photography is a genre that almost every photographer tries out at some point, but not many people truly manage to master it. Just like portraiture or landscape photography, architectural photography has its own tips and tricks that we should learn and apply. Buildings are like people in a way – each has its own mood and personality. Good architectural photography is looking to capture the most enchanting qualities of various buildings and their interiors and exteriors. In case you’re willing to combine your creativity with the following 6 tips, you can definitely improve the visual appeal of your architectural photographs. 1. Get Familiar With The Place You’re ShootingIn order to understand the visual essence of a certain building, you need to take some time to get familiar with it. This means you should learn what the building looks like on the inside and outside under various lighting conditions. You can also look for unusual angles and unusual perspectives and notice if there are any people around that you’d want to include in your shots. If you’re interested in history, you can find out more about the building from a chronological point of view. Sometimes, knowing the history of a certain place can help you unlock your creativity. 
Photo by Ricardo Gomez Angel on Unsplash 2. Follow The LinesLines are extremely important in architectural shots. You should make sure that your lines go where they’re supposed to – vertical lines should be vertical and horizontal lines should be perfectly horizontal. Even though this sounds simple it can be very challenging, because sometimes you’ll need to tilt the camera to get the entire building in the frame. There are other issues you’ll have to deal with too, such as barrel distortion. If you’re using a wide-angle lens, you’ll surely have a certain amount of distortion in your images. For fixing lens distortion and other issues with vertical and horizontal lines you’ll have to rely on post-processing. 
Photo by Andre Sanano on Unsplash 3. Show A Unique PerspectiveFinding a unique perspective matters because you want to avoid predictable images. Shooting the building from a regular eye-level perspective often doesn’t have enough visua allure. You should learn to be a careful observer and take the time to look around in ways you might not have as a regular passer by. If you’re feeling adventurous, you can explore all the sides of the building and even try to get onto balconies or rooftops. Of course, always ask for permission first to avoid trespassing fines! 
Photo by Coline Beulin on Unsplash 4. Mind The DetailsAmateur photographers often focus on capturing the entire building while forgetting some unique details. However, shooting from a close-up perspective opens up another world of possibilities! Older buildings often have very rich geometric patters and some of them are quite elaborate, such as floral patterns and abstract arabesque patterns. Also, exploring the textures of the building materials can result in some truly fascinating photos. 
Photo by Dmitri Popov on Unsplash 5. Look For ReflectionsReflections can enrich the spaces which look overly simplistic. If you use the reflections correctly, they can add a sense of depth and mystery to your compositions. Many historical buildings have large mirrors in their halls or some interesting pools or fountains in front of the main entrance – you can use them to practice capturing reflections. 
Photo by Dr Makete Lab on Unsplash 6. Add The Human ElementIncorporating the human figure into architectural shots can often make these photographs much more dynamic. It also allows the viewer to see the building from the perspective of those who live or work in it. Since buildings are by default built by humans for humans, we can better understand their functionality if we see a human figure in the photo. This also allows the viewer to create a sense of scale in the image. In case of truly monumental buildings, seeing how small we are compared with giant architectural constructions creates the sense of wonder and exhilaration. 
Photo by Andres Gerlotti on Unsplash Practicing architectural photography is a great way to improve your photographic skills in general – it makes you think about various creative ways to use lines, angles, colors, geometric shapes, and textures. Because of this, you shouldn’t be afraid to simply grab your camera and start photographing buildings in your neighborhood. You might actually surprise yourself with the quality and creativity of your own architectural shots. Also, if you want to learn all of the fundamentals of composition that you can use in your architectural photography, you should consider Photzy's Advanced Composition guide to take things further than we can in a short blog post like this. The post 6 Tips To Improve Your Architectural Photography appeared first on Light Stalking. Photography News via Light Stalking https://ift.tt/2kwTW5i June 29, 2018 at 08:00AM How to Sync Your Lightroom Classic Custom Presets Over To Lightroom Mobile in 3 Easy Steps6/29/2018
https://ift.tt/2lJySH0
OK, you have to watch this short video to see the fast-one we’re going to pull to make this happen, but it’s just three easy steps, and it works like a champ. Not bad, eh? Give it a try – it’s fast and easy!
OK, want to win a $2,800 Profoto B1X set-up and accessories? Here’s the link. Go right now and enter the contest (hey, ya never know, right?) Have a great weekend everybody! Best, -Scott The post How to Sync Your Lightroom Classic Custom Presets Over To Lightroom Mobile in 3 Easy Steps appeared first on Lightroom Killer Tips. Photography via Lightroom Killer Tips https://ift.tt/2sh0aZ8 June 29, 2018 at 03:21AM Pentax FA* 50mm F1.4 SDM AW lens shipping in July for $1199 https://ift.tt/2tM7j3q First announced last October, Ricoh is ready to ship the HD Pentax-D FA* 50mm F1.4 SDM AW, a weather-sealed fast prime for the company's full-frame DSLRs. The lens has 15 elements in 9 groups: one anomalous dispersion and three aspherical. A newly developed SDM ring-type motor has 7.5x as much torque as previous models in order to move all of that glass quickly and smoothly. HD and Aero Bright II coatings reduce flare and ghosting while a Super Protect coating on the front element should help repel dirt and precipitation. The lens is sealed against dust and moisture and weighs in at 910g / 2lbs. The 50mm F1.4 has nine rounded aperture blades, and a minimum focus distance of 40cm / 15.6". The maximum magnification is 0.18x. You'll be able to pick up the FA* 50mm F1.4 SDM AW in late July at an MSRP of $1199. Official samples:Press Release: RICOH ANNOUNCES AVAILABILITY OF HD PENTAX-D FA★ 50mm F1.4 SDM AW STAR-SERIES LENSFirst model in new generation of high-performance K-mount lenses delivers exceptional imaging performance and superior dependability in a wide range of shooting conditions WEST CALDWELL, NJ, June 28, 2018 -Ricoh Imaging Americas Corporation today announced the availability of the first model in its new generation of PENTAX Star series lenses, the HD PENTAX-D FA★50mm F1.4 SDM AW. This large-aperture, prime lens delivers stellar imaging performance and maximum light transmission—the hallmarks of the acclaimed Star series line—and is the perfect companion to any K-mount digital SLR camera including the full-frame PENTAX K-1 and new PENTAX K-1 Mark II models. Premium-quality Star-series lenses deliver the highest performance among the PENTAX SLR interchangeable lens series, and have enjoyed enthusiastic support from PENTAX SLR camera users since the days of film. In addition to the initial design concepts of optimum image quality and large apertures for maximum light transmission, the series has embraced the additional concepts of exceptional toughness and outstanding operability, achieved through the development of a dustproof, weather-resistant lens housing. The resulting lenses provide superior dependability in wide range of shooting conditions. The HD PENTAX-D FA★50mm F1.4 SDM AW lens delivers exceptional resolving power from the center to the edges of the image field, even when set to open aperture. The lens incorporates state-of-the-art PENTAX-developed lens coating technologies — including the new Aero Bright Coating II for exceptionally low reflectance and high-grade high-definition (HD) Coating — that enable it to produce extra-sharp, high-contrast images free of flare and ghost images. The lens’s dustproof, weather-resistant body also makes it extremely dependable and durable for shooting in demanding outdoor conditions. Its PENTAX K-mount covers the image circle of a 35mm-format full-frame image sensor. The new lens is the first produced following Ricoh’s extensive review of standards for the top-of-the-line Star series. Engineers evaluated a variety of approaches to minimize aberrations and deliver the highest image quality. The HD PENTAX-D FA★50mm F1.4 SDM AW lens is designed to deliver optimum imaging performance with all compatible camera bodies, including next-generation digital SLRs. | Key Features |
This lens has been developed as a new-generation member of the high-performance Star series — a lineup designed to deliver extra-clear, high-contrast images with edge-to-edge sharpness while keeping aberrations to a minimum. The lens, which is the result of an extensive review of traditional Star-series standards, provides greatly improved resolving power, which enables it to deliver excellent imaging performance even with more advanced, next-generation camera bodies. Developed as the first model of the new-generation Star-series lenses, the new lens boasts an extra-large F1.4 maximum aperture, useful with many different subjects in a range of applications, including portraiture with an effectively de-focused (bokeh) background, and handheld shooting of indoor scenes. It provides exceptional image quality even at open aperture, as well as outstanding performance at close ranges.
The lens is treated with PENTAX-developed Aero Bright Coating II — a lens coating developed using a state-of-the-art nanotechnology process. It consists of a silica aerogel layer with a uniform porous structure over a regular multi-coating layer that reduces surface reflections across a wide wavelength range and produces crisp, high-quality images. By coupling this advanced lens coating with the high-grade, multi-layer HD (high definition) Coating, average reflectance in the visible ray spectrum is reduced to less than 50% compared to conventional multi-layer coatings. As a result, the lens effectively reduces flare and minimizes ghost images even in demanding lighting conditions, such as backlighting. The lens incorporates three super-low dispersion glass elements and one aspherical element to effectively compensate for chromatic and spherical aberrations, enabling it to produce brilliant, high-contrast images with edge-to-edge sharpness. Since distortion is minimized even at a focusing distance of approximately one meter, the lens produces crisp, distortion-free images over the entire focusing range, from the minimum focusing distance to infinity.
Developed as an AW (all weather) model, this lens features a dependable dustproof, weather-resistant body with eight special seals to prevent the intrusion of water and dust into the lens interior. When paired with a PENTAX weather-resistant digital SLR camera body, it forms a durable, reliable digital imaging system that performs superbly in demanding conditions — even in rain or mist, or at locations prone to water splashes or spray.
This lens features a newly developed ring-type SDM (supersonic direct-drive motor), which generates as much as 7.5 times the torque as the SDM installed in previous-generation lenses. This enormous driving power assures a smooth, high-speed shift of the heavy, multi-element rear lens group during focusing operation.
・Nine-blade, round-shaped diaphragm produces a natural-looking de-focus (bokeh) effect up to an F2.8 aperture setting, while minimizing the streaking effect of point light sources ・A minimum focusing distance of 0.4 meters, effective for capturing images with a de-focus effect ・Electromagnetic diaphragm-control mechanism,* for flawless, high-precision exposure control during movie recording ・SP (Super Protect) coating to keep the front surface free of dust and spots * This mechanism is available when the lens is mounted on a PENTAX K-1 Mark II, K-1, K-3 II, K-3, KP, K-70, K-S2 or K-S1 camera body. | Pricing and Availability | HD PENTAX-D FA★50mm F1.4 SDM AW will be available in late July 2018 at www.ricohimaging.com and retail outlets nationwide for a manufacturer’s suggested retail price of $1,199.95. HD Pentax-D FA* 50mm F1.4 SDM AW specifications
Photography News via Articles: Digital Photography Review (dpreview.com) https://ift.tt/i0r8o5 June 28, 2018 at 05:03PM
https://ift.tt/2IB5L1s
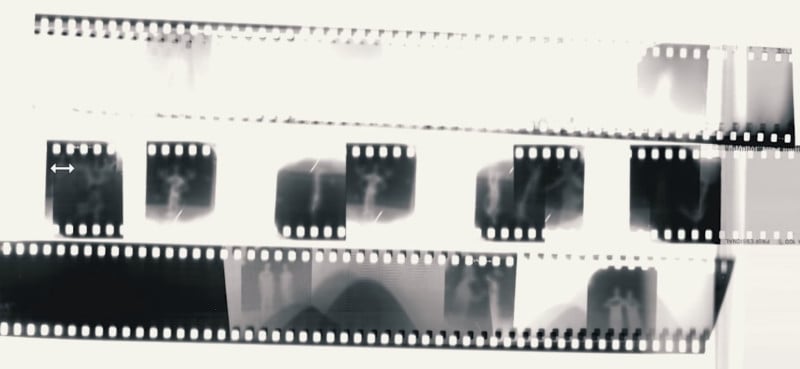
This Guy Made a Real ‘Potato Camera’ https://ift.tt/2lIunwm When low-quality photos or videos are posted online, people often say that they were shot with a “potato camera.” But if you actually want to shoot photos with a literal potato camera, how would you go about doing so? The production studio Corridor Crew‘s creative director Niko recently decided he would try his hand at creating a real, working potato camera. His journey in making this unusual custom device can be seen in the 14.5-minute video above.
After finding that potatoes aren’t particularly good at keeping light out, Niko spent time creating a light-sealed chamber (using 3D modeling and printing) to insert into the potato. 
Once he carved out openings and a chamber in his potato, Niko’s next challenge was figuring out how to expose the potato camera’s photos properly. He set the lens to f/11 and then used a DSLR to figure out how long the shutter speed should be at ISO 100 (the speed of the film he chose). The film was then loaded into the inner potato chamber in pitch blackness. Advancing the film after each exposure also required retreating into the darkroom. 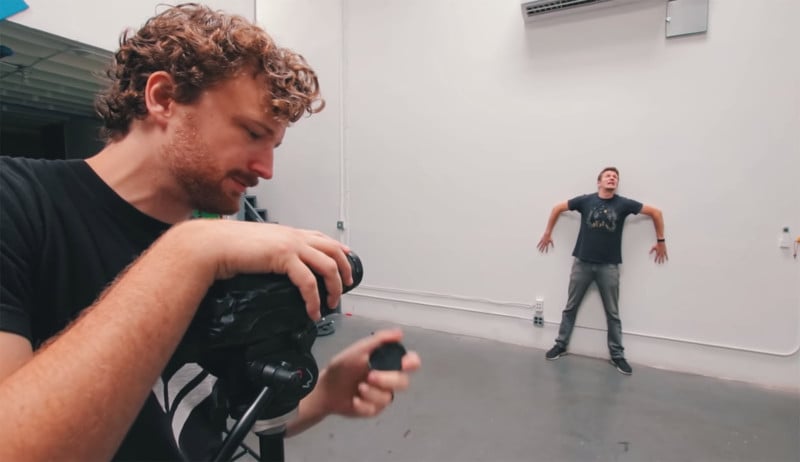
When the developed film was returned, the crew was surprised and delighted to see that blurry “potato quality” photos had successfully been captured by the camera. You can see some of the best resulting photos starting at 12:47 in the video above.
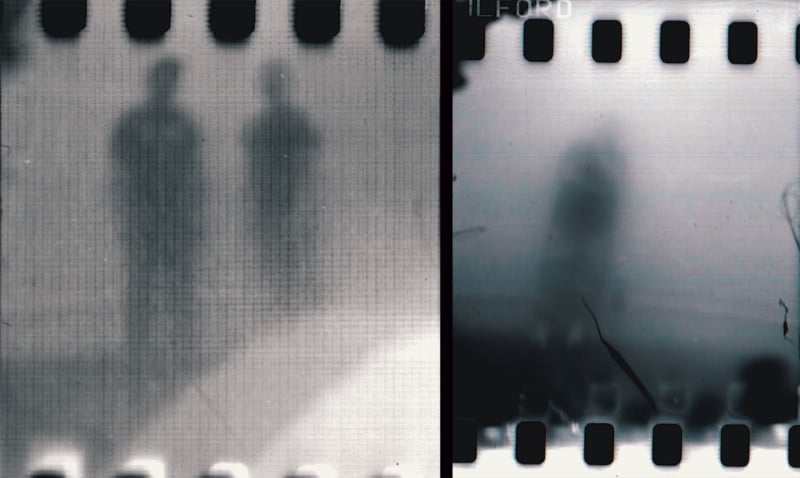
“Our potato camera does exactly what we thought it would do, which is take crappy but still visible pictures,” Niko says. “It kinda worked. We got these weird ghostly figures, which was exactly what I was hoping for.” Watch the video above for the full walkthrough of how Niko’s camera was built. You can also find more of Corridor Crew’s content on YouTube, Facebook, Twitter, and Instagram. (via Corridor Crew via DPReview) Image credits: Video and still frames by Corridor Crew Photography News via PetaPixel https://petapixel.com June 28, 2018 at 02:42PM
https://ift.tt/2tNIV1d
Sometimes it feels like getting the right composition is an endlessly moving target, with this technique and that idea and many other considerations. Balance is one of the more complicated concepts but is also a really powerful tool that is worth investing some time learning. To help you out, here are 9 ways and elements you can use to help you create balance in your images.
What is balance?Balance is a way of composing an image so that all elements complement each other equally. Visual tension or harmony are created which results in a pleasing image. Many different elements can be involved with incorporating balance into your image composition:
How do you achieve balance?When you compose your scene you need to think about the different elements and how they interact and relate to each other. What is the story you want to tell or frame up? What is the emotion you are trying to convey? Balance can be harmonious, where all elements are equally present and form an aesthetically pleasing whole – symmetry is a good example. A landscape scene perfectly mirrored in a still pond or lake is very harmonious. An image can have visual tension due to unbalance. It may seem counterintuitive to say that this also creates balance but think about negative space or a small spot of bright red in an otherwise dull image. Often several different factors come into play in considering balance, it’s not necessarily just one problem to solve for each image. Every image has color, a subject, tone, contrast and so on, which are all involved in producing your final image. Some of these concepts have to do with the mechanics of how you take the photo (light/shadow/contrast/tone) and some are more compositional (symmetry/negative space/subject placement). So there are many different things to consider at once within each image. Let’s look at each in more detail: #1 – COLOR
Even though this is a very dark image with a lot of blacks, the rich intense color of the cherries is not lost in the background – the color, quantity and placement balance out against the black shadows Color has a great impact on your images. When color film finally emerged it had a huge impact on photography. Being able to see bright colors instead of monochrome was very different. It lead to many different styles and techniques in photography and is still the dominant way images are processed today. It allows you to evoke emotion, create tension, highlight a specific element, catch our attention and tell the story of the image in different ways.
Take this garden shot with all the different foliage shades of green and yellow – yet the eye goes immediately to the small but prominent red flowers. This image has balance because the red has a lot of visual weight but physically is only a small part of the overall image. If it was much bigger it would overwhelm, instead, it gives somewhere to start the journey looking at all the different textures and colors contained in the garden.
Using color to evoke a mood, a feeling, or a period of timeThis old bicycle turned into a Welcome sign at a historic homestead. By opting for a slightly sepia tone it picks up all the textures in the shot and evens out all the different competing colors. The focus becomes the bicycle and not the bright green of the grass or the red of the chicken in the background. Changing the colors balances out all the other elements and allows the subject you want to be the focus. #2 – LIGHT VERSUS SHADOWLight and shadow are the opposite elements necessary for photography. If you have light, in general, you will have shadows. When you have both present it gives your subjects added dimension, they become physical rounded elements, not flat even though they are being viewed in a flat 2D medium (either printed or on a screen). Contrast and tonal difference make an image more dynamic and interesting. Contrast comes from the difference between the amount of light and shadow in an image. More contrast also widens out the tonal range of the image, when it is too similar it will look very flat (like the seaside landscape below). 
This image taken on a heavily overcast day has very little contrast, it’s quite flat and tonally similar and as a result, lacks punch and impact. It is not balanced in the light/shadow equation and it shows up visually as a result. So learning to use both light and shadow together can create balance in your images. The horseshoe image below was specifically shot to use the harsh midday sun to generate the shadows and capture the patterns and how they hang on the nails. It would be a much less interesting image without the shadows.
#3 – TEXTURETexture can be present in different ways – in the image of the spoons with spices (below) there are three layers of texture – the background surface, the spices in the spoons, and some scattered spices. While there is a lot of texture in the image, it balances due to the scale and the blending layer in between which softens the difference between the spices and the industrial background. If the extra scattered spices were not there it would not work as well as they help transition the eye around the image.
This blueberry shot uses texture in a different way, where the subjects themselves become the textural element, with some added interest in the form of water droplets. Without the droplets, it was a much less interesting image, and the fine detail of the droplets help balance out the size of the berries, giving the eye more elements to engage with.
Think tree bark, patterns on the water, brick walls, cracks in the pavement, clouds in the sky, foliage in a garden, shiny reflective metal, stones in a pond, sand at the beach. Think long exposure to produce soft foamy waterfalls or interesting cloud patterns. Consider ICM (Intentional Camera Movement) for soft blurred effect or pretty light trails. Texture is all around you and in everything you see, but it is often taken for granted. Texture can be highlighted and become a key element in your image if you take the time to see it and take advantage of it. #4 – VISUAL WEIGHTThis is a tricky concept to come to grips with as it sometimes seems a bit contradictory. How can a small element overwhelm a bigger image? How can one color dominate another one? In the butterfly image below, the tones are all very similar, even the colors are shades of yellow and brown. Yet the visual weight is actually held by the fuzzy green leaf in the bottom corner. If you crop the bottom section off it completely changes the feel of the image, and the butterfly becomes more prominent.
One of my personal favourite images is of a fresh new bright limestone headstone in a cemetary of very old and weathered stones (below). The light was at the perfect angle to highlight the one stone which carries the visual weight yet is only a very small element physically within the image. The central placement works well in balancing the other elements around it and allows more of the story to be told – if the focus was tight on the headstone it would have had a very different feel to the image.
5. SUBJECT PLACEMENTWhere you place the subject in the frame is important in many ways. It can be used to show scale, the relationship between elements, to highlight tension, or to create a specific feel or stylistic tone to an image. A classic example is the Rule of Thirds – where it is taught that a center placed subject lacks drama and impact – place the subject on the third lines to make it more dynamic within the frame. When the subject is looking in a particular direction, where you place them affects the feeling of the image. If they are looking out of the frame, placing them close to the edge is quite a different image than if you compose the image so that they are looking more into/across the frame. In the cave image below the people add balance by providing scale. Without them there we would be unable to appreciate the true size of the cave as we have no context to apply. The bright colors of their clothes also offer some visual weight in contrast to the textured details of the rock walls. The positioning at the bottom of the frame grounds the image and helps tell the story.
The placement of this bellbird on the branch is an appealing balance of angles and lines. The line of the main branch is echoed by the blurred ones in the background – this gives some depth and scale to the image. The bird is a nice size within the image, large enough to see the details, but not cramped within the frame and his crimson eye holds a lot of visual weight as well. If the bird was angled the other way it would be less pleasing as it would not be balanced the same way, as the X is symmetrical.
|
Categories
All
Archives
November 2020
|
||||||||||||||||||||||||||||||||||||||||||||||||||||||||||||||||||||||||||||


 RSS Feed
